Stampin’ Up! Cutest Halloween Card

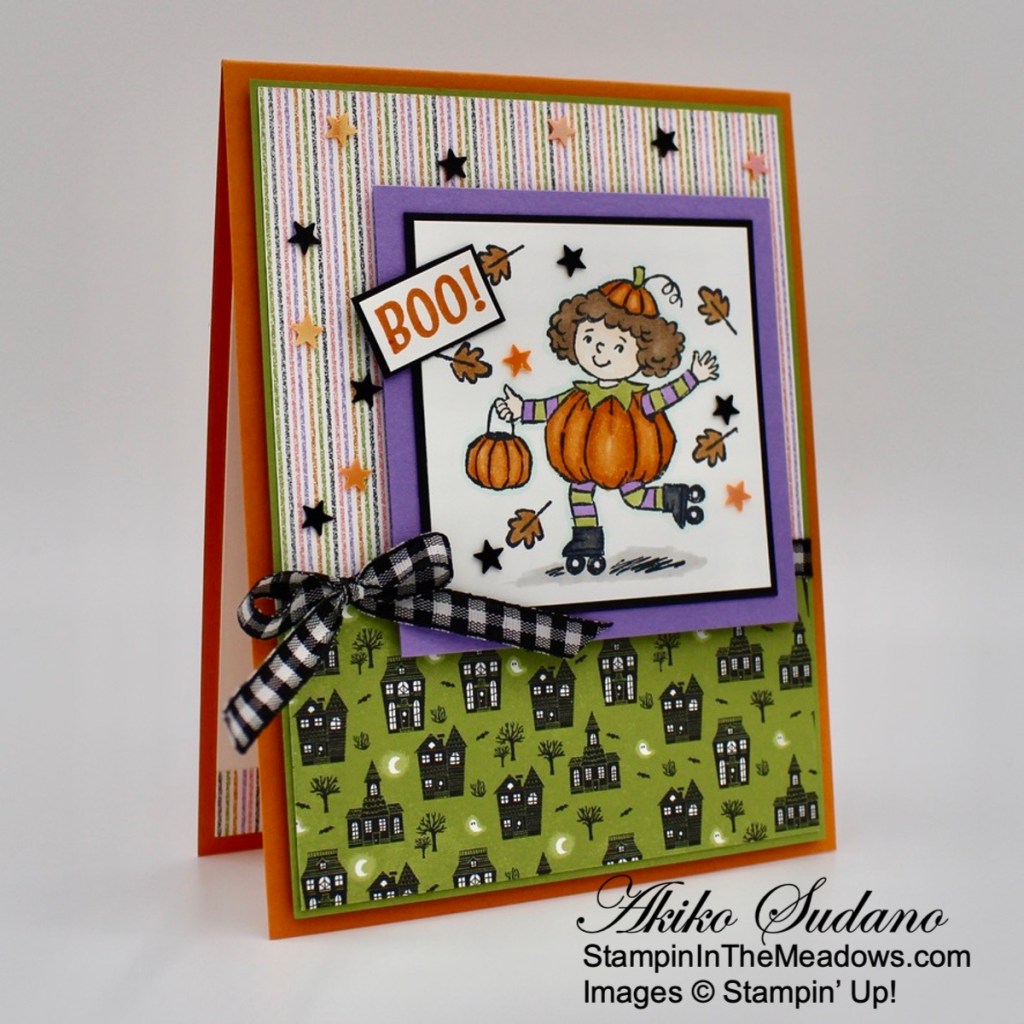
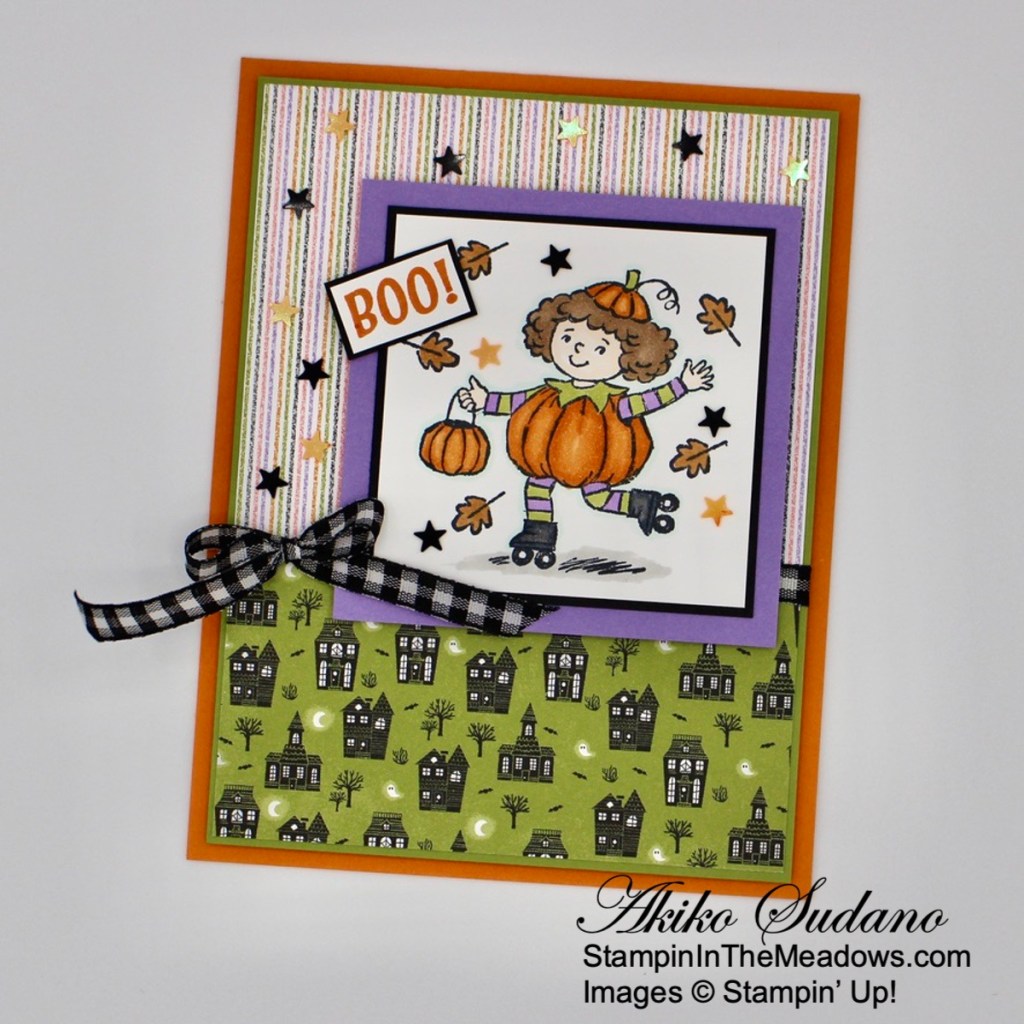
Good Morning! I hope you had a wonderful weekend. Can you believe that Halloween is only 3 weeks away? Time to get ready! The Stampin’ Up! Cutest Halloween bundle and the Cute Halloween 6″ x 6″ designer series paper are so sweet and I’ve used them on a Halloween Card for for a simple card to share today. You can find the supplies I used at the bottom of my post along with the sizes of cardstock used.

I adhered a square panel of the Cute Halloween designer series paper with the vampires to Basic Black and Old Olive mats – Aren’t these the sweetest vampires ever! And I adhered a panel of the Boo! DSP to the front of a Flirty Flamingo card base. Then I adhered the layered DSP square to the card front with dimensionals.

I made a jack-o-lantern from the Stampin’ Up! Cutest Halloween photopolymer stamp set by stamping in Memento Tuxedo Black and Pumpkin Pie on Basic White. I stamped the pumpkin outline in Tuxedo Black, then the solid pumpkin in Pumpkin Pie and then the jack-o-lantern face in Tuxedo Black. I colored the stem in Old Olive and used the Halloween Punch from the bundle to cut it out.

I stamped the sentiment from the Banner Year photopolymer stamp set in Memento Tuxedo Black on a Highland Heather strip and trimmed the end with the Banners Pick A Punch. I adhered the other end to the back of the jack-o-lantern and tucked a folded length of black glitter ribbon behind too. I adhered the label to the card front with dimensionals, just under the vampires and finished it with three star sequins.

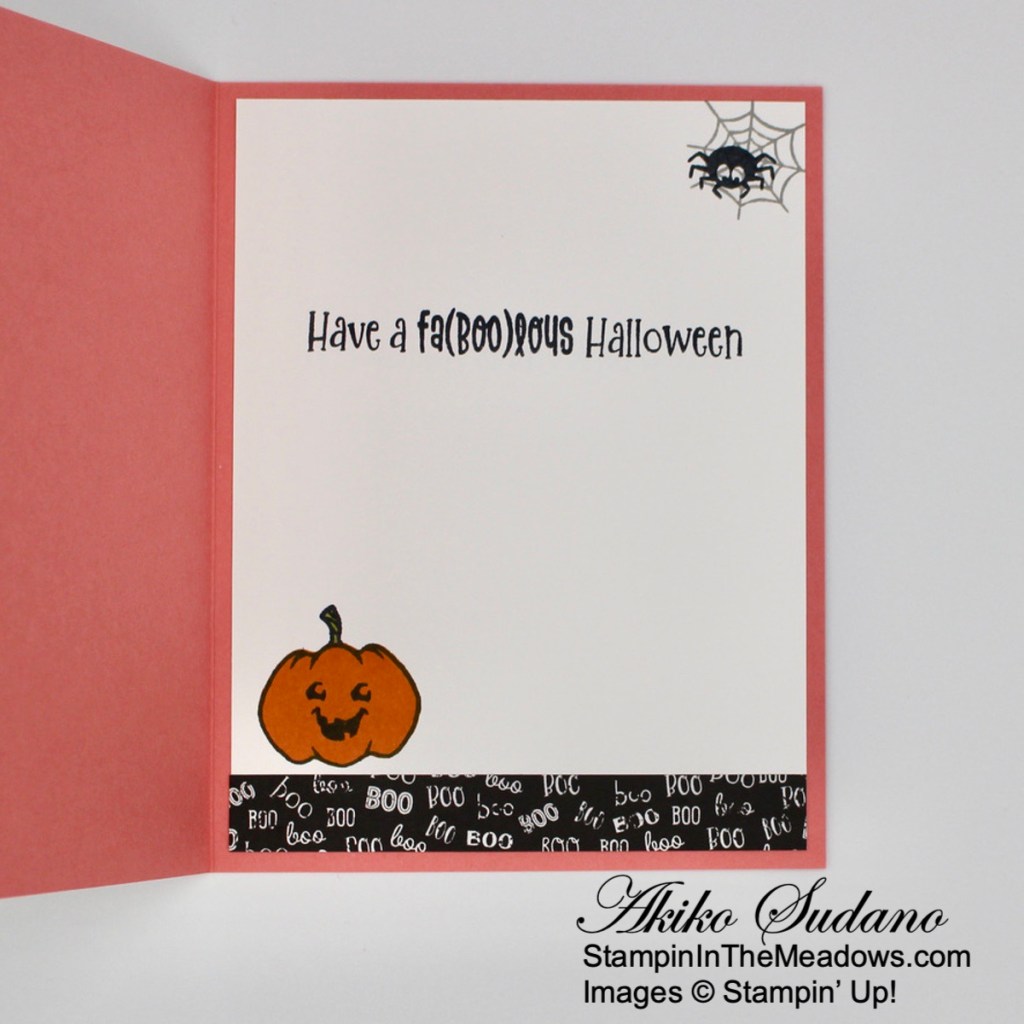
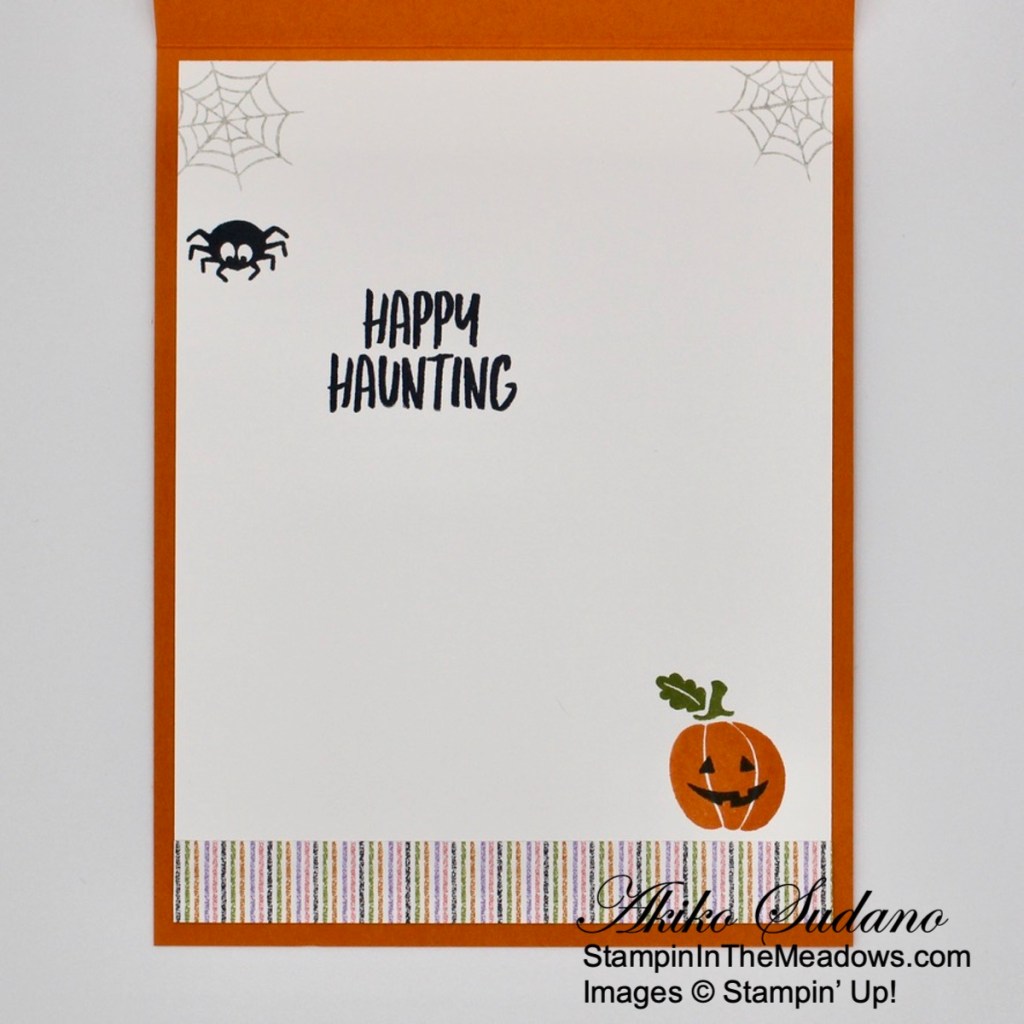
For the inside of the card, I stamped the spider web from the Banner Year stamp set in Smoky Slate in the top corner of a Basic White panel. I stamped the spider from the Stampin’ Up! Cutest Halloween stamp set in Memento Tuxedo Black in the web and the sentiment in Tuxedo Black across the panel. I stamped the jack-o-lantern in the lower corner just like the front and trimmed he bottom with a strip of boo DSP from the Cute Halloween paper pack. I adhered the panel to the inside of the card.

The Flirty Flamingo is not traditional for a Halloween Card, but the Cute Halloween vampire paper is so pretty, so I wanted to give it a try. There are so many fun items currently for Halloween crafting, and the Stampin’ Up! Cutest Halloween bundle will will coordinate with them all.


Current Host Code: 29VEKU9M

Use this host code when you order $50 or more and receive a free gift from me!  The free gift is your choice of any item valued up to $10.00 in the 2021-2022 Annual Catalog or the July – December 2021 Mini Catalog!

If your order is over $150, please do not use the host code since you’ll receive your own Host Dollars plus I’ll still send you the free gift!  This host code can be used by anyone, no club or commitment required. Let me know if you have any questions.


If you need any stamping supplies, I’d be very happy to be your Demonstrator.  Just click on the Shop Now button on the right side of the screen to go directly to my online store or contact me if you have any questions.  Happy Stamping!

Thanks for stopping by and have a great week!

Akiko

  • Visit my online store here
  • See the current Stampin’ Up! clearance rack specials here
  • Earn FREE Stampin’ Up! products through my Wildflower Frequent Shopper Program – my way of saying thank you to my online frequent shopper customers.
  • Have any questions? I’d be happy to help, click here to contact me.

Cardstock Cuts for this project:

  • Flirty Flamingo – 5-1/2″ x 8-1/2″ card base scored at 4-1/4″
  • Basic Black – 3-1/16″ x 3-1/16″ (mat)
  • Old Olive – 3-1/4″ x 3-1/4″ (mat)
  • Highland Heather – 1/2″ x 2-1/2″ (label)
  • Basic White – 3-3/4″ x 5″ (inside panel), 2-1-1/2″ x 2″ (jack-o-lantern)
  • Cute Halloween 6″ x 6″ DSP – 4″ x 5-1/4″ (front background), 3″ x 3″ (vampires), 1/2″ x 4″ (inside trim)

Stampin’ Up! products used in this project:

Cutest Halloween Bundle
$31.50
Cutest Halloween Photopolymer Stamp Set
$17.00
Halloween Punch
$18.00
Banner Year Photopolymer Stamp Set (English)
$17.00
Banners Pick A Punch
$23.00
Cute Halloween 6" X 6" (15.2 X 15.2 Cm) Designer Series Paper
$11.50
Flirty Flamingo 8-1/2" X 11" Cardstock
$8.75
Basic Black 8-1/2" X 11" Cardstock
$8.75
Old Olive 8-1/2" X 11" Cardstock
$8.75
Highland Heather 8-1/2" X 11" Cardstock
$8.75
Basic White 8 1/2" X 11" Cardstock
$9.75
Tuxedo Black Memento Ink Pad
$6.00
Pumpkin Pie Classic Stampin' Pad
$7.50
Smoky Slate Classic Stampin' Pad
$7.50
Old Olive Stampin' Blends Combo Pack
$9.00
Black 5/8" (1.6 Cm) Glittered Organdy Ribbon
$8.50
Cute Stars Adhesive Backed Sequins
$7.50
Multipurpose Liquid Glue
$4.00
Stampin' Dimensionals
$4.00
Stampin' Seal
$8.00
Mini Glue Dots
$5.25

Stampin’ Up! Welcoming Woods Thank You Card

Good Morning! Have you seen the beautiful Stampin’ Up! Welcoming Woods photopolymer stamp set? I finally got a chance to play with it this week and I love it!! I have seen several cards with a beautiful sunset and I wanted to make one and I am so happy with how it came out and how easy it was to do! You can find the supplies I used at the bottom of my post along with the sizes of cardstock used.

I was inspired by the As You See It Challenge #260 – Perpendicular for my card design:

I started by using Blending Brushes to apply So Saffron, Pumpkin Pie, Cajun Craze inks on a Basic White panel, blending them darker towards the bottom of the panel. Then I blended Pool Party, Bermuda Bay and Misty Moonlight to create the sky. This was so pretty and so easy! I stamped the trees from the Stampin’ Up! Welcoming Woods stamp set twice across the panel in Soft Suede to create the woods and cut it out with the third largest Stitched Rectangles die.

I stamped the leaves from the Stampin’ Up! Welcoming Woods stamp set in Pumpkin Pie and stamped the ground in Evening Evergreen. Note that I masked the tree from the second stamping each time so the ground would be behind the trees. I adhered the panel to a Sahara Sand mat. I stamped the sentiment in Evening Evergreen on a Sahara Sand strip and adhered it to a strip of Sahara Sand Tidings of Christmas DSP. I finished the panel with a small Cajun Craze leaf die cut from the Intricate Leaves dies and a Linen Thread bow.

I embossed a Soft Suede panel with the Bark 3D embossing folder and adhered a strip of Tidings of Christmas DSP to the side with liquid glue. I adhered the panel to the front of a Sahara Sand card base with liquid glue and adhered the art panel on top with dimensionals.

For the inside of the card, I stamped the last tree from the Stampin’ Up! Welcoming Woods stamp set in Soft Suede on the side of a Basic White panel. I stamped some Pumpkin Pie leaves by the tree and in the top corner and adhered another strip of Christmas Tidings DSP to the bottom. I adhered the panel to the inside of the card.

I drove on some of the country roads by my house this morning and saw so many of the trees starting to change color, so the pretty Fall Foliage is on it’s way! The Stampin’ Up! Welcoming Woods stamp set perfectly captures that look and feel. And this stamp set has some of the most beautiful sentiments!


Current Host Code: 29VEKU9M

Use this host code when you order $50 or more and receive a free gift from me!  The free gift is your choice of any item valued up to $10.00 in the 2021-2022 Annual Catalog or the July – December 2021 Mini Catalog!

If your order is over $150, please do not use the host code since you’ll receive your own Host Dollars plus I’ll still send you the free gift!  This host code can be used by anyone, no club or commitment required. Let me know if you have any questions.


If you need any stamping supplies, I’d be very happy to be your Demonstrator.  Just click on the Shop Now button on the right side of the screen to go directly to my online store or contact me if you have any questions.  Happy Stamping!

Thanks for stopping by and have a great week!

Akiko

  • Visit my online store here
  • See the current Stampin’ Up! clearance rack specials here
  • Earn FREE Stampin’ Up! products through my Wildflower Frequent Shopper Program – my way of saying thank you to my online frequent shopper customers.
  • Have any questions? I’d be happy to help, click here to contact me.

Cardstock Cuts for this project:

  • Sahara Sand – 5-1/2″ x 8-1/2″ card base scored at 4-1/4″, 3-1/8″ x 4-1/2″ (front mat), 1/2″ 3-1/4″ (front label)
  • Cajun Craze – 1″ x 1″ (die cut leaf)
  • Soft Suede – 3-3/4″ x 5″ (front embossed panel after embossing)
  • Basic White – 3-3/4″ x 5″ (inside panel)
  • Tidings of Christmas DSP – 1″ x 3-3/4″ (front strip), 1/2″ x 3-1/2″ (label backing), 1/2″ x 5″ (inside trim)

Stampin’ Up! products used in this project:

Welcoming Woods Photopolymer Stamp Set
$21.00
Stitched Rectangles Dies
$35.00
Intricate Leaves Dies
$28.00
Bark 3 D Embossing Folder
$10.00
Tidings Of Christmas 6" X 6" (15.2 X 15.2 Cm) Designer Series Paper
$11.50
Sahara Sand 8-1/2" X 11" Cardstock
$8.75
Cajun Craze 8-1/2" X 11" Cardstock
$8.75
Soft Suede 8-1/2" X 11" Cardstock
$8.75
Basic White 8 1/2" X 11" Cardstock
$9.75
So Saffron Classic Stampin' Pad
$7.50
Pumpkin Pie Classic Stampin' Pad
$7.50
Cajun Craze Classic Stampin' Pad
$7.50
Pool Party Classic Stampin' Pad
$7.50
Bermuda Bay Classic Stampin' Pad
$7.50
Misty Moonlight Classic Stampin' Pad
$7.50
Soft Suede Classic Stampin' Pad
$7.50
Evening Evergreen Classic Stampin' Pad
$7.50
Blending Brushes
$12.00
Linen Thread
$5.00
Stampin' Dimensionals
$4.00
Multipurpose Liquid Glue
$4.00
Mini Glue Dots
$5.25
Stampin' Seal
$8.00
Stampin' Cut & Emboss Machine
$120.00

Stampin’ Up! Whimsical Trees Christmas Card Video Tutorial For World Cardmaking Day

Good Morning! Yesterday was World Card Making Day and the Inkin’ Krew had a special Facebook event to celebrate. Several members from out team went live throughout the day making cards, many with Christmas cards so it was full of wonderful inspiration, and I have filled up my shopping list again! Anyway, my card was a Christmas card made with the beautiful Stampin’ Up! Whimsical Trees bundle and Whimsy and Wonder specialty designer series paper. You can find the supplies I used at the bottom of my post along with the sizes of cardstock used.

I posted a copy of the video in my YouTube channel so you can view it there if you didn’t get to join the Facebook Event group:

I stamped the tree from the Stampin’ Up! Whimsical Trees cling stamp set in Mossy Meadow on Thick Basic White card stock and cut it out with the coordinating die. I embossed a panel of Basic White with the Merry Melody 3D embossing folder and adhered it to a Mossy Meadow mat. Note that this is one of the embossing folders that shrinks the paper a little, so cut the panel about 1/16″ longer before embossing, or emboss a larger panel and cut it down to size after embossing. I adhered the layered embossed panel to a Blushing Bride card front with dimensionals.

I cut a panel of Whimsy and Wonder specialty designer series paper with a stitched rectangle die and adhered it to a dark silver foil mat – I love this pack of silver foil!! I adhered the panel to the card front with dimensionals and adhered the tree to the card front with more dimensionals. I cut another dark silver foil panel with the star from the Christmas Trimmings dies and adhered it to the tree top with a glue dot and decorated the tree with 2021-2023 In color jewels.

I stamped the Joy sentiment from the Stampin’ Up! Whimsical Trees stamp set in Mossy Meadow ink on Mint Macaron and trimmed the end with a fishtail from the Banners Pick A Punch. I tucked it under the tree, adhering it with glue dots and finished it with a pink jewel. I made a bow with the Blushing Bride ribbon and adhered it under the tree with glue dots.

For the inside of the card, I stamped the tree from the Stampin’ Up! Whimsical Trees stamp set in stamped off Mossy Meadow and stamped the decorations over the tree in Polished Pink. I stamped the sentiment in Polished Pink next to the tree and trimmed the bottom of the panel with Whimsy and Wonder DSP. I adhered the panel to a Mossy Meadow mat and then to the inside of the card with Stampin’ Seal.

The Stampin’ Up! Whimsical Trees bundle and the Whimsy and Wonder specialty designer series paper are absolutely beautiful! The colors are so fresh and fun, and every card is gorgeous!


Join me for a Facebook Live this Afternoon!

I’m planning to go live on my Facebook Page at 1:00 ET this afternoon to make a card with the Love of Leaves stamp set and the Stitched Leaves dies. Look forward to seeing you then!


Current Host Code: U6K4RBB4

Use this host code when you order $50 or more and receive a free gift from me!  The free gift is your choice of any item valued up to $10.00 in the 2021-2022 Annual Catalog or the July – December 2021 Mini Catalog!

If your order is over $150, please do not use the host code since you’ll receive your own Host Dollars plus I’ll still send you the free gift!  This host code can be used by anyone, no club or commitment required. Let me know if you have any questions.


If you need any stamping supplies, I’d be very happy to be your Demonstrator.  Just click on the Shop Now button on the right side of the screen to go directly to my online store or contact me if you have any questions.  Happy Stamping!

Thanks for stopping by and have a great week!

Akiko

  • Visit my online store here
  • See the current Stampin’ Up! clearance rack specials here
  • Earn FREE Stampin’ Up! products through my Wildflower Frequent Shopper Program – my way of saying thank you to my online frequent shopper customers.
  • Have any questions? I’d be happy to help, click here to contact me.

Cardstock Cuts for this project:

  • Blushing Bride – 4-1/4″ x 11″ card base scored at 5-1/2″
  • Mossy Meadow – 3-5/8″ x 4-7/8″ (front mat), 3-7/8″ x 5-1/8″ (inside mat)
  • Thick Basic White – 2″ x 3-1/2″ (die cut tree)
  • Mint Macaron – 5/8″ x 1-1/2″ (label)
  • Basic White – 3-1/2″ x 4-3/4″ (front embossed panel after embossing), 3-3/4″ x 5″ (inside panel)
  • Silver Foil – 1″ x 1″ (die cut star), 2-5/16″ x 3-11/16″ (DSP mat)
  • Whimsy and Wonder specialty DSP – 2-3/4″ x 4-1/4″ (front background), 1/2″ x 3-3/4″ (inside trim)

Stampin’ Up! products used in this project:


Stampin’ Up! Pretty Pumpkins for the Happy Inkin’ Thursday Blog Hop

Good morning and welcome to the Happy Inkin’ Thursday Blog Hop! I used the Stampin’ Up! Pretty Pumpkins bundle to make a Thanksgiving card for today. I paired it with the pretty Harvest Meadow designer series paper and an embossed Very Vanilla background for a light fall look. You can find the supplies I used at the bottom of my post along with the sizes of cardstock used.

We have a sketch challenge this week and here is the pretty sketch we are using:

And since I’m doing pumpkins, I am playing with the Fall and Pumpkins Inspiration at TGIF Challenges – #TGIFC335 Inspiration Challenge:

I embossed a panel of Very Vanilla with thee Timeworn Type 3D embossing folder and adhered it to the front of a Thick Very Vanilla Card Base. I cut a Bumblebee panel with the Scalloped Contours die and adhered a panel of Harvest Meadow designer series paper to the front with liquid glue. I popped it on the card front with dimensionals.

I cut a Pumpkin Pie panel with the pumpkin from the Detailed Pumpkins dies and a Mossy Meadow panel with the large leaf. I adhered them together with glue dots. I stamped the leafy pumpkin from the Stampin’ Up! Pretty Pumpkins cling stamp set in Versamark ink on a Very Vanilla panel. I sprinkled it with copper embossing powder and shook off the excess. I heated it with my heat tool until shiny and cut it out with the coordinating die.

I cut the sprigs from the Sunflower dies from brushed copper foil and adhered it to the card front with glue dots. I adhered the leafy pumpkin on top of the sprigs with dimensionals and adhered the Pumpkin Pie pumpkin on top with dimensionals and glue dots. I stamped the sentiment from the Stampin’ Up! Pretty Pumpkins stamp set in Early Espresso on Soft Succulent and fussy cut it with my paper snips. I made a loopy bow with Linen Thread and adhered it to the card with glue dots and topped it with the fussy cut sentiment. I finished the card front with three Genial Gems.

For the inside of the card, I stamped the pumpkin vines from the Stampin’ Up! Pretty Pumpkins stamp set in Early Espresso on a Very Vanilla panel and trimmed the bottom with a strip of Harvest Meadow DSP. I adhered the panel to the inside of the card.

The pumpkins in the Stampin’ Up! Pretty Pumpkins bundle are so artistic and pretty and you can make so many different styles of Fall and Thanksgiving cards. The sentiments are really beautiful as well. I think I’m ready for Fall, are you?

On with the Hop! Click on the Next Blog button to move forward to Karen Ksenzakovic’s project.

If you get lost along the way, here are the participants for the hop:


Current Host Code: U6K4RBB4

Use this host code when you order $50 or more and receive a free gift from me!  The free gift is your choice of any item valued up to $10.00 in the 2021 – 2022 Annual Catalog or the July – December 2021 Mini Catalog including some of the host stamp sets!

If your order is over $150, please do not use the host code since you’ll receive your own Host Dollars plus I’ll still send you the free gift!  This host code can be used by anyone, no club or commitment required. Let me know if you have any questions.


If you need any stamping supplies, I’d be very happy to be your Demonstrator.  Just click on the Shop Now button on the right side of the screen to go directly to my online store or contact me if you have any questions. 

Thanks for stopping by and Happy Stamping!

Akiko

  • Visit my online store here
  • See the current Stampin’ Up! clearance rack specials here
  • Earn FREE Stampin’ Up! products through my Wildflower Frequent Shopper Program – my way of saying thank you to my online frequent shopper customers.
  • Have any questions? I’d be happy to help, click here to contact me.

Cardstock Cuts for this project:

  • Thick Very Vanilla – 5-1/2″ x 8-1/2″ card base scored at 4-1/4″
  • Pumpkin Pie – 2″ x 2-1/2″ (die cut pumpkin)
  • Mossy Meadow – 1″ x 1″ (die cut leaf)
  • Bumblebee – 3-1/4″ x 4-1/4″ (scalloped rectangle)
  • Soft Succulent – 1″ x 3″ (label)
  • Very Vanilla – 4-1/4″ x 5-1/2″ (embossed front background), 3-3/4″ x 5″ (inside panel), 2-1/2″ x 2-1/2″ (embossed pumpkin)
  • Brushed Copper Foil – 1-1/2″ x 3″ (die cut sprigs)
  • Harvest Meadow DSP – 2-1/2″ x 3-11/16″ (front background), 1/2″ x 3-3/4″ (inside trim)

Stampin’ Up! products used in this project:


Stampin’ Up! Artistically Inked Thank You Card

Good Morning! The Stampin’ Up! Artistically Inked bundle has beautiful flowers, sentiments and die cuts. For today’s card, I decided to pair it with the beautiful Blackberry Beauty specialty designer series paper for a fall themed thank you card. You can find the supplies I used at the bottom of my post along with the sizes of cardstock used.

I adhered a panel of Blackberry Beauty specialty designer series paper to the front of a Blackberry Bliss card base. I adhered the small frame from the Blackberry Beauty Ephemera pack to the card front. I cut the leaf spray from the Artistic dies from the Stampin’ Up! Artistically Inked bundle from Gold Metallic specialty paper and adhered it to the card front over the frame and DSP.

I stamped the sentiment from the Stampin’ Up! Artistically Inked cling stamp set in VersaMark ink on Cinnamon Cider. I sprinkled it with white embossing powder, shook off the excess and heat set the powder with my heat tool. I cut the sentiment out with the Tailored Made Tags die. I cut another tag with the same die from the Blackberry Beauty specialty DSP and adhered it to the back and adhered a tag reinforcement cut from Blackberry Bliss to the front.

I looped a length of Fine Art ribbon through the tag hole and tied it, making a bow, with a length of gold cord. I adhered the tags to the front of the card with dimensionals.

For the inside of the card, I adhered one of the gold wildflower die cuts from the Blackberry Beauty Ephemera Pack to the side of a Basic White panel. I adhered a strip of Blackberry Beauty DSP to the bottom and adhered the panel to the inside of the card.

The Stampin’ Up! Artistically Inked bundle has beautiful flowers, sentiments and dies that go beautifully with the Blackberry Beauty specialty designer series paper and ephemera pack.


Sale A Bration Ends Tomorrow!

Tomorrow is the Last Day for Sale A Bration! With BUY, HOST and JOIN specials, it’s the best Stampin’ Up! promotion, so hurry! Click on the picture below to view the Sale A Bration brochure:


World Card Making Day is October 2!

World Card Making Day is coming up this Saturday and the Inkin’ Krew is celebrating with a special Facebook event! I will be making a card Live at 3:00 PM ET during the celebration! Come stamp with us!


Current Host Code: U6K4RBB4

Use this host code when you order $50 or more and receive a free gift from me!  The free gift is your choice of any item valued up to $10.00 in the 2021 – 2022 Annual Catalog or the July – December 2021 Mini Catalog!

If your order is over $150, please do not use the host code since you’ll receive your own Host Dollars plus I’ll still send you the free gift!  This host code can be used by anyone, no club or commitment required. Let me know if you have any questions.


If you need any stamping supplies, I’d be very happy to be your Demonstrator.  Just click on the Shop Now button on the right side of the screen to go directly to my online store or contact me if you have any questions. 

Thanks for stopping by and Happy Stamping!

Akiko

  • Visit my online store here
  • See the current Stampin’ Up! clearance rack specials here
  • Earn FREE Stampin’ Up! products through my Wildflower Frequent Shopper Program – my way of saying thank you to my online frequent shopper customers.
  • Have any questions? I’d be happy to help, click here to contact me.

Cardstock Cuts for this project:

  • Blackberry Bliss – 4-1/4″ x 11″ card base scored at 5-1/2″, 1″ x 1″ (tag reinforcement)
  • Cinnamon Cider – 1-1/2″ x 3″ (tag)
  • Gold and Rose Gold Metallic Specialty – 2″ x 6″ (die cut leaves)
  • Basic White – 4″ x 5-1/4″ (inside panel)
  • Blackberry Beauty Specialty DSP – 4″ x 5-1/4″ (front background), 1-1/2″ x 3″ (tag), 1/2″ x 4″ (inside trim)
  • Blackberry Beauty Ephemera Pack – small floral frame, gold wildflower

Stampin’ Up! products used in this project:

Artistically Inked Bundle (English)
$53.00
Artistically Inked Cling Stamp Set
$24.00
Artistic Dies
$35.00
Tailor Made Tags Dies
$22.00
Blackberry Beauty 12" X 12" (30.5 X 30.5 Cm) Specialty Designer Series Paper
$15.00
Blackberry Beauty Ephemera Pack
$6.00
Blackberry Bliss 8-1/2" X 11" Cardstock
$8.75
Cinnamon Cider 8-1/2" X 11" Cardstock
$8.75
Gold & Rose Gold 6" X 6" (15.2 X 15.2 Cm) Metallic Specialty Paper
$5.00
Basic White 8 1/2" X 11" Cardstock
$9.75
Versamark Pad
$9.50
Basics Embossing Powders
$18.00
Heat Tool (Us And Canada)
$30.00
Stampin' Dimensionals
$4.00
Mini Glue Dots
$5.25
Multipurpose Liquid Glue
$4.00
Stampin' Seal
$8.00
Stampin' Cut & Emboss Machine
$120.00

Stampin’ Up! Snowbody Better Card

Good Morning! Today I have a fun card with a cute group of snow people from the Stampin’ Up! Snowbody Better cling stamp set. No, we haven’t had any snow yet, but this is such a cute set, I had to break it out!! Plus I wanted to use it with the pretty Sale A Bration Penguin Playmates DSP before Sale A Bration ends in a couple of days! You can find the supplies I used at the bottom of my post along with the sizes of cardstock used.

I embossed a panel of the Misty Moonlight striped designer series paper from the Penguin Playmates designer series paper with the Tasteful Textile 3D embossing folder – it’s hard to see, but it gives the DSP a special feel in person. I adhered the panel to a Basic White mat.

I stamped the fun group of snow people from the Stampin’ Up! Snowbody Better cling stamp set in Memento Tuxedo Black ink on a Basic White panel and colored it with Stampin’ Blends. I used Balmy Blue, Granny Apple Green, Real Red, Highland Heather, Soft Suede, Bermuda Bay, Pumpkin Pie and Smoky Slate. i outlined the image and the inside of the snow people with my light Pool Party Stampin’ Blend to give it some chilly contrast. I adhered the snow people to a Basic White mat and then adhered them to the striped DSP panel.

I wrapped the panel with a length of Misty Moonlight and silver Baker’s twine and made a bow on the side. I stamped the sentiment from the Stampin’ Up! Snowbody Better stamp set in VersaMark ink on a Misty moonlight strip and sprinkled it with white embossing powder. I shook off the excess and heat set the powder with my heat tool. I cut the sentiment out with the Messages die and adhered it to the snow people panel with dimensionals over the twine. I adhered the panel to the front of a Misty Moonlight card base and adhered silver metallic pearls to the snow people panel.

For the inside of the card, I stamped some snowflakes in Pool Party around the top of a Basic White panel. I stamped the sentiment from the Stampin’ Up! Snowbody Better stamp set in Misty Moonlight and the bird and snowball in Memento Tuxedo Black. I colored the bird and snowflake ribbon with my Real Red Stampin’ Blend and adhered a strip of embossed Misty Moonlight striped DSP to the bottom. I adhered the panel to the inside of the card.

The Stampin’ Up! Snowbody Better stamp set is really cute and it’s a perfect set for sending winter time greetings. I’m not ready for snow yet, but these happy little guys are great for getting in the mood for winter fun.


3 More Days Left for Sale A Bration!

Sale A Bration ends September 30, so hurry to get in on Stampin’ Up!’s best promotion. Click on the picture below to view the Sale A Bration brochure:


Current Host Code: U6K4RBB4

Use this host code when you order $50 or more and receive a free gift from me!  The free gift is your choice of any item valued up to $10.00 in the 2021 – 2022 Annual Catalog or the July – December 2021 Mini Catalog!

If your order is over $150, please do not use the host code since you’ll receive your own Host Dollars plus I’ll still send you the free gift!  This host code can be used by anyone, no club or commitment required. Let me know if you have any questions.


If you need any stamping supplies, I’d be very happy to be your Demonstrator.  Just click on the Shop Now button on the right side of the screen to go directly to my online store or contact me if you have any questions. 

Thanks for stopping by and Happy Stamping!

Akiko

  • Visit my online store here
  • See the current Stampin’ Up! clearance rack specials here
  • Earn FREE Stampin’ Up! products through my Wildflower Frequent Shopper Program – my way of saying thank you to my online frequent shopper customers.
  • Have any questions? I’d be happy to help, click here to contact me.

Cardstock Cuts for this project:

  • Misty Moonlight – 4-1/4″ x 11″ card base scored at 5-1/2″, 3/4″ x 3-1/4″ (label)
  • Basic White – two 4″ x 5-1/4″ panels (inside panel and front mat), 3-1/4″ x 3-5/8″ (snow people panel), 3-3/8″ x 3-3/4″ (snow people mat)
  • Penguin Playmates DSP – 3-7/8″ x 5-1/8″ (front background), 1/2″ x 4″ (inside trim)

Stampin’ Up! products used in this project:

Snowbody Better Cling Stamp Set
$21.00
Tasteful Textile 3 D Embossing Folder
$9.00
Penguin Playmates 12" X 12" (30.5 X 30.5 Cm) Designer Series Paper
$0.00
Misty Moonlight 8-1/2" X 11" Cardstock
$8.75
Basic White 8 1/2" X 11" Thick Cardstock
$8.25
Tuxedo Black Memento Ink Pad
$6.00
Misty Moonlight Classic Stampin' Pad
$7.50
Pool Party Classic Stampin' Pad
$7.50
Versamark Pad
$9.50
Real Red Stampin' Blends Combo Pack
$9.00
Balmy Blue Stampin' Blends Combo Pack
$9.00
Granny Apple Green Stampin' Blends Combo Pack
$9.00
Soft Suede Stampin' Blends Combo Pack
$9.00
Smoky Slate Stampin' Blends Combo Pack
$9.00
Pumpkin Pie Stampin' Blends Combo Pack
$9.00
Highland Heather Stampin' Blends Combo Pack
$9.00
Pool Party Stampin' Blends Combo Pack
$9.00
Basics Embossing Powders
$18.00
Metallic Pearls
$7.00
Flowers For Every Season Ribbon Combo Pack
$10.00
Heat Tool (Us And Canada)
$30.00
Multipurpose Liquid Glue
$4.00
Stampin' Dimensionals
$4.00
Stampin' Seal
$8.00
Stampin' Cut & Emboss Machine
$120.00

Stampin’ Up! Seasons Of Fun Halloween Card

Good Morning! The Stampin’ Up! Seasons Of Fun cling stamp set is a cute little set with little kids enjoying the delights of the fall and winter holidays. It is a host set that you can only purchase with Host Dollars that you earn on orders or parties over $150 before shipping and taxes. And it is just so cute! I used the little girl in a pumpkin costume for a Halloween card. You can find the supplies I used at the bottom of my post along with the sizes of cardstock used.

I adhered a panel of Old Olive Cute Halloween designer series paper with the haunted houses to a panel of the striped DSP. I adhered the layered panel to an Old Olive mat. I tied a length of black and white gingham ribbon around the layered panel, tied a bow on the side and adhered the panel to the front of a Pumpkin Pie card base.

I stamped the little girl in the pumpkin costume from the Stampin’ Up! Seasons Of Fun cling stamp set in Memento Tuxedo Black ink on a Basic White panel. I colored the image with Stampin’ Blends – Pumpkin Pie, Old Olive, Highland Heather, Petal Pink, Bronze, Smoky Slate and Basic Black. I stamped some falling oak leaves in Memento Tuxedo Black and colored them with the Cinnamon Cider Stampin’ Blend. I adhered the panel to a Basic Black mat and then to a Highland Heather mat.

I adhered the panel to the card front with Stampin’ Dimensionals, I stamped the sentiment from the Banner Year stamp set in Pumpkin Pie ink on a small Basic White panel and cut it out with Paper snips. I adhered it to a Basic Black panel and used my paper snips to trim a thin mat around it. I adhered the sentiment to the panel with glue dots. I adhered the little star sequins all around the card front to give it some bling.

For the inside of the card, I stamped the sentiment from the Banner Year stamp set in Memento Tuxedo Black on a Basic White panel. I added the cobwebs in stamped off Smoky Slate and the Jack-O-Lantern in Pumpkin Pie, Old Olive and Memento Tuxedo Black. I added the spider from the Cutest Halloween stamp set in Memento Tuxedo Black. I trimmed the bottom with a strip of Cute Halloween DSP and adhered the panel to the inside of the card.

Halloween cards are so much fun and the darling little girl from the Stampin’ Up! Seasons Of Fun stamp set is a perfect example. I love how all the different Halloween theme stamp sets go together to make fun items to celebrate! Can’t wait for Trick or Treating!


Sale A Bration Ends September 30!

The end of Sale A Bration is approaching fast! With BUY, HOST and JOIN specials, it’s the best Stampin’ Up! promotion, so hurry! Click on the picture below to view the Sale A Bration brochure:


World Card Making Day is October 2!

World Card Making Day is coming up this Saturday and the Inkin’ Krew is celebrating with a special Facebook event! I will be making a card Live at 3:00 PM ET during the celebration! Come stamp with us!


Current Host Code: U6K4RBB4

Use this host code when you order $50 or more and receive a free gift from me!  The free gift is your choice of any item valued up to $10.00 in the 2021 – 2022 Annual Catalog or the July – December 2021 Mini Catalog!

If your order is over $150, please do not use the host code since you’ll receive your own Host Dollars plus I’ll still send you the free gift!  This host code can be used by anyone, no club or commitment required. Let me know if you have any questions.


If you need any stamping supplies, I’d be very happy to be your Demonstrator.  Just click on the Shop Now button on the right side of the screen to go directly to my online store or contact me if you have any questions. 

Thanks for stopping by and Happy Stamping!

Akiko

  • Visit my online store here
  • See the current Stampin’ Up! clearance rack specials here
  • Earn FREE Stampin’ Up! products through my Wildflower Frequent Shopper Program – my way of saying thank you to my online frequent shopper customers.
  • Have any questions? I’d be happy to help, click here to contact me.

Cardstock Cuts for this project:

  • Pumpkin Pie – 4-1/4″ x 11″ card base scored at 5-1/2″
  • Old Olive – 4″ x 5-1/4″ (front mat)
  • Basic Black – 2-5/8″ x 2-5/8″ (little girl mat), 1″ x 1″ (label mat)
  • Highland Heather – 3′ x 3″ (little girl mat)
  • Basic White – 4″ x 5-1/4″ (inside panel), 2-1/2″ x 2-1/2″ (little girl panel), 1″ x 1″ (label)
  • Cute Halloween DSP – 3-7/8″ x 5-1/8″ (front background), 2″ x 3-7/8″ (front lower background), 1/2″ x 4″ (inside trim)

Stampin’ Up! products used in this project:

Seasons Of Fun Host Cling Stamp Set
$12.00
Banner Year Photopolymer Stamp Set (English)
$17.00
Cutest Halloween Photopolymer Stamp Set
$17.00
Cute Halloween 6" X 6" (15.2 X 15.2 Cm) Designer Series Paper
$11.50
Pumpkin Pie 8-1/2" X 11" Cardstock
$8.75
Old Olive 8-1/2" X 11" Cardstock
$8.75
Basic Black 8-1/2" X 11" Cardstock
$8.75
Highland Heather 8-1/2" X 11" Cardstock
$8.75
Basic White 8 1/2" X 11" Cardstock
$9.75
Tuxedo Black Memento Ink Pad
$6.00
Pumpkin Pie Classic Stampin' Pad
$7.50
Old Olive Classic Stampin' Pad
$7.50
Smoky Slate Classic Stampin' Pad
$7.50
Pumpkin Pie Stampin' Blends Combo Pack
$9.00
Old Olive Stampin' Blends Combo Pack
$9.00
Highland Heather Stampin' Blends Combo Pack
$9.00
Petal Pink Stampin' Blends Combo Pack
$9.00
Bronze & Ivory Stampin' Blends Combo Pack
$9.00
Cinnamon Cider Stampin' Blends Combo Pack
$9.00
Cute Stars Adhesive Backed Sequins
$7.50
Paper Snips
$10.00
Black & White 1/4" (6.4 Mm) Gingham Ribbon
$7.00
Stampin' Dimensionals
$4.00
Multipurpose Liquid Glue
$4.00
Stampin' Seal
$8.00
Mini Glue Dots
$5.25

Stampin’ Up! Shaded Summer for the Happy Inkin’ Thursday Blog Hop

Good morning and welcome to the Happy Inkin’ Thursday Blog Hop! Today I have a Fall Thank You card made with the Stampin’ Up! Shaded Summer cling stamp set and the Sale A Bration Summer Shadows dies. I paired it with the beautiful Blackberry Beauty specialty designer series paper for a rich Fall look. You can find the supplies I used at the bottom of my post along with the sizes of cardstock used.

We have a color challenge this week and here is the pretty color palette we are using:

I adhered a strip of the wood grain In Good Taste designer series paper to the side of a Blackberry Beauty specialty designer series paper and adhered them to a Cinnamon Cider mat. I adhered a gold foil cutout from the Blackberry Beauty Ephemera pack to top seam and adhered the layered panel to the front of a Rich Razzleberry card base.

I used the Sale A Bration Summer Shadows dies to cut out the flowers and leaves. This is a pretty set of dies that coordinate with the Stampin’ Up! Shaded Summer stamp set and is available for free with a $100 purchase before shipping and taxes. I cut two of the large flowers, one of the small flowers and three sets of leaves. I cut the solid flowers from Polished Pink, the detailed flowers from Rich Razzleberry and the leaves from Cinnamon Cider. I adhered the detailed die cuts to the solid die cuts with liquid glue to make the pretty layered die cuts.

I stamped the sentiment from the Stampin’ Up! Shaded Summer stamp set in Versamark ink in the lower corner of an Early Espresso panel and sprinkled it with gold embossing powder. I shook off the excess and heat set the embossing powder with my heat tool until shiny. I cut the sentiment out with the Tasteful Labels die and adhered it to the card. I arranged the die cuts and adhered the leaves and small flower with glue dots and the large flowers with dimensionals. I accented the center of the large flowers with shimmery Opal Rounds and the label with gold metallic pearls. I finished the arrangement with a gold trim bow.

For the inside of the card, I stamped the sentiment from the Stampin’ Up! Shaded Summer stamp set in Cinnamon Cider on a Basic White panel. I stamped the berry sprig next to the sentiment in Rich Razzleberry and trimmed the bottom with a strip of the Blackberry Beauty specialty DSP. I adhered the panel to the inside of the card.

The Blackberry Beauty specialty designer series paper is such a contrast of gold elegance with rustic themes, an I thought I would add to that by trimming it with wood grain. I love the Summer Shadows die cut flowers and the gold embossed sentiment from the Stampin’ Up! Shaded Summer stamp set is the perfect finishing touch.

On with the Hop! Click on the Next Blog button to move forward to Karen Ksenzakovic’s project.

If you get lost along the way, here are the participants for the hop:


Current Host Code: U6K4RBB4

Use this host code when you order $50 or more and receive a free gift from me!  The free gift is your choice of any item valued up to $10.00 in the 2021 – 2022 Annual Catalog or the July – December 2021 Mini Catalog including some of the host stamp sets!

If your order is over $150, please do not use the host code since you’ll receive your own Host Dollars plus I’ll still send you the free gift!  This host code can be used by anyone, no club or commitment required. Let me know if you have any questions.


If you need any stamping supplies, I’d be very happy to be your Demonstrator.  Just click on the Shop Now button on the right side of the screen to go directly to my online store or contact me if you have any questions. 

Thanks for stopping by and Happy Stamping!

Akiko

  • Visit my online store here
  • See the current Stampin’ Up! clearance rack specials here
  • Earn FREE Stampin’ Up! products through my Wildflower Frequent Shopper Program – my way of saying thank you to my online frequent shopper customers.
  • Have any questions? I’d be happy to help, click here to contact me.

Cardstock Cuts for this project:

  • Rich Razzleberry – 4-1/4″ x 11″ card base scored at 5-1/2″, 2″ x 6″ (die cut flowers)
  • Polished Pink – 2″ x 6″ (die cut flowers)
  • Cinnamon Cider – 4″ x 5-1/4″ (front mat), 3-1/2″ x 5″ (die cut leaves)
  • Early Espresso – 2-1/4″ x 2-3/4″ (label)
  • Basic White – 4″ x 5-1/4″ (inside panel)
  • Blackberry Beauty specialty DSP – 3-7/8″ x 5-1/8″ panel (front background), 1/2″ x 4″ (inside trim)
  • In Good Taste DSP – 1-1/4″ x 5-1/8″ (wood grained front strip)
  • Blackberry Beauty Ephemera pack – gold foil flower

Stampin’ Up! products used in this project:

Shaded Summer Cling Stamp Set
$23.00
Summer Shadows Dies
$0.00
Tasteful Labels Dies
$31.00
In Good Taste Designer Series Paper
$21.00
Blackberry Beauty 12" X 12" (30.5 X 30.5 Cm) Specialty Designer Series Paper
$15.00
Blackberry Beauty Ephemera Pack
$6.00
Rich Razzleberry 8-1/2" X 11" Cardstock
$8.75
Polished Pink 8 1/2" X 11" Cardstock
$8.75
Cinnamon Cider 8-1/2" X 11" Cardstock
$8.75
Early Espresso 8-1/2" X 11" Cardstock
$8.75
Basic White 8 1/2" X 11" Cardstock
$9.75
Cinnamon Cider Classic Stampin' Pad
$7.50
Rich Razzleberry Classic Stampin' Pad
$7.50
Versamark Pad
$9.50
Metallics Embossing Powders
$18.00
Simply Elegant Trim
$7.50
Opal Rounds
$7.50
Metallic Pearls
$7.00
Heat Tool (Us And Canada)
$30.00
Stampin' Dimensionals
$4.00
Multipurpose Liquid Glue
$4.00
Mini Glue Dots
$5.25
Stampin' Seal
$8.00
Stampin' Cut & Emboss Machine
$120.00

Stampin’ Up! Christmas Season Cards

Good Friday Morning! One of the fin things I did last weekend was travel to my team lead’s house for our Quarterly In Person Inkin’ Krew Team meeting. We made three beautiful Christmas cards designed by three of our team members with the Stampin’ Up! Christmas Season bundle. You can find the supplies I used at the bottom of my post along with the sizes of cardstock used.

This first card was designed by Amy Koenders, our team lead. The greenery from the Stampin’ Up! Christmas Season bundle really pops against the clean white background and the Cherry Cobbler sentiment from the Merriest Moments stamp set fits perfectly in the corner. She finishes it with some nice touches of shimmer with the Cherry Cobbler ribbon and Gold Holly Leaves. You Can find more of Amy’s designs on her blog Stamp with Amy K.

This pretty card was designed by our teammate Karen Ksenzakovic. The Painted Christmas designer series paper is a gorgeous backdrop to the Stampin’ Up! Christmas Season stamped pine cones and I love how she designed the pine branches in a spray around the label. The sentiment from the Christmas To Remember cling stamp set is a sweet touch on the Cherry Cobbler die cut label. You can find more of Karen’s work on her blog Creative Stamping Designs.

Our last card was made by our teammate Donna Leonard at Stamp Dabbles. I love rustic Christmas cards made with kraft paper and Donna’s design brings this together perfectly! The pine branches from the Wintry 3D embossing folder go beautifully with the Painted Christmas DSP and I love how the stamped greenery looks on Crumb Cake card stock! Donna also incorporated the sentiments from the Christmas To Remember stamp set.

I love how each card is so different and beautiful, it really shows the versatility of the Stampin’ Up! Christmas Season bundle. And I love how each arrangement of greenery uses the same colors, Soft Succulent, Evening Evergreen, Cherry Cobbler, Soft Suede and Early Espresso, and yet each arrangement is different! It shows that you can easily arrange the die cut pieces any way you want and still come out with a beautiful card.

It was fun to get together to make cards with a few of the other ladies on our team and see these beautiful designs. I feel fortunate that I live close enough to some of my teammates to meet in person, because we are all over the country! Now is a good time to join Stampin’ Up! because of the Sale A Bration extra free bundle that you can add to your Starter Kit. Let me know if you think you might be interested in joining us, I would be happy to tell you more!


Sale A Bration is going on Now!

Sale A Bration has BUY, HOST and JOIN specials that run through September 30. Click on the picture below to view the Sale A Bration brochure:

SHOP

There are 8 new products (4 stamp sets, 3 paper packs and a die set!) that are available as free items to chose from with a level 1 order (free with an order of $50+) and 2 new items (1 stamp set and 1 die set) that are available as free choices with a level 2 order (free with an order of $100+).  So many good things to pick from!

HOST

There is also a great new host exclusive stamp set called In Your Words that will be available for FREE with either a personal order of $300+ or a party with sales totaling $300+! Drop me an email at apsudano@stampininthemeadows.com if you are interested in setting up a host code for yourself to see if you can collect $300 in orders from yourself and your stamping friends to get that FREE stamp set!  I’m happy to set up a code just for you!

JOIN

And there is an awesome joining promotion during Sale A Bration! When you join, you pay $99 for your starter kit and you get to choose $125 in product from any current catalog and your starter kit ships for free! And if you join between August 3 and September 30, you get to pick an additional qualifying bundle from the July – December 2021 Mini Catalog to add to your starter kit for free! There couldn’t be a better time to join the Stampin’ Up! family.  Contact me if you have any questions about joining and I’ll be happy to tell you more!


Current Host Code: U6K4RBB4

Use this host code when you order $50 or more and receive a free gift from me!  The free gift is your choice of any item valued up to $10.00 in the 2021 – 2022 Annual Catalog or the July – December 2021 Mini Catalog!

If your order is over $150, please do not use the host code since you’ll receive your own Host Dollars plus I’ll still send you the free gift!  This host code can be used by anyone, no club or commitment required. Let me know if you have any questions.


If you need any stamping supplies, I’d be very happy to be your Demonstrator.  Just click on the Shop Now button on the right side of the screen to go directly to my online store or contact me if you have any questions. 

Thanks for stopping by and Happy Stamping!

Akiko

  • Visit my online store here
  • See the current Stampin’ Up! clearance rack specials here
  • Earn FREE Stampin’ Up! products through my Wildflower Frequent Shopper Program – my way of saying thank you to my online frequent shopper customers.
  • Have any questions? I’d be happy to help, click here to contact me.

Cardstock Cuts for this project:

  • Amy’s Card
    • Thick Basic White – 5-1/2″ x 8-1/2″ card base scored at 4-1/4″
    • Basic White – two 4″ x 5-1/2″ panels (front mat and inside panel), 3-7/8″ x 5-1/8″ (front background), 1-7/8″ x 3-7/8″ (embossed panel), 4-1/4″ x 5-1/2″ (stamped greenery)
  • Karen’s Card
    • Thick Basic White – 4-1/4″ x 11″ card base scored at 5-1/2″
    • Basic White – 4″ x 5-1/4″ panel (inside panel), 2″ x 4″ (pine cones)
    • Cherry Cobbler – two 4-1/8″ x 5-3/8″ panels (front and inside mats), 3-1/2″ x 4-1/4″ panel (die cut label)
    • Soft Succulent – 3″ x x 4-1/4″ panel (stamped pine boughs)
    • Painted Christmas DSP – 4″ x 5-1/4″ panel (front background), 3/4″ x 4″ strip (inside trim), 2-1/4″ x 6″ (envelope flap)
  • Donna’s Card
    • Crumb Cake – 4-1/4″ x 11″ card base scored at 5-1/2″, 3″ x 7″ panel (stamped greenery)
    • Cherry Cobbler – 4-1/8″ x 5-3/8″ (front mat)
    • Evening Evergreen – 1-3/4″ x 5-1/4″ (embossed panel)
    • Painted Christmas DSP – 2-1/4″ x 5-1/5″ (front background), 1/2″ x 4-1/8″ strip (inside trim)

Stampin’ Up! products used in this project:


Stampin’ Up! Snow Wonder for the Happy Inkin’ Thursday Blog Hop

Good morning and welcome to the Happy Inkin’ Thursday Blog Hop! I made a Christmas card with the pretty Stampin’ Up! Snow Wonder cling stamp set and coordinating Snow Time dies for today. I combined them with the beautiful Peaceful Place specialty designer series paper. You can find the supplies I used at the bottom of my post along with the sizes of cardstock used.

We have a sketch challenge this week and I kind of followed it:

I adhered a panel of Peaceful Place designer series paper to a Cherry Cobbler mat and adhered it to the front of a Smoky Slate card base with dimensionals. I stamped two sets of the trees from the Stampin’ Up! Snow Wonder cling stamp set in Versamark ink on Basic Gray card stock. I sprinkled them with white embossing powder and shook off the excess. I heat set the powder with my heat tool and cut the trees out with the coordinating die from the Snow Time dies. I adhered the trees to the card front with glue dots.

I stamped the sentiment from the Stampin’ Up! Snow Wonder stamp set in Versamark ink on Smoky Slate and sprinkled it with white embossing powder. I shook off the excess and heat set the powder with my heat tool. I cut it out with the large label from the Snow Time dies and adhered it to the card front with dimensionals.

I stamped the snowman from the Stampin’ Up! Snow Wonder stamp set in Versamark ink on Basic White and sprinkled in silver embossing powder. I shook off the excess and heat set the powder with my heat tool until it was shiny. I cut it out with the coordinating die and colored it with Stampin’ Blends. I used Evening Evergreen and Cherry Cobbler on the holly, Pumpkin Pie on the carrot and Basic Black on the eyes, mouth and buttons. I adhered it to the card front with dimensionals and adhered some subtle shimmer sequins around the card with glue dots – I love these pretty sequins!

It’s really hard to see, but I embossed the upper corner of a Basic White panel with the snowflake corner die from the Snow Time dies and stamped the sentiment from the Stampin’ Up! Snow Wonder stamp set in Smoky Slate. I adhered the panel to a Cherry Cobbler mat and adhered it to the inside of the card.

The snowman from the Stampin’ Up! Snow Wonder stamp set is so sweet and is wonderful for Christmas card. The Peaceful Place specialty designer series paper is so elegant with silver foil touches and makes sophisticated monochromatic Christmas cards.

On with the Hop! Click on the Next Blog button to move forward to Karen Ksenzakovic’s project.

If you get lost along the way, here are the participants for the hop:


Current Host Code: U6K4RBB4

Use this host code when you order $50 or more and receive a free gift from me!  The free gift is your choice of any item valued up to $10.00 in the 2021 – 2022 Annual Catalog or the July – December 2021 Mini Catalog including some of the host stamp sets!

If your order is over $150, please do not use the host code since you’ll receive your own Host Dollars plus I’ll still send you the free gift!  This host code can be used by anyone, no club or commitment required. Let me know if you have any questions.


If you need any stamping supplies, I’d be very happy to be your Demonstrator.  Just click on the Shop Now button on the right side of the screen to go directly to my online store or contact me if you have any questions. 

Thanks for stopping by and Happy Stamping!

Akiko

  • Visit my online store here
  • See the current Stampin’ Up! clearance rack specials here
  • Earn FREE Stampin’ Up! products through my Wildflower Frequent Shopper Program – my way of saying thank you to my online frequent shopper customers.
  • Have any questions? I’d be happy to help, click here to contact me.

Cardstock Cuts for this project:

  • Smoky Slate – 5-1/2″ x 8-1/2″ card base scored at 4-1/4″, 2″ x 4″ (label)
  • Basic Gray – 3-1/4″ x 3-1/2″ (die cut trees)
  • Cherry Cobbler – two 4″ x 5-1/4″ panels (front and inside mats)
  • Basic White – 3-7/8″ x 5-1/8″ (inside panel), 3″ x 3-3/4″ (embossed snowman)
  • Peaceful Place specialty DSP – 3-7/8″ x 5-1/8″ panel

Stampin’ Up! products used in this project: