Stampin’ Up! Bonanza Buddies Birthday Card

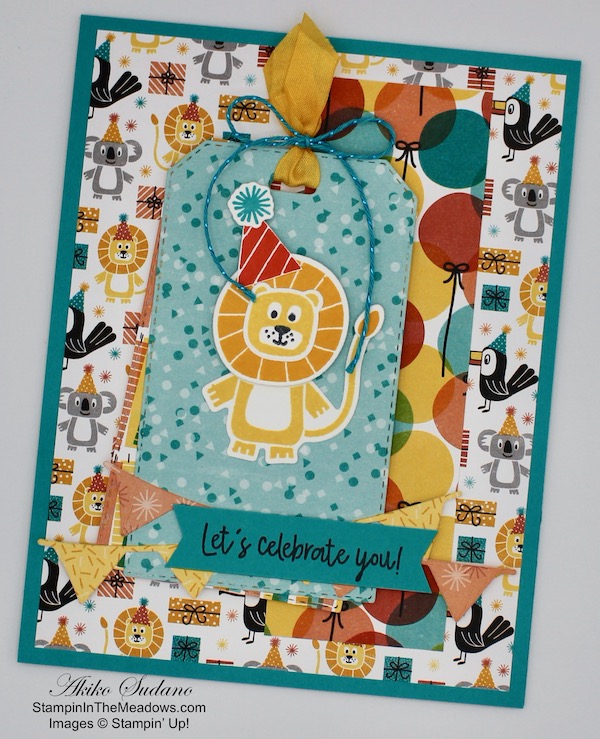
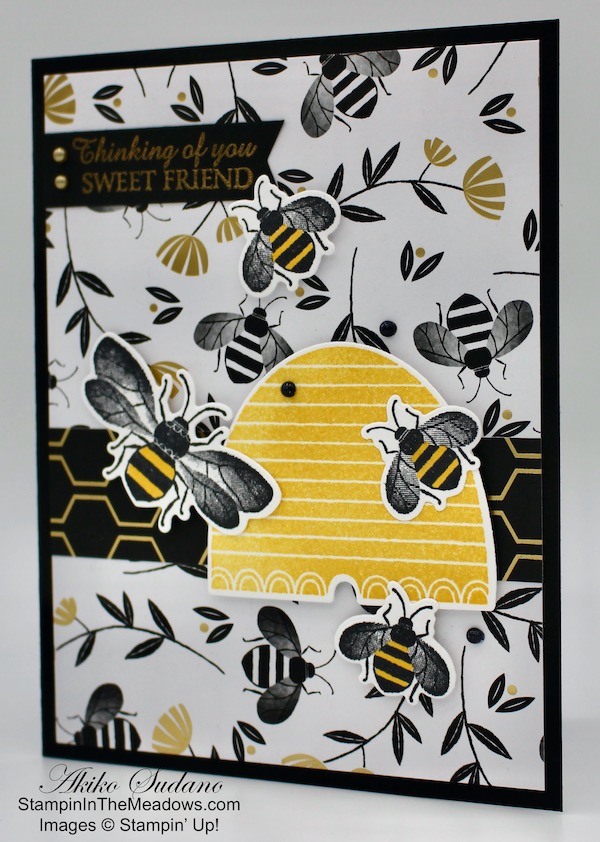
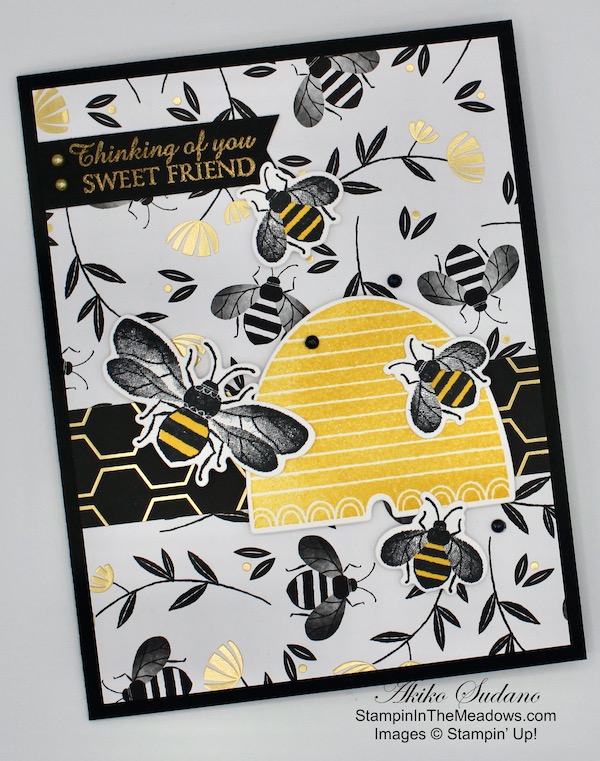
Good Morning! Today I have a cute, colorful birthday card made with the new Stampin’ Up! Bonanza Buddies bundle from the new Stampin’ Up! January-June 2020 Mini Catalog. The Bonanza Buddies photopolymer stamp set has the cutest little critters and the Birthday Bonanza designer series paper has fun colors with pretty party designs. You can find the supplies used to create this card at the bottom of my post with the sizes of cardstock used.

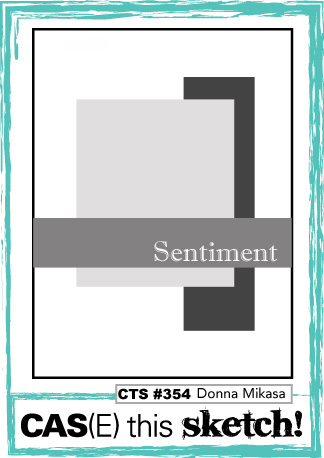
The lay out for my card is based on the sketch in CAS(E) this Sketch #354:

I adhered a panel of the Birthday Bonanza designer series paper to a Bermuda Bay card base. I added another strip of the DSP (the one with the balloons) along the side. Then I used the tag die from the Bonanza dies, that is part of the Stampin’ Up! Bonanza Buddies bundle, to cut tags from the speckled light Bermuda Bay and birthday candles paper in the Birthday Bonanza DSP pack. I offset the tags and adhered them together with multipurpose liquid glue added some Crushed Curry seam binding ribbon to the top tied with the metallic Bermuda Bay twine. This twine is from the Metallic Baker’s Twine and Sequins pack that is FREE as part of Sale-A-Bration with a $50 order.

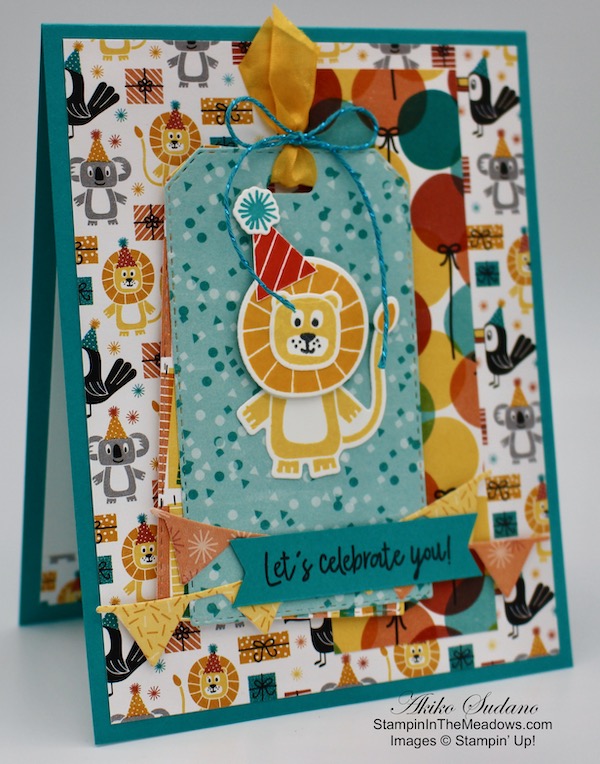
I adhered the tags to the card front with dimensionals. I stamped and die cut the lion from the Stampin’ Up! Bonanza Buddies bundle next. The lion is made with 3 stamps – one with the body and head, one with the mane and tail tip and one with the face. I stamped the body and head in Daffodil Delight, the mane and tail in Mango Melody and the face with Memento Tuxedo Black, all on whisper white card stock. Then there are two dies – one with the head and body and one with the mane and tail. So I cut them out using the dies – giving me four die cuts. I adhered the face to the mane and the tail tip to the tail. Then I adhered the body to the tag with multipurpose liquid glue and the face and mane on top with dimensionals. Then I stamped the hat in Poppy Parade ink and the Pompom in Bermuda Bay ink on a scrap of Whisper White and die cut them with the coordinating dies. I die cut the hat a little crooked so I used my paper snips to straighten it out and adhered it to the lion’s head with multipurpose liquid glue.

I die cut two of the pennant banners from the Birthday Bonanza DSP and adhered them to the bottom, using multipurpose liquid glue over the tags, and dimensionals over the background. I stamped the sentiment from the Stampin’ Up! Birthday Bonanza stamp set with Memento Tuxedo Black ink on a strip of Bermuda Bay card stock. I trimmed the ends and adhered it to the card with multipurpose liquid glue and a piece of a dimensional.

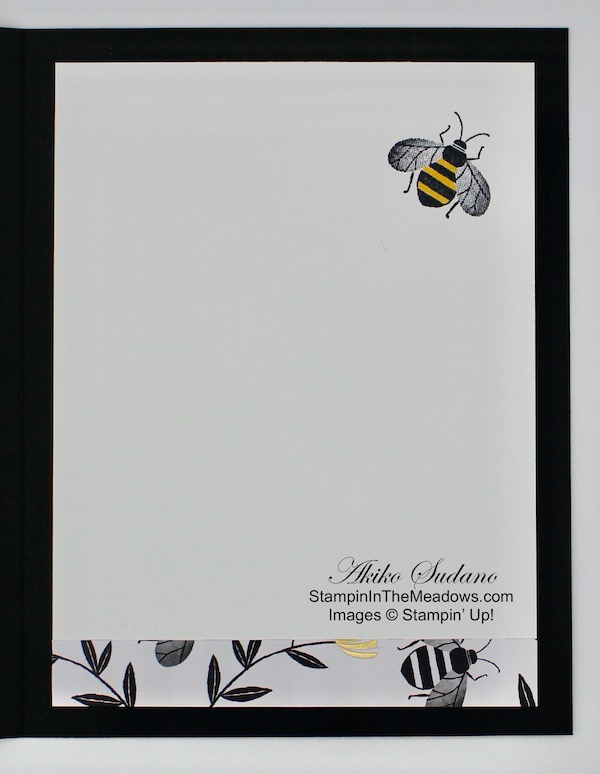
I decorated the inside by stamping the balloons in Memento Tuxedo Black, Bermuda Bay, Poppy Parade and Daffodil Delight on a Whisper White panel. I stamped the Happy Birthday sentiment from the Stampin’ Up! Bonanza Buddies stamp set and added a strip of the Birthday Bonanza DSP to the bottom before adhering to the inside of the card.

The Stampin’ Up! Bonanza Buddies bundle has so many stamps and is so versatile for creating birthday or party themed cards. The little critters are so cute and the dies are so versatile with a tag die and party banners. And coupled with the pretty Birthday Bonanza designer series paper, you have perfect compliments to make cheerful, fun projects for kids of all ages!


January 1 – 15 Host Code: FB6MBVE3

January 16 – 31 Host Code: EFVWTZUQ

Use this host code when you order $50 or more and receive a free gift from me!  The gift is your choice of any item valued up to $10.00 in the 2019-20 Annual Catalog or in the 2019 Holiday Catalog!  That includes some of the Host Exclusive stamp sets!

If your order is over $150, please do not use the host code since you’ll receive your own Host Dollars plus I’ll send you the free gift!  This host code can be used by anyone, no commitment required.  Let me know if you have any questions.


If you need any stamping supplies, I’d be very happy to be your Demonstrator.  Just click on the Shop Now button on the right side of the screen to go directly to my online store or contact me if you have any questions.  Happy Stamping!

Thanks for stopping by and have a great day!

Akiko

  • Visit my online store here
  • See the current Stampin’ Up! clearance rack specials here
  • Earn FREE Stampin’ Up! products through my Wildflower Frequent Shopper Program – my way of saying thank you to my frequent shopper online customers.
  • Sign up for my weekly newsletter here
  • Have any questions? I’d be happy to help, click here to contact me.

Cardstock Cuts for this project:

  • Bermuda Bay – 4 1/4″ x 11″ scored at 5 1/2″ (card base), 1/2″ x 3″ (label)
  • Whisper White – 2 1/2″ x 4 1/2″ (lion die cuts) , 3 7/8″ x 5 1/8″
  • Birthday Bonanza DSP – 4″ x 5 1/4″ (little critters and presents background), 1 1/2″ x 4 3/4″ (balloons), (2) 2 1/4″ x 4″ (light Bermuda Bay confetti and candles for tags), (2)1 1/2″ x 4 1/2″ (Grapefruit Grove stars and Daffodil Delight confetti for pennant banners), 1/2″ x 3 7/8″ (inside trim)

Stampin’ Up! products used in this project:


Stampin’ Up! Abstract Impressions for the Inkin’ Krew Blog Hop

Good Morning! Today it is time for the January Inkin’ Krew Monthly Blog Hop and the theme is “Love”. I made a note card with the awesome Stampin’ Up! Abstract Impressions stamp set with a little treat holder made with the Mini Curvy Keepsakes Box dies. You can find the supplies used to create this card at the bottom of my post along with the sizes of cardstock used.

I am featuring the new Best Dressed designer series paper for today’s project because hearts and flowers with presents say LOVE:

I cut a panel of the Best Dressed designer series paper and adhered it to the front of a Whisper White Note Card. I took a panel of Whisper White and stamped the sentiment from the Stampin’ Up! Abstract Impressions stamp set in Pretty Peacock ink. I stamped the two thickest images of the rose in Highland Heather ink. I stamped off the thick one and then stamped the thinner one on top full strength.

I stamped several of the round flowers in Daffodil Delight. I inked up the single flower that was off to the side and again stamped the thicker image after stamping off once and the highlight stamp full strength. I stamped the single leaf the same way using Mint Macaron – stamping off once for the background and full strength for the highlight. These two-step stamping sets make a nice design when used this way and the photopolymer makes it easy to see and control your design. For the red flowers, I used my Lovely Lipstick Stampin’ Write marker to hand draw small wispy flowers to echo the flowers in the background paper.

After I finished stamping the panel, I adhered it to a Purple Posy mat with multipurpose liquid glue and then popped it on the front of the note card with dimensionals. I finished off the front with a Purple Posy faceted dot and a Blackberry Bliss twine bow. I decorated the envelope by stamping the flower and some leaves in Highland Heather and Mint Macaron, just like the card front.

I used the same sheet of Best Dressed designer series paper to make a Mini Curvy Keepsake box. I used the heart tag die cut to cut a heart from the DSP and from Blackberry Bliss card stock. I decorated the hearts with the small stitched heart from the Stitched Labels dies – I was pleased that these hearts go together perfectly. I tied the hearts to the box handle with Mossy Meadow Linen Thread.

I kept the inside simple, just adding some hearts made with the small heart die.

This set is designed for a quick little love note and chocolate treat – perfect for that someone special!

Thanks for visiting and on with the Hop! Click on the Next Blog button to move forward to Jaimie’s project or click the Previous Blog button to move back to see the project that Connie created.

If you get lost along the way, here are the participants for the hop:

I hope you enjoy all the beautiful projects that the team has created for our hop today and that they inspire you for celebrating Valentine’s Day and fill your heart with love.


January 1 – 15 Host Code: FB6MBVE3

January 16 – 31 Host Code: EFVWTZUQ

Use this host code when you order $50 or more and receive a free gift from me!  The gift is your choice of any item valued up to $10.00 in the 2019-20 Annual Catalog or in the 2019 Holiday Catalog!  That includes some of the Host Exclusive stamp sets!

If your order is over $150, please do not use the host code since you’ll receive your own Host Dollars plus I’ll send you the free gift!  This host code can be used by anyone, no commitment required.  Let me know if you have any questions.


If you need any stamping supplies, I’d be very happy to be your Demonstrator.  Just click on the Shop Now button on the right side of the screen to go directly to my online store or contact me if you have any questions.  Happy Stamping!

Thanks for stopping by and have a great week!

Akiko

  • Visit my online store here
  • See the current Stampin’ Up! clearance rack specials here
  • Earn FREE Stampin’ Up! products through my Wildflower Frequent Shopper Program – my way of saying thank you to my frequent shopper online customers.
  • Sign up for my weekly newsletter here
  • Have any questions? I’d be happy to help, click here to contact me.

Cardstock Cuts for this project:

  • Best Dressed DSP – 6″ x 6″ (mini curvy keepsake box and die cuts), 3 1/4″ x 4 3/4″ (background)
  • Blackberry Bliss – 2″ x 2″ (die cut)
  • Whisper White – 2″ x 4″ (floral panel)
  • Purple Posey – 2 1/8″ x 4 1/8″ (front mat), 1″ x 1″ (die cut)

Stampin’ Up! products used in this project:


Stampin’ Up! Peaceful Poppies Thinking of You Card

Good Morning! Today I am sharing a video that I did yesterday during my Sunday Facebook Live session. The Stampin’ Up! Peaceful Poppies designer series paper has a sheet that makes the most beautiful full page card front, and you can make the simplest beautiful card with it.

Here’s the Facebook Live video showing how to make this pretty card:

I also posted the video to my YouTube channel and you can view it here.

In the video, I made the card backwards, making the inside first and then the card front. I started by stamping the poppy and bud stamp from the Stampin’ Up! Painted Poppies stamp set in Memento Tuxedo Black ink on a Whisper White panel. I colored the flowers with the Poppy Parade Stampin Blends and the stems and leaves with the Old Olive Stampin Blends. I used the large spatter stamp from the Painted Poppies stamp set to decorate the bottom of the panel with Blackberry Bliss and Poppy Parade inks after stamping off. I adhered it to an Old Olive mat and then to the inside of the Blackberry Bliss card base.

I trimmed the pretty panel of Stampin’ Up Peaceful Poppies DSP with an Old Olive mat. I tied a length of Blackberry Bliss twine around the panel and made a bow. I pre-made a label using the sentiment from the Peaceful Moments stamp set and dies from the Painted Frames die set. I decorated the label with Peaceful Poppies sequins and an Old Olive die cut and popped it on the card front with dimensionals over the twine. I popped the panel on the card base with dimensionals and finished it off with more Peaceful Poppies sequins.

The Stampin’ Up! Peaceful Poppies designer series paper is beautiful and with the Peaceful Moments and Painted Poppies bundles, the possibilities are endless. And this paper in the DSP pack is so artistic and pretty that it makes a statement on its own so that you can create a stunning card quick and easy.


January 1 – 15 Host Code: FB6MBVE3

Use this host code when you order $50+ and receive a free gift from me!  If your order is over $150, please do not use this code, but you’ll still get the free gift.  The free gift is your choice of any item valued up to $10.00 in the 2018-19 Annual Catalog or in the 2019 Occasions Catalog!  That includes some of the Host Exclusive stamp sets!

If your order is over $150, please do not use the host code since you’ll receive your own Host Dollars plus I’ll send you the free gift!  This host code can be used by anyone, no club or commitment required.  Let me know if you have any questions.


If you need any stamping supplies, I’d be very happy to be your Demonstrator.  Just click on the Shop Now button on the right side of the screen to go directly to my online store or contact me if you have any questions.  Happy Stamping!

Thanks for stopping by and have a great week!

Akiko

  • Visit my online store here
  • See the current Stampin’ Up! clearance rack specials here
  • Earn FREE Stampin’ Up! products through my Wildflower Frequent Shopper Program – my way of saying thank you to my frequent shopper online customers.
  • Have any questions? I’d be happy to help, click here to contact me.

Cardstock Cuts for this project:

  • Blackberry Bliss – 4 1/4″ x 11″ scored at 5 1/2″ (card base)
  • Old Olive – (2) 4″ x 5 1/4″ (mats), 1/2″ x 3″ (label trim)
  • Whisper White – 3 7/8″ x 5 1/8″ (inside panel)
  • Thick Whisper White – 2″ x 3 1/4″ (label)
  • Peaceful Poppies DSP – 3 7/8″ x 5 1/8″

Stampin’ Up! products used in this project:


Stampin’ Up! Coordination Product Release is Coming

Good Morning! Stampin’ Up! has a special release coming on February 4 with a limited set of products that coordinate with items in the January-June 2020 Mini Catalog and Sale-A-Bration Brochure.

Here are the products that are in the special release with some project inspiration:

Aren’t they cute? Click on the image below to open a PDF to see what items the new products coordinate with:

And here’s a video that Stampin’ Up created to show you all the products:

Here are the Customer details:

  • February 4–March 31, 2020
  • Items available during this promotion can be added to demonstrator, customer, workshop, and online orders.
  • No limits apply during the customer sales period.
  • Qualifying orders are eligible for Stampin’ Rewards.
  • Coordination Product Release items can be added to a starter kit. 
  • Coordination Product Release items are offered until March 31, 2020 or while supplies last.
  • Products are not part of Sale-A-Bration, and it must be purchased or redeemed for Stampin’ rewards on qualifying orders.
  • There are no bundle item numbers; each item has its own individual item number.

Stampin’ Up! Demonstrators can begin purchasing these products now through a demonstrator order or they can be added to a Starter Kit for joining. Contact me if you have questions about joining Stampin’ Up! as a demonstrator.


January 1 – 15 Host Code: FB6MBVE3

Use this host code when you order $50 or more and receive a free gift from me!  The gift is your choice of any item valued up to $10.00 in the 2019-20 Annual Catalog or in the 2019 Holiday Catalog!  That includes some of the Host Exclusive stamp sets!

If your order is over $150, please do not use the host code since you’ll receive your own Host Dollars plus I’ll send you the free gift!  This host code can be used by anyone, no commitment required.  Let me know if you have any questions.


If you need any stamping supplies, I’d be very happy to be your Demonstrator.  Just click on the Shop Now button on the right side of the screen to go directly to my online store or contact me if you have any questions.  Happy Stamping!

Thanks for stopping by and have a great day!

Akiko

  • Visit my online store here
  • See the current Stampin’ Up! clearance rack specials here
  • Earn FREE Stampin’ Up! products through my Wildflower Frequent Shopper Program – my way of saying thank you to my frequent shopper online customers.
  • Sign up for my weekly newsletter here
  • Have any questions? I’d be happy to help, click here to contact me.

Stampin’ Up! Stamp Honey Bee Thinking of You Card

Happy Friday! Today’s card is a Thinking of You card made with the pretty new Stampin’ Up! Honey Bee bundle. The Golden Honey specialty designer series paper that I used with it is available for FREE as a Sale-A-Bration item with a $50 purchase. Yay for Sale-A-Bration!! You can find the supplies used to create this card at the bottom of my post along with the sizes of cardstock used.

I love the beehive stamp and die in the Stampin’ Up! Honey Bee stamp bundle, so I had to make it a focal point in my card. I stamped it in Daffodil Delight ink on a Thick Whisper White panel and cut it out with the coordinating die. I stamped the large bee and three of the small bees in Memento Tuxedo Black ink on Thick Whisper White and cut them out with the coordinating dies. I colored the bee stripes with the dark Daffodil Delight Stampin Blend.

I cut a panel of the Golden Honey specialty designer series paper with the flowers and bees and a strip of the black background honeycomb paper and adhered them together with multipurpose liquid glue. I adhered them to a Basic Black card base. I popped the beehive on the card front with dimensionals and arranged the bees around the hive. I used dimensionals to adhere the bees to the background and multipurpose liquid glue on the bee that is on the beehive.

I stamped the sentiment from the Stampin’ Up! Honey Bee stamp set on a strip of basic black using Versamark ink. I sprinkled gold embossing powder on it and heat set. I trimmed the label and adhered it to the card. I added some gold metallic pearls to the label and colored some regular pearls with the Basic Black Dark Stampin Blend and added them around the beehive.

I stamped another small bee in Memento Tuxedo black in the corner of a Whisper White panel, I colored it’s stripes with the Dark Daffodil Delight Stampin’ Blend and added a strip of the Golden Honey Specialty DSP to the bottom. I adhered the panel to the inside of the card.

The Stampin’ Up! Honey Bee bundle is one of the new bundles in the January-June 2020 Mini Catalog. It consists of the Honey Bee cling stamp set and the Detailed Bee dies and is available with a 10% discount. The Golden Honey specialty designer series paper is in the Sale-A-Bration brochure and is available for FREE with a $50 purchase. It has designs that coordinate with the Honey Bee stamps and the bee in today’s card background can be cut out with one of the dies in the set!


January 2020 Paper Pumpkin: I’ll Bee Yours

Speaking of Bees, Today is the last day to sign up for the January Paper Pumpkin – I’ll Be Yours kit.

Paper Pumpkin’s first kit of 2020 is all about L-O-V-E. Whether you want handmade favors for Valentine’s Day, a bridal shower, or a remarkably romantic wedding, this month’s kit has everything you need to help you celebrate your favorite friendships and love stories. So make it a “LOVE”-ly year with Paper Pumpkin!

  • Kit details: Makes 20 treat bags + 10 mini cards and envelopes
  • Card size: 3″ x 3″
  • Envelope size: 3 1/8″ x 3 1/8″
  • Coordinating colors: Crushed Curry, Highland Heather, Mint Macaron, and Rococo Rose

If you’re interested in subscribing to Paper Pumpkin, you can either sign up for a subscription where you are billed monthly for your kit or you can purchase a prepaid subscription in my online store. To see more information and to sign up for the monthly subscription click here. To see the options for prepaid subscriptions in my online store, click here.


January 1 – 15 Host Code: FB6MBVE3

Use this host code when you order $50 or more and receive a free gift from me!  The gift is your choice of any item valued up to $10.00 in the 2019-20 Annual Catalog or in the 2019 Holiday Catalog!  That includes some of the Host Exclusive stamp sets!

If your order is over $150, please do not use the host code since you’ll receive your own Host Dollars plus I’ll send you the free gift!  This host code can be used by anyone, no commitment required.  Let me know if you have any questions.


If you need any stamping supplies, I’d be very happy to be your Demonstrator.  Just click on the Shop Now button on the right side of the screen to go directly to my online store or contact me if you have any questions.  Happy Stamping!

Thanks for stopping by and have a great day!

Akiko

  • Visit my online store here
  • See the current Stampin’ Up! clearance rack specials here
  • Earn FREE Stampin’ Up! products through my Wildflower Frequent Shopper Program – my way of saying thank you to my frequent shopper online customers.
  • Sign up for my weekly newsletter here
  • Have any questions? I’d be happy to help, click here to contact me.

Cardstock Cuts for this project:

  • Basic Black – 5 1/2″ x 8 1/2″ scored at 4 1/4″ (card base) 1″ x 3″ (label)
  • Thick Whisper White – 3″ x 6″ (bees and beehive die cuts)
  • Golden Honey DSP – 4″ x 5 1/4″ (background), 1″ x 4″ (honeycomb stripe), 1/2″ x 3 3/4″ (inside trim)
  • Whisper White – 3 3/4″ x 5″ (inside)

Stampin’ Up! products used in this project:


Stampin’ Up! Forever Lovely for the Happy Inkin’ Thursday Blog Hop

Good Morning! Welcome to another Happy Inkin’ Thursday Blog Hop! Can you feel all the love in the air? I am using the Stampin’ Up! Forever Lovely photopolymer stamp set with the new From My Heart specialty designer series paper to bring some more.

We have a color challenge this week, and here is the color palette we are using:

Doesn’t it inspire Love? I started with the shiny Real Red with Flirty Flamingo and Whisper White dotted paper from the From My Heart specialty DSP and cut a panel and adhered it to a Flirty Flamingo card base with multipurpose liquid glue. I cut a Thick Whisper White panel with the long flowers die cut from the Lovely Flowers dies which coordinates with the Stampin’ Up! Forever Lovely stamp set. I used the edge die from the Lovely Flowers die to cut a backing in Flirty Flamingo. I adhered the Flirty Flamingo die cut behind the Whisper White die cut with multipurpose liquid glue.

I wrapped the Real Red satin ribbon around the panels and secured it in the back. I stamped the sentiment from the Stampin’ Up! Forever Lovely stamp set in Real Red ink on a scrap of Thick Whisper White. I cut it out with the curved edge die from the Painted Labels dies and popped it over the ribbon with dimensionals. I made a bow and adhered it to the ribbon with glue dots. I popped the layered panel on the card front with dimensionals and finished it off with a Real Red faceted gem on the label.


I stamped the long floral spray from the Stampin’ Up! Forever Lovely stamp set on the bottom of a Whisper White panel in Flirty Flamingo ink. I stamped the coordinating leaf stamp over it using Pear Pizzazz ink. I added the strip of shiny Real Red paper and adhered the panel to a Real Red mat before attaching it to the inside of the card with multipurpose liquid glue.

With all the flowers and pink and red, Valentine’s Day must be right around the corner – I think we’re getting ready for it!

On with the Hop! Click the Next button below to see Karen Ksenzakovic’s project.

And just in case you get lost along the way, here’s a list of the team members participating in the hop today:


January 1 – 15 Host Code: FB6MBVE3

Use this host code when you order $50 or more and receive a free gift from me!  The gift is your choice of any item valued up to $10.00 in the 2019-20 Annual Catalog or in the 2019 Holiday Catalog!  That includes some of the Host Exclusive stamp sets!

If your order is over $150, please do not use the host code since you’ll receive your own Host Dollars plus I’ll send you the free gift!  This host code can be used by anyone, no commitment required.  Let me know if you have any questions.


If you need any stamping supplies, I’d be very happy to be your Demonstrator.  Just click on the Shop Now button on the right side of the screen to go directly to my online store or contact me if you have any questions.  Happy Stamping!

Thanks for visiting!

Akiko

  • Visit my online store here
  • See the current Stampin’ Up! clearance rack specials here
  • Earn FREE Stampin’ Up! products through my Wildflower Frequent Shopper Program – my way of saying thank you to my frequent shopper online customers.
  • Sign up for my weekly newsletter here
  • Have any questions? I’d be happy to help, click here to contact me.

Cardstock Cuts for this project:

  • Flirty Flamingo – 4 1/4″ x 11″ scored at 5 1/2″ (card base), 2″ x 4″ (die cut backing panel)
  • Whisper White – 3 3/4″ x 5″ (inside panel)
  • Thick Whisper White – 3 1/4″ x 4″ (front die cut panel), 2″ x 3″ (label)
  • Real Red – 3 7/8″ x 5 1/8″ (inside mat)
  • From My Heart specialty DSP – 4″ x 5 1/4″ (front background), 1/2″ x 3 3/4″ (inside trim)

Stampin’ Up! products used in this project:


Stampin’ Up! Timeless Tropical Birthday Card

Good Morning! Today I have birthday card made with the Stampin’ Up! Timeless Tropical bundle. I used the hibiscus stamp and die from this set to make a yellow flower to send a warm, tropical happy birthday message during this cold season. You can find the supplies used to create this card at the bottom of my post along with the sizes of cardstock used.

I stamped the hibiscus flower and three large leaves from the Stampin’ Up Timeless Tropical cling stamp set using Sahara Sand ink on Thick Whisper White card stock. I used the coordinating dies from the In The Tropics dies to cut them out. I colored the flower with Mango Melody and Daffodil Delight Stampin’ Blends and the leaves with Mossy Meadow and Old Olive Stampin’ Blends.

I embossed a panel of Soft Suede card stock with the Coastal Weave embossing folder and adhered it to a Terracotta Tile card base with multipurpose liquid glue. I cut a panel of Whisper White card stock with the Stitched Lace die and adhered it to the embossed panel with multipurpose liquid glue. I arranged the leaves on the lace panel and adhered them with multipurpose liquid glue.

I stamped the birthday sentiment from the Stampin’ Up Timeless Tropical cling stamp set on a panel of Sahara Sand card stock with Soft Suede ink. I cut it out using the Stitched Rectangle die. I adhered the label to the card front with multipurpose liquid glue over the leaves.

I brushed the flower with clear Wink of Stella to give the flower some sparkle – so pretty! I cut a short length of Braided Burlap trim and unraveled the ends. I folded it and adhered it to the card front with glue dots. I added the yellow hibiscus flower to the card front with dimensionals and finished the card front with Crushed Curry crinkled seam binding ribbon.

I stamped the hibiscus flower from the Stampin’ Up! Timeless Tropical stamp set with Sahara Sand ink on a panel of Whisper White after stamping off twice. I made a mask by stamping the flower on copy paper and cutting it out. I laid the mask on the flower and stamped two leaves, also using Sahara Sand ink after stamping off twice. I adhered the panel to a Soft Suede mat and then to the inside of the card with multipurpose liquid glue.

I wanted to combine tropical rustic with soft feminine in this birthday card. The rustic is embodied in the coastal weave embossed background and burlap ribbon and the feminine is represented by the lace overlay and sparkle. I think the hibiscus combines the best of both! I hope you like it!


January 1 – 15 Host Code: FB6MBVE3

Use this host code when you order $50 or more and receive a free gift from me!  The gift is your choice of any item valued up to $10.00 in the 2019-20 Annual Catalog or in the 2019 Holiday Catalog!  That includes some of the Host Exclusive stamp sets!

If your order is over $150, please do not use the host code since you’ll receive your own Host Dollars plus I’ll send you the free gift!  This host code can be used by anyone, no commitment required.  Let me know if you have any questions.


If you need any stamping supplies, I’d be very happy to be your Demonstrator.  Just click on the Shop Now button on the right side of the screen to go directly to my online store or contact me if you have any questions.  Happy Stamping!

Thanks for stopping by and have a great day!

Akiko

  • Visit my online store here
  • See the current Stampin’ Up! clearance rack specials here
  • Earn FREE Stampin’ Up! products through my Wildflower Frequent Shopper Program – my way of saying thank you to my frequent shopper online customers.
  • Sign up for my weekly newsletter here
  • Have any questions? I’d be happy to help, click here to contact me.

Cardstock Cuts for this project:

  • Terracotta Tile – 4 1/4″ x 11″ scored at 5 1/2″ (card base)
  • Soft Suede 3 7/8″ x 5 1/8″ (inside mat), 5 1/4″ x 4″ (embossed background)
  • Thick Whisper White – 2 1/4″ x 6″ (leaf die cuts), 2 3/4″ x 2 3/4″ (hibiscus die cut)
  • Whisper White – 3 3/4″ x 5″ (inside panel), 2 1/4″ x 4 1/2″ (stitched lace die cut)
  • Sahara Sand – 2″ x 3″ (label)

Stampin’ Up! products used in this project:


Stampin’ Up! All Dressed Up Note Card Tote

Good Morning! Today I am sharing a video that I did yesterday during my Sunday Facebook Live session. The Stampin’ Up! All Dressed Up dies set has dies to make the cutest little tote bags!

Here’s the Facebook Live video showing how to make this cute little tote bag:

I also posted the video to my YouTube channel and you can view it here.

In the video I show how I made the tote bag. I die cut two of the bag dies using two sheets of the Best Dressed designer series paper. I cut two of the handle dies from the Stampin’ Up! All Dressed Up dies from Blackberry Bliss card stock. I cut a pocket die from Blackberry Bliss card stock and two of the buckle dies from Daffodil Delight card stock.

I used Tear & Tape on the side flaps and adhered the sides together, pressing real good. I added Tear & Tape to the pocket and adhered it to the front and added the die cut heart with multipurpose liquid glue. I used Tear & Tape to secure the bottom. I slipped a buckle on each end of the Blackberry Bliss straps and used glue dots to secure the straps/buckles to the tote bag.

These are the 3×3 note cards that I made to go in the tote. I made card bases with a 3×6 panel of Whisper White card stock scored at 3″ and decorated them with various scraps of card stock, ribbons, designer series paper and embossing folders. I used small dies to use up the last bits of paper and create accents for the cards. I squared off various panels of the remaining Best Dressed scraps and used them along with coordinating scraps of matching card stock. In this case I used Blackberry Bliss and Purple Posey cardstock, the Coastal Weave 3D embossing folder, along with the butterfly from the Well Written dies and the stitched heart from the Stitched Labels dies. And I stamped sentiments in some of the open white spaces. Each note card is different with the common theme of the DSP used in the bag. And the nice thing is that the note cards can be used for any occasion. Plus it is so cute!!

These are the note cards I made for the sample tote. For these I used Blackberry Bliss and Daffodil Delight card stock. The sentiment is from the Dressed to Impress stamp set.

The Stampin’ Up! All Dressed Up dies are part of the Dressed To Impress bundle at a 10% discount. The totes are perfectly sized to hold 3×3 note cards and I made my own, but the Best Dressed suite also has the cutest 3×3 note cards with coordinating envelopes that you could use instead. The totes are also perfect for holding party favors and you can use a card stock color that coordinates with your party theme. I don’t think it matters what they hold, the person who receives them will think they are so cute, they will love them no matter what. I hope you get a chance to have fun making them.


January 1 – 15 Host Code: FB6MBVE3

Use this host code when you order $50+ and receive a free gift from me!  If your order is over $150, please do not use this code, but you’ll still get the free gift.  The free gift is your choice of any item valued up to $10.00 in the 2018-19 Annual Catalog or in the 2019 Occasions Catalog!  That includes some of the Host Exclusive stamp sets!

If your order is over $150, please do not use the host code since you’ll receive your own Host Dollars plus I’ll send you the free gift!  This host code can be used by anyone, no club or commitment required.  Let me know if you have any questions.


If you need any stamping supplies, I’d be very happy to be your Demonstrator.  Just click on the Shop Now button on the right side of the screen to go directly to my online store or contact me if you have any questions.  Happy Stamping!

Thanks for stopping by and have a great week!

Akiko

  • Visit my online store here
  • See the current Stampin’ Up! clearance rack specials here
  • Earn FREE Stampin’ Up! products through my Wildflower Frequent Shopper Program – my way of saying thank you to my frequent shopper online customers.
  • Have any questions? I’d be happy to help, click here to contact me.

Cardstock Cuts for this project:

  • Best Dressed DSP – 2 6″ x 6″ panels of same design for each die cut tote bag (There will be scraps left over that I squared off to decorate the note cards)
  • Whisper White – (4) 6″ x 3″ panels scored at 3″ (note card bases)
  • Blackberry Bliss – 1 1/2″ x 6 1/2″ (tote bag straps), 2″ x 2 1/2″ (tote bag pocket)
  • Daffodil Delight – 1 1/2″ x 2″ (tote bag buckles)
  • Purple Posey – scraps to decorate note cards

Stampin’ Up! products used in this project:


Stampin’ Up! Forever Blossoms You Mean So Much Card

Good Morning! Today is the BIG day as the Stampin’ Up! January-June 2020 Mini Catalog is finally open for ordering! I am celebrating with a card made from the beautiful Stampin’ Up! Forever Blossoms bundle. You can find the supplies used to create this card at the bottom of my post along with the sizes of cardstock used.

I cut a panel of the Parisian Blossoms specialty designer series paper and adhered it to a Pool Party card base with multipurpose liquid glue. I embossed a panel of Petal Pink card stock with the Parisian Flourish 3-D embossing folder and adhered it to the card front.

I stamped the large cherry branch from the Stampin’ Up! Forever Blossoms stamp set with Sahara Sand ink on Thick Whisper White card stock. I colored the branch with the Petal Pink and Granny Apple Green Stampin’ Blends and cut it out with the coordinating die from the Cherry Blossoms dies. I adhered the branch to the card with dimensionals and accented the blooms with large champagne gemstones.


I made a bow with Linen Thread and attached it to the cherry blossoms with a glue dot. I stamped the sentiment from the Stampin’ Up! Forever Blossoms stamp set in Sahara Sand ink on a strip of Pool Party card stock. I trimmed the end and adhered it to the card front with dimensionals.

On the inside of the card, I stamped the branch from the Stampin’ Up! Forever Blossoms stamp set in Sahara Sand ink on a panel of Whisper White card stock after stamping off. I trimmed the bottom of the panel with a strip of Parisian Blossoms specialty DSP and adhered it to a Petal Pink mat before adhering it to the inside of the card.

The Stampin’ Up! Forever Blossoms and Cherry Blossoms dies come in a bundle for 10% off in the January-June 2020 Mini Catalog. It is just one of the new beautiful sets that are now available. And the Parisian Blossoms specialty designer series paper, champagne rhinestones and Parisian Flourish 3-D embossing folder are also new items that are part of the Parisian Blossoms Suite in the new catalog.

And Today is also the start of Sale-A-Bration – the best Stampin’ Up! sale of the year.


January 1 – 15 Host Code: FB6MBVE3

Use this host code when you order $50 or more and receive a free gift from me!  The gift is your choice of any item valued up to $10.00 in the 2019-20 Annual Catalog or in the 2019 Holiday Catalog!  That includes some of the Host Exclusive stamp sets!

If your order is over $150, please do not use the host code since you’ll receive your own Host Dollars plus I’ll send you the free gift!  This host code can be used by anyone, no commitment required.  Let me know if you have any questions.


If you need any stamping supplies, I’d be very happy to be your Demonstrator.  Just click on the Shop Now button on the right side of the screen to go directly to my online store or contact me if you have any questions.  Happy Stamping!

Thanks for stopping by and have a great day!

Akiko

  • Visit my online store here
  • See the current Stampin’ Up! clearance rack specials here
  • Earn FREE Stampin’ Up! products through my Wildflower Frequent Shopper Program – my way of saying thank you to my frequent shopper online customers.
  • Sign up for my weekly newsletter here
  • Have any questions? I’d be happy to help, click here to contact me.

Cardstock Cuts for this project:

  • Pool Party – 5 1/2″ x 8 1/2″ scored at 4 1/4 (card base), 1/2″ x 3″ (label)
  • Petal Pink – 2 1/4″ x 3 1/4″ (embossed layer), 3 4/4″ x 5″ (inside mat)
  • Thick Whisper White – 2 1/2″ x 4 1/2″ (cherry blossom branch die cut)
  • Whisper White – 3 5/8″ x 4 7/8″ (inside panel)
  • Parisian Blossoms specialty DSP – 3 5/8″ x 4 7/8″ (card front background), 1/2″ x 3 5/8″ (inside trim)

Stampin’ Up! products used in this project:


Stampin’ Up! Peaceful Moments Friendship Card for the Happy Inkin’ Thursday Blog Hop

Good Morning and Happy New Year! Welcome to the first Happy Inkin’ Thursday Blog Hop of 2020! Tomorrow is first day for ordering from the 2020 January-June 2020 Mini Catalog and my card is made with the beautiful Stampin’ Up! Peaceful Moments bundle that is just one of the new items that will be available.

We have a sketch challenge this week, and here is the sketch we are using:

I started by embossing a panel of Crumb Cake card stock with the new Coastal Weave embossing folder (also available in the new Mini Catalog tomorrow) and adhering it to a Crumb Cake card base. Then I cut out the solid flowers from Poppy Parade card stock with the Poppy Moments dies and the outline flowers from Calypso Coral cardstock. The Poppy Moments dies are part of the Stampin’ Up! Peaceful Moments bundle. I adhered the flowers with multipurpose liquid glue. I cut out the centers from Basic Black card stock and adhered them to the flowers.

I cut out three sets of large leaves and 1 set of leaf clusters from Pear Pizzazz and Old Olive card stock (solids from Pear Pizzazz) and adhered them together. I love how they automatically create shading and dimension when you put them together!

I arranged the leaves and adhered them to the card with multipurpose liquid glue. I popped the flowers on with dimensionals. I stamped the sentiment from the Stampin’ Up! Peaceful Moments cling stamp set in Memento Tuxedo Black ink on a strip of Whisper White. I adhered it to a Basic Black mat and adhered it to the card base with dimensionals.

I left the inside of the card pretty simple, just adding a strip of embossed Crumb Cake card stock to the side of a Whisper White panel and adhering it to a Basic Black mat. I then adhered it to the inside of the card with multipurpose liquid glue – plenty of room to write a personal message to a dear friend.

Tomorrow is the big day for the the start of the new Mini Catalog and Sale-A-Bration! My shopping list is prepared and I’m just counting down the hours. Enjoy!!

On with the Hop! Click the Next button below to visit Karen Ksenzakovic’s blog.

And just in case you get lost along the way, here’s a list of the team members participating in the hop today:


January 1 – 15 Host Code: FB6MBVE3

Use this host code when you order $50 or more and receive a free gift from me!  The gift is your choice of any item valued up to $10.00 in the 2019-20 Annual Catalog or in the 2019 Holiday Catalog!  That includes some of the Host Exclusive stamp sets!

If your order is over $150, please do not use the host code since you’ll receive your own Host Dollars plus I’ll send you the free gift!  This host code can be used by anyone, no commitment required.  Let me know if you have any questions.


If you need any stamping supplies, I’d be very happy to be your Demonstrator.  Just click on the Shop Now button on the right side of the screen to go directly to my online store or contact me if you have any questions.  Happy Stamping!

Thanks for visiting!

Akiko

  • Visit my online store here
  • See the current Stampin’ Up! clearance rack specials here
  • Earn FREE Stampin’ Up! products through my Wildflower Frequent Shopper Program – my way of saying thank you to my frequent shopper online customers.
  • Sign up for my weekly newsletter here
  • Have any questions? I’d be happy to help, click here to contact me.

Cardstock Cuts for this project:

  • Crumb Cake – 5 1/2″ x 8 1/2″ scored at 4 1/4″ (card base), 3 1/2″ x 4 3/4″ (embossed background), 1/2″ x 3 3/4″ (inside embossed trim)
  • Poppy Parade – 2 1/2″ x 4 1/4″ (solid poppy die cuts)
  • Calypso Coral – 2 1/2″ x 4 1/4″ (outline poppy die cuts)
  • Pear Pizzazz – 1″ x 6″ (3 solid single leaf die cuts), 1 1/2″ x 3 1/4″ (solid leaf cluster)
  • Old Olive – 1″ x 6″ (3 outline single leaf die cuts), 1 1/2″ x 3 1/4″ (outline leaf cluster)
  • Whisper White – 3 3/4″ x 5″ (inside), 5/8″ x 4″ (label)
  • Basic Black – 3 7/8″ x 5 1/8″ (inside mat), 3/4″ x 4 1/8″ (label mat), 1 1/4″ x 2″ (flower centers)

Stampin’ Up! products used in this project: