Stampin’ Up! Wonder of the Season Christmas Card

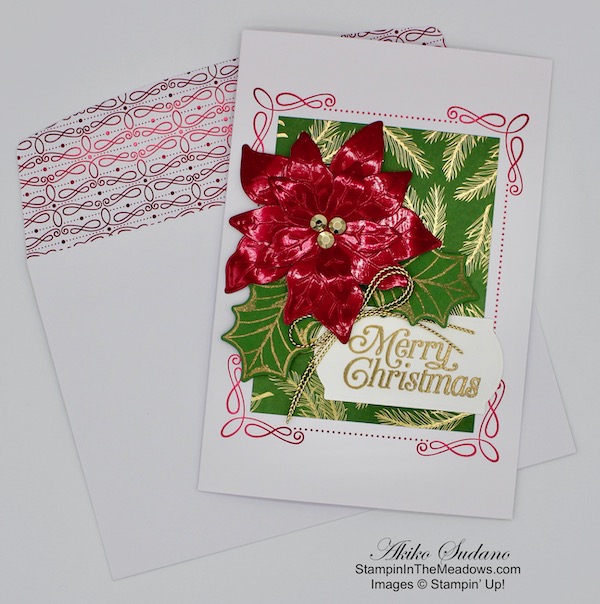
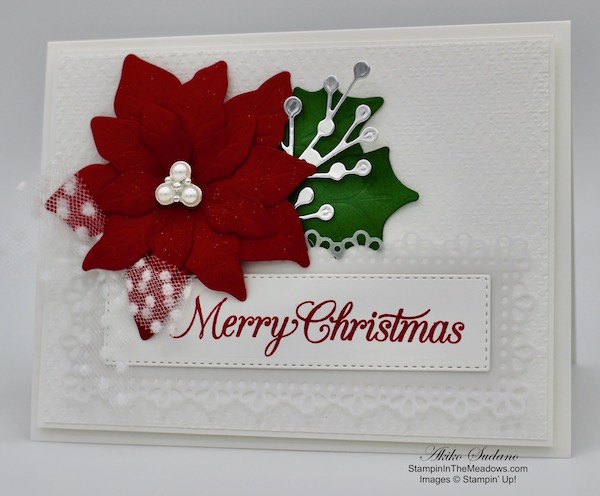
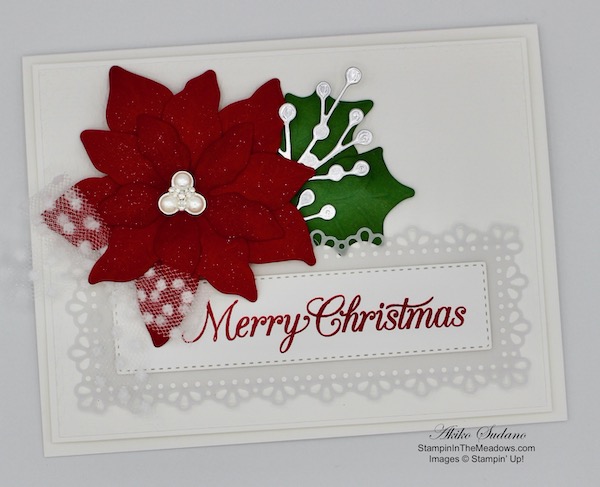
Good Morning! Today I have a Christmas Card made with the Stampin’ Up! Wonder of the Season Memories and More card pack and the cards and envelopes. But the star of the card is the beautiful red foil poinsettia made from the Poinsettia Dies. You can find the supplies used to create this card at the bottom of my post along with the sizes of cardstock used.

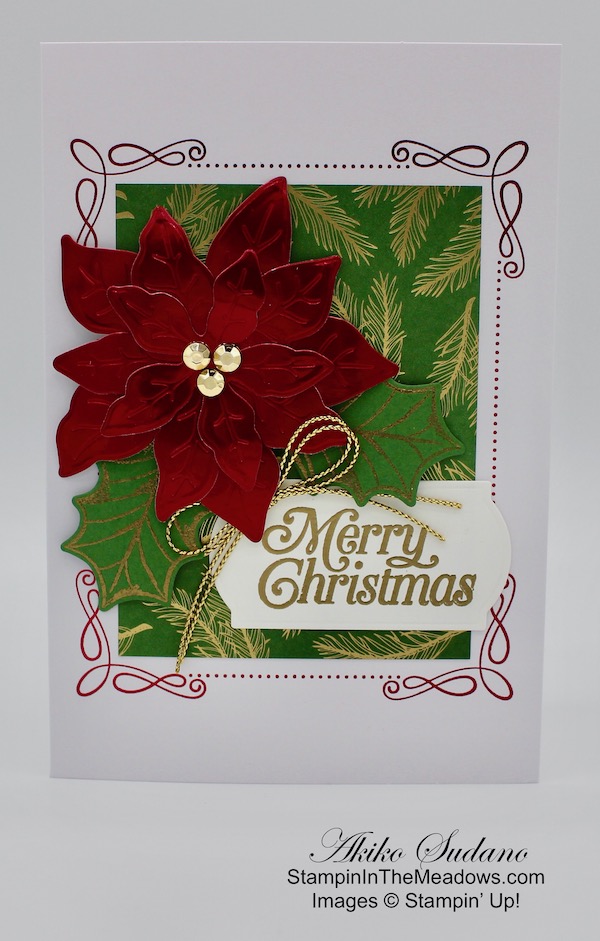
I cut the Garden Green and gold foil pine branch Stampin’ Up! Wonder of the Season Memories and More large card in half and adhered it to the front of a Stampin’ Up! Wonder of the Season Memories and More card bases. These cards are larger than your normal A2 card and are so pretty with the red foil trim. The large Memories and More cards fit perfectly on the front and the small cards fit perfectly on the on the inside of the red foil frame. So I cut the large card in half to incorporate the pretty frame in the card design.

I cut three of the petal clusters from the Poinsettia Dies from red foil with the embossing dies. I gently curled the petals down with my fingers and adhered them together with glue dots. I adhered the flower to the card front with glue dots and added three Gilded Gems to the center. I stamped the Merry Christmas sentiment from the Perfectly Plaid photopolymer stamp set in Versamark ink on a Whisper White panel. I sprinkled it with gold embossing powder and heat set until shiny. I cut it out with a die from the Painted Labels Dies and adhered it to the card front.

I stamped two leaves from the Poinsettia Petals photopolymer stamp set in Versamark ink on Garden Green card stock. I sprinkled them with gold embossing powder and heat set until shiny. I cut them out with the coordinating dies and adhered them under the poinsettia with glue dots. I finished off the card front with a double bow made with gold twine.

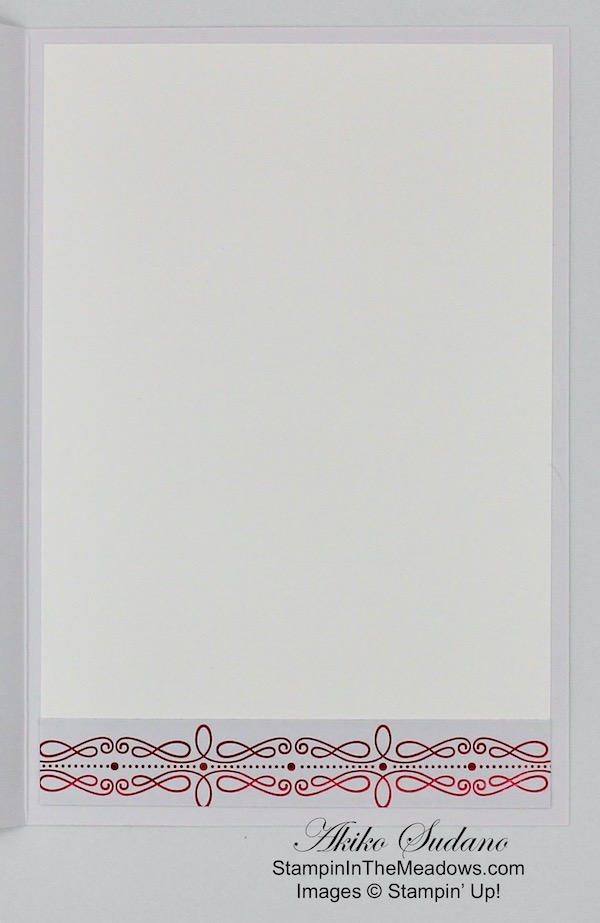
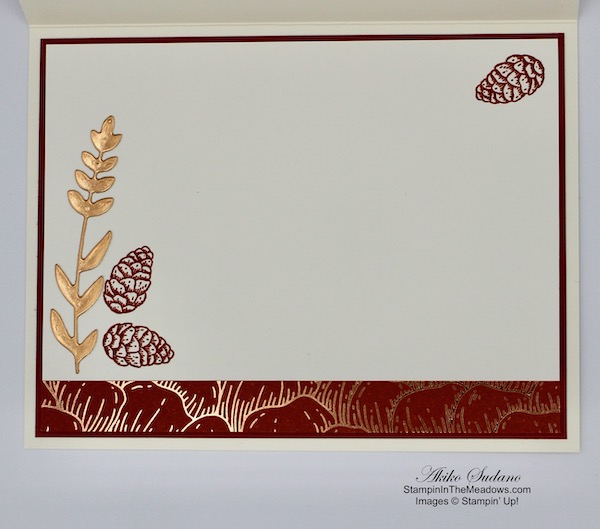
I adhered a strip of the Stampin’ Up! Wonder of the Season specialty designer series paper to the bottom of a Whisper White panel so I could bring the pretty red foil scroll work to the inside of the card. I adhered the panel to the inside of the card.

The Stampin’ Up! Wonder of the Season card pack and cards and envelopes are a great way to make beautiful quick Christmas cards. The nostalgic themes are cheerful and fun. The touches of foil add an elegant sparkle and shine that coordinate well with many Christmas stamps and dies like the pretty poinsettia.


Double Wildflower Points Extended to August 17!!

To celebrate the new catalog, I announced Double Wildflower Points. But since I couldn’t blog for days, I decided to extend this for another week! My Wildflower Points program is my way of saying thank you to my frequent shoppers.  For every $50 you order from my online store, you earn 1 point, and when you earn 8 points, I owe you a FREE $40 order of your choice!  With Double Wildflower Points, you get 2 points for each $50 order, 4 points for each $100 order, and so on, reaching the goal of 8 points faster!  Yay!!  For complete details on the program, see my Customer Rewards page.  Let me know if you have any questions!


And don’t forget to redeem your Bonus Days Coupon Codes before the end of the month!!


August 1 – 15 Host Code: B76NYDVU

August 16 – 31 Host Code: TV9N9BHQ

Use this host code when you order $50 or more and receive a free gift from me!  The gift is your choice of any item valued up to $10.00 in the 2020-21 Annual Catalog or the Aug – Dec 2020 Mini Catalog. This includes some of the host exclusive sets!

If your order is over $150, please do not use the host code since you’ll receive your own Host Dollars plus I’ll still send you the free gift!  This host code can be used by anyone, no commitment required.  Let me know if you have any questions.


If you need any stamping supplies, I’d be very happy to be your Demonstrator.  Just click on the Shop Now Button on the right side of the screen to go directly to my Online store or contact me if you have any questions.  Happy Stamping!

Thanks for stopping by and have a great day!

Akiko

  • Visit my Online store here
  • See the current Stampin’ Up! clearance rack specials here
  • Earn FREE Stampin’ Up! products through my Wildflower Frequent Shopper Program – my way of saying thank you to my frequent shopper online customers.
  • Sign up for my monthly newsletter here
  • Have any questions? I’d be happy to help, click here to contact me.

Cardstock Cuts for this project:

  • Red Foil – 3-1/4″ x 7-1/2″ (die cut poinsettia petals)
  • Garden Green – 2″ x 4″ (die cut leaves)
  • Whisper White – 4″ x 6″” (inside panel)
  • Wonder of the Season DSP – 3/4″ x 4″ (inside trim)

Stampin’ Up! products used in this project:


Stampin’ Up! Jar of Flowers and Country Home Card for the Inkin’ Krew Blog Hop

Good Morning! Welcome to the August Inkin’ Krew Team Monthly Blog Hop! The theme for this month’s hop is Fall Frenzy. My card combines the old with the new – the Stampin’ Up! Jar of Flowers and Country Home stamp sets, the Tin Tile 3D embossing folder and the beautiful Gilded Autumn specialty designer series paper. You can find the supplies used to create this card at the bottom of my post along with the sizes of cardstock used.

I embossed a panel of Mint Macaron card stock with the Tin Tile 3D embossing folder and adhered it to an Early Espresso mat with multipurpose liquid glue. I adhered a strip of the Gilded Autumn designer series paper to another Early Espresso mat and adhered them to the embossed panel. I cut the bottom of a Crumb Cake panel with the zigzag bottom of the tag die from the North Pole Wonder Dies. I used the Fancy Tag Topper die to cut the top so I would have a longer tag. I wrapped some Mint Macaron and copper ribbons through the top of the tag and tied them with Linen Thread.

I stamped the milk can from the Stampin’ Up! Country Home stamp set in Memento Tuxedo Black ink on Gray Granite card stock and fussy cut it out. I adhered it to the bottom of the tag with liquid glue. I stamped the sunflower bouquet from the Stampin’ Up! Jar of Flowers stamp set in Early Espresso ink on Very Vanilla. I colored it with Calypso Coral, Mint Macaron, Cinnamon Cider, Daffodil Delight and Mango Melody Stampin’ Blends. I fussy cut the flowers and adhered them to the tag with dimensionals.

I stamped the label and Thanks sentiment from the Country Home stamp set in Cajun Craze ink on a small panel of Very Vanilla. I fussy cut it out and adhered it to the milk can with liquid glue. I punched out an acorn from the Gilded Autumn designer series paper with the acorn punch from the Autumn Punch Pack and adhered it to the bottom of the tag. I adhered the decorated tag to the embossed panel with dimensionals and popped the panel on the front of a Cajun Craze card base.

I stamped the sentiment from the Country Home stamp set in Early Espresso ink on a Very Vanilla panel. I trimmed the bottom with a strip of Gilded Autumn DSP and added a punched oak leaf and acorn to finish the inside panel.

Decorating with old milk cans is still pretty popular, so I was happy to see that it went so well with the new bouquets from the Stampin’ Up! Jar of Flowers stamp set. What do you think of this mixing the old with the new?

Let’s get on with the hop! Be sure to visit each of this wonderfully creative team’s blogs to see all the great Fall Frenzy projects. Click on the Next Blog button to move forward to Julie Johnston’s project or click the Previous Blog button to move back to see the project that Leslie Larkin created.

If you get lost along the way, here are the participants for the hop:


August 1 – 15 Host Code: B76NYDVU

Use this host code when you order $50 or more and receive a free gift from me!  The gift is your choice of any item valued up to $10.00 in the 2020-21 Annual Catalog or the Aug–Dec 2020 Mini Catalog. This includes some of the host exclusive sets!

If your order is over $150, please do not use the host code since you’ll receive your own Host Dollars plus I’ll still send you the free gift!  This host code can be used by anyone, no commitment required.  Let me know if you have any questions.


If you need any stamping supplies, I’d be very happy to be your Demonstrator.  Just click on the Order Stampin’ Up! Online Now button on the right side of the screen to go directly to my online store or contact me if you have any questions.  Happy Stamping!

Thanks for visiting!

Akiko

  • Visit my online store here
  • See the current Stampin’ Up! clearance rack specials here
  • Earn FREE Stampin’ Up! products through my Wildflower Frequent Shopper Program – my way of saying thank you to my frequent shopper online customers.
  • Sign up for my weekly newsletter here
  • Have any questions? I’d be happy to help, click here to contact me.

Cardstock Cuts for this project:

  • Cajun Craze – 4-1/4″ x 11″ card base scored at 5-1/2″
  • Early Espresso – 4″ x 5-1/4″ (front mat), 1-5/8″ x 3-7/8″ (DSP strip mat)
  • Mint Macaron – 3-7/8″ x 5-1/8″ (embossed front background)
  • Gray Granite – 1-3/4″ x 2-1/4″ (milk can)
  • Crumb Cake – 2″ x 4-1/2″ (tag)
  • Very Vanilla – 4″ x 5-1/4″ (inside panel), 2″ x 2-1/2″ (sunflower bouquet), 1″ x 1-1/2″ (milk can label)
  • Gilded Autumn DSP – 1-1/2″ x 3-7/8″ (front strip), 1/2″ x 4″ (inside trim), 2 punched pine cones and 1 punched oak leaf

Stampin’ Up! products used in this project:


Stampin’ Up! August – December Mini Catalog is Open!!

Yay!! Today is the day that the new Stampin’ Up! August – December Mini Catalog is open for orders!!

And the new store is open too! It’s a little different, but I really love the larger pictures and I’m starting to get used to the new menus and filters on the left. And I still need to check all my blog links, so if you click on an item, it will take you to my Online Store Front but not to the right item yet.

I’ve added links to a PDF version of the catalog to my promotions page and sidebar, so you can view it online if you want. If you want a copy of the catalog and are considering becoming a customer of mine, let me know and I’ll be happy to send you one!!

And to celebrate the new catalog, I’m offering a Double Wildflower Points promotion beginning today through Monday August 10!

If you don’t know about my Wildflower Points frequent shopper program, here’s how it works:

  • For each $50 that you order from my online store (before shipping) you will earn one Wildflower point.
  • You will earn one Wildflower point for each friend that you refer when they place their first order of $50+ from my online store.
  • When you have earned 8 Wildflower points you will get a FREE product order valued up to $40.00, your choice and mailed directly to you!

With DOUBLE Wildflower points you get 2 points for each $50 order, 4 points for each $100 order, and so on, reaching your FREE order faster!!

This offer ends on Monday Aug 10, 2020.

For complete details on my Wildflower Rewards, scroll to the bottom of my Customer Rewards page or contact me. To start shopping now, head over to my Online Store!

Time to start redeeming those Bonus Days Coupon Codes!

  • Redemption Deadline:  August 31 2020, by 11:50 PM (MT)
  • There is no limit to the number of coupon codes participants can use on an order during redemption.
  • Bonus Days coupon codes may be redeemed for any product (excluding Starter Kits and Paper Pumpkin monthly subscriptions).
    • New prepaid Paper Pumpkin codes may be discounted using Bonus Days coupon codes.
  • Bonus Days coupon codes will reduce the amount of an order.
    • Note that rewards and gifts are based on the final value of your order after your coupon codes have been applied. 
  • Bonus Days coupon codes may be redeemed one time only.

August 1 – 15 Host Code: B76NYDVU

Use this host code when you order $50 or more and receive a free gift from me!  The gift is your choice of any item valued up to $10.00 in the 2020-21 Annual Catalog or the Aug–Dec 2020 Mini Catalog. This includes some of the host exclusive sets!

If your order is over $150, please do not use the host code since you’ll receive your own Host Dollars plus I’ll still send you the free gift!  This host code can be used by anyone, no commitment required.  Let me know if you have any questions.


If you need any stamping supplies, I’d be very happy to be your Demonstrator.  Just click on the Shop Now Button on the right side of the screen to go directly to my Online store or contact me if you have any questions.  Happy Stamping!

Thanks for stopping by and have a great day!

Akiko

  • Visit my Online store here
  • See the current Stampin’ Up! clearance rack specials here
  • Earn FREE Stampin’ Up! products through my Wildflower Frequent Shopper Program – my way of saying thank you to my frequent shopper online customers.
  • Sign up for my monthly newsletter here
  • Have any questions? I’d be happy to help, click here to contact me.

Stampin’ Up! Beautiful Autumn Thank You Card

Good Morning! Today is the day for then new August – December 2020 Mini Catalog to open for orders!! Yay!! The NEW and improved Online Store will open at 7:00 AM (MT) – I can’t wait to see it. But until it opens, here is a simple Thank You card that you can make with items from the new catalog – the Stampin’ Up! Beautiful Autumn photopolymer stamp set and the beautiful Gilded Autumn specialty designer series paper. You can find the supplies used to create this card at the bottom of my post along with the sizes of cardstock used.

I adhered a panel of the beautiful Gilded Autumn specialty designer series paper to the front of a Very Vanilla card base with Stampin’ Seal. I cut out a panel of Cajun Craze card stock with the label from the Tasteful Labels Dies and adhered it to the card front.

I cut the double sprig dies from the Sunflowers Dies from Copper Foil and adhered it to the card stock die cut. I stamped the sentiment from the Stampin’ Up! Beautiful Autumn photopolymer stamp set in Versamark Ink on a strip of Very Vanilla. I sprinkled it with Copper embossing powder and heat set until shiny. I stamped the little pinecone from the Stampin’ Up! Beautiful Autumn stamp set in Cajun Craze ink next to the sentiment and cut it out with the label die from the Tasteful Labels Dies

I adhered the label over the sprigs with dimensionals and added a copper ribbon bow.

I stamped more pinecones in Cajun Craze ink on a Very Vanilla panel and cut out a single sprig from Copper Foil using the die from the Sunflowers Dies. I adhered the copper foil die cut to the Very Vanilla panel and the trimmed the bottom with a strip of the Gilded Autumn DSP. I adhered the panel to a CajunCraze mat and then to the inside of the card.

This is a very simple card that is very dramatic with the foil designer series paper. And because it’s Stampin’ Up! you know that the copper foil and ribbon will coordinate beautifully with the DSP (as well as the Cajun Craze card stock and ink). (NOTE: As I pulled together my product list, I discovered that the Copper Embossing powder retired a few months ago and is no longer available. My apologies. If you don’t have it from before it retired, I recommend using the Gold embossing powder instead.)

Enjoy shopping the new items from the Aug-Dec 2020 Mini Catalog!!


August 1 – 15 Host Code: B76NYDVU

Use this host code when you order $50 or more and receive a free gift from me!  The gift is your choice of any item valued up to $10.00 in the 2020-21 Annual Catalog or the Aug – Dec 2020 Mini Catalog. This includes some of the host exclusive sets!

If your order is over $150, please do not use the host code since you’ll receive your own Host Dollars plus I’ll still send you the free gift!  This host code can be used by anyone, no commitment required.  Let me know if you have any questions.


If you need any stamping supplies, I’d be very happy to be your Demonstrator.  Just click on the Shop Now Button on the right side of the screen to go directly to my Online store or contact me if you have any questions.  Happy Stamping!

Thanks for stopping by and have a great day!

Akiko

  • Visit my Online store here
  • See the current Stampin’ Up! clearance rack specials here
  • Earn FREE Stampin’ Up! products through my Wildflower Frequent Shopper Program – my way of saying thank you to my frequent shopper online customers.
  • Sign up for my monthly newsletter here
  • Have any questions? I’d be happy to help, click here to contact me.

Cardstock Cuts for this project:

  • Thick Very Vanilla – 5-1/2″ x 8-1/2″ card base scored at 4-1/4″
  • Copper foil – 1″ x 5-1/2″ (sprig die cuts)
  • Cajun Craze – 4″ x 5-1/4″ (inside mat), 2-1/2″ x 3-3/4″ (front label)
  • Very Vanilla – 3-7/8″ x 5-1/1″ (inside panel), 1-1/2″ x 3-1/4″ (label)
  • Gilded Autumn DSP – 4″ x 5-1/4″ (front background), 1/2″ x 3-7/8″ (inside trim)

Stampin’ Up! products used in this project:


Stampin’ Up! Poinsettia Petals Christmas Card Video Tutorial

Good Morning! Today I’m sharing a Christmas card made with the Stampin’ Up! Poinsettia Petals bundle that I made during my Facebook Live video tutorial yesterday afternoon. This is hands down the best poinsettia bundle ever! You can find the supplies used to create this card at the bottom of my post along with the sizes of cardstock used.

Here is the Facebook Live video showing how I made the card:

I also posted the video to my YouTube Channel and you can view it here if you prefer.

I started by cutting three sets of petal clusters and the embossing inserts from Real Red card stock using the Poinsettia Dies that are part of the Stampin’ Up! Poinsettia Petals bundle. I also cut one each of the leaf dies with the embossing inserts from Garden Green card stock and a berry sprig from Silver Foil. I embossed a panel of Whisper White with the Tasteful Textile 3D embossing folder and adhered it to a Whisper White panel. I popped the panel on the front of a Thick Whisper White card base using dimensionals.

I cut out the fancy label frame from vellum using the Ornate Layers Dies. I stamped the sentiment from the Stampin’ Up! Poinsettia Petals photopolymer stamp set in Real Red ink on a strip of Whisper White and cut it out with the stitched label from the Ornate Layers Dies. I adhered the label to the vellum frame with Stampin’ Seal and then adhered it to the card front.

I sponged the center and edges of each of the flower petals with Real Red ink and I sponged the edges of the leaves with Garden green ink. I gently curled the flower petals under with my bone folder and adhered the layers together with glue dots. I brushed each petal with the Wink of Stella glitter brush and adhered one of the beautiful new beaded pearls to the center. I adhered the flower to the card front with glue dots. Then I adhered the leaves and silver sprigs and a polka dot tulle bow.

I stamped the sentiment from the Stampin’ Up! Poinsettia Petals stamp set in Real Red ink on a Whisper White panel. I stamped the poinsettia in the lower corner, also in Real Red ink and adhered the panel to the inside of the card.

Layered die cut poinsettias make the prettiest Christmas cards. But they can also be used for holiday tags, ornaments, garlands, package decorations and small bouquets. And since the petals come in clusters, they are easy for children to work with in holiday craft projects! So the Stampin’ Up! Poinsettia Petals bundle is a definite must have when the catalog opens on Tuesday, Aug 4!


Today is The Last Day to Earn Bonus Days Coupon Codes!!

It’s the last day to to earn Bonus Days coupon codes! We’ll be able to start redeeming the coupon codes tomorrow! For every $50 (before shipping and tax) you spend today, you earn a $5 USD Bonus Days coupon code that can be redeemed between August 4 and August 31. There’s no limit on how many coupon codes you can earn or redeem, but they must be redeemed by August 31. For full details, see my Promotions Page.


Tomorrow the August – December 2020 Mini Catalog is Live!!

The new Online Store will open at 7:00AM (MT) tomorrow morning with the new products from the new Aug – Dec 2020 Mini Catalog. You can review my blog post from Friday to get details on the new Online Store. If you don’t have your new catalog yet, but would like to be one of my customers, let me know and I’ll be happy to send you one. It has a boatload of great products for the holidays!


August 1 – 15 Host Code: B76NYDVU

Use this host code when you order $50 or more and receive a free gift from me!  The free gift is your choice of any item valued up to $10.00 in the 2020 – 2021 Annual Catalog or the new Aug-Dec 2020 Mini Catalog.  

If your order is over $150, please do not use the host code since you’ll receive your own Host Dollars plus I’ll still send you the free gift!  This host code can be used by anyone, no club or commitment required.  Let me know if you have any questions.


If you need any stamping supplies, I’d be very happy to be your Demonstrator.  Just click on the Shop Now button on the right side of the screen to go directly to my online store or contact me if you have any questions.  Happy Stamping!

Thanks for stopping by and have a great week!

Akiko

  • Visit my online store here
  • See the current Stampin’ Up! clearance rack specials here
  • Earn FREE Stampin’ Up! products through my Wildflower Frequent Shopper Program – my way of saying thank you to my online frequent shopper customers.
  • Sign up for my weekly newsletter here
  • Have any questions? I’d be happy to help, click here to contact me.

Cardstock Cuts for this project:

  • Thick Whisper White – 5-1/2″ x 8-1/2″ card base scored at 4-1/4″
  • Real Red – 3-1/2″ x 7″ (flower petal die cuts)
  • Garden Green – 2″ x 3-1/2″ (leaf die cuts)
  • Vellum – 2″ x 5″ (label frame)
  • Silver Foil – 1-1/2″ x 2-1/2″ (berry sprig)
  • Whisper White – (2) 4″ x 5-1/4″ (inside panel and embossed panel mat), 3-7/8″ x 5-1/8″ (embossed panel), 1-1/4″ x 4-1/2″ (label)

Stampin’ Up! products used in this project:


Stampin’ Up! Online Store Updates and School Supply Sales Tax Holiday

Stampin’ Up! Online Store Changes coming August 4

Stampin’ Up! is updating the Online Store on August 4th! The current online store will go offline at midnight (MT) and the new store will go live at 7:00 AM (MT) on August 4.

Stampin’ Up! is updating the look and feel of the Online Store and bringing in many improvements to make it easier to navigate while you shop!  Here are some features of the new Online Store:

  • The store is designed to work seamlessly on desktops, tablets, and mobile phones.
  • New and improved store navigation provides an updated and enhanced shopping experience.
  • The site utilizes new, larger imagery to better showcase products and allow up-close details to be seen.
  • New sorting options and filters provide a more intuitive shopping experience, making it easier to find what you are looking for. The store’s organization and terminology are also more intuitive too.
  • The site utilizes inventory status information to show customers what items will be retiring soon, have low inventory, or are backordered so you can make informed purchasing decisions.
  • You can mark their favorite items for later reference, and you can create and share personalized wish lists.
  • A new Quick Shop feature makes it easy to add items to your cart. And there is a simplified checkout process.

A Few Things to Know:

  1. Your current account information and passwords will still work with the new site.
    • Be sure that you know your current login information so that you can log in right away!!
    • If you don’t know your login information by heart (or if you do like I do and have it saved to your browser so that you don’t have to remember it every time):
      • Log into your account today and then click on “my account” and then “email/passwords” and either record the information that is shown or, if it’s not shown, update your password and then write it down.
  2. While old bookmarks and links will forward to the “new” store, your browser will see it as a new site. So the first time you log in, it will prompt you for your account and password.
  3. Be sure that you see my name in the top right corner to earn my rewards and benefits for ordering!

If You Have Trouble Logging In:

  1. If you’ve forgotten your password, you can click the “Forgot Password” link on the new online store’s sign-in page and follow the steps to reset it. (The password reset email will come from noreply@info.stampinup.com.). Should you run into any problems there is a link in the password reset page with additional information.
  2. If you have trouble accessing your account, Stampin’ Up! can help. Just call them at 1-800-STAMPUP and they’ll be happy to help!  Unfortunately, I’m not able to assist with password changes as it’s a security issue for you. But Stampin’ Up! can definitely help you!

I’m looking forward to seeing the new site, especially the larger imagery!!😊

US SCHOOL SUPPLY SALES TAX HOLIDAY

Ten states will be offering a sales tax holiday for school supplies during the months of July or August. Products that are eligible according to the statute include “items normally used by students in a standard classroom for educational purposes.” To see the names of participating states, products exempted from tax, and sales tax holiday dates click here.

Please note that you must place your order with Stampin’ Up! during the tax holiday period in order to receive these items tax-free (which is midnight on the first day to midnight on the last day of the tax holiday). Also, keep in mind that this is a state sales tax holiday; the state statute may not apply to county, city, and special jurisdiction taxes. 


Stampin Up! Bonus Days are back!

We’re in the final days to to earn Bonus Days coupon codes! We’ll be able to start redeeming the coupon codes on Tuesday, August 4! For every $50 (before shipping and tax) you spend between today and August 3, you earn a $5 USD Bonus Days coupon code that can be redeemed between August 4 and August 31. There’s no limit on how many coupon codes you can earn or redeem, but they must be redeemed by August 31. For full details, see my Promotions Page.


July 16 – 31 Host Code: FD627X9W

August 1 – 15 Host Code: B76NYDVU

Use this host code when you order $50 or more and receive a free gift from me!  The gift is your choice of any item valued up to $10.00 in the 2020-21 Annual Catalog!

If your order is over $150, please do not use the host code since you’ll receive your own Host Dollars plus I’ll still send you the free gift!  This host code can be used by anyone, no commitment required.  Let me know if you have any questions.


If you need any stamping supplies, I’d be very happy to be your Demonstrator.  Just click on the Shop Now Button on the right side of the screen to go directly to my Online store or contact me if you have any questions.  Happy Stamping!

Thanks for stopping by and have a great day!

Akiko

  • Visit my Online store here
  • See the current Stampin’ Up! clearance rack specials here
  • Earn FREE Stampin’ Up! products through my Wildflower Frequent Shopper Program – my way of saying thank you to my frequent shopper online customers.
  • Sign up for my monthly newsletter here
  • Have any questions? I’d be happy to help, click here to contact me.

Stampin’ Up! Snowflake Wishes Shaker Card Video Tutorial

Good Morning! Today I’m sharing a shaker card that I made during my Facebook Live video tutorial yesterday afternoon using the new Stampin’ Up! Snowflake Wishes bundle. This bundle is the most versatile snowflake set and the best yet, consisting of the Snowflake Wishes photopolymer stamp set and So Many Snowflakes Dies. It has so many different snowflake stamps and beautiful dies that can be combined to make many different style snowflake cards. And it has a die for a snowflake frame that I turned into my shaker card. The Stampin’ Up! Snowflake Wishes bundle will be available when the new Aug-Dec Mini Catalog premieres on Aug 4. You can find the supplies used to create this card at the bottom of my post along with the sizes of cardstock used.

Here is the Facebook Live video showing how I made the card:

I also posted the video to my YouTube Channel and you can view it here if you prefer.

I started by cutting out the frame using the snowflake window die cut from the So Many Snowflakes Dies (available Aug 4) and a Thick Whisper White panel. I embossed the the die cut panel with the Winter Snow embossing folder (available Aug 4). I adhered the window sheet to cover the opening with Tear and Tape. I applied Adhesive Foam strips around the opening making sure the ends were tight so that no sequins would leak through. I applied additional foam strips around the outside of the frame so that it would not bend.

I adhered a panel of the Snowflake Splendor designer series paper to the front of a Pacific Point card base. I die cut six of the small snowflakes from the Christmas Layers Dies from Balmy Blue Glimmer paper (available Aug 4) and placed 5 of them in the center of the DSP panel. I added some snowflake sequins (available Aug 4) and some Whale of a Time sequins (making sure to remove all pink shells) to the center with the die cut snowflakes. I peeled the covering off the adhesive foam strips and adhered the panel to the card front, pressing to make sure the foam strips next to the window were secure.

I stamped the Christmas Cheer sentiment from the Itty Bitty Christmas stamp set in Pacific Point ink on a small scrap of Thick Whisper White card stock and cut it out with a stitched die from the Ornate Frames dies. I folded a short length of Iridescent Ribbon (available Aug 4) and adhered it to the card front with glue dots. I adhered the last Balmy Blue small snowflake die cut to the label with multipurpose liquid glue and adhered it to the card over the ribbon with more glue dots. I cut the small intricate snowflake from the So Many Snowflakes dies from Balmy Blue glimmer paper and the medium intricate snowflake from Pacific Point card stock. I adhered these together with multipurpose liquid glue and adhered the snowflake to the card front with glue dots.

Inside the card, I stamped the sentiment from the Stampin’ Up! Snowflake Wishes stamp set (available Aug 4) in Pacific Point ink on a Whisper White panel. I stamped the snowflake cluster in stamped off Pacific Point ink and trimmed the bottom of the panel with a strip of Snowflake Splendor DSP before adhering it to the inside of the card.

This was the first time I made a shaker card and it was easier than I thought and they are so fun!! The pretty snowflake window die is perfect, and using the pretty Snowflake Splendor DSP (available Aug 4) makes it so easy! This bundle is a definite must have from the new Aug-Dec Mini Catalog, available on Aug 4.


Stampin’ In The Meadows August-December 2020 Mini Catalog Product Shares

I am pleased to announce that the Stampin’ In The Meadows product shares for the new Mini Catalog is open for orders! If you would like samples of all the new products from the new August-December 2020 Mini Catalog, check it out. I am offering 6×6 samples of all the new designer series papers for $25 + $7 Priority Shipping and samples of all the new embellishments for $26 + $7 Priority Shipping. And if you want both, you can get an I WANT IT ALL share for $51 + $7 Priority Shipping.

Visit my New Catalog Product Shares Page to get the full details of what is included. Fill out the order form or drop me an email if you have questions. Please note that I can only ship to addresses in the US.


Stampin Up! Bonus Days are back!

Good news – Bonus Days are back! That means it’s time to start earning coupon codes to redeem in August! If you need a refresher on this promotion, here’s how it works: For every $50 (before shipping and tax) you spend between today and August 3, you earn a $5 USD Bonus Days coupon code that can be redeemed between August 4 and August 31. There’s no limit on how many coupon codes you can earn or redeem, but they must be redeemed by August 31. For full details, see my Promotions Page.


July 16 – 31 Host Code: FD627X9W

Use this host code when you order $50 or more and receive a free gift from me!  The free gift is your choice of any item valued up to $10.00 in the 2019 – 2020 Annual Catalog or in the 2020 Mini Catalog!  That includes some of the Host Exclusive stamp sets!

If your order is over $150, please do not use the host code since you’ll receive your own Host Dollars plus I’ll still send you the free gift!  This host code can be used by anyone, no club or commitment required.  Let me know if you have any questions.


If you need any stamping supplies, I’d be very happy to be your Demonstrator.  Just click on the Shop Now button on the right side of the screen to go directly to my online store or contact me if you have any questions.  Happy Stamping!

Thanks for stopping by and have a great week!

Akiko

  • Visit my online store here
  • See the current Stampin’ Up! clearance rack specials here
  • Earn FREE Stampin’ Up! products through my Wildflower Frequent Shopper Program – my way of saying thank you to my online frequent shopper customers.
  • Sign up for my weekly newsletter here
  • Have any questions? I’d be happy to help, click here to contact me.

Cardstock Cuts for this project:

  • Pacific Point – 4-1/4″ x 11″ card base scored at 5-1/2″, 2″ x 2″ (med snowflake die cut)
  • Thick Whisper White – 3-1/2″ x 4-3/4″ (embossed & die cut top panel), 1″ x 2-1/4″ (label)
  • Window Sheet – 2-1/2″ x 4-1/2″
  • Balmy Blue Glimmer – 1-1/4″ x 3-1/4″ (die cut snowflakes)
  • Whisper White – 4″ x 5-1/4″ (inside panel)
  • Snowflake Splendor DSP – 4″ x 5-1/4″ (card front background), 1/2″ x 4″ (inside trim)

Stampin’ Up! products used in this project:


Stampin’ Up! Perfectly Plaid for the Happy Inkin’ Thursday Blog Hop

Good Morning! Welcome to another Happy Inkin’ Thursday Blog Hop! I am continuing with the Christmas in July theme for today’s card pairing a sneak peek of the new Snowflake Splendor designer series paper from the new Aug-Dec 2020 Mini Catalog with a returning favorite, the Stampin’ Up! Perfectly Plaid Christmas tree and Pine Tree Punch from the current Annual Catalog.

We have a sketch challenge this week, and here is the sketch we are using:

I embossed a strip of Balmy Blue card stock with the new Winter Snow embossing folder (available Aug 4) and adhered it to the bottom of a panel of the beautiful Snowflake Splendor designer series paper (available Aug 4). I adhered the layered panel to a Thick Whisper White panel and wrapped it with a length of Whisper White crinkle ribbon and made a bow. I adhered the panel to the front of a Balmy Blue card base with dimensionals.

I stamped the tree from the Stampin’ Up! Perfectly Plaid photopolymer stamp set three times on a panel of Thick Whisper White card stock and punched them out with the Pine Tree Punch. I adhered them to the front of the card with dimensionals.

I added sparkle to the trees by adding the iridescent adhesive backed snowflakes to the trees and added Blue Adhesive backed gems add sparkle to the background. Both of these will be available on Aug 4.

I stamped another tree from the Stampin’ Up! Perfectly Plaid stamp set in Highland Heather ink to the bottom of a Whisper White panel. I stamped the sentiment from the stamp set in the middle of the panel in Highland Heather ink and added a strip of the Snowflake Splendor DSP to the bottom. I adhered the panel to the inside of the card.

Non-Traditional colored Christmas cards aren’t for everyone, but they can be fun and whimsical – another way to spread happiness and joy during the Christmas season!

On with the Hop! Click the Next button below to visit Karen Ksenzakovic’s blog.

And just in case you get lost along the way, here’s a list of the team members participating in the hop today:


July 16 – 31 Host Code: FD627X9W

Use this host code when you order $50 or more and receive a free gift from me!  The gift is your choice of any item valued up to $10.00 in the 2019-20 Annual Catalog or in the 2020 January-June Mini Catalog!  That includes some of the Host Exclusive stamp sets!

If your order is over $150, please do not use the host code since you’ll receive your own Host Dollars plus I’ll still send you the free gift!  This host code can be used by anyone, no commitment required.  Let me know if you have any questions.


If you need any stamping supplies, I’d be very happy to be your Demonstrator.  Just click on the Shop Now Button on the right side of the screen to go directly to my online store or contact me if you have any questions.  Happy Stamping!

Thanks for visiting!

Akiko

  • Visit my online store here
  • See the current Stampin’ Up! clearance rack specials here
  • Earn FREE Stampin’ Up! products through my Wildflower Frequent Shopper Program – my way of saying thank you to my frequent shopper online customers.
  • Sign up for my weekly newsletter here
  • Have any questions? I’d be happy to help, click here to contact me.

Cardstock Cuts for this project:

  • Balmy Blue – 5-1/2″ x 8-1/2″ card base scored at 4-1/4″, 1″ x 5-1/8″ (embossed strip)
  • Thick Whisper White – 4″ x 5-1/4″ (front mat), 2-1/2″ x 5-1/2″ (punched trees)
  • Whisper White – 4″ x 5-1/4″ (inside panel)
  • Snowflake Splendor DSP – 3-7/8″ x 5-1/8″ (front background), 1/2″ x 5-1/4″ (inside trim)

Stampin’ Up! products used in this project:


Stampin’ Up! Beautiful Autumn Card Video Tutorial

Good Morning! Today I’m sharing a note card made with the upcoming Stampin’ Up! Beautiful Autumn bundle that I made during my Facebook Live video tutorial yesterday afternoon. This is a versatile photopolymer stamp set that comes with the Autumn Punch Pack. It is in the upcoming Aug-Dec 2020 Mini Catalog and will be available on Aug 4. You can find the supplies used to create this card at the bottom of my post along with the sizes of cardstock used.

Here is the Facebook Live video showing how I made the card:

I also posted the video to my YouTube Channel and you can view it here if you prefer.

I embossed a panel of Very Vanilla card stock with the Tasteful Textile 3D embossing folder and adhered it to a gold foil mat. I adhered a panel of the gold foil accented Mint Macaron paper from the Gilded Autumn specialty designer series paper (available Aug 4) to a gold foil mat and adhered it to the layered embossed panel with liquid glue. I adhered a length of basketweave Mint Macaron ribbon (available Aug 4) to the panel with Stampin’ Seal and glue dots.

Using the small embossed starburst circle from the Tasteful Labels dies, I cut three circles from Soft Suede card stock. I used the Autumn Punch Pack from the Stampin’ Up! Beautiful Autumn bundle (available Aug 4) to punch out the gold foil leaves and acorn from a sheet of the Gilded Autumn specialty DSP (available Aug 4). I adhered the punched foil images to the Soft Suede die cuts and adhered them over the ribbon with dimensionals.

I stamped the sentiment from the Stampin’ Up! Beautiful Autumn stamp set (available Aug 4) in Versamark ink on a Very Vanilla panel. I sprinkled it with gold embossing powder and heat set until shiny. I cut it out with the stitched label die from the Tasteful Labels dies and adhered it to the card front. I added the gold metallic pearls and adhered the panel to the front of a Mint Macaron card base.

Since this is just a note card, I added a strip of the pretty Mint Macaron and gold foil DSP to the side of a Very Vanilla panel and adhered it to the inside of the card. This leaves plenty of room to write all your important thoughts!

The beautiful Gilded Autumn specialty designer series paper along with the Stampin’ Up! Beautiful Autumn bundle will be available on Aug 4 – just a few short weeks away! But if you’ve thought of becoming a Demonstrator, now is a good time because you can add these products to your $99 starter kit now. Contact me for details.


Stampin’ In The Meadows August-December 2020 Mini Catalog Product Shares

I am pleased to announce that the Stampin’ In The Meadows product shares for the new Mini Catalog is open for orders! If you would like samples of all the new products from the new August-December 2020 Mini Catalog, check it out. I am offering 6×6 samples of all the new designer series papers for $25 + $7 Priority Shipping and samples of all the new embellishments for $26 + $7 Priority Shipping. And if you want both, you can get an I WANT IT ALL share for $51 + $7 Priority Shipping.

Visit my New Catalog Product Shares Page to get the full details of what is included. Fill out the order form or drop me an email if you have questions. Please note that I can only ship to addresses in the US.


Stampin Up! Bonus Days are back!

Good news – Bonus Days are back! That means it’s time to start earning coupon codes to redeem in August! If you need a refresher on this promotion, here’s how it works: For every $50 (before shipping and tax) you spend between today and August 3, you earn a $5 USD Bonus Days coupon code that can be redeemed between August 4 and August 31. There’s no limit on how many coupon codes you can earn or redeem, but they must be redeemed by August 31. For full details, see my Promotions Page.


July 16 – 31 Host Code: FD627X9W

Use this host code when you order $50 or more and receive a free gift from me!  The free gift is your choice of any item valued up to $10.00 in the 2019 – 2020 Annual Catalog or in the 2020 Mini Catalog!  That includes some of the Host Exclusive stamp sets!

If your order is over $150, please do not use the host code since you’ll receive your own Host Dollars plus I’ll still send you the free gift!  This host code can be used by anyone, no club or commitment required.  Let me know if you have any questions.


If you need any stamping supplies, I’d be very happy to be your Demonstrator.  Just click on the Shop Now button on the right side of the screen to go directly to my online store or contact me if you have any questions.  Happy Stamping!

Thanks for stopping by and have a great week!

Akiko

  • Visit my online store here
  • See the current Stampin’ Up! clearance rack specials here
  • Earn FREE Stampin’ Up! products through my Wildflower Frequent Shopper Program – my way of saying thank you to my online frequent shopper customers.
  • Sign up for my weekly newsletter here
  • Have any questions? I’d be happy to help, click here to contact me.

Cardstock Cuts for this project:

  • Mint Macaron – 4-1/4″ x 11″ card base scored at 5-1/2″
  • Soft Suede – 1-1/2″ x 4-1/4″ (circle die cuts)
  • Gold Foil – 3-7/8″ x 5-1/8″ (embossed front background mat), 1-7/8″ x 3-1/8″ (accent panel mat)
  • Very Vanilla – 3-3/4″ x 5″ (embossed front background), 4″ x 5-1/4″ (inside panel), 1″ x 3″ (label)
  • Gilded Autumn specialty DSP – 1-3/4″ x 3″ (accent panel), 1/2″ x 5-1/4″ (inside trim), gold acorn maple leaf and oak leaf for punch outs

Stampin’ Up! products used in this project:


Stampin’ Up! Beautiful Autumn Beautiful Day Card

Good Morning! Today I have CAS clean and simple card that is a sneak peek of the Stampin’ Up! Beautiful Autumn stamp set that will be available August 4 when the new August – December 2020 Mini Catalog opens. You can find the supplies used to create this card at the bottom of my post along with the sizes of cardstock used.

I stamped the leaf cluster from the Stampin’ Up! Beautiful Autumn stamp set in Mossy Meadow ink on a small panel of Very Vanilla. On top of it, I stamped the sprig in Cinnamon Cider ink and cut out the image with the second smallest Stitched Rectangle die.

I stamped the sentiment from the Stampin’ Up! Beautiful Autumn stamp set in versamark ink on a strip of Very Vanilla and sprinkled it with gold embossing powder. I heat set the sentiment until shiny and cut out the words with my paper snips.

I embossed a panel of Very Vanilla card stock with the Tasteful Textile 3D embossing folder and adhered it to a Very Vanilla mat. I applied some Stampin’ Seal in the lower left corner where I wanted to place the stamped panel and wound some gold thread on the adhesive. I adhered the stamped and die cut panel on top with dimensionals. I adhered the gold embossed words with multipurpose liquid glue next to the stamped panel. I popped the panel on the front of a Thick Very Vanilla card base and finished the front with a gold metallic pearl.

I stamped the same design in the lower left corner of a Very Vanilla panel and adhered it to the inside of the card.

The pretty Stampin’ Up! Beautiful Autumn stamp set will be available on August 4. It is a versatile set with two-step stamps, coordinating punches and great sentiments that are suitable for any time of year!


Stampin’ In The Meadows August-December 2020 Mini Catalog Product Shares

I am pleased to announce that the Stampin’ In The Meadows product shares for the new Mini Catalog is open for orders! If you would like samples of all the new products from the new August-December 2020 Mini Catalog, check it out. I am offering 6×6 samples of all the new designer series papers for $25 + $7 Priority Shipping and samples of all the new embellishments for $26 + $7 Priority Shipping. And if you want both, you can get an I WANT IT ALL share for $51 + $7 Priority Shipping.

Visit my New Catalog Product Shares Page to get the full details of what is included. Fill out the order form or drop me an email if you have questions. Please note that I can only ship to addresses in the US.


Stampin Up! Bonus Days are back!

Good news – Bonus Days are back! That means it’s time to start earning coupon codes to redeem in August! If you need a refresher on this promotion, here’s how it works: For every $50 (before shipping and tax) you spend between today and August 3, you earn a $5 USD Bonus Days coupon code that can be redeemed between August 4 and August 31. There’s no limit on how many coupon codes you can earn or redeem, but they must be redeemed by August 31. For full details, see my Promotions Page.


July 16 – 31 Host Code: FD627X9W

Use this host code when you order $50 or more and receive a free gift from me!  The gift is your choice of any item valued up to $10.00 in the 2020-21 Annual Catalog!

If your order is over $150, please do not use the host code since you’ll receive your own Host Dollars plus I’ll still send you the free gift!  This host code can be used by anyone, no commitment required.  Let me know if you have any questions.


If you need any stamping supplies, I’d be very happy to be your Demonstrator.  Just click on the Shop Now Button on the right side of the screen to go directly to my Online store or contact me if you have any questions.  Happy Stamping!

Thanks for stopping by and have a great day!

Akiko

  • Visit my Online store here
  • See the current Stampin’ Up! clearance rack specials here
  • Earn FREE Stampin’ Up! products through my Wildflower Frequent Shopper Program – my way of saying thank you to my frequent shopper online customers.
  • Sign up for my monthly newsletter here
  • Have any questions? I’d be happy to help, click here to contact me.

Cardstock Cuts for this project:

  • Very Vanilla – 1-3/4″ x 3″ (stamped panel), 1/2″ x 3″ (label), 3-5/8″ x 4-7/8″ (embossed panel), two 4″ x 5-1/4″ (front mat and inside panel)
  • Thick Very Vanilla – 4-1/4″ x 11″ card base scored at 5-1/2″

Stampin’ Up! products used in this project: