Stampinโ€™ Up! Lovely You Just Because Note Card

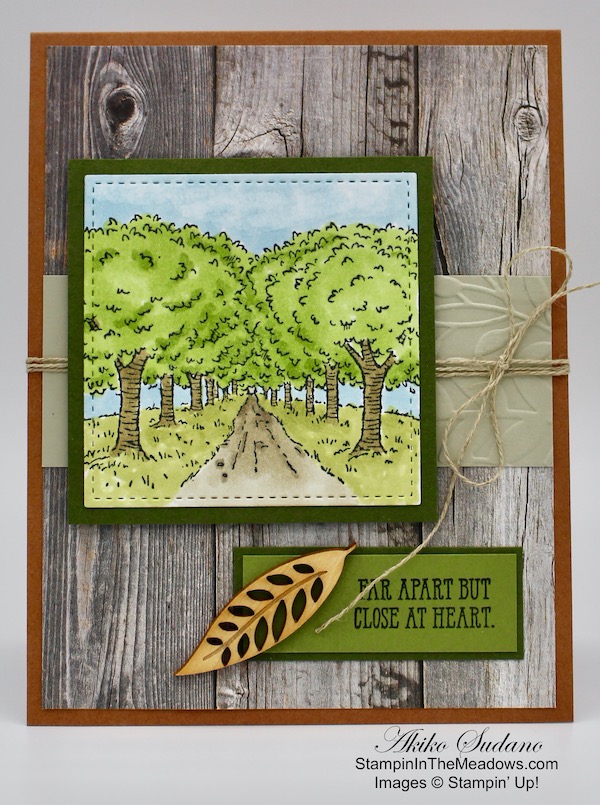
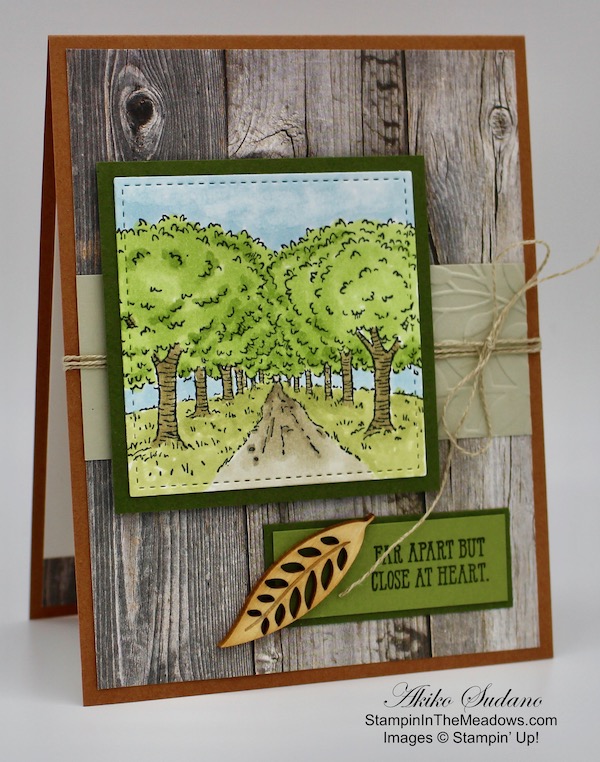
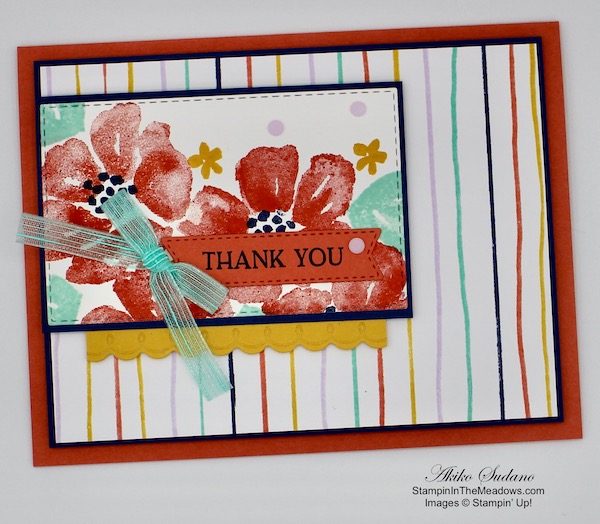
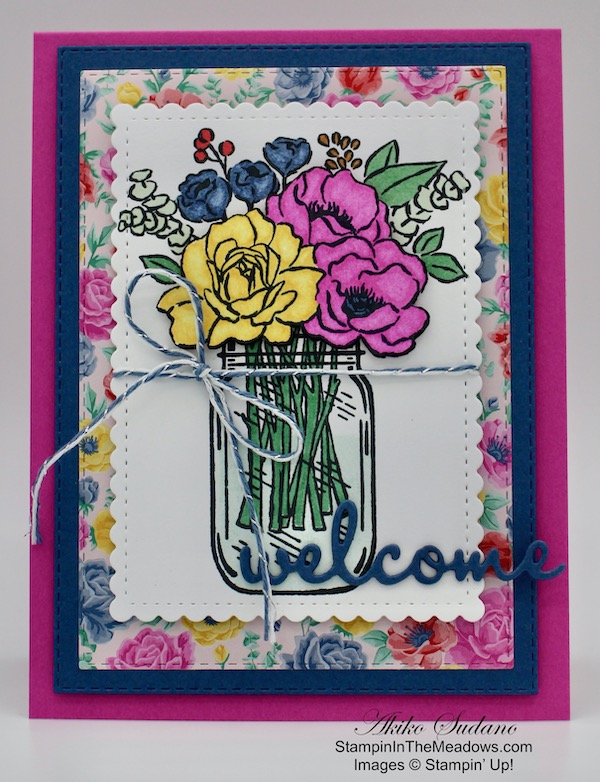
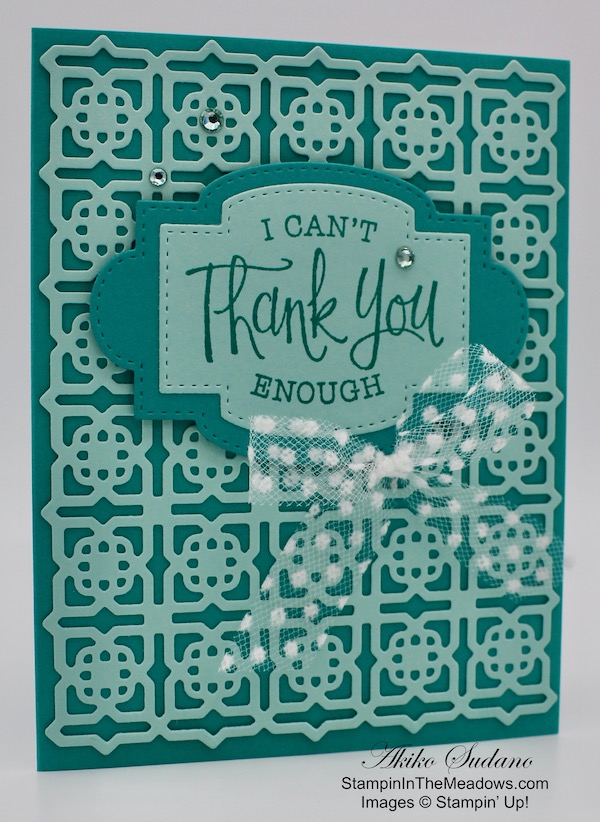
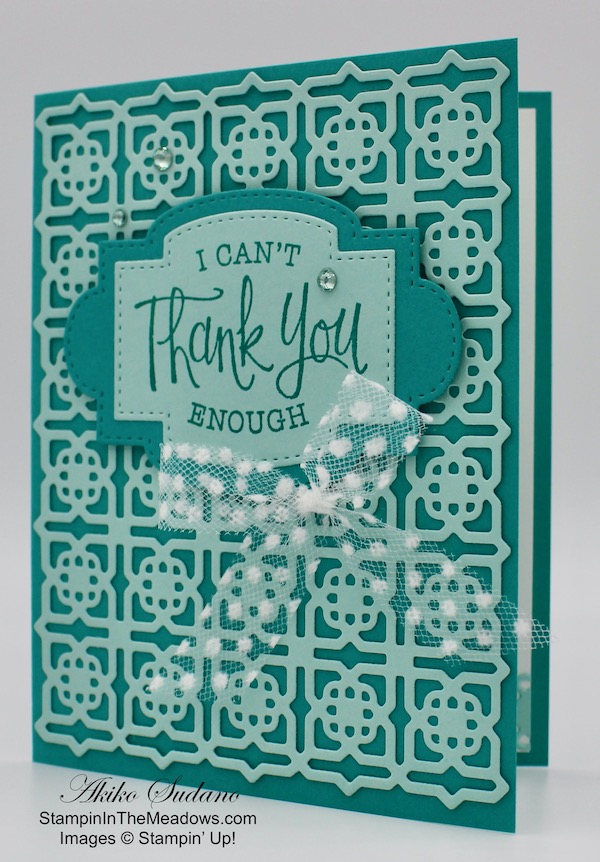
Happy Friday!! Today I’m sharing a simple Just Because card made with the fun Stampin’ Up! Lovely You stamp bundle. This bundle consists of the Stampin’ Up! Lovely You cling stamp set and the Lovely Labels Pick a Punch – and it’s available at a 10% discount! You can find all the supplies I used to create this card at the bottom of my post along with the sizes of cardstock used.

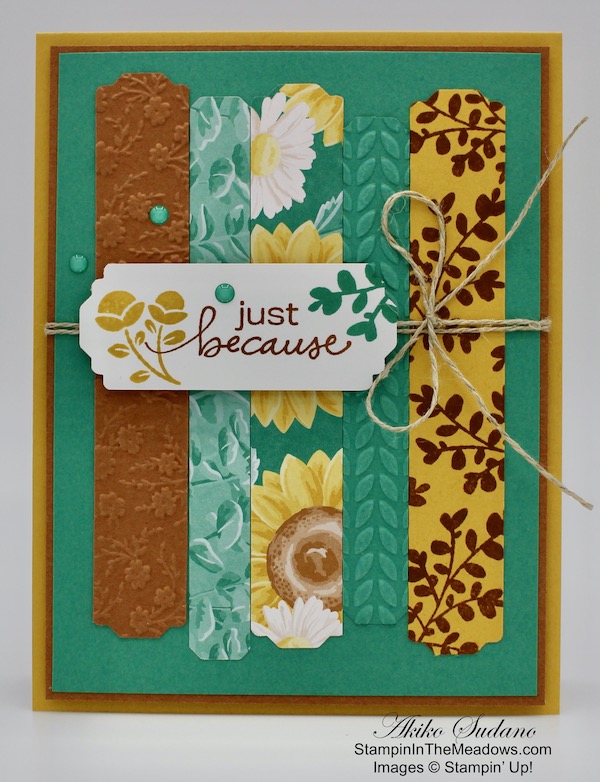
I used Stampin’ Seal to adhere a panel of Just Jade card stock to Cinnamon Cider mat. I cut strips of Bumblebee, Cinnamon Cider and Just Jade card stock. I embossed the Cinnamon cider strip with the Ornate Floral 3D embossing folder and embossed the Just Jade strip with the Greenery embossing folder. I stamped the leaf branch from the Stampin’ Up! Lovely You stamp set in Cinnamon Cider randomly on the Bumblebee strip.

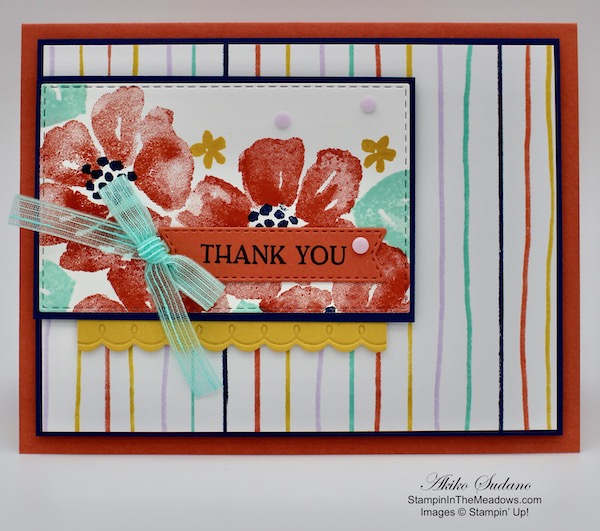
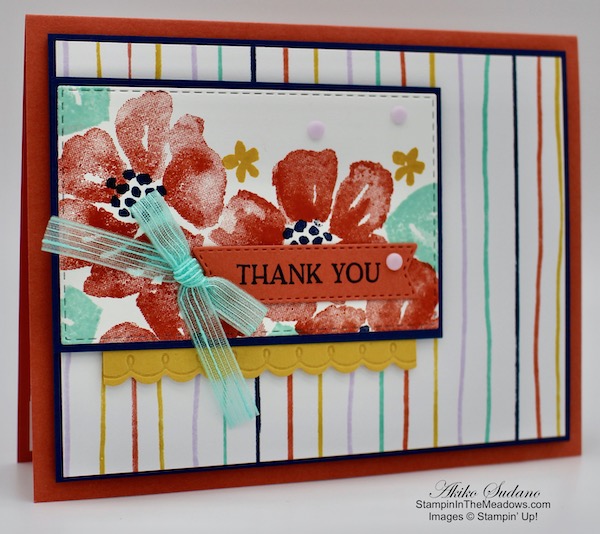
I cut strips of the Flowers for Every Season designer series paper that coordinated with the other colors I chose and I punched both ends of all the strips with the Lovely Labels Pick a Punch. I adhered the strips to the Just Jade panel, staggering the ends.

I wrapped Linen Thread around the layered panel and tied a bow on the side. I adhered the layered panel on a Bumblebee card base with dimensionals. I stamped the sentiment from the Stampin’ Up! Lovely You stamp set in Cinnamon Cider ink on a Whisper White strip. I stamped the flower in Bumblebee and the leaf branch in Just Jade. I trimmed the ends of the strip with the Lovely Labels Pick a Punch and adhered it to the card front with dimensionals. I added three Just Jade enamel dots to finish off the card front.

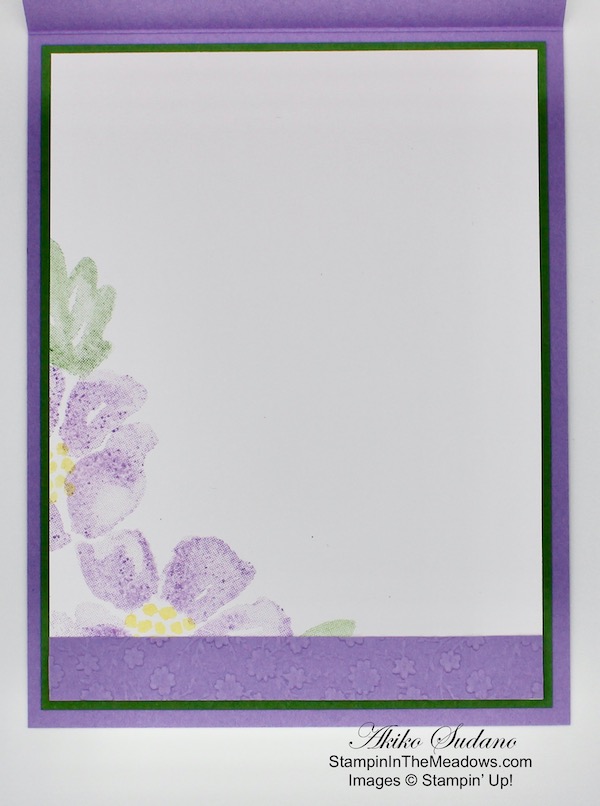
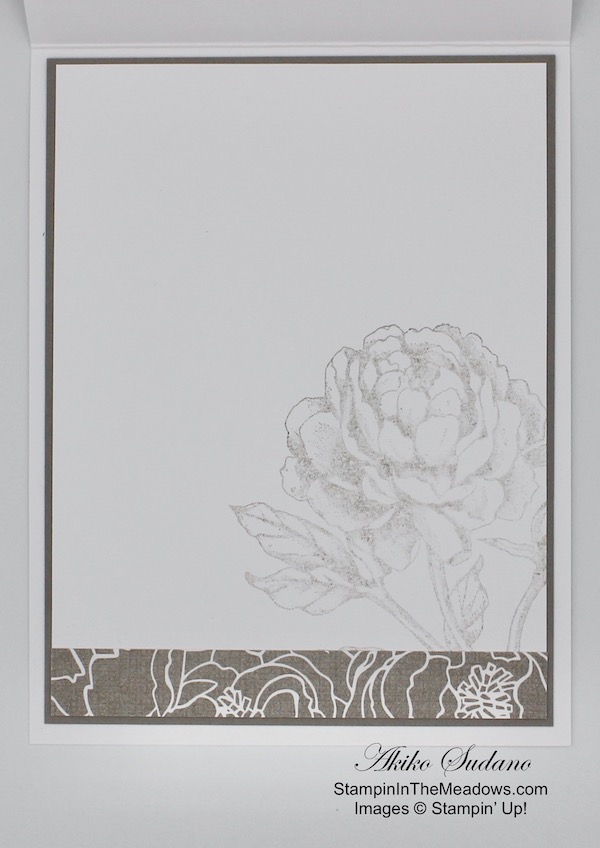
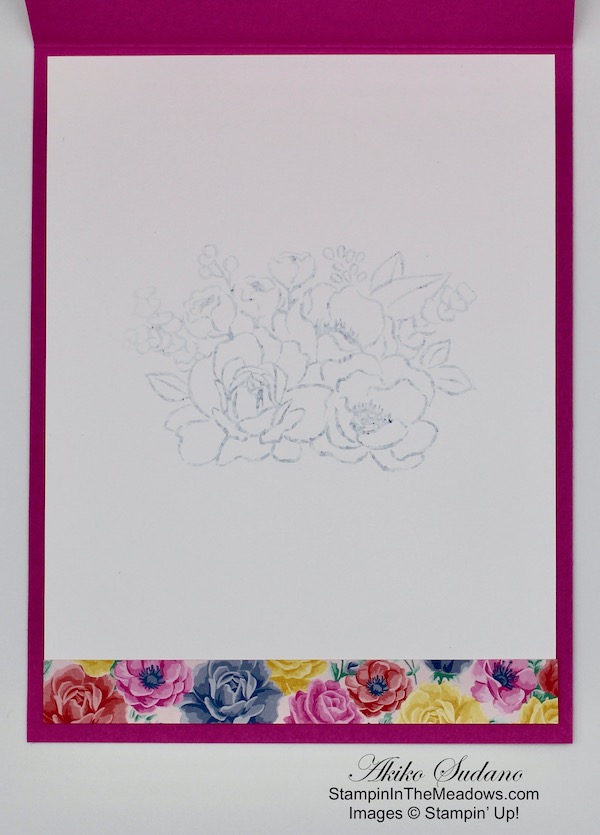
I stamped the leaf branch in Just Jade ink and the flower in Bumblebee ink on a Whisper White panel. I adhered the panel to a Just Jade mat and then to the inside of the card.

The Stampin’ Up! Lovely You bundle includes 18 cling stamps with kind-hearted messages and simple floral designs. This bundle also offers a six-in-one punch tool! Offering two designs, three widths, and any length, you can layer multiple widths of the same design for simply seamless coordination. With heartfelt greetings and dimensional pieces, the Lovely You Bundle will inspire you to create cherished, custom cards to send your friends and family.


Stampin Up! Bonus Days are back!

Good news โ€“ Bonus Days are back! That means itโ€™s time to start earning coupon codes to redeem in August! If you need a refresher on this promotion, hereโ€™s how it works: For every $50 (before shipping and tax) you spend between today and August 3, you earn a $5 USD Bonus Days coupon code that can be redeemed between August 4 and August 31. Thereโ€™s no limit on how many coupon codes you can earn or redeem, but they must be redeemed by August 31. For full details, see my Promotions Page.


Today is the Last Day to Sign Up for the July Paper Pumpkin Kit!

Celebrate the magic of summer nights with the Summer Nights Paper Pumpkin Kit! In this exclusive fun-filled kit, youโ€™ll have enough supplies to create nine postcard-style cards, coordinating envelopes, and die-cut tealight bags. Whatโ€™s even more spectacular about Julyโ€™s kit is the add-on you can purchase along with it! The Summer Nights Add-On includes 24 card bases and envelopes in coordinating Summer Nights designs. Donโ€™t miss out on the fireworks, fireflies, and fun! Complete Details are on my Promotions Page.

If youโ€™re interested in subscribing to Paper Pumpkin, you can either sign up for a subscription where you are billed monthly for your kit or you can purchase a prepaid subscription in my online store. To see more information and to sign up for the monthly subscription click here. To see the options for prepaid subscriptions in my online store, click here.

Sign up deadline for the July 2020 kit is Today! Order the Summer Nights Add-On here.


July 1-15 Host Code: DVHGBQ7V

Use this host code when you order $50 or more and receive a free gift from me!  The gift is your choice of any item valued up to $10.00 in the 2020-21 Annual Catalog!

If your order is over $150, please do not use the host code since you’ll receive your own Host Dollars plus I’ll still send you the free gift!  This host code can be used by anyone, no commitment required.  Let me know if you have any questions.


If you need any stamping supplies, Iโ€™d be very happy to be your Demonstrator.  Just click on the Shop Now Button on the right side of the screen to go directly to my Online store or contact me if you have any questions.  Happy Stamping!

Thanks for stopping by and have a great day!

Akiko

  • Visit my Online store here
  • See the current Stampinโ€™ Up! clearance rack specials here
  • Earn FREE Stampinโ€™ Up! products through my Wildflower Frequent Shopper Program – my way of saying thank you to my frequent shopper online customers.
  • Sign up for my monthly newsletter here
  • Have any questions? I’d be happy to help, click here to contact me.

Cardstock Cuts for this project:

  • Bumblebee – 4-1/4″ x 11″ card base scored at 5-1/2″, 3/4″ x 4-3/4″ (stamped strip)
  • Cinnamon Cider – 4″ x 5-1/4″ (front mat), 3/4″ x 4-3/4″ (embossed strip)
  • Just Jade – 3-7/8″ x 5-1/8″ (front background), 4″ x 5-1/4″ (inside mat), 1/2″ x 4-1/4″ (embossed strip)
  • Whisper White – 3-7/8″ x 5-1/8″ (inside panel), 1″ x 2-3/4″ (label)
  • Flowers for Every Season DSP – 1/2″ x 4-3/4″ (Just Jade leaves), 3/4″ x 4-3/4″ (sunflowers and daisies)

Stampinโ€™ Up! products used in this project:


Stampinโ€™ Up! Blossoms in Bloom Birthday Card for the Happy Inkinโ€™ Thursday Blog Hop

Good Morning! Welcome to another Happy Inkinโ€™ Thursday Blog Hop! I used the beautiful Stampin’ Up! Blossoms in Bloom photopolymer stamp set to make a birthday card to share today.

We have a sketch challenge this week, and here is the sketch we are using:

I embossed a Highland Heather card stock panel with the Ornate Floral embossing folder and adhered it to a Whisper White mat with Stampin’ Seal. I adhered the layered panel to the front of a Highland Heather card base with dimensionals.

I stamped large floral stamp from the Stampin’ Up! Blossoms in Bloom stamp using Highland Heather ink on a Whisper White panel. I stamped the dotted flower centers with Daffodil Delight ink and a few leaves in Garden Green ink. I added a couple of drops of Frost White Shimmer Paint to a Stampin’ Spritzer and added water. I shook it up and sprayed the stamped image and let it dry a bit. After it dried, I slid it in between a folded sheet of printer paper and carefully pressed it with a dry iron and then laid it under a pile of books for a couple of hours. This was to flatten the image – I’m not sure if there’s a better way to do this, but it worked ok for me. The Frost White Shimmer Paint spray gave the image a really nice shimmer that I wish you could see better. I used the third largest die from the Stitched Rectangles dies to cut the image out, and adhered it to a Garden Green mat.

I adhered the layered art piece to the card front with dimensionals. I stamped the Happy Birthday sentiment from the Stampin’ Up! Blossoms in Bloom stamp set in Highland Heather ink on a strip of Whisper White. I adhered it to a Garden Green mat and then to the card front. I finished off the card with three frosted Elegant Faceted Gems and a bow made with the gorgeous new Snowflake Splendor 1/4″ Ribbon (available August 4).

For the inside of the card, I stamped the large floral image from the Stamen’ Up! Blossoms in Bloom stamp set in Highland Heather ink (after stamping off) in the corner of a Whisper White panel. I stamped the centers in Daffodil Delight after stamping off and the leaves in Garden Green after stamping off twice. I embossed a strip of Highland Heather using the Ornate Floral embossing folder and adhered it to the bottom with Stampin’ Seal, and adhered the panel to a Garden Green mat. I adhered it to the inside of the card.

The shimmery floral image with the gems and ribbon make a nice contrast with the matte look of the embossed background and really makes the card special!

On with the Hop! Click the Next button below to visit Karen Ksenzakovic’s blog.

And just in case you get lost along the way, here’s a list of the team members participating in the hop today:


July 1-15 Host Code: DVHGBQ7V

Use this host code when you order $50 or more and receive a free gift from me!  The gift is your choice of any item valued up to $10.00 in the 2019-20 Annual Catalog or in the 2020 January-June Mini Catalog!  That includes some of the Host Exclusive stamp sets!

If your order is over $150, please do not use the host code since you’ll receive your own Host Dollars plus I’ll still send you the free gift!  This host code can be used by anyone, no commitment required.  Let me know if you have any questions.


If you need any stamping supplies, Iโ€™d be very happy to be your Demonstrator.  Just click on the Shop Now Button on the right side of the screen to go directly to my online store or contact me if you have any questions.  Happy Stamping!

Thanks for visiting!

Akiko

  • Visit my online store here
  • See the current Stampin’ Up! clearance rack specials here
  • Earn FREE Stampin’ Up! products through my Wildflower Frequent Shopper Program – my way of saying thank you to my frequent shopper online customers.
  • Sign up for my weekly newsletter here
  • Have any questions? I’d be happy to help, click here to contact me.

Cardstock Cuts for this project:

  • Highland Heather โ€“ 4-1/4โ€ณ x 11โ€ณ card base scored at 5-1/2โ€ณ, 3-7/8″ x 5-1/8″ (embossed panel), 1/2″ x 3-7/8″ (inside embossed strip)
  • Garden Green โ€“ 4″ x 5-1/4″ (inside mat), 3-1/8″ x 4-1/2″ (art panel mat), 3/8″ x 3-5/8″ (label mat)
  • Whisper White โ€“ 4โ€ณ x 5-1/4โ€ณ (front mat), 3-7/8″ x 5-1/8″ (inside panel), 3-1/4″ x 4-1/2″ (art panel), 1/2″ x 2-1/2″ (label)

Stampin’ Up! products used in this project:


Stampinโ€™ Up! Butterfly Gala Thinking of You Card

Good Morning! Today I have a thinking of you card made with the Stampin’ Up! Butterfly Gala stamp set. I wanted use this stamp set to make a card in hope of bringing back the butterflies. I haven’t seen too many of them in my yard yet – keeping my fingers crossed. You can find the supplies used to create this card at the bottom of my post along with the sizes of cardstock used.

My layout is inspired by the lovely SSC234 Going in Circles sketch by Sunday Stamps:

I adhered a panel of Forever Greenery designer series paper to Soft Sea Foam card stock with Stampin’ Seal and then to the front of a Just Jade card base with dimensionals. I stamped the sentiment from the Stampin’ Up! Butterfly Gala photopolymer stamp set using Memento Tuxedo Black ink on a strip of Soft Sea Foam card stock and used the Lovely Labels Pick a Punch to trim the ends.

I stamped 3 sets of outline butterflies from the Stampin’ Up! Butterfly Gala stamp set in Memento Tuxedo Black ink on Whisper White card stock. Many of the butterfly stamps in this set stamp two butterflies at a time – a large one and a small one. They line up perfectly with the Butterfly Duet Punch! I used the solid wing stamps to color the large and small butterfly wings using Mango Melody ink. I was impressed at how well the Mango Melody ink made them look like monarch butterflies! I punched them out using the Butterfly Duet Punch. Then I stamped the little bodies on the butterflies using Memento Tuxedo Black ink.

I arranged the large butterflies and label on the card front and adhered the label with glue dots first. Then I used more glue dots to adhere some Just Jade ribbon that I wound on the card front behind the butterflies. I adhered the butterflies with glue dots last and finished off the card front with a Bumblebee enamel dot.

I saved the small butterflies for the inside of the card. I adhered a strip of the Forever Greenery DSP to the bottom of a Whisper White panel and adhered the small butterflies with glue dots. I adhered the panel to the inside of the card with Stampin’ Seal.

In addition to hoping for butterfly sightings, I spied a ton of blooming milkweed in the meadows behind my home. This is supposed to attract monarch butterflies, so yay! Butterflies – one of the simple pleasures of summer!


Stampin Up! Bonus Days are back!

Good news โ€“ Bonus Days are back! That means itโ€™s time to start earning coupon codes to redeem in August! If you need a refresher on this promotion, hereโ€™s how it works: For every $50 (before shipping and tax) you spend between today and August 3, you earn a $5 USD Bonus Days coupon code that can be redeemed between August 4 and August 31. Thereโ€™s no limit on how many coupon codes you can earn or redeem, but they must be redeemed by August 31. For full details, see myย Promotions Page.


Just a few days left to sign up for the July Paper Pumpkin Kit!

Celebrate the magic of summer nights with the Summer Nights Paper Pumpkin Kit! In this exclusive fun-filled kit, youโ€™ll have enough supplies to create nine postcard-style cards, coordinating envelopes, and die-cut tealight bags. Whatโ€™s even more spectacular about Julyโ€™s kit is the add-on you can purchase along with it! The Summer Nights Add-On includes 24 card bases and envelopes in coordinating Summer Nights designs. Donโ€™t miss out on the fireworks, fireflies, and fun! Complete Details are on my Promotions Page.

If youโ€™re interested in subscribing to Paper Pumpkin, you can either sign up for a subscription where you are billed monthly for your kit or you can purchase a prepaid subscription in my online store. To see more information and to sign up for the monthly subscription click here. To see the options for prepaid subscriptions in my online store, click here.

Sign up deadline for the July 2020 kit is July 10, 2020. Order the Summer Nights Add-On here. Supplies may be limited toward the end of the subscription period.


July 1-15 Host Code: DVHGBQ7V

Use this host code when you order $50 or more and receive a free gift from me!  The gift is your choice of any item valued up to $10.00 in the 2020-21 Annual Catalog!

If your order is over $150, please do not use the host code since you’ll receive your own Host Dollars plus I’ll still send you the free gift!  This host code can be used by anyone, no commitment required.  Let me know if you have any questions.


If you need any stamping supplies, Iโ€™d be very happy to be your Demonstrator.  Just click on the Shop Now Button on the right side of the screen to go directly to my Online store or contact me if you have any questions.  Happy Stamping!

Thanks for stopping by and have a great day!

Akiko

  • Visit my Online store here
  • See the current Stampinโ€™ Up! clearance rack specials here
  • Earn FREE Stampinโ€™ Up! products through my Wildflower Frequent Shopper Program – my way of saying thank you to my frequent shopper online customers.
  • Sign up for my monthly newsletter here
  • Have any questions? I’d be happy to help, click here to contact me.

Cardstock Cuts for this project:

  • Just Jade – 5-1/2″ x 8-1/2″ card base scored at 4-1/4″
  • Soft Seafoam – 4″ x 5-1/4″ (front mat), 1/2″ x 3-1/2″ (label)
  • Whisper White – 4″ x 5-1/4″ (inside panel), 2-1/4″ x 6 (butterflies)
  • Forever Greenery DSP – 3-7/8″ x 5-1/8″ (front background), 1/2″ x 5-1/4″ (inside trim)

Stampinโ€™ Up! products used in this project:


Stampinโ€™ Up! Summer Days Miss You Card

Good Morning! Today I have a card made with the Stampin’ Up! Summer Days cling stamp set. This is a Host Cling stamp set that is an exclusive purchase with Host Dollars. You can find the supplies used to create this card at the bottom of my post along with the sizes of cardstock used.

I stamped the tree-lined road stamp from the Stampin’ Up! Summer Days stamp set in Memento Tuxedo Black ink on a Whisper White panel. I colored it with Stampin’ Blends – Balmy Blue, Soft Suede, Crumb Cake, Granny Apple Green, Old Olive and the Color Lifter. I cut out the image using the largest square from the Stitched Shapes Dies and adhered it to a Mossy Meadow mat.

I adhered a panel of wood grained In Good Taste designer series paper to the front of a Cinnamon Cider card base. I embossed a panel of Sahara Sand card stock with the Greenery embossing folder and adhered it to the card front. I wrapped a length of Linen Thread around the card front three times and tied a bow on the right side and popped the stamped panel on with dimensionals.

I stamped the sentiment from the Well Said cling stamp set in Memento Tuxedo Black ink on an Old Olive panel and adhered it to a Mossy Meadow mat before adhering it to the card front with Stampin’ Seal. I used glue dots to adhere the wood leaf from the In Good Taste Elements to the label.

For the inside of the card, I stamped the left side of the tree-lined road stamp from the Stampin’ Up! Summer Days stamp set in stamped off Sahara Sand ink on the lower right corner of a Whisper White panel. I adhered a strip of the In Good Taste DSP to the bottom and adhered it to the inside of the card with Stampin’ Seal.

The Stampin’ Up! Summer Days stamp set is a Host stamp set. This means that it is specially priced stamp set that can only be purchased with Stampin’ Rewards Host Dollars that are earned through hosting a party or workshop or by placing an individual qualifying order.

Interested in hosting a virtual party?  I can set up a Host Code for you and you can have your stamping friends use your host code to place their orders! Then you’ll earn Host Dollars to spend on FREE products, including the Stampin’ Up! Sumer Days stamp set. For more information, drop me an email at apsudano@stampininthemeadows.com


Stampin Up! Bonus Days are back!

Good news โ€“ Bonus Days are back! That means itโ€™s time to start earning coupon codes to redeem in August! If you need a refresher on this promotion, hereโ€™s how it works: For every $50 (before shipping and tax) you spend between today and August 3, you earn a $5 USD Bonus Days coupon code that can be redeemed between August 4 and August 31. Thereโ€™s no limit on how many coupon codes you can earn or redeem, but they must be redeemed by August 31. For full details, see my Promotions Page.


July 1-15 Host Code: DVHGBQ7V

Use this host code when you order $50 or more and receive a free gift from me!  The gift is your choice of any item valued up to $10.00 in the 2020-21 Annual Catalog!

If your order is over $150, please do not use the host code since you’ll receive your own Host Dollars plus I’ll still send you the free gift!  This host code can be used by anyone, no commitment required.  Let me know if you have any questions.


If you need any stamping supplies, Iโ€™d be very happy to be your Demonstrator.  Just click on the Shop Now Button on the right side of the screen to go directly to my Online store or contact me if you have any questions.  Happy Stamping!

Thanks for stopping by and have a great day!

Akiko

  • Visit my Online store here
  • See the current Stampinโ€™ Up! clearance rack specials here
  • Earn FREE Stampinโ€™ Up! products through my Wildflower Frequent Shopper Program – my way of saying thank you to my frequent shopper online customers.
  • Sign up for my monthly newsletter here
  • Have any questions? I’d be happy to help, click here to contact me.

Cardstock Cuts for this project:

  • Cinnamon Cider – 4-1/4″ x 11″ card base scored at 5-1/2″
  • Mossy Meadow – 2-7/8″ x 2-7/8″ (art piece mat), 7/8″ x 2-1/4″ (label mat)
  • Old Olive – 3/4″ x 2-1/8″ (label)
  • Sahara Sand – 1-1/2″ x 4″ (embossed strip)
  • Whisper White – 4″ x 5-1/4″ (inside panel), 3-1/4″ x 4-1/4″ (art piece)
  • In Good Taste DSP – 4″ x 5-1/4″ (front background), 1/2″ x 4″ (inside trim)

Stampinโ€™ Up! products used in this project:


Stampinโ€™ Up! Blossoms in Bloom Thank You Card Video Tutorial

Good Morning! Today I’m sharing a Thank You card made with the Stampin’ Up! Blossoms in Bloom stamp set that I made during my Facebook Live video tutorial Saturday afternoon. I made a colorful modern style card with the fabulous floral stamp set and I used the fun Playing with Patterns designer series paper. You can find the supplies used to create this card at the bottom of my post along with the sizes of cardstock used.

Here is the Facebook Live video showing how I made the card:

I also posted the video to my YouTube Channel and you can view it here if you prefer.

My card sketch was inspired by this week’s sketch at Fab Friday, FabFri193

I started by stamping the large flower arrangement from the Stampin’ Up! Blossoms in Bloom stamp set on a panel of Whisper White card stock using Calypso Coral ink. I stamped the flower centers in Night of Navy ink, the leaves in Calypso Coral and the small flowers in Crushed Curry. I cut it out with one of the Stitched Rectangles Dies. I stamped the Thank You sentiment in Night of Navy ink on a strip of Calypso Coral card stock and cut it out with a Tasteful Label die. I cut a strip of Crushed Curry card stock with the pretty scalloped border die from the Peony Dies.

I adhered a colorful striped panel of Playing With Patterns designer series paper to a Night of Navy Mat and adhered it to the front of a Calypso Coral card base. I used Stampin’ Seal to adhere the stamped floral panel to a Night of Navy mat. I adhered the pretty Crushed Curry scalloped die cut border behind the bottom of the panel and adhered it to the front of the card.

I adhered the label to the floral panel with glue dots. I finished off the card with Purple Posy Resin Dots and a Calypso coral bow.

For the inside, I stamped a portion of the large flower arrangement in stamped off Calypso Coral ink on a Whisper White panel. Then I stamped some leaves in Crushed Curry, flower centers in Night of Navy and an additional Crushed Curry small flower. I adhered a strip of Playing with Patterns DSP to the bottom of the panel and adhered it to the inside of the card. I think I stamped it a little low and then got nervous because I was stamping live and didn’t get a clean stamp of the flower center. In hind sight, I should have checked out how it looked with the border strip and seeing that it was too low, I wish I had flipped and stamped the opposite corner with more of the flowers showing. Now I know better for next time…

The Stampin’ Up! Blossoms in Bloom stamp set has really pretty flowers and with the Distinktiveโ„ข style, you get many shades of ink when you stamp, so that it resembles a watercolor painting. Today’s card shows it’s versatility, because I just used a tiny portion of the large stamp, and it looks great. And I didn’t even use the fabulous dies!


Stampin Up! Bonus Days are back!

Good news โ€“ Bonus Days are back! That means itโ€™s time to start earning coupon codes to redeem in August! If you need a refresher on this promotion, hereโ€™s how it works: For every $50 (before shipping and tax) you spend between today and August 3, you earn a $5 USD Bonus Days coupon code that can be redeemed between August 4 and August 31. Thereโ€™s no limit on how many coupon codes you can earn or redeem, but they must be redeemed by August 31. For full details, see my Promotions Page.


July 1-15 Host Code: DVHGBQ7V

Use this host code when you order $50 or more and receive a free gift from me!  The free gift is your choice of any item valued up to $10.00 in the 2019 – 2020 Annual Catalog or in the 2020 Mini Catalog!  That includes some of the Host Exclusive stamp sets!

If your order is over $150, please do not use the host code since you’ll receive your own Host Dollars plus I’ll still send you the free gift!  This host code can be used by anyone, no club or commitment required.  Let me know if you have any questions.


If you need any stamping supplies, Iโ€™d be very happy to be your Demonstrator.  Just click on the Shop Now button on the right side of the screen to go directly to my online store or contact me if you have any questions.  Happy Stamping!

Thanks for stopping by and have a great week!

Akiko

  • Visit my online store here
  • See the current Stampinโ€™ Up! clearance rack specials here
  • Earn FREE Stampinโ€™ Up! products through my Wildflower Frequent Shopper Program – my way of saying thank you to my online frequent shopper customers.
  • Sign up for my weekly newsletter here
  • Have any questions? I’d be happy to help, click here to contact me.

Cardstock Cuts for this project:

  • Calypso Coral โ€“ 5-1/2″ x 8-1/2″ card base scored at 4-1/4″, 1″ x 3″ (label)
  • Crushed Curry – 1″ x 3″ (trim)
  • Night of Navy – 2-3/8″ x 3-11/16″ (art piece mat), 3-7/8″ x 5-1/8″ (front background mat)
  • Whisper White – 4″ x 5-1/4″ (inside panel), 2-1/2″ x 3-3/4″ (art piece)
  • Playing with Patterns DSP – 3-3/4″ x 5″ (front background), 1/2″ x 5-1/4″ (inside trim)

Stampinโ€™ Up! products used in this project:


Stampinโ€™ Up! Stitched Stars Celebrate Card

Good Morning and Happy 4th of July!! I have wanted to make a patriotic card with the Stampin’ Up! Stitched Stars dies since the die set came out last year, and today is the day!! You can find the supplies used to create this card at the bottom of my post along with the sizes of cardstock used.

I used Stampin’ Seal to adhere a panel of Playful Pets designer series paper to a Real Red card stock mat. I wrapped length of Real Red satin ribbon around the panel and secured it the back withI Stampin’ Seal.

I stamped a strip of Whisper White card stock with the celebrate sentiment from the Celebrate Sunflowers cling stamp set using Pacific Point ink. I trimmed the ends with the Lovely Labels Pick a Punch. I also punched then ends of a Real Red strip and adhered the label to it. Then I used glue dots to adhere the label to the card over the ribbon.

I cut out the stars with the Stampin’ Up! Stitched Stars dies. I adhered the Pacific Point cut-out star to the large Pacific Point stitched star and a Whisper White star to the large Real Red star to add some texture. I added rhinestones to the centers of all the stars and adhered them to the card front with liquid glue and dimensionals.

I adhered a strip of Playful Pets DSP to the side of a Whisper White panel and adhered the panel to the inside of the card. I finished off the inside by adhering three additional stars to the upper corner.

Please join me tomorrow at 1:00 ET on my Business Facebook Page for my weekly Facebook Live card making video.

I hope you have a fun and safe 4th of July!


Stampin Up! Bonus Days are back!

Good news โ€“ Bonus Days are back! That means itโ€™s time to start earning coupon codes to redeem in August! If you need a refresher on this promotion, hereโ€™s how it works: For every $50 (before shipping and tax) you spend between today and August 3, you earn a $5 USD Bonus Days coupon code that can be redeemed between August 4 and August 31. Thereโ€™s no limit on how many coupon codes you can earn or redeem, but they must be redeemed by August 31. For full details, see my Promotions Page.


July 1-15 Host Code: DVHGBQ7V

Use this host code when you order $50 or more and receive a free gift from me!  The gift is your choice of any item valued up to $10.00 in the 2020-21 Annual Catalog!

If your order is over $150, please do not use the host code since you’ll receive your own Host Dollars plus I’ll still send you the free gift!  This host code can be used by anyone, no commitment required.  Let me know if you have any questions.


If you need any stamping supplies, Iโ€™d be very happy to be your Demonstrator.  Just click on the Shop Now Button on the right side of the screen to go directly to my Online store or contact me if you have any questions.  Happy Stamping!

Thanks for stopping by and have a great day!

Akiko

  • Visit my Online store here
  • See the current Stampinโ€™ Up! clearance rack specials here
  • Earn FREE Stampinโ€™ Up! products through my Wildflower Frequent Shopper Program – my way of saying thank you to my frequent shopper online customers.
  • Sign up for my monthly newsletter here
  • Have any questions? I’d be happy to help, click here to contact me.

Cardstock Cuts for this project:

  • Pacific Point – 4-1/4″ x 11″ card base scored at 5-1/2″, 4-1/4″ x 3-1/2″ (die cut stars)
  • Real Red – 4″ x 5-1/4″ (front mat), 1-1/2″ x 4″ (die cut stars), 3/4″ x 2-7/8″ (label mat)
  • Whisper White – 4″ x 5-1/4″ (inside panel), 5/8″ x 2-1/2″ (label), 1″ x 1″ (die cut star)
  • DSP – 3-3/4″ x 5″ (front background), 1/2″ x 5-1/4″ (inside trim)

Stampinโ€™ Up! products used in this project:


Stampinโ€™ Up! Prized Peony Sympathy Card

Good Morning! Today I am sharing a sympathy card made with the beautiful Stampin’ Up! Prized Peony bundle. I paired it with gorgeous Peony Garden designer series paper to make a simple and elegant sympathy card. You can find the supplies used to create this card at the bottom of my post along with the sizes of cardstock used.

Using Stampin’ Seal, I adhered a panel of Peony Garden designer series paper to the front of a Thick Whisper White card base. I cut a stitched rectangle frame with the 3rd and 4th largest Stitched Rectangle dies using Whisper White card stock.

I stamped the large peony flower from the Stampin’ Up! Prized Peony cling stamp set in Gray Granite ink on Whisper White card stock and cut it out with the coordinating die. I adhered the peony to the frame with dots of multipurpose liquid glue and popped the peony and frame on the card front with dimensionals.

I stamped the sentiment from the Stampin’ Up! Prized Peony stamp set in Versamark ink on Gray Granite card stock. I sprinkled it with white embossing powder and heat set until shiny. I cut it out with the small die from the Tasteful Labels die and adhered it to the frame with liquid glue. I adhered a bow made with Gray Granite shimmer ribbon using glue dots and finished the card with three pink Elegant Faceted Gems.

I stamped the large peony flower from the Stampin’ Up! Prized Peony stamp set in the corner of a Whisper White panel using Gray Granite ink after stamping off twice. I added a strip of the Peony Garden DSP to the bottom and adhered it to a Gray Granite mat and then to the inside of the card.

Sympathy cards are difficult, but the muted colors in the Peony Garden designer series paper makes an elegant card for solemn occasions.


Stampin Up! Bonus Days are back!

Good news โ€“ Bonus Days are back! That means itโ€™s time to start earning coupon codes to redeem in August! If you need a refresher on this promotion, hereโ€™s how it works: For every $50 (before shipping and tax) you spend between today and August 3, you earn a $5 USD Bonus Days coupon code that can be redeemed between August 4 and August 31. Thereโ€™s no limit on how many coupon codes you can earn or redeem, but they must be redeemed by August 31. For full details, see my Promotions Page.


July 1-15 Host Code: DVHGBQ7V

Use this host code when you order $50 or more and receive a free gift from me!  The gift is your choice of any item valued up to $10.00 in the 2020-21 Annual Catalog!

If your order is over $150, please do not use the host code since you’ll receive your own Host Dollars plus I’ll still send you the free gift!  This host code can be used by anyone, no commitment required.  Let me know if you have any questions.


If you need any stamping supplies, Iโ€™d be very happy to be your Demonstrator.  Just click on the Shop Now Button on the right side of the screen to go directly to my Online store or contact me if you have any questions.  Happy Stamping!

Thanks for stopping by and have a great day!

Akiko

  • Visit my Online store here
  • See the current Stampinโ€™ Up! clearance rack specials here
  • Earn FREE Stampinโ€™ Up! products through my Wildflower Frequent Shopper Program – my way of saying thank you to my frequent shopper online customers.
  • Sign up for my monthly newsletter here
  • Have any questions? I’d be happy to help, click here to contact me.

Cardstock Cuts for this project:

  • Thick Whisper White – 4-1/4″ x 11″ card base scored at 5-1/2″
  • Gray Granite – 4″ x 5-1/4″ (inside mat), 1-1/2″ x 1-1/2″ (label)
  • Whisper White – 3-7/8″” x 5-1/8″ (inside panel), 3″ x 4-1/2″ (frame), 3-1/2″ x 4″ (die cut peony)
  • DSP – 4″ x 5-1/4″ (front background), 1/2″ x 3-7/8″ (inside trim)

Stampinโ€™ Up! products used in this project:


Stampin’ Up! Bonus Days are Back!

Yay!! Do you remember the Bonus Days promotion from last year? Well it’s back!! Here’s how it goes – for every $50 you spend (before shipping and tax) by August 3, you earn a $5 coupon code to spend between August 4 – August 31!

Here are the details:

  • An email address is required to participate; Bonus Days coupon codes can be delivered only via email.
  • If a participant earns multiple codes from a single order, they will receive one email with multiple codes. If they earn multiple codes from multiple orders, they will receive separate emails for each code earned.
  • All order types qualify for this promotion. Fax and email orders still require an email address.
  • Orders that are started before the promotion begins will not go toward earning coupon codes.
  • There is no limit to the number of coupon codes participants can earn per order or throughout the duration of the Bonus Days earning period. 

Click here to head over to my Online Store to start earning those Bonus Days Coupons now. If you have questions, click on the image below for answers to some common questions or drop me an email me at apsudano@stampininthemeadows.com  

Have fun shopping!


Stampin’ In The Meadows July Online Class is now available

Did you know that when you place your $50 or more Stampin’ Up! order with me as your demonstrator, I will send you thank you gifts? First, you get to choose an item from the new catalog valued up to $10. Second, I will send you a link to download my Online Class Tutorial. This tutorial is a PDF file containing detailed instructions to create 4-5 projects centered around a current bundle. And the bundle changes every month!! This month, I am featuring the cute Whale Done bundle. Here’s a sneak peek at the projects:

Be sure to add my current Host Code to your orders. For complete details on all my customer reward programs, check out my Customer Rewards Page. Let me know if you have any questions.


The July Paper Pumpkin Kit Celebrates Magical Summer Nights!

Celebrate the magic of summer nights with the Summer Nights Paper Pumpkin Kit! In this exclusive fun-filled kit, youโ€™ll have enough supplies to create nine postcard-style cards, coordinating envelopes, and die-cut tealight bags. Whatโ€™s even more spectacular about Julyโ€™s kit is the add-on you can purchase along with it! The Summer Nights Add-On includes 24 card bases and envelopes in coordinating Summer Nights designs. Donโ€™t miss out on the fireworks, fireflies, and fun! Complete Details are on my Promotions Page.

If youโ€™re interested in subscribing to Paper Pumpkin, you can either sign up for a subscription where you are billed monthly for your kit or you can purchase a prepaid subscription in my online store. To see more information and to sign up for the monthly subscription click here. To see the options for prepaid subscriptions in my online store, click here.

Sign up deadline for the July 2020 kit is July 10, 2020. Order the Summer Nights Add-On here. Supplies may be limited toward the end of the subscription period.


July 1 – 15 Host Code: DVHGBQ7V

Use this host code when you order $50 or more and receive a free gift from me!  The gift is your choice of any item valued up to $10.00 in the 2020-21 Annual Catalog!

If your order is over $150, please do not use the host code since you’ll receive your own Host Dollars plus I’ll still send you the free gift!  This host code can be used by anyone, no commitment required.  Let me know if you have any questions.


If you need any stamping supplies, Iโ€™d be very happy to be your Demonstrator.  Just click on the Shop Now Button on the right side of the screen to go directly to my Online Store or contact me if you have any questions.  Happy Stamping!

Thanks for stopping by and have a great day!

Akiko

  • Visit my online store here
  • See the current Stampinโ€™ Up! clearance rack specials here
  • Earn FREE Stampinโ€™ Up! products through my Wildflower Frequent Shopper Program – my way of saying thank you to my frequent shopper online customers.
  • Sign up for my newsletter here
  • Have any questions? I’d be happy to help, click here to contact me.

Stampinโ€™ Up! Jar of Flowers for the Happy Inkinโ€™ Thursday Blog Hop

Good Morning! Welcome to another Happy Inkinโ€™ Thursday Blog Hop! I decided to use the Stampin’ Up! Jar of Flowers stamp set and the new Flowers for Every Season designer series paper to make today’s card. My layout was inspired by a similar card by one of my teammates Leslie Larkin, but her card is a unique fun fold card, so be sure to check it out here after you finish the hop.

We have a color challenge this week, and here is the color palette we are using:

Isn’t it great to use the new 2020-2022 In Colors? I used them all starting with a Magenta Madness card base. I cut a panel of the pretty Flowers for Every Season designer series paper with a Stitched Rectangle Die and adhered it to a Misty Moonlight panel cut out with the next largest die. I popped the layered panels on the card base with dimensionals.

I used the largest scalloped rectangle from the Stitched So Sweetly dies to cut out a Whisper White Panel. I stamped the flowers from the Stampin’ Up! Jar of Flowers photopolymer stamp set at the top of the panel in Memento Tuxedo Black ink. I covered them with a mask and stamped the jar below. I stamped the water using the back of the half jar stamp in Pool Party ink stamped off once. Then I stamped the stems in the jar and colored the arrangement with Magenta Madness, Mango Melody, Misty Moonlight, Just Jade, Cinnamon Cider, Soft Sea Foam, Poppy Parade and the Color Lifter Stampin’ Blends. I stamped the flowers on another Whisper White Panel and colored them with Mango Melody, Magenta Madness, Misty Moonlight and the Color Lifter Stampin’ Blends. I fussy cut the flowers with my paper snips and popped it on top of the arrangement.

I wrapped some Misty Moonlight, silver and Whisper White Twine around the scalloped panel and made a bow. I used the Welcome die from the Well Written dies to cut out the welcome word 3 times using Misty Moonlight card stock. I adhered them together with the Fine-Tip Glue pen and adhered it to the scalloped panel. I popped the floral panel on the card front with dimensionals.

I stamped the flowers again in the middle of a Whisper White panel using Misty Moonlight ink after stamping off 4 times. I trimmed the bottom of the panel with a strip of the Flowers for Every Season DSP and adhered it to the inside of the card with Stampin’ Seal.

The Flowers for Every Season DSP is so pretty and colorful – it makes it easy to create beautiful cards.

On with the Hop! Click the Next Button below to visit Karen Ksenzakovic’s blog.

And just in case you get lost along the way, here’s a list of the team members participating in the hop today:


June 15 โ€“ 30 Host Code: HMXBV3WG

Use this host code when you order $50 or more and receive a free gift from me!  The gift is your choice of any item valued up to $10.00 in the 2019-20 Annual Catalog or in the 2020 January-June Mini Catalog!  That includes some of the Host Exclusive stamp sets!

If your order is over $150, please do not use the host code since you’ll receive your own Host Dollars plus I’ll still send you the free gift!  This host code can be used by anyone, no commitment required.  Let me know if you have any questions.


If you need any stamping supplies, Iโ€™d be very happy to be your Demonstrator.  Just click on the Shop Now Button on the right side of the screen to go directly to my online store or contact me if you have any questions.  Happy Stamping!

Thanks for visiting!

Akiko

  • Visit my online store here
  • See the current Stampin’ Up! clearance rack specials here
  • Earn FREE Stampin’ Up! products through my Wildflower Frequent Shopper Program – my way of saying thank you to my frequent shopper online customers.
  • Sign up for my weekly newsletter here
  • Have any questions? I’d be happy to help, click here to contact me.

Cardstock Cuts for this project:

  • Magenta Madness โ€“ 4-1/4โ€ณ x 11โ€ณ card base scored at 5-1/2โ€ณ
  • Misty Moonlight – 4-1/2″ x 5-1/2″ (die cut front background), 2-1/2″ x 3″ (die cut welcome word)
  • Whisper White โ€“ 4โ€ณ x 5-1/4โ€ณ (inside panel), 3-1/2โ€ณ x 4-3/4โ€ณ (scalloped flower panel), 2-1/2″ x 3-1/2″ (fussy cut flowers)
  • Flowers for Every Season DSP – 3-3/4″ x 5″ (die cut front background), 1/2″ x 4″ (inside trim)

Stampin’ Up! products used in this project:


Stampinโ€™ Up! So Sentimental with Many Medallions Thank You

Good Morning! Today I have fun Thank You card made with the Stampin’ So Sentimental bundle along with the Many Medallions dies. The Stampin’ Up! So Sentimental stamp set is bundled with the Stitched So Sweetly dies and was introduced in the January Mini Catalog. But Yay for us!! -because the set is still bundled in the new 2020-2021 Annual Catalog with the 10% discount! You can find the supplies used to create this card at the bottom of my post along with the sizes of cardstock used.

I cut the large medallion die from the Many Medallions dies using Pool Party card stock and adhered it to the front of a Bermuda Bay card base with multipurpose liquid glue.

I stamped the sentiment from the Stampin’ Up! So Sentimental cling stamp set in Bermuda Bay ink on a Pool Party Panel and cut it out with the Stitched So Sweetly die. I cut the larger die from the Stitched So Sweetly dies using Bermuda Bay card stock and adhered the Pool Party Label to it. I popped it on the card front with dimensionals.

I made a bow with the Polka Dot Tulle ribbon and adhered it with a glue dot. I finished the card front off with three Pool Party Rhinestones.

I cut another medallion strip from Pool Party card stock using the Many Medallions dies. I adhered it to the bottom of a Whisper White panel and then to the inside of the card with multipurpose liquid glue.

This was a quick and simple thank you card but it looks really fancy! Its because the Many Medallions dies steps up the design – and it goes really well with the angles and curves in the Stitched So Sweetly label.


Stampin Up! Bonus Days begins Today!

Good news – Bonus Days are back! That means itโ€™s time to start earning coupon codes to redeem in August! If you need a refresher on this promotion, hereโ€™s how it works: For every $50 (before shipping and tax) you spend between today and August 3, you earn a $5 USD Bonus Days coupon code that can be redeemed between August 4 and August 31. There’s no limit on how many coupon codes you can earn or redeem, but they must be redeemed by August 31!


July 1-15 Host Code: DVHGBQ7V

Use this host code when you order $50 or more and receive a free gift from me!  The gift is your choice of any item valued up to $10.00 in the 2020-21 Annual Catalog!

If your order is over $150, please do not use the host code since you’ll receive your own Host Dollars plus I’ll still send you the free gift!  This host code can be used by anyone, no commitment required.  Let me know if you have any questions.


If you need any stamping supplies, Iโ€™d be very happy to be your Demonstrator.  Just click on the Shop Now Button on the right side of the screen to go directly to my Online store or contact me if you have any questions.  Happy Stamping!

Thanks for stopping by and have a great day!

Akiko

  • Visit my Online store here
  • See the current Stampinโ€™ Up! clearance rack specials here
  • Earn FREE Stampinโ€™ Up! products through my Wildflower Frequent Shopper Program – my way of saying thank you to my frequent shopper online customers.
  • Sign up for my monthly newsletter here
  • Have any questions? I’d be happy to help, click here to contact me.

Cardstock Cuts for this project:

  • Bermuda Bay – 5-1/2″ x 8-1/2″ card base scored at 4-1/4″, 2-3/4″ x 3-3/4″ (label)
  • Pool Party – 4-1/4″ x 5-1/2″ (die cut medallions background), 2-1/2″ x 3″ (label), 1″ x 4″ (inside die cut detail)
  • Whisper White – 4″ x 5-1/4″ (inside panel)

Stampinโ€™ Up! products used in this project: