Stampin’ Up! Floral Essence Beautiful Day Card

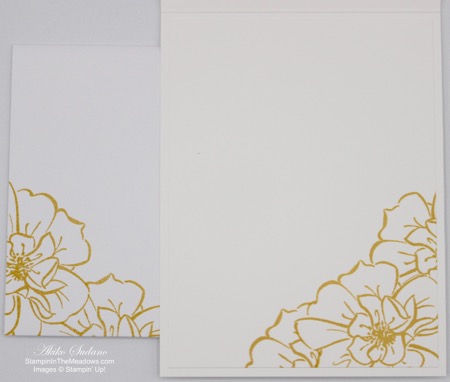
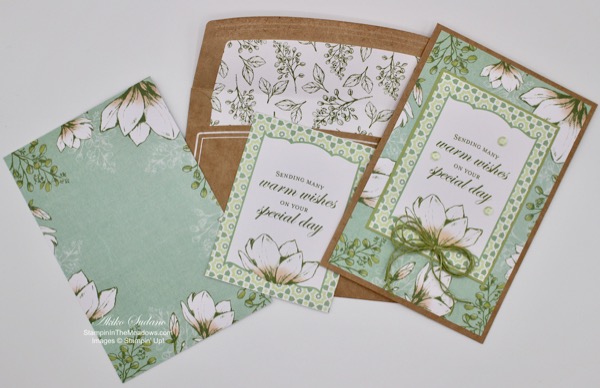
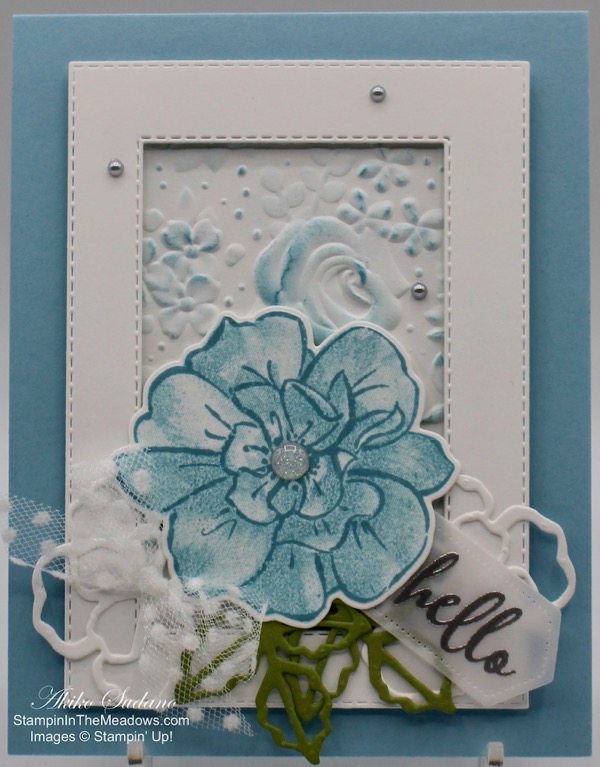
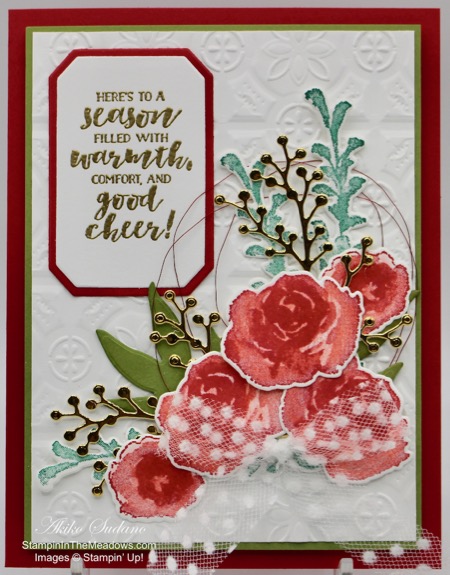
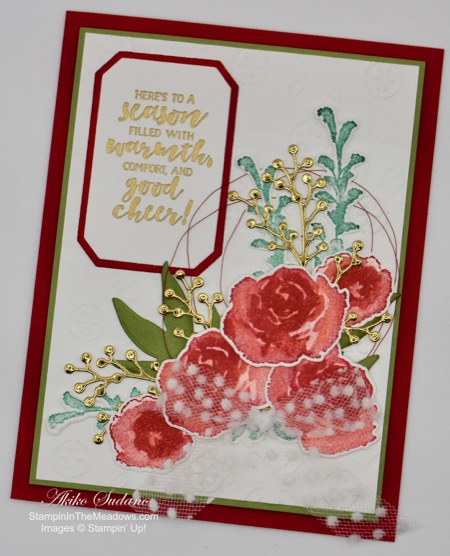
Good Friday Morning! Today’s card uses the beautiful Stampin’ Up! Floral Essence photopolymer stamp set to make a special card for someone special. I paired it with the Perennial Essence Designer Series Paper or DSP for a rich, elegant look. You can find the supplies used to create this card at the bottom of my post along with the sizes of cardstock used.

I started by cutting a panel of the beautiful Perennial Essence DSP and adhering it to a Whisper White mat before attaching it to a Pretty Peacock Card Base. I took a piece of Whisper White and ran it through the stitched Lace dies, first the large panel, and then the smaller trim dies on either side so that I ended up with a faux lace ribbon that I attached to the DSP.

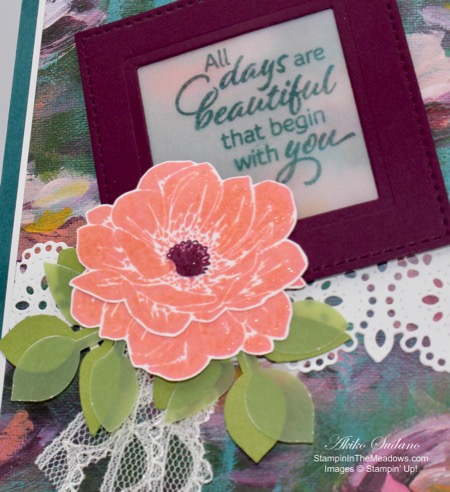
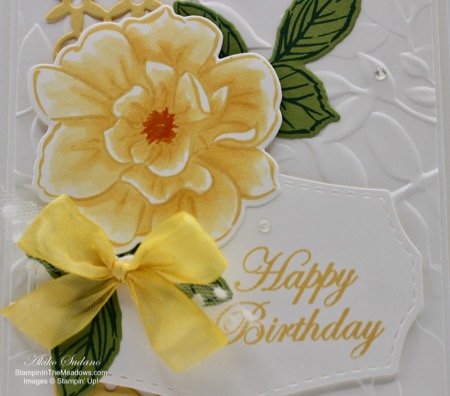
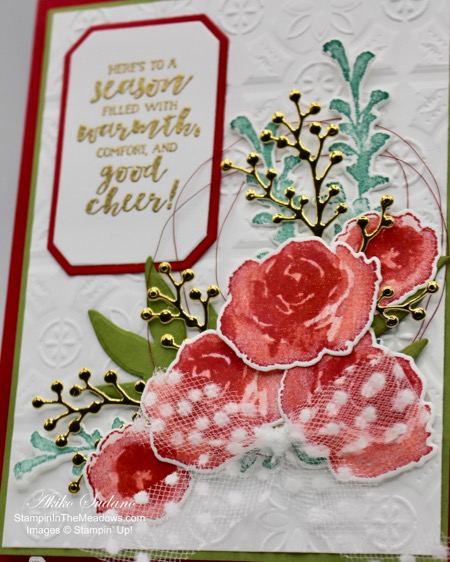
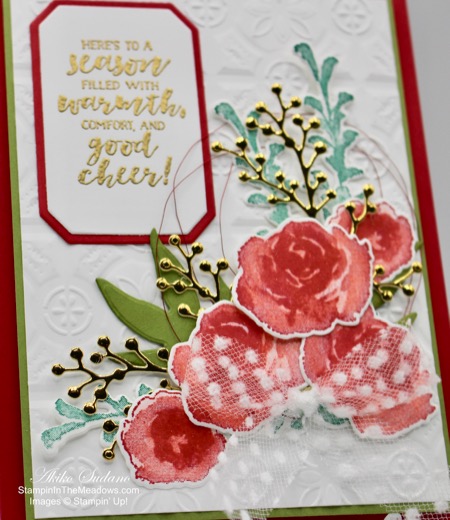
I then die cut a Blackberry Bliss frame using the largest square from the Stitched Shapes dies and the third smallest Layering Squares die. I took a piece of vellum cardstock and stamped the sentiment from the Stampin’ Up Floral Essence photopolymer stamp set in Pretty Peacock. I waited for it to dry and then attached the vellum to the back of the frame and attached the frame to the card with mini dimensionals. The vellum is nice because you can kind of see the DSP behind it.

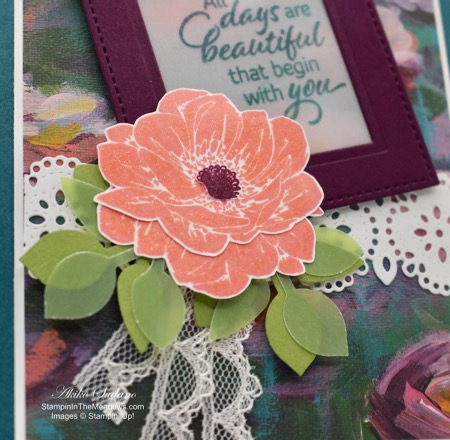
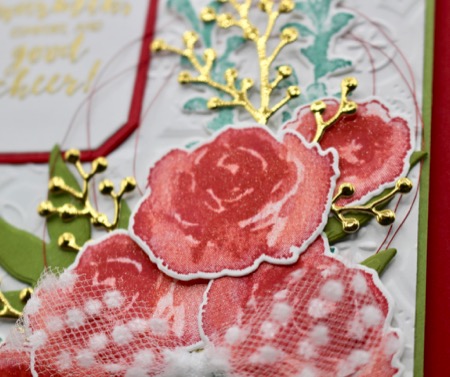
I then stamped two of the large solid flowers in Flirty Flamingo on Whisper White. I fussy cut them and turned the bottom one upside down before attaching it to the top one with multipurpose liquid glue. This makes the flower larger and I’m surprised at how good it looks. I stamped the coordinating center in Blackberry Bliss on Whisper White and adhered it to the flower center.

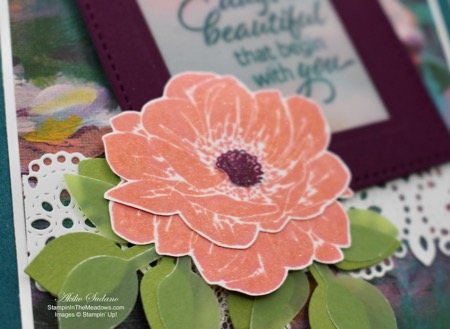
I used the leaf punch and punched two leaf clusters from Old Olive cardstock and two leaf clusters from Old Olive vellum cardstock. I arranged the leaves behind the flower with three strips of Very Vanilla scalloped lace trim and adhered it to the card. I finished off the flower with some Wink of Stella to add some sparkle.

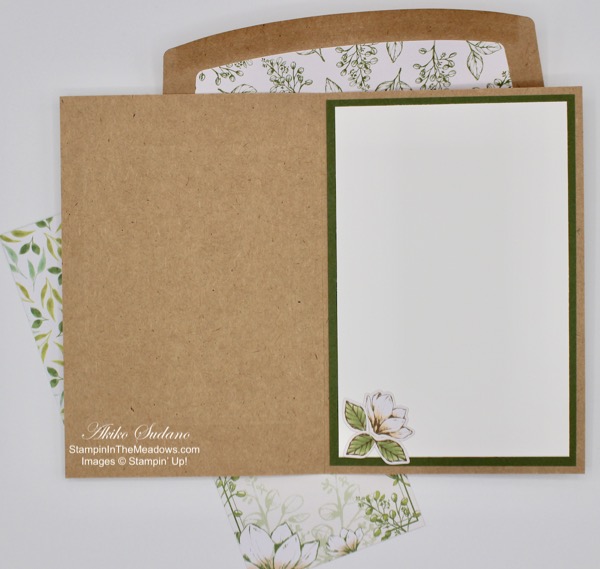
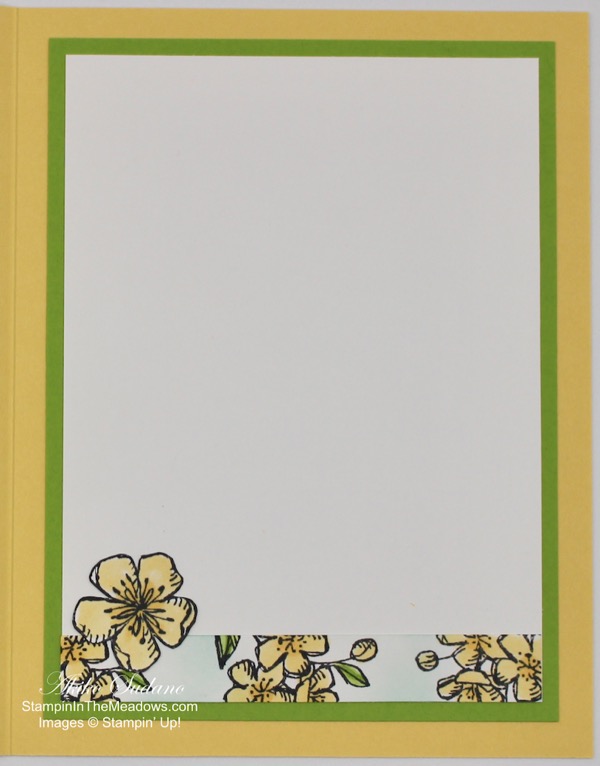
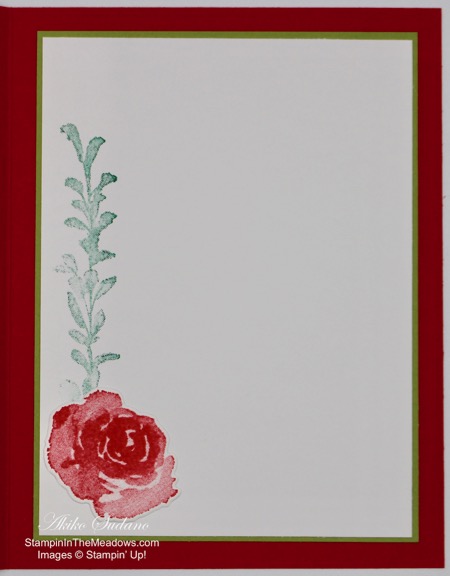
I decorated the inside of the card by adding a Blackberry Bliss mat to a Whisper White panel and adhering it to the card. I added another leaf branch cut from Old Olive vellum and a Flirty Flamingo stamped and fussy cut small flower with a Blackberry Bliss center.

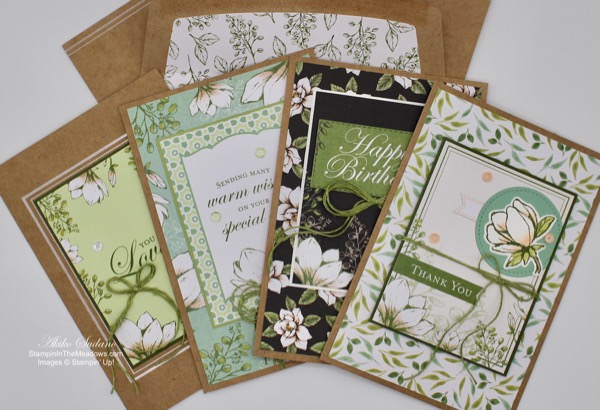
The Stampin’ Up! Perennial Essence DSP has beautiful impressionist flowers and every card made with it looks like it belongs in a museum. Thanks for stopping by and have a great weekend!

Akiko


The Bonus Days earning period is winding down. Next week is the last week for the earning period of Bonus Days where you get a coupon for $5 to redeem in August for every $50 you spend (before shipping and taxes) in July. See the full details on theย Stampinโ€™ Up! Promotions Page.


July 15 โ€“ 31 Host Code: CA7YRFE3

Use this host code when you order and receive a free gift from me!  If your order is over $150, please do not use this code, but youโ€™ll still get the free gift.  The free gift is your choice of any item valued up to $10.00 in the 2018-19 Annual Catalog or in the 2019 Occasions Catalog!  That includes some of the Host Exclusive stamp sets!


If you need any stamping supplies, Iโ€™d be very happy to be your Demonstrator.  Just click on the Shop Now button on the right side of the screen to go directly to my online store or contact me if you have any questions.  Happy Stamping!

  • Visit my online store here
  • See the current Stampin’ Up! clearance rack specials here
  • Earn FREE Stampin’ Up! products through my Wildflower Frequent Shopper Program – my way of saying thank you to my frequent shopper online customers.
  • Have any questions? I’d be happy to help, click here to contact me.

Cardstock Cuts for this project:

  • Pretty Peacock – 5 1/2″ x 8 1/2″
  • Blackberry Bliss – 3″ x 3″, 3 3/4″ x 5″
  • Whisper White – 3 1/2″ x 4 3/4″, 3 7/8″ x 5 1/8″, 2″ x 3 3/4″, 2 1/2″ x 6″ scrap for stamping flowers
  • Vellum – 2 3/4″ x 2 3/4″
  • So Saffron – 5 1/4″ x 1 1/2″
  • Old Olive – 2″ x 4″ scrap for leaves
  • Old Olive vellum – 2″ x 6″ scrap for leaves

Stampin’ Up! products used in this project:


Stampin’ Up! First Frost Holiday Card

Good Morning! Today’s card is another Christmas in July themed card using the beautiful Stampin’ Up! First Frost stamp set to make a non-traditional Christmas Card. Instead of the traditional Christmas poinsettia, pine and holly, this stamp set features beautiful roses and broad leaf foliage that can be used for any special occasion. I have received and decorated with red roses at Christmas though, so maybe it is traditional. You can find the supplies used to create this card at the bottom of my post along with the sizes of cardstock used.

I entered this card in the TGIF Challenge TGIFC#221 Inspiration Challenge – Christmas in July where they’re fighting the summer heat with dreams of Christmas. Check out the designer inspiration and other challenge entries.

I started by taking a panel of Whisper White and running it through the Tin Tile Embossing Folder and adhering it to an Old Olive mat. I then worked on the label by stamping the sentiment from the Stampin’ Up! First Frost stamp set in Versamark Ink on a piece of Whisper White and embossing it in Gold. I die cut it using the smaller label die from the Frosted Bouquet dies and cut a piece of Real Red cardstock using the larger label die from that set. I adhered the labels together and put it aside to work on the elements in the bouquet.

I stamped three of the long leafy branches from the Stampin’ Up! First Frost stamp set in Shaded Spruce after stamping off twice. I stamped four of the large roses and two of the smaller roses in Real Red. I die cut these using the coordinating die from the Frosted Bouquet Dies. I die cut two of the leaf branches from the Frosted Bouquet dies from Old Olive cardstock and two of the Berry Branches from Gold Foil.

I used some retired red metallic thread from my stash to make some circles behind the arrangement. I adhered the label, leaves and flowers to the panel using glue dots and the large center rose with dimensionals.

I added clear Wink of Stella to the roses to make them sparkle and finished it off with a bow made from the Polka Dot Tulle ribbon. I adhered the panel to the Real Red card base using dimensionals.

I decorated the inside of the card by stamping the long branch from the Stampin’ Up! First Frost stamp set in shaded Spruce after stamping off twice. I adhered the last large red rose at the bottom of the Whisper White panel. I attached the panel to an Old Olive mat and adhered it to the inside of the card.

Whether roses at Christmas is traditional or not, the Stampin’ Up! First Frost stamp set and coordinating Frosted Bouquet Dies make beautiful Christmas Cards. I hope you think so too. Thanks for visiting!

Akiko


Donโ€™t forget that we are in the earning period of Bonus Days where you get a coupon for $5 to redeem in August for every $50 you spend (before shipping and taxes) in July. See the full details on the Stampinโ€™ Up! Promotions Page.


July 15 โ€“ 31 Host Code: CA7YRFE3

Use this host code when you order and receive a free gift from me!  If your order is over $150, please do not use this code, but youโ€™ll still get the free gift.  The free gift is your choice of any item valued up to $10.00 in the 2018-19 Annual Catalog or in the 2019 Occasions Catalog!  That includes some of the Host Exclusive stamp sets!


If you need any stamping supplies, Iโ€™d be very happy to be your Demonstrator.  Just click on the Shop Now button on the right side of the screen to go directly to my online store or contact me if you have any questions.  Happy Stamping!

  • Visit my online store here
  • See the current Stampin’ Up! clearance rack specials here
  • Earn FREE Stampin’ Up! products through my Wildflower Frequent Shopper Program – my way of saying thank you to my frequent shopper online customers.
  • Have any questions? I’d be happy to help, click here to contact me.

Cardstock Cuts for this project:

  • Real Red – 5 1/2″ x 8 1/2″, 1 3/4″ x 2 1/2″
  • Whisper White – 3 3/4″ x 5″, 3 5/8″ x 4 7/8″, 4 1/2″ x 8 1/2″ for die cuts
  • Old Olive – 3 7/8″ x 5 1/8″, 3 3/4″ x 5″
  • Gold Foil – 4″ x 3″ scrap for die cuts

Stampin’ Up! products used in this project:


Stampin’ Up! Stitched All Around Special Day Card

Good Morning! Today’s card is a very simple but very elegant special day card using the Stampin’ Up! Stitched All Around stamp set and Stitched Labels dies. Coupled with the Country Floral embossing folder, the card comes together quickly and is great for any special occasion. You can find the supplies used to create this card at the bottom of my post along with the sizes of cardstock used.

I ran a piece of Seaside Spray cardstock through the Country Floral embossing folder and adhered it to a white mat before attaching it to a Seaside Spray card base with multipurpose liquid glue.

I took a piece of Thick Whisper white and embossed the Enjoy Your Special Day sentiment from the Stampin’ Up! Stitched All Around cling stamp set in silver. I cut it out using the fancy large label from the Stitched Labels die. I made a large bow from the Polka Dot Tulle ribbon and attached it to the bottom of the label with a glue dot and attached the label to the card front with dimensionals. I finished off the card front with three faux pearls.

I decorated the inside of the card by stamping the border from the Stampin’ Up! Stitched All Around stamp set in Seaside Spray on the bottom of a Whisper White panel and attaching it to the inside of the card.

That’s it! This card is embarrassingly simple, but it lets the gorgeous Stampin’ Up! elements do all the talking. The beautiful elegance of the Country floral embossing folder paired with the silver embossed lettering and intricate stitches and curves on the label will make any card special. Thanks for visiting and have a great weekend!

Akiko


Donโ€™t forget that we are in the earning period of Bonus Days where you get a coupon for $5 to redeem in August for every $50 you spend (before shipping and taxes) in July. See the full details on the Stampinโ€™ Up! Promotions Page.


July 15 โ€“ 31 Host Code: CA7YRFE3

Use this host code when you order and receive a free gift from me!  If your order is over $150, please do not use this code, but youโ€™ll still get the free gift.  The free gift is your choice of any item valued up to $10.00 in the 2018-19 Annual Catalog or in the 2019 Occasions Catalog!  That includes some of the Host Exclusive stamp sets!


If you need any stamping supplies, Iโ€™d be very happy to be your Demonstrator.  Just click on the Shop Now button on the right side of the screen to go directly to my online store or contact me if you have any questions.  Happy Stamping!

  • Visit my online store here
  • See the current Stampin’ Up! clearance rack specials here
  • Earn FREE Stampin’ Up! products through my Wildflower Frequent Shopper Program – my way of saying thank you to my frequent shopper online customers.
  • Have any questions? I’d be happy to help, click here to contact me.

Cardstock Cuts for this project:

  • Seaside Spray – 5 1/2″ x 8 1/2″, 3 3/4″ x 5″
  • Thick Whisper White – 3 1/4″ x 3 3/4″
  • Whisper White – 3 3/4″ x 5″, 3 7/8″ x 5 1/8″

Stampin’ Up! products used in this project:


Stampin’ Up! To A Wild Rose Birthday Card

Good Morning! Today’s card is a floral birthday card made with the pretty Stampin’ Up! To a Wild Rose cling stamp set. I think this is one of my favorite flower images and today I used it with the pretty floral lattice and label die cuts. You can find the supplies used to create this card at the bottom of my post along with the sizes of cardstock used.

I started by embossing a piece of Whisper White cardstock in the Layered Leaves embossing folder and attached it to a Whisper White mat. Then I popped it on a Thick Whisper White card base with dimensionals.

I die cut the floral lattice from So Saffron cardstock and die cut the label from Whisper White cardstock. These are both from the Wild Roses dies that coordinate with the Stampin’ Up! To A Wild Rose stamp set. I stamped the Happy Birthday sentiment from the Magnolia Blooms stamp set in So Saffron ink on the label. I attached these to the card. Then I stamped the large rose outline image using So Saffron ink on a piece of Whisper White cardstock. I took the So Saffron Stampin’ Blends to color the flower, using the dark close to the center and under the petals, the light in the middle leaving the petal tips white. Then I cut it out with the coordinating die.

I colored the center with a Pumpkin Pie marker. I stamped the outline leaves using Shaded Spruce ink on Old Olive cardstock and cut them out with the coordinating die. I attached the leaves to the card and then attached the flower. I colored some seam binding ribbon from my stash with the So Saffron re-inker and water and made a bow. I tied a piece of the Polka Dot Tulle ribbon and attached it to the back of the bow and attached both to the label. I finished off the card with three clear small epoxy dots.

I decorated the inside of the card by stamping the outline rose image in So Saffron ink and did the same with the envelope.

This rose stamps beautifully when you use the other two stamps to layer the color on, so I was pleased at how pretty the flower came out with using just the outline stamp and coloring with Stampin’ Blends. Plus I love yellow roses, don’t you? Thanks for visiting!

Akiko


Donโ€™t forget that we are in the earning period of Bonus Days where you get a coupon for $5 to redeem in August for every $50 you spend (before shipping and taxes) in July. See the full details on the Stampinโ€™ Up! Promotions Page.


July 15 โ€“ 31 Host Code: CA7YRFE3

Use this host code when you order and receive a free gift from me!  If your order is over $150, please do not use this code, but youโ€™ll still get the free gift.  The free gift is your choice of any item valued up to $10.00 in the 2018-19 Annual Catalog or in the 2019 Occasions Catalog!  That includes some of the Host Exclusive stamp sets!


If you need any stamping supplies, Iโ€™d be very happy to be your Demonstrator.  Just click on the Shop Now button on the right side of the screen to go directly to my online store or contact me if you have any questions.  Happy Stamping!

  • Visit my online store here
  • See the current Stampin’ Up! clearance rack specials here
  • Earn FREE Stampin’ Up! products through my Wildflower Frequent Shopper Program – my way of saying thank you to my frequent shopper online customers.
  • Have any questions? I’d be happy to help, click here to contact me.

Cardstock Cuts for this project:

  • Thick Whisper White – 4 1/4″ x 11″
  • Whisper White – (2) 4″ x 5 1/4″, 3 7/8″ x 5 1/8″, 2 1/2″ x 3 3/4″
  • So Saffron – 5 1/4″ x 1 1/2″
  • Old Olive – (2) 2 1/4″ x 2 1/4″

Stampin’ Up! products used in this project:


Stampin’ Up! A Good Man Birthday Card

Good Morning! Today’s card is a masculine birthday card featuring the Stampin’ Up! A Good Man cling stamp set. This set has some great images and sentiments for making birthday and Father’s Day cards for the special men in your life.

I was inspired to use the layout in Sunday Stamps, SSC208 Sketch Fun. Be sure to check out the other fabulous entries in the challenge.

Now for today’s card – you can find supplies used to create this card at the bottom of my post along with the sizes of cardstock used.

I started by taking a piece of Sahara Sand cardstock and running it through the Subtle embossing folder and adhering it to a Mossy Meadow mat with multipurpose liquid glue. I then took a piece of the Mint Macaron striped Magnolia Lane Memories and More card and attached the diamond strips from the retired Delightfully Detailed laser cut DSP and adhered them to the back. I attached this to a strip of mossy meadow cardstock and adhered this to the embossed panel.

I stamped the relaxed man napping in the lawn chair from the Stampin’ Up! A Good Man cling stamp set in Memento Tuxedo Black on a piece of Whisper White. I stamped the It’s your day sentiment in Mossy Meadow next to the man and colored the piece with Copic markers since I didn’t have the Stampin’ Blends in the colors I wanted to use. I cut out the image with a Layering Square die and then cut a mat from Mossy Meadow in the next larger size square die. I adhered these together and popped the image on the panel with dimensionals. I then used dimensionals to adhere the panel to a Mint Macaron card base and added some gold Metallic Pearls to finish off the picture.

On the inside of the card, I stamped the Happy Birthday sentiment from the retired Rose Wonder stamp set since the font is similar to the font in the Stampin’ Up! A Good Man stamp set. I decorated it with another strip of the Magnolia Lane Memories and More card pack and a piece of embossed Sahara Sand. I added mats in Mossy Meadow and Sahara Sand and added it to the inside of the card

A nice simple masculine birthday card! Thanks for visiting and have a great weekend!

Akiko


Donโ€™t forget that we are in the earning period of Bonus Days where you get a coupon for $5 to redeem in August for every $50 you spend (before shipping and taxes) in July. See the full details on the Stampinโ€™ Up! Promotions Page.


July 1 โ€“ 15 Host Code: 6X3A6D6C

Use this host code when you order and receive a free gift from me!  If your order is over $150, please do not use this code, but youโ€™ll still get the free gift.  The free gift is your choice of any item valued up to $10.00 in the 2018-19 Annual Catalog or in the 2019 Occasions Catalog!  That includes some of the Host Exclusive stamp sets!


If you need any stamping supplies, Iโ€™d be very happy to be your Demonstrator.  Just click on the Shop Now button on the right side of the screen to go directly to my online store or contact me if you have any questions.  Happy Stamping!

  • Visit my online store here
  • See the current Stampin’ Up! clearance rack specials here
  • Earn FREE Stampin’ Up! products through my Wildflower Frequent Shopper Program – my way of saying thank you to my frequent shopper online customers.
  • Have any questions? I’d be happy to help, click here to contact me.

Cardstock Cuts for this project:

  • Mint Macron – 5 1/2″ x 8 1/2″
  • Sahara Sand – (2) 3 3/4″ x 5″, 1/2″ x 3 1/2″
  • Mossy Meadow – (2) 3 5/8″ x 4 7/8″, 1 3/4″ x 5″, 3″ x 3″
  • Whisper White – 3 1/2″ x 4 3/4″, 3″ x 3″
  • Magnolia Lane Memories and More card – 1 1/2″ x 5, 3/4″ x 3 1/2″

Stampin’ Up! products used in this project:


Stampin’ Up! Magnolia Lane Memories and More

Good Morning! I hope you enjoyed the Blog Hop yesterday! Didn’t the cards put you in a Summer Vacation frame of mind? Well today I have something a little different to show you. I have a set of four cards that are made with the Stampin’ Up! Magnolia Lane Memories and More Card Pack and the Stampin’ Up! Magnolia Lane Large Specialty Cards and Envelopes.

The Memories and More card packs by Stampin’ Up! have 6″ x 4″ and 3″ x 4″ double sided cards that all coordinate and special laser cut stickers and other goodies. This has the following advantages:

  • It makes card making easy and quick for the beginner paper crafter or busy person with limited crafting time.
  • The card are perfectly sized and designed for Memory Keeping Journal pocket pages and Scrapbooking.

The Stampin’ Up! Magnolia Lane Memories and More card pack has cards that coordinate with the Good Morning Magnolia stamps and dies and the Magnolia Lane DSP. It also coordinates with the Verdant Garden stamp set and Garden Lane DSP. And it coordinates with most of the greens in the Stampin’ Up! color world.

For today’s cards, I paired it up with the Stampin’ Up! Magnolia Lane Large Specialty Cards and Envelopes which has the casual elegance of craft paper with white foil accents and envelope liners! Plus they are larger so that they fit a 6″ x 4″ card perfectly. Let me show you.

These pictures show the first card. The top picture shows the two cards from the Stampin’ Up! Magnolia Lane Memories and More card pack that I used to create the card. I used a Pear Pizzazz scrap for a mat and dressed it up with sequins and an Old Olive linen thread (now retired) bow. On the inside, I cut a piece of Whisper White and decorated it with some stickers from the pack and used a mat in Mint Macaron. Easy Peasy!

For the second card, I only used a 3″ x 4″ card from the memories and more card pack for the card front, so you can see the pretty white foil on the front of the card! There’s room to put a thin mat behind it, so I used Old Olive and dressed it up with some sequins and bow. For the inside, I just used one of the 4″ x 6″ cards from the memories and more card pack and added another flower sticker. Again – Easy Peasy!

I chose to mix it up a bit with this card because I wanted to use the Happy Birthday sentiment with it. So I used one of the Stitched Rectangle dies to cut the sentiment from the card and adhered it with dimensionals to cover the existing sentiment. And I added a white mat to provide contrast for the smaller card. On the inside I added a strip of Vellum to the bottom and added another sticker. And of course, I added a Basic Black mat. A little more complicated, but it still went together fast.

The last one was the most complicated because I stamped, colored and die cut the magnolia bud from the Good Morning Magnolia stamp set and laid it on a mint macaron die cut stitched circle. When I was looking for a sentiment to stamp, I decided to just use the thank you from the card, so I cut it out and covered the opening with a flag sticker behind the die cut circle. I then put a tail on the sentiment and re-attached in a different place. I added a Mossy Meadow mat, sequins and a bow and used dimensionals to attach the little card. On the inside, I just used another Mossy Meadow mat and added some stickers.

I hope that I’ve given you some fresh ideas on how to quickly create pretty cards. The Stampin’ Up Magnolia Lane Memories and More card pack is very versatile – you can keep it simple or make it elaborate. Thanks for Visiting!

Akiko


Donโ€™t forget that we are in the earning period of Bonus Days where you get a coupon for $5 to redeem in August for every $50 you spend (before shipping and taxes) in July. See the full details on the Stampinโ€™ Up! Promotions Page.


July 1 โ€“ 15 Host Code: 6X3A6D6C

Use this host code when you order and receive a free gift from me!  If your order is over $150, please do not use this code, but youโ€™ll still get the free gift.  The free gift is your choice of any item valued up to $10.00 in the 2018-19 Annual Catalog or in the 2019 Occasions Catalog!  That includes some of the Host Exclusive stamp sets!


If you need any stamping supplies, Iโ€™d be very happy to be your Demonstrator.  Just click on the Shop Now button on the right side of the screen to go directly to my online store or contact me if you have any questions.  Happy Stamping!

  • Visit my online store here
  • See the current Stampin’ Up! clearance rack specials here
  • Earn FREE Stampin’ Up! products through my Wildflower Frequent Shopper Program – my way of saying thank you to my frequent shopper online customers.
  • Have any questions? I’d be happy to help, click here to contact me.

Cardstock Cuts for this project:

  • Whisper White – (3) 3 3/4″ x 5 3/4″, 3 1/8″ x 4 1/8″, 2 1/2″ square scrap
  • Basic Black – 4″ x 6″
  • Mossy Meadow – 4″ x 6″, (2) 3 1/8″ x 4 1/8″
  • Mint Macaron – 4″ x 6″, 2″ square scrap
  • Pear Pizzazz – 3 1/8″ x 4 1/8″

Stampin’ Up! products used in this project:


Stampin’ Up! High Tide Thinking of You Card

Hello and welcome to Amy’s Inkin Krew Blog Hop. This month’s theme is ‘Celebrate Summer‘ and I have a summer at the shore card featuring the Stampin’ Up! High Tide photopolymer stamp set, the Colorful Season photopolymer stamp set and Seasonal Layers dies.

I started by stamping the waves from the Stampin’ Up! High Tide stamp set in Blueberry Bushel ink on a Pool Party background. I sponged the ocean with Balmy Blue and used my white gel pen to add white highlights. I stamped the flock of seagulls in Memento Tuxedo Black ink. I stamped the sun from the Stampin’ Up! Waterfront stamp set in Daffodil Delight ink on Whisper White cardstock and fussy cut it and adhered it to the Pool Party panel.

I stamped the sand using Sahara Sand ink on Very Vanilla cardstock and stamped second time below. I stamped several times to get the texture I was happy with. I sponged the bottom with Sahara Sand ink and stamped the Thinking of You sentiment in Early Espresso ink. I tore the top of the Very Vanilla piece and attached it to the main panel over the ocean. I stamped the sea grass in Old Olive ink, going over the ocean and attached the panel to a Blueberry Bushel mat.

I die cut two Adirondack chairs in Real Red and glued them together with the fine tipped glue pen and attached the chair to the panel with dimensionals. I used dimensionals to attach the panel to a Sahara Sand card Base.

For the inside, I stamped more sand, seagrass and seagulls on a Very Vanilla panel. I matted it with Blueberry Bushel and adhered it to the inside of the card.

I am usually a traditionalist, but I just love those bright colorful plastic Adirondack chairs that they have at the home improvement stores, so I had to have one for my shore card! Thanks for stopping by and enjoy the Blog Hop.

Akiko


Please take time to visit each blog to see what the Team members are sharing today. Click on the Next Blog button to move forward to Amy Koender’s project or click the Previous Blog button to move back to see the project that Mary Deatherage created.

If you get lost along the way, here are the participants for the hop:


July 1 – 15 Host Code: 6X3A6D6C

Use this host code when you order and receive a free gift from me!  If your order is over $150, please do not use this code, but youโ€™ll still get the free gift.  The free gift is your choice of any item valued up to $10.00 in the 2018-19 Annual Catalog or in the 2019 Occasions Catalog!  That includes some of the Host Exclusive stamp sets!


If you need any stamping supplies, Iโ€™d be very happy to be your Demonstrator.  Just click on the Order Stampinโ€™ Up! Online Now button on the right side of the screen to go directly to my online store or contact me if you have any questions.  Happy Stamping!

  • Visit my online store here
  • See the current Stampinโ€™ Up! clearance rack specials here
  • Earn FREE Stampinโ€™ Up! products through my Wildflower Frequent Shopper Program โ€“ my way of saying thank you to my frequent shopper online customers.
  • Have any questions? Iโ€™d be happy to help, click here to contact me.

Cardstock Cuts for this project

  • ย†Sahara Sand – 4 1/4″ x 11″
  • Pool Party – 3 3/4″ x 5″
  • Blueberry Bushel – (2) 3 7/8″ x 5 1/8″
  • Very Vanilla – 3 5/8″ x 4 7/8″, 2 1/4″ x 3 3/4″
  • Whisper White – 1″ square scrap

Stampinโ€™ Up! products used in this project:


Stampin’ Up! Daisy Lane Smile Card

Good Morning! I hope you had a good weekend and are ready for the weekday grind. Today I have a card with a cheery Monday morning message, “Smile … It’s your time to shine!“. The card is made with the new Stampin’ Up! Daisy Lane cling bundle. You can find the products used at the bottom of the post.

The layout for today’s card is inspired by Freshly Made Sketches #395. This simple sketch gave me a great opportunity to showcase the wonderful large Stitched Label in vellum. And the striped paper is just enough to break up the patterned background.

And the colors are inspired by Hand Stamped Sentiments Color Challenge #318. This combination is so fresh and summery and it gave me another opportunity to stamp patterned paper.

Be sure to check out the fantastic entries in these challenges for more card making inspiration.

I started today’s card by making another faux DSP – designer series paper or patterned paper. I used the daisy stamps from the Stampin’ Up! Daisy Lane and Stampin’ Up! Daisy Delight stamp sets and the leaf branch from the Stampin’ Up! Free as a Bird stamp set. On a sheet of Whisper White cardstock, I randomly stamped the large daisy in Petal Pink, the small daisy in Calypso Coral and the leaves in Mint Macaron. I lightly sponged each image in the respective colors and then I sponged the rest with So Saffron. Then I ran it through the Subtle embossing folder to add texture. The embossing really made it special!

I cut an extended piece of the striped paper from the Magnolia Lane DSP using the 1″ Stitched Rectangle die. I die cut the large fancy Stitched Label die from vellum and heat embossed the Smile sentiment from the Stampin’ Up! Daisy Lane stamp set on Mink Macaron and die cut it using the smaller Stitched label Die.

I stamped three of the small daisies in Petal Pink on Whisper White and punched them out with the Medium Daisy Punch and curled the ends before attaching them together. I finished the daisy off with a non-SU clear enamel dot from my stash that I colored with the dark Calypso Coral Stampin’ Blends and finally a Mint Macaron leaf branch from the Flourish dies. I arranged all the elements on the card front, matted it in Mint Macaron and then popped it on a Thick Whisper White card base with dimensionals.

For the inside of the card, I stamped the shine sentiment from the Stampin’ Up! Daisy Lane stamp set, added a strip of faux DSP and matted it in Mint Macaron.

Isn’t that a pretty and cheerful way to start a summer week? Thanks for visiting and I hope that you have a week where you do shine!

Akiko


Donโ€™t forget that we are in the earning period of Bonus Days where you get a coupon for $5 to redeem in August for every $50 you spend (before shipping and taxes) in July. See the full details on the Stampinโ€™ Up! Promotions Page.


July 1 โ€“ 15 Host Code: 6X3A6D6C

Use this host code when you order and receive a free gift from me!  If your order is over $150, please do not use this code, but youโ€™ll still get the free gift.  The free gift is your choice of any item valued up to $10.00 in the 2018-19 Annual Catalog or in the 2019 Occasions Catalog!  That includes some of the Host Exclusive stamp sets!


If you need any stamping supplies, Iโ€™d be very happy to be your Demonstrator.  Just click on the Shop Now button on the right side of the screen to go directly to my online store or contact me if you have any questions.  Happy Stamping!

  • Visit my online store here
  • See the current Stampin’ Up! clearance rack specials here
  • Earn FREE Stampin’ Up! products through my Wildflower Frequent Shopper Program – my way of saying thank you to my frequent shopper online customers.
  • Have any questions? I’d be happy to help, click here to contact me.

Cardstock Cuts for this project:

  • Thick Whisper White – 4 1/4″ x 11″
  • Mint Macaron – (2) 4 7/8″ x 5 1/8″, scraps for label and leaf branch
  • Whisper White – 3 5/8″ x 4 7/8″, 4 1/4″ x 5 1/2″, scraps for daisy
  • Magnolia Lane DSP – 1 1/4″ x 3 3/4″
  • Vellum – 3″ x 3 1/2″

Stampin’ Up! products used in this project:


Stampin’ Up! Free as a Bird and Bird Ballad Friendship Card

Good Morning! Today I have a sweet friendship card that features a pair of birds from the Bird Ballad Designer Series Paper or DSP. Yes, the birds are from patterned paper – so pretty, aren’t they?

With this card, I’m playing in The Paper Players Challenge #148. It is a fun Tic-Tac-Toe challenge where you choose 3 or more elements to incorporate into your card. Here is the board. I chose florals, yellow and die-cut. Check out the other beautiful entries by clicking on the board. You can find supplies used to create my card at the bottom of this post along with the sizes of cardstock used.

I started by die cutting the pair of birds from the Bird Ballad DSP using the round Stitched Shapes die. I cut another stitched circle from scrap whisper white cardstock for the back. I sandwiched a white pearlized doily in-between the two stitched circle die cuts with liquid multipurpose glue. I stamped three flowers and two leaf branches from the Stampin’ Up! Free as a Bird cling stamp set on Whisper White using Memento Tuxedo Black ink. I colored the flowers using So Saffron Stampin’ Blends and colored the leaves with Granny Apple Green Stampin’ Blends. Then I fussy cut these with paper snips. I rolled two of the flowers with a ball stylus on the backs of the petals to give them dimension.

I took a panel of Whisper White cardstock and randomly stamped the floral bouquet from the April Paper Pumpkin kit – Hugs from Shelli – using Memento Tuxedo Black ink. I colored the flowers and leaves using the So Saffron and Granny Apple Green Stampin’ Blends. Then I sponged the rest of the background in Pool Party. It looks just like the Bird Ballad DSP but with yellow flowers! Then I took an old edgelit to create the paper lace borders and attached them to the top and bottom of the faux DSP.

To make the label, I took a scrap piece of Basic Black cardstock and stamped the best of friends sentiment from the Stampin’ Up! Free as a Bird stamp set in Versamark Ink after dusting with the embossing buddy. I then sprinkled it with White Embossing Powder and heat set. I made a bow with the retired Old Olive linen thread.

With all the elements done, cut a panel of Pool Party cardstock and ran it through the Scripty 3D embossing folder. I attached it to a Garden Green mat and attached the faux DSP with the lacy edge to the front, all with liquid multipurpose adhesive. I clipped the ends of the label to make fishtails, and ran it over my bone folder to get a gentle curve and attached it to the Pool Party panel with glue dots. I glued the leaves to the panel and attached the flowers to the stitched circle with glue dots. I popped dimensionals behind the birds on the stitched circle and attached it to the panel. I also popped dimensionals behind the panel and attached it to the card base. I finished the card off by coloring the pearls with the So Saffron Stampin’ Blends and adding them to the flowers and and attaching the flowers and bow.

For the inside of the card, I took a strip of the faux DSP and adhered it to the bottom of a Whisper White panel. I took the last yellow flower and glued it on top.
I matted it with Granny Apple Green and adhered it to the inside of the card. I also stamped another flower and leaf branch to the bottom of the envelope and colored them with Stampin’ Blends. Before coloring the envelope, I put a piece of scrap cardstock inside to keep it from bleeding through.

That Bird Ballad DSP is so pretty that it can stand on its own as the focal point for a beautiful card. I hope you like today’s card. Thanks for visiting and have a great weekend!

Akiko


July 1 โ€“ 15 Host Code: 6X3A6D6C

Use this host code when you order and receive a free gift from me!  If your order is over $150, please do not use this code, but youโ€™ll still get the free gift.  The free gift is your choice of any item valued up to $10.00 in the 2018-19 Annual Catalog or in the 2019 Occasions Catalog!  That includes some of the Host Exclusive stamp sets!


If you need any stamping supplies, Iโ€™d be very happy to be your Demonstrator.  Just click on the Shop Now button on the right side of the screen to go directly to my online store or contact me if you have any questions.  Happy Stamping!

  • Visit my online store here
  • See the current Stampin’ Up! clearance rack specials here
  • Earn FREE Stampin’ Up! products through my Wildflower Frequent Shopper Program – my way of saying thank you to my frequent shopper online customers.
  • Have any questions? I’d be happy to help, click here to contact me.

Cardstock Cuts for this project:

  • So Saffron – 5 1/2″ x 8 1/2″
  • Granny Apple Green – (2) 3 3/4″ x 5″, 3 1/2″ x 2 1/2″, (2) 1″ x 3 1/2″, 1/2″ x 3 1/2″, 1″ x 2″ scraps for flowers and leaves
  • Whisper White – 3 1/2″ x 4 3/4″,
  • Pool Party – 3 1/2″ x 4 3/4″
  • Basic Black – 1/2″ x 3 1/2″ scrap
  • Whisper White – 3 7/8″ x 5 1/8″, , 3 5/8″ x 4 7/8″, 3 1/2″ x 4 3/4″,

Stampin’ Up! products used in this project:


Stampin’ Up! To A Wild Rose Hello Card

Good Morning! Today I have a blue floral hello card featuring the Stampin’ Up! To A Wild Rose photopolymer stamp set. I also used the coordinating Wild Rose Dies and both of these come in the To A Wild Rose Bundle at 10% off!

My design for this card was inspired by the current challenge at the Global Design Project #196 (#GDP196) where we CASE (copy and selectively edit) the designer. Here is the inspiration project. Isn’t it beautiful!

You can find supplies used to create this card at the bottom of my post along with the sizes of cardstock used. I started by die cutting the frame using the Stitched Rectangle dies on Thick Whisper White cardstock. I next took a piece of Whisper White cardstock and ran it through the Country Floral embossing folder and lightly sponging with Balmy Blue ink. I took the embossed piece and attached it to a Balmy Blue card base with snail adhesive. I took the floral frame and attached it to the card base with dimensionals so that it floats above the embossed piece.

I then started working on the floral arrangement. I stamped the large outline flower from the Stampin’ Up! To A Wild Rose stamp set in Balmy Blue ink on a piece of Thick Whisper White cardstock. I stamped the other two large flower stamps also in Balmy Blue after stamping off once. I die cut it with the coordinating die and brushed it lightly with Wink of Stella to give it a little sparkle. Too bad it doesn’t show up in the picture. I die cut two of the floral outline shapes in Thick Whisper White and two of the outline leaves in Old Olive

I took a scrap of Vellum and brushed it with the embossing buddy and stamped the ‘hello’ greeting from the Stampin’ Up! To A Wild Rose stamp set in Versamark Ink and sprinkled it with silver embossing powder and heat set. When cool, I die cut it with the Stitched Nested Labels die.

I made a bow with the Whisper White Polka Dot Tulle ribbon. I arranged the elements by attaching the die cuts to the back of the rose with glue dots. I added dimensionals to the back of the rose so that it would also float above the embossed background and I added glue from the fine tipped glue pen behind the die cuts where they would meet the frame. I attached the bow with glue dots. I finished off the rose with a glitter enamel dot and the background with Silver Metallic Pearls.

For the inside of the card, I stamped the flower three times on Whisper White after stamping off and masking. I attached the Whisper White panel to the inside of the card with snail. I decorated the envelope using the same stamping technique.

My sister and I have a thing that roses shouldn’t be blue because it’s not natural. But the rose is so pretty and the blue and white is so refreshing. Thanks for visiting!

I hope you have a wonderful 4th of July tomorrow!

Akiko


Don’t forget that we are in the earning period of Bonus Days where you get a coupon for $5 to redeem in August for every $50 you spend (before shipping and taxes) in July. See the full details on the Stampin’ Up! Promotions Page.


July 1 โ€“ 15 Host Code: 6X3A6D6C

Use this host code when you order and receive a free gift from me!  If your order is over $150, please do not use this code, but youโ€™ll still get the free gift.  The free gift is your choice of any item valued up to $10.00 in the 2018-19 Annual Catalog or in the 2019 Occasions Catalog!  That includes some of the Host Exclusive stamp sets!


If you need any stamping supplies, Iโ€™d be very happy to be your Demonstrator.  Just click on the Shop Now button on the right side of the screen to go directly to my online store or contact me if you have any questions.  Happy Stamping!

  • Visit my online store here
  • See the current Stampin’ Up! clearance rack specials here
  • Earn FREE Stampin’ Up! products through my Wildflower Frequent Shopper Program – my way of saying thank you to my frequent shopper online customers.
  • Have any questions? I’d be happy to help, click here to contact me.

Cardstock Cuts for this project:

  • Balmy Blue – 4 1/4″ x 11″
  • Whisper White – 3 3/4″ x 5″, 3″ x 4″
  • Thick Whisper White – 3″ x 3″, (2) 2 1/4 x 2 1/4
  • Old Olive – (2) 2″ x 2″
  • Vellum – 2 1/2″ x 1 1/2″

Stampin’ Up! products used in this project: