Stampin’ Up! Beautiful Autumn Thank You Card

Good Morning! Today is the day for then new August – December 2020 Mini Catalog to open for orders!! Yay!! The NEW and improved Online Store will open at 7:00 AM (MT) – I can’t wait to see it. But until it opens, here is a simple Thank You card that you can make with items from the new catalog – the Stampin’ Up! Beautiful Autumn photopolymer stamp set and the beautiful Gilded Autumn specialty designer series paper. You can find the supplies used to create this card at the bottom of my post along with the sizes of cardstock used.

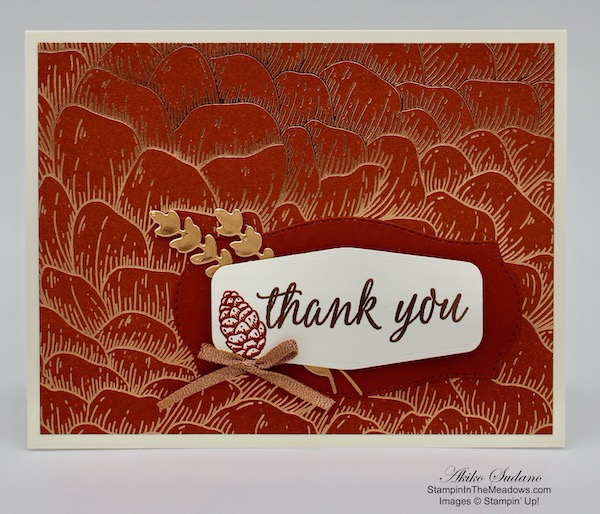
I adhered a panel of the beautiful Gilded Autumn specialty designer series paper to the front of a Very Vanilla card base with Stampin’ Seal. I cut out a panel of Cajun Craze card stock with the label from the Tasteful Labels Dies and adhered it to the card front.

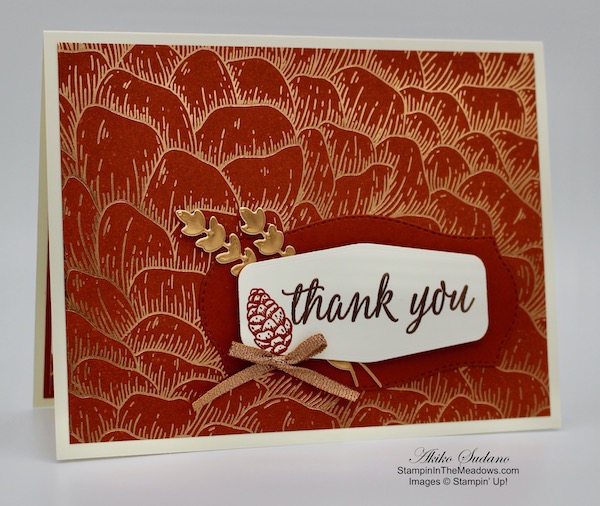
I cut the double sprig dies from the Sunflowers Dies from Copper Foil and adhered it to the card stock die cut. I stamped the sentiment from the Stampin’ Up! Beautiful Autumn photopolymer stamp set in Versamark Ink on a strip of Very Vanilla. I sprinkled it with Copper embossing powder and heat set until shiny. I stamped the little pinecone from the Stampin’ Up! Beautiful Autumn stamp set in Cajun Craze ink next to the sentiment and cut it out with the label die from the Tasteful Labels Dies

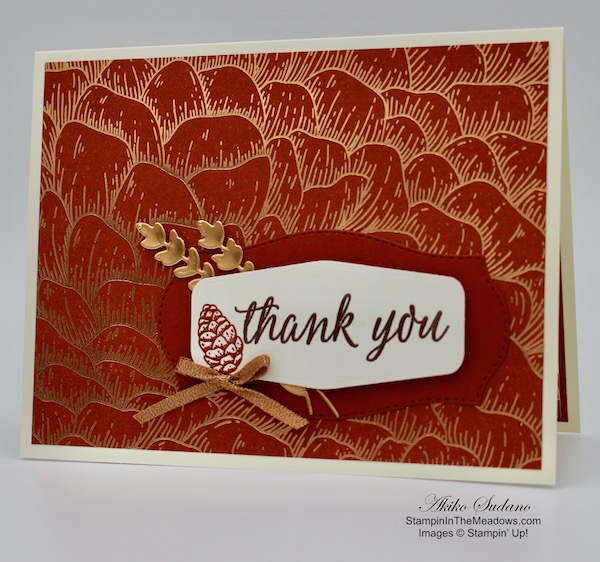
I adhered the label over the sprigs with dimensionals and added a copper ribbon bow.

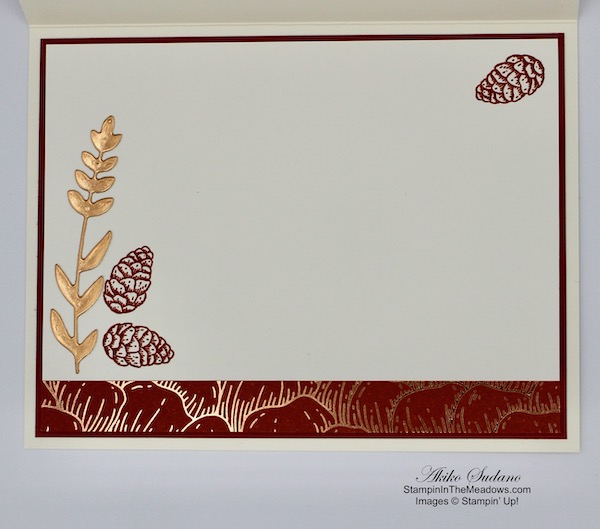
I stamped more pinecones in Cajun Craze ink on a Very Vanilla panel and cut out a single sprig from Copper Foil using the die from the Sunflowers Dies. I adhered the copper foil die cut to the Very Vanilla panel and the trimmed the bottom with a strip of the Gilded Autumn DSP. I adhered the panel to a CajunCraze mat and then to the inside of the card.

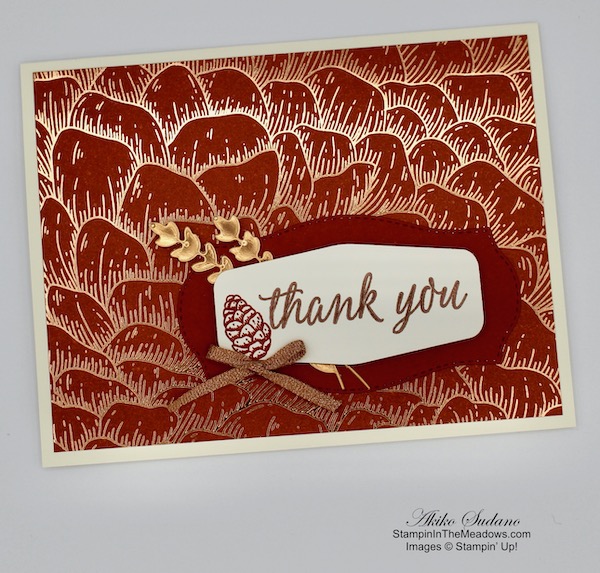
This is a very simple card that is very dramatic with the foil designer series paper. And because it’s Stampin’ Up! you know that the copper foil and ribbon will coordinate beautifully with the DSP (as well as the Cajun Craze card stock and ink). (NOTE: As I pulled together my product list, I discovered that the Copper Embossing powder retired a few months ago and is no longer available. My apologies. If you don’t have it from before it retired, I recommend using the Gold embossing powder instead.)

Enjoy shopping the new items from the Aug-Dec 2020 Mini Catalog!!


August 1 – 15 Host Code: B76NYDVU

Use this host code when you order $50 or more and receive a free gift from me!  The gift is your choice of any item valued up to $10.00 in the 2020-21 Annual Catalog or the Aug – Dec 2020 Mini Catalog. This includes some of the host exclusive sets!

If your order is over $150, please do not use the host code since you’ll receive your own Host Dollars plus I’ll still send you the free gift!  This host code can be used by anyone, no commitment required.  Let me know if you have any questions.


If you need any stamping supplies, I’d be very happy to be your Demonstrator.  Just click on the Shop Now Button on the right side of the screen to go directly to my Online store or contact me if you have any questions.  Happy Stamping!

Thanks for stopping by and have a great day!

Akiko

  • Visit my Online store here
  • See the current Stampin’ Up! clearance rack specials here
  • Earn FREE Stampin’ Up! products through my Wildflower Frequent Shopper Program – my way of saying thank you to my frequent shopper online customers.
  • Sign up for my monthly newsletter here
  • Have any questions? I’d be happy to help, click here to contact me.

Cardstock Cuts for this project:

  • Thick Very Vanilla – 5-1/2″ x 8-1/2″ card base scored at 4-1/4″
  • Copper foil – 1″ x 5-1/2″ (sprig die cuts)
  • Cajun Craze – 4″ x 5-1/4″ (inside mat), 2-1/2″ x 3-3/4″ (front label)
  • Very Vanilla – 3-7/8″ x 5-1/1″ (inside panel), 1-1/2″ x 3-1/4″ (label)
  • Gilded Autumn DSP – 4″ x 5-1/4″ (front background), 1/2″ x 3-7/8″ (inside trim)

Stampin’ Up! products used in this project:


Stampin’ Up! Poinsettia Petals Christmas Card Video Tutorial

Good Morning! Today I’m sharing a Christmas card made with the Stampin’ Up! Poinsettia Petals bundle that I made during my Facebook Live video tutorial yesterday afternoon. This is hands down the best poinsettia bundle ever! You can find the supplies used to create this card at the bottom of my post along with the sizes of cardstock used.

Here is the Facebook Live video showing how I made the card:

I also posted the video to my YouTube Channel and you can view it here if you prefer.

I started by cutting three sets of petal clusters and the embossing inserts from Real Red card stock using the Poinsettia Dies that are part of the Stampin’ Up! Poinsettia Petals bundle. I also cut one each of the leaf dies with the embossing inserts from Garden Green card stock and a berry sprig from Silver Foil. I embossed a panel of Whisper White with the Tasteful Textile 3D embossing folder and adhered it to a Whisper White panel. I popped the panel on the front of a Thick Whisper White card base using dimensionals.

I cut out the fancy label frame from vellum using the Ornate Layers Dies. I stamped the sentiment from the Stampin’ Up! Poinsettia Petals photopolymer stamp set in Real Red ink on a strip of Whisper White and cut it out with the stitched label from the Ornate Layers Dies. I adhered the label to the vellum frame with Stampin’ Seal and then adhered it to the card front.

I sponged the center and edges of each of the flower petals with Real Red ink and I sponged the edges of the leaves with Garden green ink. I gently curled the flower petals under with my bone folder and adhered the layers together with glue dots. I brushed each petal with the Wink of Stella glitter brush and adhered one of the beautiful new beaded pearls to the center. I adhered the flower to the card front with glue dots. Then I adhered the leaves and silver sprigs and a polka dot tulle bow.

I stamped the sentiment from the Stampin’ Up! Poinsettia Petals stamp set in Real Red ink on a Whisper White panel. I stamped the poinsettia in the lower corner, also in Real Red ink and adhered the panel to the inside of the card.

Layered die cut poinsettias make the prettiest Christmas cards. But they can also be used for holiday tags, ornaments, garlands, package decorations and small bouquets. And since the petals come in clusters, they are easy for children to work with in holiday craft projects! So the Stampin’ Up! Poinsettia Petals bundle is a definite must have when the catalog opens on Tuesday, Aug 4!


Today is The Last Day to Earn Bonus Days Coupon Codes!!

It’s the last day to to earn Bonus Days coupon codes! We’ll be able to start redeeming the coupon codes tomorrow! For every $50 (before shipping and tax) you spend today, you earn a $5 USD Bonus Days coupon code that can be redeemed between August 4 and August 31. There’s no limit on how many coupon codes you can earn or redeem, but they must be redeemed by August 31. For full details, see my Promotions Page.


Tomorrow the August – December 2020 Mini Catalog is Live!!

The new Online Store will open at 7:00AM (MT) tomorrow morning with the new products from the new Aug – Dec 2020 Mini Catalog. You can review my blog post from Friday to get details on the new Online Store. If you don’t have your new catalog yet, but would like to be one of my customers, let me know and I’ll be happy to send you one. It has a boatload of great products for the holidays!


August 1 – 15 Host Code: B76NYDVU

Use this host code when you order $50 or more and receive a free gift from me!  The free gift is your choice of any item valued up to $10.00 in the 2020 – 2021 Annual Catalog or the new Aug-Dec 2020 Mini Catalog.  

If your order is over $150, please do not use the host code since you’ll receive your own Host Dollars plus I’ll still send you the free gift!  This host code can be used by anyone, no club or commitment required.  Let me know if you have any questions.


If you need any stamping supplies, I’d be very happy to be your Demonstrator.  Just click on the Shop Now button on the right side of the screen to go directly to my online store or contact me if you have any questions.  Happy Stamping!

Thanks for stopping by and have a great week!

Akiko

  • Visit my online store here
  • See the current Stampin’ Up! clearance rack specials here
  • Earn FREE Stampin’ Up! products through my Wildflower Frequent Shopper Program – my way of saying thank you to my online frequent shopper customers.
  • Sign up for my weekly newsletter here
  • Have any questions? I’d be happy to help, click here to contact me.

Cardstock Cuts for this project:

  • Thick Whisper White – 5-1/2″ x 8-1/2″ card base scored at 4-1/4″
  • Real Red – 3-1/2″ x 7″ (flower petal die cuts)
  • Garden Green – 2″ x 3-1/2″ (leaf die cuts)
  • Vellum – 2″ x 5″ (label frame)
  • Silver Foil – 1-1/2″ x 2-1/2″ (berry sprig)
  • Whisper White – (2) 4″ x 5-1/4″ (inside panel and embossed panel mat), 3-7/8″ x 5-1/8″ (embossed panel), 1-1/4″ x 4-1/2″ (label)

Stampin’ Up! products used in this project:


Stampin’ Up! July Paper Pumpkin – Summer Nights

Hello! Last week I received my July Paper Pumpkin kit and I put together some of the projects but instead of making postcards, I turned them into cards. And it was so easy because the postcards fit perfectly on a 4-1/4″ x 5-1/2″ standard card base. The backgrounds are so pretty with the colors of sunset and the look of watercolor. And the projects really capture the magic and innocence of Summer Nights.

Here are the cards that I put together with the kit:

And you can see that I also made one of the tea light bags. Instead of using just the Blackberry Bliss ink spot that came with the kit, I pulled in my Calypso Coral and Coastal Cabana ink pads and stamped the fireworks in all three colors. I did this on the tea light bag, the card fronts and the envelopes.

Here’s the tea light bag with a battery operated LED tea light. That firework cut out is so magical!

And here are close ups of the cards. I pretty much followed the instructions, just adhered them to card bases with Stampin’ Seal.

For the first card, I just adhered the postcard to the front of a Whisper White card base. And it fits perfectly in the envelope.

I adhered this card to a Coastal Cabana card base. The vellum jar is perfect for catching fireflies!

The lanterns in the last card are so sweet and the sentiments in the kit are just gorgeous!

Here are the contents of the kit:

Here’s the Paper Pumpkin unboxing video from the YouTube channel showing how to assemble the cards:

And here is the Add on Kit (item 154973 – $10) that you can purchase here. It consists of 24 beautiful card bases and coordinating envelopes. The card bases are different images than the postcards in the kit, but with the same beautiful colors and watercolor look. The envelopes are so cute with the gold foil and colorful firefly linings.

And some projects that you can make with the the Add on Kit, using the Paper Pumpkin it and other items from your stash.

And here are some alternative projects that the Paper Pumpkin team put together:

If you are interested in how to make these projects and seeing other alternative ideas, visit the Paper Pumpkin Facebook Blog. They describe how to make each of these alternative projects and the Add on Projects. And they have additional ideas from demonstrators on projects using the July kit and the Add on kit.

And if you are interested in the refill kit (item 154956 – $10), you can purchase it here.

The August Paper Pumpkin Kit Celebrates The World’s Greatest

Lately, it’s become especially clear who the everyday heroes are—they’ve always surrounded us! Teachers, doctors, hairdressers, nurses, delivery workers, cashiers, and even our friends, kids, and family members go above and beyond to enrich our lives. These people are truly the world’s greatest at what they do!

Celebrate and appreciate the everyday heroes in your life with the August Paper Pumpkin Kit. The cards included in this kit are specifically designed for celebrating life’s champions! The kit includes Distinktive stamps, which are photo-realistic stamps that create an impressive detailed image with a single stamp. While the elements of the August kit can be used to show appreciation for anyone, the card designs also have a masculine feel – perfect for the men in your life!

Here are the Details:

  • Kit contains enough supplies to create nine cards and coordinating envelopes.
  • Card size: 4-1/4” x 5-1/2”
  • Envelope size: 4-1/2” x 5-3/4”
  • The kit’s stamp set includes Distinktive stamps

Coordinating Colors: Bumblebee, gold, Mint Macaron, Pacific Point, Soft Suede, white

If you’re interested in subscribing to Paper Pumpkin, you can either sign up for a subscription where you are billed monthly for your kit or you can purchase a prepaid subscription in my online store. To see more information and to sign up for the monthly subscription click here. To see the options for prepaid subscriptions in my online store, click here.

Sign up deadline for the August 2020 kit is August 10, 2020. Supplies may be limited toward the end of the subscription period.


August 1 – 15 Host Code: B76NYDVU

Use this host code when you order $50 or more and receive a free gift from me!  The gift is your choice of any item valued up to $10.00 in the 2020-21 Annual Catalog!

If your order is over $150, please do not use the host code since you’ll receive your own Host Dollars plus I’ll still send you the free gift!  This host code can be used by anyone, no commitment required.  Let me know if you have any questions.


If you need any stamping supplies, I’d be very happy to be your Demonstrator.  Just click on the Shop Now Button on the right side of the screen to go directly to my Online store or contact me if you have any questions.  Happy Stamping!

Thanks for stopping by and have a great day!

Akiko

  • Visit my Online store here
  • See the current Stampin’ Up! clearance rack specials here
  • Earn FREE Stampin’ Up! products through my Wildflower Frequent Shopper Program – my way of saying thank you to my frequent shopper online customers.
  • Sign up for my monthly newsletter here
  • Have any questions? I’d be happy to help, click here to contact me.

Stampin’ Up! Prepaid Paper Pumpkin Subscription Options:


Stampin’ Up! Online Store Updates and School Supply Sales Tax Holiday

Stampin’ Up! Online Store Changes coming August 4

Stampin’ Up! is updating the Online Store on August 4th! The current online store will go offline at midnight (MT) and the new store will go live at 7:00 AM (MT) on August 4.

Stampin’ Up! is updating the look and feel of the Online Store and bringing in many improvements to make it easier to navigate while you shop!  Here are some features of the new Online Store:

  • The store is designed to work seamlessly on desktops, tablets, and mobile phones.
  • New and improved store navigation provides an updated and enhanced shopping experience.
  • The site utilizes new, larger imagery to better showcase products and allow up-close details to be seen.
  • New sorting options and filters provide a more intuitive shopping experience, making it easier to find what you are looking for. The store’s organization and terminology are also more intuitive too.
  • The site utilizes inventory status information to show customers what items will be retiring soon, have low inventory, or are backordered so you can make informed purchasing decisions.
  • You can mark their favorite items for later reference, and you can create and share personalized wish lists.
  • A new Quick Shop feature makes it easy to add items to your cart. And there is a simplified checkout process.

A Few Things to Know:

  1. Your current account information and passwords will still work with the new site.
    • Be sure that you know your current login information so that you can log in right away!!
    • If you don’t know your login information by heart (or if you do like I do and have it saved to your browser so that you don’t have to remember it every time):
      • Log into your account today and then click on “my account” and then “email/passwords” and either record the information that is shown or, if it’s not shown, update your password and then write it down.
  2. While old bookmarks and links will forward to the “new” store, your browser will see it as a new site. So the first time you log in, it will prompt you for your account and password.
  3. Be sure that you see my name in the top right corner to earn my rewards and benefits for ordering!

If You Have Trouble Logging In:

  1. If you’ve forgotten your password, you can click the “Forgot Password” link on the new online store’s sign-in page and follow the steps to reset it. (The password reset email will come from noreply@info.stampinup.com.). Should you run into any problems there is a link in the password reset page with additional information.
  2. If you have trouble accessing your account, Stampin’ Up! can help. Just call them at 1-800-STAMPUP and they’ll be happy to help!  Unfortunately, I’m not able to assist with password changes as it’s a security issue for you. But Stampin’ Up! can definitely help you!

I’m looking forward to seeing the new site, especially the larger imagery!!😊

US SCHOOL SUPPLY SALES TAX HOLIDAY

Ten states will be offering a sales tax holiday for school supplies during the months of July or August. Products that are eligible according to the statute include “items normally used by students in a standard classroom for educational purposes.” To see the names of participating states, products exempted from tax, and sales tax holiday dates click here.

Please note that you must place your order with Stampin’ Up! during the tax holiday period in order to receive these items tax-free (which is midnight on the first day to midnight on the last day of the tax holiday). Also, keep in mind that this is a state sales tax holiday; the state statute may not apply to county, city, and special jurisdiction taxes. 


Stampin Up! Bonus Days are back!

We’re in the final days to to earn Bonus Days coupon codes! We’ll be able to start redeeming the coupon codes on Tuesday, August 4! For every $50 (before shipping and tax) you spend between today and August 3, you earn a $5 USD Bonus Days coupon code that can be redeemed between August 4 and August 31. There’s no limit on how many coupon codes you can earn or redeem, but they must be redeemed by August 31. For full details, see my Promotions Page.


July 16 – 31 Host Code: FD627X9W

August 1 – 15 Host Code: B76NYDVU

Use this host code when you order $50 or more and receive a free gift from me!  The gift is your choice of any item valued up to $10.00 in the 2020-21 Annual Catalog!

If your order is over $150, please do not use the host code since you’ll receive your own Host Dollars plus I’ll still send you the free gift!  This host code can be used by anyone, no commitment required.  Let me know if you have any questions.


If you need any stamping supplies, I’d be very happy to be your Demonstrator.  Just click on the Shop Now Button on the right side of the screen to go directly to my Online store or contact me if you have any questions.  Happy Stamping!

Thanks for stopping by and have a great day!

Akiko

  • Visit my Online store here
  • See the current Stampin’ Up! clearance rack specials here
  • Earn FREE Stampin’ Up! products through my Wildflower Frequent Shopper Program – my way of saying thank you to my frequent shopper online customers.
  • Sign up for my monthly newsletter here
  • Have any questions? I’d be happy to help, click here to contact me.

Stampin’ Up! Prized Peony Birthday Card

Good Morning! Today I want to share a birthday card made with the beautiful Stampin’ Up! Prized Peony bundle and the Peony Garden designer series paper. You can find the supplies used to create this card at the bottom of my post along with the sizes of cardstock used.

I colored a panel of the Peony Garden designer series paper with my Stampin’ Blends to create a background of yellow peonies. I colored the flowers with So Saffron and the leaves with Old Olive. I added touches of Light Calypso Coral to the centers. I colored a strip of the same paper to trim the bottom of the inside panel. I adhered the DSP panel to the front of a Gray Granite card base with Stampin’ Seal.

I cut a panel of Gray Granite card stock with a Stitched So Sweetly scalloped rectangle die and embossed it with the Dainty Diamonds 3D embossing folder. I stamped the Happy Birthday sentiment from the Peaceful Moments cling stamp set in Basic Gray ink on a small panel of Whisper White. I cut it out with a smaller scalloped rectangle die using the two step method so that it is shorter and I adhered it to the embossed panel with multipurpose liquid glue. I popped the layered embossed panel onto the front of the card with dimensionals.

I stamped the large peony flower from the Stampin’ Up! Prized Peony stamp set in Basic Gray ink on a Whisper White panel. I colored the flower with So Saffron, Old Olive and Calypso Coral Stampin’ Blends and cut it out with the coordinating die from the Peony Dies. I brushed some clear Wink of Stella on the flowers to add some glitter and popped it on the card front with dimensionals. I added a Whisper White Polka Dot Tulle Ribbon bow and some Elegant Faceted Gems to finish off the card front.

I stamped three of the medium peonies from the Stampin’ Up! Prized Peony stamp set in So Saffron ink on a Whisper White panel. I stamped the sentiment from the Peaceful Moments stamp set in Basic Gray ink and trimmed the bottom with the colored strip of Peony Garden DSP. I adhered the panel to the inside of the card with Stampin’ Seal.

Coloring DSP with Stampin’ Blends gives a whole new look to the paper and gives you an opportunity to bring in a totally different color palette. Plus it’s relaxing fun – Why not give it a try?


Stampin’ In The Meadows August-December 2020 Mini Catalog Product Shares – Sunday is the Last Day to Order!

The Stampin’ In The Meadows product shares for the new Mini Catalog are still available, but they’re filling up fast and the ordering deadline is on Sunday!! If you would like samples of all the new products from the new August-December 2020 Mini Catalog, check it out. I am offering 6×6 samples of all the new designer series papers for $25 + $7 Priority Shipping and samples of all the new embellishments for $26 + $7 Priority Shipping. And if you want both, you can get an I WANT IT ALL share for $51 + $7 Priority Shipping.

Visit my New Catalog Product Shares Page to get the full details of what is included. Fill out the order form or drop me an email if you have questions. Ordering deadline is August 2. Please note that I can only ship to addresses in the US.


Stampin Up! Bonus Days are back!

We’re in the final days to to earn Bonus Days coupon codes! We’ll be able to start redeeming the coupon codes on Tuesday, August 4! If you need a refresher on this promotion, here’s how it works: For every $50 (before shipping and tax) you spend between today and August 3, you earn a $5 USD Bonus Days coupon code that can be redeemed between August 4 and August 31. There’s no limit on how many coupon codes you can earn or redeem, but they must be redeemed by August 31. For full details, see my Promotions Page.


July 16 – 31 Host Code: FD627X9W

August 1 – 15 Host Code: B76NYDVU

Use this host code when you order $50 or more and receive a free gift from me!  The gift is your choice of any item valued up to $10.00 in the 2020-21 Annual Catalog!

If your order is over $150, please do not use the host code since you’ll receive your own Host Dollars plus I’ll still send you the free gift!  This host code can be used by anyone, no commitment required.  Let me know if you have any questions.


If you need any stamping supplies, I’d be very happy to be your Demonstrator.  Just click on the Shop Now Button on the right side of the screen to go directly to my Online store or contact me if you have any questions.  Happy Stamping!

Thanks for stopping by and have a great day!

Akiko

  • Visit my Online store here
  • See the current Stampin’ Up! clearance rack specials here
  • Earn FREE Stampin’ Up! products through my Wildflower Frequent Shopper Program – my way of saying thank you to my frequent shopper online customers.
  • Sign up for my monthly newsletter here
  • Have any questions? I’d be happy to help, click here to contact me.

Cardstock Cuts for this project:

  • Gray Granite – 4-1/4″ x 11″ card base scored at 5-1/2″, 2-3/4″ x 4″ (embossed die cut panel)
  • Whisper White – 4″ x 5-1/4″ (inside panel), 1-3/4″ x 2-1/2″ (label), 3-3/4″ x 4-3/4″ (die cut flower)
  • Peony Garden DSP – 4″ x 5-1/4″ (front background), 1/2″ x 4″ (inside trim)

Stampin’ Up! products used in this project:


Stampin’ Up! Butterfly Gala and More for the Happy Inkin’ Thursday Blog Hop

Good Morning! Welcome to another Happy Inkin’ Thursday Blog Hop! I had so much fun making today’s card – it’s so different and a bit busy. You can find the supplies I used and card stock cuts at the bottom of my post.

We have a color challenge in the Blog Hop this week, and here is the fun color palette we are using:

I was also inspired by a couple of challenges in the design of my card. First is the Try Stampin’ On Tuesday Challenge TSOT467 with this cute sketch:

The second challenge is the TGIF Challenge #TGIFC274 Product Challenge using paper scraps:

These fun challenges combined well with the color palette to create today’s fun card! I started by arranging my strips of Playing with Patterns scraps on a panel of striped Playing with Patterns DSP panel and adhering them with liquid glue. Then I adhered the layered DSP panel to a Coastal Cabana panel. I stamped the sentiment from the Stampin’ Up! Butterfly Gala photopolymer stamp set in Night of Navy ink on a small Purple Posy panel and cut it out with the Stitched Rectangles die.

I cut out the bird from the Birds & More dies from a small Purple Posy panel and the branch from a Coastal Cabana Panel. I punched two daisy petals from Whisper White card stock using the Medium Daisy Punch. I curled the petals backwards and adhered them together with liquid glue. I wrapped a length of Night of Navy ribbon around the panel and tied a bow on the left side. I adhered the label and the branch to the DSP strips with liquid glue and popped the panel on the front of a Night of Navy card base with dimensionals.

I popped the little bird on the branch with dimensionals and the daisy flower with glue dots. I added some Crushed Curry resin dots to the flower center and the branch. I finished the card front with three Purple Posy Butterfly Gems.

I stamped the sentiment from the Stampin’ Up! Butterfly Gala stamp set in Night of Navy ink on a Whisper White panel. I stamped the small butterfly and antenna in Coastal Cabana ink next to the sentiment. I trimmed the bottom of the panel with Playing with Patterns DSP and adhered the panel to the inside of the card with Stampin’ Seal.

I was a little concerned about the unique color palette, but this turned out to be a really cheerful and fun card.

On with the Hop! Click the Next button below to visit Karen Ksenzakovic’s blog.

And just in case you get lost along the way, here’s a list of the team members participating in the hop today:


July 16 – 31 Host Code: FD627X9W

Use this host code when you order $50 or more and receive a free gift from me!  The gift is your choice of any item valued up to $10.00 in the 2019-20 Annual Catalog or in the 2020 January-June Mini Catalog!  That includes some of the Host Exclusive stamp sets!

If your order is over $150, please do not use the host code since you’ll receive your own Host Dollars plus I’ll still send you the free gift!  This host code can be used by anyone, no commitment required.  Let me know if you have any questions.


If you need any stamping supplies, I’d be very happy to be your Demonstrator.  Just click on the Shop Now Button on the right side of the screen to go directly to my online store or contact me if you have any questions.  Happy Stamping!

Thanks for visiting!

Akiko

  • Visit my online store here
  • See the current Stampin’ Up! clearance rack specials here
  • Earn FREE Stampin’ Up! products through my Wildflower Frequent Shopper Program – my way of saying thank you to my frequent shopper online customers.
  • Sign up for my weekly newsletter here
  • Have any questions? I’d be happy to help, click here to contact me.

Cardstock Cuts for this project:

  • Night of Navy – 4-1/4″ x 11″ card base scored at 5-1/2″
  • Coastal Cabana – 4″ x 5-1/4″ (front background), 2″ x 4-1/4″ (die cut branch)
  • Purple Posy – 1-1/2″ x 2-1/4″ (label), 1-1/2″ x 2″ (bird die cut)
  • Whisper White – 4″ x 5-1/4″ (inside panel), 1-3/4″ x 3-1/2″ (punched flowers)
  • Playing with Patterns DSP – 1/2″ x 4″ (inside trim), 3-7/8″ x 4″ (front background), Various 3-7/8″ strips of scraps – I used a 3/8″, 1/2″ and two 3/4″ wide strips

Stampin’ Up! products used in this project:


Stampin’ Up! Dove of Hope Christmas Card

Good Morning! Today I have another sneak peek of a beautiful new bundle from the new Aug-Dec 2020 Mini Catalog. It’s called the Stampin’ Up! Dove of Hope Bundle and it comes with the Dove of Hope cling stamp set and the Detailed Dove Dies. This bundle will be available next week on Aug 4 – YAY!!! You can find the supplies used to create this card at the bottom of my post along with the sizes of cardstock used.

I stamped the Peace on Earth sentiment from the Stampin’ Up! Dove of Hope stamp set in Pacific Point ink on a panel of the new Snowflake Splendor designer series paper and adhered the panel to the front of a Pacific Point card base.

I cut out the dove body and two wings from the Detailed Dove Dies from Thick Whisper White card stock and adhered the wings to the body with liquid glue. I cut the small branch from Shaded Spruce card stock and adhered it to the beak with a dot of liquid glue. I adhered the bird to the card front with dimensionals.

I finished off the card front with two small pearls on the branch.

I stamped the sentiment from the Stampin’ Up! Dove of Hope stamp set in Pacific Point ink on a Whisper White panel. I stamped dove in Pool Party ink after stamping off, and trimmed the bottom with a strip of the Snowflake Splendor DSP. I adhered the panel to the inside of the card with Stampin’ Seal.

This was another simple Christmas card, but the dove die cut is so elegant and beautiful that it doesn’t need much.


Stampin’ In The Meadows August-December 2020 Mini Catalog Product Shares

The Stampin’ In The Meadows product shares for the new Mini Catalog are still available, but they’re filling up fast! If you would like samples of all the new products from the new August-December 2020 Mini Catalog, check it out. I am offering 6×6 samples of all the new designer series papers for $25 + $7 Priority Shipping and samples of all the new embellishments for $26 + $7 Priority Shipping. And if you want both, you can get an I WANT IT ALL share for $51 + $7 Priority Shipping.

Visit my New Catalog Product Shares Page to get the full details of what is included. Fill out the order form or drop me an email if you have questions. Ordering deadline is August 2. Please note that I can only ship to addresses in the US.


Stampin Up! Bonus Days are back!

It’s the last week to earn coupon codes in the Bonus Days promotion. If you need a refresher on this promotion, here’s how it works: For every $50 (before shipping and tax) you spend between today and August 3, you earn a $5 USD Bonus Days coupon code that can be redeemed between August 4 and August 31. There’s no limit on how many coupon codes you can earn or redeem, but they must be redeemed by August 31. For full details, see my Promotions Page.


July 16 – 31 Host Code: FD627X9W

Use this host code when you order $50 or more and receive a free gift from me!  The gift is your choice of any item valued up to $10.00 in the 2020-21 Annual Catalog!

If your order is over $150, please do not use the host code since you’ll receive your own Host Dollars plus I’ll still send you the free gift!  This host code can be used by anyone, no commitment required.  Let me know if you have any questions.


If you need any stamping supplies, I’d be very happy to be your Demonstrator.  Just click on the Shop Now Button on the right side of the screen to go directly to my Online store or contact me if you have any questions.  Happy Stamping!

Thanks for stopping by and have a great day!

Akiko

  • Visit my Online store here
  • See the current Stampin’ Up! clearance rack specials here
  • Earn FREE Stampin’ Up! products through my Wildflower Frequent Shopper Program – my way of saying thank you to my frequent shopper online customers.
  • Sign up for my monthly newsletter here
  • Have any questions? I’d be happy to help, click here to contact me.

Cardstock Cuts for this project:

  • Pacific Point – 4-1/4″ x 11″ card base scored at 5-1/2″
  • Shaded Spruce – 1″ x 1-1/2″ (branch die cut)
  • Thick Whisper White – 3″ x 5-1/4″ (dove die cuts)
  • Whisper White – 4″ x 5-1/4″ (inside panel)
  • Snowflake Splendor DSP – 4″ x 5-1/4″ (front background), 1/2″ x 4″ (inside trim)

Stampin’ Up! products used in this project:


Stampin’ Up! Snowflake Wishes Shaker Card Video Tutorial

Good Morning! Today I’m sharing a shaker card that I made during my Facebook Live video tutorial yesterday afternoon using the new Stampin’ Up! Snowflake Wishes bundle. This bundle is the most versatile snowflake set and the best yet, consisting of the Snowflake Wishes photopolymer stamp set and So Many Snowflakes Dies. It has so many different snowflake stamps and beautiful dies that can be combined to make many different style snowflake cards. And it has a die for a snowflake frame that I turned into my shaker card. The Stampin’ Up! Snowflake Wishes bundle will be available when the new Aug-Dec Mini Catalog premieres on Aug 4. You can find the supplies used to create this card at the bottom of my post along with the sizes of cardstock used.

Here is the Facebook Live video showing how I made the card:

I also posted the video to my YouTube Channel and you can view it here if you prefer.

I started by cutting out the frame using the snowflake window die cut from the So Many Snowflakes Dies (available Aug 4) and a Thick Whisper White panel. I embossed the the die cut panel with the Winter Snow embossing folder (available Aug 4). I adhered the window sheet to cover the opening with Tear and Tape. I applied Adhesive Foam strips around the opening making sure the ends were tight so that no sequins would leak through. I applied additional foam strips around the outside of the frame so that it would not bend.

I adhered a panel of the Snowflake Splendor designer series paper to the front of a Pacific Point card base. I die cut six of the small snowflakes from the Christmas Layers Dies from Balmy Blue Glimmer paper (available Aug 4) and placed 5 of them in the center of the DSP panel. I added some snowflake sequins (available Aug 4) and some Whale of a Time sequins (making sure to remove all pink shells) to the center with the die cut snowflakes. I peeled the covering off the adhesive foam strips and adhered the panel to the card front, pressing to make sure the foam strips next to the window were secure.

I stamped the Christmas Cheer sentiment from the Itty Bitty Christmas stamp set in Pacific Point ink on a small scrap of Thick Whisper White card stock and cut it out with a stitched die from the Ornate Frames dies. I folded a short length of Iridescent Ribbon (available Aug 4) and adhered it to the card front with glue dots. I adhered the last Balmy Blue small snowflake die cut to the label with multipurpose liquid glue and adhered it to the card over the ribbon with more glue dots. I cut the small intricate snowflake from the So Many Snowflakes dies from Balmy Blue glimmer paper and the medium intricate snowflake from Pacific Point card stock. I adhered these together with multipurpose liquid glue and adhered the snowflake to the card front with glue dots.

Inside the card, I stamped the sentiment from the Stampin’ Up! Snowflake Wishes stamp set (available Aug 4) in Pacific Point ink on a Whisper White panel. I stamped the snowflake cluster in stamped off Pacific Point ink and trimmed the bottom of the panel with a strip of Snowflake Splendor DSP before adhering it to the inside of the card.

This was the first time I made a shaker card and it was easier than I thought and they are so fun!! The pretty snowflake window die is perfect, and using the pretty Snowflake Splendor DSP (available Aug 4) makes it so easy! This bundle is a definite must have from the new Aug-Dec Mini Catalog, available on Aug 4.


Stampin’ In The Meadows August-December 2020 Mini Catalog Product Shares

I am pleased to announce that the Stampin’ In The Meadows product shares for the new Mini Catalog is open for orders! If you would like samples of all the new products from the new August-December 2020 Mini Catalog, check it out. I am offering 6×6 samples of all the new designer series papers for $25 + $7 Priority Shipping and samples of all the new embellishments for $26 + $7 Priority Shipping. And if you want both, you can get an I WANT IT ALL share for $51 + $7 Priority Shipping.

Visit my New Catalog Product Shares Page to get the full details of what is included. Fill out the order form or drop me an email if you have questions. Please note that I can only ship to addresses in the US.


Stampin Up! Bonus Days are back!

Good news – Bonus Days are back! That means it’s time to start earning coupon codes to redeem in August! If you need a refresher on this promotion, here’s how it works: For every $50 (before shipping and tax) you spend between today and August 3, you earn a $5 USD Bonus Days coupon code that can be redeemed between August 4 and August 31. There’s no limit on how many coupon codes you can earn or redeem, but they must be redeemed by August 31. For full details, see my Promotions Page.


July 16 – 31 Host Code: FD627X9W

Use this host code when you order $50 or more and receive a free gift from me!  The free gift is your choice of any item valued up to $10.00 in the 2019 – 2020 Annual Catalog or in the 2020 Mini Catalog!  That includes some of the Host Exclusive stamp sets!

If your order is over $150, please do not use the host code since you’ll receive your own Host Dollars plus I’ll still send you the free gift!  This host code can be used by anyone, no club or commitment required.  Let me know if you have any questions.


If you need any stamping supplies, I’d be very happy to be your Demonstrator.  Just click on the Shop Now button on the right side of the screen to go directly to my online store or contact me if you have any questions.  Happy Stamping!

Thanks for stopping by and have a great week!

Akiko

  • Visit my online store here
  • See the current Stampin’ Up! clearance rack specials here
  • Earn FREE Stampin’ Up! products through my Wildflower Frequent Shopper Program – my way of saying thank you to my online frequent shopper customers.
  • Sign up for my weekly newsletter here
  • Have any questions? I’d be happy to help, click here to contact me.

Cardstock Cuts for this project:

  • Pacific Point – 4-1/4″ x 11″ card base scored at 5-1/2″, 2″ x 2″ (med snowflake die cut)
  • Thick Whisper White – 3-1/2″ x 4-3/4″ (embossed & die cut top panel), 1″ x 2-1/4″ (label)
  • Window Sheet – 2-1/2″ x 4-1/2″
  • Balmy Blue Glimmer – 1-1/4″ x 3-1/4″ (die cut snowflakes)
  • Whisper White – 4″ x 5-1/4″ (inside panel)
  • Snowflake Splendor DSP – 4″ x 5-1/4″ (card front background), 1/2″ x 4″ (inside trim)

Stampin’ Up! products used in this project:


Stampin’ Up! Four Season Floral Christmas Card

Good Morning! Today I continue with my Christmas in July theme with a simple little Christmas note card made with the Stampin’ Up! Four Season Floral Stamp set. This little photopolymer stamp set is in the Beginner Brochure and it has four floral stamps – one of them is a poinsettia! So I decided to use it for today’s Christmas card. You can find the supplies used to create this card at the bottom of my post along with the sizes of cardstock used.

I adhered a panel of the Flowers for Every Season 6″ x 6″ designer series paper to a Poppy Parade mat with Stampin’ Seal. I adhered another strip of Poppy Parade on the left side of the panel and wrapped it with Just Jade In Color ribbon, securing it in the back.

I stamped the Merry Christmas sentiment from the Arrange a Wreath photopolymer stamp set in Poppy Parade in the lower right corner of a 3″ x 5″ Whisper White note card. I stamped the poinsettia from the Stampin’ Up! Four Season Floral stamp set in Memento Tuxedo Black ink on a small Whisper White panel. I colored it with Poppy Parade, Just Jade and Mango Melody Stampin’ Blends and cut it out with a label die from the Tasteful Labels dies.

I added Wink of Stella on the poinsettia and berries and popped it on the DSP panel with dimensionals. I added a Just Jade bow just beneath the poinsettia. I adhered the panel to the card front with dimensionals.

I left the inside of the note card pretty simple – I adhered a panel of Whisper White to a panel of Poppy Parade and adhered it to the inside of the card.

The Stampin’ Up! Four Season Floral stamp set is the perfect stamp set for beginning stampers. When paired with the Flowers for Every Season designer series paper or the Flowers for Every Season Memories and More card pack you have perfectly coordinated products that makes it easy to create beautiful cards. And also consider the Flowers for Every Season Cards and more pack that gives you a third option for coordination.


Stampin’ In The Meadows August-December 2020 Mini Catalog Product Shares

I am pleased to announce that the Stampin’ In The Meadows product shares for the new Mini Catalog is open for orders! If you would like samples of all the new products from the new August-December 2020 Mini Catalog, check it out. I am offering 6×6 samples of all the new designer series papers for $25 + $7 Priority Shipping and samples of all the new embellishments for $26 + $7 Priority Shipping. And if you want both, you can get an I WANT IT ALL share for $51 + $7 Priority Shipping.

Visit my New Catalog Product Shares Page to get the full details of what is included. Fill out the order form or drop me an email if you have questions. Please note that I can only ship to addresses in the US.


Stampin Up! Bonus Days are back!

Good news – Bonus Days are back! That means it’s time to start earning coupon codes to redeem in August! If you need a refresher on this promotion, here’s how it works: For every $50 (before shipping and tax) you spend between today and August 3, you earn a $5 USD Bonus Days coupon code that can be redeemed between August 4 and August 31. There’s no limit on how many coupon codes you can earn or redeem, but they must be redeemed by August 31. For full details, see my Promotions Page.


July 16 – 31 Host Code: FD627X9W

Use this host code when you order $50 or more and receive a free gift from me!  The gift is your choice of any item valued up to $10.00 in the 2020-21 Annual Catalog!

If your order is over $150, please do not use the host code since you’ll receive your own Host Dollars plus I’ll still send you the free gift!  This host code can be used by anyone, no commitment required.  Let me know if you have any questions.


If you need any stamping supplies, I’d be very happy to be your Demonstrator.  Just click on the Shop Now Button on the right side of the screen to go directly to my Online store or contact me if you have any questions.  Happy Stamping!

Thanks for stopping by and have a great day!

Akiko

  • Visit my Online store here
  • See the current Stampin’ Up! clearance rack specials here
  • Earn FREE Stampin’ Up! products through my Wildflower Frequent Shopper Program – my way of saying thank you to my frequent shopper online customers.
  • Sign up for my monthly newsletter here
  • Have any questions? I’d be happy to help, click here to contact me.

Cardstock Cuts for this project:

  • Poppy Parade – 3-1/8″ x 4-1/8″ (front mat), 3-1/8″ x 4-5/8″ (inside mat)
  • Whisper White – 3″ x 4-1/2″ (inside panel), 2″ x 2-1/2″ (small stamped die cut)
  • Flowers for Every Season DSP – 3″ x 4″ (front background)
  • Stampin’ Up! Whisper White note cards (item # 131527) used for card base

Stampin’ Up! products used in this project:


Stampin’ Up! Perfectly Plaid for the Happy Inkin’ Thursday Blog Hop

Good Morning! Welcome to another Happy Inkin’ Thursday Blog Hop! I am continuing with the Christmas in July theme for today’s card pairing a sneak peek of the new Snowflake Splendor designer series paper from the new Aug-Dec 2020 Mini Catalog with a returning favorite, the Stampin’ Up! Perfectly Plaid Christmas tree and Pine Tree Punch from the current Annual Catalog.

We have a sketch challenge this week, and here is the sketch we are using:

I embossed a strip of Balmy Blue card stock with the new Winter Snow embossing folder (available Aug 4) and adhered it to the bottom of a panel of the beautiful Snowflake Splendor designer series paper (available Aug 4). I adhered the layered panel to a Thick Whisper White panel and wrapped it with a length of Whisper White crinkle ribbon and made a bow. I adhered the panel to the front of a Balmy Blue card base with dimensionals.

I stamped the tree from the Stampin’ Up! Perfectly Plaid photopolymer stamp set three times on a panel of Thick Whisper White card stock and punched them out with the Pine Tree Punch. I adhered them to the front of the card with dimensionals.

I added sparkle to the trees by adding the iridescent adhesive backed snowflakes to the trees and added Blue Adhesive backed gems add sparkle to the background. Both of these will be available on Aug 4.

I stamped another tree from the Stampin’ Up! Perfectly Plaid stamp set in Highland Heather ink to the bottom of a Whisper White panel. I stamped the sentiment from the stamp set in the middle of the panel in Highland Heather ink and added a strip of the Snowflake Splendor DSP to the bottom. I adhered the panel to the inside of the card.

Non-Traditional colored Christmas cards aren’t for everyone, but they can be fun and whimsical – another way to spread happiness and joy during the Christmas season!

On with the Hop! Click the Next button below to visit Karen Ksenzakovic’s blog.

And just in case you get lost along the way, here’s a list of the team members participating in the hop today:


July 16 – 31 Host Code: FD627X9W

Use this host code when you order $50 or more and receive a free gift from me!  The gift is your choice of any item valued up to $10.00 in the 2019-20 Annual Catalog or in the 2020 January-June Mini Catalog!  That includes some of the Host Exclusive stamp sets!

If your order is over $150, please do not use the host code since you’ll receive your own Host Dollars plus I’ll still send you the free gift!  This host code can be used by anyone, no commitment required.  Let me know if you have any questions.


If you need any stamping supplies, I’d be very happy to be your Demonstrator.  Just click on the Shop Now Button on the right side of the screen to go directly to my online store or contact me if you have any questions.  Happy Stamping!

Thanks for visiting!

Akiko

  • Visit my online store here
  • See the current Stampin’ Up! clearance rack specials here
  • Earn FREE Stampin’ Up! products through my Wildflower Frequent Shopper Program – my way of saying thank you to my frequent shopper online customers.
  • Sign up for my weekly newsletter here
  • Have any questions? I’d be happy to help, click here to contact me.

Cardstock Cuts for this project:

  • Balmy Blue – 5-1/2″ x 8-1/2″ card base scored at 4-1/4″, 1″ x 5-1/8″ (embossed strip)
  • Thick Whisper White – 4″ x 5-1/4″ (front mat), 2-1/2″ x 5-1/2″ (punched trees)
  • Whisper White – 4″ x 5-1/4″ (inside panel)
  • Snowflake Splendor DSP – 3-7/8″ x 5-1/8″ (front background), 1/2″ x 5-1/4″ (inside trim)

Stampin’ Up! products used in this project: