Stampin’ Up! Prized Peony for the Happy Inkin’ Thursday Blog Hop

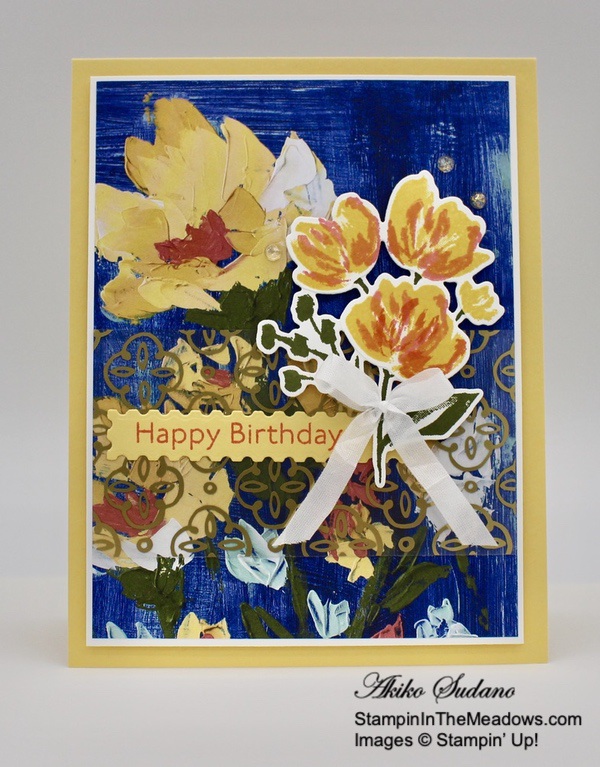
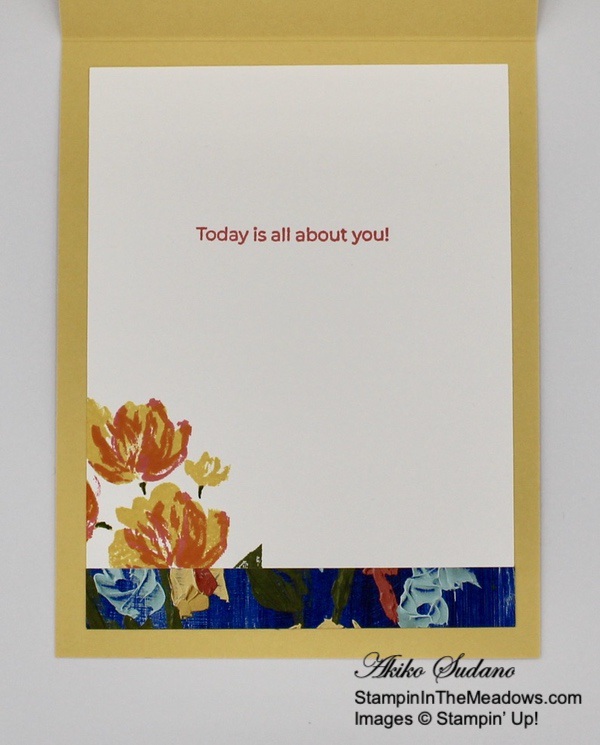
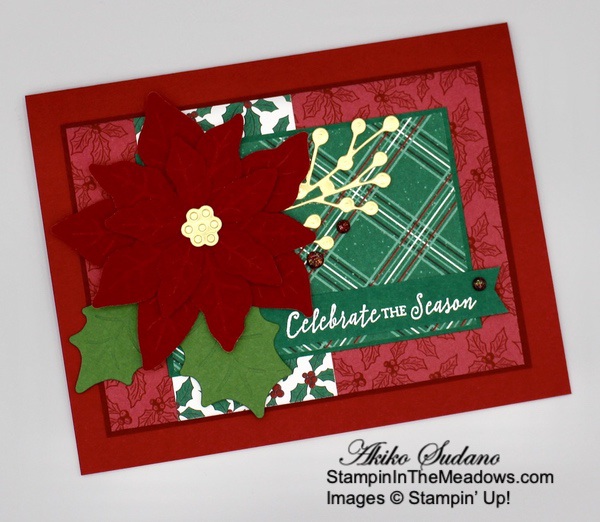
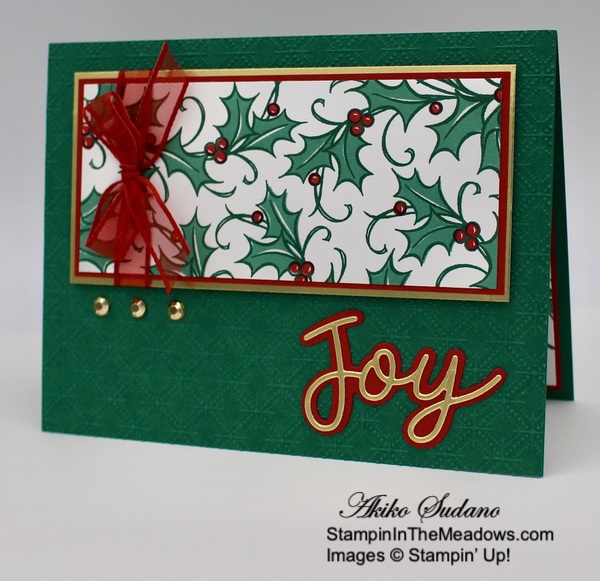
Happy Thanksgiving!! My turkey should be in the oven by now so it’s time for the Happy Inkin’ Thursday Blog Hop! For today’s hop, I used the beautiful Stampin’ Up! Prized Peony bundle with the Heartwarming Hugs designer series paper to make a holiday season birthday card. I love this peony and I wanted to use it for a special December baby birthday card. You can find the supplies used to create this card at the bottom of my post along with the sizes of cardstock used.

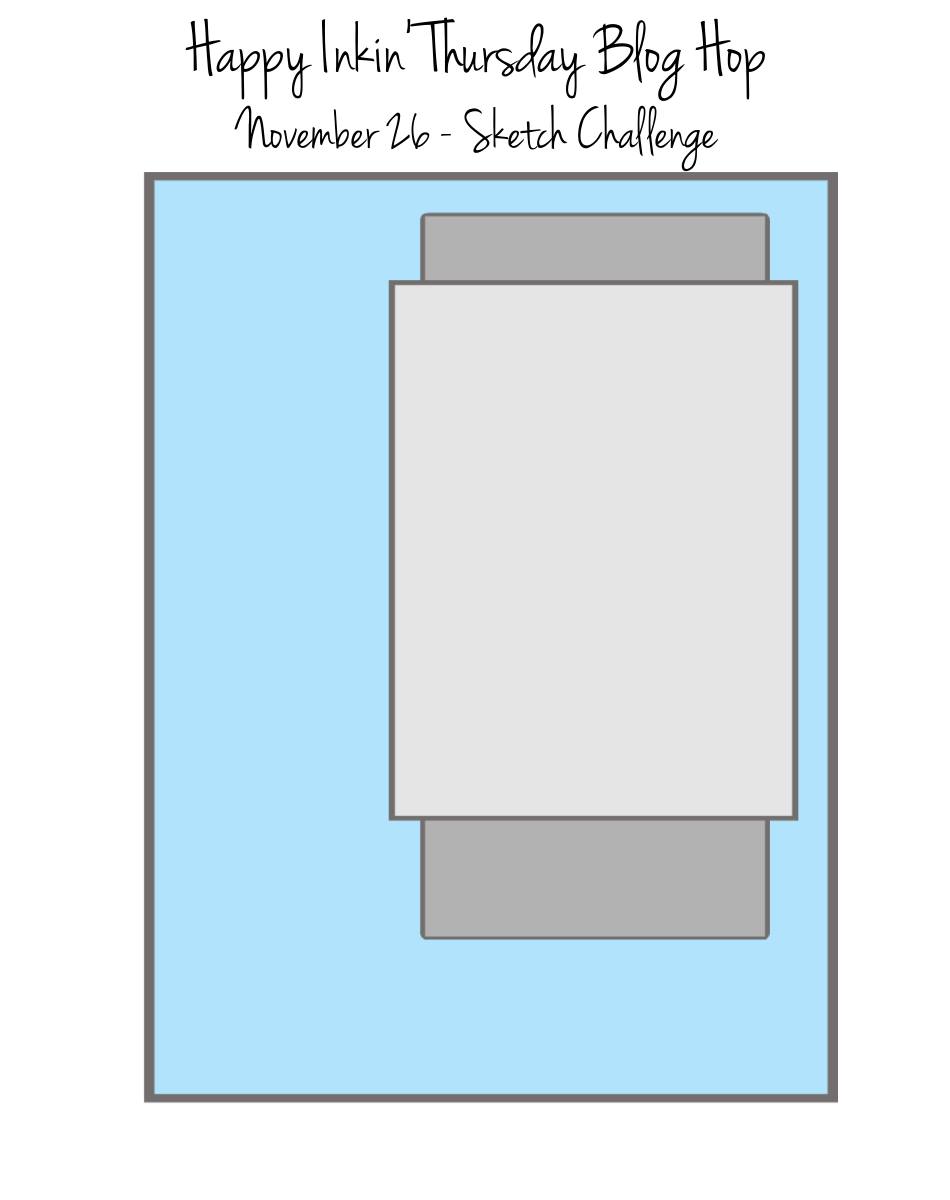
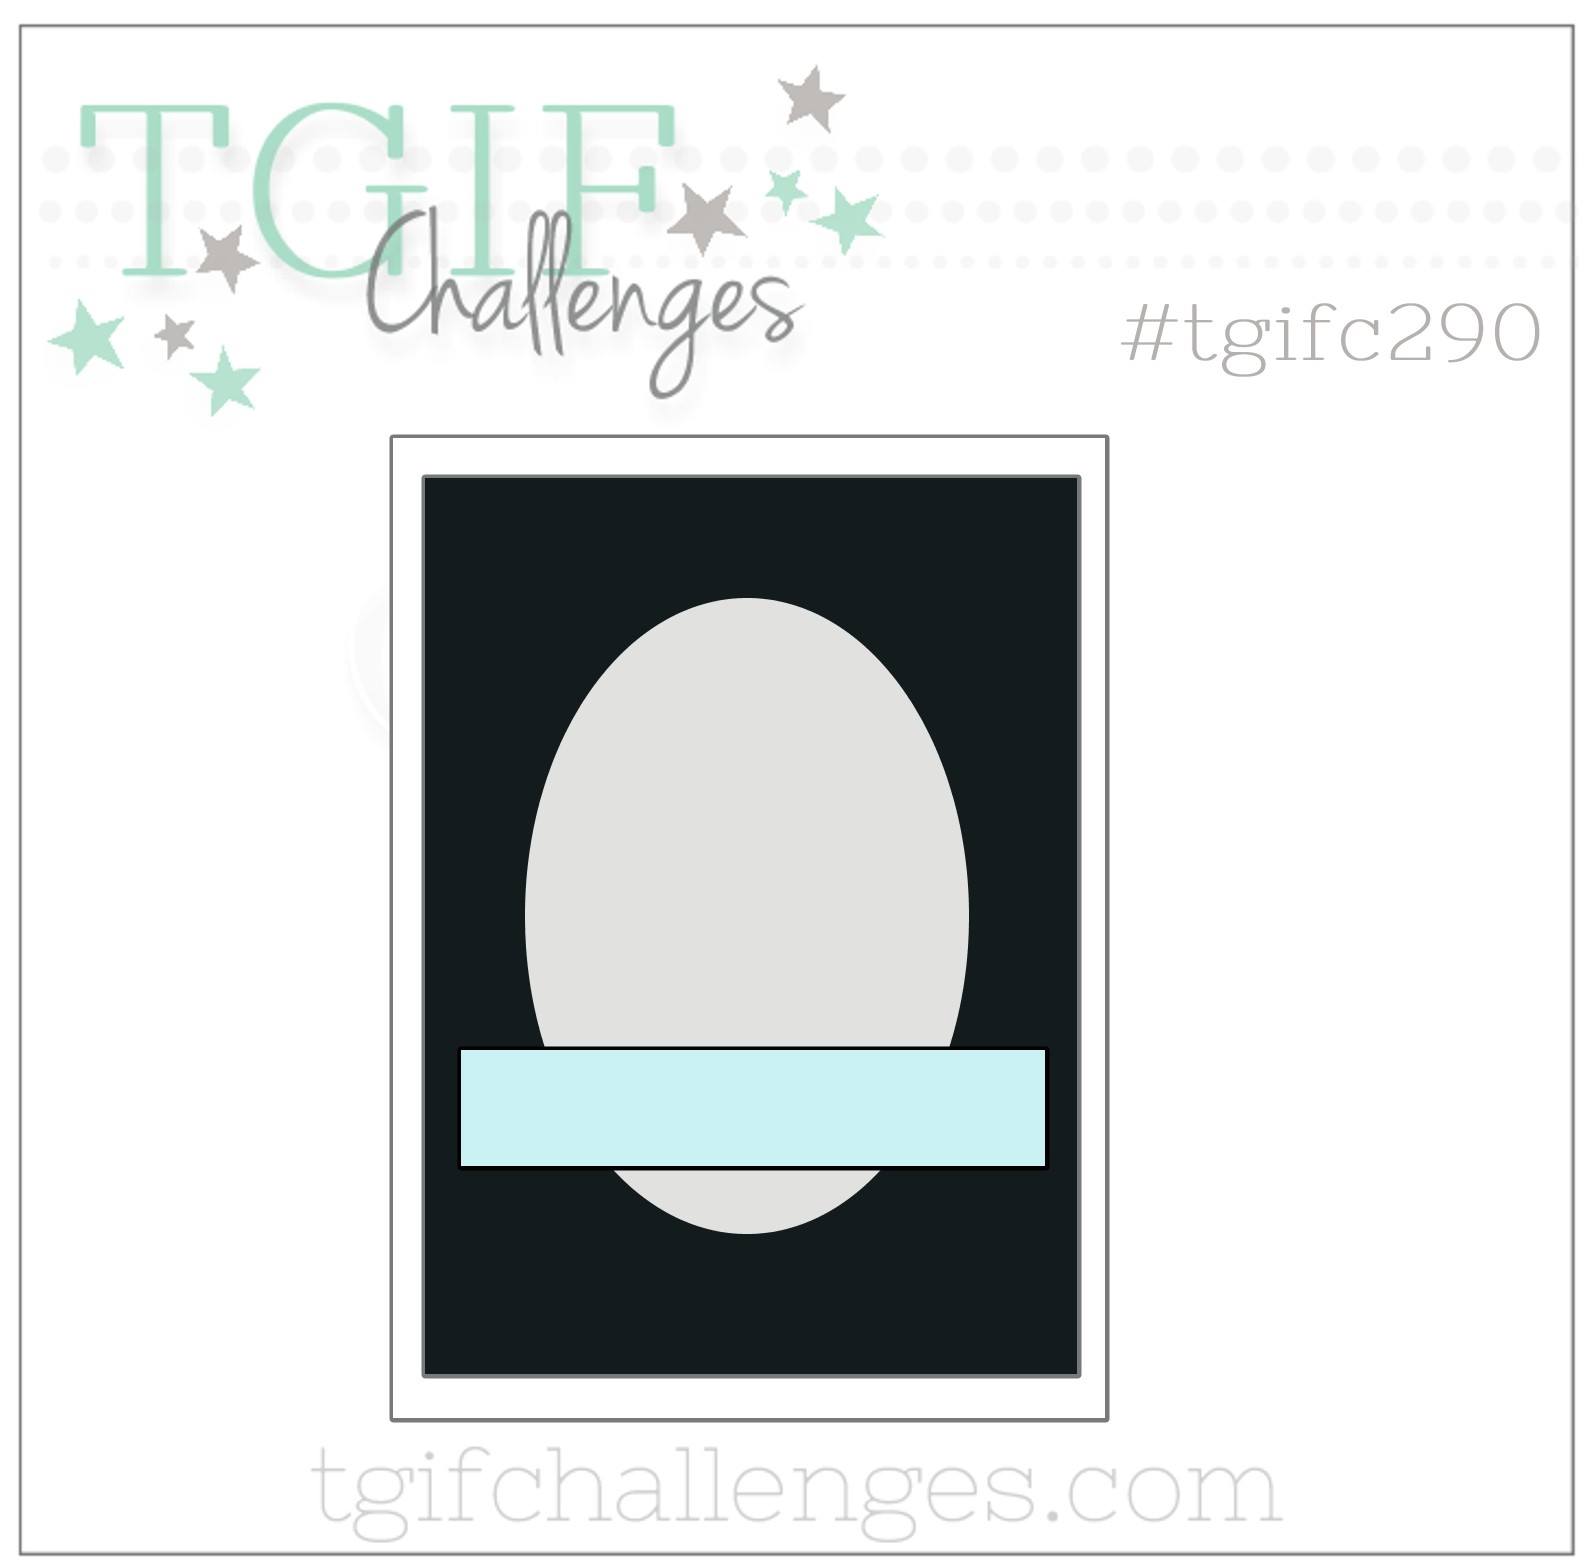
We have a sketch challenge this week, and here is the pretty sketch we are using for our projects:

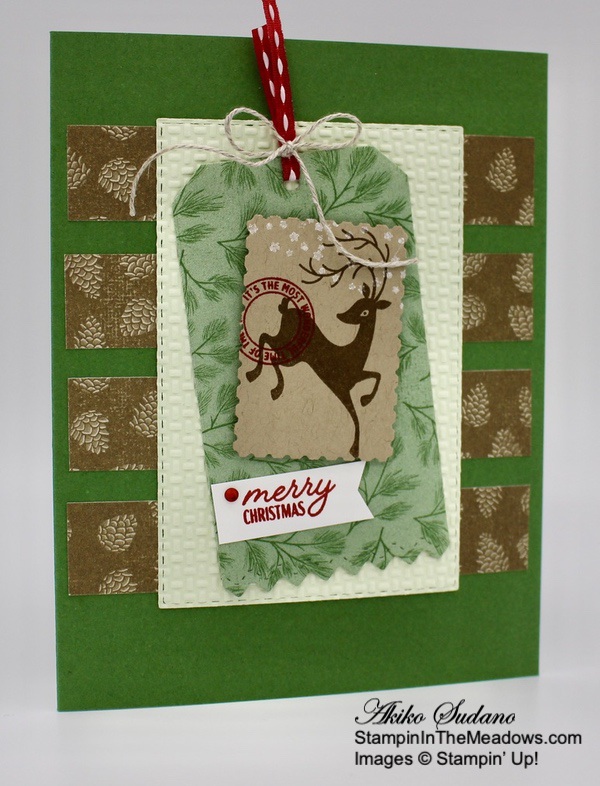
Emboss a Real Red Panel with the Parisian Flourish embossing folder and adhere it to the front of a Real Red Card Base. Adhere the striped Heartwarming Hugs Designer Series paper to the back of the red dotted designer series paper and then adhere it to the card front. Stamp the sentiment from the Peaceful Moments cling stamp set in Real Red ink on a Whisper White panel and cut it out with the Painted Labels Die. Adhere the label to the card front.

Cut the poppy petals from a Whisper White panel using the Peony Dies from the Stampin’ Up! Prized Peony bundle. Lightly sponge the petals with Real Red ink. Cut the flower center from Bumblebee. Assemble the flower and add a couple of half dimensionals at the top of the flower between the last two layers. Brush clear Wink of Stella on the flower to give it some sparkle. Cut the leaves from Mossy Meadow and Pear Pizzazz and adhere the pieces together.

Adhere the peony to the card front with glue dots. Adhere the leaves under the flower with glue dots. Make a bow with Real Red sheer ribbon and adhere a short length of Polka dot tulle ribbon behind it. Adhere it to the card and finish with three rhinestone gems.

Stamp the sentiment from the Peaceful Moments stamp set in Real Red ink on a Whisper White panel. Adhere a strip of the Heartwarming Hugs DSP to the bottom and adhere the panel to the inside of the card.

The Stampin’ Up! Prized Peony bundle is a beautiful set with gorgeous peony images as well as this innovative 3D die cut flower. It’s a must have if you love to make floral cards!

On with the Hop! Click the Next button below to visit Karen Ksenzakovic’s blog.

And just in case you get lost along the way, here’s a list of the team members participating in the hop today:


November 15-30 Host Code: N7E9DGB9

Use this host code when you order $50 or more and receive a free gift from me!  The gift is your choice of any item valued up to $10.00 in the 2019-20 Annual Catalog or in the 2020 January-June Mini Catalog!  That includes some of the Host Exclusive stamp sets!

If your order is over $150, please do not use the host code since you’ll receive your own Host Dollars plus I’ll still send you the free gift!  This host code can be used by anyone, no commitment required.  Let me know if you have any questions.


If you need any stamping supplies, I’d be very happy to be your Demonstrator.  Just click on the Shop Now Button on the right side of the screen to go directly to my online store or contact me if you have any questions.  Happy Stamping!

Thanks for visiting!

Akiko

  • Visit my online store here
  • See the current Stampin’ Up! clearance rack specials here
  • Earn FREE Stampin’ Up! products through my Wildflower Frequent Shopper Program – my way of saying thank you to my frequent shopper online customers.
  • Sign up for my weekly newsletter here
  • Have any questions? I’d be happy to help, click here to contact me.

Cardstock Cuts for this project:

  • Real Red – 5-1/2″ x 8-1/2″ card base scored at 4-1/4″, 4″ x 5-1/4″ (embossed panel)
  • Bumblebee – 1″ x 1-1/2″ (flower center)
  • Mossy Meadow – 2″ x 3″ (peony leaves)
  • Pear Pizzazz – 2-1/2″ x 3-1/2″ (peony leaves)
  • Whisper White – 4″ x 5-1/4″ (inside panel), 4″ x 4-3/4″ (peony flower), 1-3/4″ x 3″ (label)
  • Heartwarming Hugs DSP – 2-3/4″ x 4″ (red dotted panel), 2″ x 4-1/2″ (striped panel), 1/2″ x 5″ (inside trim)

Stampin’ Up! products used in this project:


Stampin’ Up! Art Gallery Sneak Peek

Good Morning! Today am sharing a sneak peek of a card that uses the new Stampin’ Up! Art Gallery bundle from the upcoming January – June 2021 Mini Catalog. I use one of the stamps in the set and pair it with the beautiful Fine Art Floral designer series paper and the Golden Garden designer specialty acetate. You can find the currently available supplies I used to create this card at the bottom of my post along with the sizes of cardstock used.

I adhered a paned of the pretty Fine Art Floral designer series paper to a Whisper White mat. I stamped the sentiment from the Stampin’ Up! Art Gallery photopolymer stamp set in Flirty Flamingo ink on a So Saffron strip and cut it out with the die from the Floral Gallery Dies. I adhered it to the pretty acetate panel with Stampin’ Seal.

I stamped the flower bouquet from the Stampin’ Up! Art Gallery stamp set in Mossy Meadow on a Whisper White panel and cut it out with the coordinating die. I stamped it again in So Saffron and cut it out again. I stamped the detail flower in Flirty Flamingo on top of the So Saffron flowers and cut out the flowers with my paper snips. I adhered the So Saffron flowers on top of the Mossy Meadow flowers with liquid glue. I positioned the bouquet on the acetate, and applied Stampin’ Seal to the back of the acetate behind the label and the bouquet. I carefully adhered the acetate to the DSP panel and popped the panel to the front of a So Saffron card base.

I popped the flowers on the card front with dimensionals and brushed some clear wink of Stella on the flowers. I adhered a Whisper White crinkle ribbon bow and three Wonderful Gems to finish the card front.

I stamped the sentiment from the Many Mates cling stamp set on a Whisper White panel. I inked up the flowers on the Stampin’ Up! Art Gallery flower bouquet stamp in So Saffron ink and stamped them in the bottom corner. I inked the leaves in Mossy Meadow and stamped again. I added some Flirty Flamingo with the detailed stamp and used my Mossy Meadow Stampin’ Write Marker to touch up the stems. I trimmed the bottom with a strip of the Fine Art Floral DSP and adhered the panel to the inside of the card.

I think the Stampin’ Up! Art Gallery bundle is definitely one of my favorites from the upcoming January – June 2021 Mini Catalog. The coordinating papers are absolutely beautiful and so much fun to play with.


Stampin’ Up! Merry & Bright Online Extravaganza Extended Another Day!!


Due to technical difficulties, the Stampin’ Up! Merry & Bright Online Extravaganza is extended another day, with 10% off select annual catalog items. Nearly all of the items in the annual catalog are eligible for the discount, but some exclusions do apply. You can see the exclusion list here. Head over to my Online Store to shop now!


January – June 2021 Mini Catalog is Coming Soon!

I received my copies of the new January – June 2021 Mini Catalog and Sale A Bration Brochure and there are so many new and exciting products coming on January 5, 2021 – Yay!! Demonstrators are able to place orders early – starting December 1, 2020. On that morning I will be placing an order that includes new catalogs for my customers! When I get my order, I’ll be sending my customer catalogs out ASAP. If you’ve placed orders with me of at least $50 during the past year, you are automatically on my list to get a catalog when my shipment arrives! If you have not placed an order with me but want to be on my mailing list for the new catalogs too, simply place an order through my Online Store and I’ll add you to my list so you can get your catalogs next month too!


November 15-30 Host Code: N7E9DGB9

Use this host code when you order $50 or more and receive a free gift from me!  The gift is your choice of any item valued up to $10.00 in the 2020-21 Annual Catalog or the Aug – Dec 2020 Mini Catalog. This includes some of the host exclusive sets!

If your order is over $150, please do not use the host code since you’ll receive your own Host Dollars plus I’ll still send you the free gift!  This host code can be used by anyone, no commitment required.  Let me know if you have any questions.


If you need any stamping supplies, I’d be very happy to be your Demonstrator.  Just click on the Shop Now Button on the right side of the screen to go directly to my Online store or contact me if you have any questions.  Happy Stamping!

Thanks for stopping by and have a great day!

Akiko

  • Visit my Online store here
  • See the current Stampin’ Up! clearance rack specials here
  • Earn FREE Stampin’ Up! products through my Wildflower Frequent Shopper Program – my way of saying thank you to my frequent shopper online customers.
  • Sign up for my monthly newsletter here
  • Have any questions? I’d be happy to help, click here to contact me.

Cardstock Cuts for this project:

  • So Saffron – 4-1/4″ x 11″ card base scored at 5-1/2″, 1″ x 3-1/2″ (label)
  • Whisper White – 3-3/4″ x 5″ (inside panel), 3-7/8″ x 5-1/8″ (front mat), 2-1/2″ x 5″ ( flower bouquet die cuts)
  • Fine Art Floral DSP – 3-3/4″ x 5″ (front panel), 1/2″ x 3-3/4″ (inside trim)
  • Golden Garden Specialty Designer Acetate – 2″ x 3-3/4″ (front strip)

Stampin’ Up! products used in this project:


Stampin’ Up! Festive Post Christmas Card

Good Morning! I have another Christmas card today, a rustic and simple card made with the pretty Stampin’ Up! Festive Post photopolymer stamp set. You can find the supplies used to create this card at the bottom of my post along with the sizes of cardstock used.

I stamped little reindeer from the Stampin’ Up! Festive Post stamp set in Soft Suede ink on a Crumb Cake panel. I stamped the little postmark in Real Red and the little stars in Whisper White Craft ink. I punched it out with the new Rectangular Postage Stamp punch that coordinates perfectly with the images in this set – and is on sale today only!! Yay!!

I cut a panel of green Poinsettia Place designer series paper with the tag die from the North Pole Wonder Dies. I wrapped a Real Red Stitched Ribbon through the hole and tied it with a length of Linen thread, making a bow. I adhered the punched deer with dimensionals. I stamped the sentiment from the Stampin’ Up! Festive Post stamp set in Real Red on a Whisper White strip and trimmed the end with the Banner Pick a punch. I adhered it to the tag with liquid glue.

I adhered four strips of pinecone Poinsettia Place DSP to the front of a Garden Green card base. I cut a panel of Soft Sea Foam with a Stitched Rectangle die and embossed it with the Wrapped In Texture embossing folder. I adhered it to the card front and adhered the label on top with liquid glue. I finished the label with a red rhinestone.

I stamped the deer from the Stampin’ Up! Festive Post stamp set in Soft Suede ink in the bottom corner of a Whisper White panel. I trimmed the bottom with a strip of green Poinsettia Place DSP and adhered the panel to the inside of the card.

I just love this happy little reindeer from the Stampin’ Up! Festive Post stamp set! And the stamp set has great holiday images that coordinate with that new Rectangular Postage Stamp Punch – I can’t wait to use the Valentine’s Day image! Of course the punch comes bundled with the pretty Posted for You cling stamp set and is on sale today too!


Stampin’ Up! Merry & Bright Online Extravaganza is Today!!

The Stampin’ Up! Merry & Bright Online Extravaganza is happening today, with 10% off select annual catalog items. Nearly all of the items in the annual catalog are eligible for the discount, but some exclusions do apply. You can see the exclusion list here. Head over to my Online Store to shop now!


January – June 2021 Mini Catalog is Coming Soon!

I received my copies of the new January – June 2021 Mini Catalog and Sale A Bration Brochure and there are so many new and exciting products coming on January 5, 2021 – Yay!! Demonstrators are able to place orders early – starting December 1, 2020. On that morning I will be placing an order that includes new catalogs for my customers! When I get my order, I’ll be sending my customer catalogs out ASAP. If you’ve placed orders with me of at least $50 during the past year, you are automatically on my list to get a catalog when my shipment arrives! If you have not placed an order with me but want to be on my mailing list for the new catalogs too, simply place an order through my Online Store and I’ll add you to my list so you can get your catalogs next month too!


Stampin’ Up! Curvy Celebrations Going On now!

The Stampin’ Up! Curvy Celebrations runs through January 4, 2021. This will include the Quite Curvy bundle, which is an early release of the upcoming January – June 2021 Mini Catalog along with the Curvy Christmas stamp set and Classic Christmas 6″ x 6″ designer series paper. Click on the picture above to view PDF Flyer with all the details. And if you purchase either the Quite Curvy Variety Bundle (item 158396) or the Quite Curvy Bundle (item 156228) from me between now and January 4, you will receive our special Online Tutorial Class with videos. This is an exclusive set of written and video tutorials created by Inkin’ Krew team members who purchase these products during the Curvy Celebrations!


November 15-30 Host Code: N7E9DGB9

Use this host code when you order $50 or more and receive a free gift from me!  The gift is your choice of any item valued up to $10.00 in the 2020-21 Annual Catalog or the Aug – Dec 2020 Mini Catalog. This includes some of the host exclusive sets!

If your order is over $150, please do not use the host code since you’ll receive your own Host Dollars plus I’ll still send you the free gift!  This host code can be used by anyone, no commitment required.  Let me know if you have any questions.


If you need any stamping supplies, I’d be very happy to be your Demonstrator.  Just click on the Shop Now Button on the right side of the screen to go directly to my Online store or contact me if you have any questions.  Happy Stamping!

Thanks for stopping by and have a great day!

Akiko

  • Visit my Online store here
  • See the current Stampin’ Up! clearance rack specials here
  • Earn FREE Stampin’ Up! products through my Wildflower Frequent Shopper Program – my way of saying thank you to my frequent shopper online customers.
  • Sign up for my monthly newsletter here
  • Have any questions? I’d be happy to help, click here to contact me.

Cardstock Cuts for this project:

  • Garden Green – 5-1/2″ x 8-1/2″ card base scored at 4-1/4″
  • Soft Sea Foam – 3″ x 4-1/2″ (die cut and embossed panel)
  • Crumb Cake – 1-1/2″ x 2-1/2″ (deer stamped punch)
  • Whisper White – 3-3/4″ x 5″ (inside panel), 1/2″ x 3″ (label)
  • Poinsettia Place DSP – 2-1/4″ x 3-3/4″ (die cut tag), 3/8″ x 3-3/4″ (inside trim), four 3/4″ x 4″ (pine cone strips)

Stampin’ Up! products used in this project:


Stampin’ Up! Snowflake Wishes Thank You Card Video Tutorial

Good Morning! Today I’m sharing a Winter Thank You card made with the Stampin’ Up! Snowflake Wishes bundle. This is the card I made during my Facebook Live video tutorial yesterday afternoon and I also used the Winter Snow 3D embossing folder and the Snowflake Splendor designer series paper to make sure I had enough snowflakes. Today’s card was inspired by a set of cards I saw on Pinterest made by Australian Demonstrator Gail Ellis. You can find the supplies I used to create this card at the bottom of my post along with the sizes of cardstock used.

Here is the Facebook Live video showing how I made the card:

I posted a copy of the video in my YouTube channel here so you can view it there if you prefer. Later this week I hope to get a quickie version posted to my channel too.

I embossed a Whisper White panel with the Winter Snow embossing folder and adhered it to the front of a Whisper White note card. I adhered the Snowflake Splendor DSP panels to the Balmy Blue mats and adhered it to the card front with liquid glue. I could not believe that when I was Live, I put my liquid glue on the wrong side of the designer series paper!! So I had to change things up a bit and stamped in Pacific Point instead of Balmy Blue. The color is a little more intense, but everything still goes together beautifully!

I stamped the sentiment from the Stampin’ Up! Snowflake Wishes photopolymer stamp set to a Whisper White panel in Pacific Point ink and cut it out with the Tasteful Labels die. I adhered some Snowflake Splendor ribbon to the back and adhered it to the card front with dimensionals.

I cut two small snowflakes and a medium snowflake from Balmy Blue glimmer paper with the So Many Snowflakes dies from the Stampin’ Up! Snowflake Wishes bundle and adhered them to the card front. I finished the card with a blue gem.

I stamped the snowflakes from the Stampin’ Up! Snowflake Wishes photopolymer stamp set in Pacific Point ink after stamping off in the corners of the inside of the card. I also stamped the outside of the envelope with Pacific Point snowflakes to match.

The Whisper White note cards and envelopes are perfect for a quick little thank you note – they are nice and thick, and don’t need an inside panel. Layered panel card designs like this one are a good use for those little scraps of pretty DSP that you can’t bear to throw out. And sending a quick thank you after Christmas is a nice way to reach out and let the joy of the season linger a little longer.


Stampin’ Up! Curvy Celebrations Going On now!

The Stampin’ Up! Curvy Celebrations runs through January 4, 2021. This will include the Quite Curvy bundle, which is an early release of the upcoming January – June 2021 Mini Catalog along with the Curvy Christmas stamp set and Classic Christmas 6″ x 6″ designer series paper. Click on the picture above to view PDF Flyer with all the details. And if you purchase either the Quite Curvy Variety Bundle (item 158396) or the Quite Curvy Bundle (item 156228) from me between now and January 4, you will receive our special Online Tutorial Class with videos. This is an exclusive set of written and video tutorials created by Inkin’ Krew team members who purchase these products during the Curvy Celebrations!


Stampin’ Up! Merry & Bright Online Extravaganza Is Tomorrow!!

The Stampin’ Up! Merry & Bright Online Extravaganza is tomorrow, with 10% off select annual catalog items. Nearly all of the items in the annual catalog are eligible for the discount, but some exclusions do apply. You can see the exclusion list here. So get your wish list ready so you can shop early in my Online Store. The sale only lasts for 24 hours on Tuesday November 24th!


November 15-30 Host Code: N7E9DGB9

Use this host code when you order $50 or more and receive a free gift from me!  The free gift is your choice of any item valued up to $10.00 in the 2019 – 2020 Annual Catalog or in the Aug-Dec 2020 Mini Catalog!  That includes some of the Host Exclusive stamp sets!

If your order is over $150, please do not use the host code since you’ll receive your own Host Dollars plus I’ll still send you the free gift!  This host code can be used by anyone, no club or commitment required.  Let me know if you have any questions.


If you need any stamping supplies, I’d be very happy to be your Demonstrator.  Just click on the Shop Now button on the right side of the screen to go directly to my online store or contact me if you have any questions.  Happy Stamping!

Thanks for stopping by and have a great week!

Akiko

  • Visit my online store here
  • See the current Stampin’ Up! clearance rack specials here
  • Earn FREE Stampin’ Up! products through my Wildflower Frequent Shopper Program – my way of saying thank you to my online frequent shopper customers.
  • Sign up for my weekly newsletter here
  • Have any questions? I’d be happy to help, click here to contact me.

Cardstock Cuts for this project:

  • Balmy Blue – 2-1/8″ x 2-1/8″, 1-1/8″ x 1-1/8″ (DSP mats)
  • Whisper White – 3-1/4″ x 4-3/4″ (embossed background), 2-1/4″ x 2-1/4″ (label)
  • Balmy Blue Glimmer – 2″ x 3-3/4″ (die cut snowflakes)
  • Snowflake Splendor DSP – 2″ x 2″, 1″ x 4″ (front panels)

Stampin’ Up! products used in this project:


Stampin’ Up! Joyful Holly Christmas Card II

Good Morning! Today am sharing another Christmas card made with the Stampin’ Up! Joyful Holly photopolymer stamp set. Earlier this week I used the stamp set to make another Christmas card – you can check it out here – that has a different look, showing the versatility of this beautiful stamp set. You can find the supplies used to create this card at the bottom of my post along with the sizes of cardstock used.

I stamped the outline holly branches from the Stampin’ Up! Joyful Holly stamp set in Shaded Spruce ink on a Whisper White panel. I stamped the corresponding solid leaves stamps in Just Jade to fill in the leaves and the berries in Cherry Cobbler ink. I adhered the panel to a Gold foil mat with liquid glue and then popped it on the front of a Cherry Cobbler card base with dimensionals.

I stamped the stamped sentiment from the Stampin’ Up! Joyful Holly stamp set in versamark ink on a Cherry Cobbler panel. I sprinkled it with white embossing powder and heat set until shiny. I cut it out with the die from the Tasteful Labels Dies.

I tied a loopy bow with gold trim and adhered it to the back with a glue dot. I popped the label on the card front with dimensionals and finished it with three gilded gems.

I stamped corners of a Whisper White panel with one of the holly branches from the Stampin’ Up! Joyful Holly stamp set in Shaded Spruce, Just Jade and Cherry Cobbler ink like the card front. I stamped the sentiment from the Toile Christmas cling stamp set in Cherry Cobbler ink and adhered the panel to the inside of the card.

This card was simpler to make than the previous Stampin’ Up! Joyful Holly card, and I think it’s just as beautiful. With this design you can appreciate how elegant and graceful the holly branches are. Thanks for stopping by and have a great weekend!


Stampin’ Up! Curvy Celebrations Going On now!

The Stampin’ Up! Curvy Celebrations runs through January 4, 2021. This will include the Quite Curvy bundle, which is an early release of the upcoming January – June 2021 Mini Catalog along with the Curvy Christmas stamp set and Classic Christmas 6″ x 6″ designer series paper. Click on the picture above to view PDF Flyer with all the details. And if you purchase either the Quite Curvy Variety Bundle (item 158396) or the Quite Curvy Bundle (item 156228) from me between now and January 4, you will receive our special Online Tutorial Class with videos. This is an exclusive set of written and video tutorials created by Inkin’ Krew team members who purchase these products during the Curvy Celebrations!


January – June 2021 Mini Catalog is Coming Soon!

I received my copies of the new January – June 2021 Mini Catalog and Sale A Bration Brochure and there are so many new and exciting products coming on January 5, 2021 – Yay!! Demonstrators are able to place orders early – starting December 1, 2020. On that morning I will be placing an order that includes new catalogs for my customers! When I get my order, I’ll be sending my customer catalogs out ASAP. If you’ve placed orders with me of at least $50 during the past year, you are automatically on my list to get a catalog when my shipment arrives! If you have not placed an order with me but want to be on my mailing list for the new catalogs too, simply place an order through my Online Store and I’ll add you to my list so you can get your catalogs next month too!


Stampin’ Up! Merry & Bright Online Extravaganza Coming November 24th!

The Stampin’ Up! Merry & Bright Online Extravaganza will be here soon, with 10% off select annual catalog items. Nearly all of the items in the annual catalog are eligible for the discount, but some exclusions do apply. You can see the exclusion list here. So get your wish list ready so you can shop early. The sale only lasts for 24 hours on Tuesday November 24th!


November 15-30 Host Code: N7E9DGB9

Use this host code when you order $50 or more and receive a free gift from me!  The gift is your choice of any item valued up to $10.00 in the 2020-21 Annual Catalog or the Aug – Dec 2020 Mini Catalog. This includes some of the host exclusive sets!

If your order is over $150, please do not use the host code since you’ll receive your own Host Dollars plus I’ll still send you the free gift!  This host code can be used by anyone, no commitment required.  Let me know if you have any questions.


If you need any stamping supplies, I’d be very happy to be your Demonstrator.  Just click on the Shop Now Button on the right side of the screen to go directly to my Online store or contact me if you have any questions.  Happy Stamping!

Thanks for stopping by and have a great day!

Akiko

  • Visit my Online store here
  • See the current Stampin’ Up! clearance rack specials here
  • Earn FREE Stampin’ Up! products through my Wildflower Frequent Shopper Program – my way of saying thank you to my frequent shopper online customers.
  • Sign up for my monthly newsletter here
  • Have any questions? I’d be happy to help, click here to contact me.

Cardstock Cuts for this project:

  • Cherry Cobbler – 4-1/4″ x 11″ card base scored at 5-1/2″, 1-1/2″ x 2-1/2″ (label)
  • Whisper White – two 3-3/4″ x 5″ (inside and front panels)
  • Gold Foil – 3-7/8″ x 5-1/8″ (front mat)

Stampin’ Up! products used in this project:


Stampin’ Up! Enjoy The Moment Sneak Peek

Good Friday Morning! Today am sharing a sneak peek of a card that uses the new Stampin’ Up! Enjoy The Moment cling stamp set from the upcoming January – June 2021 Mini Catalog. My card is CASE’d from one that Melody Hyde presented at the Stampin’ Up! OnStage@Home event a few weeks back. While Melody used new designer series paper, I paired the stamp set with the In Good Taste DSP. You can find the currently available supplies used to create this card at the bottom of my post along with the sizes of cardstock used.

I embossed a panel of Pretty Peacock with the Tasteful Textile 3D embossing folder and adhered it to the front of a Pretty Peacock card base. I used two sizes of the Stitched Rectangles Dies to cut the wood grained and the gesso canvas papers from the In Good Taste designer series paper. I stamped the small seed pods from the upcoming Stampin’ Up! Enjoy The Moment cling stamp set in Crumb Cake ink randomly across the die cut wood grained paper.

I stamped the large seed pod from the Stampin’ Up! Enjoy The Moment stamp set in Crumb Cake ink on the die cut gesso canvas DSP panel. I colored it with Crumb Cake and So Saffron Stampin’ Blends. I brushed some Pool Party Stampin’ Blends on the right side of the pod like a shadow and used the Color Lifter to blend the line. I adhered the In Good Taste paper panels to the card front with liquid glue.

I stamped the sentiment from the Stampin’ Up! Enjoy The Moment stamp set in Crumb Cake ink on a Whisper White strip and cut it out with the Tasteful Labels die. I folded a length of sheer Pool Party ribbon and adhered it behind the label. I popped it on the card front with dimensionals. I finished off the card front with blue sequins.

I stamped the seed pod from the Stampin’ Up! Enjoy The Moment stamp set in Crumb Cake ink on a small panel of the gesso canvas DSP and colored it to match the front. I stamped the little seed pods on a small panel of the wood grained DSP. I adhered the little panels of the In Good Taste DSP to the lower corner of a Whisper white panel and adhered the panel to the inside of the card.

A cute little nature themed note card! The In Good Taste designer series papers have so many different textures that coordinate beautifully with nature themed stamp sets like the new Stampin’ Up! Enjoy The Moment stamp set. With all the different images and sweet sentiments, this stamp set belongs on every wish list for the upcoming January – June 2021 Mini Catalog!


Stampin’ Up! Curvy Celebrations Going On now!

The Stampin’ Up! Curvy Celebrations runs through January 4, 2021. This will include the Quite Curvy bundle, which is an early release of the upcoming January – June 2021 Mini Catalog along with the Curvy Christmas stamp set and Classic Christmas 6″ x 6″ designer series paper. Click on the picture above to view PDF Flyer with all the details. And if you purchase either the Quite Curvy Variety Bundle (item 158396) or the Quite Curvy Bundle (item 156228) from me between now and January 4, you will receive our special Online Tutorial Class with videos. This is an exclusive set of written and video tutorials created by Inkin’ Krew team members who purchase these products during the Curvy Celebrations!


January – June 2021 Mini Catalog is Coming Soon!

I received my copies of the new January – June 2021 Mini Catalog and Sale A Bration Brochure and there are so many new and exciting products coming on January 5, 2021 – Yay!! Demonstrators are able to place orders early – starting December 1, 2020. On that morning I will be placing an order that includes new catalogs for my customers! When I get my order, I’ll be sending my customer catalogs out ASAP. If you’ve placed orders with me of at least $50 during the past year, you are automatically on my list to get a catalog when my shipment arrives! If you have not placed an order with me but want to be on my mailing list for the new catalogs too, simply place an order through my Online Store and I’ll add you to my list so you can get your catalogs next month too!


Stampin’ Up! Merry & Bright Online Extravaganza Coming November 24th!

The Stampin’ Up! Merry & Bright Online Extravaganza will be here soon, with 10% off select annual catalog items. Nearly all of the items in the annual catalog are eligible for the discount, but some exclusions do apply. You can see the exclusion list here. So get your wish list ready so you can shop early. The sale only lasts for 24 hours on Tuesday November 24th!


November 15-30 Host Code: N7E9DGB9

Use this host code when you order $50 or more and receive a free gift from me!  The gift is your choice of any item valued up to $10.00 in the 2020-21 Annual Catalog or the Aug – Dec 2020 Mini Catalog. This includes some of the host exclusive sets!

If your order is over $150, please do not use the host code since you’ll receive your own Host Dollars plus I’ll still send you the free gift!  This host code can be used by anyone, no commitment required.  Let me know if you have any questions.


If you need any stamping supplies, I’d be very happy to be your Demonstrator.  Just click on the Shop Now Button on the right side of the screen to go directly to my Online store or contact me if you have any questions.  Happy Stamping!

Thanks for stopping by and have a great day!

Akiko

  • Visit my Online store here
  • See the current Stampin’ Up! clearance rack specials here
  • Earn FREE Stampin’ Up! products through my Wildflower Frequent Shopper Program – my way of saying thank you to my frequent shopper online customers.
  • Sign up for my monthly newsletter here
  • Have any questions? I’d be happy to help, click here to contact me.

Cardstock Cuts for this project:

  • Pretty Peacock – 4-1/4″ x 11″ card base scored at 5-1/2″, 4-1/4″ x 5-1/2″ (embossed panel)
  • Whisper White – 4″ x 5-1/4″ (inside panel), 1″ x 3″ (label)
  • In Good Taste DSP
    • Wood Grain – 3-1/4″ x 4-1/2″ (front background), 1-1/4″ x 1-1/4″ (inside)
    • Rococo Rose Fabric – 3″ x 3″ (front layer), 1/2″ x 1-1/2″ (inside)
    • Gesso Canvas – 2-1/2″ x 3-3/4″ (front layer)., 1″ x 1″ (inside)

Stampin’ Up! products used in this project:


Stampin’ Up! Poinsettia Petals for the Happy Inkin’ Thursday Blog Hop

Hello and welcome to the Happy Inkin’ Thursday Blog Hop! For today’s hop, I used the beautiful Stampin’ Up! Poinsettia Petals bundle with the ‘Tis The Season 6″ x 6″ designer series paper to make a traditional Christmas Card. You can find the supplies used to create this card at the bottom of my post along with the sizes of cardstock used.

We have a color challenge this week, and here is the festive color palette we are using for our projects:

Adhere the strip of colorful holly paper to the panel of red holly ‘Tis The Season 6″ x 6″ designer series paper with liquid glue. Adhered the panel to a Cherry Cobbler mat and then to the front of a Real Red card base. Adhere the plaid ‘Tis The Season DSP to a Shaded Spruce mat and then adhere it to the card front.

Stamp the sentiment from the Itty Bitty Christmas stamp set in Versamark ink on a strip of Shaded Spruce. Sprinkle it with white embossing powder and heat set until shiny. Trim the end with the Banner Pick A Punch and adhere it to the card front. Using the Poinsettia Dies from the Stampin’ Up! Poinsettia Petals bundle, cut the three largest petal clusters from Red Velvet paper with the middle embossing panel. Adhere the layers together with liquid glue.

Cut one of each leaf from the Poinsettia Dies from Garden Green and cut the flower center and berry sprig from gold foil. Adhere the flower center to the poinsettia with a glue dot and adhere the flower to the card front with more glue dots. Add liquid glue to the leaves and gold berry sprig and tuck them under the poinsettia. Finish the card front with three Wonderful Gems.

Stamp the poinsettia from the Stampin’ Up! Poinsettia Petals photopolymer stamp set in Real Red ink on a Whisper White panel. Stamp the sentiment in Shaded Spruce and adhere another strip of plaid ‘Tis The Season 6″ x 6″ DSP to the bottom of the panel. Adhere the panel to the inside of the card.

The Stampin’ Up! Poinsettia Petals bundle makes the most beautiful 3d poinsettia flower for Christmas cards. And the ‘Tis The Season 6″ x 6″ designer series paper is so festive – any card made with it is sure to bring holiday!

On with the Hop! Click the Next button below to visit Karen Ksenzakovic’s blog.

And just in case you get lost along the way, here’s a list of the team members participating in the hop today:


November 15-30 Host Code: N7E9DGB9

Use this host code when you order $50 or more and receive a free gift from me!  The gift is your choice of any item valued up to $10.00 in the 2019-20 Annual Catalog or in the 2020 January-June Mini Catalog!  That includes some of the Host Exclusive stamp sets!

If your order is over $150, please do not use the host code since you’ll receive your own Host Dollars plus I’ll still send you the free gift!  This host code can be used by anyone, no commitment required.  Let me know if you have any questions.


If you need any stamping supplies, I’d be very happy to be your Demonstrator.  Just click on the Shop Now Button on the right side of the screen to go directly to my online store or contact me if you have any questions.  Happy Stamping!

Thanks for visiting!

Akiko

  • Visit my online store here
  • See the current Stampin’ Up! clearance rack specials here
  • Earn FREE Stampin’ Up! products through my Wildflower Frequent Shopper Program – my way of saying thank you to my frequent shopper online customers.
  • Sign up for my weekly newsletter here
  • Have any questions? I’d be happy to help, click here to contact me.

Cardstock Cuts for this project:

  • Real Red – 5-1/2″ x 8-1/2″ card base scored at 4-1/4″
  • Cherry Cobbler – 3-1/2″ x 4-3/4″ (front mat)
  • Garden Green – 1-1/2″ x 3-3/4″ (poinsettia leaves)
  • Shaded Spruce – 2-1/2″ x 3-1/2″ (front mat), 1/2″ x 3-1/2″ (label)
  • Whisper White – 3-3/4″ x 5″ (inside panel)
  • Gold Foil – 2″ x 2″ (berry sprig and flower center)
  • Red Velvet – 3-1/4″ x 8″ (poinsettia flower die cuts)
  • ‘Tis The Season 6″ x 6″ DSP – 3-3/8″ x 4-5/8″ (red holly), 1-3/4″ x 3-3/8″ (colorful holly), 2-3/8″ x 4-3/8″ (plaid), 3/8″ x 5″ (plaid inside trim)

Stampin’ Up! products used in this project:


Stampin’ Up! Well Said with Trimming The Town Welcome Card

Good Morning! Do you have new neighbors? Well I have the perfect card for the occasion – a Welcome card made with the wonderful Trimming the Town designer series paper and the Stampin’ Up! Well Said stamp set! You can find the supplies used to create this card at the bottom of my post along with the sizes of cardstock used.

Today’s card is inspired by the simply perfect #TGIFC290 sketch at TGIF Challenges:

I adhered a panel of Trimming the Town designer series paper to a Whisper White mat and then to the front of a Pear Pizzazz card base. I cut a stitched oval from Pool Party card stock using the Stitched Shapes dies. I cut the top of a snow bank with the Home Together Dies and cut the bottom with the same stitched oval die and adhered the snow bank to the oval.

I cut a house from the Trimming the Town DSP with a coordinating die from the Home Together Dies and cut two trees from the same paper – isn’t it nice when the dies match the designer series paper? I used the house die to cut a Whisper White House and adhered it to the back of the DSP house. I adhered the large tree to the oval and the small tree to the house. I adhered the oval to the card front and popped the house on the oval with dimensionals.

I adhered a strip of Adhesive sheets to the back of a strip of Old Olive card stock and cut two ‘welcome’ words with the Well Written dies. I peeled the cover off of one of the words and adhered the two words together and peeled the cover off and adhered the word to the card front.

I stamped the sentiment from the Stampin’ Up! Well Said stamp set in Old Olive ink on a Whisper White panel. I fussy cut some small houses from another sheet of Trimming the Town designer series paper and adhered them to the bottom of the panel and adhered the panel to the inside of the card.

Wouldn’t this card make you feel welcome to a new neighborhood? The Trimming the Town designer series paper has many wonderful Winter images that make beautiful cards. The small houses perfectly match the large houses, so they were perfect for placing at the bottom of the inside panel of this card. And the Stampin’ Up! Well Said and Well Written stamps and dies coordinate perfectly!


Stampin’ Up! Curvy Celebrations Going On now!

The Stampin’ Up! Curvy Celebrations runs through January 4, 2021. This will include the Quite Curvy bundle, which is an early release of the upcoming January – June 2021 Mini Catalog along with the Curvy Christmas stamp set and Classic Christmas 6″ x 6″ designer series paper. Click on the picture above to view PDF Flyer with all the details. And if you purchase either the Quite Curvy Variety Bundle (item 158396) or the Quite Curvy Bundle (item 156228) from me between now and January 4, you will receive our special Online Tutorial Class with videos. This is an exclusive set of written and video tutorials created by Inkin’ Krew team members who purchase these products during the Curvy Celebrations!


December’s Paper Pumpkin is Beary Comforting!

December’s cute and cuddly Paper Pumpkin kit—called “Beary Comforting”—is designed to uplift your loved ones as this beary tough year finally comes to a close. After a year like 2020, we all could use a big bear hug! With the help of this bear-themed kit, you can create 12 unbearably cute cards featuring warm and fuzzy friends, sweet stamps, and meaningful messages. Near or far, send your friends and family the extra comfort, love, and encouragement they need with this month’s Paper Pumpkin kit!

If you’re interested in subscribing to Paper Pumpkin, you can either sign up for a subscription where you are billed monthly for your kit or you can purchase a prepaid subscription in my online store. To see more information and to sign up for the monthly subscription click here. To see the options for prepaid subscriptions in my online store, click here.

Sign up deadline for the December 2020 kit is December 10, 2020. Supplies may be limited toward the end of the subscription period.


November 15-30 Host Code: N7E9DGB9

Use this host code when you order $50 or more and receive a free gift from me!  The gift is your choice of any item valued up to $10.00 in the 2020-21 Annual Catalog or the Aug – Dec 2020 Mini Catalog. This includes some of the host exclusive sets!

If your order is over $150, please do not use the host code since you’ll receive your own Host Dollars plus I’ll still send you the free gift!  This host code can be used by anyone, no commitment required.  Let me know if you have any questions.


If you need any stamping supplies, I’d be very happy to be your Demonstrator.  Just click on the Shop Now Button on the right side of the screen to go directly to my Online store or contact me if you have any questions.  Happy Stamping!

Thanks for stopping by and have a great day!

Akiko

  • Visit my Online store here
  • See the current Stampin’ Up! clearance rack specials here
  • Earn FREE Stampin’ Up! products through my Wildflower Frequent Shopper Program – my way of saying thank you to my frequent shopper online customers.
  • Sign up for my monthly newsletter here
  • Have any questions? I’d be happy to help, click here to contact me.

Cardstock Cuts for this project:

  • Pear Pizzazz – 4-1/4″ x 11″ card base scored at 5-1/2″
  • Pool Party – 2-3/4″ x 3-3/4″ (stitched oval die cut)
  • Old Olive – 1″ x 4″ (welcome words)
  • Whisper White – 3-3/4″ x 5″ (inside panel), 3-7/8″ x 5-1/8″ (front mat), 2″ x 2-3/4″ (large house backing), 1-1/4″ x 2-1/2″ (snow bank)
  • Trimming the Town DSP – 3-3/4″ x 5″ (tree front background), large house and two trees, small houses

Stampin’ Up! products used in this project:


Stampin’ Up! Joyful Holly Christmas Card

Good Morning! Today I am sharing a Christmas Card made with the pretty Stampin’ Up! Joyful Holly photopolymer stamp set. This is a multi step stamp set with beautiful, graceful holly branches and stamps for making the outlines and coloring the inside. Since it’s a photopolymer stamp set, it’s pretty easy to do because you can see through the stamp to get a good alignment. You can find the supplies used to create this card at the bottom of my post along with the sizes of cardstock used.

I started by stamping one of the holly branches from the Stampin’ Up! Joyful Holly stamp set in Shaded Spruce ink randomly all over the Whisper White panel to get an all over stamped look. I stamped the corresponding solid leaves stamp in Just Jade to fill in the leaves and the berries in Real Red ink to finish the panel. I adhered the panel to a Real Red mat and then to a gold foil mat and tied a length of sheer Real Red ribbon in a bow on one side.

I used the Joy dies to cut out the thin lined ‘Joy’ word from gold foil and the medium word from Real Red. I adhered the gold foil word to the Real Red word with the fine tip glue pen and set a stamp block on top for bit to let the glue dry. Meanwhile, I embossed a panel of Shaded Spruce card stock with the Dainty Diamonds 3D embossing folder and adhered it to the front of a Shaded Spruce card base.

I adhered the stamped panel to the card front with dimensionals and the Joy with liquid glue. I finished the card front off with three Gilded Gems.

I stamped three corners of a Whisper White panel with one of the holly branches from the Stampin’ Up! Joyful Holly stamp set in Shaded Spruce, Just Jade and Real Red ink like the panel on the card front. I stamped the sentiment in Real Red ink on the side and adhered the panel to a Real Red mat and then to the inside of the card.

The holly branches from the Stampin’ Up! Joyful Holly stamp set are pretty versatile because they make beautiful Christmas cards when randomly stamped as well as when stamped as simple elegant branches. And the outline images can be colored with the two step stamp method like I did or colored separately with any coloring technique – markers, watercolor, colored pencils or not at all. Here’s a close up of the stamp set so you can see what I mean about how beautifully elegant and graceful the branches are. Click on the image to see the details in my On Line Store.


Stampin’ Up! Curvy Celebrations Going On now!

The Stampin’ Up! Curvy Celebrations runs through January 4, 2021. This will include the Quite Curvy bundle, which is an early release of the upcoming January – June 2021 Mini Catalog along with the Curvy Christmas stamp set and Classic Christmas 6″ x 6″ designer series paper. Click on the picture above to view PDF Flyer with all the details. And if you purchase either the Quite Curvy Variety Bundle (item 158396) or the Quite Curvy Bundle (item 156228) from me between now and January 4, you will receive our special Online Tutorial Class with videos. This is an exclusive set of written and video tutorials created by Inkin’ Krew team members who purchase these products during the Curvy Celebrations!


January – June 2021 Mini Catalog and Sale A Bration is Coming Soon!

Last weekend at Stampin’ Up! OnStage, we got to see many of the new products that will be coming in the new January-June 2021 Mini Catalog – and they are so amazing! Another benefit of attending OnStage is that we got the opportunity to order a few of the new products and received copies of the new Mini Catalog and Sale A Bration Brochure! So I’m busy looking through the catalogs, planning my pre-order next month – including new catalogs for my customers! If you’ve placed orders with me of at least $50 during the past year, you are automatically on my list to get a catalog when my shipment arrives! If you have not placed an order with me but want to be on my mailing list for the new catalogs too, simply place an order through my Online Store and I’ll add you to my list so you can get your catalogs too!


November 15-30 Host Code: N7E9DGB9

Use this host code when you order $50 or more and receive a free gift from me!  The gift is your choice of any item valued up to $10.00 in the 2020-21 Annual Catalog or the Aug – Dec 2020 Mini Catalog. This includes some of the host exclusive sets!

If your order is over $150, please do not use the host code since you’ll receive your own Host Dollars plus I’ll still send you the free gift!  This host code can be used by anyone, no commitment required.  Let me know if you have any questions.


If you need any stamping supplies, I’d be very happy to be your Demonstrator.  Just click on the Shop Now Button on the right side of the screen to go directly to my Online store or contact me if you have any questions.  Happy Stamping!

Thanks for stopping by and have a great day!

Akiko

  • Visit my Online store here
  • See the current Stampin’ Up! clearance rack specials here
  • Earn FREE Stampin’ Up! products through my Wildflower Frequent Shopper Program – my way of saying thank you to my frequent shopper online customers.
  • Sign up for my monthly newsletter here
  • Have any questions? I’d be happy to help, click here to contact me.

Cardstock Cuts for this project:

  • Shaded Spruce – 5-1/2″ x 8-1/2″ card base scored at 4-1/4″, 4-1/4″ x 5-1/2″ (embossed panel)
  • Real Red – 4″ x 5-1/4″ (inside mat), 2-1/8″ x 4-5/8″ (stamped panel mat), 1-1/2″ x 2-3/8″ (Joy word)
  • Gold foil – 2-1/4″ x 4-3/4″ (stamped panel mat), 1-3/8″ x 2-1/2″ (Joy word)
  • Whisper White – 2″ x 4-1/2″ (stamped panel), 3-7/8″ x 5-1/8″ (inside panel)

Stampin’ Up! products used in this project:


Stampin’ Up! Gather Together Thanksgiving Card Video Tutorial

Good Morning! Today I’m sharing my final Thanksgiving card for this year – I’ll be sending them out to my family this week and moving on to finishing up Christmas cards. Kind of sad because I really love the fall season. This is the card I made during my Facebook Live video tutorial yesterday afternoon and it is full of pumpkins from the Stampin’ Up! Gather Together stamp set and Gathered Leaves dies. And I filled it out with an Autumn version of the new Quite Curvy leaves! You can find the supplies used to create this card at the bottom of my post along with the sizes of cardstock used.

Here is the Facebook Live video showing how I made the card:

I posted a copy of the video in my YouTube channel here so you can view it there if you prefer. Later this week I hope to get a quickie version posted to my channel too.

I started by stamping the pumpkins from the Stampin’ Up! Gather Together photopolymer stamp set in Cajun Craze ink on Whisper White. I stamped three large pumpkins and two of the smaller sets of pumpkins and colored them with Pumpkin Pie and Mossy Meadow Stampin’ Blends. I fussy cut them out. I cut two large leaves from the Gathered Leaves Dies from Old Olive card stock.

I stamped the large leafy vine from the Quite Curvy photopolymer stamp set in Soft Suede ink on Whisper White and cut it out with the coordinating die. I colored the leaves with Cajun Craze, Mango Melody, Cinnamon Cider and Old Olive Stampin’ Blends. I adhered a panel of Cinnamon Cider 2020-2022 In Color 6″ x 6″ designer series paper to a Cajun Craze mat and adhered it to the front of a Bumblebee card base. I adhered the die cut leaves to the panel with liquid glue and adhered the pumpkins across the bottom. I used liquid glue on all except the center pumpkin, which I popped on with a dimensional.

I adhered the Quite Curvy leafy vine with dimensionals on the bottom of the arrangement. I stamped the sentiment from the Stampin’ Up! Gathered Together stamp set in Soft Suede ink on a Bumblebee panel. I cut it out with the small label die from the Beautiful Boughs dies and stamped the wheat sheafs in Bumblebee ink. I adhered the label to the front of the card with dimensionals and finished of the card front with three Bumblebee enamel gems.

I stamped the sentiment from the Banner Year photopolymer stamp set in Cajun Craze ink on a Whisper White panel. I stamped the wheat sheaf from the Stampin’ Up! Gather Together stamp set in Bumblebee ink next to the sentiment and stamped the leafy vine in Soft Suede ink on the bottom. I colored the leaves with dimensionals like the card front and adhered the panel to a Cajun Craze mat before adhering it to the inside of the card.

I love the Stampin’ Up! Gather Together Bundle and was so happy to see it return in the Aug-Dec 2020 Mini Catalog. And I love the fall version of the Quite Curvy leafy vine!! Thanks for stopping by and Have a great week!


Stampin’ Up! Curvy Celebrations Going On now!

The Stampin’ Up! Curvy Celebrations runs through January 4, 2021. This will include the Quite Curvy bundle, which is an early release of the upcoming January – June 2021 Mini Catalog along with the Curvy Christmas stamp set and Classic Christmas 6″ x 6″ designer series paper. Click on the picture above to view PDF Flyer with all the details. And if you purchase either the Quite Curvy Variety Bundle (item 158396) or the Quite Curvy Bundle (item 156228) from me between now and January 4, you will receive our special Online Tutorial Class with videos. This is an exclusive set of written and video tutorials created by Inkin’ Krew team members who purchase these products during the Curvy Celebrations!


January – June 2021 Mini Catalog and Sale A Bration is Coming Soon!

Last weekend at Stampin’ Up! OnStage, we got to see many of the new products that will be coming in the new January-June 2021 Mini Catalog – and they are so amazing! Another benefit of attending OnStage is that we got the opportunity to order a few of the new products and received copies of the new Mini Catalog and Sale A Bration Brochure! So I’m busy looking through the catalogs, planning my pre-order next month – including new catalogs for my customers! If you’ve placed orders with me of at least $50 during the past year, you are automatically on my list to get a catalog when my shipment arrives! If you have not placed an order with me but want to be on my mailing list for the new catalogs too, simply place an order through my Online Store and I’ll add you to my list so you can get your catalogs too!


November 15-30 Host Code: N7E9DGB9

Use this host code when you order $50 or more and receive a free gift from me!  The free gift is your choice of any item valued up to $10.00 in the 2019 – 2020 Annual Catalog or in the Aug-Dec 2020 Mini Catalog!  That includes some of the Host Exclusive stamp sets!

If your order is over $150, please do not use the host code since you’ll receive your own Host Dollars plus I’ll still send you the free gift!  This host code can be used by anyone, no club or commitment required.  Let me know if you have any questions.


If you need any stamping supplies, I’d be very happy to be your Demonstrator.  Just click on the Shop Now button on the right side of the screen to go directly to my online store or contact me if you have any questions.  Happy Stamping!

Thanks for stopping by and have a great week!

Akiko

  • Visit my online store here
  • See the current Stampin’ Up! clearance rack specials here
  • Earn FREE Stampin’ Up! products through my Wildflower Frequent Shopper Program – my way of saying thank you to my online frequent shopper customers.
  • Sign up for my weekly newsletter here
  • Have any questions? I’d be happy to help, click here to contact me.

Cardstock Cuts for this project:

  • Bumblebee – 5-1/2″ x 8-1/2″ card base scored at 4-1/4″, 1-3/4″ x 3″ (label)
  • Cajun Craze – 3-1/8″ x 4-5/8″ (DSP mat), 3-7/8″ x 5-1/8″ (inside mat)
  • Old Olive – 2-1/2″ x 5″ (die cut leaves)
  • Whisper White – 3-3/4″ x 5″ panel (inside panel), 1-3/4″ x 5-1/2″ (leafy vine die cut), 2-1/2″ x 4-1/2″ (die cut pumpkins)
  • 2020-2022 In Color 6″ x 6″ DSP – 3″ x 4-1/2″ (front background)

Stampin’ Up! products used in this project: