Stampin’ Up! Poinsettia Petals Thank You Card Video Tutorial

Good Morning! Today’s card is a holiday themed Thank You card using the beautiful Stampin’ Up! Poinsettia Petals bundle and the Poinsettia Place designer series paper. This is the card I made during my Facebook Live video tutorial yesterday afternoon and you can find the supplies I used to create this card at the bottom of my post along with the sizes of cardstock used.

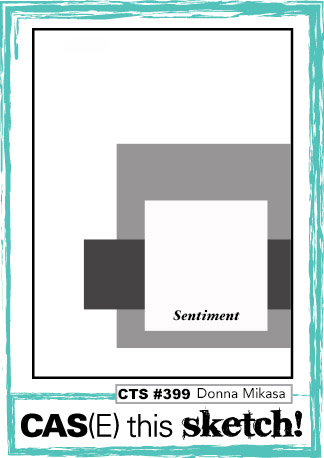
My card was inspired by the cute Sketch Challenge in Freshly Made Sketches #464.

Here is the Facebook Live video showing how I made the card:

I posted a copy of the video in my YouTube channel here so you can view it there if you prefer.


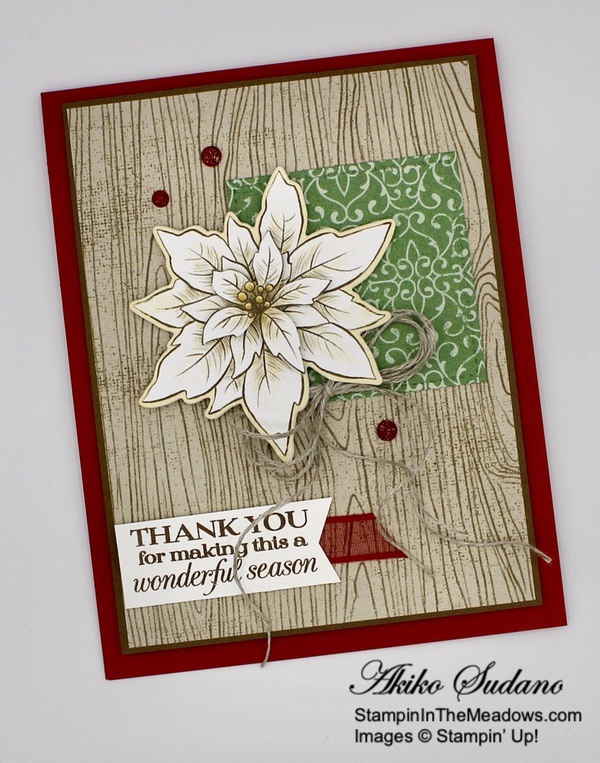
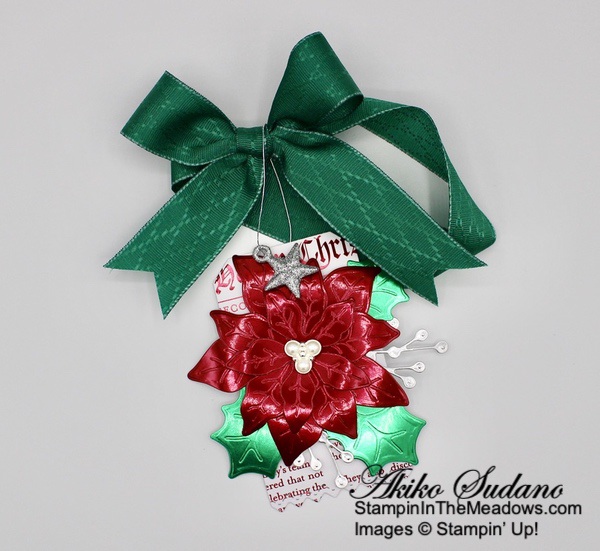
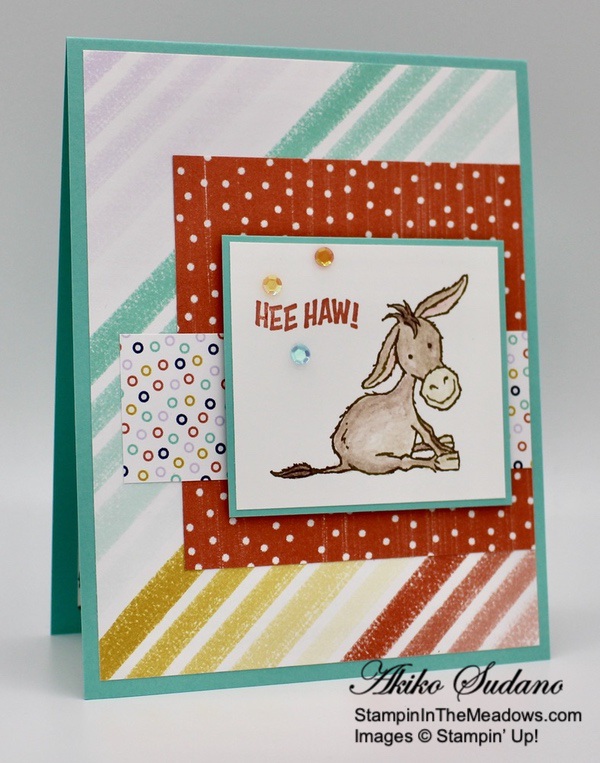
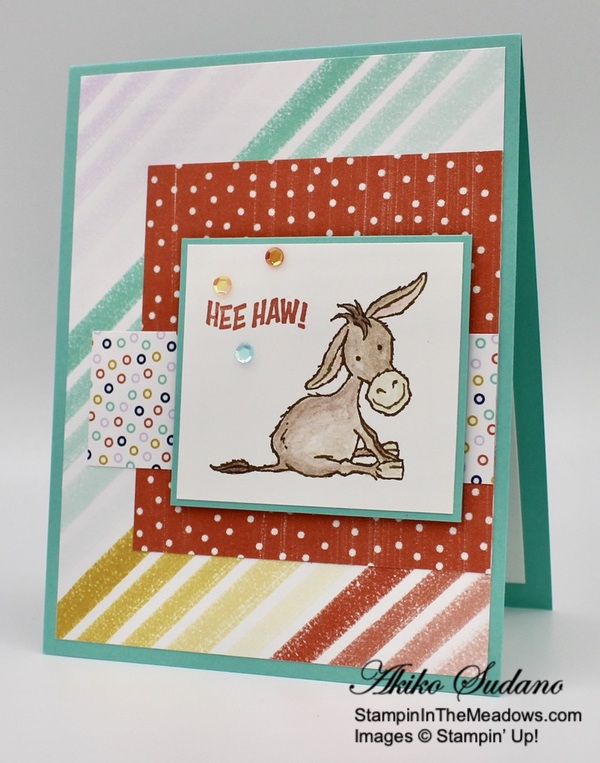
I cut a poinsettia flower from the floral Poinsettia Place designer series paper with the outline poinsettia die from the Poinsettia Dies in the Stampin’ Up! Poinsettia Petals designer series paper. I used the same die to cut a Whisper White panel and adhered it to the back of the DSP flower so that the flower would be a little stiffer. I also fussy cut the center of another poinsettia and adhered it to the center with dimensionals.

I cut a panel of fancy green paper from the Poinsettia Place DSP with the stitched square from the Stitched Shapes Dies and adhered it to a Woodgrain panel of the Poinsettia Place DSP. I adhered it all to a Soft Suede mat. I popped the poinsettia on with dimensionals and tucked a Linen Thread bow under the flower.

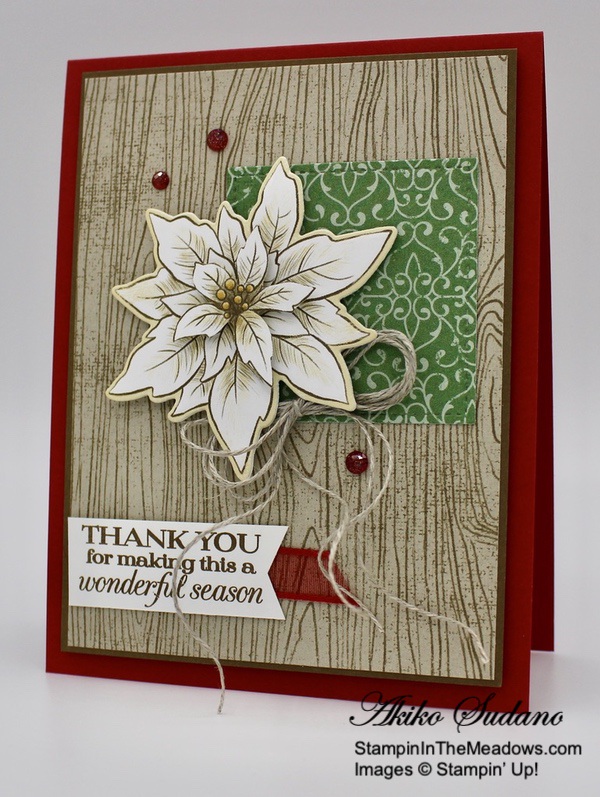
I used the Banners Pick A Punch to cut the end of a Whisper White strip and stamped the sentiment from the Stampin’ Up! Poinsettia Place photopolymer stamp set in Soft Suede ink near the end. I trimmed the other end of the label and adhered it to the panel with a length of Real Red ribbon underneath. I popped the panel on a Real Red card base with dimensionals and accented the front with three red Wonderful Gems.

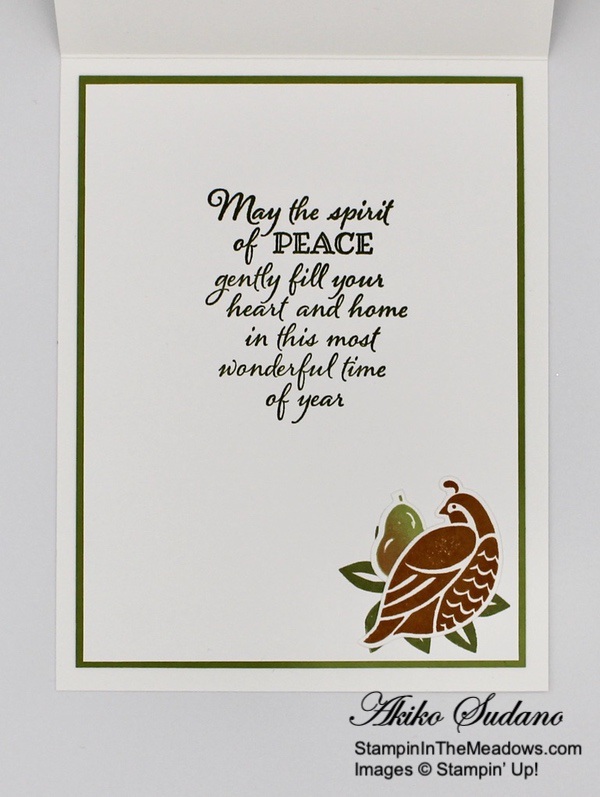
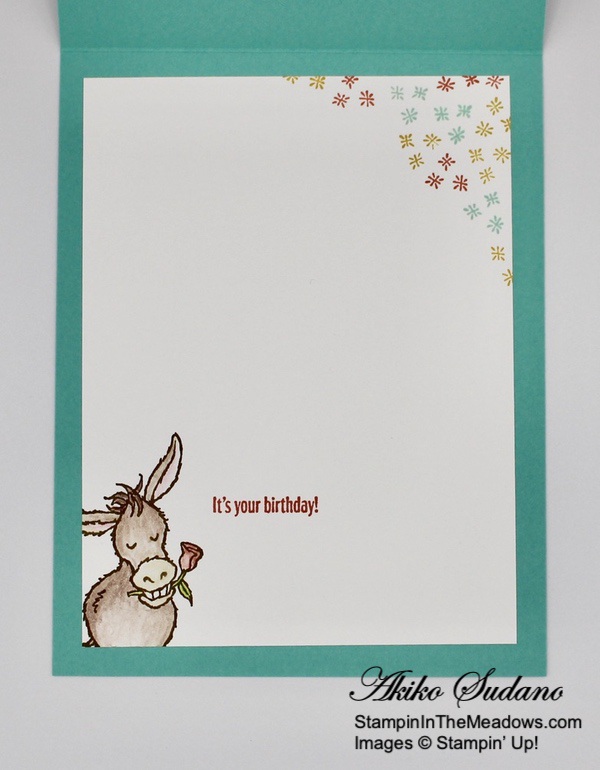
I adhered a strip of wood grain paper to a Whisper White panel and fussy cut another poinsettia from the Poinsettia Place DSP and adhered it to the corner. I trimmed the petals to be even with the Whisper White panel and adhered the panel to the inside of the card.

The sentiments from the Stampin’ Up! Poinsettia Petals stamp set are really nice! The Thank You sentiment is perfect for expressing appreciation for that extra special gift or for sending a quick note after a fun holiday visit or outing. Have a great week!!


Stampin’ In The Meadows January – June 2021 Mini Catalog New Product Shares Now Open

Do you want all of the great new products in the new January – June 2021 Mini Catalog but can’t afford everything?  Let’s do a share!  I’m placing an order early on January 5 for all the papers, ribbons and embellishments and I’m going to use the expedited shipping option so I get them fast. When I receive the order, I will cut and bundle the products and have the shares on their way to you by January 15. Go to my New Catalog Product Shares page to get the full details and to join. Please note, I can only ship to addresses within the US. Deadline to sign up for a share is January 3, 2021.


Holiday Shipping Deadlines Reminder

Stampin’ Up! has shared the following information regarding Holiday Shipping deadlines:

The Christmas season is a busy time of year for sending and receiving packages, so naturally shipping may take longer than normal. If you are placing any orders for Christmas gifts, please submit them by 9 December. We cannot guarantee that orders placed by 9 December will arrive in time for Christmas, but orders submitted after this date are unlikely to arrive before Christmas. 


FREE Bonus Quite Curvy and Curvy Christmas Project Tutorials With Videos When You Purchase The Bundle From Me!!

The Quite Curvy bundle is an early release of the upcoming January – June 2021 Mini Catalog and is a featured product during the Curvy Celebrations. And if you purchase either the Quite Curvy Variety Bundle (item 158396) or the Quite Curvy Bundle (item 156228) from me between now and January 4, you will receive the special Online Tutorial Class with videos. This is an exclusive set of five written and video tutorials created by a group of us for our customers who purchase these products during the Curvy Celebrations! And this is on top of my regular thank you gifts!


Stampin’ Up!’s Giant Year-End Closeout Begins Tomorrow!

If you love Great Deals like I do, then the Giant Year-End Closeout event is the perfect time to shop. You’ll get deep discounts on your favorite products (up to 50% off some items) from the August–December 2020 Mini Catalog. The Year-End Closeout happens only once a year, so get your shopping lists ready for December 8. Click here to download the full list of items (excel spreadsheet) that are retiring and on sale starting on December 8, 2020 or here for a PDF if you prefer that format. Get your lists ready and shop early!!  The retiring items are only available while supplies last! And everything on this list is retiring!


December 1 – 15 Host Code: E7SDCMYW

Use this host code when you order $50 or more and receive a free gift from me!  The free gift is your choice of any item valued up to $10.00 in the 2019 – 2020 Annual Catalog or in the Aug-Dec 2020 Mini Catalog!  That includes some of the Host Exclusive stamp sets!

If your order is over $150, please do not use the host code since you’ll receive your own Host Dollars plus I’ll still send you the free gift!  This host code can be used by anyone, no club or commitment required.  Let me know if you have any questions.


If you need any stamping supplies, I’d be very happy to be your Demonstrator.  Just click on the Shop Now button on the right side of the screen to go directly to my online store or contact me if you have any questions.  Happy Stamping!

Thanks for stopping by and have a great week!

Akiko

  • Visit my online store here
  • See the current Stampin’ Up! clearance rack specials here
  • Earn FREE Stampin’ Up! products through my Wildflower Frequent Shopper Program – my way of saying thank you to my online frequent shopper customers.
  • Sign up for my weekly newsletter here
  • Have any questions? I’d be happy to help, click here to contact me.

Cardstock Cuts for this project:

  • Real Red – 4-1/4″ x 11″ card base scored at 5-1/2″
  • Whisper White – 3-3/4″ x 5″ (inside panel), 3″ x 3″ (die cut poinsettia backing), 3/4″ x 3-1/2″ (label)
  • Poinsettia Place DSP – 3-3/4″ x 5″ (front background panel), 2-1/2″ x 2-1/2″ (Garden Green square), 1/2″ x 3-3/4″ (inside trim), fussy and die cut poinsettias.

Stampin’ Up! products used in this project:


Stampin’ In The Meadows January – June 2021 Mini Catalog New Product Shares

Do you want all of the great new products in the new January – June 2021 Mini Catalog but can’t afford everything?  Let’s do a share!  I’m placing an order early on January 5 for all the papers, ribbons and embellishments and I’m going to use the expedited shipping option so I get them fast. When I receive the order, I will cut and bundle the products and have the shares on their way to you by January 15. I will offer options so you can choose between Designer Series Paper or Ribbons & Embellishments or both. See the details below. Please note, I can only ship to addresses within the US. Deadline to sign up for a share is January 3, 2021.


Stampin’ In The Meadows Designer Series Paper Share – $24 + $8 Priority Shipping

You will receive one 6×6 sheet of each design from the following DSP packs (the number behind the name indicates how many 6×6 sheets of paper you will receive):

  • Love You Always Specialty DSP – 3
  • True Love DSP – 6
  • Hydrangea Hill DSP – 6
  • Dandy Garden 6″ x 6″ DSP – 12
  • Fine Art Floral DSP – 6
  • Sand & Sea DSP – 6
  • Ice Cream Corner DSP – 6
  • Snail Mail DSP – 6
  • Well Suited DSP – 6
  • Love You Always Foil Sheets – 3
  • Hydrangea Hill Mercury Glass Designer Acetate – 2
  • Golden Garden Designer Specialty Acetate – 3
  • Pearlescent Specialty Paper – 2
  • Dandy Garden Memories & More card pack – 1 card with envelope
  • Love You Always Treat Boxes – 1 treat box

In all you will receive 67 6″ x 6″ sheets of designer or specialty paper, 1 card with envelope and 1 treat box.


Stampin’ In The Meadows Double DSP Share – $48 + $8 Priority Shipping

If you’d like double shares of the designer paper, that’s fine too.  I’ll cut the designer paper sheets into 6″×12″ so that you’ll be able to get 3 full A2 size card fronts from each sheet (except for the Dandy Garden 6″ x 6″ you’ll get double sheets of it since they’re already precut 6″×6″).


Stampin’ In The Meadows Ribbon & Embellishment Share – $21 + $8 Priority Shipping

You will receive a length of each of the new ribbons (lengths are approximate) and a sample of the new embellishments as follows:

  • Heart Charms – 2
  • Matte Black Dots – 20
  • Pastel Pearls – 40
  • Ladybug Trinkets – 4
  • Opal Rounds – 20
  • Resin Hearts – 30
  • Ice Cream Corner Sprinkles – 1/4 package
  • Clever Clasps – 2
  • Blushing Bride 3/8″ Metallic Ribbon – 2 yds
  • Gorgeous Grape 3/8″ Sheer Ribbon – 2 yds
  • Mossy Meadow 3/16 Braided Linen Trim – 2 yds
  • Fine Art 3/8″ Ribbon – 2 yds
  • Blackberry Bliss Striped Ribbon – 2 yds
  • Snail Mail Twine Combo Pack – 4 yds (2 yds each color)
  • Well Suited Twine Combo Pack – 4 yds (2 yds each color)

In all you will receive 18 yards of ribbon/twine and 118 embellishments plus 1/4 package of sprinkles!


Stampin’ In The Meadows I WANT IT ALL Share – $45 + $8 Priority Shipping

The I WANT IT ALL! share includes a single Designer Series Paper Share AND a Ribbon & Embellishment Share. You will receive 67 6×6 sheets of designer series and specialty paper, 1 card with envelope and 1 treat box. You will also receive 18 yards of ribbon/twine and 118 embellishments plus 1/4 package of sprinkles.


A product share is a good way to get a sample of new products before you place an order. If you’d like to join, either go to my New Catalog Product Shares page to fill out the order form or drop me an email with the following information:

  • Your first and last name
  • Your email address
  • Your complete shipping address
  • Which share you are interested in

Deadline to sign up for my share is January 3, 2021 at 8:00 PM ET.  Payments must be received by January 4, 2021 at midnight to be included in my share. I only accept PayPal for payment. I will send out PayPal invoices on or about January 1, 2021 for orders I have received.

Let me know if you have any questions.  Thanks!


December 1 – 15 Host Code: E7SDCMYW

Use this host code when you order $50 or more and receive a free gift from me!  The gift is your choice of any item valued up to $10.00 in the 2019-20 Annual Catalog or in the 2020 January-June Mini Catalog!  That includes some of the Host Exclusive stamp sets!

If your order is over $150, please do not use the host code since you’ll receive your own Host Dollars plus I’ll still send you the free gift!  This host code can be used by anyone, no commitment required.  Let me know if you have any questions.


Holiday Shipping Deadlines Reminder

Stampin’ Up! has shared the following information regarding Holiday Shipping deadlines:

The Christmas season is a busy time of year for sending and receiving packages, so naturally shipping may take longer than normal. If you are placing any orders for Christmas gifts, please submit them by 9 December. We cannot guarantee that orders placed by 9 December will arrive in time for Christmas, but orders submitted after this date are unlikely to arrive before Christmas. 


FREE Bonus Quite Curvy and Curvy Christmas Project Tutorials With Videos When You Purchase The Bundle From Me!!

The Quite Curvy bundle is an early release of the upcoming January – June 2021 Mini Catalog and is a featured product during the Curvy Celebrations. And if you purchase either the Quite Curvy Variety Bundle (item 158396) or the Quite Curvy Bundle (item 156228) from me between now and January 4, you will receive the special Online Tutorial Class with videos. This is an exclusive set of five written and video tutorials created by a group of us for our customers who purchase these products during the Curvy Celebrations! And this is on top of my regular thank you gifts!


If you need any stamping supplies, I’d be very happy to be your Demonstrator.  Just click on the Shop Now button on the right side of the screen to go directly to my online store or contact me if you have any questions.  Happy Stamping!

Thanks for stopping by and have a great weekend!

Akiko

  • Visit my online store here
  • See the current Stampin’ Up! clearance rack specials here
  • Earn FREE Stampin’ Up! products through my Wildflower Frequent Shopper Program – my way of saying thank you to my frequent shopper online customers.
  • Sign up for my weekly newsletter here
  • Have any questions? I’d be happy to help, click here to contact me.

Stampin’ Up!’s Year End Closeout Starts December 8!

If you love Great Deals like I do, then the Giant Year-End Closeout event is the perfect time to shop. You’ll get deep discounts on your favorite products (up to 50% off some items) from the August–December 2020 Mini Catalog. The Year-End Closeout happens only once a year, so get your shopping lists ready for December 8.

Giant Year-End Closeout Sale Details

Sale Dates: December 8, 2020 – January 4, 2021

  • No minimum purchase required.
  • Retiring items are available while supplies last.
  • Exclusions apply: Carryover items will not be discounted.
  • Due to increased shipping times and possible shipping delays during the month of December, we can’t guarantee delivery before Christmas.
  • Ordering Deadlines: January 4, 2021 at 11:50 PM (MT)

Click Here to download the full list of items that are retiring and on sale starting on December 8, 2020. Get your lists ready and shop early!! The retiring items are only available while supplies last! And everything on this list is retiring!


FREE Bonus Quite Curvy and Curvy Christmas Project Tutorials With Videos When You Purchase The Bundle From Me!!

The Quite Curvy bundle is an early release of the upcoming January – June 2021 Mini Catalog and is a featured product during the Curvy Celebrations. And if you purchase either the Quite Curvy Variety Bundle (item 158396) or the Quite Curvy Bundle (item 156228) from me between now and January 4, you will receive the special Online Tutorial Class with videos. This is an exclusive set of five written and video tutorials created by a group of us for our customers who purchase these products during the Curvy Celebrations! And this is on top of my regular thank you gifts!


December 1 – 15 Host Code: E7SDCMYW

Use this host code when you order $50 or more and receive a free gift from me!  The gift is your choice of any item valued up to $10.00 in the 2020-21 Annual Catalog or the Aug – Dec 2020 Mini Catalog. This includes some of the host exclusive sets!

If your order is over $150, please do not use the host code since you’ll receive your own Host Dollars plus I’ll still send you the free gift!  This host code can be used by anyone, no commitment required.  Let me know if you have any questions.


If you need any stamping supplies, I’d be very happy to be your Demonstrator.  Just click on the Shop Now Button on the right side of the screen to go directly to my Online store or contact me if you have any questions.  Happy Stamping!

Thanks for stopping by and have a great weekend! And get those shopping lists ready!!

Akiko

  • Visit my Online store here
  • See the current Stampin’ Up! clearance rack specials here
  • Earn FREE Stampin’ Up! products through my Wildflower Frequent Shopper Program – my way of saying thank you to my frequent shopper online customers.
  • Sign up for my monthly newsletter here
  • Have any questions? I’d be happy to help, click here to contact me.

Stampin’ Up! Arrange A Wreath Partridge Christmas Card

Good Friday Morning! I have a Christmas card to share today made with the wonderful Stampin’ Up! Arrange A Wreath bundle. This is one of my favorite bundles and I finally used it with the cute little partridge and pears for a Christmas card. You can find the supplies used to create this card at the bottom of my post along with the sizes of cardstock used.

I embossed a panel of Soft Sea Foam with the Pinewood Planks 3D embossing folder and adhered it to an Old Olive mat. I cut two of the leaf wreaths using the Wreath Builder Dies from the Stampin’ Up! Arrange A Wreath bundle from Old Olive and adhered them to the card front with liquid glue. I stamped the sign post from the Stampin’ Up! Arrange A Wreath photopolymer stamp set in Soft Sea Foam ink on a Whisper White panel. I stamped the sentiment on top of it in Mossy Meadow and trimmed it with my paper snips. I popped it on the card front with dimensionals.

I stamped two sets of pears from the Stampin’ Up! Arrange A Wreath stamp set in Pear Pizzazz ink (what else?) and then used my sponge daubers to add a little Calypso Coral to the bottom and stamped them again. I stamped the partridge in Cinnamon Cider ink and then cut the bird and pears out with the coordinating dies. I cut out four little berry sprigs from gold foil and arranged them on the bottom of the wreath. I adhered the gold foil sprigs with liquid glue, the pears with glue dots and popped the partridge on with dimensionals.

I made a bow with Whisper White crinkle ribbon and adhered it with a glue dot and added some pearls around the wreath. I adhered the panel to a Thick Whisper White card base with dimensionals.

I stamped the sentiment from the Peaceful Boughs stamp set in Mossy Meadow on a Whisper White panel. I stamped another partridge from the Stampin’ Up! Arrange A Wreath stamp set in Cinnamon Cider ink and cut it out with the coordinating die. I stamped some leaves in Old Olive ink in the corner and adhered the last pear and the partridge on top. I adhered the panel to an Old Olive mat and then to the inside of the card.

Another Christmas card done and it’s a sweet one made with the Stampin’ Up! Arrange A Wreath bundle. Are you done with your Christmas cards? I think I’ve got just a few more to do, and next week I need to start mailing them out! Christmas will be here before you know it. Thanks for stopping by!


Stampin’ Up! Curvy Celebrations Going On now!

The Stampin’ Up! Curvy Celebrations runs through January 4, 2021. This will include the Quite Curvy bundle, which is an early release of the upcoming January – June 2021 Mini Catalog along with the Curvy Christmas stamp set and Classic Christmas 6″ x 6″ designer series paper. Click on the picture above to view PDF Flyer with all the details. And if you purchase either the Quite Curvy Variety Bundle (item 158396) or the Quite Curvy Bundle (item 156228) from me between now and January 4, you will receive our special Online Tutorial Class with videos. This is an exclusive set of written and video tutorials created by Inkin’ Krew team members who purchase these products during the Curvy Celebrations!


December 1 – 15 Host Code: E7SDCMYW

Use this host code when you order $50 or more and receive a free gift from me!  The gift is your choice of any item valued up to $10.00 in the 2020-21 Annual Catalog or the Aug – Dec 2020 Mini Catalog. This includes some of the host exclusive sets!

If your order is over $150, please do not use the host code since you’ll receive your own Host Dollars plus I’ll still send you the free gift!  This host code can be used by anyone, no commitment required.  Let me know if you have any questions.


If you need any stamping supplies, I’d be very happy to be your Demonstrator.  Just click on the Shop Now Button on the right side of the screen to go directly to my Online store or contact me if you have any questions.  Happy Stamping!

Thanks for stopping by and have a great day!

Akiko

  • Visit my Online store here
  • See the current Stampin’ Up! clearance rack specials here
  • Earn FREE Stampin’ Up! products through my Wildflower Frequent Shopper Program – my way of saying thank you to my frequent shopper online customers.
  • Sign up for my monthly newsletter here
  • Have any questions? I’d be happy to help, click here to contact me.

Cardstock Cuts for this project:

  • Thick Whisper White – 4-1/4″ x 11″ card base scored at 5-1/2″
  • Old Olive – two 3-7/8″ x 5-1/8″ (mats), two 4″ x 4″ (die cut wreaths)
  • Soft Sea Foam – 3-3/4″ x 5″ (embossed panel)
  • Gold Foil – 1-1/2″ x 2″ (berry sprigs)
  • Whisper White – 3-3/4″ x 5″ (inside panel), 1-1/4″ x 3-1/2″ (partridges), 1″ x 3″ (pears), 1-1/2″ x 2″ (label)

Stampin’ Up! products used in this project:


Stampin’ Up! Poinsettia Petals Holiday Gift Box for the Happy Inkin’ Thursday Blog Hop

Hello and welcome to the Happy Inkin’ Thursday Blog Hop! For today’s hop, I used the beautiful Stampin’ Up! Poinsettia Petals bundle with the Wonder of the Season specialty designer series paper and decorated a mini Paper Pumpkin box. You can find the supplies used to create this card at the bottom of my post along with the sizes of cardstock used.

We have a theme challenge this week, and here is the theme we are using for our projects:

I covered the top and sides of the mini Paper Pumpkin box with the Wonder of the Season specialty designer series paper matted with Shaded Spruce. I was careful to make sure that the writing was in the correct direction when cutting and adhering to the box. I made a loopy bow with the Shaded Spruce ribbon to tie around the box and it’s loose enough to easily slip on and off.

I made a large red foil poinsettia with the Poinsettia Dies from the Stampin’ Up! Poinsettia Petals bundle. I used the embossing inserts to cut the petals and gently bent the each petal backwards. I adhered the petal clusters together with glue dots and finished the center with the beaded Pearls.

I cut three poinsettia leaves from green foil and two silver foil berry sprigs using the dies from the Stampin’ Up! Poinsettia Petals bundle. I used the tag die from the North Pole Wonder Dies to cut a tag from the Wonder of the Season specialty designer series paper and adhered the leaves, berry sprigs and flower to the tag with glue dots.

I looped the trim from the glitter star through thee tag and tied it to the bow. So as the bow is slipped around the box, the tag goes with it.

And of course the inside of the box needs some festive tissue. I stamped a sheet of white tissue paper with the poinsettia from the Stampin’ Up! Poinsettia Petals photopolymer stamp set in Real Red and one of the outline holly branches from the Joyful Holly stamp set in Shaded Spruce to finish off the festive mood.

On with the Hop! Click the Next button below to visit Karen Ksenzakovic’s blog.

And just in case you get lost along the way, here’s a list of the team members participating in the hop today:


December 1 – 15 Host Code: E7SDCMYW

Use this host code when you order $50 or more and receive a free gift from me!  The gift is your choice of any item valued up to $10.00 in the 2019-20 Annual Catalog or in the 2020 January-June Mini Catalog!  That includes some of the Host Exclusive stamp sets!

If your order is over $150, please do not use the host code since you’ll receive your own Host Dollars plus I’ll still send you the free gift!  This host code can be used by anyone, no commitment required.  Let me know if you have any questions.


If you need any stamping supplies, I’d be very happy to be your Demonstrator.  Just click on the Shop Now Button on the right side of the screen to go directly to my online store or contact me if you have any questions.  Happy Stamping!

Thanks for visiting!

Akiko

  • Visit my online store here
  • See the current Stampin’ Up! clearance rack specials here
  • Earn FREE Stampin’ Up! products through my Wildflower Frequent Shopper Program – my way of saying thank you to my frequent shopper online customers.
  • Sign up for my weekly newsletter here
  • Have any questions? I’d be happy to help, click here to contact me.

Cardstock Cuts for this project:

  • Shaded Spruce – 3-5/8″ x 5-3/8″ (box top), two 7/8″ x 5-5/8″ (box long sides), two 7/8″ x 3-5/8″ (box short sides)
  • Red Foil – 4-1/4″ x 6″ (poinsettia petals)
  • Green Foil – 1-1/2″ x 6″ (poinsettia leaves)
  • Silver Foil -1-1/2″ x 4″ (berry sprigs)
  • Wonder of the Season specialty DSP – 3-1/2″ x 5″ (box top), two 3/4″ x 5-1/2″ (box long sides), two 3/4″ x 3-1/2″ (box short sides), 2-1/2″ x 3-3/4″ (tag)

Stampin’ Up! products used in this project:


Stampin’ Up! Darling Donkeys Sneak Peek

Good Morning! Today am sharing another sneak peek of a Sale A Bration item – the Stampin’ Up! Darling Donkeys cling stamp set. I used it to make a whimsical birthday card! You can find the currently available supplies I used to create this card at the bottom of my post along with the sizes of cardstock used.

My card was also inspired by the sketch in CAS(E) this Sketch #399 – isn’t it cute?

I adhered a multicolored striped panel of Playing with Patterns 6″ x 6″ designer series paper to the front of a Coastal Cabana card base with liquid glue. I adhered a Calypso Coral dotted panel of DSP on top of the striped panel and finished it off with a strip of multicolored circles.

I stamped the cute, er darling little donkey from the Stampin’ Up! Darling Donkeys stamp set on a small Whisper White panel in Soft Suede ink. I colored him with Early Espresso and Flirty Flamingo Watercolor pencils and used the blender pen to blend and smooth out the colors. I stamped the sentiment in Calypso Coral ink and adhered the panel to a Coastal Cabana mat.

I popped the donkey on the card front and adhered some adhesive backed sequins to the panel.

I stamped another darling donkey from the Stampin’ Up! Darling Donkeys stamp set in the lower corner of a Whisper White panel and colored him like the one on the front. I colored the flower with Calypso Coral and Granny Apple Green Watercolor pencils and stamped the sentiment in Calypso Coral ink. I also stamped the little stars in Coastal Cabana, Calypso Coral and Bumblebee in the opposite corner and adhered the panel to the inside of the card.

The Stampin’ Up! Darling Donkeys stamp set is another one of those cute, playful animals stamp sets, and it’s FREE during Sale A Bration with an order of $50 or more. Sale A Bration runs January 5, 2021 through February 28, 2021. It’s the best Stampin’ Up! promotion, and next year there will be two Sale A Brations – one in January & February and another in July & August.


January – June 2021 Mini Catalog and Sale A Bration are Coming Soon!

Stampin’ Up! Demonstrator pre-order for the January – June 2021 Mini Catalog started yesterday and got my orders in for new catalogs and Sale A Bration brochures for my customers! When I get my order, I’ll be sending my customer catalogs out ASAP. If you’ve placed orders with me of at least $50 during the past year, you are automatically on my list to get a catalog when my shipment arrives! If you have not placed an order with me but want to be on my mailing list for the new catalogs too, simply place an order through my Online Store and I’ll add you to my list so you can get your new catalogs too! And if you have thought about joining Stampin’ Up! as a Demonstrator, now is a good time because you can include the new catalog items in your Starter Kit!! Let me know if you have any questions – I’ll be happy to talk to you about the benefits of being a Stampin’ Up! Demonstrator!


The December Paper Pumpkin Kit is Beary Comforting!

December’s cute and cuddly Paper Pumpkin kit—called “Beary Comforting”—is designed to uplift your loved ones as this beary tough year finally comes to a close. After a year like 2020, we all could use a big bear hug! With the help of this bear-themed kit, you can create 12 unbearably cute cards featuring warm and fuzzy friends, sweet stamps, and meaningful messages. Near or far, send your friends and family the extra comfort, love, and encouragement they need with this month’s Paper Pumpkin kit! 

Here are the Details:

  • Kit contains enough supplies to create 12 cards and coordinating envelopes.
  • Card size: 4-1/4″ x 5-1/2″ 
  • Envelope size: 4-1/2″ x 5-3/4″ 

Coordinating Colors: Basic Gray, Calypso Coral, Cinnamon Cider, Daffodil Delight, Rich Razzleberry, Soft Sea Foam, Whisper White

If you’re interested in subscribing to Paper Pumpkin, you can either sign up for a subscription where you are billed monthly for your kit or you can purchase a prepaid subscription in my online store. To see more information and to sign up for the monthly subscription click here. To see the options for prepaid subscriptions in my online store, click here.

Sign up deadline for the December 2020 kit is December 10, 2020. Supplies may be limited toward the end of the subscription period.


December 1 – 15 Host Code: E7SDCMYW

Use this host code when you order $50 or more and receive a free gift from me!  The gift is your choice of any item valued up to $10.00 in the 2020-21 Annual Catalog or the Aug – Dec 2020 Mini Catalog. This includes some of the host exclusive sets!

If your order is over $150, please do not use the host code since you’ll receive your own Host Dollars plus I’ll still send you the free gift!  This host code can be used by anyone, no commitment required.  Let me know if you have any questions.


If you need any stamping supplies, I’d be very happy to be your Demonstrator.  Just click on the Shop Now Button on the right side of the screen to go directly to my Online store or contact me if you have any questions.  Happy Stamping!

Thanks for stopping by and have a great day!

Akiko

  • Visit my Online store here
  • See the current Stampin’ Up! clearance rack specials here
  • Earn FREE Stampin’ Up! products through my Wildflower Frequent Shopper Program – my way of saying thank you to my frequent shopper online customers.
  • Sign up for my monthly newsletter here
  • Have any questions? I’d be happy to help, click here to contact me.

Cardstock Cuts for this project:

  • Coastal Cabana – 4-1/4″ x 11″ card base scored at 5-1/2″, 2-3/8″ x 2-5/8″ (mat)
  • Whisper White – 3-3/4″ x 5″ (inside panel), 2-1/4″ x 2-1/2″ (donkey panel)
  • Playing With Patterns 6″ x 6″ DSP – 3-3/4″ x 5″ (striped panel), 3-1/4″ x 3-1/2″ (Calypso Coral dots), 1-1/4″ x 3-3/4″ (multicolor circles strip)

Stampin’ Up! products used in this project:


Stampin’ Up! Heal Your Heart Sneak Peek

Good Morning! Today am sharing a sneak peek of a new stamp set that will be part of the Sale A Bration sale that starts next month on January 5. It’s the Stampin’ Up! Heal Your Heart cling stamp set and it is one of the options that is FREE with a $50 purchase (before taxes and shipping). You can find the currently available supplies I used to create this card at the bottom of my post along with the sizes of cardstock used.

I stamped some of the leaves from the Touched My Heart cling stamp set in Pool Party on a panel of the pretty Snowflake Splendor designer series paper after stamping off. This gives is a very subtle flowing image that blends nicely with the watercolor look on the DSP. The Touched My Heart stamp set is a Host set and can be purchased only with host dollars that you receive when you have a workshop or place an order over $150. I adhered the panel to a Whisper White mat and popped it on the front of a Pool Party card base.

I stamped the sentiment from the Stampin’ Up! Heal Your Heart stamp set in Smoky Slate ink on a Pool Party panel and cut it out with the second largest circle from the Stitched Shapes Dies. I stamped the single leaf from the Touched my heart in Pool Party ink next to the sentiment.

I folded a length of sheer Pool Party Ribbon and adhered it to the card with Stampin’ seal and popped the circle on with dimensionals.

I stamped the sentiment from the Stampin’ Up! Heal Your Heart stamp set in Smoky Slate ink on a Whisper White panel and stamped the branch from Touched My Heart underneath in stamped off Pool Party. I trimmed the bottom with a strip of the Snowflake Splendor DSP and adhered the panel to the inside of the card.

The font in the Stampin’ Up! Heal Your Heart stamp set are so beautiful and gentle. It’s so exciting that Sale A Bration is just around the corner. And did you hear that Sale A Bration is going to be different next year? Stampin’ Up! is going to have TWO Sale A Brations next year one in January & February and another in July & August! If you are new to Stampin’ Up! you need to know that Sale A Bration is the biggest Stampin’ Up! sale, where you get to choose free products from the Sale A Bration brochure for each $50 increment in your order. And it starts on January 5, 2021!


January – June 2021 Mini Catalog and Sale A Bration are Coming Soon!

Stampin’ Up! Demonstrator pre-order for the January – June 2021 Mini Catalog starts today and I am placing my order! I am also ordering new catalogs and Sale A Bration brochures for my customers! When I get my order, I’ll be sending my customer catalogs out ASAP. If you’ve placed orders with me of at least $50 during the past year, you are automatically on my list to get a catalog when my shipment arrives! If you have not placed an order with me but want to be on my mailing list for the new catalogs too, simply place an order through my Online Store and I’ll add you to my list so you can get your catalogs too! And if you have thought about joining Stampin’ Up! as a Demonstrator, now is a good time because you can include the new catalog items in your Starter Kit!! Let me know if you have any questions – I’ll be happy to talk to you about the benefits of being a Stampin’ Up! Demonstrator!


December 1 – 15 Host Code: E7SDCMYW

Use this host code when you order $50 or more and receive a free gift from me!  The gift is your choice of any item valued up to $10.00 in the 2020-21 Annual Catalog or the Aug – Dec 2020 Mini Catalog. This includes some of the host exclusive sets!

If your order is over $150, please do not use the host code since you’ll receive your own Host Dollars plus I’ll still send you the free gift!  This host code can be used by anyone, no commitment required.  Let me know if you have any questions.


If you need any stamping supplies, I’d be very happy to be your Demonstrator.  Just click on the Shop Now Button on the right side of the screen to go directly to my Online store or contact me if you have any questions.  Happy Stamping!

Thanks for stopping by and have a great day!

Akiko

  • Visit my Online store here
  • See the current Stampin’ Up! clearance rack specials here
  • Earn FREE Stampin’ Up! products through my Wildflower Frequent Shopper Program – my way of saying thank you to my frequent shopper online customers.
  • Sign up for my monthly newsletter here
  • Have any questions? I’d be happy to help, click here to contact me.

Cardstock Cuts for this project:

  • Pool Party – 4-1/4″ x 11″ card base scored at 5-1/2″, 2-1/2″ x 2-1/2″ (label)
  • Whisper White – two 3-3/4″ x 5″ (inside panel and front mat)
  • Snowflake Splendor DSP – 3-5/8″ x 4-7/8″ (front panel), 1/2″ x 3-3/4″ (inside trim)

Stampin’ Up! products used in this project:


Stampin’ Up! Have A Hoot Christmas Card Video Tutorial

Good Morning! Shhh… Today I am sharing the Christmas card that I made for my husband! I used the cute Stampin’ Up! Have A Hoot bundle along with the ‘Tis The Season designer series paper and I colored the images with the Stampin’ Up! watercolor pencils! This is the card I made during my Facebook Live video tutorial yesterday afternoon and you can find the supplies I used to create this card at the bottom of my post along with the sizes of cardstock used.

Here is the Facebook Live video showing how I made the card:

I posted a copy of the video in my YouTube channel here so you can view it there if you prefer.


I adhered the plaid ‘Tis The Season designer series paper to the front of a Real Red card base. I used the Banner Triple punch on the bottom of the Garden Green strip to create the fishtail and adhered the strip to the card with liquid glue. I cut a panel of Crumb Cake card stock with the Stitched Rectangle die and stamped the owls from the Stampin’ Up! Have a Hoot cling stamp set in Crumb Cake ink. I stamped another set of owls on a smaller Crumb Cake panel and cut them out with the coordinating die.

I colored the branch, leaves and mistletoe on the large panel with the Early Espresso and Garden Green watercolor pencils. I colored the wings and sides of the die cut owls with Early Espresso and used the blender pen to smooth out the coloring. I colored the bellies with Whisper White and the beaks and feet with the daffodil delight. I popped the die cut owls on the main panel with dimensionals. I love how the images are drawn so you can die cut the owls and get a clean edge – no branch lines on the feet!

I cut two mistletoe branches from the Peek A Hoot dies from the Stampin’ Up! Have A Hoot bundle from Garden Green and adhered them on the top of the panel. I cut a Cherry Cobbler border using the pretty scalloped border die from the Peony dies and adhered them to the back of the panel. I stamped the sentiment from the Stampin’ Up! Have A Hoot stamp set in Versamark ink on Real Red. I sprinkled it with white embossing powder and heat set until shiny. I cut it out with the small Stitched Rectangle die using the two step die cutting method so that it is shorter and fits the sentiment. I adhered the sentiment to the panel with liquid glue and popped the panel on the card front with dimensionals. I finished the card front with a braided linen knot and three white resin dots.

I stamped the sentiment from the Stampin’ Up! Have A Hoot stamp set in Real Red ink on a Whisper White panel. I die cut another set of Garden Green mistletoe and adhered them to the top corner. I cut some Whisper White dots using the North Pole Wonder dies and adhered them with liquid glue. I trimmed the bottom with the plaid ‘Tis The Season DSP and adhered the panel to the inside of the card.

I CASE’d this sweet card from the Aug 2020 Mini Catalog, because when I saw it, I knew that I needed to make it for my dear hubby. The owls from the Stampin’ Up! Have A Hoot bundle are just too cute! Have a great week!!


Stampin’ Up! Curvy Celebrations Going On now!

The Stampin’ Up! Curvy Celebrations runs through January 4, 2021. This will include the Quite Curvy bundle, which is an early release of the upcoming January – June 2021 Mini Catalog along with the Curvy Christmas stamp set and Classic Christmas 6″ x 6″ designer series paper. Click on the picture above to view PDF Flyer with all the details. And if you purchase either the Quite Curvy Variety Bundle (item 158396) or the Quite Curvy Bundle (item 156228) from me between now and January 4, you will receive our special Online Tutorial Class with videos. This is an exclusive set of written and video tutorials created by Inkin’ Krew team members who purchase these products during the Curvy Celebrations!


January – June 2021 Mini Catalog is Coming Soon!

Yay!! Tomorrow is the day that the Stampin’ Up! Demonstrator Pre-Order opens! My list is ready and I will be placing my order as I have my morning coffee and that includes new catalogs for my customers! When I get my order, I’ll be sending my customer catalogs out ASAP. If you’ve placed orders with me of at least $50 during the past year, you are automatically on my list to get a catalog when my shipment arrives! If you have not placed an order with me but want to be on my mailing list for the new catalogs too, simply place an order through my Online Store and I’ll add you to my list so you can get your catalogs next month too! Ordering from the new catalog begins January 5, 2021, but if you decide to join as a Stampin’ Up! Demonstrator during the month of December, you can choose January – June Mini Catalog pre-order products as part of your Starter Kit! Let me know if you have any questions – I’ll be happy to talk to you about the benefits of being a Stampin’ Up! demonstrator!


The December Paper Pumpkin Kit is Beary Comforting!

December’s cute and cuddly Paper Pumpkin kit—called “Beary Comforting”—is designed to uplift your loved ones as this beary tough year finally comes to a close. After a year like 2020, we all could use a big bear hug! With the help of this bear-themed kit, you can create 12 unbearably cute cards featuring warm and fuzzy friends, sweet stamps, and meaningful messages. Near or far, send your friends and family the extra comfort, love, and encouragement they need with this month’s Paper Pumpkin kit! 

Here are the Details:

  • Kit contains enough supplies to create 12 cards and coordinating envelopes.
  • Card size: 4-1/4″ x 5-1/2″ 
  • Envelope size: 4-1/2″ x 5-3/4″ 

Coordinating Colors: Basic Gray, Calypso Coral, Cinnamon Cider, Daffodil Delight, Rich Razzleberry, Soft Sea Foam, Whisper White

If you’re interested in subscribing to Paper Pumpkin, you can either sign up for a subscription where you are billed monthly for your kit or you can purchase a prepaid subscription in my online store. To see more information and to sign up for the monthly subscription click here. To see the options for prepaid subscriptions in my online store, click here.

Sign up deadline for the December 2020 kit is December 10, 2020. Supplies may be limited toward the end of the subscription period. 


November 15 – 30 Host Code: N7E9DGB9

December 1 – 15 Host Code: E7SDCMYW

Use this host code when you order $50 or more and receive a free gift from me!  The free gift is your choice of any item valued up to $10.00 in the 2019 – 2020 Annual Catalog or in the Aug-Dec 2020 Mini Catalog!  That includes some of the Host Exclusive stamp sets!

If your order is over $150, please do not use the host code since you’ll receive your own Host Dollars plus I’ll still send you the free gift!  This host code can be used by anyone, no club or commitment required.  Let me know if you have any questions.


If you need any stamping supplies, I’d be very happy to be your Demonstrator.  Just click on the Shop Now button on the right side of the screen to go directly to my online store or contact me if you have any questions.  Happy Stamping!

Thanks for stopping by and have a great week!

Akiko

  • Visit my online store here
  • See the current Stampin’ Up! clearance rack specials here
  • Earn FREE Stampin’ Up! products through my Wildflower Frequent Shopper Program – my way of saying thank you to my online frequent shopper customers.
  • Sign up for my weekly newsletter here
  • Have any questions? I’d be happy to help, click here to contact me.

Cardstock Cuts for this project:

  • Real Red – 4-1/4″ x 11″ card base scored at 5-1/2″, 1-1/2″ x 2-1/2″ (label)
  • Crumb Cake – 2-1/2″ x 3-3/4″ (art panel), 1-3/4″ x 2-1/2″ (owls die cut)
  • Garden Green – 1″ x 3″ (mistletoe die cuts)
  • Cherry Cobbler – 1/2″ x 4″ (scalloped border)
  • Whisper White – 3-3/4″ x 5″ (inside panel), 1/2″ x 1-1/4″ (mistletoe berries die cut)
  • ‘Tis The Season 6″ x 6″ DSP – 4-1/4″ x 5-1/2″ (front panel), 1/2″ x 3-3/4″ (inside trim), 2″ x 5-1/4″ (Garden Green banner)

Stampin’ Up! products used in this project:


Stampin’ Up! November Paper Pumpkin Kit – Jolly Gingerbread

Hello! Last week I received my November Paper Pumpkin kit and I put together some of the cute gingerbread house gift card holders. They are really adorable!

There are three slightly different style houses and I made one of each in the three piece style where you have the card sleeve, insert and envelope. I stamped the swirls in Blushing Bride and the sentiments in Mint Macaron from my stash.

The envelopes are real cute with printed designs on the inside and outside. Here, you can see the lining on the envelope

And here’s the last one showing how the insert fits in the card holder and the envelope. You can decorate the candy dots anyway you want and it’s a lot of fun – I think my grandkids would love sticking the candy dots on everything!

Here are the contents of the November kit. There is also a Blushing Bride Stampin’ Spot with the kit.

And here’s a close up of the stamp set that is included:

Here’s the Paper Pumpkin unboxing video from the YouTube channel showing how to assemble the pretty gift card holders:

And I was inspired by Tami White to make a box for my Christmas tree. It’s open at the top and made with one of the gift card holders. First you cut the flap off the gingerbread house and cut the gingerbread house into the two pieces. I decorated the overlays as usual, this time putting my sentiment on the back and adhered them to the gingerbread houses.

Cut a panel of Bumblebee card stock to 2″ x 6-3/4″. Score the long side at 1/4″, 1-1/4″, 3-1/2″ and 4-1/2″. Score the short side at 1″. Fold on the score lines and trim the little flap off. Cut the bottom lines and adhere Tear & Tape as shown on the picture below. Adhere the side first and then fold the bottom short flaps up before adhering the bottom.

Adhere the gingerbread houses to the side and punch holes in the side and tie a handle with one of the pretty gold trims. I used the Paper Pumpkin Mint Macaron tissue to line the box and now it’s ready to hang on my Christmas Tree! And now that Thanksgiving is over, it’s time to get going with the Christmas decorating!!

The December Paper Pumpkin Kit is Beary Comforting!

December’s cute and cuddly Paper Pumpkin kit—called “Beary Comforting”—is designed to uplift your loved ones as this beary tough year finally comes to a close. After a year like 2020, we all could use a big bear hug! With the help of this bear-themed kit, you can create 12 unbearably cute cards featuring warm and fuzzy friends, sweet stamps, and meaningful messages. Near or far, send your friends and family the extra comfort, love, and encouragement they need with this month’s Paper Pumpkin kit! 

Here are the Details:

  • Kit contains enough supplies to create 12 cards and coordinating envelopes.
  • Card size: 4-1/4″ x 5-1/2″ 
  • Envelope size: 4-1/2″ x 5-3/4″ 

Coordinating Colors: Basic Gray, Calypso Coral, Cinnamon Cider, Daffodil Delight, Rich Razzleberry, Soft Sea Foam, Whisper White

If you’re interested in subscribing to Paper Pumpkin, you can either sign up for a subscription where you are billed monthly for your kit or you can purchase a prepaid subscription in my online store. To see more information and to sign up for the monthly subscription click here. To see the options for prepaid subscriptions in my online store, click here.

Sign up deadline for the December 2020 kit is December 10, 2020. Supplies may be limited toward the end of the subscription period. 


November 15-30 Host Code: N7E9DGB9

Use this host code when you order $50 or more and receive a free gift from me!  The gift is your choice of any item valued up to $10.00 in the 2020-21 Annual Catalog!

If your order is over $150, please do not use the host code since you’ll receive your own Host Dollars plus I’ll still send you the free gift!  This host code can be used by anyone, no commitment required.  Let me know if you have any questions.


If you need any stamping supplies, I’d be very happy to be your Demonstrator.  Just click on the Shop Now Button on the right side of the screen to go directly to my Online store or contact me if you have any questions.  Happy Stamping!

Thanks for stopping by and have a great day!

Akiko

  • Visit my Online store here
  • See the current Stampin’ Up! clearance rack specials here
  • Earn FREE Stampin’ Up! products through my Wildflower Frequent Shopper Program – my way of saying thank you to my frequent shopper online customers.
  • Sign up for my monthly newsletter here
  • Have any questions? I’d be happy to help, click here to contact me.

Stampin’ Up! Prepaid Paper Pumpkin Subscription Options:


Stampin’ Up! Festive Post Christmas Card II

Good Morning! I hope you all had a nice Thanksgiving! After I recovered from my turkey coma (or was my coma from all the cooking and cleaning?), I realized that I did not have a card finished for today’s post and so I wondered ‘What can I make real fast that is still nice?’ and I went looking for inspiration on Pinterest. And I found a sweet card by Brian King that did a great job of showing off pretty designer series papers and that’s my inspiration for today’s card because Stampin’ Up! has so many beautiful holiday designer series papers. And the funny thing is that I ended up using the Flowers for Every Season designer series paper from the Annual Catalog and it was a perfect excuse to pull out that cute little reindeer from the Stampin’ Up! Festive Post photopolymer stamp set. You can find the supplies used to create this card at the bottom of my post along with the sizes of cardstock used.

I adhered the greenery paper from the Flowers For Every Season 6″ x 6″ designer series paper to a Poppy Parade mat and popped it to the front of a Just Jade card base. I adhered the poinsettia paper from the Flowers For Every Season 6″ x 6″ designer series paper to a Poppy Parade mat and popped it on the card front with dimensionals.

I stamped the cute reindeer from the Stampin’ Up! Festive Post stamp set in Cinnamon Cider on a small Whisper White panel and stamped the sentiment in Poppy Parade ink. I cut it out with a die from the Layering Circles dies. I used the scalloped circle die from the Little Treat Boxes dies to cut a Poppy Parade panel to adhere behind the deer.

I folded a length of Real Red metallic ribbon and adhered it to the card with Stampin’ Seal and popped the label on top with dimensionals. I finished the card front with three gold glitter enamel dots.

I stamped the little reindeer and sentiment from the Stampin’ Up! Festive Post stamp set in Cinnamon Cider and Poppy Parade ink on a Whisper White panel. I adhered a strip of the Poinsettia DSP to the bottom and adhered the panel to the inside of the card.

I am happy to say that this was a quick card to make, but it’s really cute because it basically shows off the pretty designer series paper. And Stampin’ Up! does a great job of coordinating the colors that it makes your job even easier. You know to use Just Jade, Poppy Parade and Cinnamon Cider card stock and inks because those are the colors in the DSP. Sometimes, you can break this rule, like using the Real Red ribbon because the gold makes it look ok with Poppy Parade. So Yay! I was able to make a pretty card to share today. I hope you like it.


Stampin’ Up! Curvy Celebrations Going On now!

The Stampin’ Up! Curvy Celebrations runs through January 4, 2021. This will include the Quite Curvy bundle, which is an early release of the upcoming January – June 2021 Mini Catalog along with the Curvy Christmas stamp set and Classic Christmas 6″ x 6″ designer series paper. Click on the picture above to view PDF Flyer with all the details. And if you purchase either the Quite Curvy Variety Bundle (item 158396) or the Quite Curvy Bundle (item 156228) from me between now and January 4, you will receive our special Online Tutorial Class with videos. This is an exclusive set of written and video tutorials created by Inkin’ Krew team members who purchase these products during the Curvy Celebrations!


January – June 2021 Mini Catalog is Coming Soon!

I received my copies of the new January – June 2021 Mini Catalog and Sale A Bration Brochure and there are so many new and exciting products coming on January 5, 2021 – Yay!! Demonstrators are able to place orders early – starting December 1, 2020. On that morning I will be placing an order that includes new catalogs for my customers! When I get my order, I’ll be sending my customer catalogs out ASAP. If you’ve placed orders with me of at least $50 during the past year, you are automatically on my list to get a catalog when my shipment arrives! If you have not placed an order with me but want to be on my mailing list for the new catalogs too, simply place an order through my Online Store and I’ll add you to my list so you can get your catalogs next month too!


November 15-30 Host Code: N7E9DGB9

Use this host code when you order $50 or more and receive a free gift from me!  The gift is your choice of any item valued up to $10.00 in the 2020-21 Annual Catalog or the Aug – Dec 2020 Mini Catalog. This includes some of the host exclusive sets!

If your order is over $150, please do not use the host code since you’ll receive your own Host Dollars plus I’ll still send you the free gift!  This host code can be used by anyone, no commitment required.  Let me know if you have any questions.


If you need any stamping supplies, I’d be very happy to be your Demonstrator.  Just click on the Shop Now Button on the right side of the screen to go directly to my Online store or contact me if you have any questions.  Happy Stamping!

Thanks for stopping by and have a great day!

Akiko

  • Visit my Online store here
  • See the current Stampin’ Up! clearance rack specials here
  • Earn FREE Stampin’ Up! products through my Wildflower Frequent Shopper Program – my way of saying thank you to my frequent shopper online customers.
  • Sign up for my monthly newsletter here
  • Have any questions? I’d be happy to help, click here to contact me.

Cardstock Cuts for this project:

  • Just Jade – 4-1/4″ x 11″ card base scored at 5-1/2″
  • Poppy Parade – 3-3/4″ x 5″ (front mat), 3″ x 3″ (small mat), 2″ x 2″ (scalloped circle)
  • Whisper White – 3-3/4″ x 5″ (inside panel), 1-3/4″ x 1-3/4″ (front label)
  • Flowers For Every Season 6″ x 6″ DSP – 3-1/2″ x 4-3/4″ (front background), 2-3/4″ x 2-3/4″ (small front panel), 1/2″ x 3-3/4″ (inside trim)

Stampin’ Up! products used in this project: