Stampin’ Up! Perfectly Plaid Christmas Card

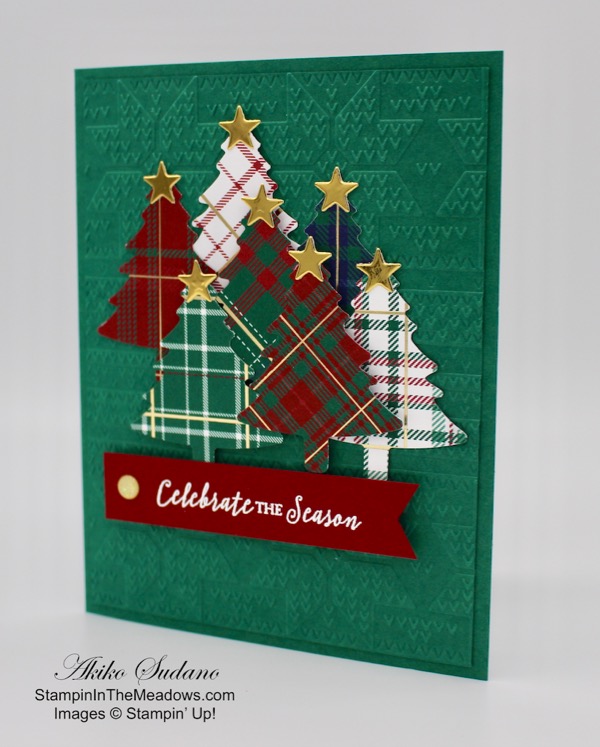
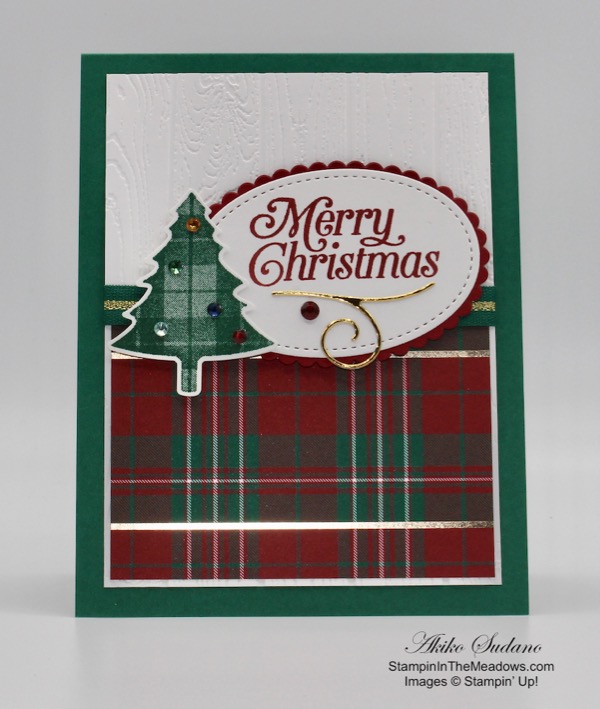
Hello and Happy Tuesday! The Stampin’ Up! Perfectly Plaid photopolymer stamp set has been a favorite for a couple of years with the coordinating Pine Tree Punch and wonderful sentiments. And it has a cute plaid Christmas tree, so I had to combine it with the pretty Sale A Bration Peaceful Prints designer series paper before the end of the month. You can find the supplies I used at the bottom of my post along with the sizes of cardstock used.

I adhered a panel of the Garden Green Christmas tree Peaceful Prints designer series paper to the left side of a Basic Black Mat. I adhered a panel of the Real Red snowflake DSP to the right side. I wrapped a length of the black and white gingham ribbon around the seam, securing it in the back and adhered it to the front of a Real Red card base with dimeensionals.

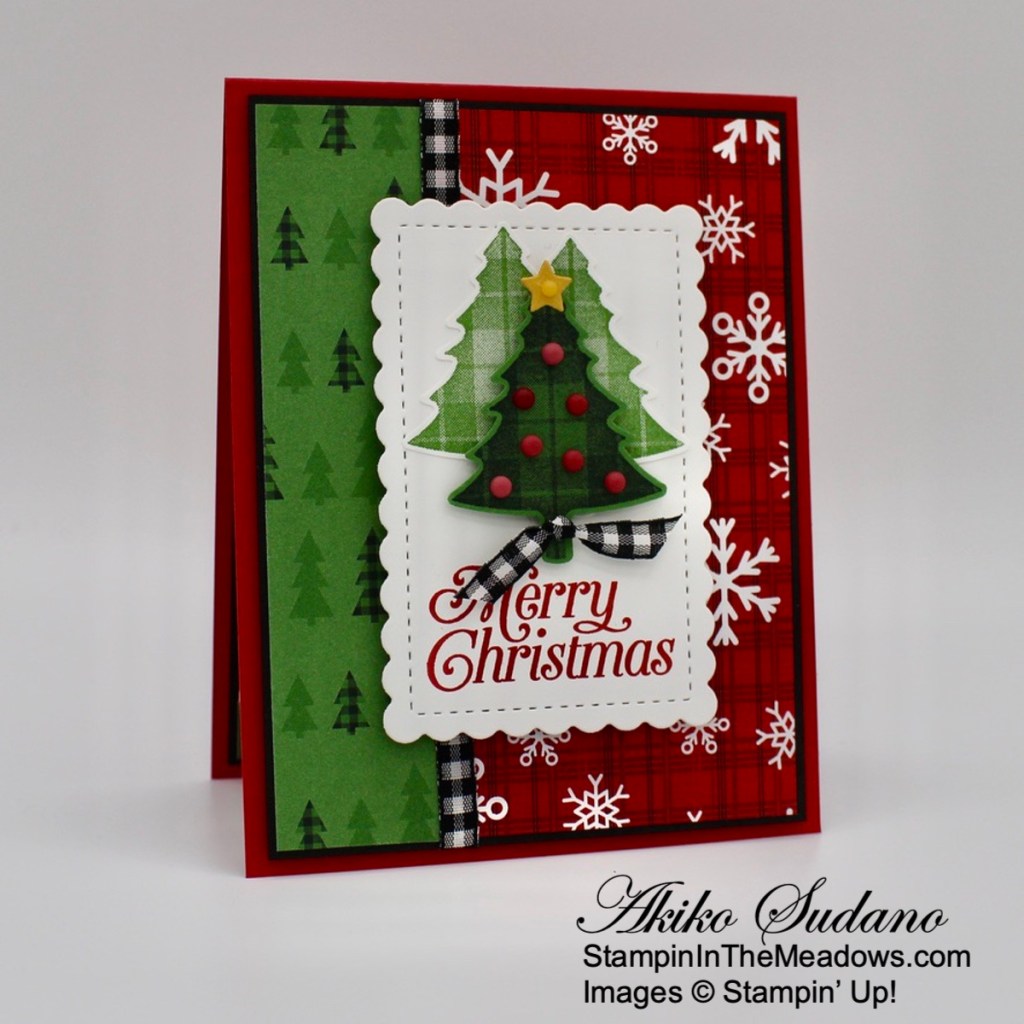
I stamped two of the plaid Christmas Trees from the Stampin’ Up! Perfectly Plaid stamp set in Garden Green on Basic White and punched them out with the Pine Tree punch. I stamped the tree again in Memento Tuxedo Black ink on Garden Green card stock and punched it out with the Pine Tree punch. I cut the little star from the Christmas Trimmings dies from Bumblebee card stock and adhered it to the top with a glue dot.

I stamped the sentiment from the Stampin’ Up! Perfectly Plaid stamp set in Real Red on the bottom of a Basic White panel and cut it out with the third largest Scalloped Contours die. I adhered the light plaid Christmas Trees with liquid glue and the dark tree with dimensionals. I decorated the tree with Matte Decorative dots. I tied a knot in another short length of gingham ribbon and adhered it with a glue dot before adhering the scalloped panel to the card front with dimensionals.

For the inside of the card, I stamped the sentiment from the Stampin’ Up! Perfectly Plaid stamp set in Real Red on a Basic White panel and stamped the plaid tree in Garden Green in the bottom corner. I trimmed the bottom of the panel with a strip of Garden Green Christmas Tree paper from the Peaceful Prints DSP and adhered the panel to a Basic Black mat before adhering it to the inside of the card.

Doesn’t the Stampin’ Up! Perfectly Plaid stamp set plaid Christmas tree look cute with the Peaceful Prints DSP? Lots of plaids in Red and Green with touches of black make a simple, cute little rustic Christmas Card. And the pretty Peaceful Prints designer series paper is only available through the end of Sale A Bration!


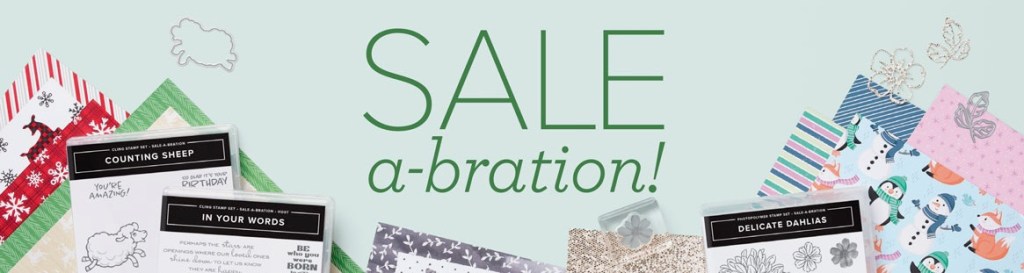
Two Days Left for Sale A Bration!

Sale A Bration ends in two days on September 30! So hurry to get in on Stampin’ Up!’s best promotion before it’s over! Click on the picture below to view the Sale A Bration brochure:


World Card Making Day is October 2!

World Card Making Day is coming up this Saturday and the Inkin’ Krew is celebrating with a special Facebook event! I will be making a card Live at 3:00 PM ET during the celebration! Come stamp with us!


Current Host Code: U6K4RBB4

Use this host code when you order $50 or more and receive a free gift from me!  The free gift is your choice of any item valued up to $10.00 in the 2021 – 2022 Annual Catalog or the July – December 2021 Mini Catalog!

If your order is over $150, please do not use the host code since you’ll receive your own Host Dollars plus I’ll still send you the free gift!  This host code can be used by anyone, no club or commitment required. Let me know if you have any questions.


If you need any stamping supplies, I’d be very happy to be your Demonstrator.  Just click on the Shop Now button on the right side of the screen to go directly to my online store or contact me if you have any questions. 

Thanks for stopping by and Happy Stamping!

Akiko

  • Visit my online store here
  • See the current Stampin’ Up! clearance rack specials here
  • Earn FREE Stampin’ Up! products through my Wildflower Frequent Shopper Program – my way of saying thank you to my online frequent shopper customers.
  • Have any questions? I’d be happy to help, click here to contact me.

Cardstock Cuts for this project:

  • Real Red – 4-1/4″ x 11″ card base scored at 5-1/2″
  • Basic Black – two 4″ x 5-1/4″ panels (front and inside mats)
  • Bumblebee – 1″ x 1″ (die cut star)
  • Garden Green – 2″ x 2-1/2″ (Christmas Tree)
  • Basic White – 3-7/8″ x 5-1/8″ (inside panel), 3″ x 4-1/4″ (scalloped rectangle die cut), 2″ x 5″ (two Christmas Trees)
  • Peaceful Prints DSP – 1-1/4″ x 5-1/8″ (Garden Green Tree print), 2-3/4″ x 5-1/8″ (Real Red snowflake print), 1/2″ x 3-7/8″ (inside trim)

Stampin’ Up! products used in this project:

Perfectly Plaid Photopolymer Stamp Set (En)
$17.00
Pine Tree Punch
$18.00
Scalloped Contours Dies
$35.00
Christmas Trimmings Dies
$27.00
Peaceful Prints 12" X 12" (30.5 X 30.5 Cm) Specialty Designer Series Paper
$0.00
Real Red 8-1/2" X 11" Cardstock
$8.75
Basic Black 8-1/2" X 11" Cardstock
$8.75
Bumblebee 8-1/2X11 Cardstock
$8.75
Garden Green 8-1/2" X 11" Cardstock
$8.75
Basic White 8 1/2" X 11" Cardstock
$9.75
Tuxedo Black Memento Ink Pad
$6.00
Garden Green Classic Stampin' Pad
$7.50
Real Red Classic Stampin' Pad
$7.50
Black & White 1/4" (6.4 Mm) Gingham Ribbon
$7.00
Decorative Matte Dots
$8.00
Stampin' Dimensionals
$4.00
Multipurpose Liquid Glue
$4.00
Mini Glue Dots
$5.25
Stampin' Seal
$8.00
Stampin' Cut & Emboss Machine
$120.00

Stampin’ Up! Perfectly Plaid for the Happy Inkin’ Thursday Blog Hop

Good Morning! Welcome to another Happy Inkin’ Thursday Blog Hop! I am continuing with the Christmas in July theme for today’s card pairing a sneak peek of the new Snowflake Splendor designer series paper from the new Aug-Dec 2020 Mini Catalog with a returning favorite, the Stampin’ Up! Perfectly Plaid Christmas tree and Pine Tree Punch from the current Annual Catalog.

We have a sketch challenge this week, and here is the sketch we are using:

I embossed a strip of Balmy Blue card stock with the new Winter Snow embossing folder (available Aug 4) and adhered it to the bottom of a panel of the beautiful Snowflake Splendor designer series paper (available Aug 4). I adhered the layered panel to a Thick Whisper White panel and wrapped it with a length of Whisper White crinkle ribbon and made a bow. I adhered the panel to the front of a Balmy Blue card base with dimensionals.

I stamped the tree from the Stampin’ Up! Perfectly Plaid photopolymer stamp set three times on a panel of Thick Whisper White card stock and punched them out with the Pine Tree Punch. I adhered them to the front of the card with dimensionals.

I added sparkle to the trees by adding the iridescent adhesive backed snowflakes to the trees and added Blue Adhesive backed gems add sparkle to the background. Both of these will be available on Aug 4.

I stamped another tree from the Stampin’ Up! Perfectly Plaid stamp set in Highland Heather ink to the bottom of a Whisper White panel. I stamped the sentiment from the stamp set in the middle of the panel in Highland Heather ink and added a strip of the Snowflake Splendor DSP to the bottom. I adhered the panel to the inside of the card.

Non-Traditional colored Christmas cards aren’t for everyone, but they can be fun and whimsical – another way to spread happiness and joy during the Christmas season!

On with the Hop! Click the Next button below to visit Karen Ksenzakovic’s blog.

And just in case you get lost along the way, here’s a list of the team members participating in the hop today:


July 16 – 31 Host Code: FD627X9W

Use this host code when you order $50 or more and receive a free gift from me!  The gift is your choice of any item valued up to $10.00 in the 2019-20 Annual Catalog or in the 2020 January-June Mini Catalog!  That includes some of the Host Exclusive stamp sets!

If your order is over $150, please do not use the host code since you’ll receive your own Host Dollars plus I’ll still send you the free gift!  This host code can be used by anyone, no commitment required.  Let me know if you have any questions.


If you need any stamping supplies, I’d be very happy to be your Demonstrator.  Just click on the Shop Now Button on the right side of the screen to go directly to my online store or contact me if you have any questions.  Happy Stamping!

Thanks for visiting!

Akiko

  • Visit my online store here
  • See the current Stampin’ Up! clearance rack specials here
  • Earn FREE Stampin’ Up! products through my Wildflower Frequent Shopper Program – my way of saying thank you to my frequent shopper online customers.
  • Sign up for my weekly newsletter here
  • Have any questions? I’d be happy to help, click here to contact me.

Cardstock Cuts for this project:

  • Balmy Blue – 5-1/2″ x 8-1/2″ card base scored at 4-1/4″, 1″ x 5-1/8″ (embossed strip)
  • Thick Whisper White – 4″ x 5-1/4″ (front mat), 2-1/2″ x 5-1/2″ (punched trees)
  • Whisper White – 4″ x 5-1/4″ (inside panel)
  • Snowflake Splendor DSP – 3-7/8″ x 5-1/8″ (front background), 1/2″ x 5-1/4″ (inside trim)

Stampin’ Up! products used in this project:


Stampin’ Up! Perfectly Plaid White and Gold Christmas Card for the Inkin’ Krew Blog Hop

Good Morning! Welcome to the November Inkin’ Krew Monthly Blog Hop!

Our team is doing a Blog Hop with the theme “Merry Christmas or Happy Holidays” and I am making a Christmas card with the Stampin’ Up! Perfectly Plaid Stamp photopolymer bundle. You can find the supplies used to create this card at the bottom of my post along with the sizes of cardstock used.

I started with the trees. I punched two from Gold Foil card stock, one from Gold Glimmer card stock and one from Sparkle Glimmer card stock. I took one foil tree and embossed it with the Stylish Scrolls embossing folder. The last three trees were stamped and gold embossed on shimmery white paper before being punched. I used the tree stamp from the Stampin’ Up! Perfectly Plaid stamp set, the diagonal stripes from the Tiny Keepsakes stamp set and the star field from the So Many Stars stamp set. For all of these, I used my embossing buddy on the shimmery white card stock, stamped with Versamark ink, sprinkled with gold embossing powder and heat set. I then punched out the trees. Then I punched out 7 additional trees from Whisper White and adhered them to the back of the trees to add stiffness.

I took a panel of Thick Whisper White and embossed it with the Subtle embossing folder. I die cut two of the edge dies from the Christmas Rose dies from gold foil and adhered them to the back of the embossed panel on the bottom. I adhered a piece of the gold shimmer ribbon just above the edge with snail and wrapped it around, securing it in the back. I arranged the trees on the panel, adhering the ones in the back with liquid glue and popped the ones in the front with dimensionals. I then adhered the panel to a Thick Whisper White card base with dimensionals. Then I decorated the trees as shown with pearls, gold glitter enamel dots and gold metallic pearls.

I stamped the sentiment from the Itty Bitty Christmas stamp set with Versamark ink on a strip of Whisper White. I sprinkled it with embossing powder and heat set. I then curled it with my bone folder to give it some movement and adhered it to the card base with glue dots. I finished the banner with two gold metallic pearls.

I decorated the inside by embossing the sentiment and tree from the Stampin’ Up! Perfectly Plaid stamp set in gold on a Whisper White panel. I adhered it to a gold foil mat and then to the inside of the card.

I love the Stampin’ Up! Perfectly Plaid stamp set with the Pine Tree punch and wanted to try making an elegant sparkly Christmas card with it. I hope you like it.

Thanks for visiting! Click on the Next Blog button to move forward to Amy Koender’s project or click the Previous Blog button to move back to see the project that Sue Prather created.

If you get lost along the way, here are the participants for the hop:

I hope you enjoy all the beautiful holiday projects that the team has created today and that they put you in a wonderful holiday frame of mind!


November 1 – 15 Host Code: WR4KJJM4

Use this host code when you order $50 or more in Stampin’ Up! products and receive a free gift from me!  The gift is your choice of any item valued up to $10.00 in the 2019-2020 Annual Catalog or in the 2019 Holiday Catalog!  That includes some of the Host Exclusive stamp sets!

If your order is over $150, please do not use the host code since you’ll receive your own Host Dollars plus I’ll send you the free gift!  This host code can be used by anyone, no commitment required.  Let me know if you have any questions.


If you need any stamping supplies, I’d be very happy to be your Demonstrator.  Just click on the Shop Now button on the right side of the screen to go directly to my online store or contact me if you have any questions.  Happy Stamping!

Thanks for stopping by and have a great week!

Akiko

  • Visit my online store here
  • See the current Stampin’ Up! clearance rack specials here
  • Earn FREE Stampin’ Up! products through my Wildflower Frequent Shopper Program – my way of saying thank you to my frequent shopper online customers.
  • Have any questions? I’d be happy to help, click here to contact me.

Cardstock Cuts for this project:

  • Thick Whisper White – 5 1/2″ x 8 1/2″ (card base), 2 1/1″ x 5 1/4″
  • Whisper White – 3 3/4″ x 5″ (inside), 3 1/2″ x 7 1/2″ (punched trees), 1/2″ x 4″
  • Sparkle Glimmer Paper – 2 1/2″ x 3″
  • Gold Glimmer Paper – 2 1/2″ x 3″
  • Gold Foil – 3 7/8″ x 5 1/8″ (inside mat), 2 1/2″ x 4″ (trees), 1/2″ x 7″ (trim)
  • Shimmery White card stock – (3) 2 1/2″ x 3″

Stampin’ Up! products used in this project:


Stampin’ Up! Itty Bitty Christmas Plaid Trees Card

Good Morning! Today I’m sharing a Christmas card with a greeting from the Stampin’ Up! Itty Bitty Christmas cling stamp set and a forest of plaid Christmas trees. The trees are all punched from the Wrapped in Plaid Designer Series Paper using the Pine Tree punch! You can find the supplies used to create this card at the bottom of my post along with the sizes of cardstock used.

I started with a panel of Shaded Spruce cardstock that I ran through the Winter Knit embossing folder. I then adhered it to the front of a Shaded Spruce card base. I selected 7 plaids from the Wrapped in Plaid DSP. I punched out a tree from each using the Pine Tree punch.

Then I die cut 7 stars from gold foil using one of the stars in the star spray die cut in the Stitched Stars dies. The large star in the Twinkle Builder punch would also work well or gold star shaped faceted gems. These would probably take less time, but I didn’t have them, so I improvised and found that this star die cut was a good size. I adhered a star to the top of each tree with liquid glue.

I then arranged the trees and adhered them to the card front. I used liquid glue to attach the back trees and dimensionals to attach the ones in front. I stamped the Celebrate the Season sentiment from the Stampin’ Up! Itty Bitty Christmas stamp set in Versamark ink on a strip of Cherry Cobbler. I sprinkled it with white embossing powder and heat set. I trimmed the end and adhered it to the card front with dimensionals. I finished it off with a gold glitter dot from the upcoming Christmastime is Here limited release suite next month.

I punched part of another plaid tree and attached it to a Whisper White panel with liquid glue. It’s hard to see, but I embossed a strip of Cherry Cobbler with the Winter Knit embossing folder and adhered it to the bottom. I then adhered the panel to the inside of the card with liquid glue.

This is an elegant Christmas Card that sparkles with the gold foil touches in the Wrapped in Plaid Designer Series Paper and stars. But it also has a flannel and knit sweater kind of look with the embossed background coupled with the DSP. Best of all, it comes together pretty quickly. I hope you like it. Thanks for visiting!

Akiko


October 1 – 15 Host Code: 44YKETNJ

Use this host code when you order and receive a free gift from me!  If your order is over $150, please do not use this code, but you’ll still get the free gift.  The free gift is your choice of any item valued up to $10.00 in the 2018-19 Annual Catalog or in the 2019 Occasions Catalog!  That includes some of the Host Exclusive stamp sets!


If you need any stamping supplies, I’d be very happy to be your Demonstrator.  Just click on the Shop Now button on the right side of the screen to go directly to my online store or contact me if you have any questions.  Happy Stamping!

  • Visit my online store here
  • See the current Stampin’ Up! clearance rack specials here
  • Earn FREE Stampin’ Up! products through my Wildflower Frequent Shopper Program – my way of saying thank you to my frequent shopper online customers.
  • Have any questions? I’d be happy to help, click here to contact me.

Cardstock Cuts for this project:

  • Shaded Spruce – 5 1/2″ x 8 1/2″, 4″ x 5 1/4″
  • Cherry Cobbler – 5/8″ x 3 1/2″, 1/2″ x 3 3/4″
  • Whisper White – 3 3/4″ x 5″
  • Gold Foil – (7) 1″ x 1″ scraps
  • Wrapped in Plaid DSP – (7) 2 1/4 x 3″, 1 3/4″ x 3″

Stampin’ Up! products used in this project:


Stampin’ Up! Perfectly Plaid Christmas Tree Card

Good Morning! Today I have a Christmas Card made with the Stampin’ Up! Perfectly Plaid photopolymer stamp set and Pine Tree Punch.

This is the first Christmas Card that I designed for my Card Making 101 video series on Facebook. I used some more die cuts and introduced dry embossing with the Pinewood Planks embossing folder. You can find the supplies used to create this card at the bottom of my post along with the sizes of cardstock used.

Here’s the video with instructions on how to make the card. I think I’m making improvements each time, but I’m still not ready for Prime Time (and definitely no Emmy!).

Here’s a picture of the inside of the card. I am planning to share card making videos on Facebook Live on Sundays at 1:00 Eastern time. I invite you to join me and like my Facebook page.

And don’t forget about the current Buy 3 Get 1 Free Designer Series Paper promotion that lasts for just one more week.

Thanks for stopping by!

Akiko


This image has an empty alt attribute; its file name is 09-19_banner_dsp_us.jpg

Buy 3 Get 1 Free Designer Series Paper Sale

By popular demand, Stampin’ Up! is bringing back the Designer Series Paper Sale! During September 4–30, you can buy three packages of select Designer Series Paper, and get one FREE! See the full details on my Stampin’ Up! Promotions Page.


September 16 – 30 Host Code: EDRVYB3Z

Use this host code when you order and receive a free gift from me!  If your order is over $150, please do not use this code, but you’ll still get the free gift.  The free gift is your choice of any item valued up to $10.00 in the 2018-19 Annual Catalog or in the 2019 Occasions Catalog!  That includes some of the Host Exclusive stamp sets!


If you need any stamping supplies, I’d be very happy to be your Demonstrator.  Just click on the Shop Now button on the right side of the screen to go directly to my online store or contact me if you have any questions.  Happy Stamping!

  • Visit my online store here
  • See the current Stampin’ Up! clearance rack specials here
  • Earn FREE Stampin’ Up! products through my Wildflower Frequent Shopper Program – my way of saying thank you to my frequent shopper online customers.
  • Have any questions? I’d be happy to help, click here to contact me.

Cardstock Cuts for this project:

  • Shaded Spruce – 4 1/4″ x 11″
  • Whisper White – (2) 3 3/4″ x 5″, 2 1/2″ x 5 3/4″
  • Cherry Cobbler – 2 1/4″ x 3 1/4″
  • Gold Foil – 1” x 2”
  • Wrapped in Plaid DSP – 2 3/4″ x 3 5/8″, 1/2″ x 3 3/4”

Stampin’ Up! products used in this project:


Stampin’ Up! Perfectly Plaid Believe Christmas Card

Good Morning! Today’s card is a Christmas Card made with the Stampin’ Up! Perfectly Plaid Photopolymer stamp set and the Stampin’ Up! Itty Bitty Christmas Cling stamp set. I teamed these up with the Let It Snow Designer Series Paper to make a light and cheerful Christmas Card. You can find the supplies used to create this card at the bottom of my post along with the sizes of cardstock used.

I was inspired by the sketch in the Try Stampin’ On Tuesday Challenge 426 – TSOT426.

I started with a strip of Sparkle Glimmer paper that I used the die cut from the Budding Blooms dies to cut a scalloped edge. I cut a strip of the striped Let It Snow DSP and adhered a strip of Coastal Cabana to the back and edged it with the Sparkle Glimmer paper scalloped edge. I tied a piece of Real Red curly ribbon around the bottom and attached it to a Real Red card base with dimensionals.

I stamped the open leaf tree image from the Stampin’ Up! Perfectly Plaid stamp set on a piece of Coastal Cabana using VersaMark ink. I sprinkled white embossing powder on it and heat set it. Then I punched it out it out with the Pine Tree punch. I punched another pine tree from Sparkle Glimmer paper and attached the trees to the card with liquid glue and dimensionals.

I stamped the believe sentiment from the Stampin’ Up! Itty Bitty Christmas on a strip of Coastal Cabana in VersaMark ink and sprinkled it with white embossing powder and heat set. I trimmed the ends and attached it to a strip of Real Red and attached it to the card. I finished off the card front with three read glittered enamel dots.

I stamped the sentiment from the Stampin’ Up! Perfectly Plaid stamp set in Real Red ink on a panel of Whisper White. I stamped the tree image again in Coastal Cabana in the lower left of the inside panel. I added a strip of the same designer paper that I used on the front of the card to the bottom of the inside panel an adhered it to a Coastal Cabana mat before attaching it to the inside of the card. I also stamped the tree image on the lower left of a white envelope.

Coastal Cabana and Real Red make a cheerful and happy Christmas card. And I guess that this shows how to make a non-plaid Christmas card with the Stampin’ Up! Perfectly Plaid bundle. On Sunday I will be on Facebook Live making a Plaid Christmas card using this bundle on my business page at 1:00 PM Eastern time. I welcome you to tune in. Thanks for visiting and have a great weekend!

Akiko


This image has an empty alt attribute; its file name is 09-19_banner_dsp_us.jpg

Buy 3 Get 1 Free Designer Series Paper Sale

By popular demand, Stampin’ Up! is bringing back the Designer Series Paper Sale! During September 4–30, you can buy three packages of select Designer Series Paper, and get one FREE! See the full details on my Stampin’ Up! Promotions Page.


September 16 – 30 Host Code: EDRVYB3Z

Use this host code when you order and receive a free gift from me!  If your order is over $150, please do not use this code, but you’ll still get the free gift.  The free gift is your choice of any item valued up to $10.00 in the 2018-19 Annual Catalog or in the 2019 Occasions Catalog!  That includes some of the Host Exclusive stamp sets!


If you need any stamping supplies, I’d be very happy to be your Demonstrator.  Just click on the Shop Now button on the right side of the screen to go directly to my online store or contact me if you have any questions.  Happy Stamping!

  • Visit my online store here
  • See the current Stampin’ Up! clearance rack specials here
  • Earn FREE Stampin’ Up! products through my Wildflower Frequent Shopper Program – my way of saying thank you to my frequent shopper online customers.
  • Have any questions? I’d be happy to help, click here to contact me.

Cardstock Cuts for this project:

  • Real Red – 4 1/4″ x 11″, 1/2″ x 2″
  • Coastal Cabana – 3 3/4″ x 5″, 2″ x 5 1/2″, 2 1/2″ x 3″, 1/2″ x 2″
  • Let it Snow DSP – 5 1/2″ x 2 1/4″, 1/2″ x 3 5/8″,
  • Whisper White – 3 5/8″ x 4 7/8″
  • Sparkle Glimmer Paper – 3/4″ x 5 1/2″, 2 1/2″ x 3″

Stampin’ Up! products used in this project:


Stampin’ Up! Perfectly Plaid Christmas Card

Good Morning! Today I have a card that has a sneak peek of a stamp set and punch that will be coming out in the new Stampin’ Up! 2019 Holiday Catalog. The stamp set is Stampin’ Up! Perfectly Plaid photopolymer stamp set and it comes in a bundle with the coordinating Pine Tree punch at 10% off. You can find the supplies I used to create this card at the bottom of my post along with the sizes of cardstock used.

I was inspired by the sketch in The Paper Players PP456 Challenge and it worked well for showcasing the different designs in the Stampin’ UP! Wrapped in Plaid 6×6 Designer Series Paper pack.

In the Wrapped in Plaid DSP pack, there is a Christmas tree patterned paper that fits perfectly in the Pine Tree punch. So I started by punching one of these tree and punching two more trees in whisper White cardstock to give it thickness. I adhered the trees together and decorated it with Cherry Cobbler gems and a gold star sequin topped with a foil star. I selected two more of the Wrapped in Plaid papers and punched a tree from each. I cut a panel of Sparkle Glimmer paper using the large circle in the Stitched Shapes dies and adhered the trees to the circle with glue dots.

I stamped the Merry Christmas sentiment from the Stampin’ Up! Perfectly Plaid stamp set on a panel of the striped DSP in Versamark ink, sprinkled it with white embossing powder and heat set. I then adhered it to a Whisper White mat.

The background panel is double matted with the Cherry Cobbler Christmas trees DSP background, a Shaded Spruce mat and a Whisper White mat. It is mounted on a Cherry Cobbler card base with snail. I added the striped panel with snail and finally the circle with dimensionals.

I decorated the inside of the card by stamping the sentiment from the Stampin’ Up! Perfectly Plaid stamp set in Cherry Cobbler ink on a panel of Whisper White. I stamped the tree in in the lower right corner with Shaded Spruce ink after stamping off once. Doesn’t it look just like the tree in the DSP? I added a strip of the striped DSP and matted it with Shaded Spruce and Whisper White before adding it to the inside of the card.

The Stampin’ Up! Perfectly Plaid photopolymer stamp set and Pine Tree punch are perfect for creating Christmas Tree cards. And the beautiful designs with the gold foil touches in the Wrapped in Plaid 6×6 specialty designer series paper coordinates beautifully with the bundle. These are just a few of the wonderful products that will be available in the 2019 Stampin’ Up! Holiday Catalog on September 4. Thanks for visiting and have a great weekend!

Akiko


Buy 3 Get 1 Free Designer Series Paper Sale Is Back – Starting Sept 4!

By popular demand, Stampin’ Up! is bringing back the Designer Series Paper Sale! During September 4–30, you can buy three packages of select Designer Series Paper, and get one FREE! See the full details on my Stampin’ Up! Promotions Page.


We only have a few more days in Bonus Days! Don’t forget to redeem those $5 coupons that you earned for purchases in July. See the full details on my Stampin’ Up! Promotions Page.


August 16 – 30 Host Code: KHSFPFPZ

August 31 – September 15 Host Code: DHYEBG62

Use this host code when you order and receive a free gift from me!  If your order is over $150, please do not use this code, but you’ll still get the free gift.  The free gift is your choice of any item valued up to $10.00 in the 2018-19 Annual Catalog or in the 2019 Occasions Catalog!  That includes some of the Host Exclusive stamp sets!


If you need any stamping supplies, I’d be very happy to be your Demonstrator.  Just click on the Shop Now button on the right side of the screen to go directly to my online store or contact me if you have any questions.  Happy Stamping!

  • Visit my online store here
  • See the current Stampin’ Up! clearance rack specials here
  • Earn FREE Stampin’ Up! products through my Wildflower Frequent Shopper Program – my way of saying thank you to my frequent shopper online customers.
  • Have any questions? I’d be happy to help, click here to contact me.

Cardstock Cuts for this project:

  • Cherry Cobbler – 4 1/4″ x 11″ card base
  • Whisper White -(2) 3 3/4″ x 5″, 2 1/8″ x 3 1/8″, 3 1/2″ x 4 3/4″
  • Shaded Spruce – (2) 3 5/8″ x 4 7/8″
  • Sparkle Glimmer Paper – 3 1/4″ x 3 1/4″
  • Wrapped in Plaid DSP – 3 1/2″ x 4 3/4″ (Cherry Cobbler tree background), 2″ x 3″, 1/2″ x 3 1/2″ (striped paper), (2) 2″ x 3″ (plaid trees)

Stampin’ Up! products used in this project: