Stampin’ Up! Cheerful Daisies Mother’s Day Card

Happy St. Patrick’s Day! Last weekend we had our quarterly Inkin’ Krew Team meeting and Carol Buckalew demonstrated a beautiful Center Pop Out card made with the pretty Simply Zinnia bundle (you can see her pretty card here). I CASE’d her card and used the Stampin’ Up! Cheerful Daisies bundle with the Fresh As A Daisy designer series paper to make a Mother’s Day card. You can find the products I used at the bottom of my post along with the card stock sizes.

I carefully scored a Thick Basic White card base and burnished the score lines and adhered the panels of Fresh As A Daisy designer series paper to Garden Green mats with liquid glue. I adhered each layered DSP panel to the front center and side panels of my card base.

I adhered panels of Delightfully Eclectic DSP to the middle panels to add some interest because the white was too stark. Then I cut out all the flower dies from the Stampin’ Up! Cheerful Daisies dies from Basic White. I made each flower three layers, so I cut one of each of the dies and I cut one large center and two small ones. I used the light Lemon Lolly and Dark Daffodil Delight Stampin’ Blends to color the centers so that they looked like the DSP flowers. Then I used the Early Espresso Stampin’ Write Marker make highlights on the top, detailed die cuts for each flower. I cut off the leaves from the center section with my paper snips and adhered the detailed die cuts to the top and the larger die cuts to the back of each flower. I trimmed one of the small flower centers with my paper snips and popped them on the flowers with dimensionals.

I used the medium rectangle label die from the Something Fancy dies to cut a Garden Green panel for the label mat. I stamped the sentiment from the Flower Cart stamp set in Early Espresso ink on Daffodil Delight and cut it out with the smallest rectangle label die from the Something Fancy dies. I adhered the labels together and adhered it to the center section of the card base.

I cut three twig clusters using the Stampin’ Up! Cheerful Daisies dies and adhered them to the top of the center section of the card with tiny dots of liquid glue. I adhered the flowers with dimensionals. I used the leaf cluster section of the large die to cut out four sets of leaves from Garden Green. I adhered the leaves to the card, tucking them under the flowers. I finished with a Parakeet Party metallic bow and three Daffodil Delight glossy dots.

For the inside of the card, I used the back of the center section. I stamped the sentiment from the Flower Cart stamp set in Early Espresso ink on a Basic White panel. I stamped the flower cluster from the Stampin’ Up! Cheerful Daisies stamp set in Daffodil Delight ink. I accented the centers with my Early Espresso Stampin’ Write marker and cut out a mask using the coordinating die. I covered the flowers with the mask and stamped two leaves using Garden Green ink. I adhered the panel to a Garden Green mat and then adhered it to the center space in the back. I finished by adhering panels of Delightfully Eclectic DSP to the remaining back panels.
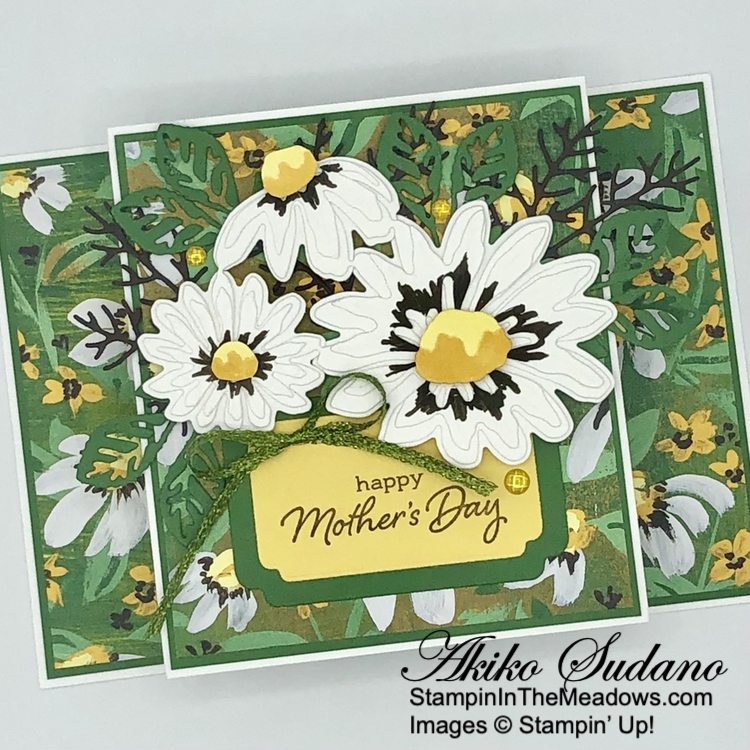
I loved making this fun fold card and it was really pretty simple. I was happy to pull out the beautiful Stampin’ Up! Cheerful Daisy bundle and Fresh As A Daisy DSP to make it. Daisies are simple flowers, so they’re perfect to give on Mother’s Day. And there’s so much green on this card that it’s perfect for St. Patrick’s Day! Enjoy!!


Your Day To Shine and Frog & Friends Added to Kits Collection!

The Kits Collection by Stampin’ Up! provides different options and a range of project types that allow you to choose the crafting experiences that best fits your style and needs. There’s a variety of kits to choose from and these all-inclusive project kits have everything you need in one box! You can Find these kits in the Online Store.

The new kits for March are the Your Day To Shine Kit and the Frog & Friends Kit. Click on the images below to see the details in the Online Store.

Your Day To Shine Kit
Frog & Friends Kit

Current Host Code: XR9HAEK4

Use this host code when you order $50 or more and receive a Thank You gift from me!  The free gift is your choice of any item currently available valued up to $10.00.

If your order is over $150, please do not use the host code since you’ll receive your own Host Dollars plus I’ll still send you the Thank You gift!  This host code can be used by anyone, no club or commitment required. Let me know if you have any questions.


If you need any stamping supplies, I’d be very happy to be your Demonstrator.  Just click on the Shop Now Button on the right side of the screen to go directly to my Online store or contact me if you have any questions.  Happy Stamping!

Thanks for stopping by and have a great day!

Akiko

  • Visit my online store here
  • See the current Stampin’ Up! clearance rack specials here
  • Earn FREE Stampin’ Up! products through my Wildflower Frequent Shopper Program – my way of saying thank you to my online frequent shopper customers.
  • Have any questions? I’d be happy to help, click here to contact me.

Cardstock Cuts for this project:

  • Thick Basic White – 4-1/4″ x 11″ card base scored at 2-1/4″, 3-5/8″, 7-3/8″ and 8-3/4″
  • Garden Green – two 3-5/8″ x 4-1/8″ panels (front and back center panel mats), two 2-1/8″ x 4-1/8″ panels (side DSP mats), 2″ x 3″ (label mat), 1-1/2″ x 6″ (die cut leaves)
  • Daffodil Delight – 1-3/4″ x 3″ (label)
  • Early Espresso – 2-1/2″ x 4-1/2″ (die cut twigs)
  • Basic White – 3-1/2″ x 4″ (back center panel), 4″ x 8″ panel (floral die cuts)
  • Fresh As A Daisy DSP – 3-1/2″ x 4″ (center panel background), two 2″ x 4″ (side panels)
  • Delightfully Eclectic DSP – four 1-1/4″ x 4-1/8″ panels (front and back middle panels), two 2-1/8″ x 4-1/8″ panels (back side panels)
Stampin’ Up! products used in this project:


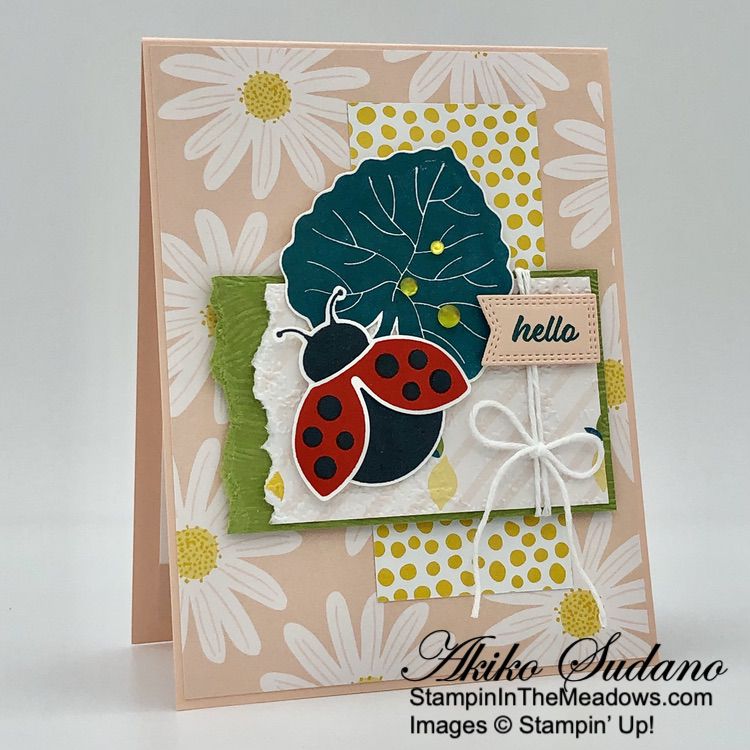
Stampin’ Up! Hello Ladybug Card

Good Morning and Happy Labor Day! I hope you’re having a wonderful, fun weekend to wind down Summer, although our weather certainly doesn’t feel like Fall. I was inspired by the pretty Masterfully Made designer series paper to make a card with torn edges, layering and texture, and I wanted to use the sweet Stampin’ Up! Hello Ladybug photopolymer stamp set and coordinating Ladybug Builder punch before Summer is gone. You can find the products I used at the bottom of my post along with the card stock sizes.

I adhered a panel of Delightfully Eclectic designer series paper to the front of a Petal Pink card base with liquid glue. I adhered a strip of Crushed Curry dots from the same DSP pack on top with liquid glue. I embossed an Old Olive panel with the Timber 3D embossing folder and a striped panel of Delightfully Eclectic DSP with the Timeworn Type 3D embossing folder. I tore the left edge of each, adhered them together and wrapped it with white baker’s twine, making a bow. I adhered it to the card front with dimensionals.

I stamped leaf from the Stampin’ Up! Hello Ladybug stamp set in Pretty Peacock ink on Basic White and fussy cut it with my paper snips. I adhered it to the card front with glue dots and dimensionals. I stamped the ladybug body in Memento Tuxedo Black and the wings in Poppy Parade and Memento Tuxedo Black on Basic White. I punched them out with the Ladybug Builder punch and adhered them together with glue dots. I popped them on the card with dimensionals.

I stamped the sentiment from the Stampin’ Up! Hello Ladybug stamp set in Pretty Peacock ink on Petal Pink and cut it out with the small banner from the Nested Essentials dies. I adhered it to the card front with dimensionals and finished the card by adhering yellow dots to the leaf with glue dots.

For the inside of the card, I stamped the flowers from the Stampin’ Up! Hello Ladybug stamp set in Daffodil Delight ink on a Basic White panel. I stamped the sentiment in Pretty Peacock and adhered a strip of Delighhtfully Eclectic DSP to the bottom. I adhered the panel to the inside of the card with Stampin’ Seal.

The ladybug from the Stampin’ Up! Hello Ladybug stamp set is simple and cute. I hope you like how the torn edges came out and give it a try. And I really like how the different bold graphic designs in the Delightfully Eclectic designer series paper go together so well – it’s a pretty versatile paper pack.


Designer Series Paper Special Release Starts September 6, 2023!

A special selection of Designer Series Papers will be available in the Online Exclusives section of the Online Store beginning September 6, 2023. These papers will be available only while supplies last, so shop early to bet yours before they’re gone. Click on the image below to download a PDF with all the details including item numbers and prices.

These papers are perfect for both holiday crafting and all occasion crafting.


The September Paper Pumpkin Kit is With Love & Gratitude!

Express your love and gratitude in elegant style with the September Paper Pumpkin Kit inspired by Shelli! This kit includes eight treat packages (you can also use for small gifts) and eight miniature note cards with matching envelopes and specialty gold foil embellishments. Whether you’re needing a hostess gift, a sweet surprise for dinner guests, or have another reason to give love and thanks, this kit has you covered.

The September Kit Includes:

  • All the supplies you need to create 8 treat packages and note cards
    • 8 treat packages – Finished Size: 3-1/2″ x 5″ x 2″
    • 8 note cards – Card Size: 3-1/2″ x 3-1/2″
    • 8 coordinating envelopes
  • 1 photopolymer stamp set
  • 1 Lost Lagoon Ink Spot
  • Specialty gold foil, precut embellishments
  • Adhesives

Coordinating Colors: Copper Clay, Crumb Cake, gold foil, Lost Lagoon, Mossy Meadow, Pebbled Path

Plus, don’t miss the Thoughts of Thanks Journal! It matches both the design and intent of the kit, giving you an even more personal way to document and express your gratitude. It’s available as an add-on, but only while supplies last!

Thoughts of Thanks Journal

  • 8” x 10” journal
  • 2 specialty gold foil sticker sheets
  • Item number 163270
  • $15.00

If you’re interested in subscribing to Paper Pumpkin, you can either sign up for a subscription where you are billed monthly for your kit or you can purchase a prepaid subscription in my Online Store. To see more information and to sign up for the monthly subscription click here. To see the options for prepaid subscriptions in my Online Store, click here.

Sign up deadline for the September 2023 kit is September 10, 2023. Note: Supplies may be limited toward the end of the subscription period.


Current Host Code: ATSGGVYD

Use this host code when you order $50 or more and receive a Thank You gift from me!  The free gift is your choice of any item currently available valued up to $10.00 .

If your order is over $150, please do not use the host code since you’ll receive your own Host Dollars plus I’ll still send you the Thank You gift!  This host code can be used by anyone, no club or commitment required. Let me know if you have any questions.


If you need any stamping supplies, I’d be very happy to be your Demonstrator.  Just click on the Shop Now button on the right side of the screen to go directly to my online store or contact me if you have any questions.  Happy Stamping!

Thanks for stopping by and have a great weekend!

Akiko

  • Visit my online store here
  • See the current Stampin’ Up! clearance rack specials here
  • Earn FREE Stampin’ Up! products through my Wildflower Frequent Shopper Program – my way of saying thank you to my online frequent shopper customers.
  • Have any questions? I’d be happy to help, click here to contact me.

Cardstock Cuts for this project:

  • Petal Pink – 4-1/4″ x 11″ card base, scored at 5-1/2″, 1″ x 1-1/2″ (label)
  • Old Olive – 2-1/8″ x 5″ (embossed panel)
  • Basic White – 3-3/4″ x 5″ (inside panel), 3″ x 5″ (leaf and ladybug stamps)
  • Delightfully Eclectic DSP – 4-1/8″ x 5-3/8″ (front background), 1-3/4″ x 4-1/4″ (front stripe), 2″ x 3-3/4″ (embossed panel), 1/2″ x 3-3/4″ (inside trim)

Stampin’ Up! products used in this project:


Stampin’ Up! Just My Type Hello Card

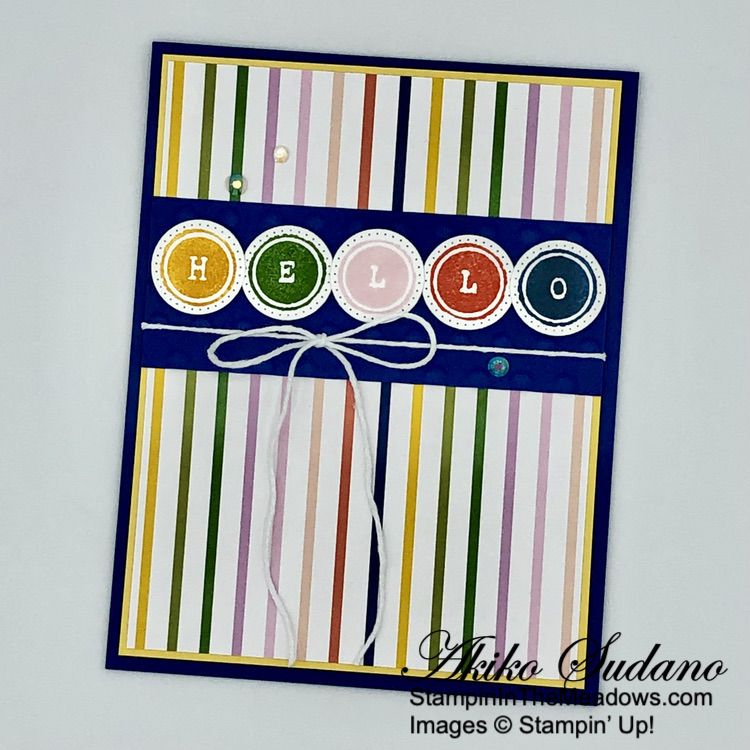
Good Morning! The Stampin’ Up! Just My Type photopolymer stamp set is a cute set with lots of fun images and sentiments. I just used the hello stamp on my card front and paired it with the wonderful Delightfully Eclectic designer series paper for a simple card. You can find the products I used at the bottom of my post along with the card stock sizes.

The hello stamp is a single stamp with all the letters connected. I wanted to do each letter in a separate color to pick up the stripes in the Delightfully Eclectic DSP, so I stamped each letter one at a time on Basic White card stock and cut them out with the smallest circle in the Stylish Shapes dies. I stamped them in Crushed Curry, Garden Green, Bubble Bath, Calypso Coral and Misty Moonlight.

But let me start at the beginning… I adhered a panel of Delightfully Eclectic DSP to a Daffodil Delight mat with liquid glue. I embossed a Blueberry Bushed panel with the large dots from the Basics Embossing Folders and adhered it to the DSP panel with liquid glue. I popped each die cut letter on the embossed panel (starting in the middle and working outward) with dimensionals and wrapped a length of white baker’s twine around the panel, making a bow.

I adhered the panel to the front of a Blueberry Bushel card base with dimensionals and finished with three iridescent rhinestones.

For the inside of the card, I stamped the sentiment from the Stampin’ Up! Just My Type stamp set in Memento Tuxedo Black ink on a Basic White panel. I stamped the rainbow at the top of the panel and colored it roughly with Stampin’ Blends – dark Daffodil Delight, light Old Olive, dark Bubble Bath, dark Calypso Coral and light Blueberry Bushel. I adhered a strip of DSP to the bottom and adhered the panel to the inside of the card with Stampin’ Seal.

I love the typewriter font in the Stampin’ Up! Just My Type stamp set and how the sentiment brings in the rainbow stamp and this DSP also reminds me of rainbows. This stamp set is so versatile and perfect for creative expression for lots of occasions.


Tomorrow is the Last Day To Redeem Your Bonus Days Coupons!

Time to redeem those Bonus Days coupons! Make sure you save all your coupons because you can redeem them (and we mean ALL of them) between August 1 – August 31, 2023. There’s no limit to how many coupons you can earn!

Promotion Details:

Redemption Period: August 1 – August 31, 2023

  • There is no limit to the number of coupon codes participants can redeem on an order during the redemption period. If using multiple codes, they must be separated by a space. 
  • Coupons may be redeemed one time only.
  • Coupon codes may be redeemed for any product (excluding Starter Kits, demonstrator supply items, and Paper Pumpkin month-to-month subscriptions).
  • New prepaid Paper Pumpkin codes may be discounted using Bonus Days coupon codes.

Let me know if you have any questions, and have fun shopping!


Kits Collection Sale Ends Tomorrow!

Save big on the Kits Collection for a limited time only! Each paper crafting kit comes with everything you need to create artistically designed handmade projects. From birthday cards to festive tags, cute treat packaging to floral wreaths, you can try something new at a great discount. Craft with friends, buy as gifts, or simply stock up on your favorites—just don’t miss out on this great deal!

Details:

  • Sales period: August 1, 2023 – August 31, 2023
  • The sale only applies to the Kits Collection by Stampin’ Up!
    • It does not include Paper Pumpkin kits
  • There is no limit to how many kits may be purchased.
  • The kits will be up to 30% off as indicated on the website.
  • No discount code necessary—the discount will be applied automatically.

Note: Discounted Kits are only available while supplies last!

Shop the Stampin’ Up! Kits Collection in my Online Store.


Current Host Code: ATSGGVYD

Use this host code when you order $50 or more and receive a Thank You gift from me!  The free gift is your choice of any item currently available valued up to $10.00 .

If your order is over $150, please do not use the host code since you’ll receive your own Host Dollars plus I’ll still send you the Thank You gift!  This host code can be used by anyone, no club or commitment required. Let me know if you have any questions.


If you need any stamping supplies, I’d be very happy to be your Demonstrator.  Just click on the Shop Now button on the right side of the screen to go directly to my online store or contact me if you have any questions.  Happy Stamping!

Thanks for stopping by and have a great weekend!

Akiko

  • Visit my online store here
  • See the current Stampin’ Up! clearance rack specials here
  • Earn FREE Stampin’ Up! products through my Wildflower Frequent Shopper Program – my way of saying thank you to my online frequent shopper customers.
  • Have any questions? I’d be happy to help, click here to contact me.

Cardstock Cuts for this project:

  • Blueberry Bushel – 4-1/4″ x 11″ card base, scored at 5-1/2″, 1-1/2″ x 4″ (embossed strip)
  • Daffodil Delight – 4″ x 5-1/4″ (front mat)
  • Basic White – 4″ x 5-1/4″ (inside panel), 1″ x 6″ (hello letters)
  • Delightfully Eclectic DSP – 3-7/8″ x 5-1/8″ (front background), 1/2″ x 4″ (inside trim)

Stampin’ Up! products used in this project:


Stampin’ Up! Bird’s Eye View Hello Card

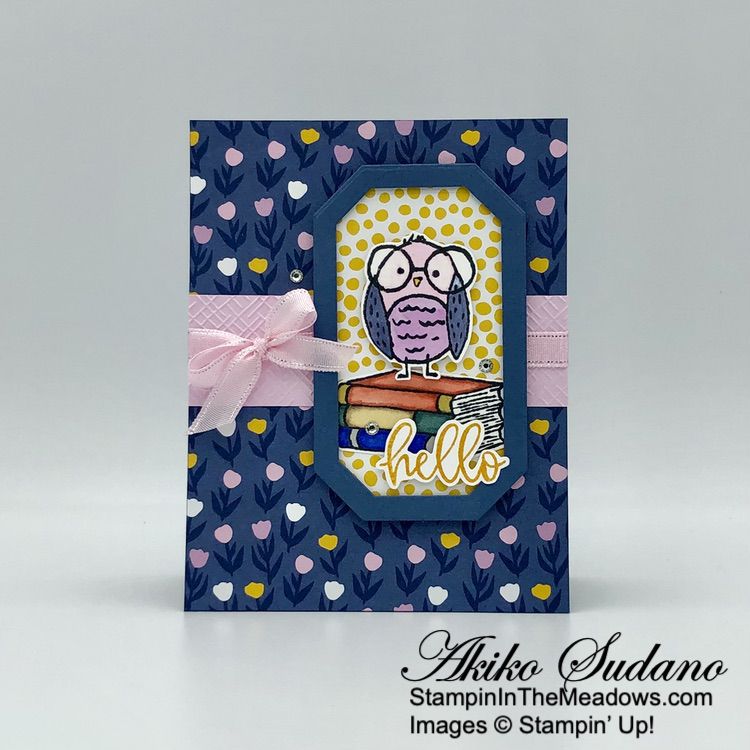
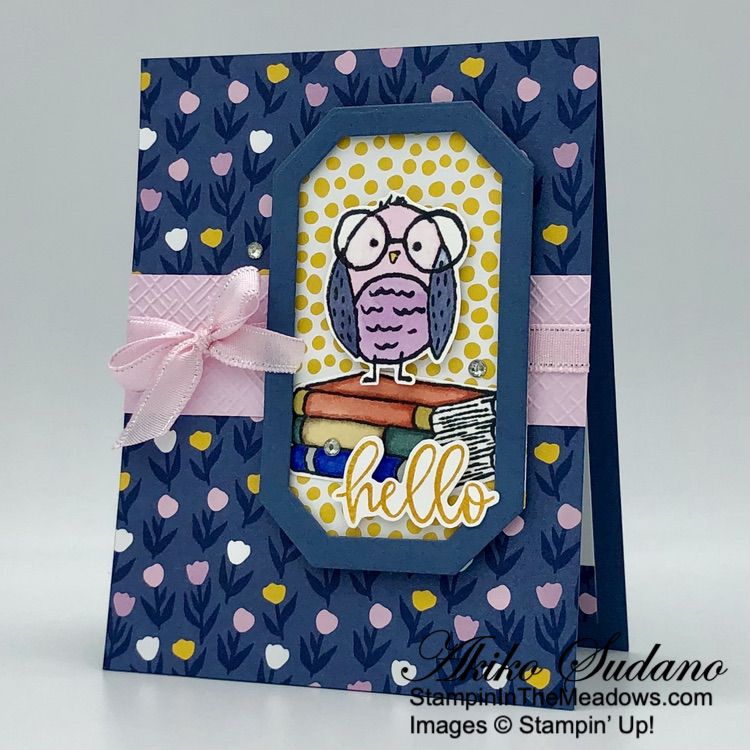
Good Morning! The whimsical birdies in the Stampin’ Up! Bird’s Eye photopolymer stamp set are so cute, especially with the glasses on! I finally picked up this stamp set and had to use it so I could color a little bird and I paired it with a sentiment from the Biggest Wish stamp set. You can find the supplies I used at the bottom of my post along with the sizes of cardstock used.

I adhered a panel of Delightfully Eclectic designer series paper to the front of a Misty Moonlight card base with liquid glue. I embossed a strip of Bubble Bath card stock with the Cross Hatch 3D embossing folder and adhered it to the front and wrapped a length of Bubble Bath ribbon around the card front and made a bow.

I cut a panel of Delightfully Eclectic DSP with the 3rd largest Countryside Corners die and cut a frame from Misty Moonlight card stock using the 3rd and 4th largest dies. I stamped the little bird and the stack of books from the Stampin’ Up! Bird’s Eye View stamp set using Memento Tuxedo Black ink on Basic White and colored them with Stampin’ Blends. I used light Misty Moonlight, light Bubble Bath and light Fresh Freesia on the little bird. I used the color lifter to lighten the bird behind the glasses. I used Calypso Coral, Wild Wheat, Crumb Cake, Pretty Peacock , Orchid Oasis and Smoky Slate on the Books.

I fussy cut the bird and books using my Paper Snips. I adhered the books on the Delightfully Eclectic DSP die cut with liquid glue and adhered the frame over it with strips of dimensionals. I popped the cute bird on with dimensionals. I stamped the sentiment from the Biggest Wish stamp set in Crushed Curry on Basic White and fussy cut it with my Paper Snips. I popped it on the frame with dimensionals and glue dots and popped the frame on the card front with dimensionals. I trimmed the bow strings and secured the bow with another glue dot and finished with rhinestones.

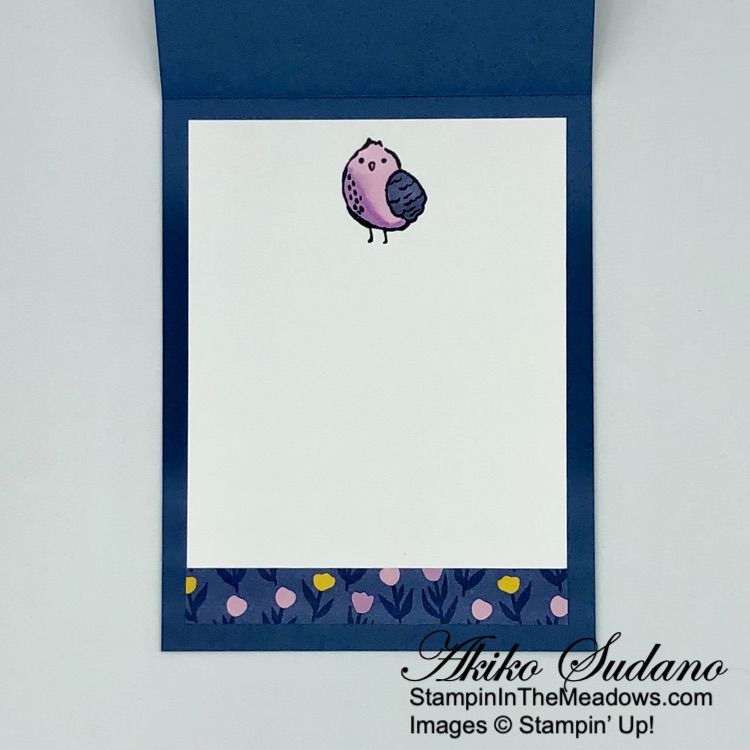
For the inside of the card, I stamped the little bird from the Stampin’ Up! Bird’s Eye View stamp set in Memento Tuxedo Black ink on a Basic White panel. I trimmed the bottom with a strip of Delightfully Eclectic DSP and adhered the panel to the inside of the card with Stampin’ Seal.

Isn’t the bird so cute? The Stampin’ Up! Bird’s Eye View stamp set has three other birds and in addition to the books, theres a branch, leaves and balloon stamp that you can use to make a cute little scene. Oh, and there’s another set of glasses that are a little more stylish – but I like them both!


Bonus Days Redemption Period Going on Now!

Time to redeem those Bonus Days coupons! Make sure you save all your coupons because you can redeem them (and we mean ALL of them) between August 1 – August 31, 2023. There’s no limit to how many coupons you can earn!

Promotion Details:

Redemption Period: August 1 – August 31, 2023

  • There is no limit to the number of coupon codes participants can redeem on an order during the redemption period. If using multiple codes, they must be separated by a space. 
  • Coupons may be redeemed one time only.
  • Coupon codes may be redeemed for any product (excluding Starter Kits, demonstrator supply items, and Paper Pumpkin month-to-month subscriptions).
  • New prepaid Paper Pumpkin codes may be discounted using Bonus Days coupon codes.

Let me know if you have any questions, and have fun shopping!


Last Day to Sign up for the August Paper Pumpkin Kit – Meaningful Flowers!

Discover messages of friendship and loyalty in the flowers from the August Paper Pumpkin Kit! This kit includes 8 cards, 4 each of 2 designs, and 8 coordinating envelopes. The kit is special because of the way it uses the meaning of flowers. On each card, you’ll find a small inscription of what the flowers represent. As you craft with the included vellum and watercolor paper pieces, you’ll know you’re sending a message of encouragement and loyalty to your recipients. 

And don’t wait, because anyone who subscribes to this month’s kit will get a FREE stamp set! This Distinktive stamp set is perfect for a variety of occasions! 

The August Kit Includes:

  • All the supplies you need to create 8 cards: 4 each of 2 designs; and 8 coordinating envelopes. 
    • Finished card size: 5-1/2″ x 4-1/4″
  • A photopolymer stamp set.
  • A Pretty Peacock Stampin’ Spot.
  • Linen Thread.
  • Vellum and precut paper pieces.
  • Free Distinktive stamp set.
  • Adhesives

Coordinating Colors: Bubble Bath, Crushed Curry, Garden Green, Melon Mambo, Misty Moonlight, Orchid Oasis, Pretty Peacock, Tahitian Tide

If you’re interested in subscribing to Paper Pumpkin, you can either sign up for a subscription where you are billed monthly for your kit or you can purchase a prepaid subscription in my Online Store. To see more information and to sign up for the monthly subscription click here. To see the options for prepaid subscriptions in my Online Store, click here.

Sign up deadline for the August 2023 kit is August 10, 2023. Note: Supplies may be limited toward the end of the subscription period.


Introducing the new Festive Tags Kit!

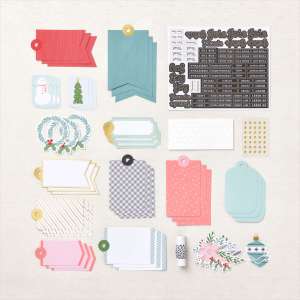
’Tis the season to start your holiday crafting! It’s easy with this all-inclusive kit. Just adhere the die cuts and embellishments and finish with a twine tie. You’ll have tags in minutes, ready for adding a handmade touch to your gifts. Here are the tags you can create and the kit supplies:

The Kits Collection Festive Tags Kit is Item# 162485 and the price is $13 (it’s on sale now for $11.70).

This Kit includes:

  • Enough supplies to make 15 tags: 3 each of 5 designs
  • Size Range: 1-1/2″ x 2″– 2-1/2″ x 3″
  • Die cut stickers and accents
  • Peel-and-stick gold dots
  • Baker’s twine

Coordinating colors: Basic Black, Flirty Flamingo, Garden Green, Lost Lagoon, Pool Party, Real Red


Current Host Code: MK3GJ47F

Use this host code when you order $50 or more and receive a Thank You gift from me!  The free gift is your choice of any item currently available valued up to $10.00 .

If your order is over $150, please do not use the host code since you’ll receive your own Host Dollars plus I’ll still send you the Thank You gift!  This host code can be used by anyone, no club or commitment required. Let me know if you have any questions.


If you need any stamping supplies, I’d be very happy to be your Demonstrator.  Just click on the Shop Now button on the right side of the screen to go directly to my online store or contact me if you have any questions.  Happy Stamping!

Thanks for stopping by and have a great weekend!

Akiko

  • Visit my online store here
  • See the current Stampin’ Up! clearance rack specials here
  • Earn FREE Stampin’ Up! products through my Wildflower Frequent Shopper Program – my way of saying thank you to my online frequent shopper customers.
  • Have any questions? I’d be happy to help, click here to contact me.

Cardstock Cuts for this project:

  • Misty Moonlight – 4-1/4″ x 11″ card base scored at 5-1/2″, 2-3/4″ x 4-3/4″ (frame)
  • Bubble Bath – 1-1/4″ x 4-1/4″ (embossed stripe)
  • Basic White – 3-3/4″ x 5″ (inside panel), 3″ x 5″ (fussy cut images)
  • Delightfully Eclectic DSP – 4-1/4″ x 5-1/2″ (front background), 2-3/4″ x 4-3/4″ (frame background), 1/2″ x 3-3/4″ (inside trim)

Stampin’ Up! products used in this project:


Stampin’ Up! Little Dreamers Baby Card

Good Morning! The sweet Stampin’ Up! Little Dreamers bundle is great for making baby cards and I used it yesterday to share this card at our Inkin’ Krew Team meeting. You can find the supplies I used at the bottom of my post along with the sizes of cardstock used.

I adhered a panel of Delightfully Eclectic designer series paper to a Garden Green mat with liquid glue and adhered it to the front of a Daffodil Delight card base with dimensionals. I used the large banner die from the Nested Essentials dies to cut a panel of Calypso Coral and embossed it with the polka dots from the Basics 3D embossing folders. I adhered it to the card with liquid glue.

I stamped the lion, stars and sentiment from the Stampin’ Up! Little Dreamers stamp set in Memento Tuxedo Black ink on Basic White. I colored the lion with Stampin’ Blends – light Crumb Cake for the lion’s body, dark Calypso Coral for the mane and dark Lemon Lolly for the star. I also colored the little stars with the Lemon Lolly Stampin’ Blend. I cut out the lion and little stars with the coordinating dies and I cut out the sentiment with the smallest rectangle die from the Nested Essentials dies.

I cut out the cloud dies from the Stampin’ Up! Little Dreamers dies and adhered them to the card with liquid glue. I adhered the lion with dimensionals and the label with liquid glue. I adhered the stars with glue dots. I made a knot in a short length of Garden Green ribbon and adhered it with a glue dot.

For the inside of the card, I stamped the sentiment from the Stampin’ Up! Little Dreamers stamp set in Memento Tuxedo Black ink on a Basic White panel. I stamped the little stars and colored them with a dark Lemon Lolly Stampin’ Blend. I trimmed the bottom with a strip of Delightfully Eclectic DSP and adhered the panel to the inside of the card with Stampin’ Seal. And I decorated a coordinating envelope with the stars on the front and DSP on the envelope flap.

The sweet Stampin’ Up! Little Dreamers bundle is great for baby and children’s cards with the fun, playful critters. With the bold crayon colors of the Delightfully Eclectic DSP, this card could easily be converted to a birthday card with the addition of die cut numbers from the Alphabet A La Mode dies. That would be perfect for a toddler!


Current Host Code: 9SKETT74

Use this host code when you order $50 or more and receive a Thank You gift from me!  The free gift is your choice of any item valued up to $10.00 from the 2023-2024 Annual Catalog.

If your order is over $150, please do not use the host code since you’ll receive your own Host Dollars plus I’ll still send you the Thank You gift!  This host code can be used by anyone, no club or commitment required. Let me know if you have any questions.


If you need any stamping supplies, I’d be very happy to be your Demonstrator.  Just click on the Shop Now button on the right side of the screen to go directly to my online store or contact me if you have any questions.  Happy Stamping!

Thanks for stopping by and have a great week!

Akiko

  • Visit my online store here
  • See the current Stampin’ Up! clearance rack specials here
  • Earn FREE Stampin’ Up! products through my Wildflower Frequent Shopper Program – my way of saying thank you to my online frequent shopper customers.
  • Have any questions? I’d be happy to help, click here to contact me.

Cardstock Cuts for this project:

  • Daffodil Delight – 5-1/2” x 8-1/2” card base scored at 4-1/4”
  • Garden Green – 4” x 5-1/4” (front mat)
  • Calypso Coral – 2-1/2” x 3-1/2” (embossed banner)
  • Basic White – two 4” x 5-1/4” panels (inside panel and die cuts)
  • Delightfully Eclectic Designer Series Paper – 3-7/8” x 5-1/8” (front background), 1/2” x 4” (inside trim), 2-1/2” x 6” (envelope flap)

Stampin’ Up! products used in this project:


Stampin’ Up! Timeless Arrangements Thank You Card with Video Tutorial

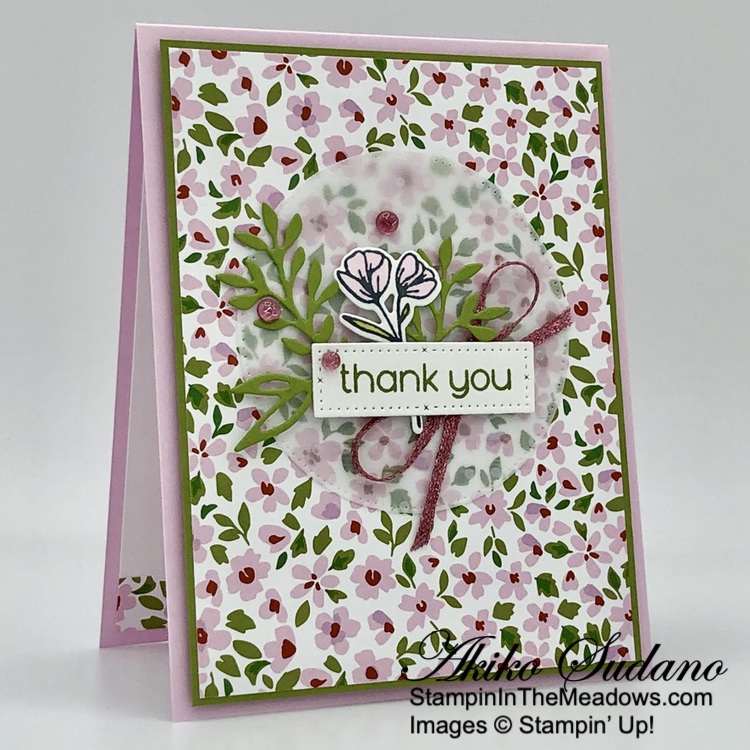
Good Morning! The Stampin’ Up! Timeless Arrangements bundle is a great little flora bundle with wonderful sentiments to express gratitude and love. It has the sweetest label dies and is perfectly designed to surround a sentiment label with a spray of flowers and greenery. I paired the bundle with a dainty floral print from the Delightfully Eclectic designer series paper pack for a simple Thank You card for my Facebook Live yesterday afternoon. You can find the supplies I used at the bottom of my post along with the sizes of cardstock used.

You can watch my FB Live video on my Facebook page HERE. I also posted the video to my YouTube Channel and you can view it HERE.

I adhered a panel of Delightfully Eclectic designer series paper to an Old Olive mat and cut a circle from polka dot vellum with the largest circle from the Stylish Shapes dies. I adhered the vellum to the panel with Stampin’ Seal. I stamped the sentiment from the Stampin’ Up! Timeless Arrangements photopolymer stamp set in Old Olive ink on Basic White and cut it out with the smallest label die.

I stamped the flower from the Stampin’ Up! Timeless Arrangements stamp set in Memento Tuxedo Black ink on Basic White and cut it out with the coordinating die. I colored it with light Bubble Bath and light Old Olive Stampin’ Blends. I adhered the flower to the back of the label with a glue dot.

I cut the leaf spray from the Stampin’ Up! Timeless Arrangements dies from Old Olive and adhered it to the back of the label with glue dots. I adhered a bow made with the Sweet Sorbet metallic ribbon to the panel with a glue dot and adhered the layered label on top with dimensionals. I adhered the panel to the front of a Bubble Bath card base and finished it with three tinsel gems.

For the inside of the card, I stamped the sentiment from the Stampin’ Up! Timeless Arrangements stamp set in Old Olive ink on a Basic White panel. I stamped the circles in Bubble Bath ink around the sentiment and trimmed the bottom with a strip of Delightfully Eclectic DSP. I adhered the panel to the inside of the card with Stampin’ Seal.

The Stampin’ Up! Timeless Arrangements bundle is perfect for making beautifully framed sentiments, but it’s also great for a simple embellishment to make a sentiment extra special.


Current Host Code: TUMGKET9

Use this host code when you order $50 or more and receive a Thank You gift from me!  The free gift is your choice of any item VALUED UP TO $10 from the 2023-2024 Annual Catalog!

If your order is over $150, please do not use the host code since you’ll receive your own Host Dollars plus I’ll still send you the Thank You gift!  This host code can be used by anyone, no club or commitment required. Let me know if you have any questions.


If you need any stamping supplies, I’d be very happy to be your Demonstrator.  Just click on the Shop Now button on the right side of the screen to go directly to my online store or contact me if you have any questions.  Happy Stamping!

Thanks for stopping by and have a great week!

Akiko

  • Visit my online store here
  • See the current Stampin’ Up! clearance rack specials here
  • Earn FREE Stampin’ Up! products through my Wildflower Frequent Shopper Program – my way of saying thank you to my online frequent shopper customers.
  • Have any questions? I’d be happy to help, click here to contact me.

Cardstock Cuts for this project:

  • Bubble Bath – 4-1/4″ x 11″ card base scored at 5-1/2″
  • Old Olive – 4″ x 5-1/4″ (front mat), 2-1/2″ x 3-1/4″ (die cut leaf spray)
  • Basics Vellum – 3-1/4″ x 3-1/4″ (die cut circle)
  • Basic White – 4″ x 5-1/4″ (inside panel), 1″ x 2-1/2″ (label), 1-1/4″ x 2″ (die cut flower)
  • Delightfully Eclectic DSP – 3-7/8″ x 5-1/8″ (front background), 1/2″ x 4″ (inside trim)

Stampin’ Up! products used in this project: