Stampin’ Up! Winterly Tree Tops for the Happy Inkin’ Thursday Blog Hop

Good Morning and welcome to the Happy Inkin’ Thursday Blog Hop! I decided to use one of the birds from the upcoming Stampin’ Up! Winterly Tree Tops bundle (from the Sept-Dec 2024 Mini Catalog available Sept 4, 2024) with the pretty Meandering Meadows 6″ x 6″ designer series paper for a thank you card. You can find the supplies I used along with card stock cuts at the bottom of my post.

We have a fun theme challenge this week andI thought a sneak peek of this upcoming bundle would work with Summery DSP:

I adhered a panel of Meandering Meadows 6″ x6″ designer series paper to the front of a Balmy Blue card base. I cut a Pecan Pie panel with one of the Deckled Rectangles dies and embossed it with the Timber 3D embossing folder. I used one of the Deckled Circles dies to cut a scene from a Meandering Meadows panel and used the next largest circle to cut another panel that is predominantly Garden Green. I adhered the circles together and adhered them to the embossed panel with liquid glue. I wrapped it with linen thread and tied a bow. I adhered the panel to the card with dimensionals.

I stamped the single bird from the Stampin’ Up! Winterly Tree Top stamp set in Memento Tuxedo Black ink on Basic White. I colored it with Petal Pink, Crumb Cake, Pecan Pie, Wild Wheat and Peach Pie Stampin’ blends and cut it out with the coordinating die. I adhered it to the card with dimensionals.

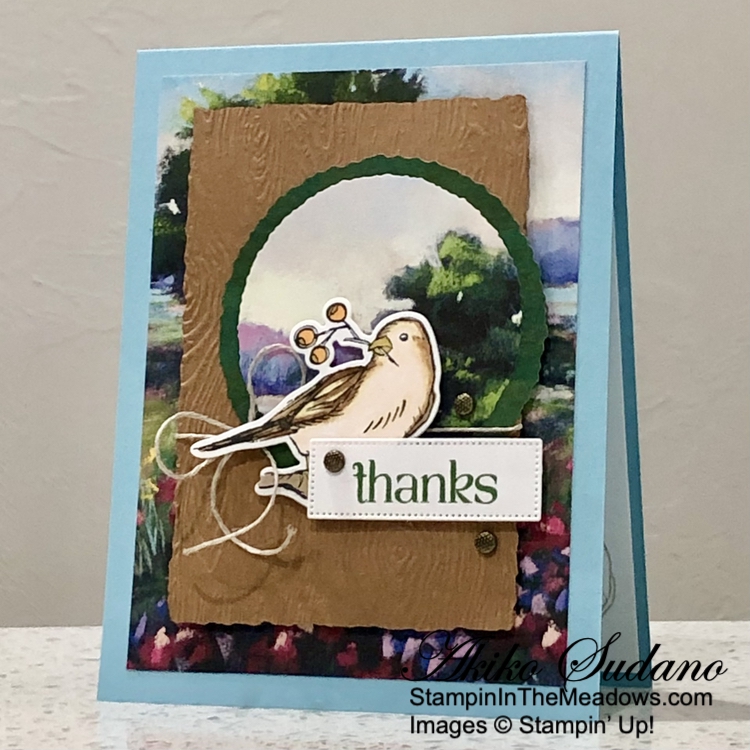
I stamped part of the sentiment from the Stampin’ Up! Winterly Tree Tops stamp set using Garden Green ink on Basic White. I cut it out with the small label die from the Wild Ferns dies and adhered it to the card with glue dots and dimensionals. I finished the card with textured dots.

For the inside of the card, I stamped the bird from the Stampin’ Up! Winterly Tree Tops stamp set using stamped off Crumb Cake ink on Basic White and adhered the panel to the inside of the card with Stampin’ Seal.

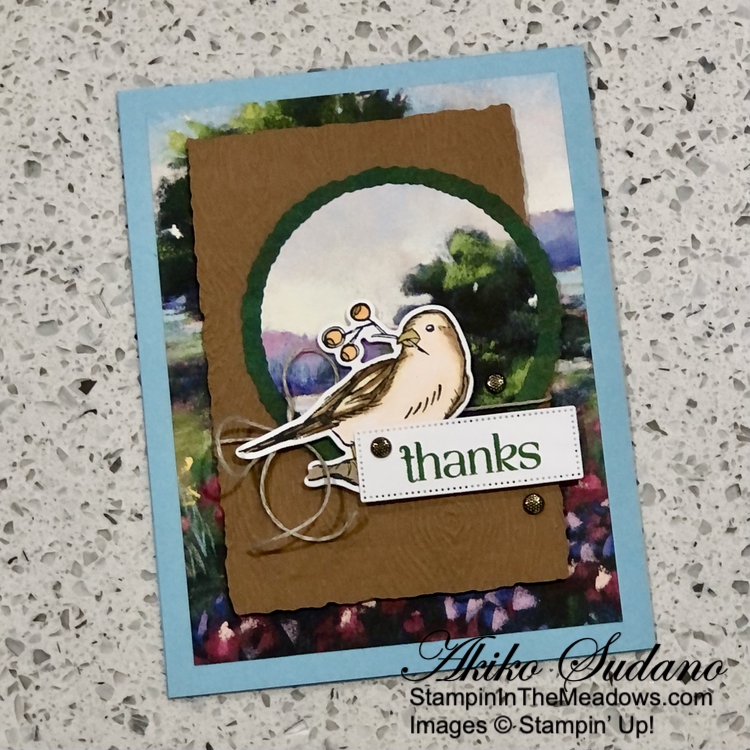
I really like the birds from the Stampin’ Up! Winterly Tree Tops bundle and I think they look great with the Meandering Meadows 6×6 DSP. Together, they make a perfect summer thank you card. Here is the Stampin’ Up! Winterly Tree Tops bundle. It will be available September 4, 2024.

On with the Hop! Click on the Next Blog button to move forward to see the beautiful project Karen Ksenzakovic has created.

If you get lost along the way, here are the participants for the hop:


Current Host Code: XQZKDQU9

Use this host code when you order $50 or more and receive a free gift from me!  The free gift is your choice of any item currently available valued up to $10.00!

If your order is over $150, please do not use the host code since you’ll receive your own Host Dollars plus I’ll still send you the free gift!  This host code can be used by anyone, no club or commitment required. Let me know if you have any questions.


If you need any stamping supplies, I’d be very happy to be your Demonstrator.  Just click on the Shop Now button on the right side of the screen to go directly to my online store or contact me if you have any questions. 

Thanks for stopping by and Happy Stamping!

Akiko

  • Visit my online store here
  • See the current Stampin’ Up! clearance rack specials here
  • Earn FREE Stampin’ Up! products through my Wildflower Frequent Shopper Program – my way of saying thank you to my online frequent shopper customers.
  • Have any questions? I’d be happy to help, click here to contact me.

Cardstock Cuts for this project:

  • Balmy Blue – 4-1/4″ x 11″” card base, scored at 5-1/2″
  • Pecan Pie – 3-1/4″ x 4-1/2″ (embossed panel)
  • Basic White – 3-3/4″ x 5″ (inside panel), 1″ x 2-1/4″ (label), 2″ x 2-1/2″ (die cut bird)
  • Meandering Meadows 6″ x 6″ DSP – 3-3/4″ x 5″ (front background), 3″ x 3″ (deckled circle mat), 2-3/4″ x 2-3/4″ (deckled circle meadow)

Stampin’ Up! products used in this project:


Stampin’ Up! Simply Zinnia for the Inkin’ Krew Blog Hop

Good Morning! Welcome to the May Inkin’ Krew Team Blog Hop! The theme for this month’s hop is “Fun Fold” and I used the pretty Stampin’ Up! Simply Zinnia bundle and the Flowering Zinnias designer series paper to make an accordion Birthday Card with a belly band. You can find the supplies I used along with card stock cuts at the bottom of my post.

I adhered panels of Flowering Zinnias designer series paper to the front folds of the Melon Mambo accordion card base with liquid glue. This card base is 4″ wide (rather than 4-1/4″) and fits better in the standard envelope with the belly band.

For my belly band panel, I cut a circle from Old Olive using the Spotlight On Nature dies. I cut three sets of zinnia petals (two small and one large) from Real Red and centers from Pumpkin Pie and Daffodil Delight using the Stampin’ Up! Simply Zinnia dies. I assembled the zinnia, adhering it with liquid glue and adhered three leaves to the back – two Mossy Meadow and one Lemon Lime Twist.

I stamped the sentiment from the Unbounded Love stamp set in Old Olive on Basic White and cut it out with the small rectangle die. I used the large rectangle die to cut a mat from Melon Mambo and adhered it to the back of the sentiment. I adhered the label to the die cut circle and adhered the zinnia on top with glue dots. I adhered a panel of Flowering Zinnias DSP to a Melon Mambo strip to make the belly band. I loosely wrapped it around the card so it would slide and secured the ends with Tear-N-Tape. I used glue dots to adhere the decorated circle to the belly band.

I cut the two zinnia bud dies from the Stampin’ Up! Simply Zinnia dies from Real Red and the small stem and leaves from Old Olive. I adhered them with glue dots and adhered them to a die cut circle using the Spotlight on Nature dies. I adhered the decorated die cut circle to the first middle panel with liquid glue.

I stamped the sentiment from the Unbounded Love stamp set in Melon Mambo ink on Basic White and cut it out with the Spotlight on Nature die. I cut small flowers from scraps using the die from the Stampin’ Up! Simply Zinnia dies and adhered them with liquid glue. I adhered the panel to the second middle panel with liquid glue.

For the inside of the card, I stamped the sentiment from the Unbounded Love stamp set in Melon Mambo ink on the left side of a Basic White panel and adhered the last strip of Flowering Zinnias DSP to the right side. I adhered the layered panel to the back panel of the card.

Belly band cards are so fun and special, especially for a birthday. The beautiful die cut flowers from the Stampin’ Up! Simply Zinnia bundle are awesome for decorating a belly band. And it’s wonderful to see all the beautiful papers from the Flowering Zinnias designer series paper on a card!

On With The Hop! Click on the Next Blog button to move forward to Karen Ksenzakovic’s project or click the Previous Blog button to move back to see the project that Karen Finkle created.

If you get lost along the way, here are the participants for the hop:


Current Host Code: SSMUTY4A

Use this host code when you order $50 or more and receive a Thank You gift from me!  The free gift is your choice of any currently available item valued up to $10.00.

If your order is over $150, please do not use the host code since you’ll receive your own Host Dollars plus I’ll still send you the Thank You gift!  This host code can be used by anyone, no club or commitment required. Let me know if you have any questions.


If you need any stamping supplies, I’d be very happy to be your Demonstrator.  Just click on the Shop Now button on the right side of the screen to go directly to my online store or contact me if you have any questions.  Happy Stamping!

Thanks for stopping by and have a great week!

Akiko

  • Visit my online store here
  • See the current Stampin’ Up! clearance rack specials here
  • Earn FREE Stampin’ Up! products through my Wildflower Frequent Shopper Program – my way of saying thank you to my online frequent shopper customers.
  • Have any questions? I’d be happy to help, click here to contact me.

Cardstock Cuts for this project:

  • Melon Mambo – 5-1/2″ x 11″ card base, scored at 1-1/2″ (valley), 4-1/4″ (mountain), and 7″ (valley), 1-1/4″ x 10″ (belly band), 1-3/4″ x 2-1/2″ (label)
  • Mossy Meadow – 2″ x 4″ (die cut leaves)
  • Real Red – 2-1/4″ x ” (die cut zinnia), 1″ x 1-1/2″ (die cut small bud)
  • Daffodil Delight – 1″ x 1″ (flower center)
  • Pumpkin Pie – 1″ x 1″ (flower center)
  • Lemon Lime Twist – 1″ x 2″ (die cut leaf)
  • Old Olive – 3″ x 3″ (belly band circle)
  • Basic White – 3-3/4″ x 5-1/4″ (inside panel), 1-1/2″ x 2-1/4″ (label), 2-1/2″ x 5″ (die cut circles)
  • Flowering Zinnias DSP DSP – 1″ x 10″ (belly Band), three 1-1/4″ x 5-1/4″ panels two 2-3/4″ x 5-1/4″ panels

Stampin’ Up! products used in this project:

Stampin’ Up! Round We Go Celebrate Card

Good Morning! The Stampin’ Up! Round We Go bundle is such a fun set that includes a die to make a 3D rosette and other fun circle themed stamps and dies. And it also includes great sentiments in an energetic fun font that are perfect for any kind of celebration, including birthdays. I made a general purpose celebrate card that could be used for any fun occasion. You can find the products I used at the bottom of my post along with the card stock sizes.

I adhered a panel of Bright and Beautiful 6″ x 6″ designer series paper to the front of an Azure Afternoon card base with liquid glue. I cut another panel with the 3D rosette die from the Stampin’ Up! Round We Go dies twice, lining up the DSP design so it would be similar all around. I folded the rosettes on the score lines and adhered the end tabs of the rosette die cuts to the underside of the opposite rosette die cut using liquid glue. I flattened the rosette and used lots of liquid glue to adhere it to an Azure Afternoon die cut scalloped circle.

I used the curved edge petal die from the Stampin’ Up! Round We Go dies to cut two Azure Afternoon and one Bubble Bath petals. I used the angle edge petal die to cut a Berry Burst and Lemon Lime Twist petals. I adhered one of the Azure Afternoon petals to the rosette with liquid glue and the other to the Lemon Lime Twist petal. I adhered the Bubble Bath petal to the Berry Burst Petal. I finished the rosette with a medium circle cut from Pretty Peacock. I arranged the rosette and petal circles on the card and adhered them with glue dots.

I stamped the sentiment from the Stampin’ Up! Round We Go stamp set in Berry Burst ink on a Basic White strip and cut it out with the long skinny die from the Stylish Shapes dies. I adhered the label to the card with glue dots. I used Rainbow gems in each circle and scattered some more around the card front.

For the inside of the card I stamped the angle petal from the Stampin’ Up! Round We Go stamp set in Azure Afternoon on a Basic White panel. I rotated the stamp and stamped again between each petal. I cut a small Lemon Lime Twist circle for the center. I stamped the sentiment in Berry Burst and trimmed the bottom with DSP. I adhered the panel to the inside of the card with Stampin’ Seal.

The Stampin’ Up! Round We Go bundle is so fun and happy and perfect for lighthearted, whimsical cards for any occasion. There are so many different ways to combine the die cuts and stamped circle images, you could keep yourself (or your kids) busy for hours playing with different ideas and colors.


Bonus Days Coming July 3, 2024!

It’s time for one of our favorite promotions—BONUS DAYS! Because do you know what’s a great deal? Getting rewarded for all the crafting supplies you’re already going to buy! When you shop between 3–31 July and spend $50 you will earn a $5 coupon! Make sure you save all your coupons because you can redeem them (and we mean ALL of them) between August 1 and August 31. There’s no limit to how many coupons you can earn! 

Promotion Details:

Earning Period: July 3 – July 31 2024

  • Earn a $5 coupon for every $50 spent (before shipping and tax). 
  • All coupon codes will be emailed right after a qualifying purchase has been made. Customers must have a customer account with a valid email address to earn coupons when they shop. If you don’t already have an account, you can easily create one in the Online store – contact me if you have any questions. 
  • If you earn multiple codes from a single order, you will receive one email with multiple codes. If you earn multiple codes from multiple orders, you will receive separate emails for each code earned.
  • All order types qualify for this promotion. Phone and email orders still require an email address.
  • Orders started before the promotion begins will not count toward earning coupon codes. For example, if you add items to your cart before July 3 and wait to purchase until that date or later, then those items will not qualify towards earning coupons. You must add items to your cart and complete your purchase during the earning period. 
  • There is no limit to the number of coupon codes participants can earn per order or throughout the duration of the earning period. 
  • Customers must use a valid email address during checkout in order to receive their coupon code. If a customer places an order over the phone, they must still provide a valid email address to receive their coupon code.
  • Starter Kit orders are excluded from this offer.

Redemption Period: August 1 – August 31, 2024

  • There is no limit to the number of coupon codes you can redeem on an order during the redemption period. If using multiple codes, they must be separated by a space. 
  • Coupon codes may be redeemed one time only. They cannot be redeemed after August 31, 2024.
  • Coupon codes may be redeemed for any product (excluding Starter Kits). They cannot be used on exchanges.
  • Bonus Days coupon codes can be applied to month-to-month Paper Pumpkin subscriptions and new prepaid subscriptions.

New Online Exclusives Available Now!

A new selection of Online Exclusive products was just introduced. Online Exclusives won’t appear in any catalog and are only available in the Online Store. There is no fixed end date for Online Exclusives! Some products will be reordered when inventory is low, and others will only be available while supplies last. This way Stampin’ Up! can offer even more new products throughout the year.

This release includes several items to get an early start on Fall and Christmas crafting. So check them out!


Current Host Code: XQZKDQU9

Use this host code when you order $50 or more and receive a Thank You gift from me!  The free gift is your choice of any item currently available valued up to $10.00.

If your order is over $150, please do not use the host code since you’ll receive your own Host Dollars plus I’ll still send you the Thank You gift!  This host code can be used by anyone, no club or commitment required. Let me know if you have any questions.


If you need any stamping supplies, I’d be very happy to be your Demonstrator.  Just click on the Shop Now Button on the right side of the screen to go directly to my Online store or contact me if you have any questions.  Happy Stamping!

Thanks for stopping by and have a great day!

Akiko

  • Visit my online store here
  • See the current Stampin’ Up! clearance rack specials here
  • Earn FREE Stampin’ Up! products through my Wildflower Frequent Shopper Program – my way of saying thank you to my online frequent shopper customers.
  • Have any questions? I’d be happy to help, click here to contact me.

Cardstock Cuts for this project:

  • Azure Afternoon – 4-1/4″ x 11″ card base, scored at 5-1/2″, 1-3/4″ x 3-1/2″ (two curved edge petals), 2-3/4″ x 2-3/4″ (die cut scalloped circle for rosette back)
  • Lemon Lime Twist – 2″ x 2″ (angle edge petal), 1″ x 1″ (small circle for inside)
  • Pretty Peacock – 1″ x 1″ (medium circle for rosette)
  • Berry Burst – 2″ x 2″ (angle edge petal)
  • Bubble Bath – 1-3/4″ x 1-3/4″ (curve edge petal)
  • Basic White – 3-3/4″ x 5″ (inside panel)
  • Bright and Beautiful DSP – 3-3/4″ x 5″ (front background), two 1-3/4″ x 5-1/2″ panels (3D rosette), 1/2″ x 3-3/4″ (inside trim)

Stampin’ Up! products used in this project:


Stampin’ Up! Spotlight On Nature Thank You Card

Good Morning! There are so many pretty bundles in the current Annual Catalog and one of my favorites is the Stampin’ Up! Spotlight On Nature bundle. With its simple and elegant images, beautiful sentiments and wonderful circle dies, it’s so easy to make pretty cards and I’ve paired it with the pretty Country Woods designer series paper for a thank you card. You can find the products I used at the bottom of my post along with the card stock sizes.

I adhered a panel of Country Woods designer series paper to an Early Espresso mat with liquid glue and popped it on the front of a Basic Beige card base.

I stamped the flowers from the Stampin’ Up! Spotlight On Nature stamp set in Early Espresso ink on Basic Beige. I stamped the sentiment in Early Espresso ink and cut it out with the eyelet circle die. I colored the flowers using Petal Pink Stampin’ Blends and the leaves with the Lost Lagoon Stampin’ Blends. I cut an Early Espresso panel with the radiating circle die and adhered the floral die cut to the Early Espresso die cut.

I trimmed the left side of the layered circles and popped them on the card with dimensionals. I tied a knot with a short length of Basic Beige ribbon and adhered it to the stems with a glue dot. I finished the card with three Petal Pink dots.

For the inside of the card I stamped the leaf cluster from the Stampin’ Up! Spotlight On Nature stamp set in stamped off Lost Lagoon ink on a Basic White panel. I trimmed the bottom with a strip of DSP and adhered the panel to the inside of the card with Stampin’ Seal.

The graceful flowers in the Stampin’ Up! Spotlight on Nature stamp set are really pretty and easy to color and the sentiments are wonderful. And the different styles of the circle dies are fabulous and perfect for layering.


Bonus Days Going On Now!

It’s time for one of our favorite promotions—BONUS DAYS! Because do you know what’s a great deal? Getting rewarded for all the crafting supplies you’re already going to buy! When you shop between 3–31 July and spend $50 you will earn a $5 coupon! Make sure you save all your coupons because you can redeem them (and we mean ALL of them) between August 1 and August 31. There’s no limit to how many coupons you can earn! 

Promotion Details:

Earning Period: July 3 – July 31 2024

  • Earn a $5 coupon for every $50 spent (before shipping and tax). 
  • All coupon codes will be emailed right after a qualifying purchase has been made. Customers must have a customer account with a valid email address to earn coupons when they shop. If you don’t already have an account, you can easily create one in the Online store – contact me if you have any questions. 
  • If you earn multiple codes from a single order, you will receive one email with multiple codes. If you earn multiple codes from multiple orders, you will receive separate emails for each code earned.
  • All order types qualify for this promotion. Phone and email orders still require an email address.
  • Orders started before the promotion begins will not count toward earning coupon codes. For example, if you add items to your cart before July 3 and wait to purchase until that date or later, then those items will not qualify towards earning coupons. You must add items to your cart and complete your purchase during the earning period. 
  • There is no limit to the number of coupon codes participants can earn per order or throughout the duration of the earning period. 
  • Customers must use a valid email address during checkout in order to receive their coupon code. If a customer places an order over the phone, they must still provide a valid email address to receive their coupon code.
  • Starter Kit orders are excluded from this offer.

Redemption Period: August 1 – August 31, 2024

  • There is no limit to the number of coupon codes you can redeem on an order during the redemption period. If using multiple codes, they must be separated by a space. 
  • Coupon codes may be redeemed one time only. They cannot be redeemed after August 31, 2024.
  • Coupon codes may be redeemed for any product (excluding Starter Kits). They cannot be used on exchanges.
  • Bonus Days coupon codes can be applied to month-to-month Paper Pumpkin subscriptions and new prepaid subscriptions.

Current Host Code: XQZKDQU9

Use this host code when you order $50 or more and receive a Thank You gift from me!  The free gift is your choice of any item currently available valued up to $10.00.

If your order is over $150, please do not use the host code since you’ll receive your own Host Dollars plus I’ll still send you the Thank You gift!  This host code can be used by anyone, no club or commitment required. Let me know if you have any questions.


If you need any stamping supplies, I’d be very happy to be your Demonstrator.  Just click on the Shop Now Button on the right side of the screen to go directly to my Online store or contact me if you have any questions.  Happy Stamping!

Thanks for stopping by and have a great day!

Akiko

  • Visit my online store here
  • See the current Stampin’ Up! clearance rack specials here
  • Earn FREE Stampin’ Up! products through my Wildflower Frequent Shopper Program – my way of saying thank you to my online frequent shopper customers.
  • Have any questions? I’d be happy to help, click here to contact me.

Cardstock Cuts for this project:

  • Basic Beige – 4-1/4″ x 11″ card base, scored at 5-1/2″, 3-1/2″ x 3-1/2″ (floral panel)
  • Early Espresso – 4″ x 5-1/4″ (front mat), 4-1/4″ x 4-1/4″ (circle mat)
  • Basic White – 4″ x 5-1/4″ (inside panel)
  • Country Woods DSP – 3-7/8″ x 5-1/8″ (front background), 1/2″ x 4″ (inside trim)

Stampin’ Up! products used in this project:


Stampin’ Up! Beach Day for the Happy Inkin’ Thursday Blog Hop

Happy 4th of July!! Good Morning and welcome to the Happy Inkin’ Thursday Blog Hop! The Stampin’ Up! Beach Day stamp set and dies are a fun way to celebrate summer at the beach. It has a wonderful palm tree and beach chairs and clever dies to make waves crashing on the shoreline. You can find the supplies I used along with card stock cuts at the bottom of my post.

We have a fun sketch challenge this week – I turned it upside down:

Iused a blending brush to lightly apply some Balmy Blue ink to the top of a Basic White panel. I used the wave die from the stampin’ Up! Beach Day stamp set to cut a panel of Azure Afternoon, and I laid the die on an angle and I adhered it to the Basic White panel I used the wavy line die to cut the top off the Basic Beige panel so that it is at an angle just below the breaking waves.

I used the sea shell stamp from the Stampin’ Up! Beach Day stamp set and stamped off Crumb Cake ink to make sea shells along the shore line and adhered the panel Basic Beige panel to the waves and sky with liquid glue. I cut the palm tree from Garden Green and Pecan Pie card stock and adhered the tree to the panel with glue dots. I stamped three beach chairs using Memento Tuxedo Black ink on Basic White and colored them with Azure Afternoon, Poppy Parade and Daffodil Delight ink and cut them out with the coordinating die. I adhered the beach chairs to the panel with glue dots and stamped a sand castle on the bottom using Crumb Cake ink.

I adhered the panel to the front of an Azure Afternoon card base with dimensionals. I stamped the seagull and beach ball using Memento Tuxedo Black ink on Basic White and cut them out with the coordinating dies. I colored the beach ball with Azure Afternoon, Poppy Parade, Granny Apple Green Daffodil Delight and Summer Splash Stampin’ Blends and adhered the seagull and beach ball with glue dots. I stamped the sentiment from the Stampin’ Up! Beach Day stamp set using Azure Afternoon ink on Basic White and cut it out with the Stylish Shapes dies. I accented the label with an Azure Afternoon dot.

For the inside of the card, I stamped the sentiment from the Stampin’ Up! Beach Day stamp set using Azure Afternoon ink on Basic White. I stamped another seagull and beach ball along with an umbrella in Memento Tuxedo Black ink on Basic White and cut them out with the coordinating dies. I colored the umbrella and beach ball with Stampin’ Blends and adhered them all to the card with glue dots. I adhered the panel to the inside of the card with Stampin’ Seal.

The Stampin’ Up! Beach Day stamp set and dies are a fun way to celebrate the summer and the 4th of July. Have fun and stay safe if you’re lucky enough to spend time at the beach this summer. And thanks for taking time out from this special day to visit!!

On with the Hop! Click on the Next Blog button to move forward to see the beautiful project Karen Ksenzakovic has created.

If you get lost along the way, here are the participants for the hop:


Current Host Code: XQZKDQU9

Use this host code when you order $50 or more and receive a free gift from me!  The free gift is your choice of any item currently available valued up to $10.00!

If your order is over $150, please do not use the host code since you’ll receive your own Host Dollars plus I’ll still send you the free gift!  This host code can be used by anyone, no club or commitment required. Let me know if you have any questions.


If you need any stamping supplies, I’d be very happy to be your Demonstrator.  Just click on the Shop Now button on the right side of the screen to go directly to my online store or contact me if you have any questions. 

Thanks for stopping by and Happy Stamping!

Akiko

  • Visit my online store here
  • See the current Stampin’ Up! clearance rack specials here
  • Earn FREE Stampin’ Up! products through my Wildflower Frequent Shopper Program – my way of saying thank you to my online frequent shopper customers.
  • Have any questions? I’d be happy to help, click here to contact me.

Cardstock Cuts for this project:

  • Azure Afternoon – 4-1/4″ x 11″” card base, scored at 5-1/2″, 3-1/4″ x 3-1/4″ (die cut waves)
  • Basic Beige – 3-1/4″ x 4-1/2″ (sand)
  • Garden Green – 2″ x 3″ (palm fronds)
  • Pecan Pie – 1/2″ x 2-1/2″ (palm trunk)
  • Basic White – 4″ x 5-1/4″ (inside panel), 1″ x 3″ (label), 3-1/4″ x 4-1/2″ (sky), 3″ x 6″ (die cut chairs, birds, beach balls, umbrella)

Stampin’ Up! products used in this project:


Stampin’ Up! Greetings of the Season Christmas Card

Good Morning! Did you know that there is a new release of Stampin’ Up! Online Exclusive products today? There is and it’s a great opportunity to get a head start on Holiday crafting. One of the pretty products is the Stampin’ Up! Greetings of the Season bundle. I’ve paired it with the beautiful Season of Green and Gold specialty designer series paper to make a tag Christmas card. You can find the products I used at the bottom of my post along with the card stock sizes.

I embossed a panel of Garden Green with the elegant Distressed Tile 3D embossing folder and adhered it to the front of a Garden Green card base with liquid glue. I cut a panel of Season of Gold and Green specialty DSP with the large tag die from the Greetings Of The Season dies.

I used the Golden Greenery dies to cut out pine sprigs and greenery boughs from a panel of Season of Green and Gold DSP. I also cut some of the edge partial images and adhered them to the back of the greenery to make the boughs look fuller. I adhered the greenery to the die cut tag with glue dots.

I stamped the sentiments from the Stampin’ Up! Greetings of the Season stamp set in Versamark ink and sprinkled them with gold embossing powder. Since I used two stamps and I had a hard time seeing the stamped image, I went ahead and sprinkled it with the embossing powder. I shook off the excess powder and easily lined up and stamped the second sentiment under it. I sprinkled more embossing powder and shook off the excess and heated it with my heat tool until it was bright and shiny.

Then I used a two step method to cut it out with the banner tag die, so it’s a little shorter than the whole die. I adhered the label to the tag with dimensionals and a glue dot at the top and decorated the tag with a gold bow and iridescent foil gems. I adhered the tag to the card with dimensionals.

For the inside of the card I stamped the sentiment from the Stampin’ Up! Greetings of the Season stamp set in Garden Green ink on a Very Vanilla panel. I trimmed the bottom with DSP and a adhered the panel to the inside of the card with Stampin’ Seal.

If you’re like me and have a bunch of Christmas cards to make, it’s good to get an early start. So Yay for the new Online Exclusives release! The sentiments in the Stampin’ Up! Greetings of the Season bundle are so beautiful and I love that you have inside greetings for your Christmas cards. And the dies are all tags, and so many different shapes, so you will be able to create beautiful gift tags and easily disguise the string holes for your sentiment labels.


Bonus Days Coming July 3, 2024!

It’s time for one of our favorite promotions—BONUS DAYS! Because do you know what’s a great deal? Getting rewarded for all the crafting supplies you’re already going to buy! When you shop between 3–31 July and spend $50 you will earn a $5 coupon! Make sure you save all your coupons because you can redeem them (and we mean ALL of them) between August 1 and August 31. There’s no limit to how many coupons you can earn! 

Promotion Details:

Earning Period: July 3 – July 31 2024

  • Earn a $5 coupon for every $50 spent (before shipping and tax). 
  • All coupon codes will be emailed right after a qualifying purchase has been made. Customers must have a customer account with a valid email address to earn coupons when they shop. If you don’t already have an account, you can easily create one in the Online store – contact me if you have any questions. 
  • If you earn multiple codes from a single order, you will receive one email with multiple codes. If you earn multiple codes from multiple orders, you will receive separate emails for each code earned.
  • All order types qualify for this promotion. Phone and email orders still require an email address.
  • Orders started before the promotion begins will not count toward earning coupon codes. For example, if you add items to your cart before July 3 and wait to purchase until that date or later, then those items will not qualify towards earning coupons. You must add items to your cart and complete your purchase during the earning period. 
  • There is no limit to the number of coupon codes participants can earn per order or throughout the duration of the earning period. 
  • Customers must use a valid email address during checkout in order to receive their coupon code. If a customer places an order over the phone, they must still provide a valid email address to receive their coupon code.
  • Starter Kit orders are excluded from this offer.

Redemption Period: August 1 – August 31, 2024

  • There is no limit to the number of coupon codes you can redeem on an order during the redemption period. If using multiple codes, they must be separated by a space. 
  • Coupon codes may be redeemed one time only. They cannot be redeemed after August 31, 2024.
  • Coupon codes may be redeemed for any product (excluding Starter Kits). They cannot be used on exchanges.
  • Bonus Days coupon codes can be applied to month-to-month Paper Pumpkin subscriptions and new prepaid subscriptions.

Current Host Code: XQZKDQU9

Use this host code when you order $50 or more and receive a Thank You gift from me!  The free gift is your choice of any item currently available valued up to $10.00.

If your order is over $150, please do not use the host code since you’ll receive your own Host Dollars plus I’ll still send you the Thank You gift!  This host code can be used by anyone, no club or commitment required. Let me know if you have any questions.


If you need any stamping supplies, I’d be very happy to be your Demonstrator.  Just click on the Shop Now Button on the right side of the screen to go directly to my Online store or contact me if you have any questions.  Happy Stamping!

Thanks for stopping by and have a great day!

Akiko

  • Visit my online store here
  • See the current Stampin’ Up! clearance rack specials here
  • Earn FREE Stampin’ Up! products through my Wildflower Frequent Shopper Program – my way of saying thank you to my online frequent shopper customers.
  • Have any questions? I’d be happy to help, click here to contact me.

Cardstock Cuts for this project:

  • Garden Green – 5-1/2″ x 8-1/2″ card base, scored at 4-1/4″, 4-1/4″ x 5-1/2″ (embossed background)
  • Very Vanilla – 4″ x 5-1/4″ (inside panel), 1″ x 3-1/2″ (label)
  • Season of Green & Gold specialty DSP – 2-3/4″ x 4″ (die cut tag), 1/2″ x 4″ (inside trim), die cut greenery

Stampin’ Up! products used in this project:


Stampin’ Up! Winterly Tree Tops Sneak Peek

Good Morning! I got an opportunity to get the Stampin’ Up! Winterly Tree Tops bundle from the Upcoming September-December 2024 Mini Catalog and attend the Stampin’ Up! Creativity Now event. During the event we made some projects with this pretty new bundle and I’m sharing one of those cards today. You can find the currently avaliable products I used at the bottom of my post along with the card stock sizes. And I’ve also included some pictures of this pretty bundle and the Nests of Winter designer series paper that I used.

I adhered a panel of Nests of Winter designer series paper filled with pussy willows to a Basic Black mat and adhered it to the front of a Moody Mauve card base with liquid glue. I stamped the pair of birds from the Stampin’ Up! Winterly Tree Tops stamp set using Memento Tuxedo Black ink on a Basic White panel. I colored the birds with Balmy Blue, Petal Pink, Poppy Parade and Pecan Pie Stampin’ Blends and cut it out with the coordinating die.

I stamped three pussy willows from the Stampin’ Up! Winterly Tree tops stamp set in Memento Tuxedo Black ink on Basic White and colored the stems using the light Pecan Pie Stampin’ Blend. I cut them out with the coordinating die and adhered them to the back of the birds with glue dots. I adhered the layered die cuts to the card with dimensionals.

I stamped the sentiment from the Stampin’ Up! Winterly Tree Tops stamp set in Memento Tuxedo Black ink on Basic White. I wrapped a length of black baker’s twine around one end and tied a bow. I adhered the label to the card with dimensionals and finished the card with Moody Mauve dots.

For the inside of the card I stamped the pussy willows from the Stampin’ Up! Winterly Tree Tops stamp set in Memento Tuxedo Black ink in the corners of a Basic White panel. I colored the stems with the light Pecan Pie Stampin’ Blend and a adhered the panel to the inside of the card with Stampin’ Seal.

The birds in the Stampin’ Up! Winterly Tree Tops bundle are so cute and the sentiments are nice and can be used all year long. Here is the bundle:

And here is the Nests of Winter designer series paper:

There are coordinating embellishments in the Nests of Winter Suite that can be used throughout the Fall and Winter months as well as during the Holidays. These products will be available September 4, 2024.


Bonus Days Coming July 3, 2024!

It’s time for one of our favorite promotions—BONUS DAYS! Because do you know what’s a great deal? Getting rewarded for all the crafting supplies you’re already going to buy! When you shop between 3–31 July and spend $50 you will earn a $5 coupon! Make sure you save all your coupons because you can redeem them (and we mean ALL of them) between August 1 and August 31. There’s no limit to how many coupons you can earn! 

Promotion Details:

Earning Period: July 3 – July 31 2024

  • Earn a $5 coupon for every $50 spent (before shipping and tax). 
  • All coupon codes will be emailed right after a qualifying purchase has been made. Customers must have a customer account with a valid email address to earn coupons when they shop. If you don’t already have an account, you can easily create one in the Online store – contact me if you have any questions. 
  • If you earn multiple codes from a single order, you will receive one email with multiple codes. If you earn multiple codes from multiple orders, you will receive separate emails for each code earned.
  • All order types qualify for this promotion. Phone and email orders still require an email address.
  • Orders started before the promotion begins will not count toward earning coupon codes. For example, if you add items to your cart before July 3 and wait to purchase until that date or later, then those items will not qualify towards earning coupons. You must add items to your cart and complete your purchase during the earning period. 
  • There is no limit to the number of coupon codes participants can earn per order or throughout the duration of the earning period. 
  • Customers must use a valid email address during checkout in order to receive their coupon code. If a customer places an order over the phone, they must still provide a valid email address to receive their coupon code.
  • Starter Kit orders are excluded from this offer.

Redemption Period: August 1 – August 31, 2024

  • There is no limit to the number of coupon codes you can redeem on an order during the redemption period. If using multiple codes, they must be separated by a space. 
  • Coupon codes may be redeemed one time only. They cannot be redeemed after August 31, 2024.
  • Coupon codes may be redeemed for any product (excluding Starter Kits). They cannot be used on exchanges.
  • Bonus Days coupon codes can be applied to month-to-month Paper Pumpkin subscriptions and new prepaid subscriptions.

Current Host Code: XQZKDQU9

Use this host code when you order $50 or more and receive a Thank You gift from me!  The free gift is your choice of any item currently available valued up to $10.00.

If your order is over $150, please do not use the host code since you’ll receive your own Host Dollars plus I’ll still send you the Thank You gift!  This host code can be used by anyone, no club or commitment required. Let me know if you have any questions.


If you need any stamping supplies, I’d be very happy to be your Demonstrator.  Just click on the Shop Now Button on the right side of the screen to go directly to my Online store or contact me if you have any questions.  Happy Stamping!

Thanks for stopping by and have a great day!

Akiko

  • Visit my online store here
  • See the current Stampin’ Up! clearance rack specials here
  • Earn FREE Stampin’ Up! products through my Wildflower Frequent Shopper Program – my way of saying thank you to my online frequent shopper customers.
  • Have any questions? I’d be happy to help, click here to contact me.

Cardstock Cuts for this project:

  • Moody Mauve – 4-1/4″ x 11″ card base, scored at 5-1/2″
  • Basic Black – 3-5/8″ x 4-1/8″ (front mat)
  • Basic White – 4″ x 5-1/4″ (inside panel), 4-1/4″ x 4-1/4″ (die cut birds and pussy willows), 5/8″ x 3-3/4″ (label)
  • Nests of Winter DSP – 3-1/2″ x 4″ (front background)

Stampin’ Up! products used in this project:


Last Day for Stampin’ Up! Bundle Sale

Good Morning! I don’t have a card to share today, but I wanted to post a quick reminder of the Stampin’ Up! Promotions. Today is the last day for the Stampin’ Up! Bundle Sale where you get an extra 10% off on all stamp and die bundles and 10% off on on the Stampin’ Cut & Emboss machine and the Mini Stampin’ cut & Emboss macnine.

Everyone loves a good deal, which is why Stampin’ Up! is offering an additional 10% off all stamp and die bundles! Between June 5, 2024 and June 30, 2024, take advantage of the sale and add some new bundles to your collection. Plus, save 10% on the Stampin’ Cut & Emboss Machine and the Mini Stampin’ Cut & Emboss Machine. These machines make the perfect crafting partner for stamp and die bundles.

Promotion Details:

  • Sales Period: June 5, 2024 – June 30, 2024
  • Get an additional 10% discount on stamp and die bundles only (that’s a total of 20% discount on stamp and die bundles!).
  • This excludes suite collections, stamp and punch bundles and any other bundles*.
  • Save 10% on Stampin’ Cut & Emboss Machine and Mini Stampin’ Cut & Emboss Machine (white and Boho Blue). 
  • The 10% discount applies automatically to stamp and die bundles in all orders including Starter Kit orders.

On Wednesday July 3, there will be a new release of Online Exclusives including the Stampin’ Up! Golden Greenery bundle. But there will also be so much more including the Iconic Celebrations Suite, Changing Leaves bundle, the Potions and Spells bundle and the Sophisticated Sled bundle. So there will be lots of new options to get started with crafting for the Fall Holidays

Click on the image below to download a flyer for details on the Season of Green and Gold Suite.

Be sure to check the Online Exclusives on Wednesday, July 3, 2024.


Bonus Days Coming July 3, 2024!

It’s time for one of our favorite promotions—BONUS DAYS! Because do you know what’s a great deal? Getting rewarded for all the crafting supplies you’re already going to buy! When you shop between 3–31 July and spend $50 you will earn a $5 coupon! Make sure you save all your coupons because you can redeem them (and we mean ALL of them) between August 1 and August 31. There’s no limit to how many coupons you can earn! 

Promotion Details:

Earning Period: July 3 – July 31 2024

  • Earn a $5 coupon for every $50 spent (before shipping and tax). 
  • All coupon codes will be emailed right after a qualifying purchase has been made. Customers must have a customer account with a valid email address to earn coupons when they shop. If you don’t already have an account, you can easily create one in the Online store – contact me if you have any questions. 
  • If you earn multiple codes from a single order, you will receive one email with multiple codes. If you earn multiple codes from multiple orders, you will receive separate emails for each code earned.
  • All order types qualify for this promotion. Phone and email orders still require an email address.
  • Orders started before the promotion begins will not count toward earning coupon codes. For example, if you add items to your cart before July 3 and wait to purchase until that date or later, then those items will not qualify towards earning coupons. You must add items to your cart and complete your purchase during the earning period. 
  • There is no limit to the number of coupon codes participants can earn per order or throughout the duration of the earning period. 
  • Customers must use a valid email address during checkout in order to receive their coupon code. If a customer places an order over the phone, they must still provide a valid email address to receive their coupon code.
  • Starter Kit orders are excluded from this offer.

Redemption Period: August 1 – August 31, 2024

  • There is no limit to the number of coupon codes you can redeem on an order during the redemption period. If using multiple codes, they must be separated by a space. 
  • Coupon codes may be redeemed one time only. They cannot be redeemed after August 31, 2024.
  • Coupon codes may be redeemed for any product (excluding Starter Kits). They cannot be used on exchanges.
  • Bonus Days coupon codes can be applied to month-to-month Paper Pumpkin subscriptions and new prepaid subscriptions.

The July Paper Pumpkin Kit – Painted Petals!

Craft beautiful cards with unique watercolor designs and pretty layers!

  • Makes 9 cards: 3 each of 3 designs with 9 coordinating envelopes
  • Printed cards and coordinating envelopes
  • Precut paper pieces and embellishments
  • Gray Granite Classic Stampin’ Spot

Coordinating Colors: Calypso Coral, Gray Granite, Melon Mambo, Mossy Meadow, Old Olive

And the coordinating add-on is the Every Celebration dies.

If you’re interested in subscribing to Paper Pumpkin, you can either sign up for a subscription where you are billed monthly for your kit or you can purchase a prepaid subscription in my Online Store. To see more information and to sign up for the monthly subscription click here. To see the options for prepaid subscriptions in my Online Store, click here.

Sign up deadline for the July 2024 kit is July 10, 2024. Note: Supplies may be limited toward the end of the subscription period.


Current Host Code: XQZKDQU9

Use this host code when you order $50 or more and receive a Thank You gift from me!  The free gift is your choice of any item currently available valued up to $10.00.

If your order is over $150, please do not use the host code since you’ll receive your own Host Dollars plus I’ll still send you the Thank You gift!  This host code can be used by anyone, no club or commitment required. Let me know if you have any questions.


If you need any stamping supplies, I’d be very happy to be your Demonstrator.  Just click on the Shop Now Button on the right side of the screen to go directly to my Online store or contact me if you have any questions.  Happy Stamping!

Thanks for stopping by and have a great day!

Akiko

  • Visit my online store here
  • See the current Stampin’ Up! clearance rack specials here
  • Earn FREE Stampin’ Up! products through my Wildflower Frequent Shopper Program – my way of saying thank you to my online frequent shopper customers.
  • Have any questions? I’d be happy to help, click here to contact me.

Stampin’ Up! Golden Greenery Sneak Peek

Good Morning! Are you ready to start making Christmas Cards? Well, get ready for a sneak peek of the beautiful new Stampin’ Up! Golden Greenery bundle! This beautiful new bundle will be available next week beginning on July 3, 2024 when Stampin’ Up! releases a new set of Online Exclusive items. You can find the currently available products I used at the bottom of my post along with the card stock sizes. And you can download a PDF flyer which describes the items in the Season of Green and Gold Suite below.

I adhered a panel of plaid Season of Green and Gold specialty designer series paper to a Mossy Meadow mat and I adhered a greenery panel to the front of a Thick Basic White card base. I adhered the plaid DSP panel to the card base with dimensionals.

I cut a Garden Green panel with the pine dies from the Stampin’ Up! Golden Greenery dies. The stamps are two step, and stamped one of the boughs using Old Olive and stamped off Old Olive. I cut the bough out with the coordinating die. I stamped the bells using stamped off Wild Wheat for the detailed stamp and Daffodil Delight for the background and cut them out with the coordinating dies.

I stamped the sentiment from the Greetings of the Season stamp set (available July 3, 2024) in Versamark ink and sprinkled it with gold embossing powder. I shook off the excess powder and heated the sentiment with my heat tool. I cut the sentiment out with one of the Greetings of The Season label dies and adhered it to the card with glue dots. I adhered the die cut greenery to the card with glue dots and the bells with glue dots and dimensionals. I finished with a gold bow and gold faceted gems.

For the inside of the card I stamped the beautiful sentiment from the Greetings of the Season stamp set in Old Olive ink on a Basic White panel. I trimmed the bottom with DSP and adhered it to a Mossy Meadow mat before adhering the panel to the inside of the card with Stampin’ Seal.

The Stampin’ Up! Golden Greenery bundle will be available on Wednesday July 3, 2024 when the new Online Exclusives releases. Click on the image below to download a flyer for the detail on the Season of Green and Gold Suite, including the pretty bundles and DSP I used for this card.

Even though we’re in the heat of Summer, I’m ready to start planning for Christmas! There’s so much to do that I like to get an early start and I’ll use this beautiful bundle a lot. And when the new Online Exclusives are released, there will be other items for Christmas and the other Fall Holidays. So be sure to check the Online Exclusives on Wednesday, July 3, 2024.


Stampin’ Up! Bundle Sale Ending Soon!

Sunday is the last day for 10% off on Stampin’ Up! Stamp and Die Bundles!

Everyone loves a good deal, which is why Stampin’ Up! is offering an additional 10% off all stamp and die bundles! Between June 5, 2024 and June 30, 2024, take advantage of the sale and add some new bundles to your collection. Plus, save 10% on the Stampin’ Cut & Emboss Machine and the Mini Stampin’ Cut & Emboss Machine. These machines make the perfect crafting partner for stamp and die bundles.

Promotion Details:

  • Sales Period: June 5, 2024 – June 30, 2024
  • Get an additional 10% discount on stamp and die bundles only (that’s a total of 20% discount on stamp and die bundles!).
  • This excludes suite collections, stamp and punch bundles and any other bundles*.
  • Save 10% on Stampin’ Cut & Emboss Machine and Mini Stampin’ Cut & Emboss Machine (white and Boho Blue). 
  • The 10% discount applies automatically to stamp and die bundles in all orders including Starter Kit orders.

*Please note Close to My Heart products are not included in this promotion.


Current Host Code: XQZKDQU9

Use this host code when you order $50 or more and receive a Thank You gift from me!  The free gift is your choice of any item currently available valued up to $10.00.

If your order is over $150, please do not use the host code since you’ll receive your own Host Dollars plus I’ll still send you the Thank You gift!  This host code can be used by anyone, no club or commitment required. Let me know if you have any questions.


If you need any stamping supplies, I’d be very happy to be your Demonstrator.  Just click on the Shop Now Button on the right side of the screen to go directly to my Online store or contact me if you have any questions.  Happy Stamping!

Thanks for stopping by and have a great day!

Akiko

  • Visit my online store here
  • See the current Stampin’ Up! clearance rack specials here
  • Earn FREE Stampin’ Up! products through my Wildflower Frequent Shopper Program – my way of saying thank you to my online frequent shopper customers.
  • Have any questions? I’d be happy to help, click here to contact me.

Cardstock Cuts for this project:

  • Thick Basic White – 5-1/2″ x 8-1/2″ card base, scored at 4-1/4″
  • Mossy Meadow – 4″ x 5-1/4″ (inside mat), 3-1/3″ x 4-1/2″ (front mat)
  • Garden Green – 2-1/2″ x 4″ (pine die cuts)
  • Basic White – 3-7/8″ x 5-1/8″ (inside panel), 1-3/4″ x 3″ (label), 1″ x 3-1/2″ (bells), 2″ x 3″ (greenery die cut)
  • Golden Greenery specialty DSP – 4″ x 5-1/4″ (front background), 3-1/8″ x 4-3/8″ (plaid panel), 1/2″ x 4″ (inside trim)

Stampin’ Up! products used in this project:


Stampin’ Up! Country Birdhouse for the Happy Inkin’ Thursday Blog Hop

Good Morning and welcome to the Happy Inkin’ Thursday Blog Hop! I finally got to play with the pretty Stampin’ Up! Country Birdhouse bundle and made this sweet hello card. You can find the supplies I used along with card stock cuts at the bottom of my post.

We have a pretty color challenge this week and I think I used all the colors:

I embossed a strip of Country Lace designer series paper with the Eyelet 3D embossing folder and adhered it to another panel of Country Lace DSP. I adhered the layered panel to the front of a Basic Beige card base with liquid glue. I used the Stampin’ Up! Country Birdhouse dies to cut out different panels of Country Woods DSP to make the birdhouse. I used liquid glue to adhere the die cuts together and adhered the birdhouse to the card with dimensionals.

I stamped the bird and flowers from the Stampin’ Up! Country Birdhouse stamp set in Memento Tuxedo Black ink on Basic White. I colored the bird with light Boho Blue and light Petal Pink Stampin’ Blends and I used Flirty Flamingo, Peach Pie, dark Daffodil Delight and light Lemon Lime Twist Stampin’ Blends to color the flowers. I cut out the birds and floweers with the coordinating dies. I also die cut some leaves and a flower from Basic White and colored them with light Lemon Lime Twist and Light Boho Blue Stampin’ Blends.

I stamped the sentiment from the Stampin’ Up! Country Birdhouse stamp set. in Misty Moonlight ink on a Basic Beige panel. I used one of the new tag dies from the upcoming Greetings of the Season dies (available July 3) to cut it out. I colored a length of Linen Trhead with the light Misty Moonlight Stampin’ Blend and looped it through the hole, tying a knot. I adhered it to the card with glue dots and dimensionals. I adhered the bird to and flowers to the card with glue dots and dimensionals and finished with metallic textured dots.

For the inside of the card, I stamped the flower bouquet from the Stampin’ Up! Country Birdhouse stamp set across the bottom of a Basic White panel using Memento Tuxedo Black ink. I colored the flowers like the flowers on the front and adhered the panel to the inside of the card with Stampin’ Seal.

The die cut birdhouse from the Stampin’ Up! Country Birdhouse bundle is really wonderful and fun to make. And the sweet images and pretty sentiments make this a pretty versatile bundle.

On with the Hop! Click on the Next Blog button to move forward to see the beautiful project Karen Ksenzakovic has created.

If you get lost along the way, here are the participants for the hop:


Current Host Code: XQZKDQU9

Use this host code when you order $50 or more and receive a free gift from me!  The free gift is your choice of any item currently available valued up to $10.00!

If your order is over $150, please do not use the host code since you’ll receive your own Host Dollars plus I’ll still send you the free gift!  This host code can be used by anyone, no club or commitment required. Let me know if you have any questions.


If you need any stamping supplies, I’d be very happy to be your Demonstrator.  Just click on the Shop Now button on the right side of the screen to go directly to my online store or contact me if you have any questions. 

Thanks for stopping by and Happy Stamping!

Akiko

  • Visit my online store here
  • See the current Stampin’ Up! clearance rack specials here
  • Earn FREE Stampin’ Up! products through my Wildflower Frequent Shopper Program – my way of saying thank you to my online frequent shopper customers.
  • Have any questions? I’d be happy to help, click here to contact me.

Cardstock Cuts for this project:

  • Basic Beige – 5-1/2″ x 8-1/2″ card base, scored at 4-1/4″, 1-1/4″ x 2-1/2″ (label)
  • Pecan Pie – 2-1/4″ x 3-1/4″ (birdhouse trim)
  • Basic White – 4″ x 5-14″ (inside panel), 1-1/4″ x 4″ (die cut birds, flowers and leaves)
  • Country Woods DSP – 3-1/4″ x 4″ (die cut birdhouse), 2″ x 3-1/4″ (birdhouse roof), 3/4″ x 3-1/4″ (birdhouse ledge)
  • Country Lace DSP – 4″ x 5-1/4″ (front background), 2″ x 4″ (embossed strip)

Stampin’ Up! products used in this project: