Stampin’ Up! Peace On Earth Sympathy Card

Good Morning! I needed a sympathy card and pulled out the beautiful Stampin’ Up! Peace On Earth bundle that I just received. And I CASE’s one of the cards on page 32 of the Sep-Dec 2025 Mini Catalog. You can find the card stock cuts along with supplies at the bottom of my post.

Emboss a Cloud Cover panel of Peaceful Garden designer series paper with the Birchwood 3D embossing folder. Unfortunately, it’s hard to see the embossing in the pictures. Adhere the embossed DSP to the front of a Cloud cover card base with liquid glue. Adhere another panel of DSP to a Misty Moonlight mat and adhere it to the card with liquid glue. This gives you a fairly flat card that is good for mailing.

Cut a Cloud Cover strip with the long, skinny banner die from the Stylish Shapes dies. Cut it in half and adhere it to the card with about a 1/4″ gap. Use the long leaf sprig die from the Stampin’ Up! Peace On Earth dies to cut a Misty Moonlight strip and adhere the die cut leaf sprig to the card over the banner.

Stamp the sentiment from the Stampin’ Up! Peace On Earth stamp set on Basic White using Misty Moonlight ink. Punch the sentiment out using the Labeled with Love punch and adhere it to the card with dimensionals. Finish with three small white flower embellishments.

For the inside, stamp the leaf sprig from the Charming Day stamp set on Basic White using Misty Moonlight ink. Trim the bottom with DSP and adhere the panel to the inside of the card with Stampin’ Seal.

Sympathy cards are so hard, so it was good to work from an example. The Peaceful Garden DSP is serene and the simple sentiments from the Stampin’ Up! Peace On Earth stamp set are perfect with it, making it so much easier.

Thanks so much for stopping by and Happy Stamping!!

Akiko

Cardstock Cuts for this project:

  • Cloud Cover – 5-1/2″ x 8-1/2″ card base, scored at 4-1/4″, 1-1/4″ x 3-1/2″ (die cut banner)
  • Misty Moonlight – 1″ x 3-1/4″ (die cut leaf sprig), 2-5/8″ x 4-5/8″ (leafy DSP mat)
  • Basic White – 3-3/4″ x 5″ (inside panel), 2″ x 3″ (label)
  • Peaceful Garden DSP – 4-1/4″ x 5-1/2″ (front background), 2-1/2″ x 4-1/2″ (leafy panel), 1/2″ x 3-3/4″ (inside trim)

Stampin’ Up! products used in this project:


Stampin’ Up! Thoughtful Expressions Card

Good Morning! The Stampin’ Up! Thoughtful Expressions stamp set has beautiful images, but today I focused on the great sentiments and paired it with the beautiful Thoughtful Journey 6″ x 6″ designer series paper to make a sympathy card. You can find the products I used at the bottom of my post along with the card stock sizes.

I adhered a strip of pretty Thoughtful Designs specialty 6″ x 6″ designer series paper to the front of a Wild Wheat card base with liquid glue. I adhered a pretty panel of Thougthful Journey 6″ x 6″ DSP on top of it with liquid glue.

I stamped the sentiment from the Stampin’ Up! Thoughtful Expressions stamp set in Versamark ink on a Mossy Meadow panel. I sprinkled it with white embossing powder and shook off the excess. I heated it until it was bright and shiny and cut it out with the long label die from the Autumn Leaves dies.

I adhered a length of Petunia Pop ribbon to the card with Stampin’ Seal and adhered the label on top with dimensionals. I finished the card with three brass birds.

For the inside of the card, I the flower sprig from the Stampin’ Up! Thoughtful Expressions stamp set in Memento Tuxedo Black ink on a Basic White panel. I colored the flowers with light Petunia Pop Stampin’ Blend and the leaves with light Mossy Meadow. I stamped the sentiment using Mossy Meadow ink and trimmed the side with DSP. I adhered the panel to the inside of the card with Stampin’ Seal.

Sympathy cards are hard to make and the sentiments in the Stampin’ Up! Thoughtful Expressions stamp set are simple and pretty. Paired with pretty designer series paper, it becomes easier.


Stampin’ Up! May Joining Special!

Exciting News! Between May 1 and May 31, anyone who becomes a Stampin’ Up! demonstrator will receive four 2024–2026 In Color products in their Starter Kit for FREE! This is one of our richest offerings yet!

Promotion Details:

  • Dates: May 1, 2024 – May 31, 2024
  • New Demonstrators will receive the following products in their Starter Kit at no additional cost:
    • 2024–2026 In Color Classic Stampin’ Pad Bundle
    • 2024–2026 In Color 8-1/2″ x 11″ Cardstock
    • 2024–2026 In Color 6″ x 6″ Designer Series Paper
    • 2024–2026 In Color Stampin’ Write Markers
  • New team members may not use their team leader’s shipping address to ship their kit. 
  • New team members may only pay for their kit using a credit card on which they are listed as an authorized user. 
  • All orders should be closed by 31 May. 
  • New demonstrators who submit their Independent Demonstrator Agreement (IDA) before 1 May or after 31 May will not be eligible for this Starter Kit offer.

Click on the picture below to download a flyer to see more:

In addition to the In Color products, new Demonstrators will pick $125 USD worth of products of their choice for $99! When you join, the In Color products will be automatically added to your Starter Kit. You will also receive free business supplies with your order and free shipping. Not to mention all the fun that comes with being a part of our wonderful crafting community. Click the button below to Join Now, or get additional details on my Join My Team page


Current Host Code: SSMUTY4A

Use this host code when you order $50 or more and receive a Thank You gift from me!  The free gift is your choice of any item currently available valued up to $10.00.

If your order is over $150, please do not use the host code since you’ll receive your own Host Dollars plus I’ll still send you the Thank You gift!  This host code can be used by anyone, no club or commitment required. Let me know if you have any questions.


If you need any stamping supplies, I’d be very happy to be your Demonstrator.  Just click on the Shop Now Button on the right side of the screen to go directly to my Online store or contact me if you have any questions.  Happy Stamping!

Thanks for stopping by and have a great day!

Akiko

  • Visit my online store here
  • See the current Stampin’ Up! clearance rack specials here
  • Earn FREE Stampin’ Up! products through my Wildflower Frequent Shopper Program – my way of saying thank you to my online frequent shopper customers.
  • Have any questions? I’d be happy to help, click here to contact me.

Cardstock Cuts for this project:

  • Wild Wheat – 4-1/4″ x 11″ card base, scored at 5-1/2″
  • Mossy Meadow – 1-1/2″ x 3″ (label)
  • Basic White – 4″ x 5-1/4″ x 4″ (inside panel)
  • Thoughtful Designs specialty DSP – 1″ x 5-1/4″
  • Thoughtful Journey 6″ x 6″ DSP – 3-1/2″ x 4-3/4″ (front background), 1/2″ x 5-1/4″ (inside trim)

Stampin’ Up! products used in this project:


Stampin’ Up! Autumn Leaves Sympathy Card

Good Morning and Happy Saturday! Here is a Fall sympathy card made with the Stampin’ Up! Autumn Leaves bundle and sentiments from the Something Fancy and Phrases for All stamp sets. The All About Autumn 6″ x 6″ specialty designer series paper add a touch of fall elegance to the card. You can find the products I used at the bottom of my post along with the card stock sizes.

I embossed a Copper Clay panel with the pretty Leaf Fall 3D embossing folder and adhered it to the front of a Copper Clay card base. I adhered a panel of Pretty Peacock and copper foil All About Autumn 6″ x 6″ specialty designer series paper to the card front with Stampin’ Seal. I adhered another panel to a Pretty Peacock mat and adhered it to the card front with liquid glue.

I cut a small maple leaf from Pumpkin Pie with the Stampin’ Up! Autumn Leaves dies and adhered it with glue dots. I cut two little leaves from Oxidized Copper specialty paper and adhered those with glue dots. I stamped the sentiment from the Something Fancy stamp set in Versamark ink and sprinkled it with copper embossing powder. I shook off the excess and heated the powder with my heat tool. I cut the sentiment out with the label die from the Stampin’ Up! Autumn Leaves dies.

I looped some copper ribbon on the card front, adhering it with Stampin’ Seal. I adhered the label over the ribbon and leaves with dimensionals and finished the card front with Brushed Metallic dots.

For the inside of the card, I stamped the sentiment from the Phrases For All stamp set in Copper Clay ink on a Very Vanilla panel. I stamped the large maple leaf from the Stampin’ Up! Autumn Leaves stamp set in Pumpkin Pie ink in the corner and adhered the panel to the inside of the card with Stampin’ Seal.

Sympathy cards are difficult, and I hope that the copper foil adds seasonal elegance to the card without being inappropriate. I do think that the sentiments are perfect along with all the Fall leaves.


Today Is World Card Making Day!

It’s time to celebrate one of our favorite days of the year—World Card Making Day! Invite your friends to craft along with Stampin’ Up! as we express our creativity and make fabulous cards! In just under three hours, we’ll create three unique cards together. Everyone is invited and welcome. And the event and registration are FREE!

Here are the Details:

  • Who: Anyone!
  • When: October 7, 2023 from 2:00 – 5:00 pm (MT)
  • Where: Online
  • Price of Event: FREE
  • Registration Dates: Sept 6 – Oct 7, 2023
    • You can participate in the event without registering. However, registration is encouraged because it’s the best way to stay up to date regarding event details. The email address provided will only be used for event communication.

Go to the World Card Making Day page in my Online Store to register and get more information. You will also find Supply Lists and Card Stock cuts that you can download to prepare.

Inkin’ Krew World Card Making Day Event

In addition to the World Card Making Day event that Stampin’ Up! is planning, The Inkin’ Krew is planning a Facebook event to celebrate World Card Making Day!! We’ll be sharing projects and doing live card making videos all day on Saturday, October 7!

Hop in now so that you’re all ready to go first thing on Saturday! It’s free and open to all who would like to join us! Here is the link to the event page: https://www.facebook.com/groups/worldcardmakingdayinkinkewevent2023/

Here’s the schedule for the videos:

Join our page and you’ll be all set for a fun day of stamping!  I’ve pre-recorded a video that will go live at 3:00 PM ET – I hope you like it!


Free Shipping from Stampin’ Up! Oct 9 – 11, 2023!

Stampin’ Up! is offering free shipping on all orders of $75+ placed between October 9-11!  So get your lists ready and save on shipping fees Monday, Tuesday and Wednesday!

Details:

  • Free shipping offer begins:  October 9 at 12:01 AM MT
  • Ordering Deadline:  October 11 at 11:59 PM MT
  • Free shipping applies after the qualifying amount has been met.
  • The minimum qualifying amount to receive free shipping is $75 or more (before tax).
  • Free shipping only applies during the three-day period the promotion is live; this means that the order must be opened and closed between October 9-11.
  • With the exception of a one-time monthly Paper Pumpkin subscription, all Stampin’ Up! products qualify for the promotion. Subscriptions billed and shipped this month will be charged for the normal amount ($24.50 shipping included) + tax.
  • Prepaid 3, 6, or 12 month Paper Pumpkin subscriptions are eligible for FREE shipping under the same rules as all other Stampin’ Up! items during the promotion.
  • The free shipping promotion does not cover the additional cost for expedited shipping.
  • Please keep in mind, that with any product launch, the distribution center may fall behind our typical shipping timeframes.

Let me know if you have any questions. You can find my online store here.


Current Host Code: 4BTBNFDU

Use this host code when you order $50 or more and receive a Thank You gift from me!  The free gift is your choice of any item currently available valued up to $10.00 .

If your order is over $150, please do not use the host code since you’ll receive your own Host Dollars plus I’ll still send you the Thank You gift!  This host code can be used by anyone, no club or commitment required. Let me know if you have any questions.


If you need any stamping supplies, I’d be very happy to be your Demonstrator.  Just click on the Shop Now button on the right side of the screen to go directly to my online store or contact me if you have any questions.  Happy Stamping!

Thanks for stopping by and have a great weekend!

Akiko

  • Visit my online store here
  • See the current Stampin’ Up! clearance rack specials here
  • Earn FREE Stampin’ Up! products through my Wildflower Frequent Shopper Program – my way of saying thank you to my online frequent shopper customers.
  • Have any questions? I’d be happy to help, click here to contact me.

Cardstock Cuts for this project:

  • Copper Clay – 4-1/4″ x 11″ card base, scored at 5-1/2″, 4-1/4″ x 5-1/2″ (embossed background)
  • Pretty Peacock – 2-7/8″ x 3-5/8″ (DSP mat)
  • Pumpkin Pie – 1-1/2″ x 1-3/4″ (die cut leaf)
  • Oxidized Copper – 3/4″ x 2″ (die cut leaves)
  • Very Vanilla – 4″ x 5-1/4″ (inside panel), 1-1/4″ x 3-1/4″ (label)
  • All About Autumn 6″ x 6″ DSP – 2-3/4″ x 4-1/2″ (front background), 2-3/4″ x 3-1/2″ (leaf panel)

Stampin’ Up! products used in this project:


Stampin’ Up! Splendid Thoughts Sending Hugs Card

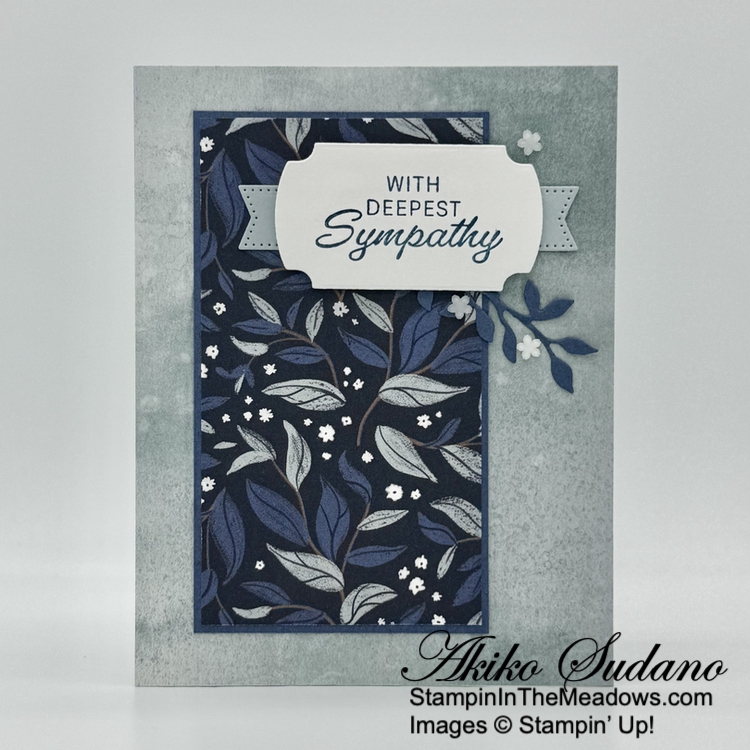
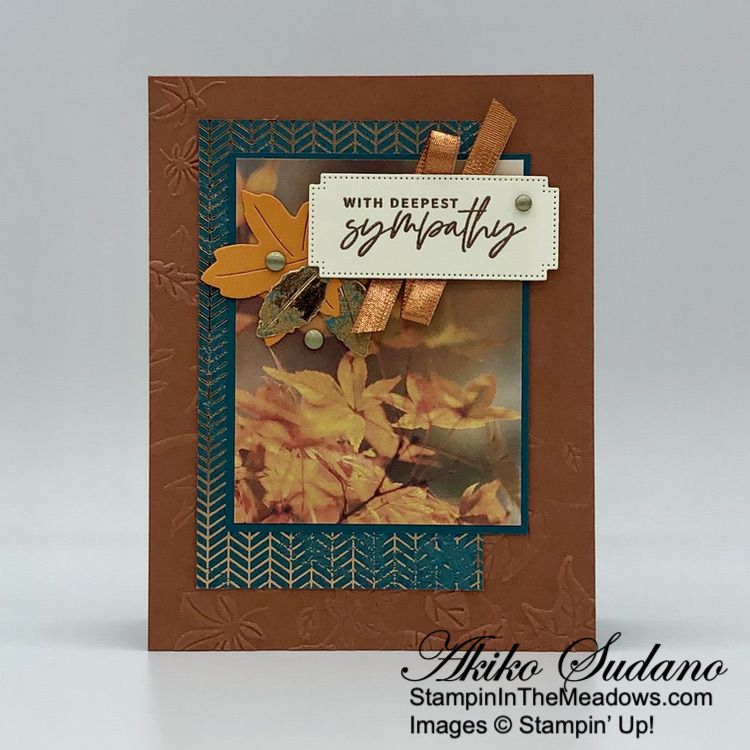
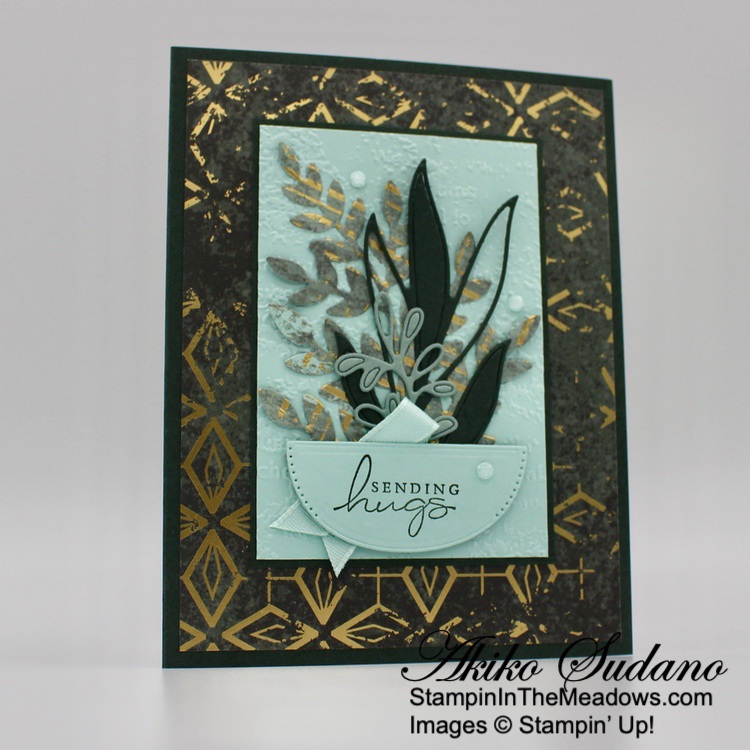
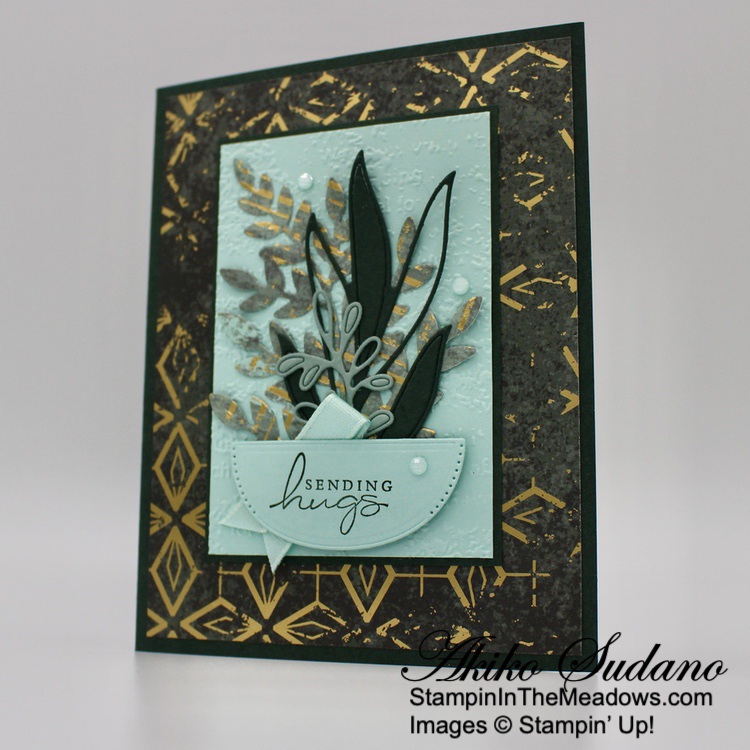
Good Morning! The Stampin’ Up! Splendid Thoughts bundle is a beautiful bundle that is retiring soon, and it has been one of my favorites from the July-December 2022 Mini Catalog. I paired it with the beautiful Texture Chic specialty designer series paper for today’s sending hugs card. You can find the supplies I used at the bottom of my post along with the sizes of cardstock used.

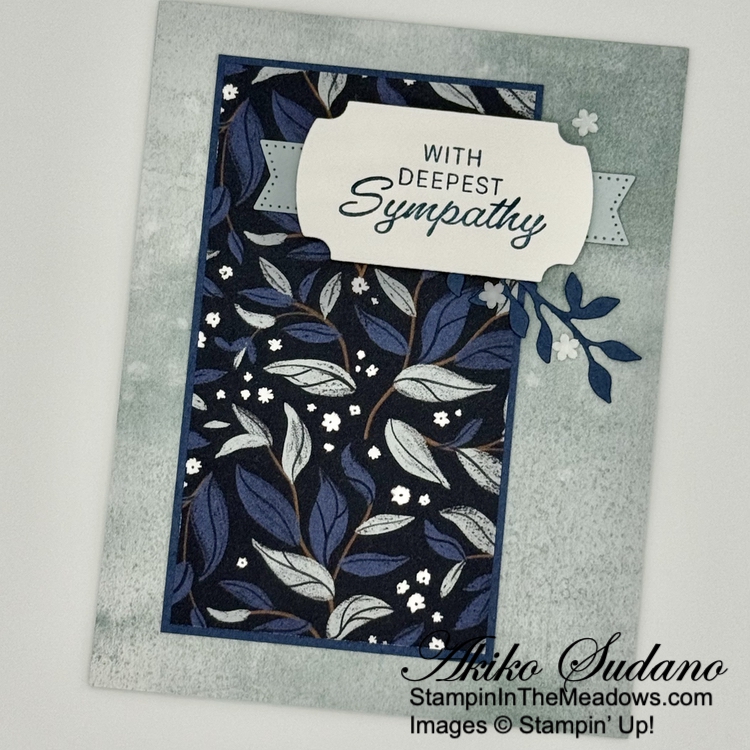
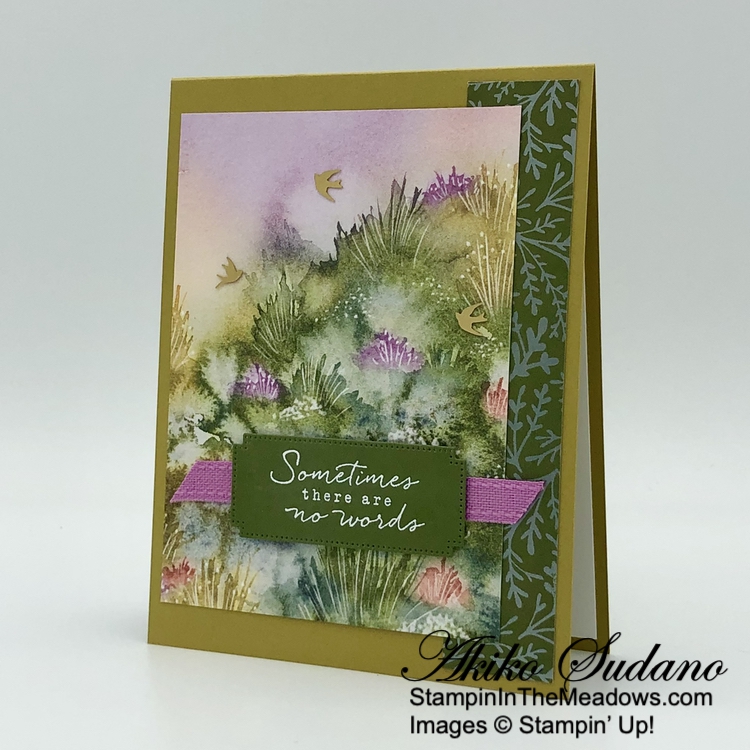
I adhered a panel of Texture Chic specialty designer series paper to the front of an Evening Evergreen panel with liquid glue. I embossed a Pool Party panel with the Timeworn Type 3D embossing folder and adhered it to an Evening Evergreen mat. I adhered the layered embossed panel to the card front with liquid glue.

I cut the large fern die from the Forever Flourishing dies from a Soft Succulent and gold panel of Texture Chic DSP and adhered it to the card with dots of liquid glue. I cut the large leaf die from the Stampin’ Up! Splendid Thoughts bundle using Evening Evergreen card stock and adhered it to the card front with glue dots. I used the small die to cut a Sot Succulent panel and adhered it with glue dots. I left some inside pieces in some of the leaves on purpose for added texture.

I stamped the sentiment from the Stampin’ Up! Splendid Thoughts cling stamp set in Evening Evergreen on Pool Party card stock and cut it out with the bowl die. I adhered a short folded length of Pool Party ribbon (I realized this ribbon is from the upcoming mini catalog and will be available January 5, 2023) and adhered it to the back of the label with glue dots and adhered the label to the card with dimensionals. I finished the card with Pool Party Fine Sparkle gems.

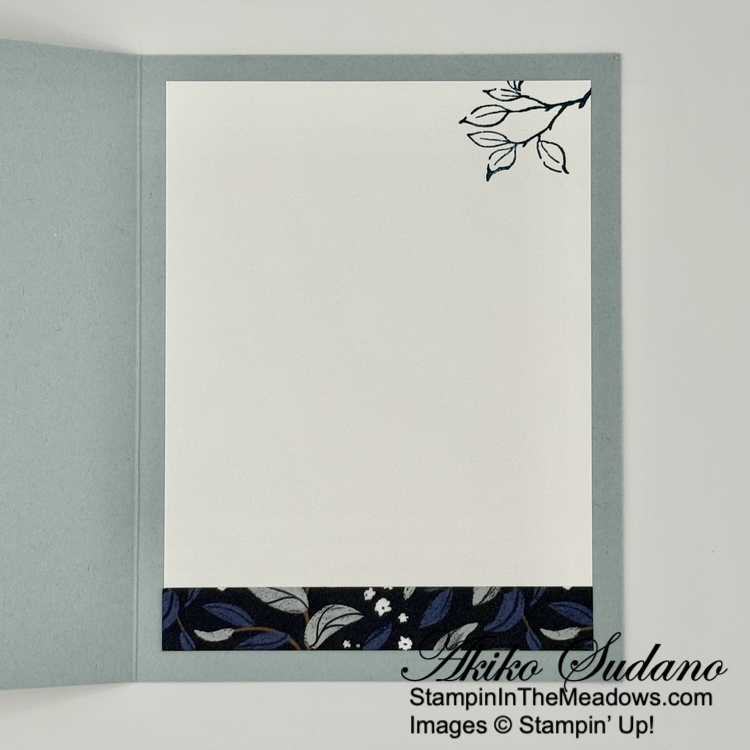
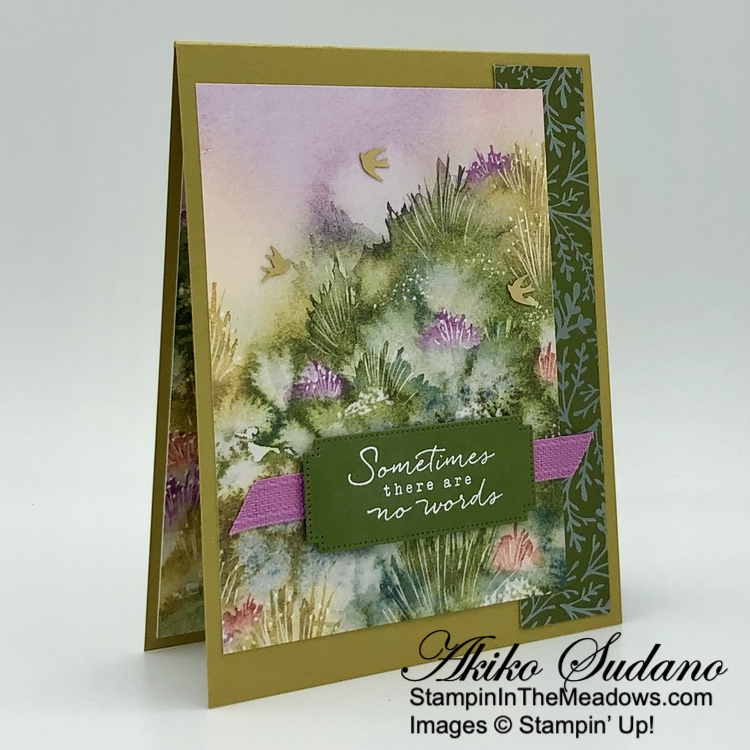
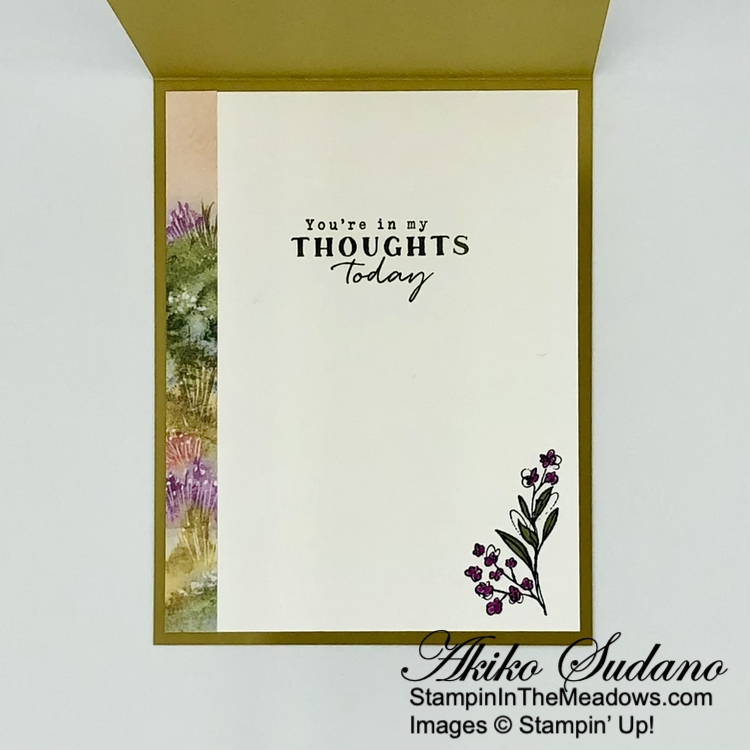
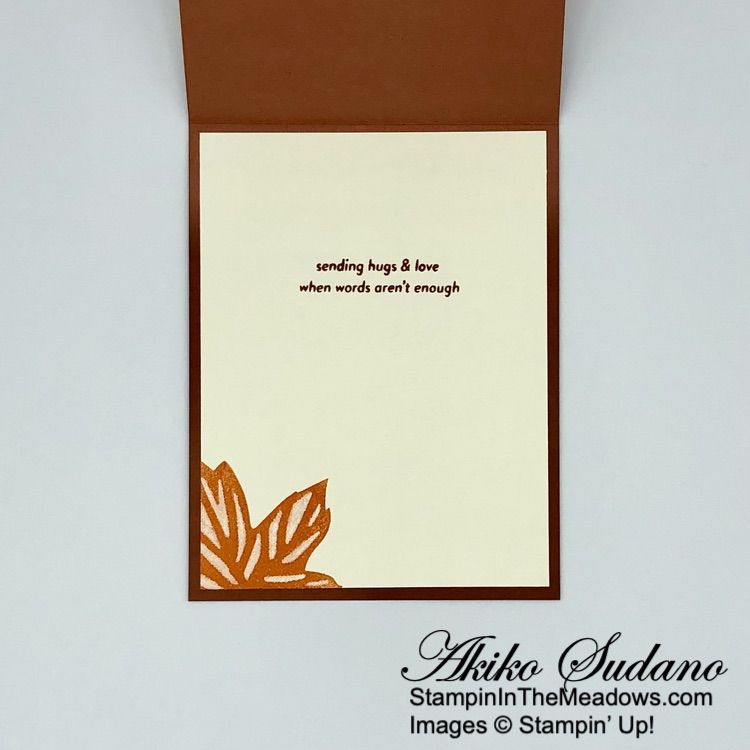
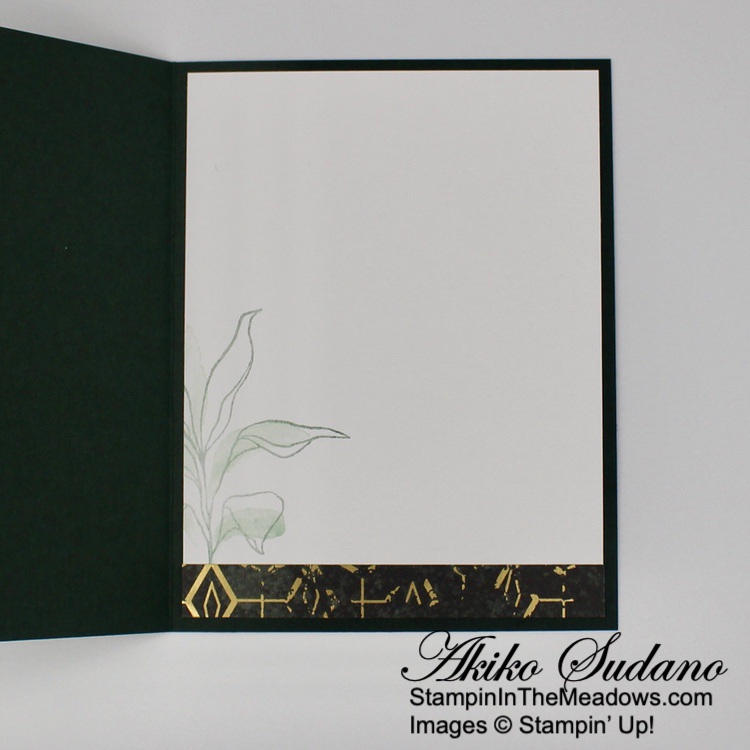
For the inside of the card, I stamped the plant outline from the Stampin’ Up! Splendid Thoughts stamp set in stamped off Soft Succulent ink on a Basic White panel. I stamped the solid leaf over it in stamped off Pool Party ink and trimmed the bottom with a strip of Texture chic DSP. I adhered the panel to the inside of the card with Stampin’ Seal.

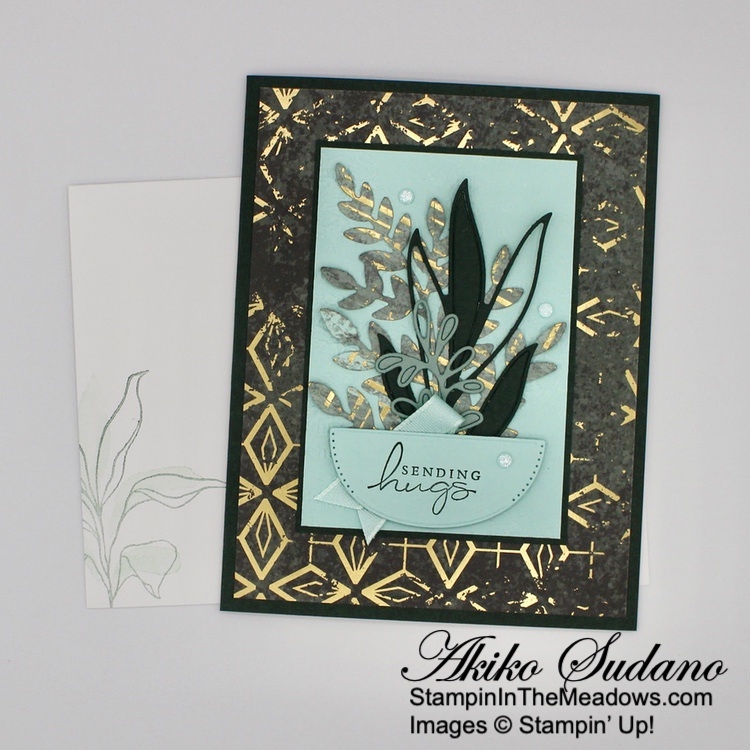
I stamped the outside of a medium Basic White envelop with the same design as the inside panel. A somber, elegant card for a friend going through a tough spot.


The July–December 2022 Mini Catalog will be retiring soon! It’s always bittersweet to see a classic Stampin’ Up! catalog take a trip to retirement. But, we’re looking forward to all the new products on their way—and we hope you are, too!

Stock up on your favorite products before they’re gone for good! Save up to 60% on essential craft supplies. What are you waiting for? Start shopping! After all, this selection of Last Chance Products is only available while supplies last and some favorites are already sold out – and many items have already sold out!

Note that while some of the bundles are on the retiring list, the individual stamps and dies/punches may be carried over. These items are marked with three asterisks on the retiring lists. Also, if one of the items in the bundle is deeply discounted, the total price may be less than the bundled price, so pull out your calculators to double check.

Click HERE to download an Excel Spreadsheet of the Retiring Last Chance Items.

Click HERE to download a PDF of the Retiring Last Chance Items.

Click HERE to download a PDF of the Carryover List of items.

Shop early to get the items you want before they’re gone for good! Click HERE to shop in my Online Store 24×7!


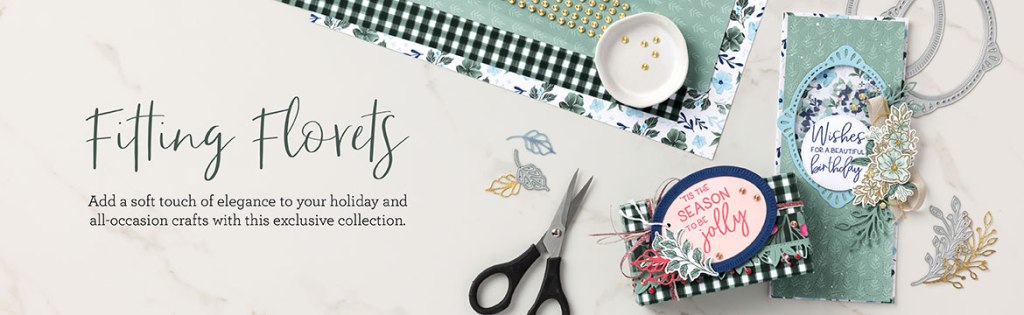
The Fitting Florets Collection is Now Available!

Add just the right touch of elegance to any occasion, including Christmas and seasonal celebrations, with the sweet Fitting Florets Collection. From color schemes to sentiments and embellishments to dies, these unique products blend together so that your cards and crafts fit whatever occasion you might need. Send birthday wishes, express your gratitude, or spread Christmas cheer—with so many options to mix and match you’ll be set no matter the celebration all year!

The beautiful Framed Florets bundle is an early release from the upcoming January-June 2023 Mini catalog. The Framed & Festive cling stamp set, Fitting Florets designer series paper and gold adhesive backed swirls are only available during this promotion. Click on the picture below to download a flyer with the details.

Note: Sadly the Gold Adhesive-Backed Swirls have sold out.


Current Host Code: N6Z4VWV3

Use this host code when you order $50 or more and receive a free gift from me!  The free gift is your choice of any item currently available valued up to $10.00 from the July-December 2022 Mini Catalog or the 2022-2023 Annual Catalog!

If your order is over $150, please do not use the host code since you’ll receive your own Host Dollars plus I’ll still send you the free gift!  This host code can be used by anyone, no club or commitment required. Let me know if you have any questions.


If you need any stamping supplies, I’d be very happy to be your Demonstrator.  Just click on the Shop Now button on the right side of the screen to go directly to my online store or contact me if you have any questions.  Happy Stamping!

Thanks for stopping by and have a great week!

Akiko

  • Visit my online store here
  • See the current Stampin’ Up! clearance rack specials here
  • Earn FREE Stampin’ Up! products through my Wildflower Frequent Shopper Program – my way of saying thank you to my online frequent shopper customers.
  • Have any questions? I’d be happy to help, click here to contact me.

Cardstock Cuts for this project:

  • Evening Evergreen – 5-1/2″ x 8-1/2″ card base scored at 4-1/4″, 2-1/4″ x 4″ (die cut leaf), 2-3/4″ x 4″ (embossed panel mat)
  • Pool Party – 2-5/8″ x 3-7/8″ (embossed panel), 1-1/4″ x 3″ (label)
  • Soft Succulent – 1-1/4″ x 2-1/4″ (die cut leaf)
  • Basic White – 4″ x 5-1/4″ (inside panel)
  • Texture Chic specialty DSP – 4″ x 5-1/4″ (front background), 3″ x 3-1/2″ (

Stampin’ Up! products used in this project:


Stampin’ Up! Prized Peony Sympathy Card

Good Morning! Today I am sharing a sympathy card made with the beautiful Stampin’ Up! Prized Peony bundle. I paired it with gorgeous Peony Garden designer series paper to make a simple and elegant sympathy card. You can find the supplies used to create this card at the bottom of my post along with the sizes of cardstock used.

Using Stampin’ Seal, I adhered a panel of Peony Garden designer series paper to the front of a Thick Whisper White card base. I cut a stitched rectangle frame with the 3rd and 4th largest Stitched Rectangle dies using Whisper White card stock.

I stamped the large peony flower from the Stampin’ Up! Prized Peony cling stamp set in Gray Granite ink on Whisper White card stock and cut it out with the coordinating die. I adhered the peony to the frame with dots of multipurpose liquid glue and popped the peony and frame on the card front with dimensionals.

I stamped the sentiment from the Stampin’ Up! Prized Peony stamp set in Versamark ink on Gray Granite card stock. I sprinkled it with white embossing powder and heat set until shiny. I cut it out with the small die from the Tasteful Labels die and adhered it to the frame with liquid glue. I adhered a bow made with Gray Granite shimmer ribbon using glue dots and finished the card with three pink Elegant Faceted Gems.

I stamped the large peony flower from the Stampin’ Up! Prized Peony stamp set in the corner of a Whisper White panel using Gray Granite ink after stamping off twice. I added a strip of the Peony Garden DSP to the bottom and adhered it to a Gray Granite mat and then to the inside of the card.

Sympathy cards are difficult, but the muted colors in the Peony Garden designer series paper makes an elegant card for solemn occasions.


Stampin Up! Bonus Days are back!

Good news – Bonus Days are back! That means it’s time to start earning coupon codes to redeem in August! If you need a refresher on this promotion, here’s how it works: For every $50 (before shipping and tax) you spend between today and August 3, you earn a $5 USD Bonus Days coupon code that can be redeemed between August 4 and August 31. There’s no limit on how many coupon codes you can earn or redeem, but they must be redeemed by August 31. For full details, see my Promotions Page.


July 1-15 Host Code: DVHGBQ7V

Use this host code when you order $50 or more and receive a free gift from me!  The gift is your choice of any item valued up to $10.00 in the 2020-21 Annual Catalog!

If your order is over $150, please do not use the host code since you’ll receive your own Host Dollars plus I’ll still send you the free gift!  This host code can be used by anyone, no commitment required.  Let me know if you have any questions.


If you need any stamping supplies, I’d be very happy to be your Demonstrator.  Just click on the Shop Now Button on the right side of the screen to go directly to my Online store or contact me if you have any questions.  Happy Stamping!

Thanks for stopping by and have a great day!

Akiko

  • Visit my Online store here
  • See the current Stampin’ Up! clearance rack specials here
  • Earn FREE Stampin’ Up! products through my Wildflower Frequent Shopper Program – my way of saying thank you to my frequent shopper online customers.
  • Sign up for my monthly newsletter here
  • Have any questions? I’d be happy to help, click here to contact me.

Cardstock Cuts for this project:

  • Thick Whisper White – 4-1/4″ x 11″ card base scored at 5-1/2″
  • Gray Granite – 4″ x 5-1/4″ (inside mat), 1-1/2″ x 1-1/2″ (label)
  • Whisper White – 3-7/8″” x 5-1/8″ (inside panel), 3″ x 4-1/2″ (frame), 3-1/2″ x 4″ (die cut peony)
  • DSP – 4″ x 5-1/4″ (front background), 1/2″ x 3-7/8″ (inside trim)

Stampin’ Up! products used in this project: