Stampin’ Up! A Little Bit Festive for the Happy Inkin’ Thursday Blog Hop

Good Morning and welcome to the Happy Inkin’ Thursday Blog Hop! Here’s another super simple Christmas card made with the pretty Stampin’ Up! A Little Bit Festive Mix & Match specialty designer series paper. You can find the supplies I used along with card stock cuts at the bottom of my post.

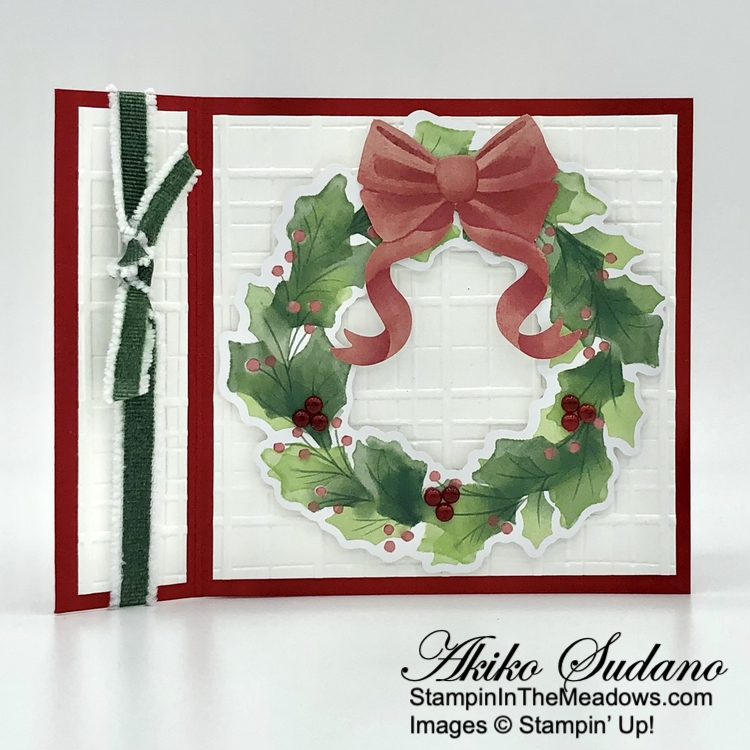
We have a fun theme challenge this week, so I decided to use the pretty wreath to make a book fold card!

After scoring and burnishing the Real Red card base I adhered the left side book bind section together with liquid glue.

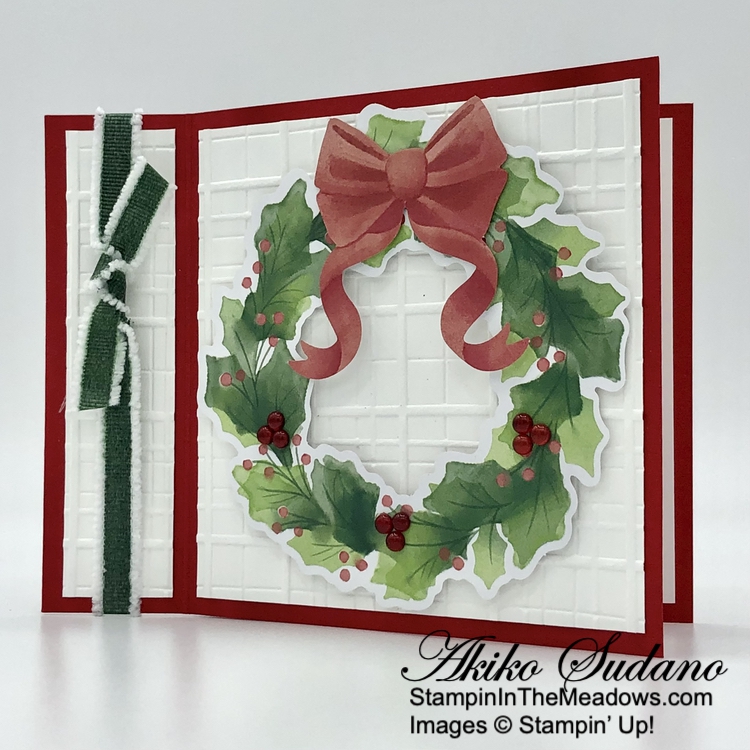
I used the pretty Forever Plaid 3D embossing folder to emboss Basic White panels for the two sections of the card front. I adhered the embossed panels to the card with liquid glue. I used my Garden Green Stampin’ Write marker to color the center part of Basic White Frayed ribbon and wrapped it around the book bind edge and tied a knot.

I adhered the pretty holly wreath from the Stampin’ Up! A Little Bit Festive specialty DSP to the main section with dimensionals. I adhered three triple berries to the wreath to give it some sparkle. And that’s it – so quick and easy!! And a great way to show off the pretty wreath!

For the inside of the card, I stamped the sentiment from the Greetings of the Season stamp set using Real Red ink on a Basic White panel. I adhered the panel to the inside of the card with Stampin’ Seal.

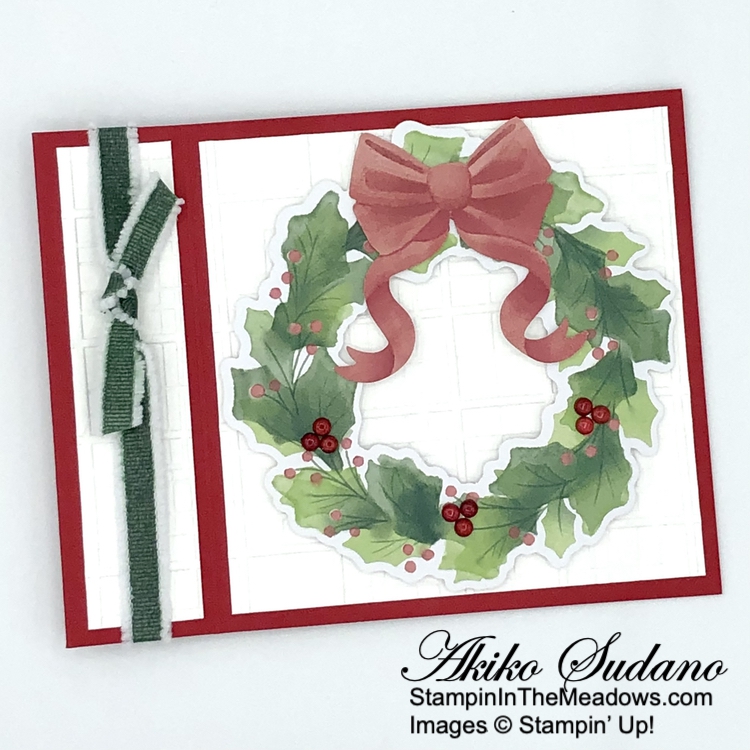
This is such a pretty holly wreath from the Stampin’ Up! A Little Bit Festive Mix & Match specialty DSP pack and I wanted to let it stand on it’s own against a simple textured Basic White background. And the bow from the DSP pack is perfect with the wreath, so I didn’t want to make another one with ribbon. I hope you’re inspired to check out the new Mix & Match items. This DSP pack is expected to be restocked next week and it coordinates with the Christmas Ephemera packs. They’re great for quick and easy Christmas crafting of any kind!

On with the Hop! Click on the Next Blog button to move forward to see the beautiful project Karen Ksenzakovic has created.

If you get lost along the way, here are the participants for the hop:


Current Host Code: BTWRDNAU

Use this host code when you order $50 or more and receive a free gift from me!  The free gift is your choice of any item currently available valued up to $10.00!

If your order is over $150, please do not use the host code since you’ll receive your own Host Dollars plus I’ll still send you the free gift!  This host code can be used by anyone, no club or commitment required. Let me know if you have any questions.


If you need any stamping supplies, I’d be very happy to be your Demonstrator.  Just click on the Shop Now button on the right side of the screen to go directly to my online store or contact me if you have any questions. 

Thanks for stopping by and Happy Stamping!

Akiko

  • Visit my online store here
  • See the current Stampin’ Up! clearance rack specials here
  • Earn FREE Stampin’ Up! products through my Wildflower Frequent Shopper Program – my way of saying thank you to my online frequent shopper customers.
  • Have any questions? I’d be happy to help, click here to contact me.

Cardstock Cuts for this project:

  • Real Red – 4-1/4″ x 11″ card base, scored at 4-1/4″ and 5-1/2″
  • Basic White – two 4″ x 4″ panels (inside panel and embossed front), 1″ x 4″ (embossed book bind strip)
  • A Little Bit Festive specialty DSP – holly wreath cut-out, bow

Stampin’ Up! products used in this project:


Stampin’ Up! Sentimental Wishes Joy Fold Christmas Card

Good Morning! The Stampin’ Up! Sentimental Wishes bundle is such a cute, vintage inspired bundle with gorgeous images that can be cut out with coordinating dies and wonderful sentiments in a fun font. I paired it with the pretty Christmas Wishes designer series paper to make a Joy Fold Christmas card. You can find the products I used at the bottom of my post along with the card stock sizes.

I adhered a floral panel of Sentimental Christmas designer series paper to the back and front flap of a Shaded Spruce card base as well as the inside flap of the Poppy Parade mini card base. I adhered the green stripe pattern to the inside flap and to the front of the mini card base. I adhered the mini card base to the inside of the main card base. I used the dies from the Stampin’ Up! Sentimental Wishes die set to cut out a stocking and bow from the Christmas Wishes DSP and adhered them to the inside flap of the main card base.

I stamped the holly spray and two sets of candles from the Stampin’ Up! Sentimental Wishes stamp set using Memento Tuxedo Black ink on Basic White. I colored them with Stampin’ Blends – dark Lost Lagoon, Light Old Olive, light Shaded Spruce, light Pecan Pie, dark Daffodil Delight and Poppy Parade. I cut them out with the coordinating dies. I used the Spotlight On Nature dies to cut out Poppy Parade and Basic Beige panels and adhered them to the front of the mini card. I adhered the candles, and holly bough to the card with glue dots.

I stamped the ‘Celebrate‘ part of the sentiment from the Stampin’ Up! Sentimental Wishes stamp set using Versamark ink. I sprinkled the sentiment with white embossing powder and heated it with my heat tool until it was bright and shiny. I cut it out with the Something Fancy die and adhered it to the card with glue dots. I adhered a Shaded Spruce bow with a glue dot and finished with Cherry Cobbler dots.

For the inside of the card, I stamped the sentiment from the Stampin’ Up! Sentimental Wishes stamp set using Poppy Parade ink on Basic White and adhered it to the inside of the card with Stampin’ Seal. I stamped the sentiment from the Stampin’ Up! Sentimental Wishes stamp set using Poppy Parade ink on Basic White and cut it out with the small Something Fancy die. I cut a Shaded Spruce panel with the large die and adhered the sentiment to it before adhering it to the inside of the mini card front flap.

I made this card live for our quarterly Inkin’ Krew team meeting. Each month, the Stampin’ Up! Demonstrators in the Inkin’ Krew have a virtual meeting and every quarter we craft live together. I haven’t done videos in a while, so I was a bit nervous showing everyone how to make the card. But it was fun! Karen Ksenzakovic and Terry Lynn Bright also made pretty cards with this bundle for everyone. Let me know if you’re interested in learning more about joining my team and participating in the Inkin Krew activities.

I love that the Stampin’ Up! Sentimental Wishes dies can also cut images from the Christmas Wishes DSP. These vintage designs are reminiscent of the best of Christmases long ago.


New Kits In Kits Collection!

The Kits Collection by Stampin’ Up! provides different options and a range of project types that allow you to choose the crafting experiences that best fits your style and needs. There’s a variety of kits to choose from and these all-inclusive project kits have everything you need in one box! You can Find these kits in the Online Store.

The new kits for September are the pretty Christmas Ornaments Kit and the wonderful Card Keeper Kit. The Christmas Ornaments kit makes 9 Christmas ornaments including precut paper greenery, pinecones, bright berries, and festive details. The Card Keeper Kit includes everything you need to make 10 beautiful all-occasion cards plus a coordinating card container to keep everything organized.

The Kits Collection offering changes frequently as new kits are released, and kit availability fluctuates. To check the availability of these new kits or past kits, visit my Online Store. 


The October Paper Pumpkin Kit – Nests of Christmas!

Spread Christmas cheer with this cozy, all-inclusive crafting kit that coordinates with the new Nests of Winter Suite Collection

  • Makes 10 cards: 5 each of 2 designs with 10 coordinating envelopes
  • Project includes tri-fold printed card bases and precut grosgrain ribbon
  • Precut labels with specialty green foil
  • Shaded Spruce Classic Stampin’ Spot

Coordinating Colors: Basic Black, Coastal Cabana, Granny Apple Green, Night of Navy, Real Red, Shaded Spruce

And the coordinating add-on is the Merry Tags & More dies – item #165639 for $12 (available while supplies last).

If you’re interested in subscribing to Paper Pumpkin, you can either sign up for a subscription where you are billed monthly for your kit or you can purchase a prepaid subscription in my Online Store. To see more information and to sign up for the monthly subscription click here. To see the options for prepaid subscriptions in my Online Store, click here.

Sign up deadline for the October 2024 kit is October 10, 2024. Note: Supplies may be limited toward the end of the subscription period.


Current Host Code: 37AE7ZXV

Use this host code when you order $50 or more and receive a Thank You gift from me!  The free gift is your choice of any item currently available valued up to $10.00.

If your order is over $150, please do not use the host code since you’ll receive your own Host Dollars plus I’ll still send you the Thank You gift!  This host code can be used by anyone, no club or commitment required. Let me know if you have any questions.


If you need any stamping supplies, I’d be very happy to be your Demonstrator.  Just click on the Shop Now Button on the right side of the screen to go directly to my Online store or contact me if you have any questions.  Happy Stamping!

Thanks for stopping by and have a great day!

Akiko

  • Visit my online store here
  • See the current Stampin’ Up! clearance rack specials here
  • Earn FREE Stampin’ Up! products through my Wildflower Frequent Shopper Program – my way of saying thank you to my online frequent shopper customers.
  • Have any questions? I’d be happy to help, click here to contact me.

Cardstock Cuts for this project:

  • Shaded Spruce – 4-1/4” x 8-1/2” card base, scored at 3”, 2” x 3-1/2” (die cut label mat)
  • Poppy Parade – 3” x 8” mini card base, scored at 4”, 3-1/2” x 3-1/2” (die cut circle), 1” x 3” (die cut label)
  • Basic Beige – 3” x 3” (die cut circle)
  • Basic White – 2-3/4” x 3-3/4” (inside panel), 4-1/4” x 5-1/2” panel (stamped/die cut images)
  • Sentimental Christmas DSP:
    • Floral Pattern – 4” x 5-1/4” (mini card inside panel), 2-3/4” x 4” (front short flap), 2-3/4” x 3-3/4” (mini card inside)
    • Stripe Pattern – 2-3/4” x 4” (short flap inside), 2-3/4” x 3-3/4” (mini card front)
    • Die cut stocking and bow

Stampin’ Up! products used in this project:


Stampin’ Up! Snowy Wonder Sneak Peek for the Happy Inkin’ Thursday Blog Hop

Good Morning and welcome to the Happy Inkin’ Thursday Blog Hop! Here’s a sneak peek of a fun new bundle from the upcoming Mini Catalog – the Stampin’ Up! Snowy Wonder bundle. This is a great little bundle with lots of great Winter images and coordinating dies and bold sentiments. This bundle will be available on Wednesday Sept 4 when the September – December 2024 Mini Catalog opens for orders! You can find the currently available supplies I used along with card stock cuts at the bottom of my post.

We have a sketch challenge this week, so I turned it into a simple fun fold – a card base panel with a mini card.

I embossed a pool party panel with the Snowflake Sky 3D embossing folder and adhered it to the mini Basic White card base with liquid glue. I adhered strips of striped Snowy Scenes designer series paper (available Sept 4, 2024) to the top and bottom of the embossed panel and adhered the mini card base to a Poppy Parade panel.

I stamped and die cut several images from the Stampin’ Up! Snowy Wonder bundle on Basic White. I stamped the little house in Poppy Parade and used my black Stampin’ Write marker on the roof to make it contrast. I colored the windows dark Lemon Lolly and the door light Pecan Pie. I stamped the mountains (1 large and 2 small) in Pool Party and the trees in Garden Green.

I built the scene on the embossed panel starting with the mountains and adhered them with glue dots. I adhered the Garden Green Trees with glue dots and adhered the house with dimensionals. Lastly, I used dimensionals to adhere the two small line trees. I adhered a bunch of White Loose Snowflakes to the sky using glue dots.

For the inside of the mini card, I stamped the sentiment from Stampin’ Up! Snowy Wonder stamp set using Garden Green ink. I stamped the holly leaves in Garden Green and the berries in Poppy Parade.

The Stampin’ Up! Snowy Wonder stamp set is so versatile with so many different winter themes – snowflakes, a snowman, a penguin, a present and candy cane in addition to the trees, mountains and house I used on this card. And there are dies to cut them all out! Here’s a picture of the bundle.

Snowy Wonder Bundle – item 164125 $45.75

Note the snow globe dies – they coordinate with the images in the Snowy Scenes DSP. They’re calling ‘Shaker Card’ to me, filled with the loose snowflakes. Be sure to also check out the Snow Day Scrapbooking Workshop that will coordinate with this bundle. The details will be in the Scrapbooking Brochure that will also be available on September 4! So much to look forward to next month!

On with the Hop! Click on the Next Blog button to move forward to see the beautiful project Karen Ksenzakovic has created.

If you get lost along the way, here are the participants for the hop:


Current Host Code: 37AE7ZXV

Use this host code when you order $50 or more and receive a free gift from me!  The free gift is your choice of any item currently available valued up to $10.00!

If your order is over $150, please do not use the host code since you’ll receive your own Host Dollars plus I’ll still send you the free gift!  This host code can be used by anyone, no club or commitment required. Let me know if you have any questions.


If you need any stamping supplies, I’d be very happy to be your Demonstrator.  Just click on the Shop Now button on the right side of the screen to go directly to my online store or contact me if you have any questions. 

Thanks for stopping by and Happy Stamping!

Akiko

  • Visit my online store here
  • See the current Stampin’ Up! clearance rack specials here
  • Earn FREE Stampin’ Up! products through my Wildflower Frequent Shopper Program – my way of saying thank you to my online frequent shopper customers.
  • Have any questions? I’d be happy to help, click here to contact me.

Cardstock Cuts for this project:

  • Poppy Parade – 4-1/4″ x 5-1/2″ card base panel
  • Basic White – 3″ x 8-1/2″ mini card base, scored at 4-1/4″, 4″ x 4″ (die cuts)
  • Pool Party – 3″ x 4″ (embossed panel)
  • Snowy Scenes DSP – two 1/2″ x 3″ strips (top and bottom trim)

Stampin’ Up! products used in this project:


Stampin’ Up! Adventurous Sky Birthday Card

Good Morning! Here’s a fun masculine fun fold birthday card made with the awesome Stampin’ Up! Adventurous Sky bundle and the wonderful Take To The Sky designer series paper. I was inspired by a card made by my Inkin’ Krew teammate Tara Carpenter a few weeks ago and you can find her card HERE (she has a video, too!). You can find the products I used at the bottom of my post along with the card stock sizes.

I scored and burnished a panel of Take To The Sky designer series paper to make an accordion card base and adhered it to a Copper Clay card base panel. I cut another panel of the DSP with the largest circle in the Stylish Shapes dies. I traced the outside of the die on a Misty Moonlight panel and fussy cut it with my paper snip to make a mat and adhered the die cut to the mat with liquid glue. I adhered it to the front middle section of the card.

I used the large bi-plane dies from the Stampin’ Up! Adventurous Sky dies to cut the body of the plane from Copper Clay and the wings and propeller from Gray Granite. I used a black Stampin’ Write marker to color the wheels and adhered the die cuts together with liquid glue. I popped the plane on the card front with dimensionals. I stamped the sentiment from the Stampin’ Up! Adventurous Sky stamp set in Misty Moonlight ink on Basic White and cut it out with the banner die. I adhered it to the card with glue dots and finished it with an industrial trinket.

I stamped the sentiment from the Stampin’ Up Adventurous Sky stamp set using Misty Moonlight ink on a Basic White panel. I stamped the small bi-plane using Gray Granite ink and stamped several clouds using twice stamped off Misty Moonlight ink. I adhered the panel to a Copper Clay mat and adhered the layered panel to the little flap, being careful to only use liquid glue on the edge. I love this extra panel, it really makes the card special!

For the inside of the card, I stamped the sentiment from the Stampin’ Up! Adventurous Sky stamp set using Misty Moonlight ink on a Basic White panel. I adhered it to a Misty Moonlight mat before adhering it to the inside of the card with Stampin’ Seal.

The Stampin’ Up! Adventurous Sky bundle is perfect for flying fanatics, or someone who likes vintage machines. And this wonderful fun fold really allows the pretty DSP images to shine. The Take To The Sky designer series paper is included in the August DSP sale, but hurry, because the sale is ending soon.


Time to Redeem Bonus Days Coupons!

It’s time to redeem Bonus Days Coupons. All the coupons that you earned in July can be redeemed through August 31! 

Promotion Details:

  • There is no limit to the number of coupon codes you can redeem on an order during the redemption period. If using multiple codes, they must be separated by a space. 
  • Coupon codes may be redeemed one time only. They cannot be redeemed after August 31, 2024.
  • Coupon codes may be redeemed for any product (excluding Starter Kits). They cannot be used on exchanges.
  • Bonus Days coupon codes can be applied to month-to-month Paper Pumpkin subscriptions and new prepaid subscriptions.

Designer Series Paper Sale This Month!

This month, you can shop select Designers Series Paper from the 2024–2025 Annual Catalog at 15% off! It’s the perfect time to stock up and save on your favorite paper.

Stampin’ Up! Designer Series Paper is perfect for card making, gift packaging, scrapbooking, and more! The in-house artists create Designer Series Paper using different mediums. They work to create paper for every design you’d need for your paper crafts. Some of the designs coordinate with different products, such as die cuts and punches. It’s also made up of Stampin’ Up! colors, ensuring perfect color coordination with other products.

Promotion Details:

  • Sales Period: August 6, 2024 – August 31, 2024
  • Specialty paper, cardstock assortments, Designer Series Paper stacks, and paper not yet live is not included in the sale.
  • Customers must open and close the order during the allotted dates to receive the discount. 
  • There are NO limits on ordering. However, product is only available while supplies last. 
  • Designer Series Paper purchased with Stampin’ Rewards or as part of a Starter Kit WILL qualify for the discount.  
  • Ordering Deadline: August 31, 2024 at 11:59 PM (MT)

Click on the image below to download a PDF with the details and the lists of Designer Series Paper that are included in the sale:

While there are no limits to order quantity, product is only available while supplies last.


The September Paper Pumpkin Kit – Autumn Abundance!

Share your love for all things Autumn with the September Paper Pumpkin kit!

  • Makes 9 cards: 3 each of 3 designs with 9 coordinating envelopes
  • Project includes printed card bases, coordinating envelopes, and labels
  • Laser cut card fronts, a watercolored ephemera pack, and embellishments
  • Cajun Craze Classic Stampin’ Spot

Coordinating Colors: Cajun Craze, Crushed Curry, Poppy Parade, Pumpkin Pie, Very Vanilla, Wild Wheat

And the coordinating add-on is the Every Celebration dies – item #164991 for $12.

If you’re interested in subscribing to Paper Pumpkin, you can either sign up for a subscription where you are billed monthly for your kit or you can purchase a prepaid subscription in my Online Store. To see more information and to sign up for the monthly subscription click here. To see the options for prepaid subscriptions in my Online Store, click here.

Sign up deadline for the August 2024 kit is August 10, 2024. Note: Supplies may be limited toward the end of the subscription period.


Current Host Code: 37AE7ZXV

Use this host code when you order $50 or more and receive a Thank You gift from me!  The free gift is your choice of any item currently available valued up to $10.00.

If your order is over $150, please do not use the host code since you’ll receive your own Host Dollars plus I’ll still send you the Thank You gift!  This host code can be used by anyone, no club or commitment required. Let me know if you have any questions.


If you need any stamping supplies, I’d be very happy to be your Demonstrator.  Just click on the Shop Now Button on the right side of the screen to go directly to my Online store or contact me if you have any questions.  Happy Stamping!

Thanks for stopping by and have a great day!

Akiko

  • Visit my online store here
  • See the current Stampin’ Up! clearance rack specials here
  • Earn FREE Stampin’ Up! products through my Wildflower Frequent Shopper Program – my way of saying thank you to my online frequent shopper customers.
  • Have any questions? I’d be happy to help, click here to contact me.

Cardstock Cuts for this project:

  • Copper Clay – 4-1/4″ x 5-1/2″ (card base), 2-3/4″ x 4-1/4″ (middle panel mat), 1-3/4″ x 4-1/4″ (plane body)
  • Gray Granite – 1-3/4″ x 4-1/4″ (plane wings), 3/4″ x 1-1/2″ (propeller)
  • Misty Moonlight – 3-1/2″ x 3-1/2″ (fussy cut circle), 3-3/4″ x 5″ (inside panel mat)
  • Basic White – 2-3/4″ x 4-3/4″ (middle panel), 3-5/8″ x 4-7/8″ (inside panel), 3/4″ x 3″ (label)
  • Take To The Sky DSP – 5-1/4″ x 12″ scored at 3″ , 6- 1/2″ and 10-1/2″ (DSP accordion), 3-1/4″ x 3-1/4″ (die cut circle

Stampin’ Up! products used in this project:


Stampin’ Up! Wildflower Designs Hello Card for the Happy Inkin’ Thursday Blog Hop

Good Morning and welcome to the Happy Inkin’ Thursday Blog Hop! I used the Stampin’ Up! Wildflower Designs bundle and the pretty Wildly Flowering designer series paper with the sentiments from the Citrus Blooms stamp sets for a simple fun fold Hello card. You can find the supplies I used along with card stock cuts at the bottom of my post.

We have a or challenge this week and it’s perfect for the Wildly Flowering designer series paper!

I cut panels of Moody Mauve Wildly Flowering designer series paper and adhered them to Misty Moonlight mats before adhering them to the inside and front flap of a Moody Mauve card base. Instead of using a Moody Mauve panel, I cut a Misty Moonlight panel to adhere to the front flap. I cut a panel of Moody Mauve DSP and adhered it to the Misty Moonlight panel with liquid glue. And I used the panel without the little bouquets.

I cut a Misty Moonlight panel with the scalloped frame die from the Stampin’ Up! Wildflower Designs dies and adhered it to the panel with dimensionals. I used the small hexagon panel to cut a panel of Wildly Flowering DSP and adhered it to the center with liquid glue.

I stamped the hello sentiment from the Citrus Blooms stamp set using Versamark ink on a Misty Moonlight panel. I sprinkled it with white embossing powder and shook off the excess. I heated the powder with my heat tool until it was bright and shiny and cut it out with the little diamond die from the Unbounded Love dies. I made a bow with linen thread and adhered it to the back of the label and adhered the label to the card front with Dimensionals and glue dots. I finished the card with Moody Mauve dots.

For the Inside of the card, I stamped the sentiment from the Citrus Blooms stamp set in Misty Moonlight ink on a Basic White panel. I used Crumb Cake ink to ink up the flower from the Stampin’ Up! Wildflower Designs stamp set and stamped it off before stamping it over the sentiment. I adhered the panel to the inside panel with liquid glue, being careful to line it up under the front panel so is hidden when the card is closed.

I love how the Stampin’ Up! Wildflower Designs bundle looks with the Wildly Flowering DSP and I finally figured out why I love this paper so much. It looks just like wallpaper I had in my house 30 years ago! Definitely vintage! LOL.

On with the Hop! Click on the Next Blog button to move forward to see the beautiful project Karen Ksenzakovic has created.

If you get lost along the way, here are the participants for the hop:


Current Host Code: 37AE7ZXV

Use this host code when you order $50 or more and receive a free gift from me!  The free gift is your choice of any item currently available valued up to $10.00!

If your order is over $150, please do not use the host code since you’ll receive your own Host Dollars plus I’ll still send you the free gift!  This host code can be used by anyone, no club or commitment required. Let me know if you have any questions.


If you need any stamping supplies, I’d be very happy to be your Demonstrator.  Just click on the Shop Now button on the right side of the screen to go directly to my online store or contact me if you have any questions. 

Thanks for stopping by and Happy Stamping!

Akiko

  • Visit my online store here
  • See the current Stampin’ Up! clearance rack specials here
  • Earn FREE Stampin’ Up! products through my Wildflower Frequent Shopper Program – my way of saying thank you to my online frequent shopper customers.
  • Have any questions? I’d be happy to help, click here to contact me.

Cardstock Cuts for this project:

  • Moody Mauve – 4-1/4″ x 8-1/4″ card base, scored 2-3/4″
  • Misty Moonlight – 4″ x 5-1/4″ (inside mat), 2-1/2″ x 4″ (front flap mat), 2-3/4″ x 4-1/4″ (front panel), 3″ x 4-1/4″ (scalloped frame die cut), 1-1/4″ x 1-3/4″ (label)
  • Basic White – 2-5/8″ x 4-1/8″ (inside panel)
  • Wildly Flowering DSP – 3-7/8″ x 5-1/8″ (inside background), 2-3/8″ x 3-7/8″ (front flap background), 2-5/8″ x 4-1/8″ (front panel background), 2-1/4″ x 3-1/2″ (die cut middle panel)

Stampin’ Up! products used in this project:


Stampin’ Up! Wildflower Designs Gate Fold Card

Good Morning! I I really love the Wildly Flowering designer series paper and I wanted to use the Wild Wheat pattern with the Stampin’ Up! Wildflower Designs stamp set. So I made this gatefold card to step it up a bit while still keeping it simple and showing off the pretty DSP. You can find the products I used at the bottom of my post along with the card stock sizes.

I embossed a Wild Wheat panel with the Dashing Designs 3D embossing folder and cut the panel in half. I adhered each embossed panel to the front flaps of my gatefold card base with liquid glue.

I cut my DSP panel into thirds and adhered them to an Early Espresso mat, starting at each end and adhering the middle panel last. I was careful to keep the panels in order, so that the design would flow continuously. I adhered the panel to the left side of the gatefold card with liquid glue.

I stamped the sentiment from the Stampin’ Up! Wildflower Designs stamp set in Early Espresso ink on Basic White and cut it out with the large rectangle label die from the Wild Ferns dies. I colored a length of white baker’s twine with my Mossy Meadow Stampin’ Blend and made a bow that I adhered to the back of the label with a glue dot. I adhered the label to the left flap of the card with dimensionals and finished with three textured dots.

For the inside of the card I stamped the the little flower from the Stampin’ Up! Wildflower Designs stamp set in Early Espresso ink on the top of a Basic White panel. I trimmed the bottom with a strip of DSP and adhered the panel to the inside of the card with Stampin’ Seal.

This is really a simple fun fold card that shows off the pretty DSP. The Wildly Flowering designer series paper has such a vintage feel – perhaps because of the color palette. But it is one of my favorites. And I need to use the pretty dies in the Stampin’ Up! Wildflower Designs bundle soon, because they’re just awesome!


Bonus Days Earning Period Ends Soon!

It’s time for one of our favorite promotions—BONUS DAYS! Because do you know what’s a great deal? Getting rewarded for all the crafting supplies you’re already going to buy! When you shop between 3–31 July and spend $50 you will earn a $5 coupon! Make sure you save all your coupons because you can redeem them (and we mean ALL of them) between August 1 and August 31. There’s no limit to how many coupons you can earn! 

Promotion Details:

Earning Period: July 3 – July 31 2024

  • Earn a $5 coupon for every $50 spent (before shipping and tax). 
  • All coupon codes will be emailed right after a qualifying purchase has been made. Customers must have a customer account with a valid email address to earn coupons when they shop. If you don’t already have an account, you can easily create one in the Online store – contact me if you have any questions. 
  • If you earn multiple codes from a single order, you will receive one email with multiple codes. If you earn multiple codes from multiple orders, you will receive separate emails for each code earned.
  • All order types qualify for this promotion. Phone and email orders still require an email address.
  • Orders started before the promotion begins will not count toward earning coupon codes. For example, if you add items to your cart before July 3 and wait to purchase until that date or later, then those items will not qualify towards earning coupons. You must add items to your cart and complete your purchase during the earning period. 
  • There is no limit to the number of coupon codes participants can earn per order or throughout the duration of the earning period. 
  • Customers must use a valid email address during checkout in order to receive their coupon code. If a customer places an order over the phone, they must still provide a valid email address to receive their coupon code.
  • Starter Kit orders are excluded from this offer.

Redemption Period: August 1 – August 31, 2024

  • There is no limit to the number of coupon codes you can redeem on an order during the redemption period. If using multiple codes, they must be separated by a space. 
  • Coupon codes may be redeemed one time only. They cannot be redeemed after August 31, 2024.
  • Coupon codes may be redeemed for any product (excluding Starter Kits). They cannot be used on exchanges.
  • Bonus Days coupon codes can be applied to month-to-month Paper Pumpkin subscriptions and new prepaid subscriptions.

Current Host Code: DWUSFG7T

Use this host code when you order $50 or more and receive a Thank You gift from me!  The free gift is your choice of any item currently available valued up to $10.00.

If your order is over $150, please do not use the host code since you’ll receive your own Host Dollars plus I’ll still send you the Thank You gift!  This host code can be used by anyone, no club or commitment required. Let me know if you have any questions.


If you need any stamping supplies, I’d be very happy to be your Demonstrator.  Just click on the Shop Now Button on the right side of the screen to go directly to my Online store or contact me if you have any questions.  Happy Stamping!

Thanks for stopping by and have a great day!

Akiko

  • Visit my online store here
  • See the current Stampin’ Up! clearance rack specials here
  • Earn FREE Stampin’ Up! products through my Wildflower Frequent Shopper Program – my way of saying thank you to my online frequent shopper customers.
  • Have any questions? I’d be happy to help, click here to contact me.

Cardstock Cuts for this project:

  • Wild Wheat – 5-1/2″ x 8-1/2″ card base scored at 2-1/8″ and 6-3/8″, 4″ x 5-3/8″ panel embossed and cut in half (two 2″ x 5-3/8″ embossed panels)
  • Early Espresso – 3-1/4″ x 4-1/8″ (DSP mat)
  • Basic White – 5″ x 5-1/4″ (inside panel), 1-1/2″ x 3″ (label)
  • Wildly Flowering DSP – 3″ x 4″ (DSP panel, cut in thirds for three 1″ x 4″ panels), 1/2″ x 4″ (inside trim)

Stampin’ Up! products used in this project:


Stampin’ Up! Flowers Of Beauty for the Happy Inkin’ Thursday Blog Hop

Good Morning and welcome to the Happy Inkin’ Thursday Blog Hop! I was so inspired by this month’s Paper Pumpkin kit so I decided to use the Stampin’ Up! Flowers of Beauty bundle to make a card using some of the same design elements. And I combined them with a simple fun fold technique to make a book fold card. You can find the supplies I used along with card stock cuts at the bottom of my post.

We have a pretty color challenge this week that uses the new In Colors:

I embossed panels of Unbounded Beauty designer series paper with the diamond pattern in the Fun Patterns embossing folder. I adhered the large panel to the book end of a Summer Splash card base and adhered the end shut with liquid glue. I adhered a floral pattern of the DSP to the main card front. I adhered a small strip of embossed DSP to the lower right corner of the front panel to pop the sentiment. I used the two largest circles from the Stylish Shapes dies to cut a Sunny Splash circle and adhered it to the card with pieces of dimensionals.

I stamped the flowers and leaves from the Stampin’ Up! Flowers of Beauty stamp set using Petunia Pop, Peach Pie and Summer Splash inks on Basic White. These are two step stamps and I stamped the detailed images first full strength and then the background images using stamped off ink. I cut them out with the coordinating dies and adhered the leaves to the back of the flowers with glue dots. Then I adhered the flowers to the card with dimensionals.

I stamped the sentiment from the Unbounded Love stamp set in Berry Burst ink on Basic White and cut it out with my paper snips. I adhered it to the card with dimensionals and glue dots. I added three Pretty In Pink shimmer dots to the card and wrapped the binding with Summer Splash ribbon, tying a bow.

I left the inside of the card simple, trimming a Basic White panel with embossed DSP and adhereing the panel to the inside of the card with Stampin’ Seal.

The book fold design is a simple fun fold that makes your card extra special.

On with the Hop! Click on the Next Blog button to move forward to see the beautiful project Karen Ksenzakovic has created.

If you get lost along the way, here are the participants for the hop:


Current Host Code: DWUSFG7T

Use this host code when you order $50 or more and receive a free gift from me!  The free gift is your choice of any item currently available valued up to $10.00!

If your order is over $150, please do not use the host code since you’ll receive your own Host Dollars plus I’ll still send you the free gift!  This host code can be used by anyone, no club or commitment required. Let me know if you have any questions.


If you need any stamping supplies, I’d be very happy to be your Demonstrator.  Just click on the Shop Now button on the right side of the screen to go directly to my online store or contact me if you have any questions. 

Thanks for stopping by and Happy Stamping!

Akiko

  • Visit my online store here
  • See the current Stampin’ Up! clearance rack specials here
  • Earn FREE Stampin’ Up! products through my Wildflower Frequent Shopper Program – my way of saying thank you to my online frequent shopper customers.
  • Have any questions? I’d be happy to help, click here to contact me.

Cardstock Cuts for this project:

  • Summer Splash – 4-1/4″ x 11″” card base, scored at 4-1/4″ and 5-1/2″, 3-1/4″ x 3-1/4″ (die cut circle)
  • Basic White – 4″ x 4″ (inside panel), 3″ x 4″ (die cut flowers and leaves), 1″ x 2″ (label)
  • Unbounded Love DSP – 4″ x 4″ (front background), 1″ x 4″ (embossed front), 1/2″ x 2″ (embossed label mat), 1/2″ x 4″ (embossed inside trim)

Stampin’ Up! products used in this project:


Stampin’ Up! Thoughtful Wishes Thinking of You Card

Good Morning! The Stampin’ Up! Thoughtful Wishes bundle and Thoughtful Journey 6″ x6″ designer series paper are gorgeous products and I used them to make a simple Z-fold Thinking of you card. You can find the products I used at the bottom of my post along with the card stock sizes.

I adhered a panel of Thoughtful Journey 6″ x 6″ designer series paper to the left panel of a Lost Lagoon Z-fold card base with liquid glue. I used the thistle dies from the Stampin’ Up! Thoughtful Wishes dies to cut Fresh Freesia and Mossy Meadow panels and adhered them together with small dots of liquid glue. I adhered the die cut to the card front with glue dots.

I stamped the sentiment from the Stampin’ Up! Thoughtful Wishes stamp set using Mossy Meadow ink on Wild Wheat card stock. I cut it out with the small fat banner die from the Stylish Shapes dies. I cut a Fresh Freesia panel with the small thin banner die and cut it in half and adhered the pieces to the back of the sentiment label with liquid glue.

I made a loopy bow with Linen Thread and adhered it to the back of the label with a glue dot. I adhered the label to the card with dimensionals and finished the card front with fresh freesia dots.

For the inside of the card I stamped the sentiment from the Stampin’ Up! Thoughtful Wishes stamp set using Mossy Meadow ink on the side of a Basic White panel. I trimmed thr panel with the thin Thoughtful Journey DSP panel and adhered the panel to the inside of the card with Stampin’ Seal. I love how you can see the wide image when the card is open!

The Stampin’ Up! Thoughtful Wishes bundle coordinates so well with the beautiful Thoughtful Journey 6″ x 6″ DSP. This simple fun fold lets the pretty DSP be the star!


Bonus Days Coming July 3, 2024!

It’s time for one of our favorite promotions—BONUS DAYS! Because do you know what’s a great deal? Getting rewarded for all the crafting supplies you’re already going to buy! When you shop between 3–31 July and spend $50 you will earn a $5 coupon! Make sure you save all your coupons because you can redeem them (and we mean ALL of them) between August 1 and August 31. There’s no limit to how many coupons you can earn! 

Promotion Details:

Earning Period: July 3 – July 31 2024

  • Earn a $5 coupon for every $50 spent (before shipping and tax). 
  • All coupon codes will be emailed right after a qualifying purchase has been made. Customers must have a customer account with a valid email address to earn coupons when they shop. If you don’t already have an account, you can easily create one in the Online store – contact me if you have any questions. 
  • If you earn multiple codes from a single order, you will receive one email with multiple codes. If you earn multiple codes from multiple orders, you will receive separate emails for each code earned.
  • All order types qualify for this promotion. Phone and email orders still require an email address.
  • Orders started before the promotion begins will not count toward earning coupon codes. For example, if you add items to your cart before July 3 and wait to purchase until that date or later, then those items will not qualify towards earning coupons. You must add items to your cart and complete your purchase during the earning period. 
  • There is no limit to the number of coupon codes participants can earn per order or throughout the duration of the earning period. 
  • Customers must use a valid email address during checkout in order to receive their coupon code. If a customer places an order over the phone, they must still provide a valid email address to receive their coupon code.
  • Starter Kit orders are excluded from this offer.

Redemption Period: August 1 – August 31, 2024

  • There is no limit to the number of coupon codes you can redeem on an order during the redemption period. If using multiple codes, they must be separated by a space. 
  • Coupon codes may be redeemed one time only. They cannot be redeemed after August 31, 2024.
  • Coupon codes may be redeemed for any product (excluding Starter Kits). They cannot be used on exchanges.
  • Bonus Days coupon codes can be applied to month-to-month Paper Pumpkin subscriptions and new prepaid subscriptions.

New Online Exclusives Available Now!

A new selection of Online Exclusive products was just introduced. Online Exclusives won’t appear in any catalog and are only available in the Online Store. There is no fixed end date for Online Exclusives! Some products will be reordered when inventory is low, and others will only be available while supplies last. This way Stampin’ Up! can offer even more new products throughout the year.

This release includes several items to get an early start on Fall and Christmas crafting. So check them out!


Current Host Code: XQZKDQU9

Use this host code when you order $50 or more and receive a Thank You gift from me!  The free gift is your choice of any item currently available valued up to $10.00.

If your order is over $150, please do not use the host code since you’ll receive your own Host Dollars plus I’ll still send you the Thank You gift!  This host code can be used by anyone, no club or commitment required. Let me know if you have any questions.


If you need any stamping supplies, I’d be very happy to be your Demonstrator.  Just click on the Shop Now Button on the right side of the screen to go directly to my Online store or contact me if you have any questions.  Happy Stamping!

Thanks for stopping by and have a great day!

Akiko

  • Visit my online store here
  • See the current Stampin’ Up! clearance rack specials here
  • Earn FREE Stampin’ Up! products through my Wildflower Frequent Shopper Program – my way of saying thank you to my online frequent shopper customers.
  • Have any questions? I’d be happy to help, click here to contact me.

Cardstock Cuts for this project:

  • Lost Lagoon – 5-1/2″ x 8-1/2″ card base scored at 2-1/8″ and 4-1/4″
  • Mossy Meadow – 1-3/4″ x 3-1/2″ (die cut thistle)
  • Fresh Freesia – 1-3/4″ x 3-3/4″ (die cut thistle), 1″ x 2″ (label banner)
  • Wild Wheat – 1-1/4″ x 2-3/4″ (label)
  • Basic White – 4″ x 5-1/4″ (inside panel)
  • Thoughtful Journey 6″ x6″ DSP – 4″ x 5-1/4″ (front background), 1-3/4″ x 5-1/4″ (inside panel)

Stampin’ Up! products used in this project:


Stampin’ Up! Flowers of Beauty Love Card

Good Morning! Here’s a simple fun fold Love card using the Stampin’ Up! Flowers Of Beauty bundle with the Wildly Flowering designer series paper. I also used the beautiful Unbounded Love bundle to make the pretty layered sentiment label. You can find the products I used at the bottom of my post along with the card stock sizes.

I adhered a panel of Wildly Flowering designer series paper to Moody Mauve card base and another panel to the front of the Boho Blue mini card base. I adhered the mini card to thelarger card base with Tear & Tape. I cut a Basic White panel with the foliage die from the Stampin’ Up! Flowers Of Beauty dies and adhered it to the mini card base with glue dots.

I stamped the sentiment from the Unbounded Love stamp set on the right side of the Crumb Cake panel using Early Espresso ink and cut it out with the scalloped oval die. I cut a Basic White panel with the small scalloped oval die and adhered it to the label with liquid glue. I adhered the layered oval die cuts to the right side of the mini card base with dimensionals.

I stamped The small flower outline stamp from the Stampin’ Up! Flowers Of Beauty stamp set four times using Moody Mauve ink on Basic White.   I stamped the filler die on each flower using stamped off Moody Mauve ink and cut the flowers out with the coordinating die.  I used the small leaf die from the Unbounded Love dies to cut two leaves from Old Olive. I adhered one leaf to label with liquid glue and adhered three flowers with glue dots and dimensionals. I finished the cars with textured dots.

For the inside of the card I adhered the die cut flower and leaf to a Basic White panel. I stamped the sentiment from the Unbounded Love stamp set using Early Espresso ink and adhered the panel to the inside of the mini card with Stampin’ Seal.

I love the vintage feel of the Wildly flowering DSP. So I wanted to use it with the Stampin’ Up! Flowers Of Beauty stamp set. And I love it with the pretty scalloped label from the Unbounded Love bundle!


Bonus Days Going On Now!

It’s time for one of our favorite promotions—BONUS DAYS! Because do you know what’s a great deal? Getting rewarded for all the crafting supplies you’re already going to buy! When you shop between 3–31 July and spend $50 you will earn a $5 coupon! Make sure you save all your coupons because you can redeem them (and we mean ALL of them) between August 1 and August 31. There’s no limit to how many coupons you can earn! 

Promotion Details:

Earning Period: July 3 – July 31 2024

  • Earn a $5 coupon for every $50 spent (before shipping and tax). 
  • All coupon codes will be emailed right after a qualifying purchase has been made. Customers must have a customer account with a valid email address to earn coupons when they shop. If you don’t already have an account, you can easily create one in the Online store – contact me if you have any questions. 
  • If you earn multiple codes from a single order, you will receive one email with multiple codes. If you earn multiple codes from multiple orders, you will receive separate emails for each code earned.
  • All order types qualify for this promotion. Phone and email orders still require an email address.
  • Orders started before the promotion begins will not count toward earning coupon codes. For example, if you add items to your cart before July 3 and wait to purchase until that date or later, then those items will not qualify towards earning coupons. You must add items to your cart and complete your purchase during the earning period. 
  • There is no limit to the number of coupon codes participants can earn per order or throughout the duration of the earning period. 
  • Customers must use a valid email address during checkout in order to receive their coupon code. If a customer places an order over the phone, they must still provide a valid email address to receive their coupon code.
  • Starter Kit orders are excluded from this offer.

Redemption Period: August 1 – August 31, 2024

  • There is no limit to the number of coupon codes you can redeem on an order during the redemption period. If using multiple codes, they must be separated by a space. 
  • Coupon codes may be redeemed one time only. They cannot be redeemed after August 31, 2024.
  • Coupon codes may be redeemed for any product (excluding Starter Kits). They cannot be used on exchanges.
  • Bonus Days coupon codes can be applied to month-to-month Paper Pumpkin subscriptions and new prepaid subscriptions.

Current Host Code: XQZKDQU9

Use this host code when you order $50 or more and receive a Thank You gift from me!  The free gift is your choice of any item currently available valued up to $10.00.

If your order is over $150, please do not use the host code since you’ll receive your own Host Dollars plus I’ll still send you the Thank You gift!  This host code can be used by anyone, no club or commitment required. Let me know if you have any questions.


If you need any stamping supplies, I’d be very happy to be your Demonstrator.  Just click on the Shop Now Button on the right side of the screen to go directly to my Online store or contact me if you have any questions.  Happy Stamping!

Thanks for stopping by and have a great day!

Akiko

  • Visit my online store here
  • See the current Stampin’ Up! clearance rack specials here
  • Earn FREE Stampin’ Up! products through my Wildflower Frequent Shopper Program – my way of saying thank you to my online frequent shopper customers.
  • Have any questions? I’d be happy to help, click here to contact me.

Cardstock Cuts for this project:

  • Moody Mauve – 4-1/4″ x 5-1/2″ card base
  • Boho Blue – 3″ x 8-1/2″ mini card base, scored at 4-1/4″
  • Crumb Cake – 2″ x 3 (label)
  • Old Olive – 1″ x 3″ (die cut leaves)
  • Basic White – 2-3/4″ x 4″ (inside panel), 2-1/4″ x 3-1/2″ (die cut foliage), 1-3/4″ x 2-1/2″ (scalloped oval trim), 1-1/4″ x 4-1/2″ (die cut flowers)
  • Wildly Flowering DSP – 4″ x 5-1/4″ (front background), 2-3/4″ x 4″ (mini card background)

Stampin’ Up! products used in this project:


Stampin’ Up! Ice Cream Swirl for the Happy Inkin’ Thursday Blog Hop

Good Morning and welcome to the Happy Inkin’ Thursday Blog Hop! Last week I spent a couple of days in Ocean City, MD with my visiting family, and you guessed it, we had ice cream. So I had to use the Stampin’ Up! Ice Cream Swirl bundle to make a card. And I wanted beachy colors, so I used the Sketched Plaid background stamp to make ‘DSP’ for the background. You can find the supplies I used along with card stock cuts at the bottom of my post.

We have a theme challenge this week and no veggies or fruits, but ice cream is a food, so yay!

I stamped the sketched plaid background stamp in Azure Afternoon ink on a Basic White panel and colored the stripes with Stampin’ Blends. I used light Pretty In Pink, light Shy Shamrock, light Granny Apple Green and dark Fresh Freesia for the horizontal stripes and dark Lemon Lolly, light Azure Afternoon, light Peach Pie and light Summer Splash for the vertical stripes. I just colored the stripes and I wasn’t too careful. I adhered the stamped panel to a Pretty In Pink mat and to the front of a Shy Shamrock Z-Fold card base with liquid glue. I also stamped and colored a panel for the middle of the card and for the inside panel trim.

I used the Stampin’ Up! Ice Cream Swirl dies to cut my ice cream, using Peach Pie for the background die and Basic White for the detailed die. This is exactly like the Creamsicle/Vanilla cone I had at the beach (my husband had chocolate/vanilla swirl). I stamped the cone using Pecan Pie ink on Crumb Cake and cut it out with the coordinating die. I adhered the ice cream cone die cuts together and popped it on the card front with dimensionals.

I stamped the sentiment from the Stampin’ Up! Ice Cream Swirl stamp set using Azure Afternoon ink on Pretty In Pink card stock. I cut it out with the small circle from the Unbounded Love dies and adhered it to the larger circle cut from Shy Shamrock card stock. I adhered a folded length of Azure Afternoon ribbon to the back and adhered it to the card with dimensionals. I used Shiny Sequins as sprinkles on my ice cream.

For the inside of the card, I stamped the sentiment from the Stampin’ Up! Ice Cream Swirl stamp set using Azure Afternoon ink. I adhered a strip of my stamped and colored plaid to the bottom and adhered the panel to the inside of the card with Stampin’ Seal. You can see the last panel on the left side – this is the middle section of the Z-Fold.

With Summer upon us, it’s time for ice cream – cones, sandwiches, sundaes, any ways. And the Stampin’ Up! Ice Cream Swirl bundle is perfect to celebrate. And OK, fruits and veggies are good too.

On with the Hop! Click on the Next Blog button to move forward to see the beautiful project Karen Ksenzakovic has created.

If you get lost along the way, here are the participants for the hop:


Current Host Code: XQZKDQU9

Use this host code when you order $50 or more and receive a free gift from me!  The free gift is your choice of any item currently available valued up to $10.00!

If your order is over $150, please do not use the host code since you’ll receive your own Host Dollars plus I’ll still send you the free gift!  This host code can be used by anyone, no club or commitment required. Let me know if you have any questions.


If you need any stamping supplies, I’d be very happy to be your Demonstrator.  Just click on the Shop Now button on the right side of the screen to go directly to my online store or contact me if you have any questions. 

Thanks for stopping by and Happy Stamping!

Akiko

  • Visit my online store here
  • See the current Stampin’ Up! clearance rack specials here
  • Earn FREE Stampin’ Up! products through my Wildflower Frequent Shopper Program – my way of saying thank you to my online frequent shopper customers.
  • Have any questions? I’d be happy to help, click here to contact me.

Cardstock Cuts for this project:

  • Shy Shamrock – 5-1/2″ x 8-1/2″ card base, scored at 2-1/8″ and 5-1/2″, 1-1/2″ x 1-1/2″ (label mat)
  • Pretty In Pink – 1-1/2″ x 1-1/2″ (label)
  • Peach Pie – 3″ x 3-1/4″ (ice cream die cut)
  • Crumb Cake – 2-1/2″ x 3-1/4″ (cone die cut)
  • Basic White – 3-3/4″ x 5″ (inside panel), 3-7/8″ x 5-1/8″ (stamped front background), 1-7/8″ x 5-1/4″ (stamped middle panel), 1/2″ x 3-3/4″ (stamped inside trim), 2-1/2″ x 3″ (ice cream die cut)

Stampin’ Up! products used in this project: