Stampin’ Up! Adventurous Sky Birthday Card

Good Morning! Here’s a fun masculine fun fold birthday card made with the awesome Stampin’ Up! Adventurous Sky bundle and the wonderful Take To The Sky designer series paper. I was inspired by a card made by my Inkin’ Krew teammate Tara Carpenter a few weeks ago and you can find her card HERE (she has a video, too!). You can find the products I used at the bottom of my post along with the card stock sizes.

I scored and burnished a panel of Take To The Sky designer series paper to make an accordion card base and adhered it to a Copper Clay card base panel. I cut another panel of the DSP with the largest circle in the Stylish Shapes dies. I traced the outside of the die on a Misty Moonlight panel and fussy cut it with my paper snip to make a mat and adhered the die cut to the mat with liquid glue. I adhered it to the front middle section of the card.

I used the large bi-plane dies from the Stampin’ Up! Adventurous Sky dies to cut the body of the plane from Copper Clay and the wings and propeller from Gray Granite. I used a black Stampin’ Write marker to color the wheels and adhered the die cuts together with liquid glue. I popped the plane on the card front with dimensionals. I stamped the sentiment from the Stampin’ Up! Adventurous Sky stamp set in Misty Moonlight ink on Basic White and cut it out with the banner die. I adhered it to the card with glue dots and finished it with an industrial trinket.

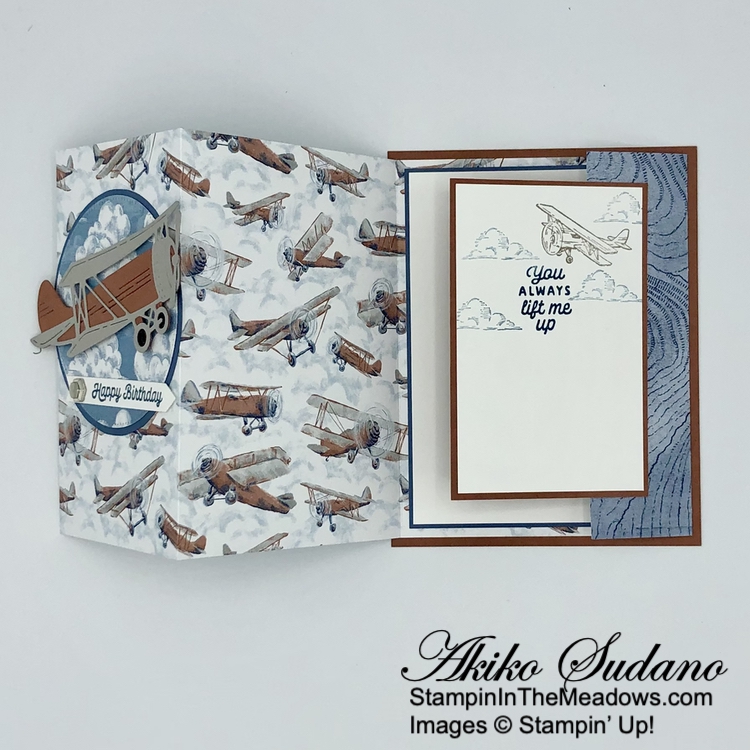
I stamped the sentiment from the Stampin’ Up Adventurous Sky stamp set using Misty Moonlight ink on a Basic White panel. I stamped the small bi-plane using Gray Granite ink and stamped several clouds using twice stamped off Misty Moonlight ink. I adhered the panel to a Copper Clay mat and adhered the layered panel to the little flap, being careful to only use liquid glue on the edge. I love this extra panel, it really makes the card special!

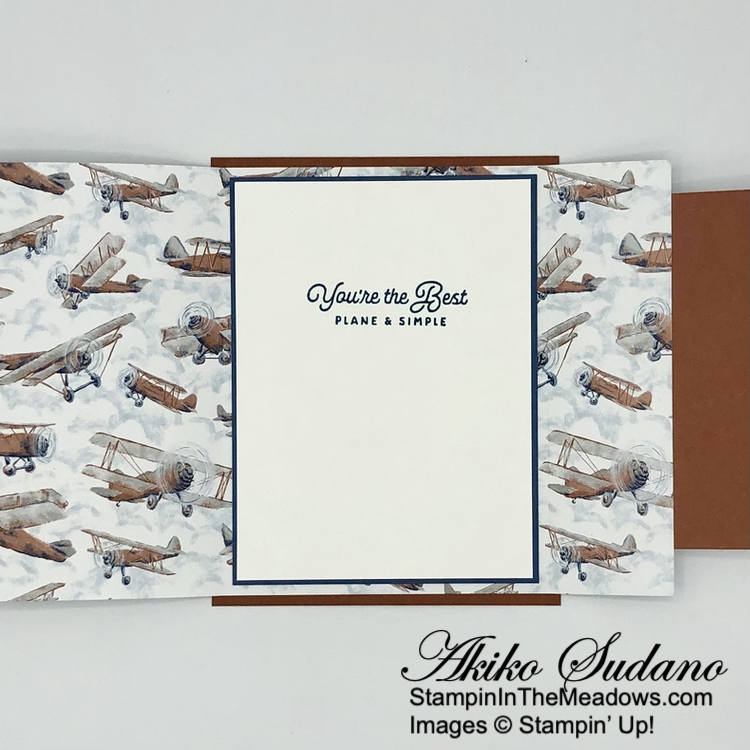
For the inside of the card, I stamped the sentiment from the Stampin’ Up! Adventurous Sky stamp set using Misty Moonlight ink on a Basic White panel. I adhered it to a Misty Moonlight mat before adhering it to the inside of the card with Stampin’ Seal.

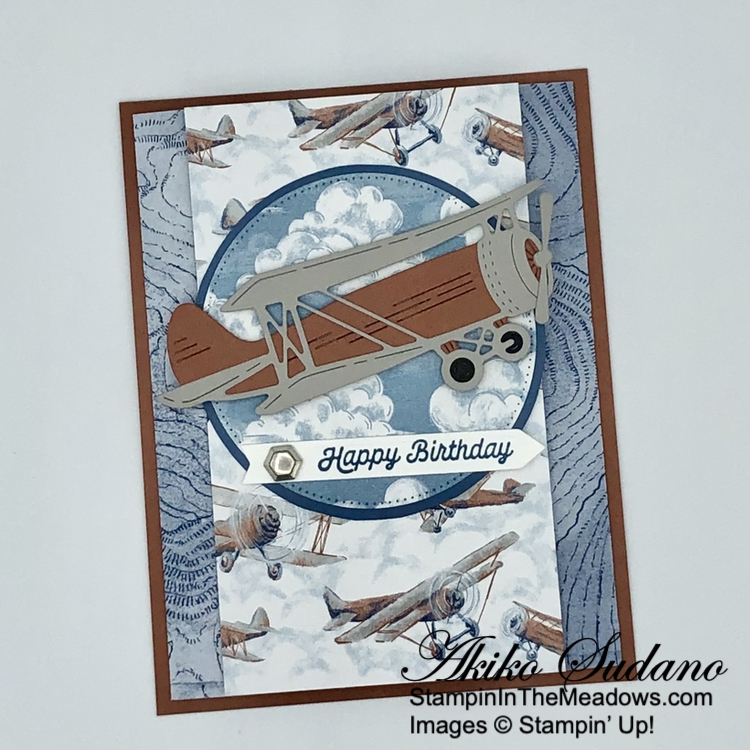
The Stampin’ Up! Adventurous Sky bundle is perfect for flying fanatics, or someone who likes vintage machines. And this wonderful fun fold really allows the pretty DSP images to shine. The Take To The Sky designer series paper is included in the August DSP sale, but hurry, because the sale is ending soon.


Time to Redeem Bonus Days Coupons!

It’s time to redeem Bonus Days Coupons. All the coupons that you earned in July can be redeemed through August 31! 

Promotion Details:

  • There is no limit to the number of coupon codes you can redeem on an order during the redemption period. If using multiple codes, they must be separated by a space. 
  • Coupon codes may be redeemed one time only. They cannot be redeemed after August 31, 2024.
  • Coupon codes may be redeemed for any product (excluding Starter Kits). They cannot be used on exchanges.
  • Bonus Days coupon codes can be applied to month-to-month Paper Pumpkin subscriptions and new prepaid subscriptions.

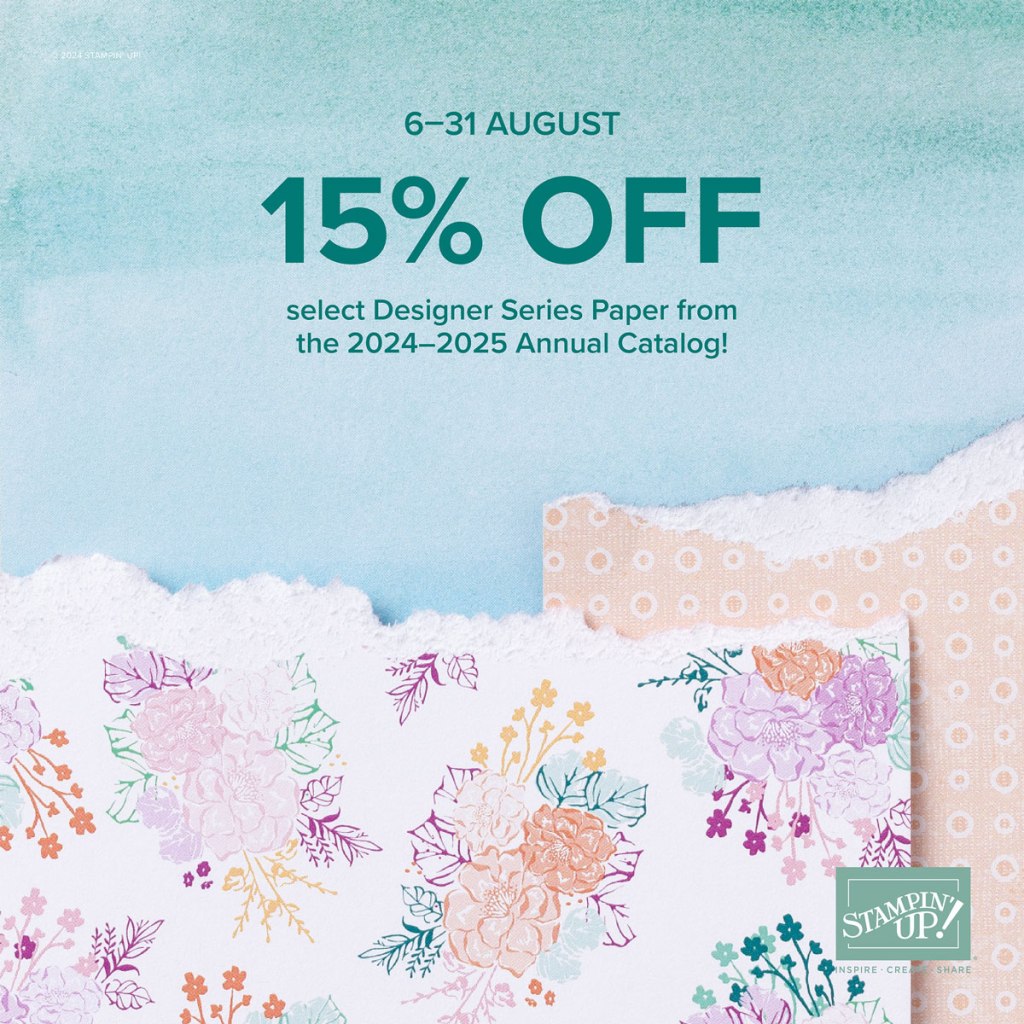
Designer Series Paper Sale This Month!

This month, you can shop select Designers Series Paper from the 2024–2025 Annual Catalog at 15% off! It’s the perfect time to stock up and save on your favorite paper.

Stampin’ Up! Designer Series Paper is perfect for card making, gift packaging, scrapbooking, and more! The in-house artists create Designer Series Paper using different mediums. They work to create paper for every design you’d need for your paper crafts. Some of the designs coordinate with different products, such as die cuts and punches. It’s also made up of Stampin’ Up! colors, ensuring perfect color coordination with other products.

Promotion Details:

  • Sales Period: August 6, 2024 – August 31, 2024
  • Specialty paper, cardstock assortments, Designer Series Paper stacks, and paper not yet live is not included in the sale.
  • Customers must open and close the order during the allotted dates to receive the discount. 
  • There are NO limits on ordering. However, product is only available while supplies last. 
  • Designer Series Paper purchased with Stampin’ Rewards or as part of a Starter Kit WILL qualify for the discount.  
  • Ordering Deadline: August 31, 2024 at 11:59 PM (MT)

Click on the image below to download a PDF with the details and the lists of Designer Series Paper that are included in the sale:

While there are no limits to order quantity, product is only available while supplies last.


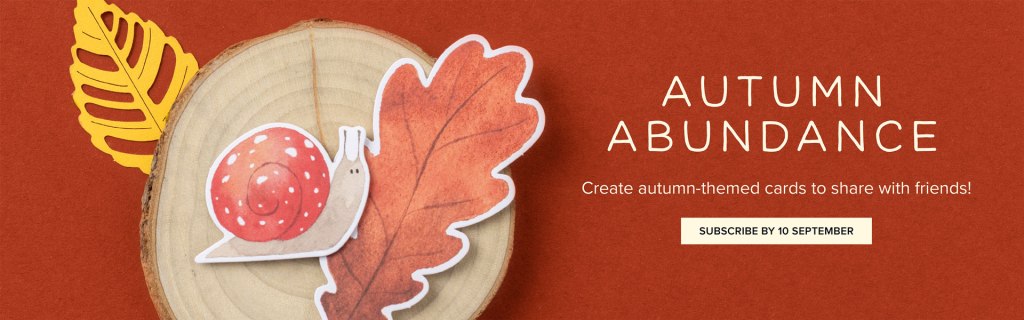
The September Paper Pumpkin Kit – Autumn Abundance!

Share your love for all things Autumn with the September Paper Pumpkin kit!

  • Makes 9 cards: 3 each of 3 designs with 9 coordinating envelopes
  • Project includes printed card bases, coordinating envelopes, and labels
  • Laser cut card fronts, a watercolored ephemera pack, and embellishments
  • Cajun Craze Classic Stampin’ Spot

Coordinating Colors: Cajun Craze, Crushed Curry, Poppy Parade, Pumpkin Pie, Very Vanilla, Wild Wheat

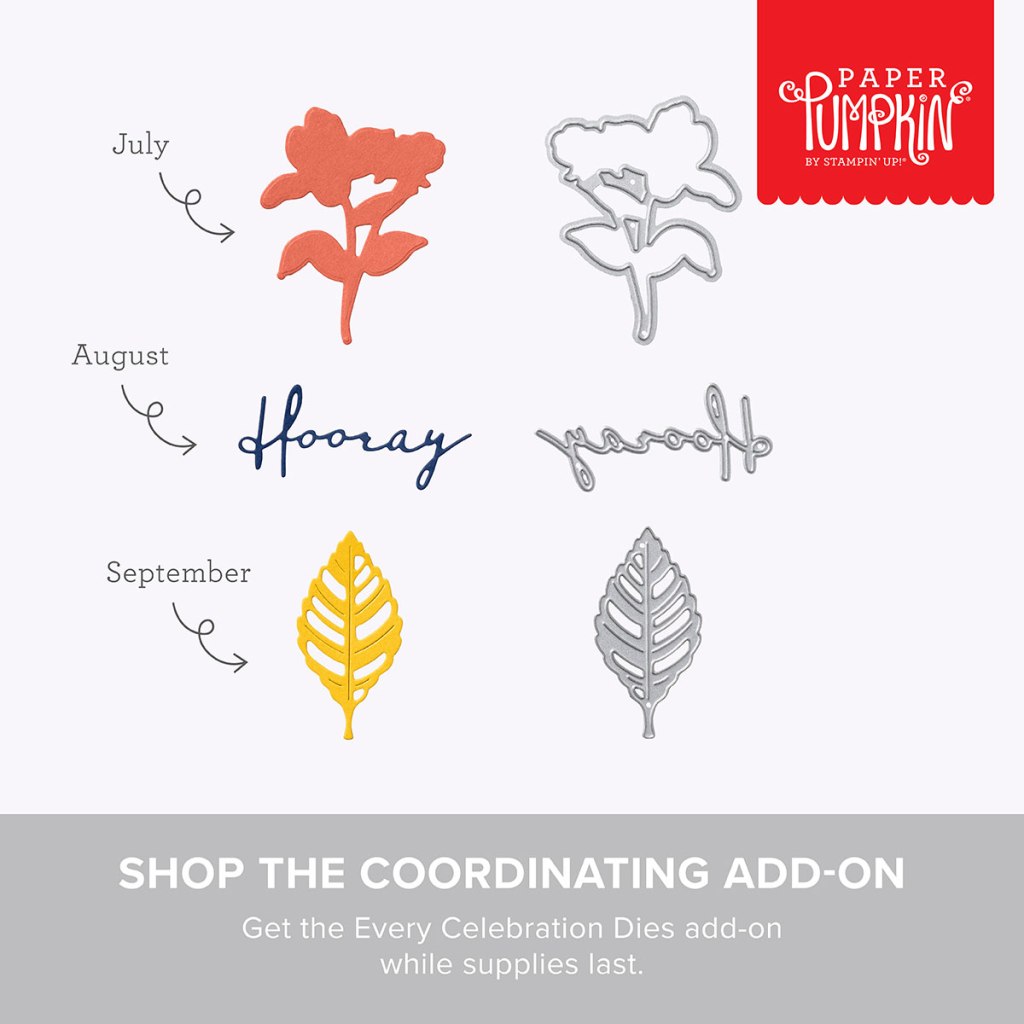
And the coordinating add-on is the Every Celebration dies – item #164991 for $12.

If you’re interested in subscribing to Paper Pumpkin, you can either sign up for a subscription where you are billed monthly for your kit or you can purchase a prepaid subscription in my Online Store. To see more information and to sign up for the monthly subscription click here. To see the options for prepaid subscriptions in my Online Store, click here.

Sign up deadline for the August 2024 kit is August 10, 2024. Note: Supplies may be limited toward the end of the subscription period.


Current Host Code: 37AE7ZXV

Use this host code when you order $50 or more and receive a Thank You gift from me!  The free gift is your choice of any item currently available valued up to $10.00.

If your order is over $150, please do not use the host code since you’ll receive your own Host Dollars plus I’ll still send you the Thank You gift!  This host code can be used by anyone, no club or commitment required. Let me know if you have any questions.


If you need any stamping supplies, I’d be very happy to be your Demonstrator.  Just click on the Shop Now Button on the right side of the screen to go directly to my Online store or contact me if you have any questions.  Happy Stamping!

Thanks for stopping by and have a great day!

Akiko

  • Visit my online store here
  • See the current Stampin’ Up! clearance rack specials here
  • Earn FREE Stampin’ Up! products through my Wildflower Frequent Shopper Program – my way of saying thank you to my online frequent shopper customers.
  • Have any questions? I’d be happy to help, click here to contact me.

Cardstock Cuts for this project:

  • Copper Clay – 4-1/4″ x 5-1/2″ (card base), 2-3/4″ x 4-1/4″ (middle panel mat), 1-3/4″ x 4-1/4″ (plane body)
  • Gray Granite – 1-3/4″ x 4-1/4″ (plane wings), 3/4″ x 1-1/2″ (propeller)
  • Misty Moonlight – 3-1/2″ x 3-1/2″ (fussy cut circle), 3-3/4″ x 5″ (inside panel mat)
  • Basic White – 2-3/4″ x 4-3/4″ (middle panel), 3-5/8″ x 4-7/8″ (inside panel), 3/4″ x 3″ (label)
  • Take To The Sky DSP – 5-1/4″ x 12″ scored at 3″ , 6- 1/2″ and 10-1/2″ (DSP accordion), 3-1/4″ x 3-1/4″ (die cut circle

Stampin’ Up! products used in this project:


Stampin’ Up! Something For Everything Birthday Card for the Happy Inkin’ Thursday Blog Hop

Good Morning and welcome to the Happy Inkin’ Thursday Blog Hop! One of the new items in the new Stampin’ Up! 2024-2025 Annual Catalog are the Mix & Match Ephemera Packs and I decided to use the Stampin’ Up! Something For Everything ephemera pack to make a birthday card for today. You can find the supplies I used along with card stock cuts at the bottom of my post.

We have a fun theme challenge this week:

I embossed a Pool Party panel with the diamond from the Fun Patterns embossing folders. I adhered it to a Basic White mat with liquid glue and adhered the layered panel to the front of a Crumb Cake Card base.

I adhered the balloons from the Stampin’ Up! Something For Everything ephemera pack to the card with glue dots and popped the party cat and dog on the card with dimensionals.

I adhered the ‘Happy Birthday’ sentiment from the Saying Something ephemera pack to the card with glue dots along with three hearts. I finished the card with three iridescent faceted gems.

For the Inside of the card, I adhered a Basic White panel to the inside of the card with Stampin’ Seal. I decorated it with more cutouts from the Stampin’ Up! Something For Everything ephemera pack – the banner, cake and another heart. And I finished with a sentiment from the Saying Something Ephemera pack. I love how it all coordinates!

The Stampin’ Up! Something For Everything ephemera pack is truly that, with cutouts covering several themes and occasions. These new products are so versatile – you can mix the elements from different packs since they all coordinate (like I did with my sentiments). You can mix them with stamped sentiments or images or other DSP. And they are perfect for quick and easy cards.

On with the Hop! Click on the Next Blog button to move forward to see the beautiful project Karen Ksenzakovic has created.

If you get lost along the way, here are the participants for the hop:


Current Host Code: DWUSFG7T

Use this host code when you order $50 or more and receive a free gift from me!  The free gift is your choice of any item currently available valued up to $10.00!

If your order is over $150, please do not use the host code since you’ll receive your own Host Dollars plus I’ll still send you the free gift!  This host code can be used by anyone, no club or commitment required. Let me know if you have any questions.


If you need any stamping supplies, I’d be very happy to be your Demonstrator.  Just click on the Shop Now button on the right side of the screen to go directly to my online store or contact me if you have any questions. 

Thanks for stopping by and Happy Stamping!

Akiko

  • Visit my online store here
  • See the current Stampin’ Up! clearance rack specials here
  • Earn FREE Stampin’ Up! products through my Wildflower Frequent Shopper Program – my way of saying thank you to my online frequent shopper customers.
  • Have any questions? I’d be happy to help, click here to contact me.

Cardstock Cuts for this project:

  • Crumb Cake – 5-1/2″ x 8-1/2″ card base, scored 4-1/4″
  • Pool Party – 3″ x 4-1/4″ (embossed panel)
  • Basic White – 3-3/4″ x 5″ (inside panel), 3-1/8″ x 4-3/8″ (embossed panel mat)
  • Something For Everything ephemera pack – cat, dog, balloons, cake, banner and hearts
  • Say Something ephemera pack – sentiments

Stampin’ Up! products used in this project:


Stampin’ Up! Delicate Forest Birthday Card

Good Morning! I used the Stampin’ Up! Delicate Forest stamp set with the Meandering Meadows and Country Woods designer series papers to make a masculine birthday card. The wood grain patterns look great with the watercolor woodland scenes! You can find the products I used at the bottom of my post along with the card stock sizes.

I adhered a panel of Country Woods designer series paper to a Pecan Pie mat and adhered them to the front of a Crumb Cake card base with liquid glue.

I stamped the tree from the Stampin’ Up! Delicate Forest stamp set in Garden Green and Early Espresso inks on a panel of Woodland Meadow 6″ x 6″ designer series paper. I cut it out with the Deckled Rectangle die using a two step method, so that it lets the stamped tree be the focal point. I adhered the die cut panel to a Pretty Peacock mat and wrapped it with Crumb Cake baker’s Twine and made a knot. I popped the panel on the card front with dimensionals.

I used the new Everyday Greetings and Greetings of the Season stamp sets to stamp the ‘Happy Birthday’ sentiment using Pretty Peacock ink on Crumb Cake card stock. I used the Deckled Rectangles dies to cut out the sentiment using a two step method and adhered it to a Pretty Peacock mat. I adhered the label to the card with dimensionals and glue dots. I finished the card with three textured metallic dots.

For the inside of the card I stamped the sentiment from the Stampin’ Up! Delicate Forest stamp set in Pretty Peacock ink on a Basic White panel. I inked up the tree stamp using Garden Green and Early Espresso inks and stamped it on the side. I used the small greenery stamp to stamp the brush on the bottom using Garden Green ink, both full strength and stamped off. I adhered the panel to the inside of the card with Stampin’ Seal.

Stamping on designer series paper is a fun technique and a great way to make it unique. The Stampin’ Up! Delicate Forest stamp set is pretty versatile and great for both Summer and Fall. And the coordinating dies are great as well!


Bonus Days Earning Period Ends Soon!

It’s time for one of our favorite promotions—BONUS DAYS! Because do you know what’s a great deal? Getting rewarded for all the crafting supplies you’re already going to buy! When you shop between July 3 and July 31, 2024 and spend $50 you will earn a $5 coupon! Make sure you save all your coupons because you can redeem them (and we mean ALL of them) between August 1 and August 31. There’s no limit to how many coupons you can earn! 

Promotion Details:

Earning Period: July 3 – July 31 2024

  • Earn a $5 coupon for every $50 spent (before shipping and tax). 
  • All coupon codes will be emailed right after a qualifying purchase has been made. Customers must have a customer account with a valid email address to earn coupons when they shop. If you don’t already have an account, you can easily create one in the Online store – contact me if you have any questions. 
  • If you earn multiple codes from a single order, you will receive one email with multiple codes. If you earn multiple codes from multiple orders, you will receive separate emails for each code earned.
  • All order types qualify for this promotion. Phone and email orders still require an email address.
  • Orders started before the promotion begins will not count toward earning coupon codes. For example, if you add items to your cart before July 3 and wait to purchase until that date or later, then those items will not qualify towards earning coupons. You must add items to your cart and complete your purchase during the earning period. 
  • There is no limit to the number of coupon codes participants can earn per order or throughout the duration of the earning period. 
  • Customers must use a valid email address during checkout in order to receive their coupon code. If a customer places an order over the phone, they must still provide a valid email address to receive their coupon code.
  • Starter Kit orders are excluded from this offer.

Redemption Period: August 1 – August 31, 2024

  • There is no limit to the number of coupon codes you can redeem on an order during the redemption period. If using multiple codes, they must be separated by a space. 
  • Coupon codes may be redeemed one time only. They cannot be redeemed after August 31, 2024.
  • Coupon codes may be redeemed for any product (excluding Starter Kits). They cannot be used on exchanges.
  • Bonus Days coupon codes can be applied to month-to-month Paper Pumpkin subscriptions and new prepaid subscriptions.

New Online Exclusives Available Now!

A new selection of Online Exclusive products was just introduced. Online Exclusives won’t appear in any catalog and are only available in the Online Store. There is no fixed end date for Online Exclusives! Some products will be reordered when inventory is low, and others will only be available while supplies last. This way Stampin’ Up! can offer even more new products throughout the year.

This release includes several items to get an early start on Fall and Christmas crafting. So check them out!


Current Host Code: DWUSFG7T

Use this host code when you order $50 or more and receive a Thank You gift from me!  The free gift is your choice of any item currently available valued up to $10.00.

If your order is over $150, please do not use the host code since you’ll receive your own Host Dollars plus I’ll still send you the Thank You gift!  This host code can be used by anyone, no club or commitment required. Let me know if you have any questions.


If you need any stamping supplies, I’d be very happy to be your Demonstrator.  Just click on the Shop Now Button on the right side of the screen to go directly to my Online store or contact me if you have any questions.  Happy Stamping!

Thanks for stopping by and have a great day!

Akiko

  • Visit my online store here
  • See the current Stampin’ Up! clearance rack specials here
  • Earn FREE Stampin’ Up! products through my Wildflower Frequent Shopper Program – my way of saying thank you to my online frequent shopper customers.
  • Have any questions? I’d be happy to help, click here to contact me.

Cardstock Cuts for this project:

  • Crumb Cake – 5-1/2″ x 8-1/2″ card base, scored at 4-1/4″, 1″ x 2-1/2″ (label)
  • Pecan Pie – 4″ x 5-1/4″ (front mat)
  • Pretty Peacock – 1-3/4″ x 4-5/8″ (tree mat), 1″ x 2-1/4″ (label mat)
  • Basic White – 4″ x 5-1/4″ (inside panel)
  • Meandering Meadows 6″ x 6″ DSP – 2″ x 6″ (tree panel)
  • Country Woods DSP – 3-7/8″ x 5-1/8″ (front background)

Stampin’ Up! products used in this project:


Stampin’ Up! Simply Zinnia for the Inkin’ Krew Blog Hop

Good Morning! Welcome to the May Inkin’ Krew Team Blog Hop! The theme for this month’s hop is “Fun Fold” and I used the pretty Stampin’ Up! Simply Zinnia bundle and the Flowering Zinnias designer series paper to make an accordion Birthday Card with a belly band. You can find the supplies I used along with card stock cuts at the bottom of my post.

I adhered panels of Flowering Zinnias designer series paper to the front folds of the Melon Mambo accordion card base with liquid glue. This card base is 4″ wide (rather than 4-1/4″) and fits better in the standard envelope with the belly band.

For my belly band panel, I cut a circle from Old Olive using the Spotlight On Nature dies. I cut three sets of zinnia petals (two small and one large) from Real Red and centers from Pumpkin Pie and Daffodil Delight using the Stampin’ Up! Simply Zinnia dies. I assembled the zinnia, adhering it with liquid glue and adhered three leaves to the back – two Mossy Meadow and one Lemon Lime Twist.

I stamped the sentiment from the Unbounded Love stamp set in Old Olive on Basic White and cut it out with the small rectangle die. I used the large rectangle die to cut a mat from Melon Mambo and adhered it to the back of the sentiment. I adhered the label to the die cut circle and adhered the zinnia on top with glue dots. I adhered a panel of Flowering Zinnias DSP to a Melon Mambo strip to make the belly band. I loosely wrapped it around the card so it would slide and secured the ends with Tear-N-Tape. I used glue dots to adhere the decorated circle to the belly band.

I cut the two zinnia bud dies from the Stampin’ Up! Simply Zinnia dies from Real Red and the small stem and leaves from Old Olive. I adhered them with glue dots and adhered them to a die cut circle using the Spotlight on Nature dies. I adhered the decorated die cut circle to the first middle panel with liquid glue.

I stamped the sentiment from the Unbounded Love stamp set in Melon Mambo ink on Basic White and cut it out with the Spotlight on Nature die. I cut small flowers from scraps using the die from the Stampin’ Up! Simply Zinnia dies and adhered them with liquid glue. I adhered the panel to the second middle panel with liquid glue.

For the inside of the card, I stamped the sentiment from the Unbounded Love stamp set in Melon Mambo ink on the left side of a Basic White panel and adhered the last strip of Flowering Zinnias DSP to the right side. I adhered the layered panel to the back panel of the card.

Belly band cards are so fun and special, especially for a birthday. The beautiful die cut flowers from the Stampin’ Up! Simply Zinnia bundle are awesome for decorating a belly band. And it’s wonderful to see all the beautiful papers from the Flowering Zinnias designer series paper on a card!

On With The Hop! Click on the Next Blog button to move forward to Karen Ksenzakovic’s project or click the Previous Blog button to move back to see the project that Karen Finkle created.

If you get lost along the way, here are the participants for the hop:


Current Host Code: SSMUTY4A

Use this host code when you order $50 or more and receive a Thank You gift from me!  The free gift is your choice of any currently available item valued up to $10.00.

If your order is over $150, please do not use the host code since you’ll receive your own Host Dollars plus I’ll still send you the Thank You gift!  This host code can be used by anyone, no club or commitment required. Let me know if you have any questions.


If you need any stamping supplies, I’d be very happy to be your Demonstrator.  Just click on the Shop Now button on the right side of the screen to go directly to my online store or contact me if you have any questions.  Happy Stamping!

Thanks for stopping by and have a great week!

Akiko

  • Visit my online store here
  • See the current Stampin’ Up! clearance rack specials here
  • Earn FREE Stampin’ Up! products through my Wildflower Frequent Shopper Program – my way of saying thank you to my online frequent shopper customers.
  • Have any questions? I’d be happy to help, click here to contact me.

Cardstock Cuts for this project:

  • Melon Mambo – 5-1/2″ x 11″ card base, scored at 1-1/2″ (valley), 4-1/4″ (mountain), and 7″ (valley), 1-1/4″ x 10″ (belly band), 1-3/4″ x 2-1/2″ (label)
  • Mossy Meadow – 2″ x 4″ (die cut leaves)
  • Real Red – 2-1/4″ x ” (die cut zinnia), 1″ x 1-1/2″ (die cut small bud)
  • Daffodil Delight – 1″ x 1″ (flower center)
  • Pumpkin Pie – 1″ x 1″ (flower center)
  • Lemon Lime Twist – 1″ x 2″ (die cut leaf)
  • Old Olive – 3″ x 3″ (belly band circle)
  • Basic White – 3-3/4″ x 5-1/4″ (inside panel), 1-1/2″ x 2-1/4″ (label), 2-1/2″ x 5″ (die cut circles)
  • Flowering Zinnias DSP DSP – 1″ x 10″ (belly Band), three 1-1/4″ x 5-1/4″ panels two 2-3/4″ x 5-1/4″ panels

Stampin’ Up! products used in this project:

Stampin’ Up! Magnolia Mood Birthday Card

Good Morning! The Stampin’ Up! Magnolia Mood bundle has some of the best images and dies for magnolias ever. These magnificent trees and flowers are special to me because of my memories of living in the South in my youth and having these in my yard. So I had to have this bundle when it came out in the Online Exclusives. You can find the products I used at the bottom of my post along with the card stock sizes.

I adhered a panel of Country Woods designer series paper to an Early Espresso mat with liquid glue and popped it on the front of a Basic Beige card base. I cut the large floral die from the Stampin’ Up! Magnolia Mood dies from Mossy Meadow card stock and adhered it to the card with glue dots.

I stamped the large bouquet from the Stampin’ Up! Magnolia Mood stamp set on a Basic White panel using Memento Tuxedo Black ink. I stamped the seed pod as well and colored the images with Stampin’ Blends. I used light Mossy Meadow on the top of the leaves and light Old Olive and Wild Wheat on the undersides. I used dark Daffodil Delight on the flower center and the seed pod and also shaded the seed pod with light Wild Wheat. I used light Petal Pink on the flower petals and used Wink of Stella on the flowers and seed pod to add a touch of sparkle. I cut the flowers out with the coordinating dies and popped the large flower on the card with dimensionals and adhered the seed pod with glue dots.

I cut some extra leaves from Mossy Meadow using the leaf dies from the Stampin’ Up! Magnolia Mood dies and tucked them under the flowers, adhering them with glue dots. I stamped the sentiment using Mossy Meadow ink on Pool Party and cut it out with the long label die from the Wonderful Thoughts dies. I adhered the label to the card with dimensionals and finished with Shiny Sequins.

For the inside of the card I stamped the sentiment from the Stampin’ Up! Magnolia Mood stamp set in Mossy Meadow ink on a Basic White panel. I stamped the flowers in Memento Tuxedo Black ink and colored it with Mossy Meadow and Petal Pink Stampin’ Blends . I adhered the panel to the inside of the card with Stampin’ Seal.

The images in the Stampin’ Up! Magnolia Mood stamp set are gorgeous!! The dies are modern and fun and compliment the stamped images nicely. The set is a must have for anyone who likes magnolias!


Stampin’ Up! May Joining Special!

Exciting News! Between May 1 and May 31, anyone who becomes a Stampin’ Up! demonstrator will receive four 2024–2026 In Color products in their Starter Kit for FREE! This is one of our richest offerings yet!

Promotion Details:

  • Dates: May 1, 2024 – May 31, 2024
  • New Demonstrators will receive the following products in their Starter Kit at no additional cost:
    • 2024–2026 In Color Classic Stampin’ Pad Bundle
    • 2024–2026 In Color 8-1/2″ x 11″ Cardstock
    • 2024–2026 In Color 6″ x 6″ Designer Series Paper
    • 2024–2026 In Color Stampin’ Write Markers
  • New team members may not use their team leader’s shipping address to ship their kit. 
  • New team members may only pay for their kit using a credit card on which they are listed as an authorized user. 
  • All orders should be closed by 31 May. 
  • New demonstrators who submit their Independent Demonstrator Agreement (IDA) before 1 May or after 31 May will not be eligible for this Starter Kit offer.

Click on the picture below to download a flyer to see more:

In addition to the In Color products, new Demonstrators will pick $125 USD worth of products of their choice for $99! When you join, the In Color products will be automatically added to your Starter Kit. You will also receive free business supplies with your order and free shipping. Not to mention all the fun that comes with being a part of our wonderful crafting community. Click the button below to Join Now, or get additional details on my Join My Team page


Current Host Code: SSMUTY4A

Use this host code when you order $50 or more and receive a Thank You gift from me!  The free gift is your choice of any item currently available valued up to $10.00.

If your order is over $150, please do not use the host code since you’ll receive your own Host Dollars plus I’ll still send you the Thank You gift!  This host code can be used by anyone, no club or commitment required. Let me know if you have any questions.


If you need any stamping supplies, I’d be very happy to be your Demonstrator.  Just click on the Shop Now Button on the right side of the screen to go directly to my Online store or contact me if you have any questions.  Happy Stamping!

Thanks for stopping by and have a great day!

Akiko

  • Visit my online store here
  • See the current Stampin’ Up! clearance rack specials here
  • Earn FREE Stampin’ Up! products through my Wildflower Frequent Shopper Program – my way of saying thank you to my online frequent shopper customers.
  • Have any questions? I’d be happy to help, click here to contact me.

Cardstock Cuts for this project:

  • Basic Beige – 5-1/2″ x 8-1/2″ card base, scored at 4-1/4″
  • Early Espresso – 4″ x 5-1/4″ (front mat)
  • Mossy Meadow – 4″ x 4-1/2″ (die cut flowers and leaves)
  • Pool Party – 1″ x 3-1/4″ (label)
  • Basic White – 4″ x 5-1/4″ (inside panel), 3-1/4″ x 3-3/4″ (large die cut flower), 2-1/4″ x 2-1/2″ (seed pod)
  • Country Woods DSP – 3-7/8″ x 5-1/8″ (front background)

Stampin’ Up! products used in this project:


Stampin’ Up! Beautiful Balloons for the Happy Inkin’ Thursday Blog Hop

Good Morning and welcome to the Happy Inkin’ Thursday Blog Hop! The Stampin’ Up! Beautiful Balloons bundle is a wonderful balloon theme bundle that is great for birthdays and other celebrations. I paired it pretty Lighter Than Air 6″ x 6″ designer series paper for a Springtime Birthday card. You can find the supplies I used along with card stock cuts at the bottom of my post.

We have a fun sketch challenge this week:

I cut two panels of Lighter Than Air 6″ x 6″ designer series paper and adhered them to an Azure Afternoon card base with liquid glue.

I used one of the balloon dies from the Stampin’ Up! Beautiful Balloons dies to cut twelve balloons from different patterns in the Lighter Than Air 6″ x 6″ designer series paper. I used the 1-3/4″ punch to cut a Basic White panel and adhered the die cut balloons to the circle with liquid glue to make a large bunch. I tied four strands of Baker’s twine in a knot and used glue dots to adhere one end to the back of the balloon bundle. I adhered the balloons to the card with dimensionals, pulled the strings taut and secured the knot to the card with another glue dot.

I applied some adhesive strips to teh back of a Basic White strip and cut out the detailed celebrate die from the Wanted To Say dies. I cut out the background die and pulled off the adhesive backing from the detailed die and adhered it to the background. I adhered the die cut word to the card with dimensionals and finished the card with Rainbow dots.

For the inside of the card, I stamped the sentiment from the Stampin’ Up! Beautiful Balloons stamp set in Azure Afternoon ink on a Basic White panel. I stamped balloon in Fresh Freesia and the string in Smoky Slate. I trimmed the bottom with a strip of DSP before adhering the panel to the inside of the card. with Stampin’ Seal.

The Stampin’ Up! Beautiful Balloons bundle will be retiring at the end of April, and it’s a pretty versatile set.

On with the Hop! Click on the Next Blog button to move forward to see the beautiful project Karen Ksenzakovic has created.

If you get lost along the way, here are the participants for the hop:


Current Host Code: 9WAA9JP9

Use this host code when you order $50 or more and receive a free gift from me!  The free gift is your choice of any item currently available valued up to $10.00!

If your order is over $150, please do not use the host code since you’ll receive your own Host Dollars plus I’ll still send you the free gift!  This host code can be used by anyone, no club or commitment required. Let me know if you have any questions.


If you need any stamping supplies, I’d be very happy to be your Demonstrator.  Just click on the Shop Now button on the right side of the screen to go directly to my online store or contact me if you have any questions. 

Thanks for stopping by and Happy Stamping!

Akiko

  • Visit my online store here
  • See the current Stampin’ Up! clearance rack specials here
  • Earn FREE Stampin’ Up! products through my Wildflower Frequent Shopper Program – my way of saying thank you to my online frequent shopper customers.
  • Have any questions? I’d be happy to help, click here to contact me.

Cardstock Cuts for this project:

  • Azure Afternoon – 4-1/4″ x 11″ card base, scored at 5-1/2″, 1-1/4″ x 4″ (die cut word backing)
  • Basic White – 4″ x 5-1/4″ (inside panel), 2″ x 2″ (punched circle), 1″ x 3-1/2″ (die cut detailed word)
  • Lighter Than Air 6″ x 6″ DSP – two 3″ x 4-3/4″ panels (background DSP), twelve die cut balloons

Stampin’ Up! products used in this project:


Stampin’ Up! Reach For the Stars Birthday Card

Good morning! The Stampin’ Up! Reach for the Stars bundle is a fun space theme set with planets, an astronaut and space shuttle that is great for astronomy fans. I used the planet dies with the Stargazing designer series paper to make a birthday card. You can find the products I used at the bottom of my post along with the card stock sizes.

I adhered a panel of Stargazing designer series paper to the front of a Starry Sky card base with liquid glue. I adhered another panel to a Azure Afternoon mat and popped it on the card with Dimensionals. I used the Stampin’ Up! Reach For the Stars dies to cut several planets in different sizes and colors from the Stargazing DSP.

I used the small ring from the Stampin’ Up! Reach For The Stars dies to cut a Rose Gold ring and tucked one of the die cut planets into it, adhering it in the back with a glue dot. I adhered the planets to the card with glue dots and dimensionals.

I stamped the sentiment from the Level Complete stamp set in Versamark ink and sprinkled it with white embossing powder. I shook off the excess and heated the powder with my heat tool until it was bright and shiny. I cut it out with the Stylish Shapes banner die and popped it on the card with dimensionals. I used the stars dies from the Stampin’ Up! Reach For The Stars dies to cut several stars from Rose Gold foil and adhered them with glue dots.

For the inside of the card, I stamped the sentiment from the Stampin’ Up! Reach For The Stars stamp set in Starry Sky ink on a Basic White panel. I stamped the space dust in stamped off Lemon Lime Twist, Pumpkin Pie and Fresh Freesia inks by the sentiment and stamped the stars in Azure Afternoon. I trimmed the bottom with a Strip of DSP and adhered the panel to the inside of the card with Stampin’ Seal. I wanted to use the astronaut and space shuttle, so I stamped them in Starry Sky (I stamped off the space shuttle first) on the inside of the of the front flap.

The Stargazing designer series paper has amazing space images and the planets are beautiful, so I had to use them for the front of my card. And the Stampin’ Up! Reach For The Stars bundle is fun and perfect for space enthusiasts. All of these fun products are on the 2023-2024 Annual Catalog retiring list, so they won’t be available for too much longer. And beginning April 9, the designer series paper will be on sale at 40% off!


Current Catalogs Retiring Lists Announced!

There is a retiring list for the 2023-2024 Annual Catalog and the January-April 2024 Mini Catalog and annual catalog. These lists detail the products that will no longer be available once the catalogs are gone on April 30. Items are only available while supplies last. Note – The Sale Prices don’t start until April 9th.

Click HERE to download a PDF of the retiring items from the Annual Catalog.

Click HERE to download an excel spreadsheet of the Annual Catalog retiring items.

Click HERE to download a PDF of the retiring items from the Mini Catalog.

Click HERE to download an excel spreadsheet of the Mini Catalog retiring items.

Click HERE to go to my online store to shop now.

Stampin’ Up! 2023-2024 Annual Catalog coming May 1, 2024!

It’s sad to see items retiring, but the new Stampin’ Up! 2024-2025 Annual Catalog will be here soon! Here are a few details about the transition to the new catalog:

  • April 2: Demonstrator preorder for the new 2024-2025 Annual Catalog begins and I will be ordering catalogs for my customers and sending them out
  • April 30 – last day to order from the January-April 2024 Mini Catalog and 2023-2024 Annual Catalog
  • May 1 – ordering from the new Annual Catalog begins!!

If you’ve ordered from me during the last year, you’re on my list to receive a catalog. If you are not a current customer of mine but would like to be and would like to get a copy of the upcoming catalog, simply place an order through my online store and I’ll be happy to send you a copy of the catalog too!


Current Host Code: 9WAA9JP9

Use this host code when you order $50 or more and receive a Thank You gift from me!  The free gift is your choice of any item currently available valued up to $10.00.

If your order is over $150, please do not use the host code since you’ll receive your own Host Dollars plus I’ll still send you the Thank You gift!  This host code can be used by anyone, no club or commitment required. Let me know if you have any questions.


If you need any stamping supplies, I’d be very happy to be your Demonstrator.  Just click on the Shop Now Button on the right side of the screen to go directly to my Online store or contact me if you have any questions.  Happy Stamping!

Thanks for stopping by and have a great day!

Akiko

  • Visit my online store here
  • See the current Stampin’ Up! clearance rack specials here
  • Earn FREE Stampin’ Up! products through my Wildflower Frequent Shopper Program – my way of saying thank you to my online frequent shopper customers.
  • Have any questions? I’d be happy to help, click here to contact me.

Cardstock Cuts for this project:

  • Starry Sky – 5-1/2″ x 8-1/2″ card base, scored at 4-1/4″
  • Azure Afternoon – 3-9/16″ x 4-5/8″ (front mat), 1″ x 3-1/2″ (label)
  • Rose Gold Foil – 1-1/4″ x 4-1/2″ (planet ring and stars)
  • Basic White – 4″ x 5-1/2″ (inside panel)
  • Stargazing DSP – 4-1/4″ x 5-1/2″ (front background), 3-1/2″ x 4-1/2″ (planet panel), 1/2″ x 4″ (inside trim), five die cut planets

Stampin’ Up! products used in this project:


Stampin’ Up! Feathered Flight for the Happy Inkin’ Thursday Blog Hop

Good Morning and welcome to the Happy Inkin’ Thursday Blog Hop! The Stampin’ Up! Feathered Flight Cling Stamp set is an Online Exclusive with beautiful ducks and sweet sentiments and I used it to make a masculine birthday card. You can find the supplies I used along with card stock cuts at the bottom of my post.

We have a sketch challenge this week:

I embossed a panel of Very Vanilla with the Timber 3D embossing folder and adhered it to the front of a Thick Very Vanilla card base. I stamped the large flying duck from the Stampin’ Up! Feathered Flight stamp set in Pecan Pie ink on a Very Vanilla panel and cut it out with one of the Deckled Circles dies. I cut a Pecan Pie panel with the next largest die and adhered the duck to the front. I adhered the layered circles to the card front with liquid glue.

I cut a Mossy Meadow panel with the large branch die from the Dainty Delight dies and cut it in half. I adhered the branches to the card with glue dots.

I stamped the sentiment from the Something Fancy stamp set using Pecan Pie ink on Very Vanilla. I cut it out with the Something Fancy angled label die and adhered it to the card with dimensionals. I finished the card with cork rounds on the label and in the branches.

For the inside of the card, I stamped the sentiment from the So Sincere stamp set in Pecan Pie ink on Very Vanilla. I stamped the small ducks from the Stampin’ Up! Feathered Flight stamp set next to the sentiment and the pond in the lower corner. I adhered the panel to a PEcan Pie mat before adhering it to the inside of the card with Stampin’ Seal.

The shading on the stamps in the Stampin’ Up! Feathered Flight stamp set is fantastic, making it easy to create monotone images easily! And it’s perfect for making outdoors themed masculine cards.

On with the Hop! Click on the Next Blog button to move forward to see the beautiful project Karen Ksenzakovic has created.

If you get lost along the way, here are the participants for the hop:


Current Host Code: XR9HAEK4

Use this host code when you order $50 or more and receive a free gift from me!  The free gift is your choice of any item currently available valued up to $10.00!

If your order is over $150, please do not use the host code since you’ll receive your own Host Dollars plus I’ll still send you the free gift!  This host code can be used by anyone, no club or commitment required. Let me know if you have any questions.


If you need any stamping supplies, I’d be very happy to be your Demonstrator.  Just click on the Shop Now button on the right side of the screen to go directly to my online store or contact me if you have any questions. 

Thanks for stopping by and Happy Stamping!

Akiko

  • Visit my online store here
  • See the current Stampin’ Up! clearance rack specials here
  • Earn FREE Stampin’ Up! products through my Wildflower Frequent Shopper Program – my way of saying thank you to my online frequent shopper customers.
  • Have any questions? I’d be happy to help, click here to contact me.

Cardstock Cuts for this project:

  • Thick Very Vanilla – 5-1/2″ x 8-1/2″ card base, scored at 4-1/4″
  • Pecan Pie – 4″ x 4″ panels (deckled circle mat), 4″ x 5-1/4″ (inside mat)
  • Mossy Meadow – 2″ x 5″ (die cut branch)
  • Very Vanilla 4-1/4″ x 5-1/2″ (embossed background), 3-7/8″ x 5-1/8″ (inside panel), 4″ x 4″ (bird panel), 1″ x 3″ (label)

Stampin’ Up! products used in this project:


Stampin’ Up! Trusty Tools for the Inkin’ Krew Blog Hop

Good Morning! Welcome to the February Inkin’ Krew Team Blog Hop! The theme for this month’s hop is “Birthday” and I used the Stampin’ Up! Trusty Tools bundle with the Trusty Toolbox Sale-A-Bration designer series paper to make a fun fold masculine birthday card. You can find the supplies I used along with card stock cuts at the bottom of my post.

I cut and scored the Gray Granite and Lost Lagoon card bases for my Joy Fold card and adhered panels of Trusty Toolbox designer series paper to the back section and front and back of the front flap of the Gray Granite card base and to the front and back of the front flap of the Lost Lagoon mini card. I used different patterns for each panel and adhered them with liquid glue. I adhered the Lost Lagoon mini card to the inside of the main Gray Granite card base with liquid glue, placing the hinge on the right side.

I used the drill dies from the Stampin’ Up! Trusty Tools dies to cut Crushed Curry, Gray Granite, Copper Clay, Lost Lagoon and Basic Black card stock. For the Basic Black and Lost Lagoon sections, I used the large drill die to partially cut the pieces and finished cutting with paper snips. I adhered the die cuts together with liquid glue and adhered the drill to the front flap of the large card base. 

I used the Stampin’ Up! Trusty Tools dies to cut the pencil, tape measure and paintbrush from Trusty Toolbox DSP and fussy cut the screwdriver and pliers. I used dies to cut nuts and bolts from Gray Granite card stock and adhered the all the tools to the inside flaps with liquid glue.

I stamped the Happy Birthday sentiment from the Carousel Horses stamp set in Memento Tuxedo Black in on a strip of Trusty Toolbox DSP and cut it out with the Gorgeously Made label die. I cut the toolbox from Copper Clay card stock using the Stampin’ Up! Trusty Tools dies. I adhered the handle to the mini card front with liquid glue and adhered the label on top. I adhered more die cut and fussy cut Trusty Toolbox DSP tools to the card and popped the toolbox on top with dimensionals. I adhered a die cut DSP hammer on top with glue dots and dimensionals.

For the inside of the card, I stamped the sentiment from the Stampin’ Up! Trusty Tools stamp set in Lost Lagoon ink on Basic White. I stamped the nuts and bolts in Gray Granite and adhered the panel to the inside of the card with Stampin’ Seal.

The Stampin’ Up! Trusty Tools bundle is a great tool themed bundle that is perfect for making cards for your handy man or handy lady who is great at fixing things.

On With The Hop! Click on the Next Blog button to move forward to Amy Koender’s project or click the Previous Blog button to move back to see the project that Nel Thames created.

If you get lost along the way, here are the participants for the hop:

UPDATE: I decided to enter this card in the Creative Creases Challenge #75 – Anything Goes with a Fun Fold. Check out the other fun folds:


Current Host Code: M3WQ2HCB

Use this host code when you order $50 or more and receive a Thank You gift from me!  The free gift is your choice of any currently available item valued up to $10.00.

If your order is over $150, please do not use the host code since you’ll receive your own Host Dollars plus I’ll still send you the Thank You gift!  This host code can be used by anyone, no club or commitment required. Let me know if you have any questions.


If you need any stamping supplies, I’d be very happy to be your Demonstrator.  Just click on the Shop Now button on the right side of the screen to go directly to my online store or contact me if you have any questions.  Happy Stamping!

Thanks for stopping by and have a great week!

Akiko

  • Visit my online store here
  • See the current Stampin’ Up! clearance rack specials here
  • Earn FREE Stampin’ Up! products through my Wildflower Frequent Shopper Program – my way of saying thank you to my online frequent shopper customers.
  • Have any questions? I’d be happy to help, click here to contact me.

Cardstock Cuts for this project:

  • Gray Granite – 4-1/4″ x 8-1/2″ card base scored at 5-1/2″, 1″ x 3-1/2″ (die cut tools)
  • Lost Lagoon – 3″ x 8″ mini card base scored at 4″, 1″ x 2″ (die cut tools)
  • Copper Clay – 3″ x 4″ (die cut tool box)
  • Crushed Curry – 2″ x 2-3/4″ (die cut tools)
  • Basic Black – 1″ x 1-1/2″ (die cut tools)
  • Basic White – 2-3/4″ x 3-3/4″ (inside panel)
  • Trusty Toolbox DSP – 3-3/4″ x 5″ (inside background), two 2-3/4″ x 4″ panels (large card front flap), two 2-3/4″ x 3-3/4″ panels (mini card front flap), 1″ x 3″ (label), die cut and fussy cut tools

Stampin’ Up! products used in this project:

Stampin’ Up! Sentimental Park for the Inkin’ Krew Blog Hop

Good Morning! Welcome to the December Inkin’ Krew Team Blog Hop! The theme for this month’s hop is “Celebrate” and I used the Stampin’ Up! Sentimental Park stamp set with the beautiful new Flight and Airy Sale-A-Bration designer series paper that will be available on January 4, 2024. You can find the supplies I used along with card stock cuts at the bottom of my post.

Today’s card is celebrating a special birthday and it’s a dainty gate fold card.

I adhered panels of the new Flight and Airy designer series paper to the front panels of a Misty Moonlight card base with liquid glue. I cut a Misty Moonlight panel with the large floral label die from the Stampin’ Up! Sentimental Park dies and I cut a panel of Flight and Airy DSP with a sweet bird with the plain die. I inserted the bird die cut into the slots of the floral die cut – I love how this works!

I cut several small flowers from Flirty Flamingo and Petal Pink and adhered them to the larger die cut and adhered some pink pearls to some flower centers. I adhered the panel to the left side of the card with liquid glue applied to half of the die cut.

I stamped the sentiment from the Stampin’ Up! Sentimental Park stamp set in Misty Moonlight ink on Petal Pink and cut it out with the small banner die from the Stylish Shapes dies using the two-step die cutting technique. I adhered it to the card with glue dots and finished the card front with a Night of Navy bow.

For the inside of the card, I stamped the sentiments from the Stampin’ Up! Sentimental Park stamp set in Misty Moonlight ink on a Basic White panel. I stamped the flowers in Petal Pink ink in the corner and colored them with Daffodil Delight, Petal Pink and Flirty Flamingo Stampin’ Blends. I used the dark Granny Apple Green Stampin’ Blend to color the berries and made some stems. I adhered the panel to the inside of the card and adhered two floral panels of Flight and Airy DSP to the inside of the front flaps.

The Flight and Airy DSP is a Sale-A-Bration item that you will be able to get for free with a $50 purchase when Sale-A-Bration starts on January 4, 2024 and it’s so pretty! And it goes so well with the Stampin’ Up! Sentimental Park stamp set and dies and so many other current and retired Stampin’ Up sets. Be sure to check it out!

On With The Hop! Click on the Next Blog button to move forward to Nel Thames’ project or click the Previous Blog button to move back to see the project that Terry Lynn Bright created.

If you get lost along the way, here are the participants for the hop:


Current Host Code: 27CYQXTT

Use this host code when you order $50 or more and receive a Thank You gift from me!  The free gift is your choice of any currently available item valued up to $10.00.

If your order is over $150, please do not use the host code since you’ll receive your own Host Dollars plus I’ll still send you the Thank You gift!  This host code can be used by anyone, no club or commitment required. Let me know if you have any questions.


If you need any stamping supplies, I’d be very happy to be your Demonstrator.  Just click on the Shop Now button on the right side of the screen to go directly to my online store or contact me if you have any questions.  Happy Stamping!

Thanks for stopping by and have a great week!

Akiko

  • Visit my online store here
  • See the current Stampin’ Up! clearance rack specials here
  • Earn FREE Stampin’ Up! products through my Wildflower Frequent Shopper Program – my way of saying thank you to my online frequent shopper customers.
  • Have any questions? I’d be happy to help, click here to contact me.

Cardstock Cuts for this project:

  • Misty Moonlight – 4-1/4″ x 11″ card base scored at 2-3/4″ and 8-1/4″
  • Petal Pink – 2″ x 3″ (die cut flowers), 1″ x 3″ (label)
  • Flirty Flamingo – 1″ x 3″ (die cut flowers)
  • Basic White – 4″ x 5-1/4″ (inside panel)
  • Light and Airy DSP – 2″ x 4″ (die cut bird), two 2-5/8″ x 4-1/8″ panels (front background panels), two 2-1/2″ x 4″ (inside panels)

Stampin’ Up! products used in this project: