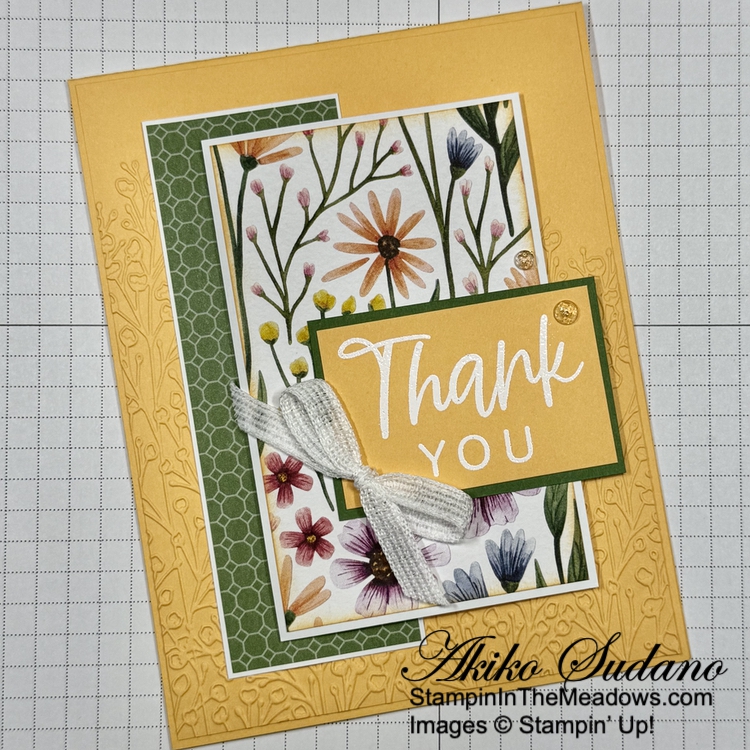
Good Morning! Here is a quick layered thank you card made with the Stampin’ Up! With You In Mind stamp set and the Floral Impressions designer series paper. I’m not going to go into the details of the construction of the card as it’s fairly straightforward. But you can still find the card stock cuts for this card along with the supplies at the bottom of my post.
I’m going to take a break from blogging for the summer so this is my last card for a while. I want to say thank you to all my followers for the support over the last six years. It’s been a fun and enjoyable creative journey and I’ve learned so much.
Take care of yourselves, God Bless You, Have a great summer and Happy Stamping!
Akiko
Cardstock Cuts for this project:
Peach Pie – 4-1/4″ x 11″ card base, scored at 5-1/2″, 4-1/8″ x 5-3/8″ (embossed background), 1-1/2″ x 2-1/4″ (label)
Garden Green – 1-5/8″ x 2-3/8″ (label mat)
Basic White – 4″ x 5-1/4″ (inside panel), 1-5/8″ x 4-5/8″ (back DSP mat), 2-5/8″ x 4-1/8″ (floral DSP mat)
Floral Impressions DSP – 1-1/2″ x 4-1/2″ (back DSP), 2-1/2″ x 4″ (floral DSP), 1/2″ x 4″ (inside trim)
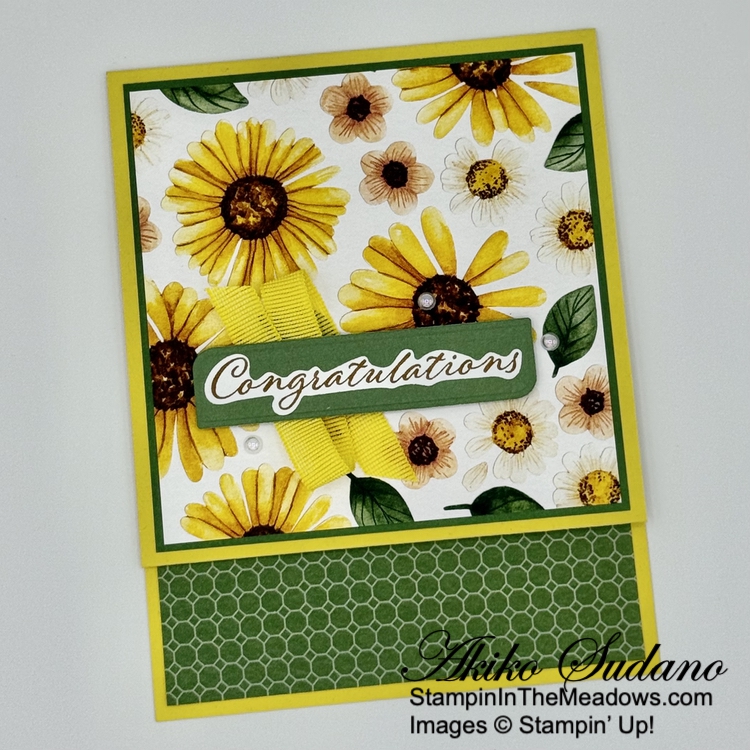
Good Morning! It’s Graduation season and I always like to make feminine Congratulations cards for the young ladies getting diplomas and degrees. With all the pretty new floral designer series papers that have just come out, there are so many fresh options to use with the Stampin’ Up! Wonderful Thoughts stamp set and dies for a quick card or gift card holder. You can find the products I used at the bottom of my post along with the card stock sizes.
I folded the 1-1/4″ end of the Darling Duckling card base to the inside and adhered the ends with Tear-N-Tape to make a pocket for a standard gift card.
I adhered a panel of the Floral Impressions DSP to the dark side of a Garden Green two tone mat and adhered it to the front of the card with liquid glue.
I stamped the sentiment from the Stampin’ Up! Wonderful Thoughts stamp set using Pecan Pie ink on Basic White and cut it out with the coordinating die. I cut the large background die from the light side of the Garden Green two tone card stock and adhered the word to the background. I adhered Darling Duckling ribbon to the card with Stampin’ Seal and popped the layered label on top with dimensionals. I finished with three pearls.
For the inside of the card, I adhered a panel of Garden Green Floral Impressions DSP to the bottom of a Basic White panel. I stamped the sentiment from the Stampin’ Up! Wonderful Thoughts stamp set using Pecan Pie ink and adhered the panel to the inside of the card with Stampin’ Seal.
I love how the inside panel DSP trim peeks out when the card is closed. The coordinating word stamps and dies in the Stampin’ Up! Wonderful Thoughts stamps and dies make the gift card holder both easy and fancy. And the wonderful floral and coordinating geometric patterns in the Floral impressions DSP makes it pretty!
If you need any stamping supplies, I’d be very happy to be your Demonstrator. Just click on the Shop Now Button on the right side of the screen to go directly to my Online store or contact me if you have any questions. Happy Stamping!
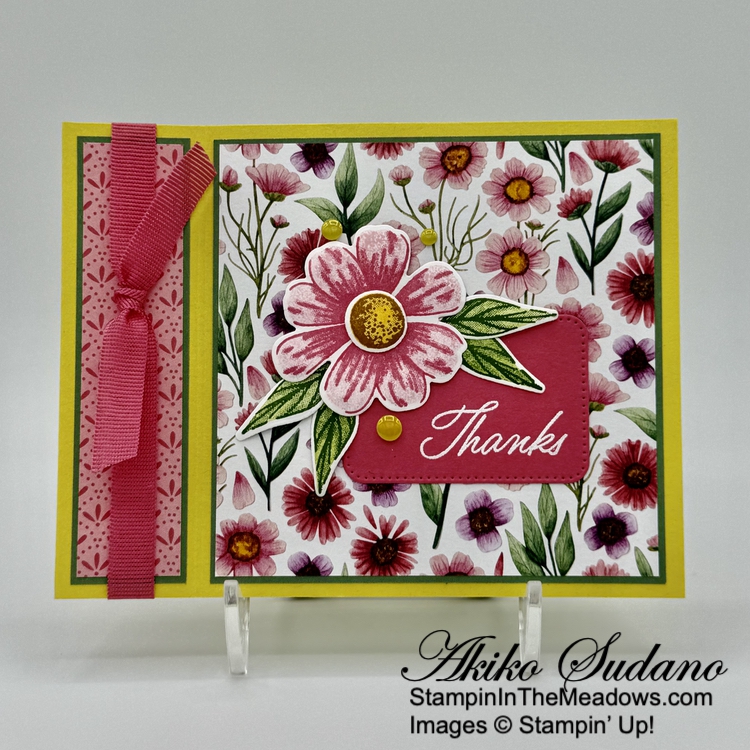
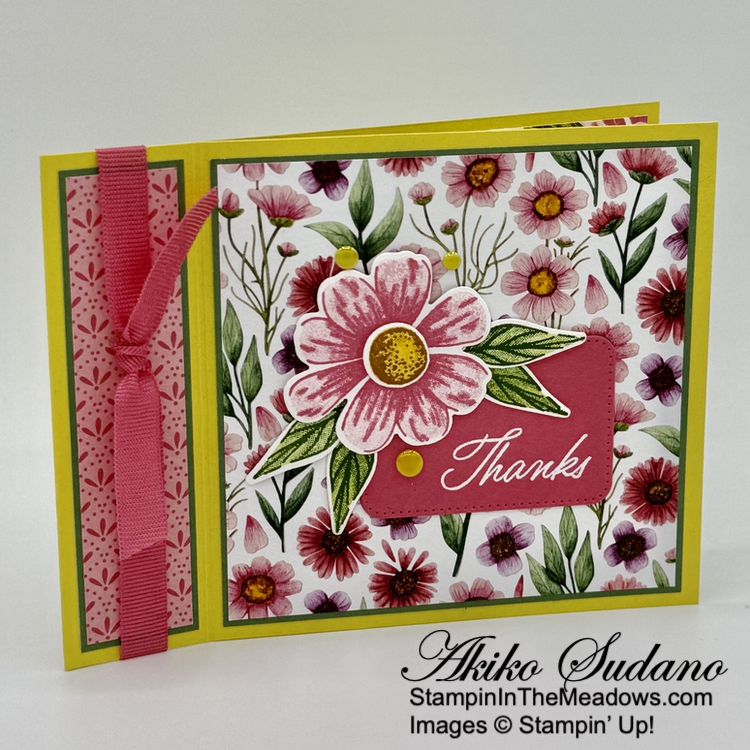
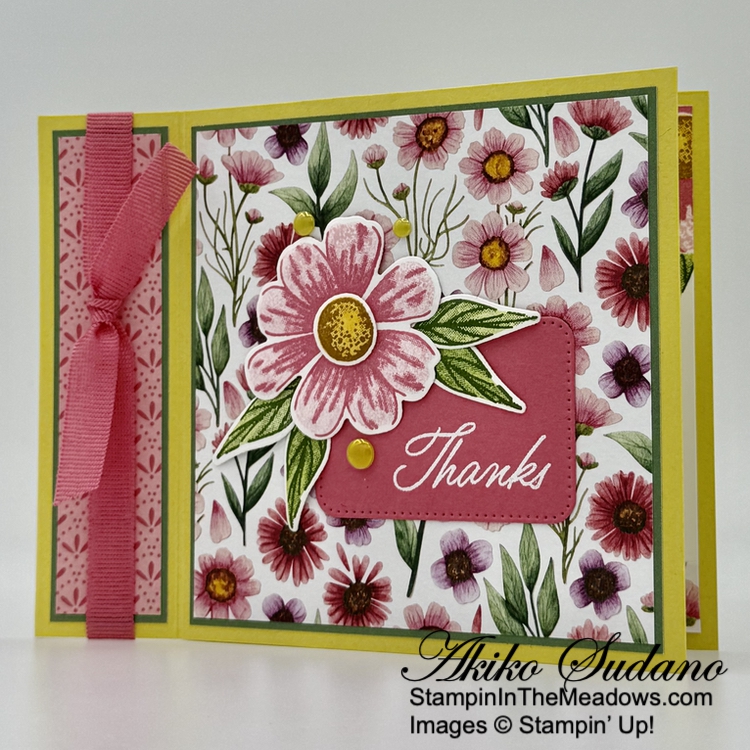
Good Morning! Here is a Book Fold card made with the new Stampin’ Up! Impressions Abloom bundle and the pretty Floral Impressions designer series paper. These are from the latest Online Exclusives release a few weeks ago. I also used new In Colors – Strawberry Slush and Darling Duckling. You can find the products I used at the bottom of my post along with the card stock sizes.
After scoring my Darling Duckling card base, I adhered the ‘book’ section on the left side together using liquid glue. I adhered the pretty Floral Impressions DSP to light Garden Green mats and adhered the panels to the card front with liquid glue.
The Stampin’ Up! Impressions Abloom stamps are designed for two-step stamping with a detailed stamp and a background stamp for each image. I stamped the detailed stamps first and lined up the background stamps afterward. For the large flower, I used Strawberry Slush for the detailed stamp and stamped off Pretty In Pink for the background. I used Pecan Pie and Crushed Curry for the flower center and Garden Green and stamped off Granny Apple Green for the leaves. After stamping, I cut each image with the coordinating dies and used a ball stylus and a foam pad to make little circles on the back of the die cuts to make domes on the petals, leaves and flower center. This gives each piece dimension. I adhered the flower center using dimensionals.
I stamped the sentiment from the Stampin’ Up! Impressions Abloom stamp set using Versamark ink on Strawberry Slush. I sprinkled it with white embossing powder, shook off the excess and heated it with my heat tool until it was bright and shiny. I cut it out with a rectangle from the Nesting Essentials dies and adhered it to the card with glue dots. I adhered the layered flower to the card with glue dots and tucked the leaves underneath, adhering them with more glue dots. I wrapped the side with Strawberry Slush ribbon, tying a know and securing it with another glue dot. I finished with beautiful Darling Duckling iridescent dots.
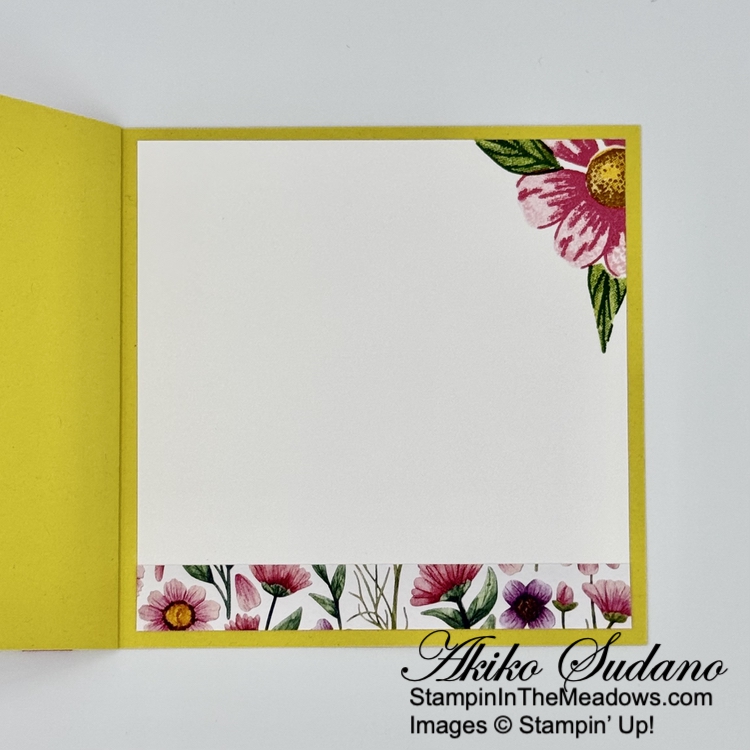
For the inside of the card, I stamped the flower, flower center and leaves from the Stampin’ Up! Impressions Abloom stamp set using the same colors as the front in the corner of a Basic White panel. I trimmed the bottom with DSP and adhered the panel to the inside of the card with Stampin’ Seal.
The Stampin’ Up! Impressions Abloom bundle is so versatile with stamped floral images, die cuts and pretty sentiments. All the pretty new designer series papers and stamps are so inspiring and really motivate me for Spring card making.
If you need any stamping supplies, I’d be very happy to be your Demonstrator. Just click on the Shop Now Button on the right side of the screen to go directly to my Online store or contact me if you have any questions. Happy Stamping!
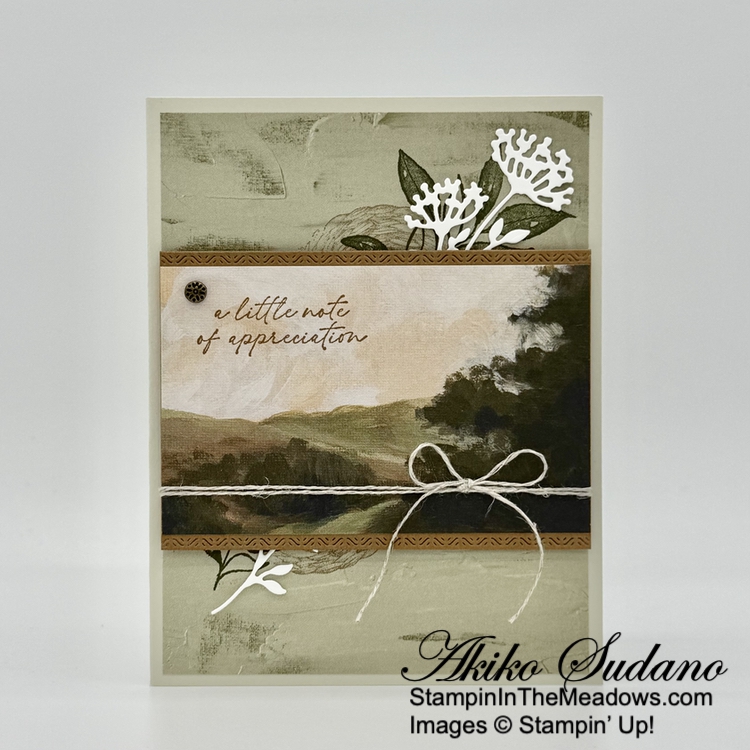
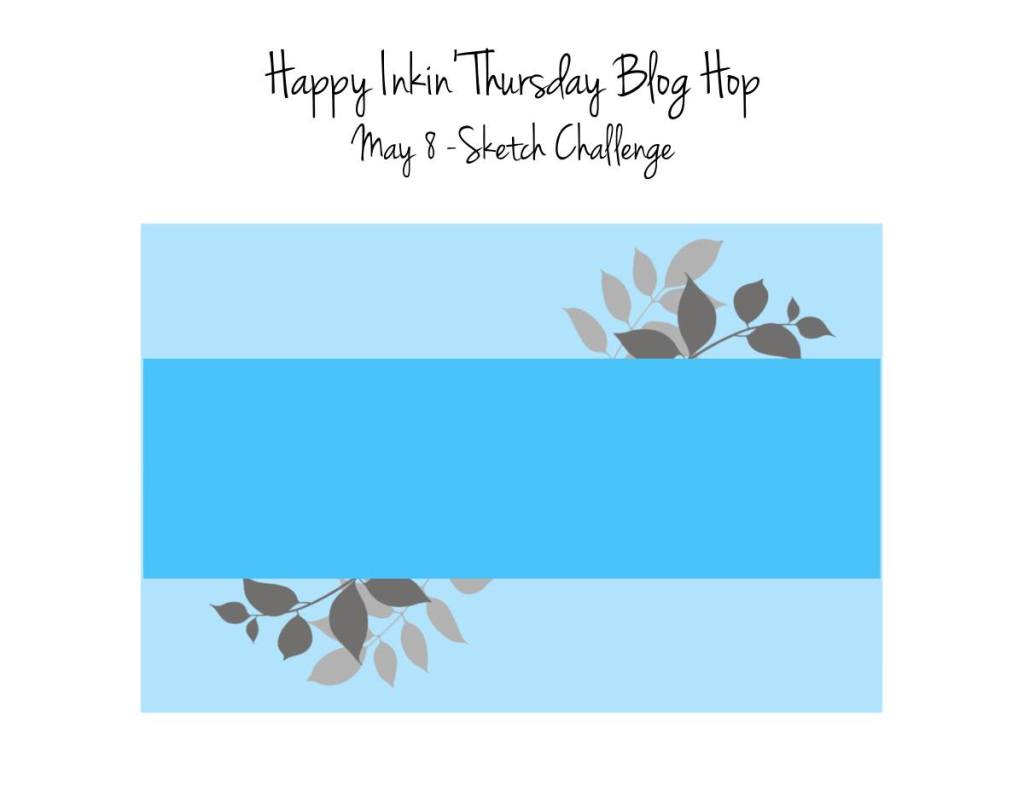
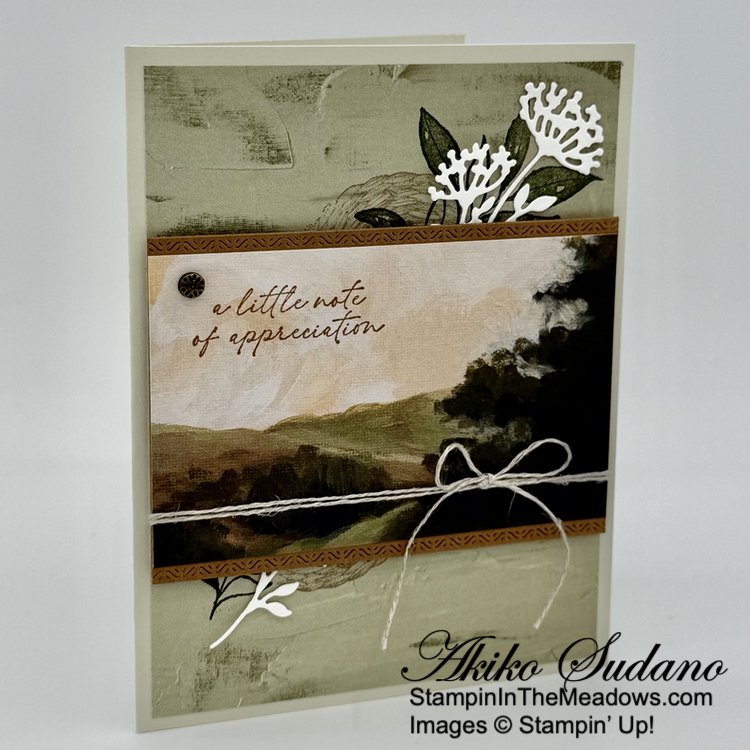
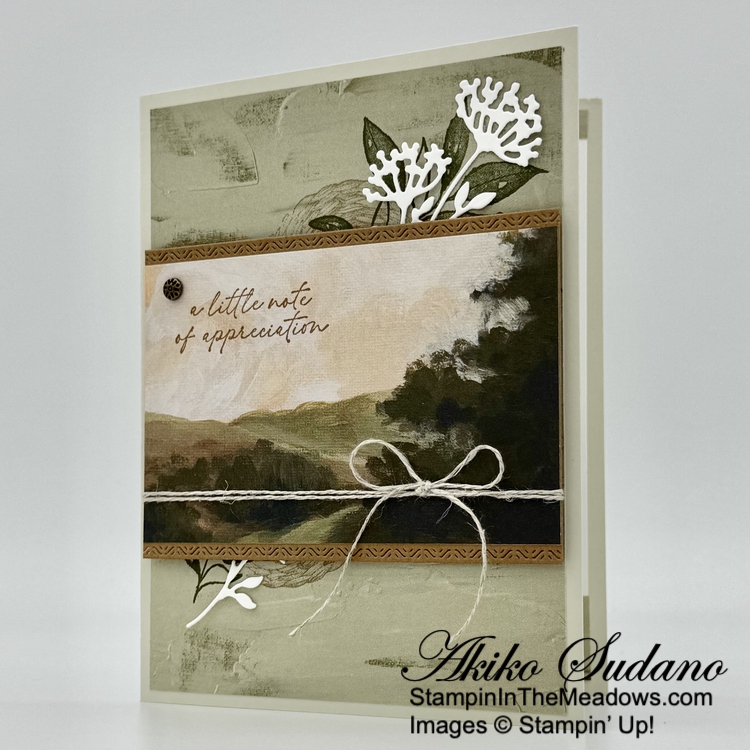
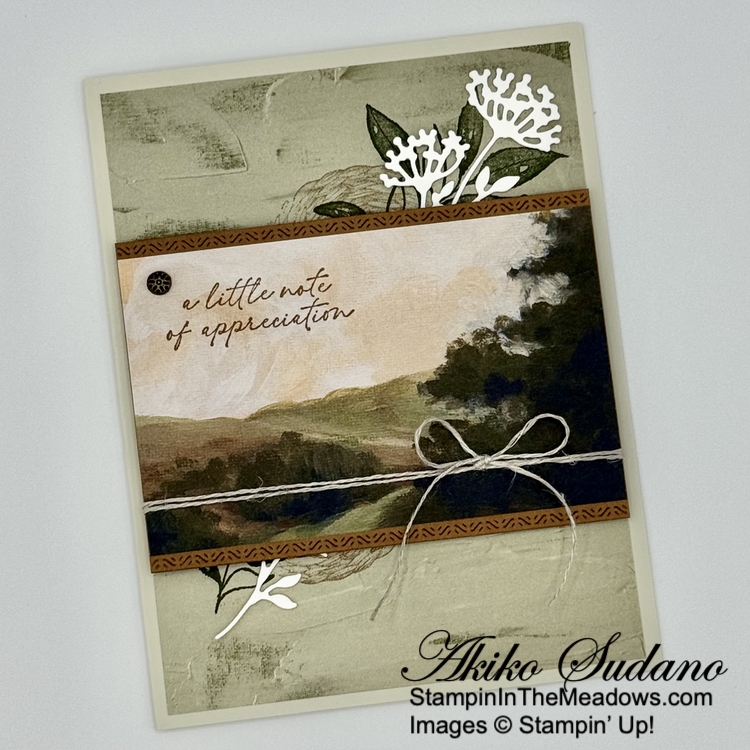
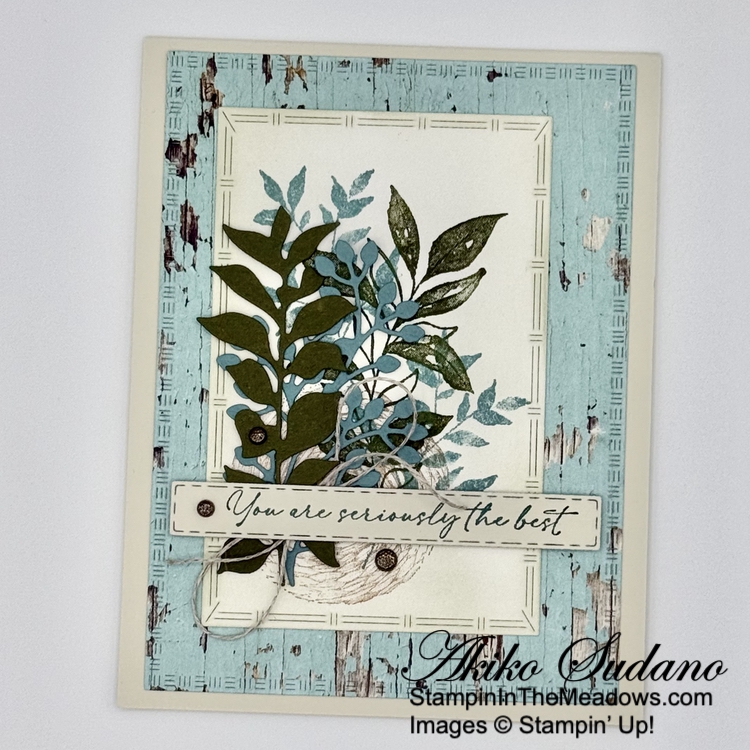
Good Morning and welcome to the Happy Inkin’ Thursday Blog Hop! I used the wonderful Stampin’ Up! Textured Notes bundle from the March Online Exclusives release with some new products from to make a thank you card for today. You can find the supplies I used along with card stock cuts at the bottom of my post.
We have a pretty sketch challenge this week, and I interpreted it on a portrait card:
I selected the landscape section from one of the panels of the Beautiful Gallery 6″ x 6″ designer series paper and cut it to 2-1/2″ x 4″. I stamped the sentiment from the Stampin’ Up! Textured Notes stamp set on the panel using Pecan Pie ink. I used the long side of one of the Stampin’ Up! Textured Notes rectangle dies to cut the top and bottom of the Pecan Pie panel and adhered the DSP to the die cut panel.
I stamped the large leaf cluster from the Stampin’ Up! Textured Notes stamp set using Mossy Meadow ink on a fairly plain panel of Beautiful Gallery DSP. I stamped it in the top right corner and then again in the lower left section. I stamped the woven circle basket using Crumb Cake ink and adhered the panel to the front of a Basic Beige card base. I cut a Basic White panel with the floral die from the Beautiful Motifs dies and snipped it in the middle. I adhered the two sections to the card with glue dots.
I wrapped the landscape panel twice with linen thread and tied a bow before adhering it to the card with dimensionals and finished with a textured metallic dot near the sentiment.
For the inside of the card I stamped the leaf cluster and woven circle basket from the Stampin’ Up! Textured Notes stamp set using Mossy Meadow and Crumb Cake inks on Basic White. I trimmed the top and bottom with dSP and adhered the panel to the inside of the card with Stampin’ Seal.
The gorgeous Beautiful Gallery 6″ x 6″ DSP is so versatile and the landscapes make nice focal points for cards. I was pleased that the images from the Stampin’ Up! Textured Notes stamp set would compliment the DSP so well and of course those rectangle dies make wonderful bordered mats!
On with the Hop! Click on the Next Blog button to move forward to see the beautiful project Karen Ksenzakovichas created.
If you get lost along the way, here are the participants for the hop:
If you need any stamping supplies, I’d be very happy to be your Demonstrator. Just click on the Shop Now button on the right side of the screen to go directly to my online store or contact me if you have any questions.
See the current Stampin’ Up! Last Chance items here
Have any questions? I’d be happy to help, click here to contact me.
Cardstock Cuts for this project:
Basic Beige – 5-1/2″ x 8-1/2″ card base, scored at 4-1/4″
Pecan Pie – 2-7/8″ x 4″ (DSP mat)
Basic White – 4″ x 5-1/4″ (inside panel), 1-3/4″ x 4-1/2″ (die cut flower)
Beautiful Gallery 6″ x 6″ DSP – 4″ x 5-1/4″ (front background), 2-1/2″ x 4″ (landscape panel), 3/4″ x 4″ (inside bottom trim), 1/4″ x 4″ (inside top trim)
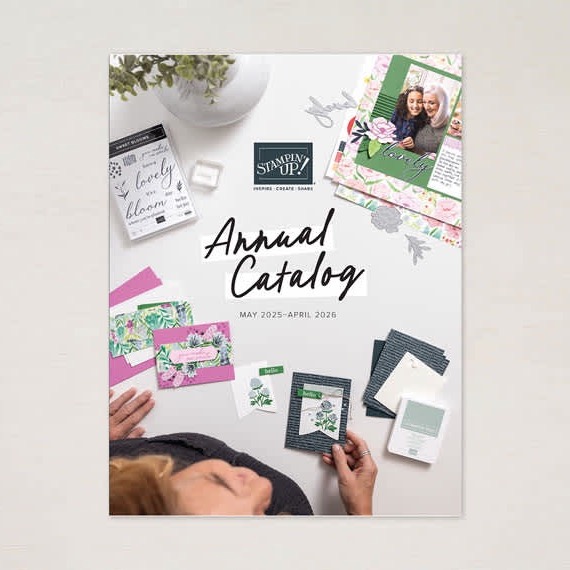
Good Morning! Welcome the new Stampin’ Up! 2025-2026 Annual Catalog! Today is the first day that the catalog is open for orders! It’s full of new products and returning favorites. Click on the picture below to download a copy or view it online.
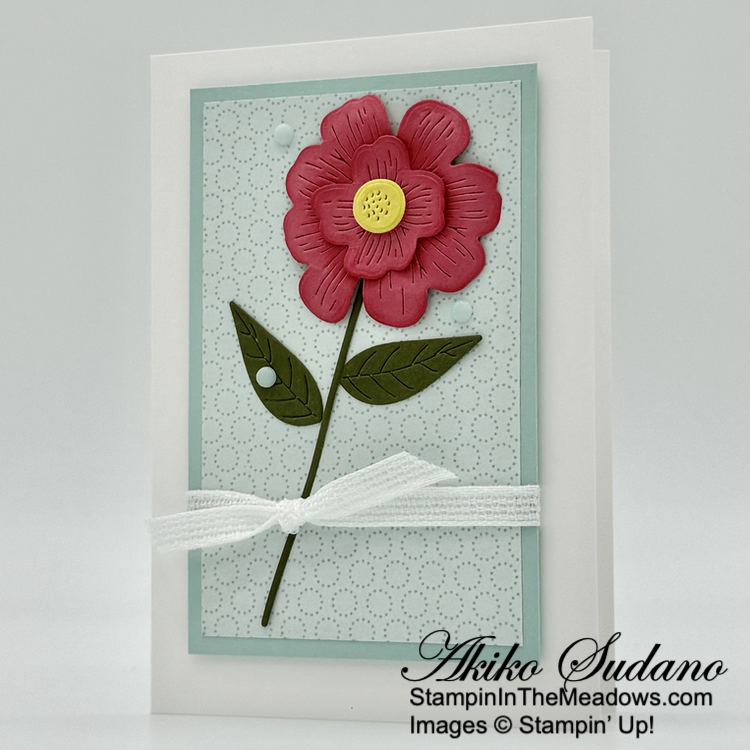
In addition to the new catalog, a new release of Online Exclusive products is available today and I used one of the new bundles, the Stampin’ Up! Impressions Abloom bundle to make a quick card. You can find the products I used at the bottom of my post along with the card stock sizes.
I used the Basic White Note cards and envelopes for my card base – the card size is 3-1/2″ x 5″ and they are also good for mailing. I adhered a panel of Pool Party Floral Impressions designer series paper to a Pool Party mat.
I used the large and small flower dies from the Stampin’ Up! Impressions Abloom dies with the inserts to cut a Strawberry Slush panel. Strawberry Slush is one of the new 2025-2027 In Colors. I used a sponge dauber to apply Strawberry Slush ink to the center of the large die cut flower and the edges of both flowers. I curved the petals of the large flower downward and the petals of the small flower upwards with my fingers to give it dimension and adhered the flowers together with a glue dot. I cut the small flower center with the two sets of dies from Timid Tiger, another new 2025-2027 In Color, and adhered the flower center with a dimensional.
I cut the single stem and two leaf dies from the Stampin’ Up! Impressions Abloom dies from Mossy Meadow card stock and adhered the stem to the back of the flower with a glue dot. I adhered the flower and leaves to the DSP panel with glue dots. I wrapped the panel with white ribbon tying a knot over the stem and adhered the panel to the front of a Basic White note card with dimensionals. I finished the card with Pool Party dots. The stamp set has pretty sentiments, but I didn’t use one for this card and I also left the inside blank.
The Stampin’ Up! Impressions Abloom stamps have pretty two step stamping florals and sentiments. And the dies are unique in that they can cut stamped images or be used with the inserts for textured flowers like I made for today’s card. And it’s finally available today!!
If you need any stamping supplies, I’d be very happy to be your Demonstrator. Just click on the Shop Now Button on the right side of the screen to go directly to my Online store or contact me if you have any questions. Happy Stamping!
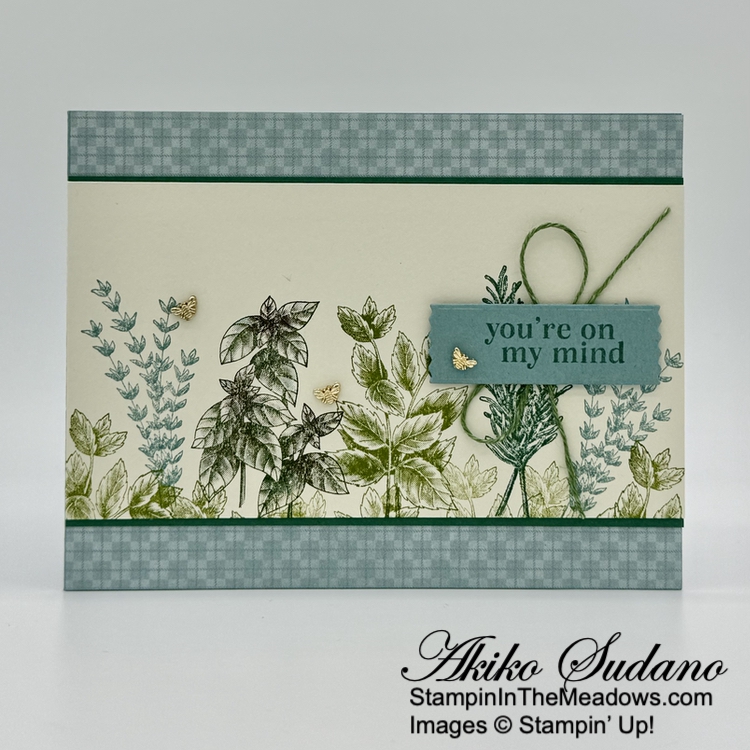
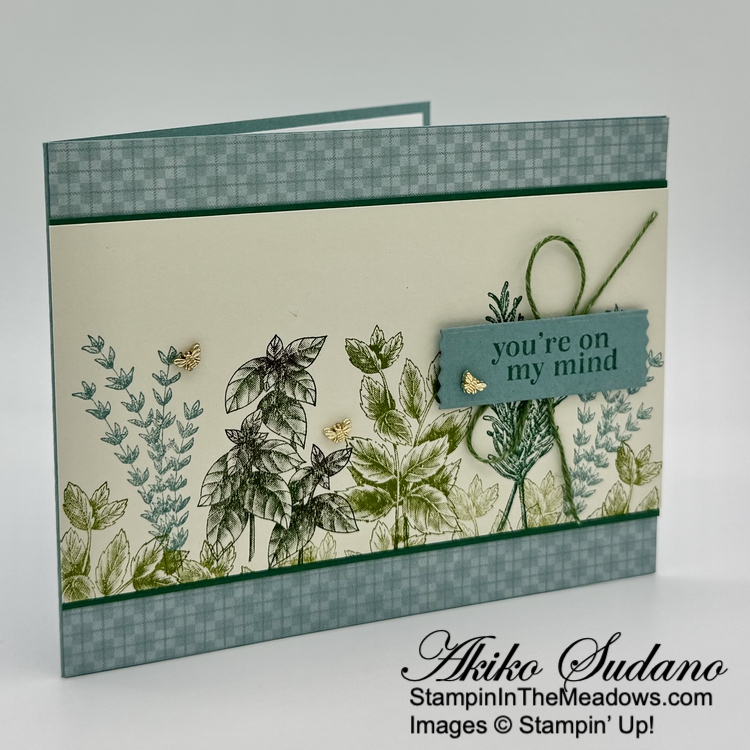
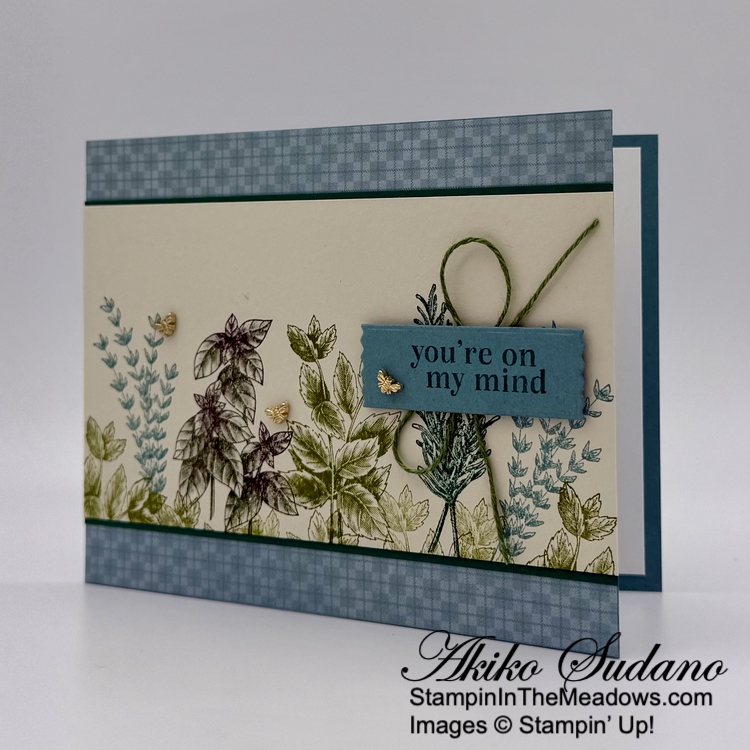
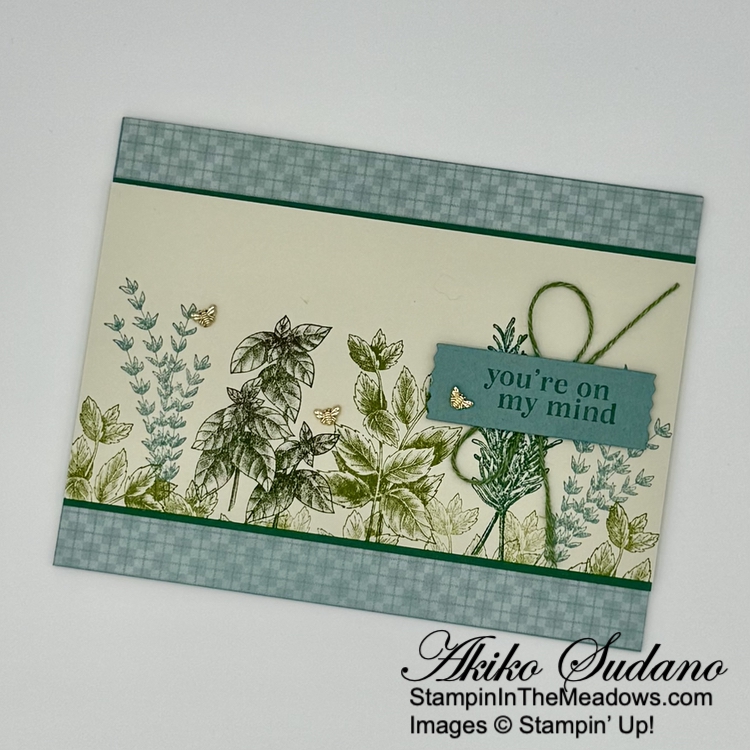
Good Morning and welcome to the Happy Inkin’ Thursday Blog Hop! The Stampin’ Up! Grow with Love bundle is a fun herb and seed themed set with beautiful stamped images and fun seed envelope dies. But I just used the beautiful herb stamps and pretty sentiment for today’s card. You can find the supplies I used along with card stock cuts at the bottom of my post.
We have a pretty sketch challenge this week and I took some liberties by resizing the sketch and mounting it on a DSP background:
I adhered a panel of Timeless Plaid 6″ x 6″ designer series paper to the front of a Lost Lagoon card base with liquid glue.
I stamped the herbs from the Stampin’ Up! Grow With Love stamp set on Basic Beige. Before the final stamping, I practiced several times on printer paper to arrange the herbs and select the right color combinations until I came up with the right mix of colors and herb placement. For my final run, I stamped the mint in Grammy Apple Green in the middle of the panel. Next, I inked up the basil using Garden Green ink and applied Blackberry Bliss to the buds with sponge daubers before stamping it next to the mint. Then I stamped the rosemary using Shaded Spruce ink and finished with thyme in Lost lagoon on either side. I filled in the bottom and sides with the top of the mint stamp in full strength and stamped off Granny Apple Green. I adhered the stamped panel to a Shaded Spruce mat and adhered it to the card with liquid glue.
I stamped the sentiment from the Stampin’ Up! Grow With Love stamp set using Shaded Spruce ink on Lost Lagoon and cut it out with the small label die. I used Garden Green linen thread to make a bow and adhered it to the back with a glue dot before adhering the label to the card with dimensionals. I finished with the cute mini bee trinkets adhered with glue dots.
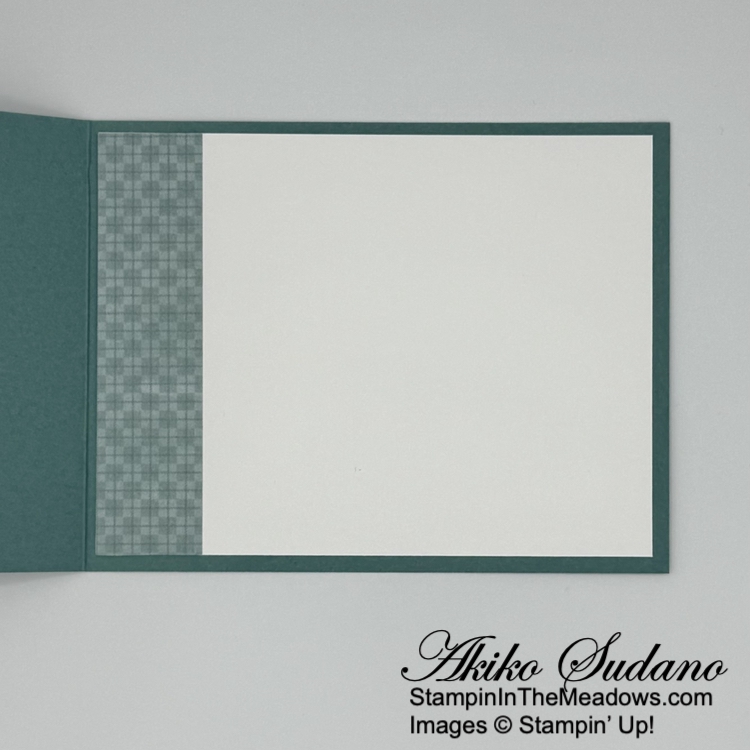
For the inside of the card, I kept it simple, trimming the side of a Basic White panel with DSP and adhering the panel to the inside of the card with Stampin’ Seal.
The herb stamps in the Stampin’ Up! Grow with Love stamp set are so detailed and realistic, and they look beautiful no matter what color you use. I had fun playing with all the different shades of green as I was working on my arrangement.
On with the Hop! Click on the Next Blog button to move forward to see the beautiful project Karen Ksenzakovichas created.
If you get lost along the way, here are the participants for the hop:
If you need any stamping supplies, I’d be very happy to be your Demonstrator. Just click on the Shop Now button on the right side of the screen to go directly to my online store or contact me if you have any questions.
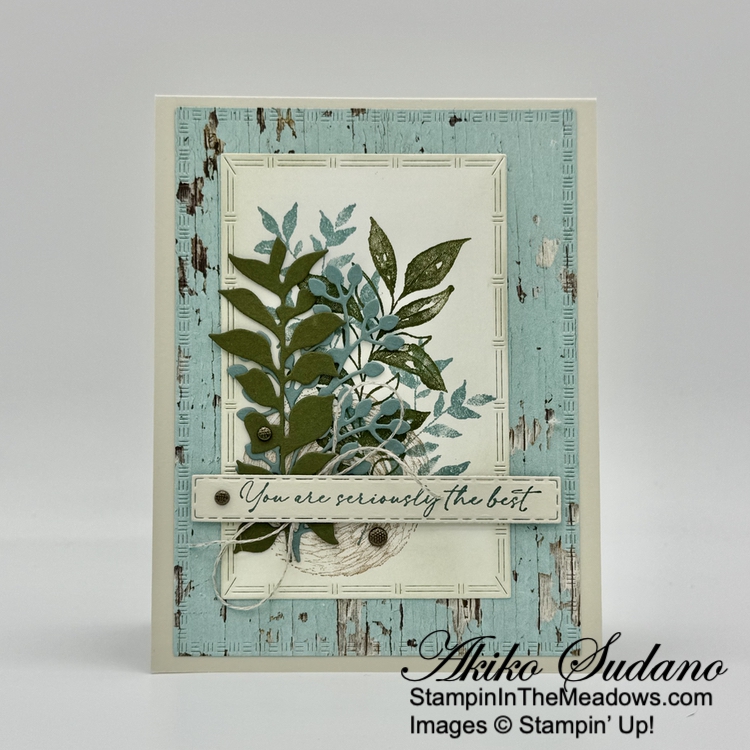
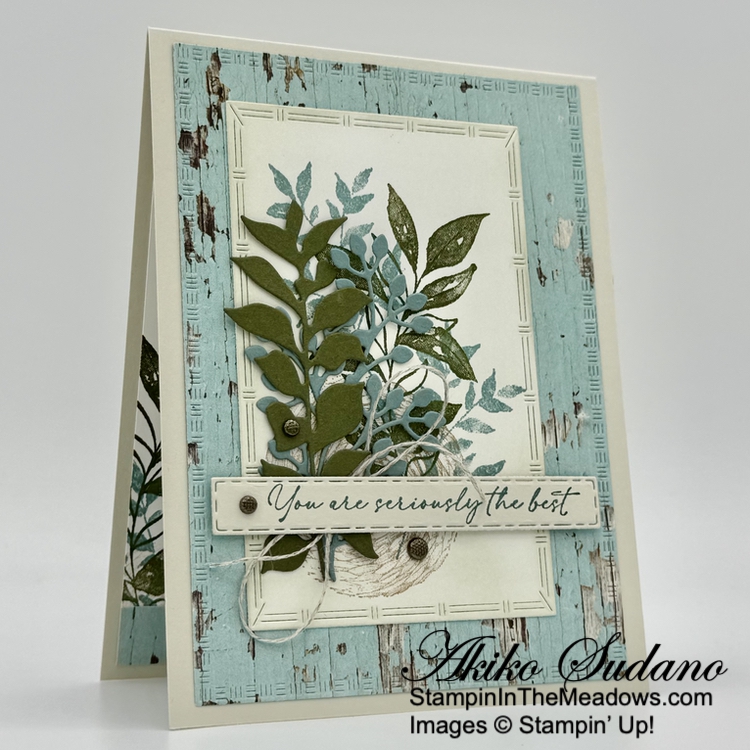
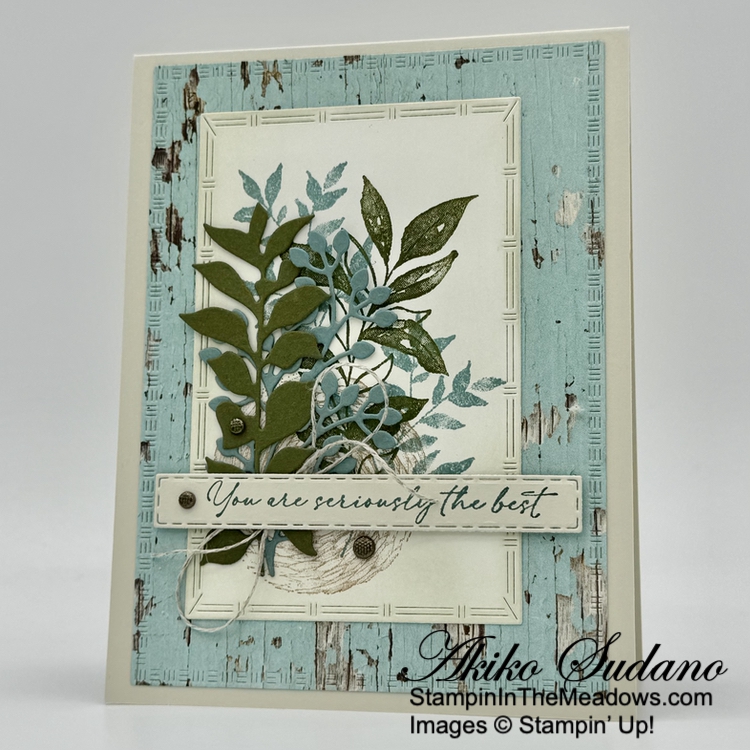
Good Morning! The Stampin’ Up! Textured Notes bundle is part of the new Online Exclusives release and has these wonderful bordered rectangle dies. I used the bundle with the pretty Country Woods designer series paper and the leaf sprig dies from the Textured Floral dies for today’s card. You can find the products I used at the bottom of my post along with the card stock sizes.
I used the large rectangle die from the Stampin’ Up! Textured Notes dies to cut a Pool Party panel of Country Woods designer series paper and adhered it to the front of a basic Beige card base with liquid glue.
I lightly applied Basic Beige ink to a Basic White panel with a blending brush to give it a little color and stamped the large leaf sprig from the Stampin’ Up! Textured Notes stamp set using Mossy Meadow ink. I stamped the round basket using Crumb Cake and I used Lost Lagoon to stamp the small leaf sprig twice. I cut the stamped image out with the third largest rectangle die and applied more Basic Beige ink to the edges. I adhered the panel to the card with liquid glue.
I cut the large leaf sprig die from the Textured Florals dies from Mossy Meadow and the small sprig from Lost Lagoon. I adhered the leaf sprigs to the card with glue dots. I stamped the sentiment from the Stampin’ Up! Textured Notes stamp set using Lost Lagoon ink on Basic Beige. I cut it out with the long skinny die and adhered a Linen Thread bow to the back before popping it on the card with dimensionals. I finished the card with textured metallic dots.
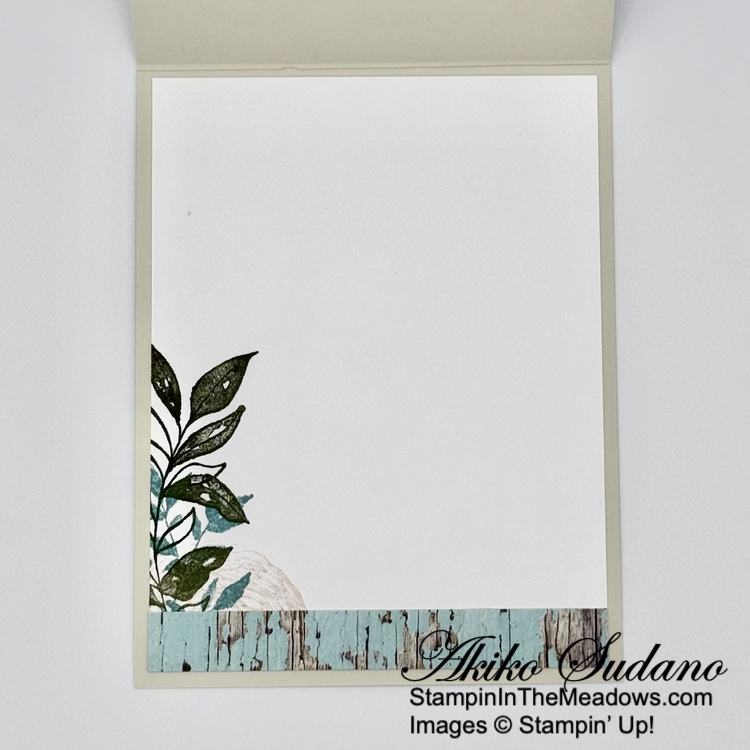
For the inside panel, I stamped the leaf sprigs and round basket from the Stampin’ Up! Textured Notes stamp set using the same colors as the card front on a Basic White panel. I trimmed the bottom with DSP and adhered it to the inside of the card with Stampin’ Seal.
The Stampin’ Up! Textured Notes bundle is wonderful for stamping textured collages and can be combined with images from other stamp sets, such as letters, graphic designs and naturals such as flowers and butterflies. I also think the leaves from the Textured Floral dies nicely coordinate with the stamped images in the stamp set. And I just love these new bordered rectangle dies!
If you need any stamping supplies, I’d be very happy to be your Demonstrator. Just click on the Shop Now Button on the right side of the screen to go directly to my Online store or contact me if you have any questions. Happy Stamping!
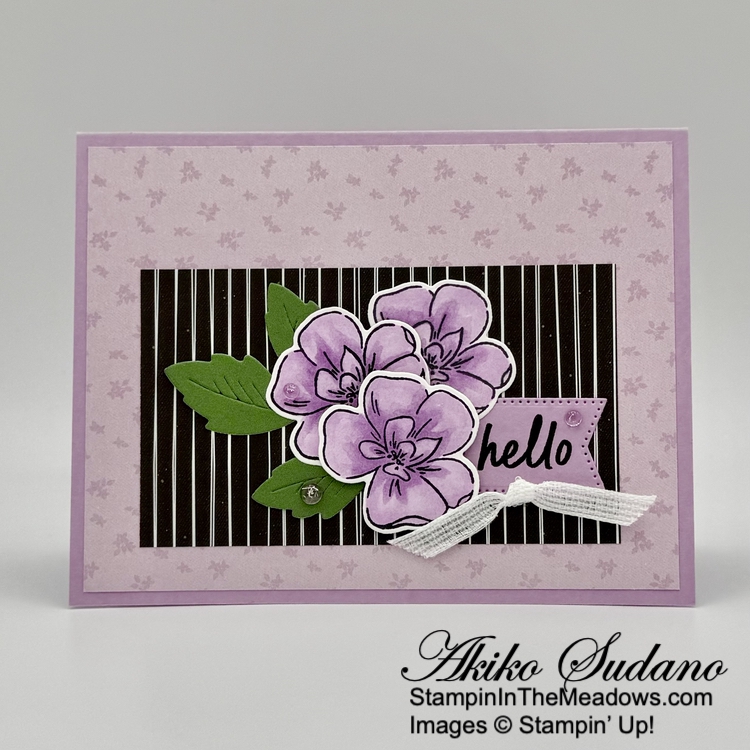
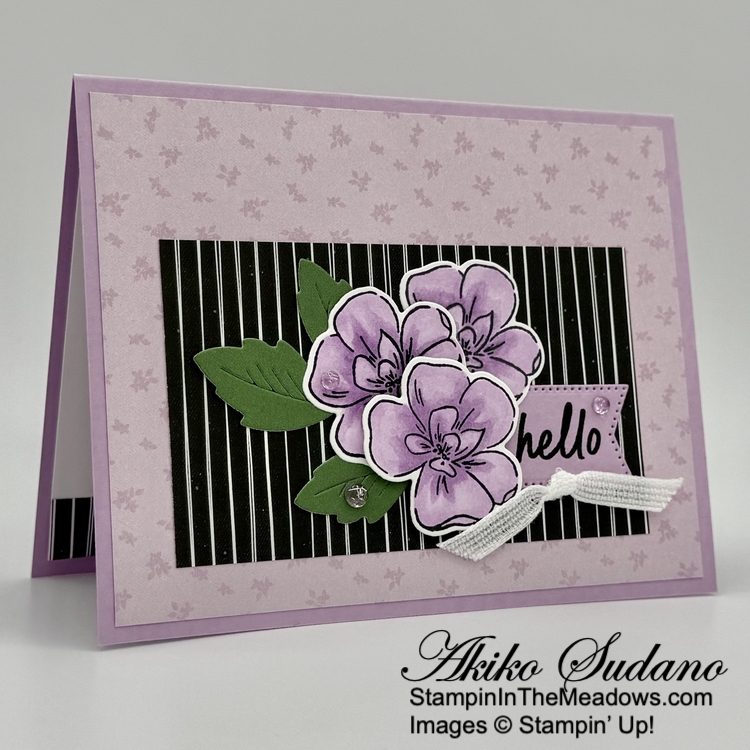
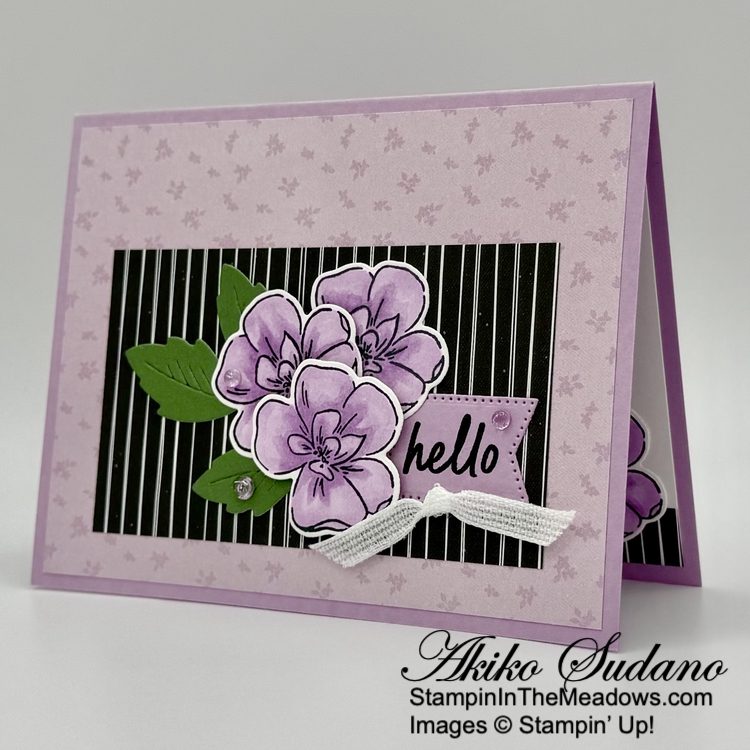
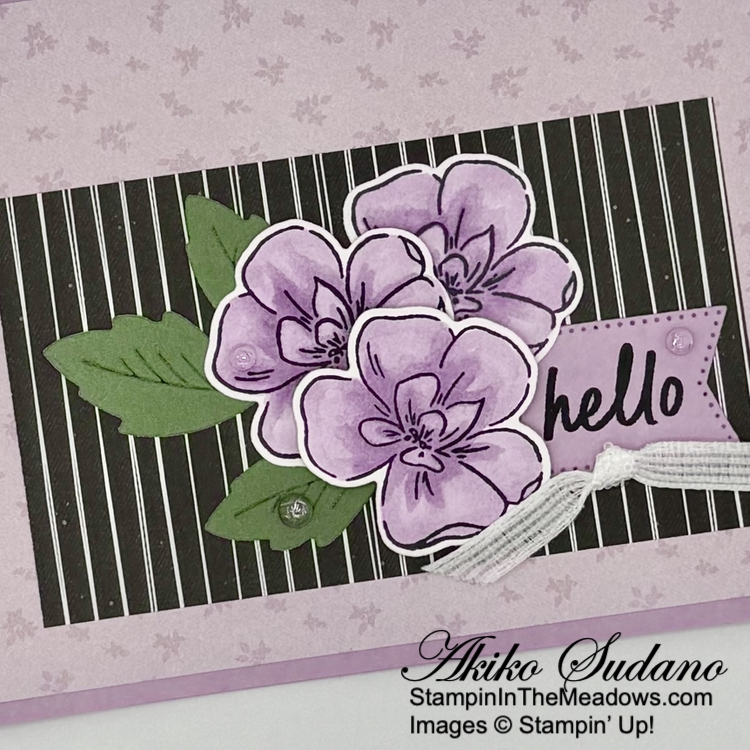
Good Morning and welcome to the Happy Inkin’ Thursday Blog Hop! I used the Stampin’ Up! Thankful Garden bundle with the Simply Said stamp set and Lovely Garden designer series paper to make a Hello card for today. You can find the supplies I used along with card stock cuts at the bottom of my post.
We have a sketch challenge this week and I interpreted the flowers as the oval.
I adhered a panel of Lovely Garden designer series paper to the front of a Fresh Freesia card base with liquid glue and adhered a contrasting black and white striped panel on top.
I stamped the flower from the Stampin’ Up! Thankful Garden stamp set using Memento Tuxedo Black ink on Basic White four times amd cut it out with the small flower die. I partially inked the smaller flower with the ink and stamped it on one side of a Basic White strip and then flipped it, inked it up again and stamped the other side, so I get a clean stamped flower. I colored the flowers with Fresh Freesia Stampin’ Blends and cut them out with the coordinating small single flower die.
I used the leaf die from the Stampin’ Up! Thankful Garden dies to cut the light side of Garden Green Two-Tone card stock and adhered it to the card with glue dots. I stamped the sentiment from the Simply Said stamp set on Fresh Freesia and cut it out with the banner die fromt eh Stylish Shapes dies. I adhered the label to the card with glue dots and also used glue dots to adhere two of the die cut flowers. I popped the last flower on the card with dimensionals and finished with Fresh Freesia dots and a white ribbon tie.
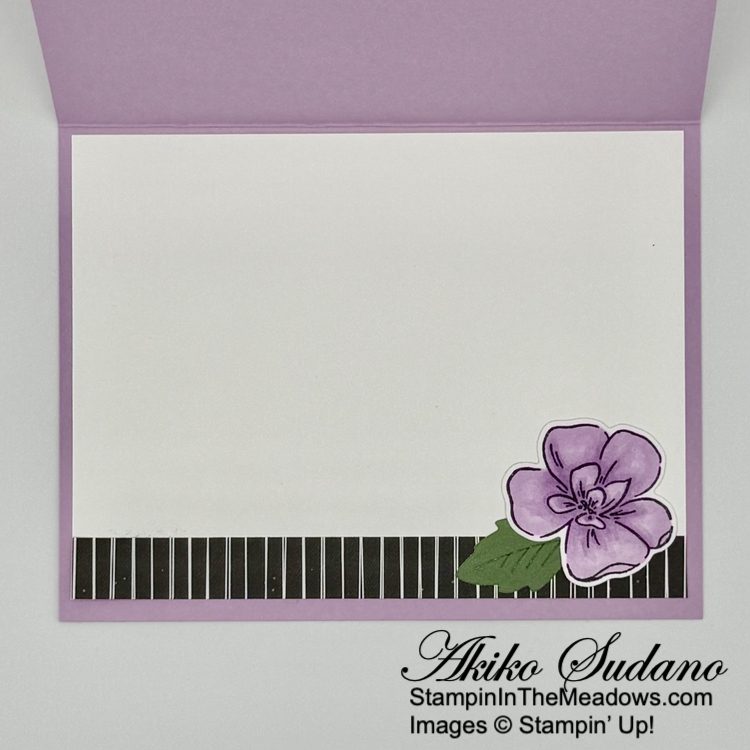
For the inside, I adhered a strip of DSP to the bottom of a Basic White panel. I cut a single leaf from the Stampin’ Up! Thankful Garden leaf cluster die and adhered it and the last flower to the panel. I adhered the panel to the inside of the card with Stampin’ Seal.
The flowers from the Stampin’ Up! Thankful Garden bundle are so pretty and can be colored in so many ways! I also love how you have dies to cut single flowers from the bouquets because it gives you more options to use the stamp set. It’s a wonderful bundle!
On with the Hop! Click on the Next Blog button to move forward to see the beautiful project Karen Ksenzakovichas created.
If you get lost along the way, here are the participants for the hop:
If you need any stamping supplies, I’d be very happy to be your Demonstrator. Just click on the Shop Now button on the right side of the screen to go directly to my online store or contact me if you have any questions.
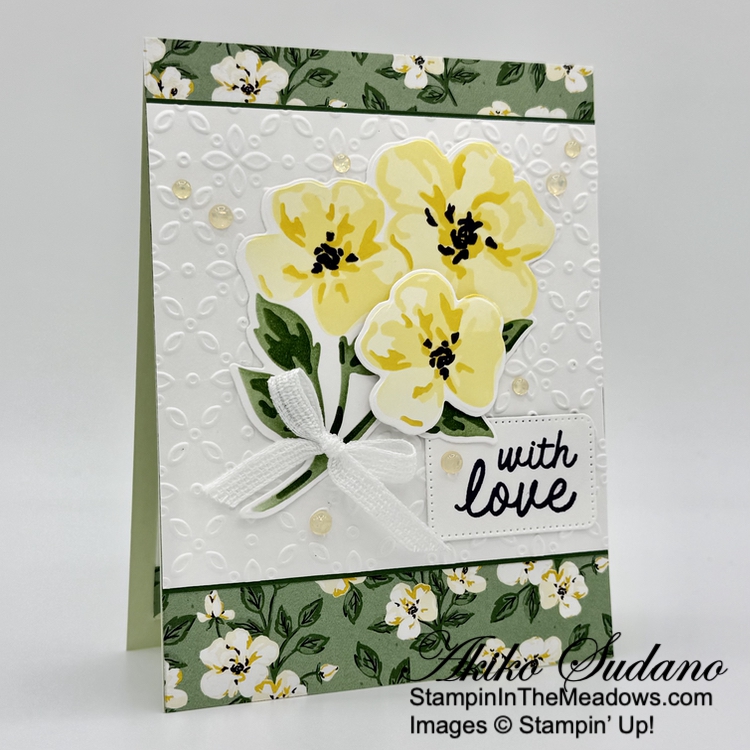
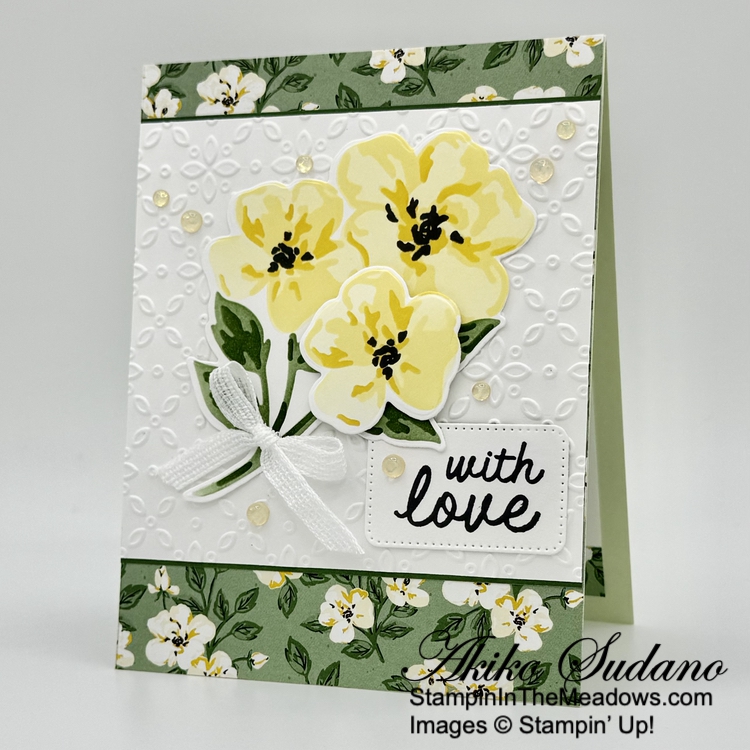
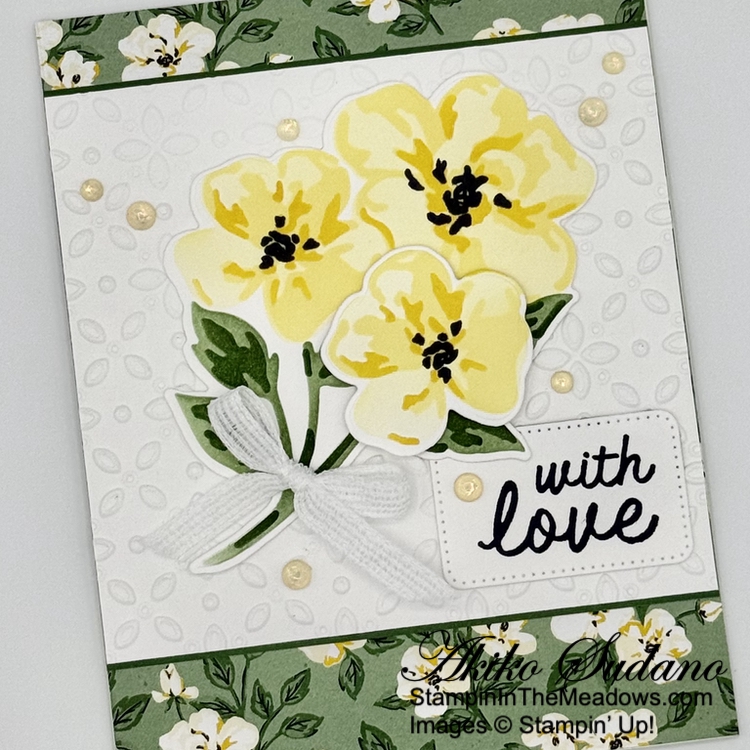
Good Morning! There’s a new release of Online Exclusives today and one of the new bundles is the pretty Stampin’ Up! Thankful Garden bundle. This is a stamp, die and mask bundle with big, bold flowers and pretty sentiments. I used the masks to make my flowers today and I’ve paired it with the coordinating Lovely Garden designer series paper. You can find the products I used at the bottom of my post along with the card stock sizes.
I adhered a panel of Lovely Garden designer series paper to the front of a Soft Sea Foam card base with liquid glue. I was going to use Garden Green, but I wanted a softer color – I think it works. I embossed a Basic White panel with the Eyelet 3D embossing folder and adhered strips of dark Garden Green two-tone card stock to the top and bottom edges. The two Tone card stock is thinner than regular card stock and I didn’t want the extra bulk and since I was adhering the embossed panel with liquid glue, I think it’s a great option! It gives me just a little stronger definition between the embossed panel and DSP.
The masks for the Stampin’ Up! Thankful Garden bundle are numbered 1 – 5 and have little notches to help line them up. I applied Lemon Lolly with Blending Brushes to 1 and 2. I applied the ink a little darker on the second mask. I used Daffodil Delight on the third mask to get the darkest highlights. The last two masks are for the leaves and I used Garden Green ink, making the ink darker on the last one. I used Memento Tuxedo Black ink to stamp the flower centers and cut the flowers out with the large coordinating die. I had to do this twice because the die didn’t line up correctly the first time. So on the second attempt, I snugged the stems up tighter against the flower and checked my die after I laid down enough Garden Green ink. For the third flower, I just used ink on the smaller flower in the masks (no need to do the stems). and cut it out with the small flower die. I adhered the flower and stems to the card with glue dots and popped the small flower on top with dimensionals.
I stamped sentiment from theStampin’ Up! Thankful Garden stamp set using Memento Tuxedo Black ink on Basic White and cut it out with the small rectangle die from the Nested Essentials dies. I adhered the label to the card with glue dots. I made a bow with the new white ribbon and adhered it with a glue dot and finished with daffodil Delight opal rounds.
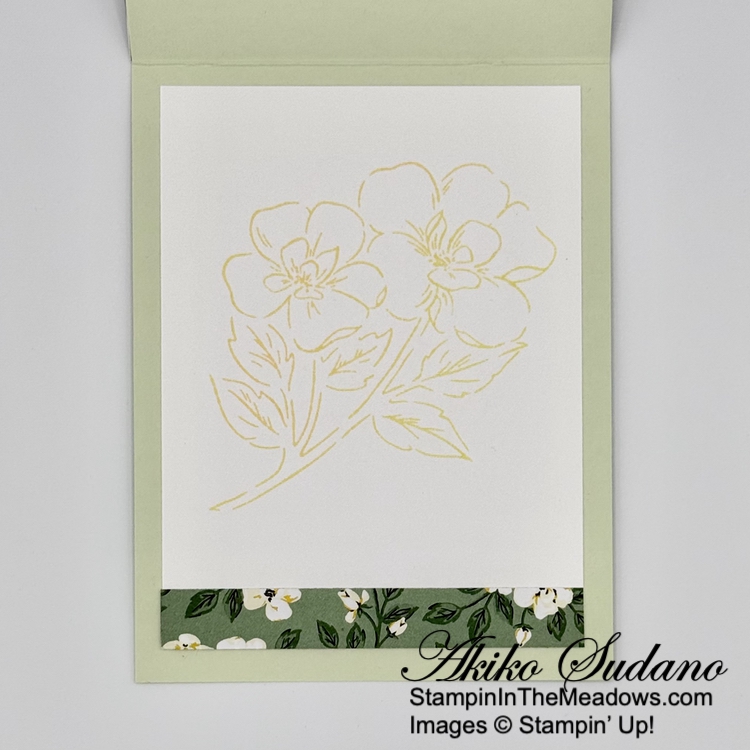
For the inside panel, I stamped the the flowers from the Stampin’ Up! Thankful Garden stamp set using Lemon Lolly ink on a Basic White panel. I trimmed the bottom with DSP and adhered it to the inside of the card with Stampin’ Seal.
The flowers from the Stampin’ Up! Thankful Garden bundle are so versatile and can be colored in so many ways. I think it would have been a little easier to align the coordinating die if I had stamped the whole flower first, but I wanted the look without the stamped image. And I love the black stamped center accents!
Next, I’ll have to try coloring the stamped outline image. This pretty bundle can be used in so many ways. Check it out along with the other new Online Exclusives here.
If you need any stamping supplies, I’d be very happy to be your Demonstrator. Just click on the Shop Now Button on the right side of the screen to go directly to my Online store or contact me if you have any questions. Happy Stamping!
See the current Stampin’ Up! Last Chance items here
Have any questions? I’d be happy to help, click here to contact me.
Cardstock Cuts for this project:
Soft Sea Foam – 4-1/4″ x 11″ card base scored at 5-1/2″
Garden Green Two-Tone – two 1″ x 4-1/4″ strips (embossed panel mat)
Basic White – 4″ x 4-1/4″ (embossed front background), 3-3/4″ x 5″ (inside panel), 3-1/2″ x 3-1/2″ (die cut flowers), 2-1/2″ x 2-1/2″ (die cut flower), 1-1/2″ x 2″ (label)
Lovely Garden DSP – 4-1/4″ x 5-1/2″ (front background), 1/2″ x 3-3/4″ (inside trim)
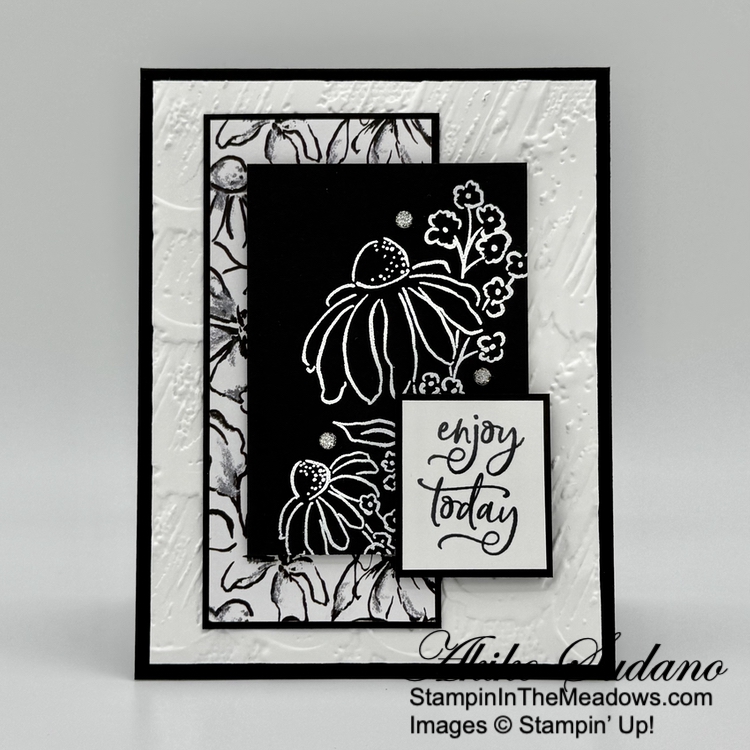
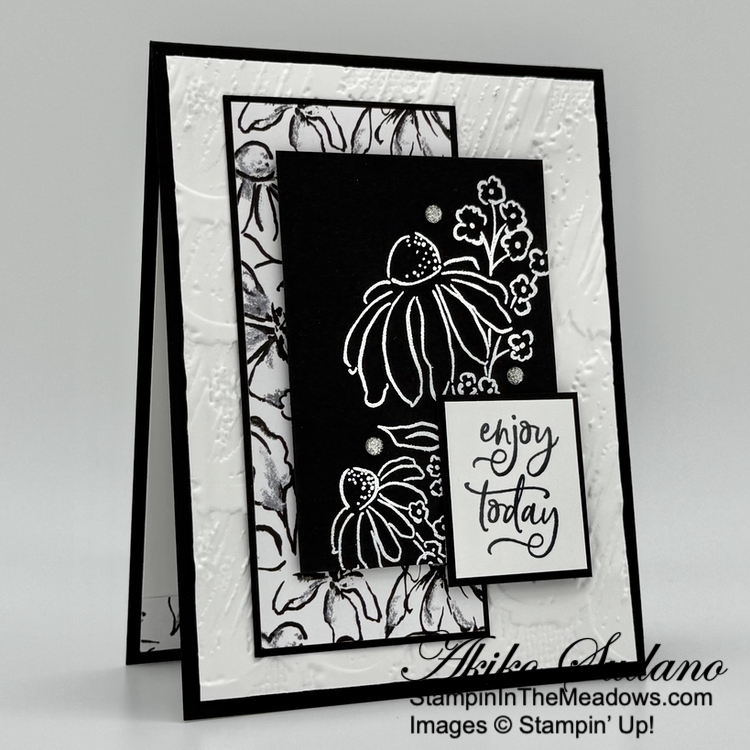
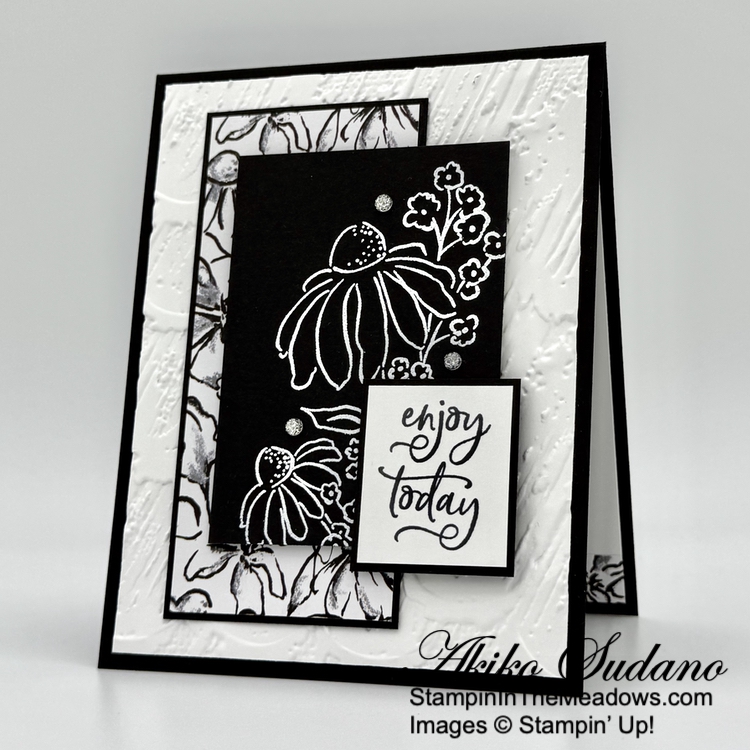
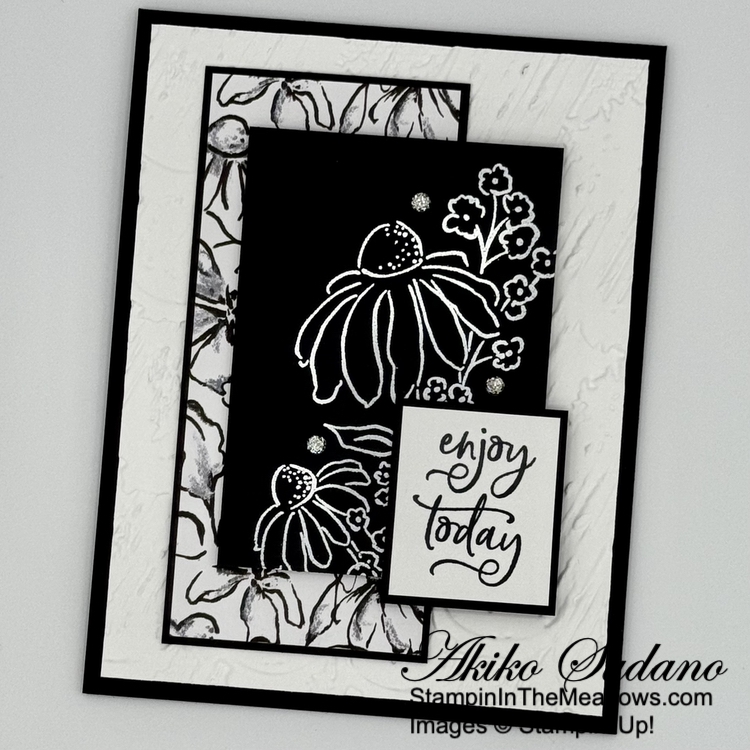
Good Morning! I used the pretty daisy image from the Stampin’ Up! Mixed Florals stamp set with the pretty sentiment from the Labeled with Love stamp set o make an monochromatic black and white card for today. You can find the products I used at the bottom of my post along with the card stock sizes.
I embossed a Basic White panel with the Plaster Painting 3D embossing folder and adhered it to the front of a Basic Black card base with liquid glue. I adhered a black and white floral panel of Mixed Media Florals designer series paper to a Basic Black mat and adhered it to the card.
I stamped the daisy image from the Stampin’ Up! Mixed Florals stamp set using Versamark ink on a Basic Black panel. I sprinkled it with white embossing powder and shook off the excess. I heated the powder with my heat tool until it was bright and shiny and popped it on the card with dimensionals.
I stamped sentiment from theLabeled with Love stamp set using Memento Tuxedo Black ink ink on Basic White and adhered it to a basic Black mat. I adhered it to the card with glue dots and finished the card with clear sparkle dots.
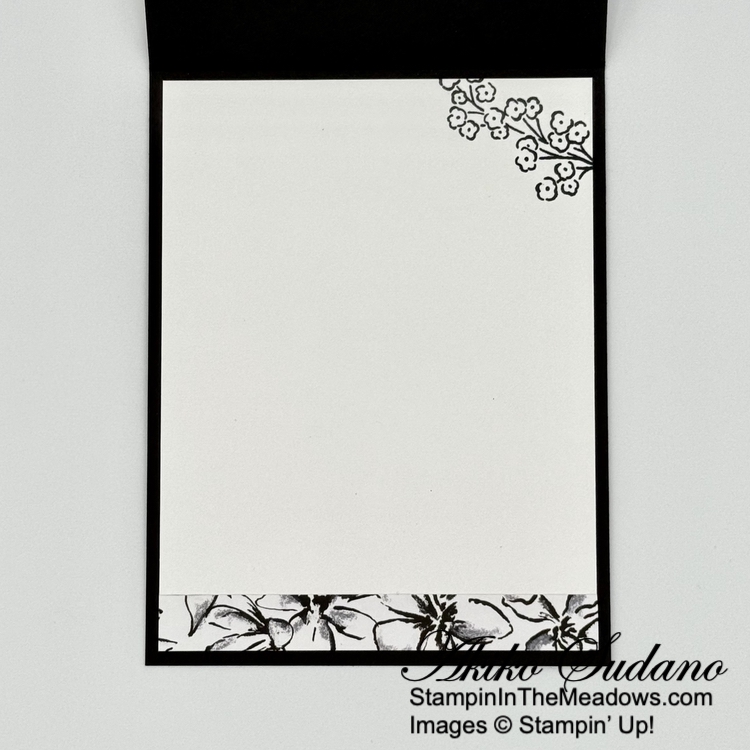
For the inside panel, I stamped the the floral sprig from the Stampin’ Up! Mixed Florals stamp set using Memento Tuxedo Black ink on a Basic White panel. I trimmed the bottom with DSP and adhered it to the inside of the card with Stampin’ Seal.
I love the Mixed Media Florals designer series paper and the floral images go well with the stamped daisy from the Stampin’ Up! Mixed Florals stamp set. And I love that sentiment from the Labeled with Love stamp set – the curvy script goes perfect with the flowers. And the sentiment is the perfect start to the week – Enjoy!!
If you need any stamping supplies, I’d be very happy to be your Demonstrator. Just click on the Shop Now Button on the right side of the screen to go directly to my Online store or contact me if you have any questions. Happy Stamping!
![With You In Mind Photopolymer Stamp Set (English) [ 164747 ]](https://assets1.tamsnetwork.com/images/EC042017NF/164747s.jpg "With You In Mind Photopolymer Stamp Set (English) [ 164747 ]")
![Pressed Flowers Embossing Folder [ 165614 ]](https://assets1.tamsnetwork.com/images/EC042017NF/165614s.jpg "Pressed Flowers Embossing Folder [ 165614 ]")
![Floral Impressions 12" X 12" (30.5 X 30.5 Cm) Designer Series Paper [ 165603 ]](https://assets1.tamsnetwork.com/images/EC042017NF/165603s.jpg "Floral Impressions 12\" X 12\" (30.5 X 30.5 Cm) Designer Series Paper [ 165603 ]")
![Peach Pie 8 1/2" X 11" Cardstock [ 163799 ]](https://assets1.tamsnetwork.com/images/EC042017NF/163799s.jpg "Peach Pie 8 1/2\" X 11\" Cardstock [ 163799 ]")
![Garden Green 8-1/2" X 11" Cardstock [ 102584 ]](https://assets1.tamsnetwork.com/images/EC042017NF/102584s.jpg "Garden Green 8-1/2\" X 11\" Cardstock [ 102584 ]")
![Basic White 8 1/2" X 11" Cardstock [ 166780 ]](https://assets1.tamsnetwork.com/images/EC042017NF/166780s.jpg "Basic White 8 1/2\" X 11\" Cardstock [ 166780 ]")
![Versamark Pad [ 102283 ]](https://assets1.tamsnetwork.com/images/EC042017NF/102283s.jpg "Versamark Pad [ 102283 ]")
![Basics Wow! Embossing Powder [ 165679 ]](https://assets1.tamsnetwork.com/images/EC042017NF/165679s.jpg "Basics Wow! Embossing Powder [ 165679 ]")
![Strawberry Slush & Pretty In Pink Gems [ 165615 ]](https://assets1.tamsnetwork.com/images/EC042017NF/165615s.jpg "Strawberry Slush & Pretty In Pink Gems [ 165615 ]")
![White 1/4" (6.4 Mm) Ribbon [ 165562 ]](https://assets1.tamsnetwork.com/images/EC042017NF/165562s.jpg "White 1/4\" (6.4 Mm) Ribbon [ 165562 ]")


![Wonderful Thoughts Photopolymer Stamp Set (English) [ 161899 ]](https://assets1.tamsnetwork.com/images/EC042017NF/161899s.jpg "Wonderful Thoughts Photopolymer Stamp Set (English) [ 161899 ]")
![Wonderful Thoughts Dies (English) [ 161491 ]](https://assets1.tamsnetwork.com/images/EC042017NF/161491s.jpg "Wonderful Thoughts Dies (English) [ 161491 ]")
![Darling Duckling 8 1/2" X 11" Cardstock [ 165622 ]](https://assets1.tamsnetwork.com/images/EC042017NF/165622s.jpg "Darling Duckling 8 1/2\" X 11\" Cardstock [ 165622 ]")
![Garden Green 12" X 12" (30.5 X 30.5 Cm) Two Tone Cardstock [ 166665 ]](https://assets1.tamsnetwork.com/images/EC042017NF/166665s.jpg "Garden Green 12\" X 12\" (30.5 X 30.5 Cm) Two Tone Cardstock [ 166665 ]")
![Pecan Pie Classic Stampin' Pad [ 161665 ]](https://assets1.tamsnetwork.com/images/EC042017NF/161665s.jpg "Pecan Pie Classic Stampin' Pad [ 161665 ]")
![Iridescent Pearl Basic Jewels [ 158987 ]](https://assets1.tamsnetwork.com/images/EC042017NF/158987s.jpg "Iridescent Pearl Basic Jewels [ 158987 ]")
![Darling Duckling 3/8" (1 Cm) Faux Linen Ribbon [ 165272 ]](https://assets1.tamsnetwork.com/images/EC042017NF/165272s.jpg "Darling Duckling 3/8\" (1 Cm) Faux Linen Ribbon [ 165272 ]")
![Tear & Tape Adhesive [ 154031 ]](https://assets1.tamsnetwork.com/images/EC042017NF/154031s.jpg "Tear & Tape Adhesive [ 154031 ]")


![Impressions Abloom Bundle (English) [ 165611 ]](https://assets1.tamsnetwork.com/images/EC042017NF/165611s.jpg "Impressions Abloom Bundle (English) [ 165611 ]")
![Nested Essentials Dies [ 161597 ]](https://assets1.tamsnetwork.com/images/EC042017NF/161597s.jpg "Nested Essentials Dies [ 161597 ]")
![Strawberry Slush 8 1/2" X 11" Cardstock [ 165625 ]](https://assets1.tamsnetwork.com/images/EC042017NF/165625s.jpg "Strawberry Slush 8 1/2\" X 11\" Cardstock [ 165625 ]")
![Strawberry Slush Classic Stampin' Pad [ 165286 ]](https://assets1.tamsnetwork.com/images/EC042017NF/165286s.jpg "Strawberry Slush Classic Stampin' Pad [ 165286 ]")
![Pretty In Pink Classic Stampin Pad [ 163807 ]](https://assets1.tamsnetwork.com/images/EC042017NF/163807s.jpg "Pretty In Pink Classic Stampin Pad [ 163807 ]")
![Crushed Curry Classic Stampin' Pad [ 147087 ]](https://assets1.tamsnetwork.com/images/EC042017NF/147087s.jpg "Crushed Curry Classic Stampin' Pad [ 147087 ]")
![Garden Green Classic Stampin' Pad [ 147089 ]](https://assets1.tamsnetwork.com/images/EC042017NF/147089s.jpg "Garden Green Classic Stampin' Pad [ 147089 ]")
![Granny Apple Green Stampin' Pad [ 147095 ]](https://assets1.tamsnetwork.com/images/EC042017NF/147095s.jpg "Granny Apple Green Stampin' Pad [ 147095 ]")
![2025–2027 In Color™ Flat Pearls [ 165192 ]](https://assets1.tamsnetwork.com/images/EC042017NF/165192s.jpg "2025–2027 In Color™ Flat Pearls [ 165192 ]")
![Strawberry Slush 3/8" (1 Cm) Faux Linen Ribbon [ 165274 ]](https://assets1.tamsnetwork.com/images/EC042017NF/165274s.jpg "Strawberry Slush 3/8\" (1 Cm) Faux Linen Ribbon [ 165274 ]")
![Heat Tool (Us And Canada) [ 129053 ]](https://assets1.tamsnetwork.com/images/EC042017NF/129053s.jpg "Heat Tool (Us And Canada) [ 129053 ]")
![Take Your Pick [ 144107 ]](https://assets1.tamsnetwork.com/images/EC042017NF/144107s.jpg "Take Your Pick [ 144107 ]")


![Textured Notes Bundle (English) [ 165556 ]](https://assets1.tamsnetwork.com/images/EC042017NF/165556s.jpg "Textured Notes Bundle (English) [ 165556 ]")
![Beautiful Motifs Dies [ 165205 ]](https://assets1.tamsnetwork.com/images/EC042017NF/165205s.jpg "Beautiful Motifs Dies [ 165205 ]")
![Beautiful Gallery 6" X 6" (15.2 X 15.2 Cm) Designer Series Paper [ 165196 ]](https://assets1.tamsnetwork.com/images/EC042017NF/165196s.jpg "Beautiful Gallery 6\" X 6\" (15.2 X 15.2 Cm) Designer Series Paper [ 165196 ]")
![Basic Beige 8 1/2" X 11" Cardstock [ 164511 ]](https://assets1.tamsnetwork.com/images/EC042017NF/164511s.jpg "Basic Beige 8 1/2\" X 11\" Cardstock [ 164511 ]")
![Pecan Pie 8 1/2" X 11" Cardstock [ 161717 ]](https://assets1.tamsnetwork.com/images/EC042017NF/161717s.jpg "Pecan Pie 8 1/2\" X 11\" Cardstock [ 161717 ]")
![Mossy Meadow Classic Stampin' Pad [ 147111 ]](https://assets1.tamsnetwork.com/images/EC042017NF/147111s.jpg "Mossy Meadow Classic Stampin' Pad [ 147111 ]")
![Crumb Cake Classic Stampin' Pad [ 147116 ]](https://assets1.tamsnetwork.com/images/EC042017NF/147116s.jpg "Crumb Cake Classic Stampin' Pad [ 147116 ]")
![Pressed Flower Motifs [ 165215 ]](https://assets1.tamsnetwork.com/images/EC042017NF/165215s.jpg "Pressed Flower Motifs [ 165215 ]")
![Linen Thread [ 104199 ]](https://assets1.tamsnetwork.com/images/EC042017NF/104199s.jpg "Linen Thread [ 104199 ]")


![Basic White Note Cards & Envelopes [ 159232 ]](https://assets1.tamsnetwork.com/images/EC042017NF/159232s.jpg "Basic White Note Cards & Envelopes [ 159232 ]")
![Pool Party 8-1/2" X 11" Cardstock [ 122924 ]](https://assets1.tamsnetwork.com/images/EC042017NF/122924s.jpg "Pool Party 8-1/2\" X 11\" Cardstock [ 122924 ]")
![Timid Tiger 8 1/2" X 11" Cardstock [ 165626 ]](https://assets1.tamsnetwork.com/images/EC042017NF/165626s.jpg "Timid Tiger 8 1/2\" X 11\" Cardstock [ 165626 ]")
![Mossy Meadow 8-1/2" X 11" Cardstock [ 133676 ]](https://assets1.tamsnetwork.com/images/EC042017NF/133676s.jpg "Mossy Meadow 8-1/2\" X 11\" Cardstock [ 133676 ]")
![Rainbow Adhesive Backed Dots [ 162758 ]](https://assets1.tamsnetwork.com/images/EC042017NF/162758s.jpg "Rainbow Adhesive Backed Dots [ 162758 ]")


![Grow With Love Bundle (English) [ 164804 ]](https://assets1.tamsnetwork.com/images/EC042017NF/164804s.jpg "Grow With Love Bundle (English) [ 164804 ]")
![Timeless Plaid 6" X 6" (15.2 X 15.2 Cm) Designer Series Paper [ 164678 ]](https://assets1.tamsnetwork.com/images/EC042017NF/164678s.jpg "Timeless Plaid 6\" X 6\" (15.2 X 15.2 Cm) Designer Series Paper [ 164678 ]")
![Lost Lagoon 8-1/2" X 11" Cardstock [ 133679 ]](https://assets1.tamsnetwork.com/images/EC042017NF/133679s.jpg "Lost Lagoon 8-1/2\" X 11\" Cardstock [ 133679 ]")
![Shaded Spruce 8-1/2" X 11" Cardstock [ 146981 ]](https://assets1.tamsnetwork.com/images/EC042017NF/146981s.jpg "Shaded Spruce 8-1/2\" X 11\" Cardstock [ 146981 ]")
![Blackberry Bliss Classic Stampin' Pad [ 147092 ]](https://assets1.tamsnetwork.com/images/EC042017NF/147092s.jpg "Blackberry Bliss Classic Stampin' Pad [ 147092 ]")
![Shaded Spruce Classic Stampin' Pad [ 147088 ]](https://assets1.tamsnetwork.com/images/EC042017NF/147088s.jpg "Shaded Spruce Classic Stampin' Pad [ 147088 ]")
![Lost Lagoon Classic Stampin' Pad [ 161678 ]](https://assets1.tamsnetwork.com/images/EC042017NF/161678s.jpg "Lost Lagoon Classic Stampin' Pad [ 161678 ]")
![Tiny Bee Trinkets [ 164714 ]](https://assets1.tamsnetwork.com/images/EC042017NF/164714s.jpg "Tiny Bee Trinkets [ 164714 ]")
![Natural Tones Linen Thread [ 164071 ]](https://assets1.tamsnetwork.com/images/EC042017NF/164071s.jpg "Natural Tones Linen Thread [ 164071 ]")


 Designer Series Paper")


")
")

 Designer Series Paper")


")

 Designer Series Paper")


