Stampin’ Up! Reindeer Fun Christmas Money Holder

Good Morning! One of the things that I need for Christmas are money holders. You know the story, Grandma doesn’t know what the kids are interested in, so she sends money so that they can get something they really want. And I guess I’m kind of old fashioned, because I think of sending money instead of gift cards or Amazon codes, so I decided I would make money holders and use the seriously cute Stampin’ Up! Reindeer Fun die cut reindeer. You can find the products I used at the bottom of my post along with the card stock sizes.

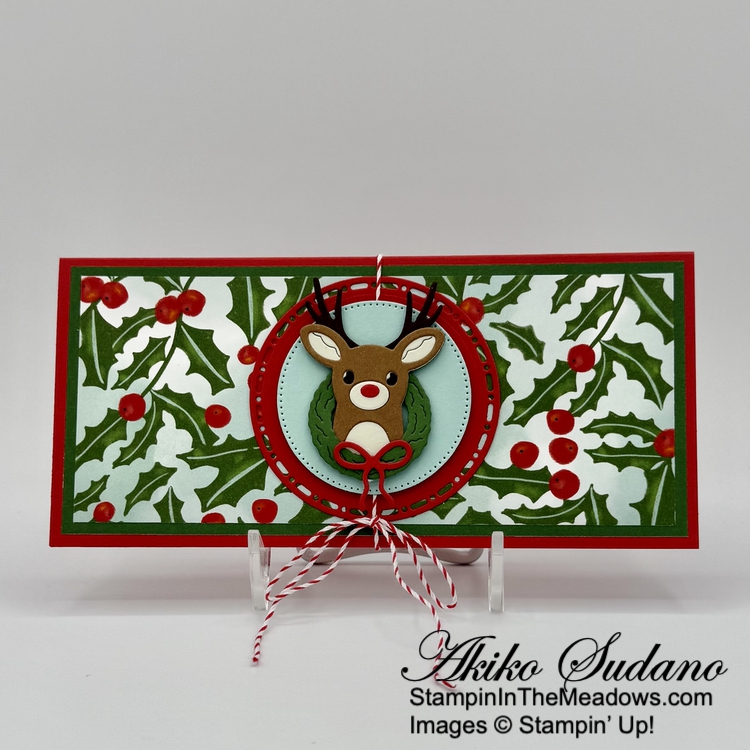
I used a 8-1/2″ x 7″ Poppy Parade panel, scored at 2″ and 5-1/4″ on the long side to make the base. I used Tear & Tape along the sides to secure the inside pocket and cut Garden Green mats for the pretty holly pattern in the Snowy Scenes designer series paper. I adhered the DSP to the mats and adhered them to the front and pocket.

I used the cute die cut reindeer from the Stampin’ Up! Reindeer Fun dies as the focal point for my money holder. I used Early Espresso, Basic Beige and Pecan Pie to make the reindeer and Poppy Parade for his nose. I did cut two extra Basic Beige ovals so that his snout and nose would be higher than his face. After assembling the deer, I cut a Garden Green wreath and Poppy Parade bow and adhered it to the deer with glue dots.

I used the Stylish Shapes dies to cut a Pool Party circle and adhered the deer to the circle with glue dots. I used a Spotlight on Nature circle die to cut a Poppy Parade panel and adhered it to the front with liquid glue. I taped a long length of Real Red Baker’s twine to the center and tied a bow at the bottom. I adhered the deer on top with dimensionals.

For the inside of the money holder, I stamped the sentiment from the Stampin’ Up! Reindeer Fun stamp set using Poppy Parade ink on a Pool Party strip and cut it out with the Stylish Shapes die. I adhered the label to the pocket with liquid glue. I stamped the longer sentiment using Poppy Parade ink on a Basic White panel. I stamped the holly leaves in Garden Green and the berries in Poppy Parade. I adhered the panel to a Garden Green mat and then to the top flap of the money holder.

The little deer is so cute and really looks impressive in person! It’s sure to delight anyone receiving money at Christmas.


Current Host Code: GBVHGQ4W

Use this host code when you order $50 or more and receive a Thank You gift from me!  The free gift is your choice of any item currently available valued up to $10.00.

If your order is over $150, please do not use the host code since you’ll receive your own Host Dollars plus I’ll still send you the Thank You gift!  This host code can be used by anyone, no club or commitment required. Let me know if you have any questions.


If you need any stamping supplies, I’d be very happy to be your Demonstrator.  Just click on the Shop Now Button on the right side of the screen to go directly to my Online store or contact me if you have any questions.  Happy Stamping!

Thanks for stopping by and have a great day!

Akiko

  • Visit my online store here
  • See the current Stampin’ Up! clearance rack specials here
  • Earn FREE Stampin’ Up! products through my Wildflower Frequent Shopper Program – my way of saying thank you to my online frequent shopper customers.
  • Have any questions? I’d be happy to help, click here to contact me.

Cardstock Cuts for this project:

  • Poppy Parade – 7″ x 8-1/2″ base, scored at 2″ and 5-1/4″, 3″ x 3″ (die cut circle), 1″ x 1″ (die cut bow)
  • Garden Green – two 3″ x 6-3/4″ panels (front and inside mats), 1-3/4″ x 6-3/4″ (pocket DSP mat), 1-1/2″ x 1-1/2″ (die cut wreath)
  • Early Espresso – 1-3/4″ x 2-1/4″ (die cut deer w/ antlers)
  • Basic Beige – 1-3/4″ x 1-3/4″ (die cut deer – middle layer)
  • Pecan Pie – 1-3/4″ x 1-3/4″ (die cut deer – top layer)
  • Pool Party – 2-1/2″ x 2-1/2″ (die cut circle), 1-1/4″ x 3″ (label)
  • Basic White – 2-3/4″ x 6-1/2″ (inside panel)
  • Snowy Scenes DSP – 2-3/4″ x 6-1/2″ (front background), 1-1/2″ x 6-1/2″ (pocket background)

Stampin’ Up! products used in this project:


Stampin’ Up! Happy Hibiscus for the Happy Inkin’ Thursday Blog Hop

Good Morning and welcome to the Happy Inkin’ Thursday Blog Hop! I used the Stampin’ Up! Happy Hibiscus bundle to make a congratulations card for today. You can find the supplies I used along with card stock cuts at the bottom of my post.

We have a fun sketch challenge this week and my interpretation was to use the three flowers in the bundle as the flourishes!

I stamped the triple flower stamp in the Stampin’ Up! Happy Hibiscus stamp set using Poppy Parade ink on Basic White and I used stamped off Poppy Parade for the fill of each flower. I used the hybrid embossing folder and dies to cut the flowers out, but I had to cut the flowers apart before die cutting and embossing – I found it so much easier to line up the flower, die and embossed image one at a time.

I used the large leaf die from the Stampin’ Up! Happy Hibiscus dies to cut four leaves from Garden Green and adhered them to the card with glue dots. I used the sprig die from the Cheerful Daisies dies to cut two sprigs from Pecan Pie and adhered them to the card. I cut two of the small leaves from the Stampin’ Up! Happy Hibiscus dies from Lost Lagoon and adhered them. Finally I adhered the die cut/embossed flowers using glue dots on the two side flowers and dimensionals on the center flower.

I cut three small flowers from Petal Pink using the small flower die from the Stampin’ Up! Happy Hibiscus dies and adhered them to the card. I added Crumb Cake shimmer gems to the flower centers and adhered a quadruple loop linen thread bow to the bottom.

For the inside panel, I stamped the sentiment from the Stampin’ Up! Happy Hibiscus stamp set using Pecan Pie ink on Basic White. I stamped the flower twice stamped off Poppy Parade ink and the leaves in twice stamped off Garden Green ink. I adhered the panel to the inside of the card with Stampin’ Seal.

There are so many ways to color the pretty flowers in the Stampin’ Up! Happy Hibiscus bundle and so many pretty coordinating dies.

On with the Hop! Click on the Next Blog button to move forward to see the beautiful project Karen Ksenzakovic has created.

If you get lost along the way, here are the participants for the hop:


Current Host Code: GBVHGQ4W

Use this host code when you order $50 or more and receive a free gift from me!  The free gift is your choice of any item currently available valued up to $10.00!

If your order is over $150, please do not use the host code since you’ll receive your own Host Dollars plus I’ll still send you the free gift!  This host code can be used by anyone, no club or commitment required. Let me know if you have any questions.


If you need any stamping supplies, I’d be very happy to be your Demonstrator.  Just click on the Shop Now button on the right side of the screen to go directly to my online store or contact me if you have any questions. 

Thanks for stopping by and Happy Stamping!

Akiko

  • Visit my online store here
  • See the current Stampin’ Up! clearance rack specials here
  • Earn FREE Stampin’ Up! products through my Wildflower Frequent Shopper Program – my way of saying thank you to my online frequent shopper customers.
  • Have any questions? I’d be happy to help, click here to contact me.

Cardstock Cuts for this project:

  • Crumb Cake – 5-1/2″ x 8-1/2″ card base, scored at 4-1/4″
  • Petal Pink – 1″ x 3″ (die cut flowers)
  • Garden Green – 1-3/4″ x 4″ (die cut leaves)
  • Pecan Pie – 2-1/4″ x 3″ (die cut sprigs)
  • Lost Lagoon – 1-1/4″ x 2-1/2″ (die cut leaves)
  • Basic White – 4″ x 5-1/4″ (inside panel), 3″ x 4-1/2″ (flowers)
  • Perennial Lavender DSP – 4″ x 5-1/4″ (front background)

Stampin’ Up! products used in this project:


Stampin’ Up! Autumn Expressions Card

Happy Saturday Morning! The Stampin’ Up! Autumn Expressions bundle is one of the pretty fall bundles the last mini catalog and it goes so well with the beautiful Splendid Autumn designer series paper. The weather has turned cold, so I was inspired to pull these out and make a fall friendship card. You can find the products I used at the bottom of my post along with the card stock sizes.

I adhered a pretty fall landscape panel of Splendid Autumn designer series paper to the right side of a Wild Wheat mat. I embossed a strip of Cajun Craze card stock with the Distressed Tile 3D embossing folder and adhered it to the left side. I wrapped a length of Garden Green Linen Thread around the seam and made a bow and popped the layered panel on the front of a Copper Clay card base.

I adhered two gold metallic mesh leaves to the card with glue dots. I used the leaf dies from the Stampin’ Up! Autumn Expressions dies to cut Cajun Craze and Garden Green card stock. I cut a maple leaf using the Autumn Leaves dies and adhered the leaves on top of the mesh leaves with glue dots and dimensionals.

I stamped the sentiment from the Stampin’ Up! Autumn Expressions stamp set using Cajun Craze ink on Wild Wheat. I cut it out with the small label die from the Iconic Images dies and adhered it to the card glue dots. I finished the card with faux glass gems.

For the inside of the card, I stamped the sentiment from the Stampin’ Up! Autumn Expressions stamp set Cajun Craze ink on a Basic White panel. I stamped the oak leaves using twice stamped off Pecan Pie ink and the wood cut using stamped off Basic Beige ink. I adhered the panel to the inside of the card with Stampin’ Seal.

The Splendid Autumn designer series paper has such pretty landscapes that you can make pretty Fall cards real quick! And the pretty sentiments and die cuts from the Stampin’ Up! Autumn Expressions bundle make nice embellishments to customize the cards and make them extra special!


Current Host Code: GBVHGQ4W

Use this host code when you order $50 or more and receive a Thank You gift from me!  The free gift is your choice of any item currently available valued up to $10.00.

If your order is over $150, please do not use the host code since you’ll receive your own Host Dollars plus I’ll still send you the Thank You gift!  This host code can be used by anyone, no club or commitment required. Let me know if you have any questions.


If you need any stamping supplies, I’d be very happy to be your Demonstrator.  Just click on the Shop Now Button on the right side of the screen to go directly to my Online store or contact me if you have any questions.  Happy Stamping!

Thanks for stopping by and have a great day!

Akiko

  • Visit my online store here
  • See the current Stampin’ Up! clearance rack specials here
  • Earn FREE Stampin’ Up! products through my Wildflower Frequent Shopper Program – my way of saying thank you to my online frequent shopper customers.
  • Have any questions? I’d be happy to help, click here to contact me.

Cardstock Cuts for this project:

  • Copper Clay – 4-1/4″ x 11″ card base, scored at 5-1/2″
  • Wild Wheat – 4″ x 5-1/4″ (front mat), 1″ x 2″ (label)
  • Cajun Craze – 7/8″ x 5-1/8″ (embossed strip), 1″ x 1-1/2″ (die cut leaf)
  • Daffodil Delight – 1-3/4″ x 1-3/4″ (die cut leaf)
  • Garden Green – 1″ x 1-3/4″ (die cut leaf)
  • Basic White – 4″ x 5-1/4″ (inside panel)
  • Splendid Autumn 6″ x 6″ DSP – 3″ x 5-1/8″ (front background)

Stampin’ Up! products used in this project:


Stampin’ Up! Sophisticated Sled for the Happy Inkin’ Thursday Blog Hop

Good Morning and welcome to the Happy Inkin’ Thursday Blog Hop! Here’s a Christmas card with the pretty Stampin’ Up! Sophisticated Sled bundle with the pretty Nests of Winter designer series paper in a book Z-fold card. I used the awesome die cut sled and skates reminiscent of Christmas door front displays. You can find the supplies I used along with card stock cuts at the bottom of my post.

We have a color challenge this week and I used most of the colors in the card:

I scored and burnished the folds in the card base and glued the left side together to make the book bind end. I adhered panels of the Nests of Winter designer series paper to the ends and middle panel with liquid glue. I embossed the light side of the Pool Party two tone card stock (from the Scrapbooking Brochure) with the Snowflake Sky 3D embossing folder and adhered it to a panel of Pool Party card stock. I adhered the layered embossed panel to the center flap of the Z-fold, centering it on the card front. I love the embossed light Pool Party against the panel!

I die cut the sections of the sled and skates using the dies from the Stampin’ Up! Sophisticated Sled bundle. I used Real Red for the sled rails and Pecan Pie for the slats. For the skates, I used Real Red for the laces, silver foil for the blades and Basic White for the boots. I also cut two of the greenery boughs using Granny Apple Green and Garden Green card stock. I assembled the skates and sled with liquid glue. I tied a short length of Linen Thread to the sled handles (through the little holes on the side) and adhered the skates to a short length of Linen Thread and to the sled with glue dots. I adhered the Garden Green bough to the sled with a glue dot and cut the Granny Apple Green bough in half before adhering it . I finished with the triple berries.

I adhered the decorated sled to the middle section of the card with dimensionals. I stamped the sentiment from the Stampin’ Up! Sophisticated Sled stamp set in Real Red ink on a Pool Party panel and cut it out with the small banner die from the Stylish Shapes dies. I adhered it to the card with glue dots and dimensionals.

For the inside panel, I stamped the sentiment from the Stampin’ Up! Sophisticated Sled stamp set using Real Red ink on Basic White. I stamped the cardinal in Memento Tuxedo Black ink and colored it with the Real Red and Daffodil Delight Stampin Blends. I adhered the panel to the inside of the card with Stampin’ Seal next to the DSP strip.

The Stampin’ Up! Sophisticated Sled bundle is just beautiful and definitely one of my all time favorites! The die cut sled is so realistic and well done and it’s pretty easy and fun to assemble. I used to decorate my husband’s childhood sled and prop it on the front porch for Christmas, and it looked pretty much like this one.

On with the Hop! Click on the Next Blog button to move forward to see the beautiful project Karen Ksenzakovic has created.

If you get lost along the way, here are the participants for the hop:


Current Host Code: GBVHGQ4W

Use this host code when you order $50 or more and receive a free gift from me!  The free gift is your choice of any item currently available valued up to $10.00!

If your order is over $150, please do not use the host code since you’ll receive your own Host Dollars plus I’ll still send you the free gift!  This host code can be used by anyone, no club or commitment required. Let me know if you have any questions.


If you need any stamping supplies, I’d be very happy to be your Demonstrator.  Just click on the Shop Now button on the right side of the screen to go directly to my online store or contact me if you have any questions. 

Thanks for stopping by and Happy Stamping!

Akiko

  • Visit my online store here
  • See the current Stampin’ Up! clearance rack specials here
  • Earn FREE Stampin’ Up! products through my Wildflower Frequent Shopper Program – my way of saying thank you to my online frequent shopper customers.
  • Have any questions? I’d be happy to help, click here to contact me.

Cardstock Cuts for this project:

  • Pool Party – 5-1/2″ x 8-1/2″ card base, scored at 4-1/4″, 5-1/4″ and 7″, 3″ x 5-1/2″ (front Z-fold panel), 1-1/4″ x 2″ (label)
  • Light Pool Party – 2-3/4″ x 5-1/4″ (embossed panel)
  • Garden Green – 1-1/2″ x 2-1/2″ (die cut bough)
  • Granny Apple Green – 1-1/2″ x 2-1/2″ (die cut bough)
  • Real Red – 2″ x 4″ (sled rails, skate laces)
  • Pecan Pie – 2-1/4″ x 3″ (sled slats)
  • Silver Foil – 1″ x 1-1/2″ (skate blades)
  • Basic White – 2-1/4″ x 5-1/4″ (inside panel), 1-1/2″ x 2″ (skates)
  • Nests of Winter DSP – two 3/4″ x 5-1/4″ panels (side panels), 1-3/4″ x 5-1/4″ (middle panel)

Stampin’ Up! products used in this project:


Stampin’ Up! Decorative Trees for the Inkin’ Krew Blog Hop

Good Morning! Welcome to the November Inkin’ Krew Team Blog Hop! The theme for this month’s hop is “Merry Christmas or Happy Holidays” and I used the pretty Stampin’ Up! Decorative Trees bundle with the Snowy Scenes designer series paper to make a Z Fold Christmas card. You can find the supplies I used along with card stock cuts at the bottom of my post.

I scored and burnished a 5-1/2″ x 8-1/4″ Poppy Parade card base at 4-1/4″ and 7″ to make a Z fold card with a skinny front section. This 1-1/4″ front section is in the middle of the card, so I had to trim 1/4″ off the normal card length, but it’s nice and symmetric! I adhered the panels of Snowy Scenes designer series paper to the different sections of the card base.

I used the third largest octagon die from the Countryside Corners die to cut a Pool Party panel and the next smallest size to cut a Basic White panel. I embossed the Basic White panel with the Snowflake Sky 3D embossing folder and adhered it to the mat. I adhered the layered octagons to the skinny front panel with liquid glue.

I used the solid tree die from the Stampin’ Up! Decorative Trees dies to cut a Garden Green panel. I applied an adhesive sheet to the back of a Basic White panel and cut it with the snowflake overlay tree die. I pulled off the adhesive backing and adhered the snowflake overlay to the Garden Green tree. I applied adhesive sheets to the back of a Poppy Parade panel and cut the garland dies. I removed the adhesive sheet backing and adhered the garlands to the tree. I cut a Daffodil Delight star and adhered it to the top of the tree and popped the tree onto the octagons with dimensionals. I finished the tree with iridescent faceted gems.

I stamped part of the sentiment from the Stampin’ Up! Decorative Trees stamp set using Poppy Parade ink on a Pool Party panel. I cut it out with the small octagon from the Countryside Corners dies and adhered it to the skinny front panel.

For the inside of the card, I stamped the sentiment from the Stampin’ Up! Decorative Trees stamp set in Poppy Parade ink on a Basic White panel. I stamped the holly leaves and berries from the Snowy Wonder stamp set in Garden Green and Poppy Parade ink in the corner and adhered the panel to the inside of the card with Stampin’ Seal, butting it up next to the DSP trim

The Stampin’ Up! Decorative Trees bundle is one of my favorite Christmas tree bundles of all time! There are so many different looks with the overlays, and even with plain cardstock, the trees are beautiful! They’re also fun to make!!

On With The Hop! Click on the Next Blog button to move forward to Ann Louise’s project or click the Previous Blog button to move back to see the project that Christie created.

If you get lost along the way, here are the participants for the hop:

  1. Tara Carpenter 
  2. Mary Deatherage 
  3. Christie King 
  4. Akiko Sudano  <– you are here
  5. Ann Louise Fodgaard 
  6. Shirley Gentry 
  7. Karen Ksenzakovic 
  8. Sue Prather 
  9. Karen Finkle 
  10. Carol Buckalew 
  11. Amy Koenders

Current Host Code: GBVHGQ4W

Use this host code when you order $50 or more and receive a Thank You gift from me!  The free gift is your choice of any currently available item valued up to $10.00.

If your order is over $150, please do not use the host code since you’ll receive your own Host Dollars plus I’ll still send you the Thank You gift!  This host code can be used by anyone, no club or commitment required. Let me know if you have any questions.


If you need any stamping supplies, I’d be very happy to be your Demonstrator.  Just click on the Shop Now button on the right side of the screen to go directly to my online store or contact me if you have any questions.  Happy Stamping!

Thanks for stopping by and have a great week!

Akiko

  • Visit my online store here
  • See the current Stampin’ Up! clearance rack specials here
  • Earn FREE Stampin’ Up! products through my Wildflower Frequent Shopper Program – my way of saying thank you to my online frequent shopper customers.
  • Have any questions? I’d be happy to help, click here to contact me.

Cardstock Cuts for this project:

  • Poppy Parade – 5-1/2-1/4″ x 8-1/4″ card base, scored at 4-1/4″ and 7″, 1″ x 2-1/2″ (garland die cuts)
  • Pool Party – 2-3/4″ x 4-1/4″ (octagon mat), 1″ x 3″ (label)
  • Garden Green – 2-1/2″ x 3-1/2″ (die cut tree)
  • Daffodil Delight – 1″ x 1″ (die cut star)
  • Basic White – 2-1/2″ x 5-1/4″ (inside panel), 2-1/4″ x 3-3/4″ (embossed octagon), 2-1/2″ x 3-1/2″ (die cut tree overlay)
  • Snowy Scenes DSP – two 2-1/2″ x 5-1/4″ panels (front and back of middle section), 1-1/2″ x 5-1/4″ (inside trim), 1″ x 5-1/4″ (front section background)

Stampin’ Up! products used in this project:

Stampin’ Up! Sweetest Star Christmas Card

Happy Saturday! Here’s a simple Christmas card made with the fun Stampin’ Up! Sweetest Star bundle. I used the punch with the pretty Take A Bow 6″ x 6″ designer series paper to make dimensional stars for the card front. You can find the products I used at the bottom of my post along with the card stock sizes.

I embossed a Real Red panel with the Forever Plaid 3D embossing folder and adhered it to the front of a Thick Basic White card base.

I used the Stampin’ Up! Sweetest Star punch to punch out three stars from the Take A Bow 6″ x 6″ designer series papers. I scored each star 5 times from the point to the opposite corner and folded it along the score lines, mountain style at the points and valley style at the corners. This makes the center pop up! I applied two dimensionals, stacked on top of each other in the center back of each star.

I stamped the sentiment from the Stampin’ Up! Sweetest Star stamp set in two steps, so that it wrapped along two lines. I inked part of the stamp using Real Red ink, stamped it on Basic White, cleaned it off and inked and stamped the remainder underneath. I cut it out with the long label die from the Happy Hibiscus dies (I love the scored ends!) and adhered it to the card. I positioned and adhered the stars and finished with a baker’s twine bow and green iridescent dots.

For the inside of the card, I stamped the sentiment from the Stampin’ Up! Sweetest Star stamp set in Garden Green ink on a Basic White panel. I stamped the star cluster from the Decorative Trees stamp set using Real Red ink in the upper corner and trimmed the bottom with DSP. I adhered the panel to a Real Red mat and adhered the layered panel to the inside of the card with Stampin’ Seal.

I love dimensional stars on Christmas cards and the chubby star from the Stampin’ Up! Sweetest Star bundle is perfect for this technique. The festive Take A Bow DSP is also perfect and full of holiday cheer!


The November Paper Pumpkin Kit – Filled With Joy!

Today is the last day to sign up to receive the November Paper Pumpkin kit! Celebrate Christmas with adorable stockings and gift tags!

  • Makes 8 projects: 8 stockings with 8 gift tags
  • Precut paper pieces
  • Safety pins and specialty gold foil
  • Poppy Parade Classic Stampin’ Spot

Coordinating Colors: Flirty Flamingo, Pool Party, Poppy Parade, Shaded Spruce, Very Vanilla

And the coordinating add-on is the Merry Tags & More dies – item #165639 for $12 (available while supplies last).

If you’re interested in subscribing to Paper Pumpkin, you can either sign up for a subscription where you are billed monthly for your kit or you can purchase a prepaid subscription in my Online Store. To see more information and to sign up for the monthly subscription click here. To see the options for prepaid subscriptions in my Online Store, click here.

Sign up deadline for the November 2024 kit is November 10, 2024. Note: Supplies may be limited toward the end of the subscription period.


Save on Select Items From the Annual Catalog During the Seasonal Sale November 13 – 15, 2024!

Create more by spending less during the Seasonal Sale! Between November 13–15, you can get 20% off all stamp bundles and Designer Series Paper and 10% off select ink and cardstock from the 2024–2025 Annual Catalog. Make sure to act quickly on this limited-time-only sale!

Details:

  • Sales Period: November 13-15 2024
  • From the 2024–2025 Annual Catalog:
    • 10% off ink, including pads, refills, markers, and Stampin’ Blends. Ink pad bundles and third-party ink pads are NOT included.
    • 10% off cardstock. Close To My Heart cardstock is NOT included.
    • 20% total off all stamp and die bundles and stamp and punch bundles. (Stamp bundles are normally 10% off. With this sale you get an additional 10% off.)
    • 20% off all Designer Series Paper.
  • Shop online to see the full selection of discounted products available; this is a limited time offer.
  • Products are available while supplies last.
  • Discounts are automatically applied when sale items are added to any order, including Starter Kits.
  • Ordering Deadline: November 15, 2024, at 11:59 p.m. (MT)

Current Host Code: GBVHGQ4W

Use this host code when you order $50 or more and receive a Thank You gift from me!  The free gift is your choice of any item currently available valued up to $10.00.

If your order is over $150, please do not use the host code since you’ll receive your own Host Dollars plus I’ll still send you the Thank You gift!  This host code can be used by anyone, no club or commitment required. Let me know if you have any questions.


If you need any stamping supplies, I’d be very happy to be your Demonstrator.  Just click on the Shop Now Button on the right side of the screen to go directly to my Online store or contact me if you have any questions.  Happy Stamping!

Thanks for stopping by and have a great day!

Akiko

  • Visit my online store here
  • See the current Stampin’ Up! clearance rack specials here
  • Earn FREE Stampin’ Up! products through my Wildflower Frequent Shopper Program – my way of saying thank you to my online frequent shopper customers.
  • Have any questions? I’d be happy to help, click here to contact me.

Cardstock Cuts for this project:

  • Thick Basic White – 4-1/4″ x 11″ card base, scored at 5-1/2″
  • Real Red – two 4″ x 5-1/4″ panels (embossed background and inside mat)
  • Basic White – 3-7/8″ x 5-1/8″ (inside panel), 1-1/4″ x 3-1/2″ (label),
  • Take A Bow 6″ x 6″ DSP – three 2-1/2″ x 2-1/2″ panels (punched stars), 1/2″ x 3-7/8″ (inside trim)

Stampin’ Up! products used in this project:


Stampin’ Up! Seaside Wishes with Splendid Autumn for the Happy Inkin’ Thursday Blog Hop

Good Morning and welcome to the Happy Inkin’ Thursday Blog Hop! I used some of the pretty sentiments from the Stampin’ Up! Seaside Wishes stamp set with the beautiful Splendid Autumn 6″ x 6″ designer series paper for a Fall love card. You can find the supplies I used along with card stock cuts at the bottom of my post.

We have a pretty sketch challenge this week. I wanted to show as much of the pretty sunset as I could, so I took the liberty to shrink the square:

I adhered a pretty sunset landscape panel of Splendid Autumn 6″ x 6″ designer series paper to the front of a Cajun Craze card base with liquid glue.

I stamped the sentiment from the Stampin’ Up! Seaside Wishes stamp set using Cajun Craze ink on the right side of a Basic Beige panel. I cut the sentiment with the rectangular Nested Essentials die and adhered it to the card with dimensionals.

I used the long greenery die from the Textured Florals dies to cut a Copper foil panel and a Mossy Meadow panel. I adhered the leafy die cuts together with glue dots and adhered them to the card with dimensionals and glue dots. I finished the card with a Copper Clay Linen thread bow and Faux Glass dots.

For the inside of the card, I stamped the sentiment from the Stampin’ Up! Seaside Wishes stamp set stamp set using Mossy Meadow ink ink on a Basic Beige panel. I stamped the rocks from the Stampin’ Up! Seaside Wishes stamp set in Gray Granite and the dots in Basic Beige. I trimmed the side with DSP and adhered the panel to the inside of the card with Stampin’ Seal.

The Splendid Autumn 6″ x 6″ designer series paper has such beautiful landscapes that are great for making easy and simple cards. And the Stampin’ Up! Seaside Wishes stamp set gave me the perfect sentiments to express love and appreciation of the beauty of nature.

On with the Hop! Click on the Next Blog button to move forward to see the beautiful project Karen Ksenzakovic has created.

If you get lost along the way, here are the participants for the hop:


Current Host Code: GBVHGQ4W

Use this host code when you order $50 or more and receive a free gift from me!  The free gift is your choice of any item currently available valued up to $10.00!

If your order is over $150, please do not use the host code since you’ll receive your own Host Dollars plus I’ll still send you the free gift!  This host code can be used by anyone, no club or commitment required. Let me know if you have any questions.


If you need any stamping supplies, I’d be very happy to be your Demonstrator.  Just click on the Shop Now button on the right side of the screen to go directly to my online store or contact me if you have any questions. 

Thanks for stopping by and Happy Stamping!

Akiko

  • Visit my online store here
  • See the current Stampin’ Up! clearance rack specials here
  • Earn FREE Stampin’ Up! products through my Wildflower Frequent Shopper Program – my way of saying thank you to my online frequent shopper customers.
  • Have any questions? I’d be happy to help, click here to contact me.

Cardstock Cuts for this project:

  • Cajun Craze – 4-1/4″ x 11″ card base, scored at 5-1/2″
  • Textured Copper – 1-1/2″ x 3-1/2″ (leaf sprig)
  • Mossy Meadow – 1-1/2″ x 3-1/2″ (leaf sprig)
  • Basic Beige – 3-3/4″ x 5″ (inside panel), 2″ x 2-1/2″ (label)
  • Splendid Autumn 6″ x 6″ DSP – 4″ x 5-1/4″ (front background), 1/2″ x 5″ (inside trim)

Stampin’ Up! products used in this project:


Stampin’ Up! Sophisticated Sled Wreath Christmas Card

Good Saturday Morning! The Stampin’ Up! Sophisticated Sled bundle is a wonderful bundle for making Christmas cards and other projects wonderful sleds, skates and Christmas greenery to go with the pretty sentiments. I used the wreath for today’s Christmas card, pairing it with the festive Take A Bow 6″ x 6″ designer series paper. You can find the products I used at the bottom of my post along with the card stock sizes.

The wreath is kind of small, so I decided to make the front flap shorter than the back, and use pretty DSP to show through. So I cut, scored and burnished my card base so that the fold is on the side and the front is 1″ shorter that the back. I adhered Real Red mats to the card front and inside panel and adhered the panels of Take A Bow 6″ x 6″ DSP to the mats.

I stamped the wreath from the Stampin’ Up! Sophisticated Sled stamp set using Mossy Meadow ink on Basic White and colored it with light Cherry Cobbler, light Lost Lagoon, light Granny Apple Green and dark Old Olive Stampin’ Blends. I cut it out with the coordinating die – it is such a pretty wreath! I cut a Basic White panel with the Stylish Shapes square and adhered it to the card front with liquid glue and popped the wreath on top with dimensionals. I colored a length of gingham ribbon with the dark Real Red Stampin’ Blend and made a bow. I adhered the bow to the top of the wreath with a glue dot.

I stamped the sentiments from the Greetings of the Season stamp set using Versamark ink on Real Red card stock. I sprinkled them with white embossing powder and shook off the excess powder. I heated them with my heat tool until they were bright and shiny and then cut them out with the small banner die from the Stylish Shapes dies. I used the two step method on both sentiments, making the ‘Merry‘ shorter and the “Christmas‘ longer. I adhered the labels to the card with dimensionals and finished the card with sparkle gems.

For the inside panel, I stamped the sentiment from the Stampin’ Up! Sophisticated Sled stamp set using Real Red ink on Basic White. I stamped the little cardinal from the stamp set using Memento Tuxedo Black ink on Basic White and colored it with Daffodil Delight, Real Red and Cherry Cobbler Stampin’ Blends. I cut it out with the coordinating die and adhered it next to the sentiment with a glue dot. I adhered the panel to the left side of the Real Red mat on the inside of the card with Stampin’ Seal.

The wreath in the Stampin’ Up! Sophisticated Sled bundle is small, but it’s so, so pretty and I love wreath Christmas cards. All the winter fun elements make the bundle really versatile, and I can’t wait to play with it again!


Current Host Code: GBVHGQ4W

Use this host code when you order $50 or more and receive a Thank You gift from me!  The free gift is your choice of any item currently available valued up to $10.00.

If your order is over $150, please do not use the host code since you’ll receive your own Host Dollars plus I’ll still send you the Thank You gift!  This host code can be used by anyone, no club or commitment required. Let me know if you have any questions.


If you need any stamping supplies, I’d be very happy to be your Demonstrator.  Just click on the Shop Now Button on the right side of the screen to go directly to my Online store or contact me if you have any questions.  Happy Stamping!

Thanks for stopping by and have a great day!

Akiko

  • Visit my online store here
  • See the current Stampin’ Up! clearance rack specials here
  • Earn FREE Stampin’ Up! products through my Wildflower Frequent Shopper Program – my way of saying thank you to my online frequent shopper customers.
  • Have any questions? I’d be happy to help, click here to contact me.

Cardstock Cuts for this project:

  • Thick Basic White – 5-1/2″ x 7-1/2″ card base, scored at 3-1/4″ (the front flap will be 1″ shorter than the back)
  • Real Red – 3″ x 5-1/4″ (front mat), 4″ x 5-1/4″ (inside mat), 3/4″ x 2″ (short label banner), 3/4″ x 2-1/2″ (long label banner)
  • Basic White – 2-7/8″ x 5-1/8″ (inside panel), 2-1/2″ x 2-1/2″ (wreath), 2-3/4″ x 2-3/4″ (die cut square), 1″ x 1″ (cardinal)
  • Take A Bow 6″ x 6″ DSP – 2-7/8″ x 5-1/8″ (front background), 7/8″ x 5-1/8″ (inside trim)

Stampin’ Up! products used in this project:


Stampin’ Up! Decorative Trees for the Happy Inkin’ Thursday Blog Hop

Good Morning and welcome to the Happy Inkin’ Thursday Blog Hop! I used the awesome Stampin’ Up! Decorative Trees bundle with the pretty Winter Meadow designer series paper to make a simple fun fold Christmas card in Pretty Peacock and gold. You can find the supplies I used along with card stock cuts at the bottom of my post.

We have a theme challenge this week:

I embossed a panel of Winter Meadow designer series paper with the Snowflake Sky 3D embossing folder and adhered it to a flat pretty Peacock card base. I scored and burnished the the mini pretty peacock card base and adhered it on top with liquid glue.

I cut the plain tree from the Stampin’ Up! Decorative Trees dies from Lost Lagoon and Brushed Metallic specialty paperand adhered them together. The Brushed Metallic paper is shiny and thin, so it needs extra support with dimensionals. I applied an adhesive sheet to the back of a Textured Gold Foil panel and used the curved tree branch die to cut it out. I removed the adhesive sheet backing and adhered it to the tree. I adhered a Pretty Peacock and gold bow to the card with a glue dot and adhered the layered tree on top with dimensionals.

I stamped the sentiment from the Stampin’ Up! Decorative Trees stamp set in Versamark ink on a Basic White panel. I sprinkled it with gold embossing powder and shook off the excess. I heated the sentiment with my heat tool until it was bright and shiny and cut it out with the long label die from the Autumn Trees dies. I adhered the label to the mini card with glue dots and finished the card with gold adhesive snowflakes, including adhering a snowflake to the tree top.

For the inside of the mini card, I stamped the sentiment from the Stampin’ Up! Decorative Trees stamp set using Pretty Peacock ink ink on a Basic White panel. I trimmed the bottom with DSP and adhered the panel to the inside of the mini card with Stampin’ Seal.

The beautiful overlay dies in the Stampin’ Up! Decorative Trees bundle are gorgeous with foil or glimmer paper and I love a Christmas card with lots of sparkle and shine. I think the Brushed Metallic paper is technically the retired Soft Succulent color, but it looks fantastic with Pretty Peacock and Lost Lagoon. Now which overlay should I use on my next card?

On with the Hop! Click on the Next Blog button to move forward to see the beautiful project Karen Ksenzakovic has created.

If you get lost along the way, here are the participants for the hop:


Current Host Code: GBVHGQ4W

Use this host code when you order $50 or more and receive a free gift from me!  The free gift is your choice of any item currently available valued up to $10.00!

If your order is over $150, please do not use the host code since you’ll receive your own Host Dollars plus I’ll still send you the free gift!  This host code can be used by anyone, no club or commitment required. Let me know if you have any questions.


If you need any stamping supplies, I’d be very happy to be your Demonstrator.  Just click on the Shop Now button on the right side of the screen to go directly to my online store or contact me if you have any questions. 

Thanks for stopping by and Happy Stamping!

Akiko

  • Visit my online store here
  • See the current Stampin’ Up! clearance rack specials here
  • Earn FREE Stampin’ Up! products through my Wildflower Frequent Shopper Program – my way of saying thank you to my online frequent shopper customers.
  • Have any questions? I’d be happy to help, click here to contact me.

Cardstock Cuts for this project:

  • Pretty Peacock – 4-1/4″ x 5-1/2″ card base, 3″ x 8-1/2″ mini card base, scored at 4-1/4″
  • Lost Lagoon – 2-1/2″ x 3-1/2″ (tree backing)
  • Textured Gold – 1-3/4″ x 3″ (detailed tree die cut)
  • Brushed Metallic specialty – 2-1/2″ x 3-1/2″ (tree)
  • Basic White – 2-3/4″ x 4″ (inside panel), 1-1/4″ x 3″ (label)
  • Winter Meadow DSP – 4″ x 5-1/4″ (embossed background), 2-3/4″ x 4″ (mini card background), 3/8″ x 2-3/4″ (inside trim)

Stampin’ Up! products used in this project:


Stampin’ Up! Sweetest Star for the Happy Inkin’ Thursday Blog Hop

Good Morning and welcome to the Happy Inkin’ Thursday Blog Hop! I used the sweet Stampin’ Up! Sweetest Star bundle with the pretty Take A Bow 6″ x 6″ designer series paper to make a Christmas card. You can find the supplies I used along with card stock cuts at the bottom of my post.

We have a sketch challenge this week and I took liberty by replacing the large square with a star:

I adhered a panel of Take A Bow 6″ x 6″ designer series paper to a the front of a Real Red card base with liquid glue. I adhered another panel to a Garden Green mat and wrapped it with red and white baker’s twine, making a bow on one side. I popped the panel on the card front with dimensionals.

I stamped Mrs. Santa Clause from the Stampin’ Up! Sweetest Star bundle using Memento Tuxedo Black ink on Basic White and colored her with Stampin’ Blends. I used light Pecan Pie, light Petal Pink, Real Red and dark Granny Apple Green. I punched her out with the Stampin’ Up! Sweetest Star punch. I stamped the sentiment using Memento Tuxedo Black ink on Basic White and cut it out with a square from the Stylish Shapes dies. I popped the star and sentiment on the card with dimensionals.

I stamped three gingerbread men from the More Than Autumn bundle using Versamark ink on Pecan Pie card stock. I sprinkled them with white embossing powder and shook off the excess. I heated them with my heat tool until they was bright and shiny and cut them out with the coordinating die. I adhered two gingerbread men to the card front with glue dots and finished with peppermints.

For the inside of the card, I stamped the sentiment from the Stampin’ Up! Sweetest Star stamp set using Real Red ink on a Basic White panel. I adhered the last gingerbread man next to the sentiment and trimmed the bottom with DSP. I adhered the panel to the inside of the card with Stampin’ Seal.

I love the Stampin’ Up! Sweetest Star bundle with it’s sweet images and fun sentiments! And I love the pudgy star punch – I think it’s perfect for punching stars for Holiday decorations. And I love how perfect the little gingerbread men from the More than Autumn bundle are for Mrs. Santa Clause with her pretty apron. I can smell the cookies baking already!

On with the Hop! Click on the Next Blog button to move forward to see the beautiful project Karen Ksenzakovic has created.

If you get lost along the way, here are the participants for the hop:


Current Host Code: BTWRDNAU

Use this host code when you order $50 or more and receive a free gift from me!  The free gift is your choice of any item currently available valued up to $10.00!

If your order is over $150, please do not use the host code since you’ll receive your own Host Dollars plus I’ll still send you the free gift!  This host code can be used by anyone, no club or commitment required. Let me know if you have any questions.


If you need any stamping supplies, I’d be very happy to be your Demonstrator.  Just click on the Shop Now button on the right side of the screen to go directly to my online store or contact me if you have any questions. 

Thanks for stopping by and Happy Stamping!

Akiko

  • Visit my online store here
  • See the current Stampin’ Up! clearance rack specials here
  • Earn FREE Stampin’ Up! products through my Wildflower Frequent Shopper Program – my way of saying thank you to my online frequent shopper customers.
  • Have any questions? I’d be happy to help, click here to contact me.

Cardstock Cuts for this project:

  • Real Red – 5-1/2″ x 8-1/2″ card base, scored at 4-1/4″
  • Garden Green – 3-1/8″ x 4-4/8″ (DSP mat)
  • Pecan Pie – 3/4″ x 3″ (gingerbread cookies)
  • Basic White – 3-3/4″ x 5″ (inside panel), 2-1/2″ x 4″ (punched star and die cut square)
  • Take A Bow 6″ x 6″ DSP – 3-3/4″ x 5″ (holly background), 3″ x 4-1/4″ (red dot background), 1/2″ x 3-5″ (inside trim)

Stampin’ Up! products used in this project: