Stampin’ Up! Merriest Moments Christmas Card

Good Morning! Happy World Card Making Day! I hope you have a wonderful weekend and have some time to craft. I made a Christmas card with the Stampin’ Up! Merriest Moments stamp set for today. You can find the supplies I used at the bottom of my post along with the sizes of cardstock used.

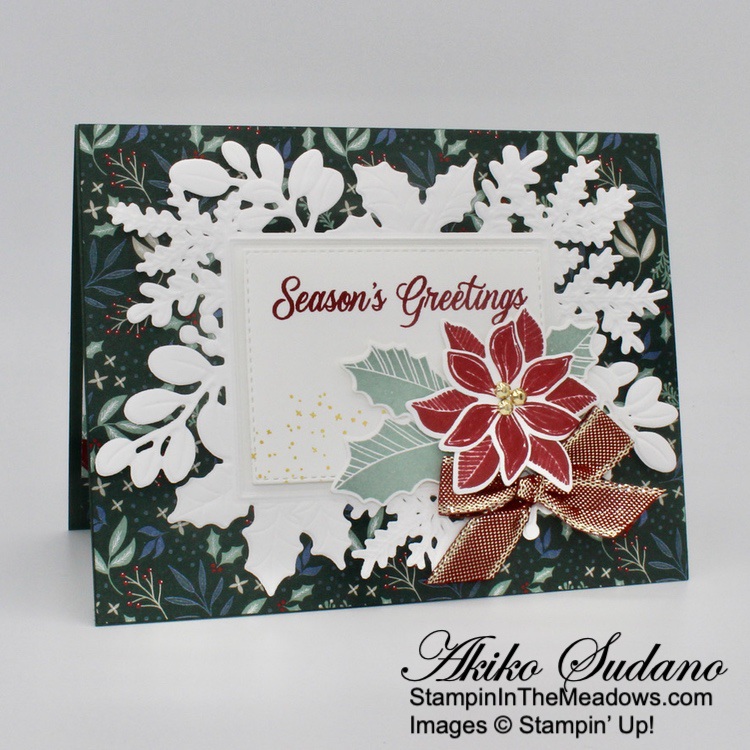
Emboss a Basic White panel with the Merry Melody 3D embossing folder and adhere it to a Basic White mat.

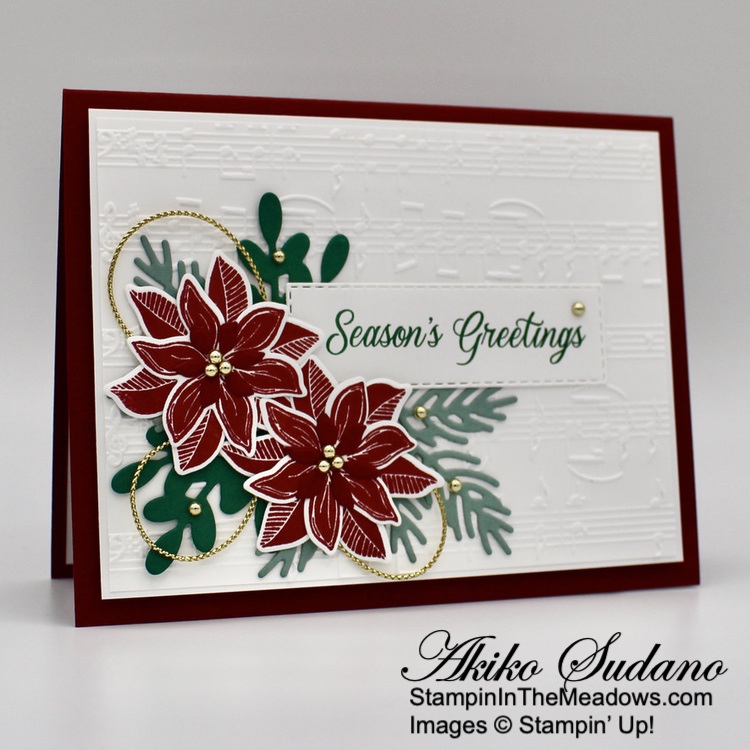
Use the Christmas Banner dies to cut three pine sprigs from Soft Succulent and two leaf clusters from Shaded Spruce and adhere them to the embossed panel with liquid glue. Wrap some gold trim around the die cuts, and adhere with glue dots.

Pine sprig and leaf cluster placement with gold trim.

Stamp the flowers from the Stampin’ Up! Merriest Moments photopolymer stamp sets in Cherry Cobbler on Basic White. Stamp two each of the flowers and cut them out with the coordinating dies. Cut two of the smaller poinsettia clusters from Cherry Cobbler and adhere them together with liquid glue to make two 3 layer flowers. Adhere the flowers to the embossed panel with dimensionals.

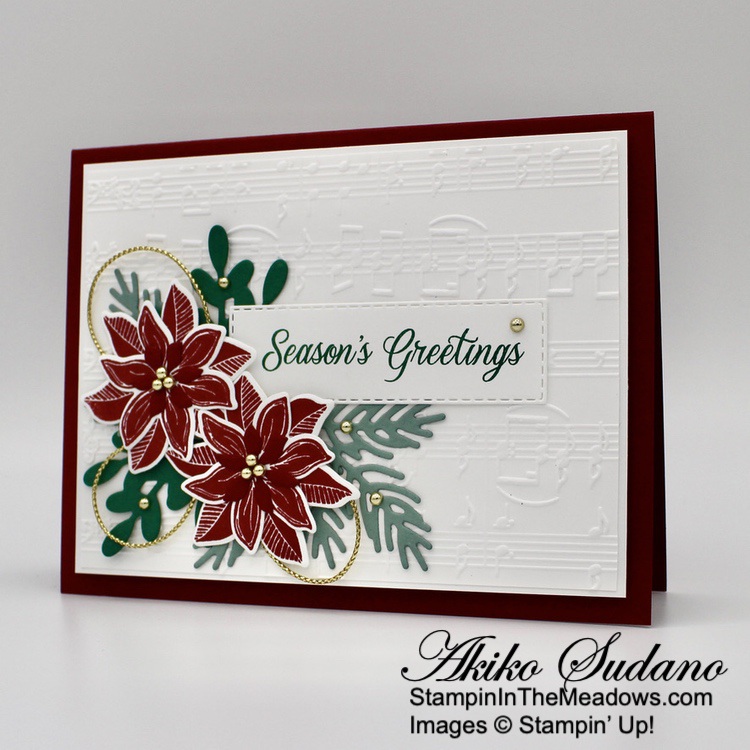
Stamp the Sentiment from the Stampin’ Up! Merriest Moments stamp set in Shaded Spruce on Basic White. Cut the sentiment with the 2nd smallest long skinny Stitched Rectangle die and adhere it to the panel with glue dots. Adhere the decorated panel to the front of a Cherry Cobbler card base with dimensionals. Finish the card front with gold pearls on the flower centers and around the greenery.

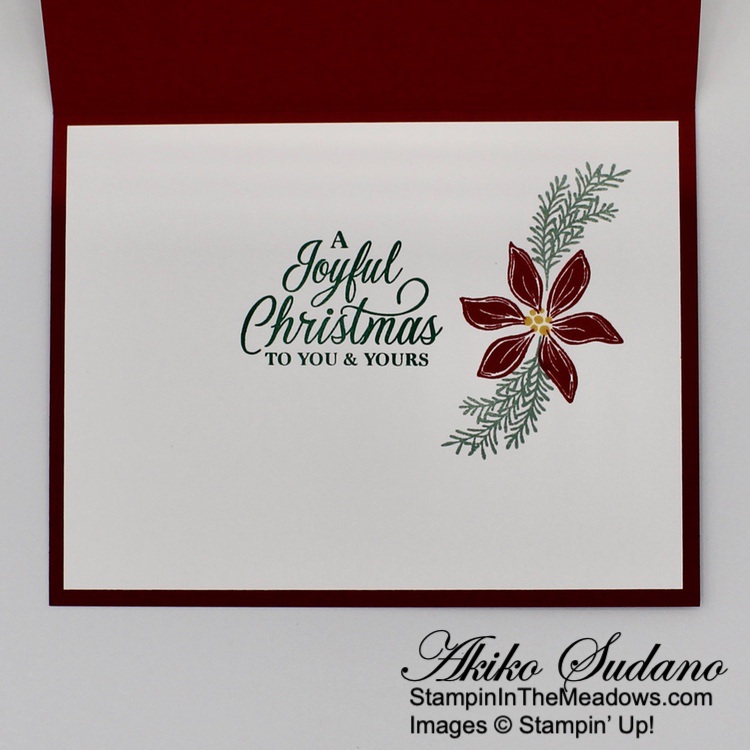
For the inside of the card, stamp the sentiment from the Stampin’ Up! Merriest Moments stamp set in Shaded Spruce ink on a Basic White panel. Stamp the small flower in Cherry Cobbler next to the sentiment and the flower center in Crushed Curry. Stamp the sprigs in Soft Succulent around the flower and adhere the panel to the inside of the card with Stampin’ Seal.

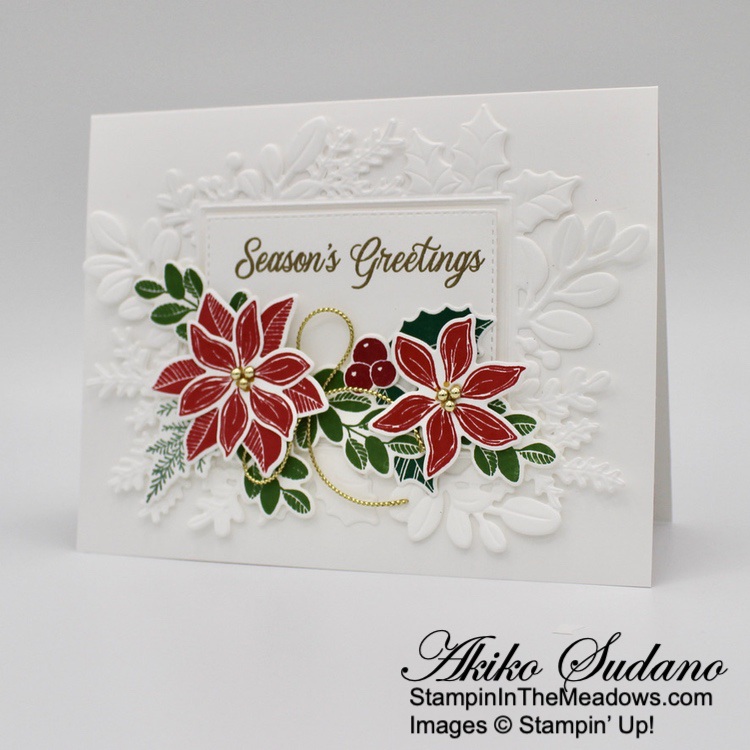
Another Christmas card done, thank goodness for the pretty Stampin’ Up! Merriest Moments stamp set. The pretty flowers make wonderful and easy cards, even without the beautiful Merriest Frames Hybrid embossing folder. Now relax and have some fun making cards!


It’s World Card Making Day!

The Inkin’ Krew card making demonstrations start at 9:00 ET on our Facebook Event Page! If you haven’t already joined, hop over page now and request to join so that you don’t miss out on any of the fun!  You can find the page right here:

https://www.facebook.com/groups/inkinkrewworldcardmakingday2022

Here’s a schedule of our presentations:

If you can’t join us or are not on Facebook, you can catch my video on my YouTube channel afterwards. And I’ll post links and all the information about my card tomorrow.

And don’t forget the Stampin’ Up! WCMD event between 4PM and 7PM ET.

You can join in on the fun by registering HERE or hopping on the event site HERE.


Starter Kit + Starts on October 4, 2022!

Stampin’ Up! has a new Joining promotion starting on October 4, 2022! New team members will get even MORE FREE products in their customizable Starter Kit. Between October 4–31 2022, those who sign up can get $125 $155 worth of products for only $99 + free business supplies + free shipping + all the fun being a part of Stampin’ Up!

What are the benefits of being a Stampin’ Up! Demonstrator?

  • Choose any items you want for your Starter Kit – Choose $125 $155 worth of products for $99.
  • Receive a minimum 20% discount on products.
  • Support from Stampin’ Up!
  • Support from me and the rest of the Inkin’ Krew Team
  • Early Access to new products

See my Join My Team page for all the benefits and to get started. Or Contact Me at apsudano@stampininthemeadows.com if you want to chat.


Current Host Code: HHFMZPFH

Use this host code when you order $50 or more and receive a free gift from me!  The free gift is your choice of any item currently available valued up to $10.00 from the July-December 2022 Mini Catalog or the 2022-2023 Annual Catalog!

If your order is over $150, please do not use the host code since you’ll receive your own Host Dollars plus I’ll still send you the free gift!  This host code can be used by anyone, no club or commitment required. Let me know if you have any questions.


If you need any stamping supplies, I’d be very happy to be your Demonstrator.  Just click on the Shop Now button on the right side of the screen to go directly to my online store or contact me if you have any questions.  Happy Stamping!

Thanks for stopping by and have a great week!

Akiko

  • Visit my online store here
  • See the current Stampin’ Up! clearance rack specials here
  • Earn FREE Stampin’ Up! products through my Wildflower Frequent Shopper Program – my way of saying thank you to my online frequent shopper customers.
  • Have any questions? I’d be happy to help, click here to contact me.

Cardstock Cuts for this project:

  • Cherry Cobbler – 5-1/2″ x 8-1/2″ card base scored at 4-1/4″, 1-1/4″ x 2″ (little poinsettias)
  • Shaded Spruce – 1-1/2″ x 3-1/2″ (die cut leaves)
  • Soft Succulent – 1-1/4″ x 4-1/2″ (die cut pine boughs)
  • Basic White – 4” x 5-1/4” (inside panel), 3-3/4″ x 5″ (embossed background), 3-7/8″ x 5-1/8″ (front mat), 1-1/2″ x 4″ (label), 2″ x 8″ (die cut poinsettias)

Stampin’ Up! products used in this project:


Stampin’ Up! Merriest Moments Christmas Card

Have you heard that on July 1, the Stampin’ Up! July – December 2022 Mini Catalog will be available for ordering?  There are so many pretty new and returning holiday stamp sets in the new mini, and by coming out in July instead of August, we have an extra month to make Christmas cards – Yay!!  One of the pretty returning sets in the Stampin’ Up! Merriest Moments photopolymer stamp set with the cool Merriest Frames Hybrid embossing folder and dies.  So I pulled it out to make my first Christmas card for the year! You can find the supplies I used at the bottom of my post along with the sizes of cardstock used.

I cut a Basic White panel with the detailed die from the Merriest Frames set and then put it in the embossing folder with the outline die.  I ran it through my die cutting machine to get the gorgeous embossed die cut greenery.  I adhered the die cut to the front of a Thick Basic White card base.  I stamped the sentiment from the Stampin’ Up! Merriest Moments stamp set in Versamark Ink on a Basic White panel and sprinkled it with gold embossing powder.  I shook off the excess and heated the powder until it was shiny with my heat tool.  I cut out the sentiment with the Merriest Frames rectangle die and adhered it to the card front with dimensionals. 

I stamped and die cut the flowers and greenery from the Stampin’ Up! Merriest Moments stamp set on Basic White to decorate the front.  I stamped two small poinsettias and one large one in Sweet Sorbet and I stamped the centers with Crushed Curry.  I stamped a set of holly berries in Cherry Cobbler and two holly leaves in Shaded Spruce.  I stamped four of the rounded leaf sprigs in Garden Green and one of the spruce sprigs in Soft Succulent. 

I cut everything out and adhered one of the small poinsettias to the large one.  I adhered the leaves and holly berries to the card front with glue dots and adhered the poinsettias to the card with dimensionals.  I made a bow with gold trim and tucked it under the flower.  I finished the flower centers with gold metallic pearls (available July 1).

For the inside of the card, I stamped the sentiment from the Stampin’ Up! Merriest Moments stamp set in Sweet Sorbet on a Basic White panel.  I stamped the poinsettias in Sweet Sorbet in the corners and masked them before stamping the leaf clusters in Garden Green.  I added some Shaded Spruce holly leaves and Cherry Cobbler berries.  I adhered the panel to a Sweet Sorbet mat and adhered the layered panel to the inside of the card.

The Stampin’ Up! Merriest Moments stamp set has fun, modern graphic Christmas greenery images and it’s great to have coordinating dies, especially with the hybrid embossing folder!  But the pretty images can also be stamped without the dies like I did on the inside of the card.  It has beautiful sentiments and the coordinating Merriest Frames Hybrid Embossing Folder makes the most beautiful Christmas cards!

There’s less than a week before the new catalog is available for ordering, so it’s time to start planning those Holiday cards. Here’s a picture of the upcoming July-December Mini Catalog and I will post a PDF on July 1 when it’s open for ordering.

If you haven’t received a catalog yet, but would like to be a customer of mine, I’ll be happy to send you one!


Stampin’ Up! January – June 2022 Mini Catalog Last Chance Sale Ending Soon!

The Stampin’ Up! January – June 2022 Mini Catalog is retiring on June 30 and retiring items are available while supplies last. Some Items have already sold out and are no longer available, but there’a a lot of good stuff still available – and some items are on sale for up to 50% off! But the retiring items are available while supplies last through June 30, 2022.

Order soon to make sure that you are able to get the items that you are wanting! Happy shopping!

Click HERE to shop now in my Online Store.

Click HERE to download a PDF of the Retiring List items.

Click HERE to download an Excel Spreadsheet of the Retiring List items.


Stampin’ Up! Kits Collection BOGO Sale Ending Soon!

The Stampin’ Up! Kits Collection is having a buy one, get one 50% off sale, but time is running out! The Kits Collection by Stampin’ Up! is perfect for beginner crafters with its variety and all-inclusive projects. And this is the perfect time to share a kit from the Kits Collection with a friend!

The kit selection is based on availability, and new kits are continually being added. Shop the Kits Collection in my online store HERE. Kits Collection BOGO Sale Ends on June 30!


Current Host Code: MHHQUNTF

Use this host code when you order $50 or more and receive a free gift from me!  The free gift is your choice of any item currently available valued up to $10.00 from the January – June 2022 Mini Catalog or the 2022-2023 Annual Catalog!

If your order is over $150, please do not use the host code since you’ll receive your own Host Dollars plus I’ll still send you the free gift!  This host code can be used by anyone, no club or commitment required. Let me know if you have any questions.


If you need any stamping supplies, I’d be very happy to be your Demonstrator.  Just click on the Shop Now button on the right side of the screen to go directly to my online store or contact me if you have any questions.  Happy Stamping!

Thanks for stopping by and have a great week!

Akiko

  • Visit my online store here
  • See the current Stampin’ Up! clearance rack specials here
  • Earn FREE Stampin’ Up! products through my Wildflower Frequent Shopper Program – my way of saying thank you to my online frequent shopper customers.
  • Have any questions? I’d be happy to help, click here to contact me.

Cardstock Cuts for this project:

  • Thick Basic white – 5-1/2″ x 8-1/2″ card base scored at 4-1/4
  • Sweet Sorbet – 3-7/8″ x 5-1/8″ (inside mat)
  • Basic White – 4-1/4″ x 5-1/2″ (foliage die cut), 5″ x 6″ (die cut flowers and leaves), 2-1/2″ x 3″ (label)

Stampin’ Up! products used in this project:


Stampin’ Up! Merriest Moments Christmas Card

Good Morning! The Stampin’ Up! Merriest Moments stamp bundle is really cute and versatile and I finally got it and used it for today’s Christmas card. You can find the supplies I used at the bottom of my post along with the sizes of cardstock used.

I adhered a panel of Tidings of Christmas 6″ x 6″ designer series paper to the front of an Evening Evergreen card base. I cut a panel of Basic White with the detailed greenery frame die from the Merriest Frames Hybrid die. I carefully placed it in the Merriest Frames Hybrid embossing folder and ran it through my Stampin’ Cut & Emboss machine to get the wonderful leafy texture. I adhered it to the card front with liquid glue.

I stamped the sentiment from the Stampin’ Up! Merriest Moments photopolymer stamp set in Cherry Cobbler on a Basic White panel. I stamped the spatter in Bumblebee ink along the bottom and out it out with the label die. I adhered it to the card front with dimensionals.

I stamped the two flower stamps from the Stampin’ Up! Merriest Moments stamp set in Cherry Cobbler ink on Basic White and cut them out with the coordinating dies. I stamped four of the leaves in Soft Succulent ink and cut them out with the coordinating dies. I adhered the flowers together with liquid glue and popped them onto the card front with dimensionals. I adhered the leaves with glue dots, tucking them under the flower. I made a bow and adhered it with a glue dot and finished the flower center with three small gilded gems.

For the inside of the card, I stamped the sentiment from the Stampin’ Up! Merriest Moments stamp set in Cherry Cobbler. I stamped the corners with Cherry Cobbler flowers and Soft Succulent leaves and trimmed the bottom with a strip of Tidings of Christmas 6″ x 6″ DSP. I adhered the panel to the inside of the card.

The Stampin’ Up! Merriest Moments bundle is fantastic for elegant Christmas cards. the Hybrid embossing folder is great for both cutting and embossing at the same time, or embossing separately. This makes it so versatile in making different styles of cards and each one is really special!


Last Chance Products Sale Starts December 1, 2021!

The July–December 2021 Mini Catalog will be retiring soon! It’s always bittersweet to see a classic Stampin’ Up! catalog take a trip to retirement. But, we’re looking forward to all the new products on their way—and we hope you are, too!

Stock up on your favorite products before they’re gone for good! After all, this selection of Last Chance Products is only available through January 3, 2022 or while supplies last.

Click Here to download a PDF with the retiring products.

Click Here to download a PDF with the carry over list of products.


A few more days left to Start with Savings!

Jump for join! There’s no better time than November to begin your Stampin’ Up! business. Why? If you sign up to be an Independent Stampin’ Up! demonstrator before the end of the month, you’ll get the $99 Starter Kit—filled with your pick of products—for only $75! Start your Stampin’ Up! business strong with big savings!

Enjoy early access to our amazing products, exclusive perks, an opportunity to earn additional income, and an incredible community of crafters. Whether you want to make the most of your papercrafting passion or build a business, there’s so much in store for you with Stampin’ Up! Check out my Join My Team Page to see more benefits and join now or contact me if you have any questions and I’ll be happy to tell you more!


Current Host Code: H6UDQF6U

Use this host code when you order $50 or more and receive a free gift from me!  The free gift is your choice of any item valued up to $10.00 in the 2021-2022 Annual Catalog or the July – December 2021 Mini Catalog!

If your order is over $150, please do not use the host code since you’ll receive your own Host Dollars plus I’ll still send you the free gift!  This host code can be used by anyone, no club or commitment required. Let me know if you have any questions.


If you need any stamping supplies, I’d be very happy to be your Demonstrator.  Just click on the Shop Now button on the right side of the screen to go directly to my online store or contact me if you have any questions.  Happy Stamping!

Thanks for stopping by and have a great week!

Akiko

  • Visit my online store here
  • See the current Stampin’ Up! clearance rack specials here
  • Earn FREE Stampin’ Up! products through my Wildflower Frequent Shopper Program – my way of saying thank you to my online frequent shopper customers.
  • Have any questions? I’d be happy to help, click here to contact me.

Cardstock Cuts for this project:

  • Evening Evergreen – 5-1/2″ x 8-1/2″ card base scored at 4-1/4″
  • Basic White – 4-1/2″ x 5-1/2″ (die cut & embossed panel), 4″ x 5-1/4″ (inside panel), 2-1/2″ x 3-1/4″ (label), 2″ x 4″ (flowers), 1-1/2″ x 4″ (leaves)
  • Tidings of Christmas 6″ x 6″ DSP – 4-1/4″ x 5-1/2″ (front background), 1/2″ x 5-1/4″ (inside trim)

Stampin’ Up! products used in this project:


Stampin’ Up! Christmas Season Cards

Good Friday Morning! One of the fin things I did last weekend was travel to my team lead’s house for our Quarterly In Person Inkin’ Krew Team meeting. We made three beautiful Christmas cards designed by three of our team members with the Stampin’ Up! Christmas Season bundle. You can find the supplies I used at the bottom of my post along with the sizes of cardstock used.

This first card was designed by Amy Koenders, our team lead. The greenery from the Stampin’ Up! Christmas Season bundle really pops against the clean white background and the Cherry Cobbler sentiment from the Merriest Moments stamp set fits perfectly in the corner. She finishes it with some nice touches of shimmer with the Cherry Cobbler ribbon and Gold Holly Leaves. You Can find more of Amy’s designs on her blog Stamp with Amy K.

This pretty card was designed by our teammate Karen Ksenzakovic. The Painted Christmas designer series paper is a gorgeous backdrop to the Stampin’ Up! Christmas Season stamped pine cones and I love how she designed the pine branches in a spray around the label. The sentiment from the Christmas To Remember cling stamp set is a sweet touch on the Cherry Cobbler die cut label. You can find more of Karen’s work on her blog Creative Stamping Designs.

Our last card was made by our teammate Donna Leonard at Stamp Dabbles. I love rustic Christmas cards made with kraft paper and Donna’s design brings this together perfectly! The pine branches from the Wintry 3D embossing folder go beautifully with the Painted Christmas DSP and I love how the stamped greenery looks on Crumb Cake card stock! Donna also incorporated the sentiments from the Christmas To Remember stamp set.

I love how each card is so different and beautiful, it really shows the versatility of the Stampin’ Up! Christmas Season bundle. And I love how each arrangement of greenery uses the same colors, Soft Succulent, Evening Evergreen, Cherry Cobbler, Soft Suede and Early Espresso, and yet each arrangement is different! It shows that you can easily arrange the die cut pieces any way you want and still come out with a beautiful card.

It was fun to get together to make cards with a few of the other ladies on our team and see these beautiful designs. I feel fortunate that I live close enough to some of my teammates to meet in person, because we are all over the country! Now is a good time to join Stampin’ Up! because of the Sale A Bration extra free bundle that you can add to your Starter Kit. Let me know if you think you might be interested in joining us, I would be happy to tell you more!


Sale A Bration is going on Now!

Sale A Bration has BUY, HOST and JOIN specials that run through September 30. Click on the picture below to view the Sale A Bration brochure:

SHOP

There are 8 new products (4 stamp sets, 3 paper packs and a die set!) that are available as free items to chose from with a level 1 order (free with an order of $50+) and 2 new items (1 stamp set and 1 die set) that are available as free choices with a level 2 order (free with an order of $100+).  So many good things to pick from!

HOST

There is also a great new host exclusive stamp set called In Your Words that will be available for FREE with either a personal order of $300+ or a party with sales totaling $300+! Drop me an email at apsudano@stampininthemeadows.com if you are interested in setting up a host code for yourself to see if you can collect $300 in orders from yourself and your stamping friends to get that FREE stamp set!  I’m happy to set up a code just for you!

JOIN

And there is an awesome joining promotion during Sale A Bration! When you join, you pay $99 for your starter kit and you get to choose $125 in product from any current catalog and your starter kit ships for free! And if you join between August 3 and September 30, you get to pick an additional qualifying bundle from the July – December 2021 Mini Catalog to add to your starter kit for free! There couldn’t be a better time to join the Stampin’ Up! family.  Contact me if you have any questions about joining and I’ll be happy to tell you more!


Current Host Code: U6K4RBB4

Use this host code when you order $50 or more and receive a free gift from me!  The free gift is your choice of any item valued up to $10.00 in the 2021 – 2022 Annual Catalog or the July – December 2021 Mini Catalog!

If your order is over $150, please do not use the host code since you’ll receive your own Host Dollars plus I’ll still send you the free gift!  This host code can be used by anyone, no club or commitment required. Let me know if you have any questions.


If you need any stamping supplies, I’d be very happy to be your Demonstrator.  Just click on the Shop Now button on the right side of the screen to go directly to my online store or contact me if you have any questions. 

Thanks for stopping by and Happy Stamping!

Akiko

  • Visit my online store here
  • See the current Stampin’ Up! clearance rack specials here
  • Earn FREE Stampin’ Up! products through my Wildflower Frequent Shopper Program – my way of saying thank you to my online frequent shopper customers.
  • Have any questions? I’d be happy to help, click here to contact me.

Cardstock Cuts for this project:

  • Amy’s Card
    • Thick Basic White – 5-1/2″ x 8-1/2″ card base scored at 4-1/4″
    • Basic White – two 4″ x 5-1/2″ panels (front mat and inside panel), 3-7/8″ x 5-1/8″ (front background), 1-7/8″ x 3-7/8″ (embossed panel), 4-1/4″ x 5-1/2″ (stamped greenery)
  • Karen’s Card
    • Thick Basic White – 4-1/4″ x 11″ card base scored at 5-1/2″
    • Basic White – 4″ x 5-1/4″ panel (inside panel), 2″ x 4″ (pine cones)
    • Cherry Cobbler – two 4-1/8″ x 5-3/8″ panels (front and inside mats), 3-1/2″ x 4-1/4″ panel (die cut label)
    • Soft Succulent – 3″ x x 4-1/4″ panel (stamped pine boughs)
    • Painted Christmas DSP – 4″ x 5-1/4″ panel (front background), 3/4″ x 4″ strip (inside trim), 2-1/4″ x 6″ (envelope flap)
  • Donna’s Card
    • Crumb Cake – 4-1/4″ x 11″ card base scored at 5-1/2″, 3″ x 7″ panel (stamped greenery)
    • Cherry Cobbler – 4-1/8″ x 5-3/8″ (front mat)
    • Evening Evergreen – 1-3/4″ x 5-1/4″ (embossed panel)
    • Painted Christmas DSP – 2-1/4″ x 5-1/5″ (front background), 1/2″ x 4-1/8″ strip (inside trim)

Stampin’ Up! products used in this project: