Good Morning! Welcome to the April Inkin’ Krew Team Blog Hop! The theme for this month’s hop is “For the Ladies/Girls” and I used the some retiring products to make a Mother’s Day Card, including the pretty Stampin’ Up! Country Flowers bundle and the Countryside Inn designer series paper. You can find the supplies I used along with card stock cuts at the bottom of my post.

I adhered a panel striped panel of the retiring Countryside Inn designer series paper to a Misty Moonlight mat with liquid glue. I adhered it to a floral panel of the Countryside Inn DSP and then adhered the layered DSP to the front of a Boho Blue card base. Boho Blue is one of the retiring 2023-3035 In Colors.
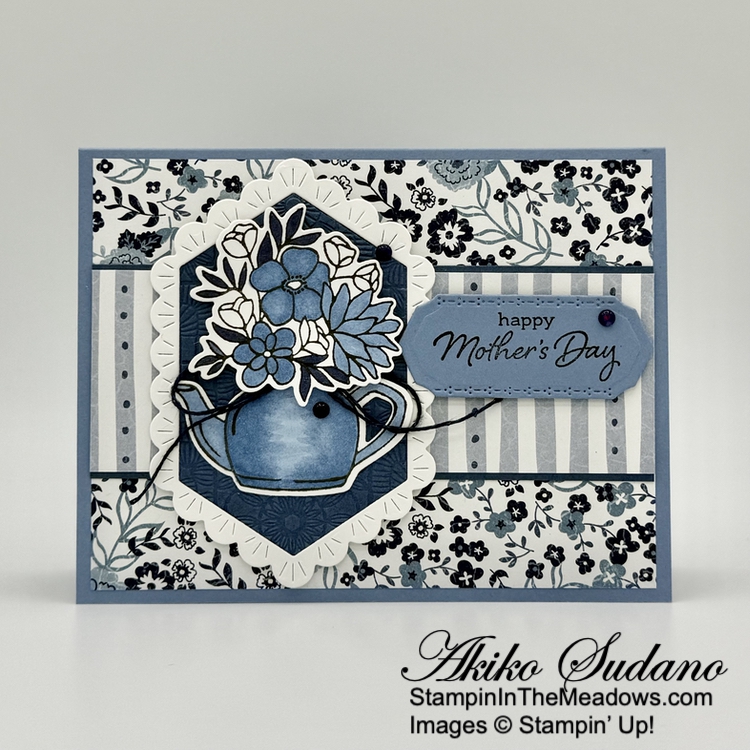
I stamped teapot and flowers from the retiring Stampin’ Up! Country Flowers stamp set using Memento Tuxedo Black ink on Basic White and cut them out with the coordinating dies. I colored the teapot with light Boho Blue Stampin’ Blend, shading it to give the teapot dimension. I colored the flowers with the light Boho Blue Stampin’ Blend and the dark Night of Navy Stampin’ Blend, leaving some flowers white.
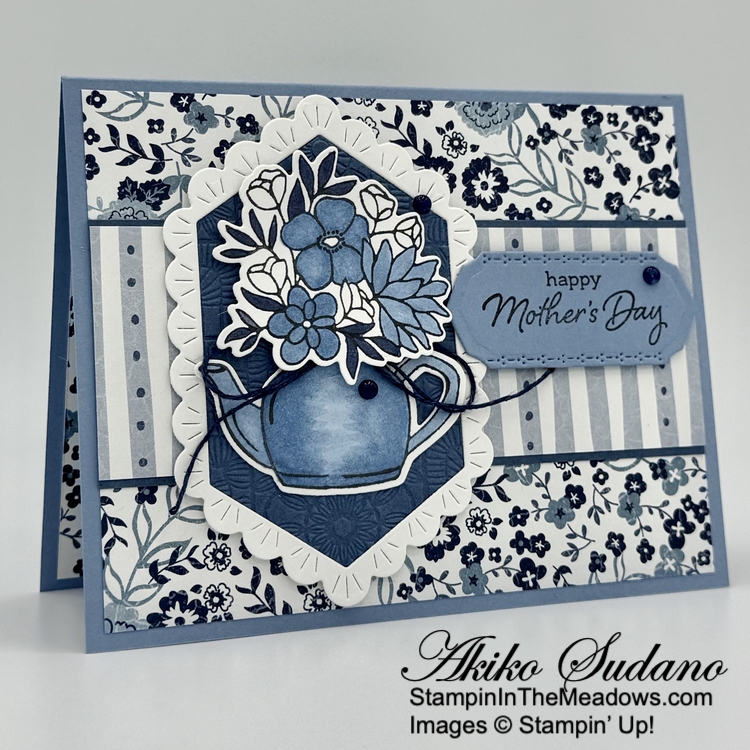
I cut panels of Misty Moonlight and Basic White with the large octagonal die from the retiring Wildflower Designs dies. I embossed the inside of the Misty Moonlight panel with the retiring Cute Crochet 3D embossing folder. I adhered the Basic White frame to the card with dimensionals on the top and bottom and adhered the embossed panel with liquid glue. Doesn’t it look like a lacy doily? With the DSP stripe layer, the embossed inside and frame are almost level. I adhered the teapot with glue dots and popped the flowers on top with dimensionals.
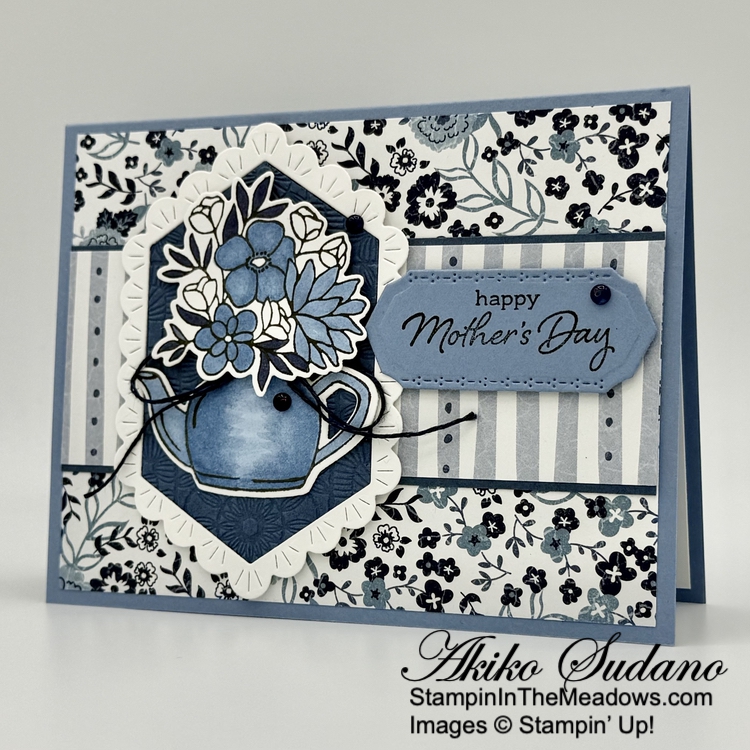
I stamped the sentiment from the retiring Flower Cart stamp set using Memento Tuxedo Black ink on Boho Blue and cut it out with the medium label die from the Mixed Labels dies. I used the two step method to make the die cut a little longer and was glad it worked out pretty well! I adhered the label to the card with dimensionals and finished with Night of Navy gems and a loopy Night of Navy linen thread bow.
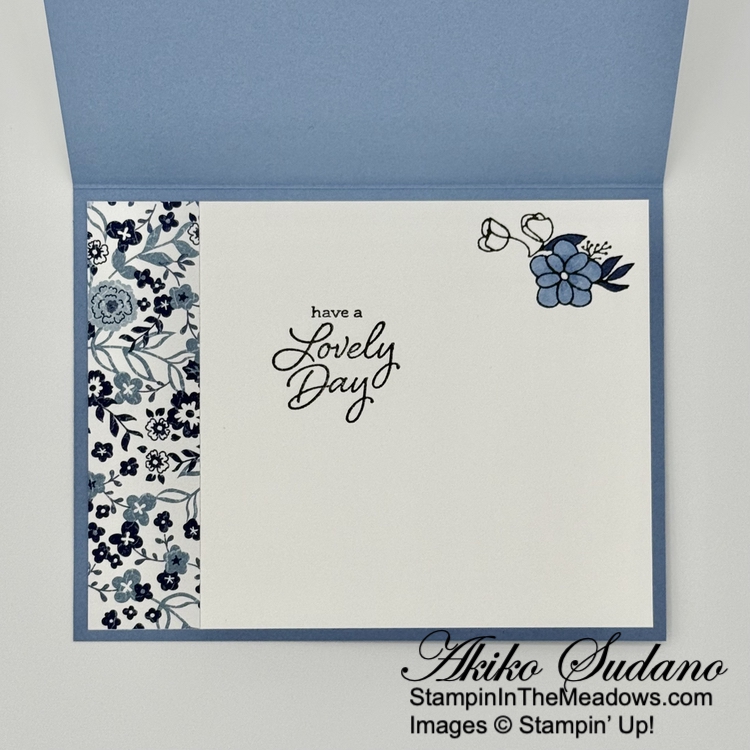
For the inside of the card, I stamped a flower cluster from the Country Birdhouse stamp set using Memento Tuxedo Black ink in the corner of a Basic White panel and colored it with Boho Blue and Night of Navy Stampin’ Blends. I stamped the sentiment from the Flower Card stamp set in Memento Tuxedo Black ink and trimmed the side with DSP. I adhered the panel to the inside of the card with Stampin’ Seal.
The Stampin’ Up! Country Flowers stamp set and dies are such a sweet set and I’m sorry to see it retiring. I don’t usually like to use so many different stamp sets and tools on cards, but I think all of these items work well together to make a sweet, feminine Mother’s Day card. Many of the retiring products I used for today’s card have been discounted in the Last Chance section of the Online Store. Many times the individual discounted prices of the stamp sets and dies total less than the bundled prices, so make sure to double check before adding them to your card.
On With The Hop! Click on the Next Blog button to move forward to Amy Koenders’ project or click the Previous Blog button to move back to see the project that Tara Carpenter created.


If you get lost along the way, here are the participants for the hop:
- Christine King
- Karen Ksenzakovic
- Karen Finkle
- Ann Louise Fogdaard
- Terry Lynn Bright
- Tara Carpenter
- Akiko Sudano <– you are here
- Amy Koenders
If you need any stamping supplies, I’d be very happy to be your Demonstrator. Just click on the Shop Now button on the right side of the screen to go directly to my online store or contact me if you have any questions. Happy Stamping!
Thanks for stopping by and have a great week!
Akiko
- Visit my online store here
- See the current Stampin’ Up! Last Chance items here
- Have any questions? I’d be happy to help, click here to contact me.
Cardstock Cuts for this project:
- Boho Blue – 5-1/2″ x 8-1/2″ card base, scored at 4-1/4″, 1-1/2″ x 3″ (label)
- Misty Moonlight – 2″ x 5-1/4″ (DSP mat), 3″ x 4-1/4″ (octagonal frame)
- Basic White – 4″ x 5-1/4″ (inside panel), 3″ x 4-1/4″ (octagonal frame), 2-1/2″ x 3-1/2″ (die cut teapot and flowers)
- Countryside Inn DSP – 1-7/8″ x 5-1/4″ (front stripe), 4″ x 5-1/4″ (front background), 1″ x 4″ (inside trim)
Stampin’ Up! products used in this project:
![Country Flowers Photopolymer Stamp Set (English) [ 163405 ]](https://assets1.tamsnetwork.com/images/EC042017NF/163405s.jpg "Country Flowers Photopolymer Stamp Set (English) [ 163405 ]")
![Country Flowers Dies [ 163410 ]](https://assets1.tamsnetwork.com/images/EC042017NF/163410s.jpg "Country Flowers Dies [ 163410 ]")
![Flower Cart Photopolymer Stamp Set (English) [ 162776 ]](https://assets1.tamsnetwork.com/images/EC042017NF/162776s.jpg "Flower Cart Photopolymer Stamp Set (English) [ 162776 ]")
![Country Birdhouse Photopolymer Stamp Set (English) [ 163395 ]](https://assets1.tamsnetwork.com/images/EC042017NF/163395s.jpg "Country Birdhouse Photopolymer Stamp Set (English) [ 163395 ]")
![Wildflower Designs Dies [ 163333 ]](https://assets1.tamsnetwork.com/images/EC042017NF/163333s.jpg "Wildflower Designs Dies [ 163333 ]")
![Mixed Labels Dies [ 164652 ]](https://assets1.tamsnetwork.com/images/EC042017NF/164652s.jpg "Mixed Labels Dies [ 164652 ]")
![Cute Crochet 3 D Embossing Folder [ 163792 ]](https://assets1.tamsnetwork.com/images/EC042017NF/163792s.jpg "Cute Crochet 3 D Embossing Folder [ 163792 ]")
![Countryside Inn 12" X 12" (30.5 X 30.5 Cm) Designer Series Paper [ 161467 ]](https://assets1.tamsnetwork.com/images/EC042017NF/161467s.jpg "Countryside Inn 12\" X 12\" (30.5 X 30.5 Cm) Designer Series Paper [ 161467 ]")
![Boho Blue 8 1/2" X 11" Cardstock [ 161724 ]](https://assets1.tamsnetwork.com/images/EC042017NF/161724s.jpg "Boho Blue 8 1/2\" X 11\" Cardstock [ 161724 ]")
![Misty Moonlight 8-1/2" X 11" Cardstock [ 153081 ]](https://assets1.tamsnetwork.com/images/EC042017NF/153081s.jpg "Misty Moonlight 8-1/2\" X 11\" Cardstock [ 153081 ]")
![Basic White 8 1/2" X 11" Cardstock [ 166780 ]](https://assets1.tamsnetwork.com/images/EC042017NF/166780s.jpg "Basic White 8 1/2\" X 11\" Cardstock [ 166780 ]")
![Tuxedo Black Memento Ink Pad [ 132708 ]](https://assets1.tamsnetwork.com/images/EC042017NF/132708s.jpg "Tuxedo Black Memento Ink Pad [ 132708 ]")
![Boho Blue Stampin’ Blends Combo Pack [ 161659 ]](https://assets1.tamsnetwork.com/images/EC042017NF/161659s.jpg "Boho Blue Stampin’ Blends Combo Pack [ 161659 ]")
![Night Of Navy Stampin' Blends Combo Pack [ 154891 ]](https://assets1.tamsnetwork.com/images/EC042017NF/154891s.jpg "Night Of Navy Stampin' Blends Combo Pack [ 154891 ]")
![Opal Rounds Assortment [ 163298 ]](https://assets1.tamsnetwork.com/images/EC042017NF/163298s.jpg "Opal Rounds Assortment [ 163298 ]")
![Natural Tones Linen Thread [ 164071 ]](https://assets1.tamsnetwork.com/images/EC042017NF/164071s.jpg "Natural Tones Linen Thread [ 164071 ]")