Stampin’ Up! Peaceful Boughs Wreath Seasons Greetings Card

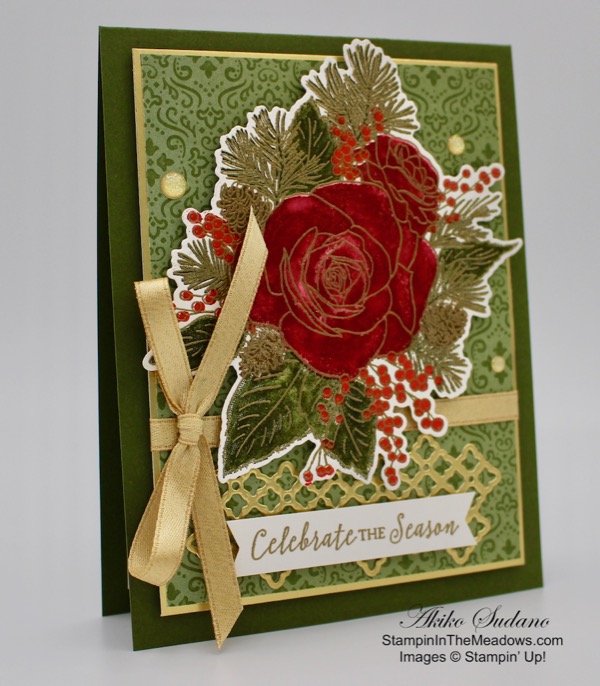
Good Morning! I hope you had a great Thanksgiving. I have a Christmas card this morning made with the Stampin’ Up! Peaceful Boughs bundle and the Stampin’ Up! Christmastime Is Here specialty designer series paper. I love cards with dimensional wreaths and so I made one with the small bough from the Beautiful Boughs dies in the bundle. You can find the supplies used to create this card at the bottom of my post along with the sizes of cardstock used.

I cut out 7 small boughs from the Beautiful Boughs dies using Old Olive card stock. I sponged the outside of each bough with Old Olive ink so that it would have some texture. I cut out a circle with two medium circle dies from the Layering Circles dies using Early Espresso card stock. I adhered the boughs around the circle with liquid glue on the stem and lowest needle section. I tucked the last stem underneath the first branch’s upper needles, so that it looks like a continuous circle of pine branches.

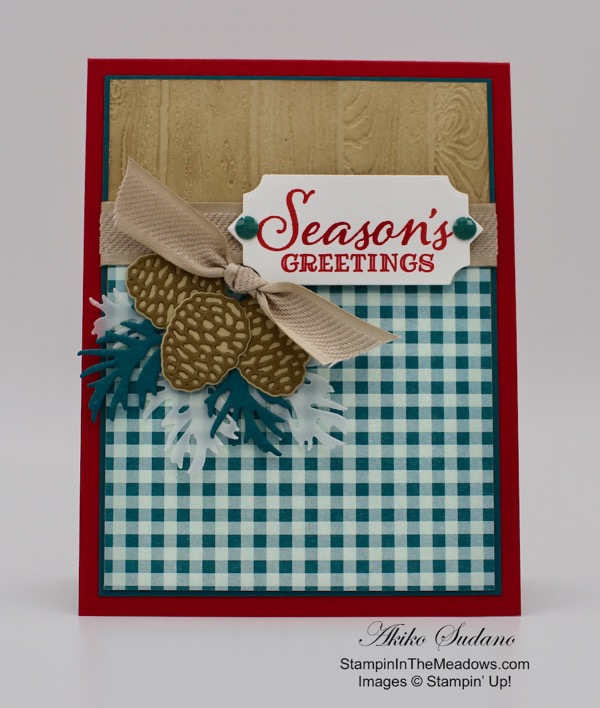
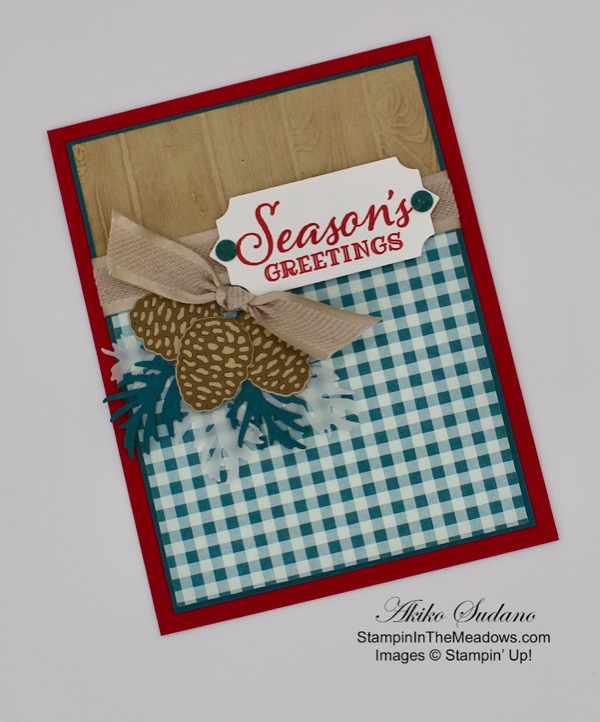
I cut a panel of the pinecone paper from the Christmastime Is Here specialty designer series paper and adhered it to a Poppy Parade card base with liquid glue. I stamped the Seasons Greetings sentiment from the Stampin’ Up! Peaceful Boughs stamp set in Poppy Parade ink on Crumb Cake card stock and cut it out with the small label die from the Beautiful Boughs dies.

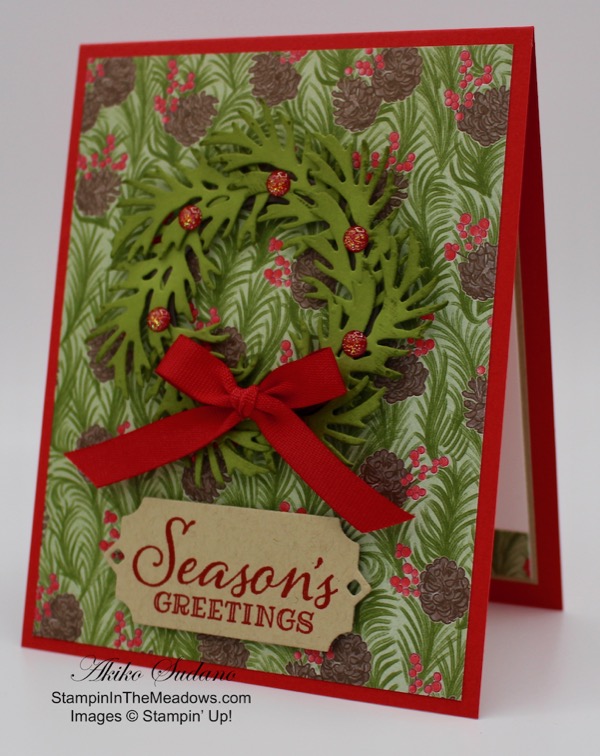
I adhered the wreath to the card front with mini dimensionals. I made a bow with Real Red ribbon and adhered it to the bottom of the wreath with glue dots. I finished the wreath off with red glitter enamel dots. I adhered the label to the card with mini dimensionals.

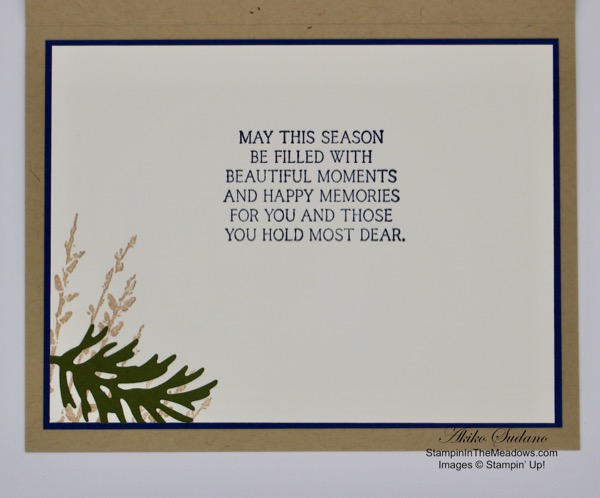
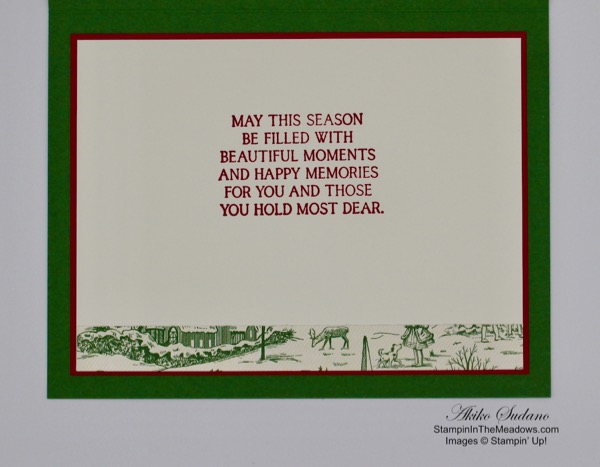
I stamped the greeting from the Stampin’ Up! Peaceful Boughs stamp set in Poppy Parade on a Whisper White panel for the inside of the card. I stamped the medium pine sprig stamp over the sentiment in Old Olive after stamping off twice. I added a strip of the pinecone DSP to the bottom and adhered it to a Crumb Cake mat before adhering it to the inside of the card.

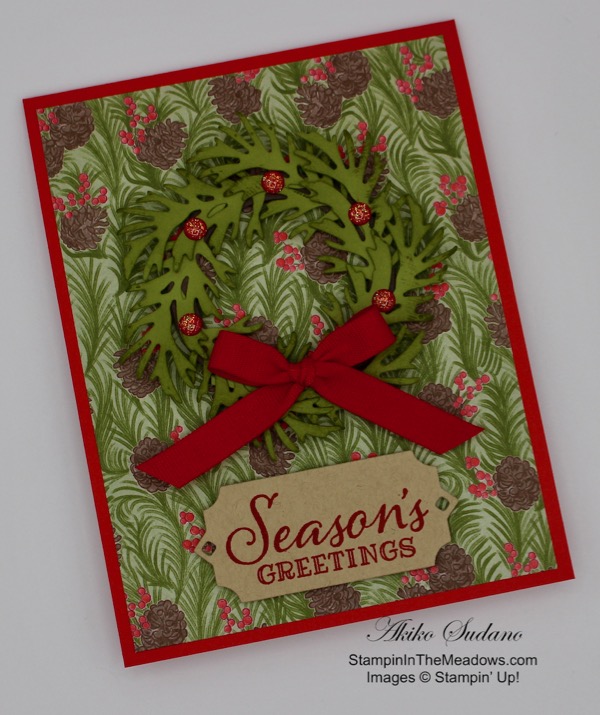
I thought the Christmastime Is Here pinecone paper would coordinate nicely with the Stampin’ Up! Peaceful Boughs bundle. What do you think?

Join me on Sunday at 1 PM on my Facebook Page for my weekly Facebook Live session as I re-do one of the Make and Takes that I received from Stampin’ Up! On Stage a couple of weeks ago. It did not come out very well and I will show you how to make it better (I hope it comes out better). I will post it on my Monday blog so you can catch it there if you have a busy weekend planned. I think all weekends are going to be busy for the next month!


Stampin’ Up!’s Year-End Closeout is almost here!

Beginning December 3 and while supplies last, you can save big on a selection of retiring and surplus items including holiday catalog items, stamp sets, and Paper Pumpkin past kits. Shop early to avoid missing out! Supplies are limited and popular items will sell out quickly. This amazing sale ends on January 2. Additional details will be posted as soon as they are available.


This image has an empty alt attribute; its file name is 10.01.19_OMAIN_Q4_OOP_NAUK.jpg

We hope you’re ready to make this holiday season magical, because the Christmastime Is Here Suite is, well . . . here! This exclusive, limited-time collection of festive, floral coordinating products has everything you need to share love, joy, and creativity this holiday season.

Products from the Christmastime Is Here Suite will be available while supplies last only.

Click on the image below to see the details of the products in the suite and the pricing or click here to shop the products in my online store.

This image has an empty alt attribute; its file name is 10-01-19_th_flyer_q4_oop_na.jpg

November 16 – 30 Host Code: 462PVWKY

December 1 – 15 Host Code: R497392Q

Use this host code when you order $50 or more and receive a free gift from me!  The gift is your choice of any item valued up to $10.00 in the 2019-20 Annual Catalog or in the 2019 Holiday Catalog!  That includes some of the Host Exclusive stamp sets!

If your order is over $150, please do not use the host code since you’ll receive your own Host Dollars plus I’ll send you the free gift!  This host code can be used by anyone, no commitment required.  Let me know if you have any questions.


If you need any stamping supplies, I’d be very happy to be your Demonstrator.  Just click on the Shop Now button on the right side of the screen to go directly to my online store or contact me if you have any questions.  Happy Stamping!

Thanks for stopping by and have a great weekend!

Akiko

  • Visit my online store here
  • See the current Stampin’ Up! clearance rack specials here
  • Earn FREE Stampin’ Up! products through my Wildflower Frequent Shopper Program – my way of saying thank you to my frequent shopper online customers.
  • Sign up for my weekly newsletter here
  • Have any questions? I’d be happy to help, click here to contact me.

Cardstock Cuts for this project:

  • Poppy Parade – 4 1/4″ x 11″ scored at 5 1/2″ (card base)
  • Crumb Cake – 3 3/4″ x 5″ (inside mat), 1 3/4″ x 3 1/4″ (sentiment label)
  • Old Olive – 5″ x 6″ (7 pine sprig die cuts)
  • Early Espresso – 2 3/4″ x 2 3/4″ (wreath ring)
  • Whisper White – 3 5/8″ x 4 7/8″ (inside panel)
  • Christmastime Is Here DSP – 4″ x 5 1/4″(card front background), 1/2″ x 3 5/8″ (inside trim)

Stampin’ Up! products used in this project:


Stampin’ Up! Country Road with Beautiful Boughs for the Happy Inkin’ Thursday Blog Hop

Happy Thanksgiving! Welcome to another Happy Inkin’ Thursday Blog Hop! I used the Stampin’ Up! Country Road stamp set along with the Beautiful Boughs dies to create a country themed Christmas Card for this week’s challenge. Here is my card:

We have a color challenge this week, and here is color palette we are using:

I started by stamping the horse weather vane from the Stampin’ Up! Country Road stamp set in Versamark Ink on a panel of Very Vanilla. I sprinkled it with Copper embossing powder and heat set. I stamped the grain stamp along the left side and bottom in Crumb Cake ink. I blotted the weather vane with a paper towel to remove wet Crumb Cake ink so it wouldn’t smear. I stamped the wagon wheel in Soft Suede ink. I sponged the sky in Night of Navy, Balmy Blue, Calypso Coral and Mango Melody so that it would look like an evening sunset. I sponged Crumb Cake ink along the bottom. I adhered the image to a Night of Navy mat with liquid glue and then to a Crumb Cake card base with dimensionals.

I cut the berry branch using the Beautiful Bouquet dies from Real Red Glimmer paper. I cut the medium branch from the Stampin’ Up! Beautiful Boughs dies from Mossy Meadow. I snipped the berry branch in two and adhered the pieces behind the Mossy Meadow branch between the boughs with glue dots. I adhered the branch and berries to the card front with glue dots. I stamped the Blessed Christmas Wishes sentiment from the Stampin’ Up! Itty Bitty Christmas stamp set in Real Red ink on a strip of Very Vanilla. I trimmed the ends and adhered it to a Night of Navy mat and then to the bottom of the card front using liquid glue.

I made two pinecones with the small pine cone dies from the Beautiful Boughs dies. I used Crumb cake for the background and Soft Suede for the front. I adhered them to the bough with glue dots. I adhered a short length of copper trim with glue dots and made a bow with the Real Red ribbon and adhered it with a glue dot. I finished the label off with a Night of Navy rhinestone.

I decorated the inside of the card with a Very Vanilla panel stamped with the sentiment from the Toile Christmas stamp set in Night of Navy ink. I stamped the grain from the Stampin’ Up! Country Road stamp set in Crumb Cake ink and added a small Mossy Meadow bough from the Beautiful Boughs dies. I adhered the panel to a Night of Navy mat and then to the inside of the card with liquid glue.

I hope you like the card and that you have a wonderful time with family and friends!

On with the Hop! Click the Next button below to visit Karen Ksenzakovic’s blog.

And just in case you get lost along the way, here’s a list of the team members participating in the hop today:


November 16 – 30 Host Code: 462PVWKY

Use this host code when you order $50 or more and receive a free gift from me!  The gift is your choice of any item valued up to $10.00 in the 2019-20 Annual Catalog or in the 2019 Holiday Catalog!  That includes some of the Host Exclusive stamp sets!

If your order is over $150, please do not use the host code since you’ll receive your own Host Dollars plus I’ll send you the free gift!  This host code can be used by anyone, no commitment required.  Let me know if you have any questions.


If you need any stamping supplies, I’d be very happy to be your Demonstrator.  Just click on the Shop Now button on the right side of the screen to go directly to my online store or contact me if you have any questions.  Happy Stamping!

Thanks for taking the time to visit!

Akiko

  • Visit my online store here
  • See the current Stampin’ Up! clearance rack specials here
  • Earn FREE Stampin’ Up! products through my Wildflower Frequent Shopper Program – my way of saying thank you to my frequent shopper online customers.
  • Sign up for my weekly newsletter here
  • Have any questions? I’d be happy to help, click here to contact me.

Cardstock Cuts for this project:

  • Crumb Cake – 5 1/2″ x 8 1/2″, 1 1/2″ x 2″
  • Night of Navy – 3 7/8″ x 5 1/8″, 5/8″ x 3 1/2″
  • Mossy Meadow – 2 1/2″ x 3″
  • Very Vanilla – (2) 3 3/4″ x 5″, 1/2″ x 3″
  • Soft Suede – 1 1/2″ x 2″
  • Real Red Glimmer – 2″ x 2 1/2″

Stampin’ Up! products used in this project:


Stampin’ Up! Christmas Rose Celebrate the Season Card

Good Morning! Today I have another Christmas card made with the Stampin’ Up! Christmas Rose stamp set from the beautiful Christmastime is Here Suite. For today’s card, I used gold embossing for the outline and the photopolymer stamps to color each section in different colors. You can find the supplies used to create this card at the bottom of my post along with the sizes of cardstock used.

I stamped the outline image from the Christmas Rose stamp set in Versamark Ink on Shimmery White Paper. I sprinkled it with gold embossing powder and heat set. I then cut it out with the coordinating die. I was glad I used the shimmery white paper for two reasons. First after I stamped each section, I used my aqua painter to go over the sections and blend them (you can use the aqua painter on shimmery white card stock without pilling problems). This gave me a smoother look. The second reason is that the shimmer shows through the image nicely and makes it look special!

I stamped the flowers with Cherry Cobbler ink and then went over them with the aqua painter. Then I blotted it with a paper towel to clean the ink from the embossing. You need to blot it because the embossing resists the ink from being absorbed on the paper and so it has wet ink that can be smeared and spoil your project if you don’t blot it. I next stamped each leaf section with Mossy Meadow ink and repeated with the aqua painter on the broad leaves and paper towel after each. I then stamped the pinecones in Soft Suede and repeated with the aqua painter and paper towel. I finished it off by stamping the berries in Poppy Parade. I did not use the aqua painter on these, but I did blot the ink off the embossing with a paper towel. The Poppy Parade berries really brought the bouquet to life after they were stamped!

Next I cut a panel of the green paper from the Christmastime is Here specialty designer series paper and adhered it to a gold mat. I cut the lattice from gold foil with the large die and adhered it to the panel with liquid glue. I cut a strip of the shimmery gold ribbon and wrapped it around the panel, securing it in the back. I stamped the Celebrate the Season sentiment from the Itty Bitty Christmas stamp set in Versamark Ink on a strip of shimmery white card stock and sprinkled it with gold embossing powder and heat set. I then trimmed the ends and adhered it over the lattice with dimensionals. I adhered the floral bouquet on the panel with dimensionals and added a large bow made with the gold shimmer ribbon. I then popped the panel on a Mossy Meadow card base with dimensionals. I finished off the card front with three gold glitter enamel dots.

I stamped the sentiment from the Frosted Foliage stamp set in Mossy Meadow ink on a panel of Whisper White. I added a strip of the green paper from the Christmastime is Here DSO to the bottom and added a thin strip of gold foil. Then I adhered the panel to the inside of the card.

When I first got the stamp set I was surprised that it had both cling stamps and photopolymer stamps. But it makes sense that you have photopolymer for the solid images so you can see through the stamp to position it over the lined images. I was pleased at how easy this makes it to create the main focal image and how beautiful it came out with this technique. Stampin’ Up! did a great job of designing the pieces so you can use all the different colors on different sections of the bouquet. I definitely recommend trying it.


We hope you’re ready to make this holiday season magical, because the Christmastime Is Here Suite is, well . . . here! This exclusive, limited-time collection of festive, floral coordinating products has everything you need to share love, joy, and creativity this holiday season.

Products from the Christmastime Is Here Suite will be available while supplies last only.

Click on the image below to see the details of the products in the suite and the pricing or click here to shop the products in my online store.


November 16 – 30 Host Code: 462PVWKY

Use this host code when you order $50 or more and receive a free gift from me!  The gift is your choice of any item valued up to $10.00 in the 2019-20 Annual Catalog or in the 2019 Holiday Catalog!  That includes some of the Host Exclusive stamp sets!

If your order is over $150, please do not use the host code since you’ll receive your own Host Dollars plus I’ll send you the free gift!  This host code can be used by anyone, no commitment required.  Let me know if you have any questions.


If you need any stamping supplies, I’d be very happy to be your Demonstrator.  Just click on the Shop Now button on the right side of the screen to go directly to my online store or contact me if you have any questions.  Happy Stamping!

Thanks for stopping by and have a great week!

Akiko

  • Visit my online store here
  • See the current Stampin’ Up! clearance rack specials here
  • Earn FREE Stampin’ Up! products through my Wildflower Frequent Shopper Program – my way of saying thank you to my frequent shopper online customers.
  • Sign up for my weekly newsletter here
  • Have any questions? I’d be happy to help, click here to contact me.

Cardstock Cuts for this project:

  • Mossy Meadow – 4 1/4″ x 11″
  • Shimmery White – 4″ x 5″ (rose bouquet), 1/2″ x 3″ (label)
  • Gold foil – 3 3/4″ x 5″ (front mat), 1 1/2″ x 3″ (lattice), 1/8″ x 3 3/4″
  • Whisper White – 3 3/4″ x 5″
  • Christmastime Is Here DSP – 3 5/8″ x 4 7/8″, 1/2″ x 3 3/4″

Stampin’ Up! products used in this project:


Stampin’ Up! November Paper Pumpkin Kit – Winter Woods Tags and Cards

Good Morning! Today I am sharing a video that I did yesterday during my Sunday Facebook Live session. I received my November Paper Pumpkin Kit last week and I made the tags for the kit. But since I don’t use a lot of tags, I also made some cards using the elements in the kit along with elements from the October Paper Pumpkin card kit and some add on items from my stash. You can find the supplies used to create this card at the bottom of my post along with the sizes of cardstock used.

Here are the cards that I made. In the video, I show how to make the two on the left. The last one was inspired by all the cards I saw using last month’s kit with deer. I had a few card bases left over, so I added the beautiful silver deer. It’s a perfect fit!

Here are the tags that I made the day before. I pretty much followed the instructions in the video. These are pretty nice tags!

Here’s the Facebook Live video on making the deer tag card and the cardinal card. I also go through the contents of the kit and show the tags that I pre-made.

I also posted the video to my YouTube channel and you can view it here.

The first card that I made was the cardinal card. Beforehand, I stamped the Whisper White panel with the large snowflake stamp from the October Paper Pumpkin kit using Versamark Ink and sprinkled it with clear embossing powder. I heat set the snowflakes, giving a shiny but subtle texture to the white background. I adhered it to a Thick Whisper White card base with dimensionals. I adhered the Silver Foil panel in the upper center with dimensionals and adhered the cardinal with glue dots. That’s it! I used the Celebrate the Season sentiment from the Itty Bitty Christmas stamp set for the inside. I silver embossed it on a Whisper White panel and adhered it to the inside of the card.

This is the second card that I made in the video. I used the stamps from the October Paper Pumpkin kit to stamp the label and inside greetings in Shaded Spruce and the little cardinal in Poppy Parade. I started by embossing a Whisper White panel with the Pinewood Planks embossing folder. This picks up on the wood grain theme in the circle of the red tag. I adhered the embossed panel to a Pool Party card base with liquid glue. I added the Shaded Spruce ribbon and Silver cord to the top per the kit instructions. I adhered a small snowflake and two holly leaves and a sprig with the glue dots that came with the kit. I adhered the deer with dimensionals. I stamped the label with the Seasons Greetings sentiment in Shaded Spruce and adhered it with dimensionals.

I finished the tag with silver sequins from the kit and red rhinestones from my stash. Then I adhered the tag to the card front with dimensionals. On the inside, I trimmed a Whisper White panel on the bottom with one of the strips of wood grain paper from the October kit and stamped the sentiment and a little cardinal.

I love that Paper Pumpkin kits have everything you need. They even give you a stamp block when you first subscribe!


Paper Pumpkin Delivers Something for Everything in the December Paper Pumpkin Kit

When looking for the right sentiments to share with special friends, it’s nice to have choices. That’s why Paper Pumpkin is delivering Something for Everything in the month of December. This smartly designed, versatile kit includes a 13-sentiment stamp set—giving you tons of ways to let loved ones know they care! Plus, you’ll get supplies to create 12 beautiful, full-sized cards and coordinating envelopes. 

The three full-sized card designs (4 of each) are gorgeous but completely versatile, giving you the flexibility to use them for any occasion. Start the new year right with cute, fun, and easy cards for 2020.

  • Kit details: Makes 12 cards and envelopes
  • Card size: 4 1/4″ x 5-1/2″ (10.8 x 14 cm)
  • Envelope size: 4-1/2″ x 5-3/4″ (11.4 x 14.6 cm)
  • Coordinating colors: Crushed Curry, Grapefruit Grove, Old Olive, Shaded Spruce, Terracotta Tile

If you’re interested in subscribing to Paper Pumpkin, you can either sign up for a subscription where you are billed monthly for your kit or you can purchase a prepaid subscription in my online store. To see more information and to sign up for the monthly subscription click here. To see the options for prepaid subscriptions in my online store, click here.

Sign up deadline for the December kit is December 10.


Last Day for the Double Wildflower Points Ordering Bonus!

Today is the last day for the ordering bonus of DOUBLE the Wildflower Points in my Wildflower Frequent Shopper Program!

You’ll get DOUBLE Wildflower Reward Points for every order of $50 or greater before shipping and taxes (no matter what you order!) placed through my online store from now through, Monday, November 25!!

Don’t forget to add the Host Code below if your order is under $150 to get your free thank you gift (don’t apply the code to orders over $150 – they will automatically get the free thank you gift AND you get host rewards of your own!).  For more information about my WildflowerFrequent Shopper Program (my way of saying thanks to my returning buyers) and Wildflower Points, click here.  Let me know if you have any questions.  Happy Shopping!!


November 16 – 30 Host Code: 462PVWKY

Use this host code when you order $50+ and receive a free gift from me!  If your order is over $150, please do not use this code, but you’ll still get the free gift.  The free gift is your choice of any item valued up to $10.00 in the 2018-19 Annual Catalog or in the 2019 Occasions Catalog!  That includes some of the Host Exclusive stamp sets!

If your order is over $150, please do not use the host code since you’ll receive your own Host Dollars plus I’ll send you the free gift!  This host code can be used by anyone, no club or commitment required.  Let me know if you have any questions.


If you need any stamping supplies, I’d be very happy to be your Demonstrator.  Just click on the Shop Now button on the right side of the screen to go directly to my online store or contact me if you have any questions.  Happy Stamping!

Thanks for stopping by and have a great week!

Akiko

  • Visit my online store here
  • See the current Stampin’ Up! clearance rack specials here
  • Earn FREE Stampin’ Up! products through my Wildflower Frequent Shopper Program – my way of saying thank you to my frequent shopper online customers.
  • Have any questions? I’d be happy to help, click here to contact me.

Cardstock Cuts for this project:

  • Cardinal Card
    • Thick Whisper White – 4 1/4″ x 11″ (card base)
    • Whisper White – 4″ x 5 1/4″ (embossed front) , 3 3/4″ x 5″ (inside)
    • Silver Foil – 2 1/4″ x 2 1/2″
  • Deer Tag Card
    • Pool Party – 5 1/2″ x 8 1/2″ (card base)
    • Whisper White – (2) 3 3/4″ x 5″ (embossed panel and inside panel)

Stampin’ Up! products used in this project:


Stampin’ Up! Toile Christmas for the Happy Inkin’ Thursday Blog Hop

Good Morning! Welcome to another Happy Inkin’ Thursday Blog Hop! I used the beautiful Stampin’ Up! Toile Christmas cling stamp set along with the Toile Tidings designer series paper to make a nostalgic Christmas Card. Here is my card:

We have a sketch challenge this week, and here is the sketch we are using:

I used the second largest circle in the Layering Circles dies to cut a circle in a panel of Garden Green card stock and then ran it through the Subtle embossing folder. I used the largest scalloped circle in the Layering Circles dies to cut a scalloped circle from Real Red card stock. I cut a circle in the middle of the scalloped circle with the second largest circle die to create a scalloped frame. I adhered the frame to the embossed panel with liquid glue. I added a strip of the striped Toile Tidings DSP to the card front and added a length of the Garden Green ribbon on top, securing it on the back.

I stamped the double banner sentiment from the Stampin’ Up! Toile Christmas in Garden Green on a panel of Very Vanilla and cut it out with the coordinating die. I adhered it to the panel with dimensionals. I tied another strip of the ribbon in a knot and adhered it to the panel with glue dots.

I cut a circle of the countryside Toile Tidings DSP with the largest circle of the Layering circles dies and attached it to a Thick Very Vanilla Card base with liquid glue. I was careful to select a portion that had an interesting scene, such as this with the children playing in front of the barn. I then adhered the embossed Garden Green panel to the card base with dimensionals, so that the little scene would show through behind the frame. I finished off the card front with 3 red glitter enamel dots.

On the inside of the card, I stamped the sentiment from the Stampin’ Up! Toile Christmas stamp set using Garden Green ink on a panel of Very Vanilla. I added a strip of the countryside Toile Tidings DSP to the bottom of the panel and stamped the flourish in Real Red ink under the sentiment. I added a Garden Green mat and adhered it to the inside of the card. I adhered a panel of the countryside Toile Tidings DSP to the flap of a Very Vanilla medium envelope with liquid glue and trimmed it with paper snips.

The nostalgic images of the countryside Toile Tidings DSP bring back memories of winter fun and Christmases past. They are sure to make this Christmas Merry and Bright!

On with the Hop! Click the Next button below to visit Karen Ksenzakovic’s blog.

And just in case you get lost along the way, here’s a list of the team members participating in the hop today:


We are in the middle of Stampin’ Up! Online Extravaganza. See my Stampin’ Up! Promotions page for details.


November 16 – 30 Host Code: 462PVWKY

Use this host code when you order $50 or more and receive a free gift from me!  The gift is your choice of any item valued up to $10.00 in the 2019-20 Annual Catalog or in the 2019 Holiday Catalog!  That includes some of the Host Exclusive stamp sets!

If your order is over $150, please do not use the host code since you’ll receive your own Host Dollars plus I’ll send you the free gift!  This host code can be used by anyone, no commitment required.  Let me know if you have any questions.


If you need any stamping supplies, I’d be very happy to be your Demonstrator.  Just click on the Shop Now button on the right side of the screen to go directly to my online store or contact me if you have any questions.  Happy Stamping!

Thanks for visiting!

Akiko

  • Visit my online store here
  • See the current Stampin’ Up! clearance rack specials here
  • Earn FREE Stampin’ Up! products through my Wildflower Frequent Shopper Program – my way of saying thank you to my frequent shopper online customers.
  • Sign up for my weekly newsletter here
  • Have any questions? I’d be happy to help, click here to contact me.

Cardstock Cuts for this project:

  • Thick Very Vanilla – 4 1/4″ x 11″
  • Real Red – 3 1/2″ x 3 1/2″
  • Very Vanilla – 3 5/8″ x 4 7/8″ (inside), 2 1/4″ x 3 1/2″ (label)
  • Garden Green – 4″ x 5 1/4″ (front), 3 3/4″ x 5″ (inside mat)
  • Toile Tidings DSP – 3 1/2″ x 3 1/2″ (front), 1/2″ x 3 5/8″ (inside), 2 1/2″ x 6″ (envelope flap), 3/4″ x 3 3/4″ (red stripe)

Stampin’ Up! products used in this project:


Stampin’ Up! Peaceful Boughs Seasons Greetings Card

Good Morning! Today made a country style Christmas card with the Come to Gather Designer Series paper, the pretty peacock gingham paper, and the Stampin’ Up! Peaceful Boughs bundle. This bundle combines the Peaceful Boughs cling stamp set and the Beautiful Boughs dies at a 10% discount. You can find the supplies used to create this card at the bottom of my post along with the sizes of cardstock used.

I started by embossing Crumb cake Card stock with the Pinewood Planks embossing folder. I lightly sponged it with crumb cake ink to enhance the texture and then adhered it to a Pretty Peacock mat. I added the Pretty Peacock gingham paper from the Come to Gather DSP pack to the bottom and wrapped a length of the Come to Gather Crumb Cake Ribbon around the seam with snail adhesive. I added tape to the back to secure it. I adhered the layered panel to a Real Red card base with liquid glue.

I die cut the following using the Beautiful Boughs dies to make the arrangement:

  • A medium branch from Vellum card stock
  • Two small branches from Pretty Peacock card stock
  • Three small solid pine cones from Crumb Cake card stock
  • Three small textured pine cones from Soft Suede card stock

I glued the Soft Suede pine cones to the Crumb cake pine cones to get the layered look. I built the arrangement using glue dots to adhere the pieces, starting with the Vellum branch on the bottom, two Pretty Peacock branches next and topped it with the pine cones. I tied a short length of the Crumb Cake ribbon in a knot to make a faux bow and adhered it to the arrangement with glue dots.

I stamped the Seasons Greetings sentiment from the Stampin’ Up! Peaceful Boughs stamp set in Real Red ink on a scrap of Whisper White. I cut it out with the small label die from the Beautiful Boughs dies. I added two Pretty Peacock faceted dots to the label and popped it on the card with dimensionals. I then nestled the pine cone arrangement under the label and adhered it with glue dots.

On the inside of the card, I added a strip of the Pretty Peacock gingham paper to the bottom of a Whisper White panel. I stamped the small branch from the Stampin’ Up! Peaceful Boughs stamp set in Pretty Peacock after stamping off twice. I stamped the sentiment from the Stampin’ Up! Peaceful Boughs stamp set in Real Red ink. I matted the panel with Pretty Peacock and adhered it to the inside of the card.

I love country decor and the gingham and natural elements of the wood planks, pine cones and branches give this card a comfy holiday feel – all you need is a warm fireplace!


October 15 – 31 Host Code: 3KQUKV9U

Use this host code when you order and receive a free gift from me!  If your order is over $150, please do not use this code, but you’ll still get the free gift.  The free gift is your choice of any item valued up to $10.00 in the 2018-19 Annual Catalog or in the 2019 Occasions Catalog!  That includes some of the Host Exclusive stamp sets!


If you need any stamping supplies, I’d be very happy to be your Demonstrator.  Just click on the Shop Now button on the right side of the screen to go directly to my online store or contact me if you have any questions.  Happy Stamping!

I hope you liked my card today. Thanks for stopping by.

Akiko

  • Visit my online store here
  • See the current Stampin’ Up! clearance rack specials here
  • Earn FREE Stampin’ Up! products through my Wildflower Frequent Shopper Program – my way of saying thank you to my frequent shopper online customers.
  • Have any questions? I’d be happy to help, click here to contact me.

Cardstock Cuts for this project:

  • Real Red – 4 1/4″ x 11″
  • Pretty Peacock – 3 7/8″ x 5 1/8″, 3 3/4″ x 5″, 2″ x 3″
  • Crumb Cake – 3 3/4″ x 5″, 1 1/4″ x 3 3/4″
  • Soft Suede – 1 1/4″ x 3 3/4″
  • Come to Gather DSP – 3 3/4″ x 3 1/2″, 1/2″ x 3 1/2″
  • Vellum – 2 1/2″ x 3 1/2″
  • Whisper White – 3 1/2″ x 4 3/4″, 1 1/2″ x 3 3/4″

Stampin’ Up! products used in this project:


Stampin’ Up! Toile Christmas Card

Good Morning! Today I have a Christmas card made with the Stampin’ Up! Toile Christmas bundle. This is a simple card that uses the vintage images in the Toile Tidings Designer Series Paper as the focal point. You can find the supplies used to create this card at the bottom of my post along with the sizes of cardstock used.

I cut a panel of the Stampin’ Up! Toile Tidings designer series paper using the largest of the Stitched Rectangles dies and adhered it to a Real Red mat. I attached them to a Garden Green card base with dimensionals.

Using the Stamparatus, I stamped the Christmas Wishes banner greeting from the Stampin’ Up! Toile Christmas stamp set using the Real Red and Garden Green Stampin’ Write markers. The Stamparatus allowed me to use stamp the image in the same place twice. The first time was with the Real Red marker coloring the letters and the second time was with the Garden Green marker coloring the banner. I cut the banner out using the coordinating die from the Christmas Cardinal dies. I cut two of the medium leaf branches and one of the small leaf branches from the Christmas Cardinal dies and arranged and adhered them behind the label with liquid glue. I attached the label to the card front using dimensionals and added some red glittered enamel dots.

I stamped the sentiment from the Stampin’ Up! Toile Christmas stamp set in Real Red ink on a panel of Very Vanilla. I adhered a strip of the Toile Tidings DSP to the bottom of the panel and adhered it to a Real Red mat before attaching it to the inside of the card.

This is a simple and pretty nostalgic Christmas card. I hope you like it. Thanks for visiting!

Akiko


October 1 – 15 Host Code: 44YKETNJ

Use this host code when you order and receive a free gift from me!  If your order is over $150, please do not use this code, but you’ll still get the free gift.  The free gift is your choice of any item valued up to $10.00 in the 2018-19 Annual Catalog or in the 2019 Occasions Catalog!  That includes some of the Host Exclusive stamp sets!


Join us for the Inkin Krew World Card Making Day Facebook Event!

The Inkin’ Krew is celebrating World Card Making Day on Oct 5 with a Facebook Live Event. Members of our team will be presenting live card making demonstrations throughout the day. In addition we will have fun games and give aways. You can join us NOW at Inkin’ Krew WCMD and join the fun. as we warm up for the big day.


If you need any stamping supplies, I’d be very happy to be your Demonstrator.  Just click on the Shop Now button on the right side of the screen to go directly to my online store or contact me if you have any questions.  Happy Stamping!

  • Visit my online store here
  • See the current Stampin’ Up! clearance rack specials here
  • Earn FREE Stampin’ Up! products through my Wildflower Frequent Shopper Program – my way of saying thank you to my frequent shopper online customers.
  • Have any questions? I’d be happy to help, click here to contact me.

Cardstock Cuts for this project:

  • Garden Green – 5 1/2″ x 8 1/2″, 2″ x 3″
  • Real Red – 3 7/8″ x 5 1/4″, 3 3/4″ x 5″
  • Very Vanilla – 3 5/8″ x 4 7/8″, 2″ x 4″
  • Toile Tidings DSP – 4″ x 5 1/4″, 1/2″ x 4 7/8″

Stampin’ Up! products used in this project:

Product List

Stampin’ Up! Snowman Season Christmas Card

Good Morning! Today is the big day – the 2019 Stampin’ Up! Holiday Catalog is finally open for orders! Yay! To celebrate, I made a snowman Christmas card made with the Stampin’ Up! Snowman Season bundle. This includes the Snowman Season Photopolymer stamp set and the Snowman Builder punch. The Snowman Season stamp set is used for cards and tags on the cover of the new catalog.

In addition to it being the first day to order from the new catalog, today is the first day of the popular Buy 3 get 1 Free Designer Series Paper or DSP promotion. The details are on the Stampin’ Up! Promotions page.

Now, on to today’s Snowman Season Christmas card. You can find the supplies used to create this card at the bottom of my post along with the sizes of cardstock used.

I started by adhering the Let it Snow Specialty Designer Series Paper with the trees to a Real mat and then to a Coastal Cabana card base. The DSP has glitter on the pine trees, so pretty! I cut the large circle from the Stitched Shapes dies from Sparkle Glimmer paper and adhered it to the card front.

I made the snowman by stamping it in Memento Tuxedo Black ink on Thick Whisper White cardstock. I then punched it out with the Snowman Builder punch. I colored his nose with a Pumpkin Pie Stamp’ Write marker and added two large and two small coal pieces from the Let it Snow Embellishment kit to his belly. I stamped the top hat in Memento Tuxedo Black ink on Thick Whisper White, punched it out and colored it. I punched the arms in Crumb Cake and attached the red felt gloves from the Let it Snow Embellishment kit.

I stamped the Merry Christmas sentiment from the Stampin’ Up! Snowman Season stamp set in Real Red on a strip of Whisper White cardstock. I die cut the scalloped mat using the scallop die from the Budding Blooms dies on Real Red cardstock and attached the label to it. I attached it to the card with liquid glue and then attached the snowman with dimensionals.

On the inside of the card, I stamped the sentiment from the Stampin’ Up! Snowman Season stamp set in Real Red on a Whisper White panel. I added a strip of DSP to the bottom and added a Real Red mat before adhering it to the inside of the card.

The colors in the Let it Snow DSP are so cheerful and the glitter really makes it special. Coupled with the different snowmen from the Stampin’ Up! Snowman Seasons stamp set, it really makes for happy, whimsical Christmas cards.

My last few cards have been sneak peeks from the new 2019 Stampin’ Up! Holiday Catalog which is open for orders today! If you haven’t received a catalog yet but would like one, visit the Stampin’ Up! Catalogs page to request one and I’ll get it out to you. Thanks for visiting and happy holiday stamping!

Akiko


Buy 3 Get 1 Free Designer Series Paper Sale Is Back – Starting Today!

By popular demand, Stampin’ Up! is bringing back the Designer Series Paper Sale! During September 4–30, you can buy three packages of select Designer Series Paper, and get one FREE! See the full details on my Stampin’ Up! Promotions Page.


September 1 – 15 Host Code: DHYEBG62

Use this host code when you order and receive a free gift from me!  If your order is over $150, please do not use this code, but you’ll still get the free gift.  The free gift is your choice of any item valued up to $10.00 in the 2018-19 Annual Catalog or in the 2019 Occasions Catalog!  That includes some of the Host Exclusive stamp sets!


If you need any stamping supplies, I’d be very happy to be your Demonstrator.  Just click on the Shop Now button on the right side of the screen to go directly to my online store or contact me if you have any questions.  Happy Stamping!

  • Visit my online store here
  • See the current Stampin’ Up! clearance rack specials here
  • Earn FREE Stampin’ Up! products through my Wildflower Frequent Shopper Program – my way of saying thank you to my frequent shopper online customers.
  • Have any questions? I’d be happy to help, click here to contact me.

Cardstock Cuts for this project:

  • Coastal Cabana – 5 1/2″ x 8 1/2″
  • Real Red – (2) 3 3/4″ x 5″, 1″ x 3 1/4″
  • Thick Whisper White – 4″ x 2″
  • Whisper White – 3 5/8″ x 4 7/8″, 5/8″ x 3 1/4″
  • Sparkle Glimmer Paper – 3 1/4″ x 3 1/4″
  • Let it Snow Specialty DSP – 3 5/8″ x 4 7/8″, 1/2″ x 3 5/8″
  • Crumb Cake – 1″ x 2″

Stampin’ Up! products used in this project:


Stampin’ Up! Christmas Stockings Card

Good Morning! Today I am celebrating Christmas in July and sharing a Christmas Card with you. I know it’s early, but I need the idea of starting to plan for Christmas early because I’m such a procrastinator, and my Christmas to-do list is only half done on December 25.

One of my all time favorite Stampin’ Up! Christmas products is the Hang Your Stockings stamp set and the coordinating Stampin’ Up! Christmas Stockings dies. And guess what? These dies have been on the clearance rack for a while, and as of yesterday morning, they’re still there at a nice discount! So, I decided to focus today’s post on the Christmas Stockings dies and use other clearance rack items that I have on hand.

In addition to the clearance rack items, I kind of followed the current sketch at Try Stampin’ On Tuesday Challenge 416, where they must also be getting ready because their alternate theme is Christmas in July so check out the other entries there.

I started by making my stocking. I used the Stampin’ Up! Christmas Stockings die to cut the main stocking piece in Cherry Cobbler. I had some white glitter paper in my stash and used it to cut the stocking cuff, heel and toe pieces and as well as the snowflake that is embedded in another stocking die. I attached these to the main stocking piece with multipurpose glue. I die cut the hanger loop from Garden Green and attached it to the back. Isn’t it awesome! The Stampin’ Up! Christmas Stockings die set has other pieces where you can cut a Christmas tree, bow, holly and star. There are also other stocking dies to make swirly stockings and Nordic stockings. It is so versatile and the results are amazing!

Another clearance rack item that I used is the Dashing Along Designer Series Paper or DSP. I cut a piece of the red and white floral and adhered it to a Whisper White mat and then to a Cherry Cobbler card base. I took another piece of Whisper White and ran it through my Snow Burst embossing folder. This is retired, but it goes perfect with the red and white DSP because they are both so angular. I cut the green star DSP and attached it to a Garden Green mat and attached it to the card with dimensionals. Then I popped the stocking on with dimensionals. I stamped the Merry Christmas greeting in Cherry Cobbler on Whisper White. This sentiment is from the Stampin’ Up Timeless Tidings, and is also available on the clearance rack. I clipped the corners with the Triple Banner Punch and adhered it to the bottom of the card.

I stamped the and a Happy New Year sentiment in Cherry Cobbler ink on a Whisper White panel and added a strip of DSP to the bottom. I finished it off with a Garden Green mat and adhered it to the inside of the card. Yay! One set of Christmas cards is done!

Amy Koenders is my Stampin’ Up! upline (she recruited me to be a Stampin’ Up! demonstrator) and she was fortunate enough to go on the Stampin’ Up! Incentive Trip cruising the Greek Isles. On the incentive trip, Amy was lucky enough to also receive an advanced copy of the upcoming 2019 Stampin’ Up! Holiday Catalog and she shared a picture of it on her blog here, along with some early sneak peeks of items in the catalog and lots of pictures of the Mediterranean. Check out her blog at Stamp with Amy K if you haven’t already, because she makes amazing cards!

The 2019 Stampin’ Up! Holiday Catalog will go live on September 4, 2019, but in the meantime, check out your supply stash and start to prepare for Christmas in July. Or if your stash needs a refresh, check out the Stampin’ Up clearance rack, because there are a lot of great items at great prices that are still available while supplies last. There are also a few beautiful products for Christmas in the 2019 Annual Catalog. Thanks and have a great week!

Akiko


Don’t forget that we are in the earning period of Bonus Days where you get a coupon for $5 to redeem in August for every $50 you spend (before shipping and taxes) in July. See the full details on the Stampin’ Up! Promotions Page.


July 15 – 31 Host Code: CA7YRFE3

Use this host code when you order and receive a free gift from me!  If your order is over $150, please do not use this code, but you’ll still get the free gift.  The free gift is your choice of any item valued up to $10.00 in the 2018-19 Annual Catalog or in the 2019 Occasions Catalog!  That includes some of the Host Exclusive stamp sets!


If you need any stamping supplies, I’d be very happy to be your Demonstrator.  Just click on the Shop Now button on the right side of the screen to go directly to my online store or contact me if you have any questions.  Happy Stamping!

  • Visit my online store here
  • See the current Stampin’ Up! clearance rack specials here
  • Earn FREE Stampin’ Up! products through my Wildflower Frequent Shopper Program – my way of saying thank you to my frequent shopper online customers.
  • Have any questions? I’d be happy to help, click here to contact me.

Cardstock Cuts for this project:

  • Cherry Cobbler – 4 1/4″ x 11″, 1 3/4″ x 2 3/4″
  • Garden Green – 3 3/4″ x 5″, 2 3/8″ x 3 3/8″, scrap for hanger
  • Whisper White – 3 7/8″ x 5 1/8″, 3 1/2″ x 4 3/4″, 3/4″ x 3 1/2″
  • Dashing Along Red DSP – 3 3/4″ x 5″, 3 1/2″ x 1/2″
  • Dashing Along Green DSP – 2 1/4″ x 3 1/4″
  • White glitter – scraps to accent stocking

Stampin’ Up! products used in this project: