Stampin’ Up! Round We Go Celebrate Card

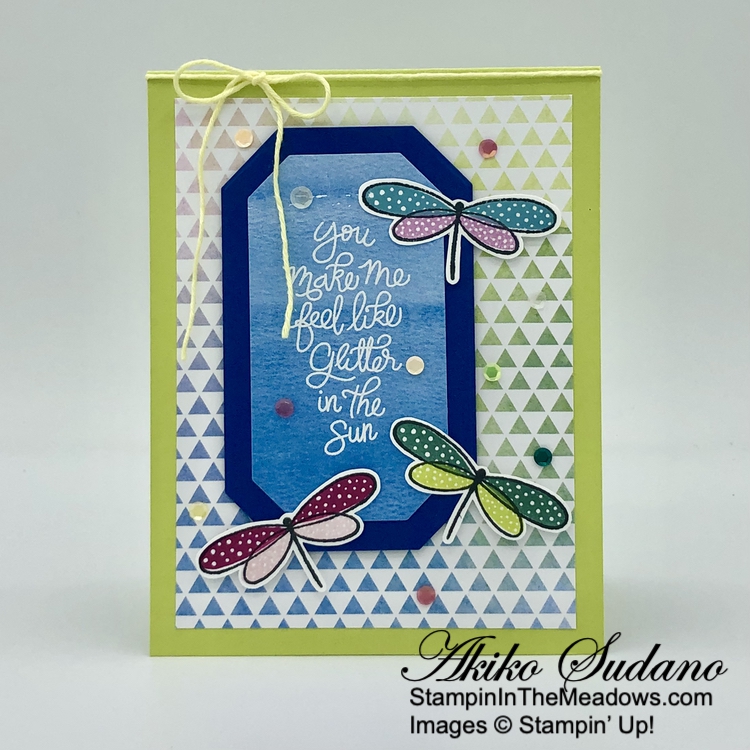
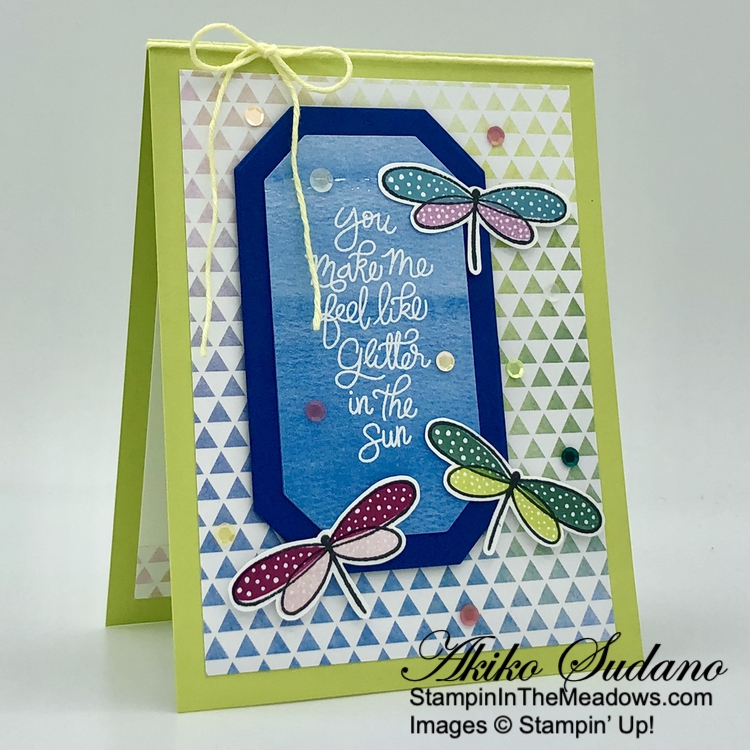
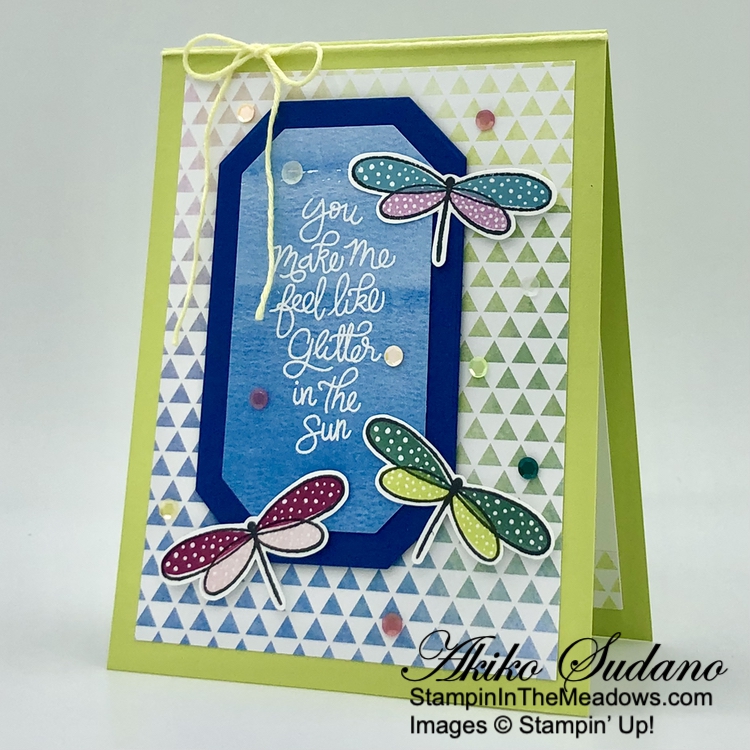
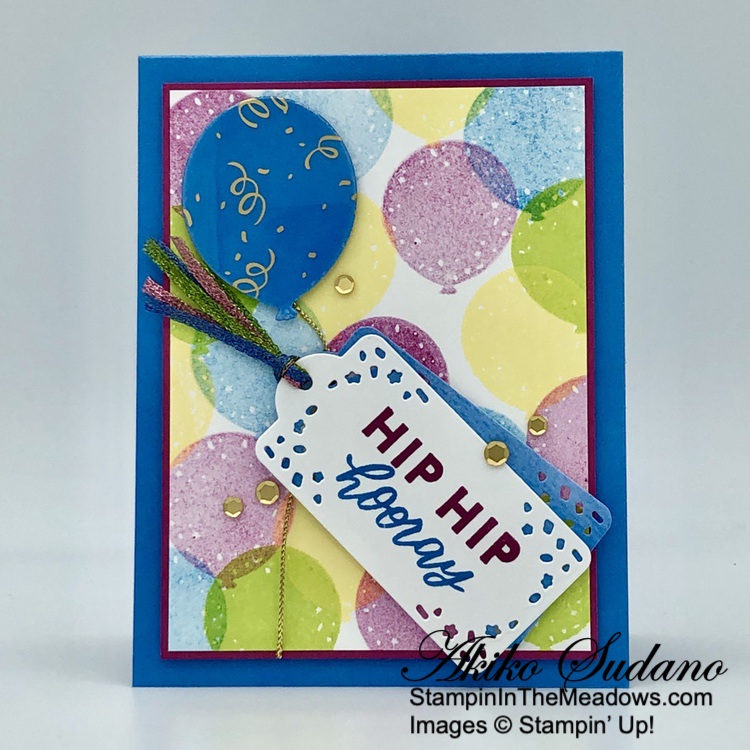
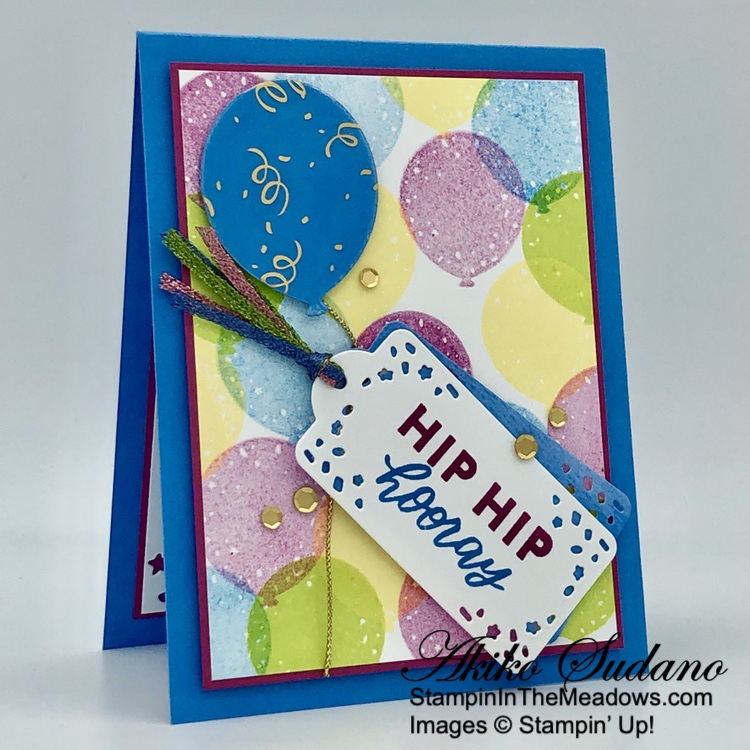
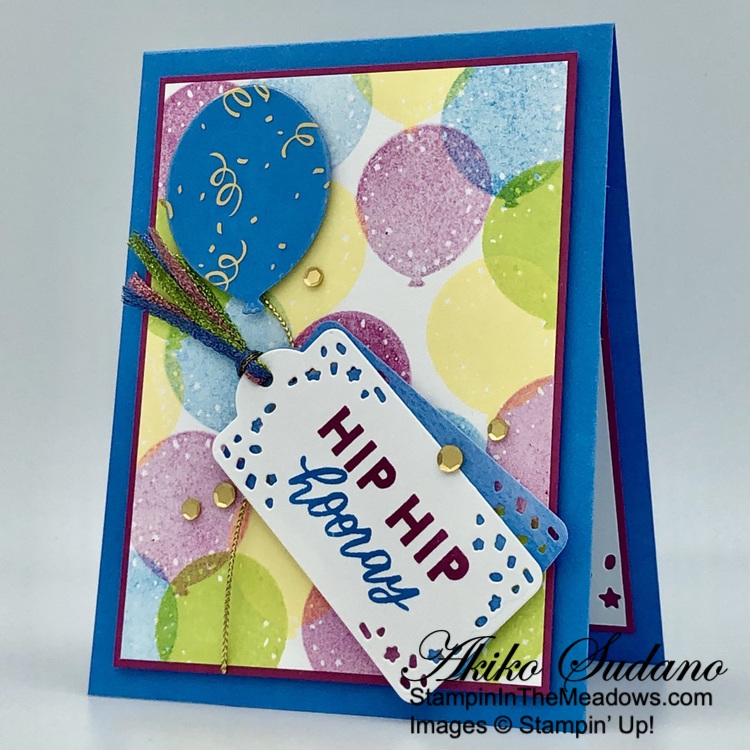
Good Morning! The Stampin’ Up! Round We Go bundle is such a fun set that includes a die to make a 3D rosette and other fun circle themed stamps and dies. And it also includes great sentiments in an energetic fun font that are perfect for any kind of celebration, including birthdays. I made a general purpose celebrate card that could be used for any fun occasion. You can find the products I used at the bottom of my post along with the card stock sizes.

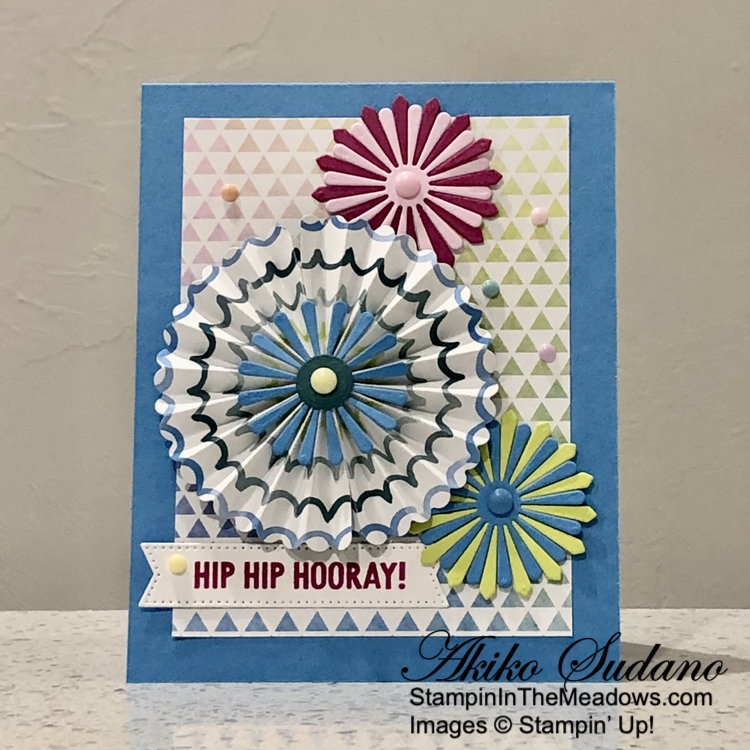
I adhered a panel of Bright and Beautiful 6″ x 6″ designer series paper to the front of an Azure Afternoon card base with liquid glue. I cut another panel with the 3D rosette die from the Stampin’ Up! Round We Go dies twice, lining up the DSP design so it would be similar all around. I folded the rosettes on the score lines and adhered the end tabs of the rosette die cuts to the underside of the opposite rosette die cut using liquid glue. I flattened the rosette and used lots of liquid glue to adhere it to an Azure Afternoon die cut scalloped circle.

I used the curved edge petal die from the Stampin’ Up! Round We Go dies to cut two Azure Afternoon and one Bubble Bath petals. I used the angle edge petal die to cut a Berry Burst and Lemon Lime Twist petals. I adhered one of the Azure Afternoon petals to the rosette with liquid glue and the other to the Lemon Lime Twist petal. I adhered the Bubble Bath petal to the Berry Burst Petal. I finished the rosette with a medium circle cut from Pretty Peacock. I arranged the rosette and petal circles on the card and adhered them with glue dots.

I stamped the sentiment from the Stampin’ Up! Round We Go stamp set in Berry Burst ink on a Basic White strip and cut it out with the long skinny die from the Stylish Shapes dies. I adhered the label to the card with glue dots. I used Rainbow gems in each circle and scattered some more around the card front.

For the inside of the card I stamped the angle petal from the Stampin’ Up! Round We Go stamp set in Azure Afternoon on a Basic White panel. I rotated the stamp and stamped again between each petal. I cut a small Lemon Lime Twist circle for the center. I stamped the sentiment in Berry Burst and trimmed the bottom with DSP. I adhered the panel to the inside of the card with Stampin’ Seal.

The Stampin’ Up! Round We Go bundle is so fun and happy and perfect for lighthearted, whimsical cards for any occasion. There are so many different ways to combine the die cuts and stamped circle images, you could keep yourself (or your kids) busy for hours playing with different ideas and colors.


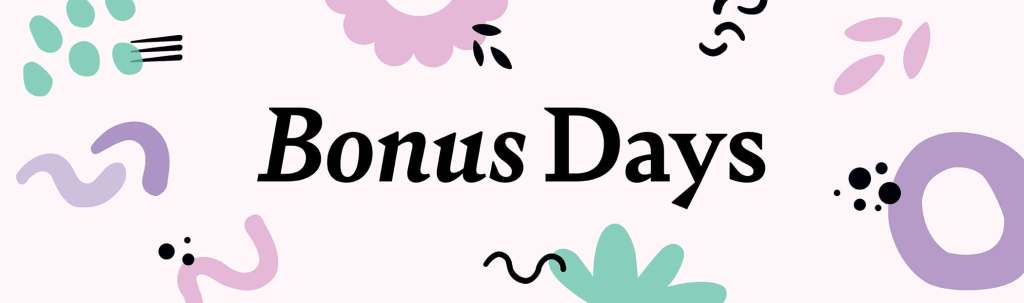
Bonus Days Coming July 3, 2024!

It’s time for one of our favorite promotions—BONUS DAYS! Because do you know what’s a great deal? Getting rewarded for all the crafting supplies you’re already going to buy! When you shop between 3–31 July and spend $50 you will earn a $5 coupon! Make sure you save all your coupons because you can redeem them (and we mean ALL of them) between August 1 and August 31. There’s no limit to how many coupons you can earn! 

Promotion Details:

Earning Period: July 3 – July 31 2024

  • Earn a $5 coupon for every $50 spent (before shipping and tax). 
  • All coupon codes will be emailed right after a qualifying purchase has been made. Customers must have a customer account with a valid email address to earn coupons when they shop. If you don’t already have an account, you can easily create one in the Online store – contact me if you have any questions. 
  • If you earn multiple codes from a single order, you will receive one email with multiple codes. If you earn multiple codes from multiple orders, you will receive separate emails for each code earned.
  • All order types qualify for this promotion. Phone and email orders still require an email address.
  • Orders started before the promotion begins will not count toward earning coupon codes. For example, if you add items to your cart before July 3 and wait to purchase until that date or later, then those items will not qualify towards earning coupons. You must add items to your cart and complete your purchase during the earning period. 
  • There is no limit to the number of coupon codes participants can earn per order or throughout the duration of the earning period. 
  • Customers must use a valid email address during checkout in order to receive their coupon code. If a customer places an order over the phone, they must still provide a valid email address to receive their coupon code.
  • Starter Kit orders are excluded from this offer.

Redemption Period: August 1 – August 31, 2024

  • There is no limit to the number of coupon codes you can redeem on an order during the redemption period. If using multiple codes, they must be separated by a space. 
  • Coupon codes may be redeemed one time only. They cannot be redeemed after August 31, 2024.
  • Coupon codes may be redeemed for any product (excluding Starter Kits). They cannot be used on exchanges.
  • Bonus Days coupon codes can be applied to month-to-month Paper Pumpkin subscriptions and new prepaid subscriptions.

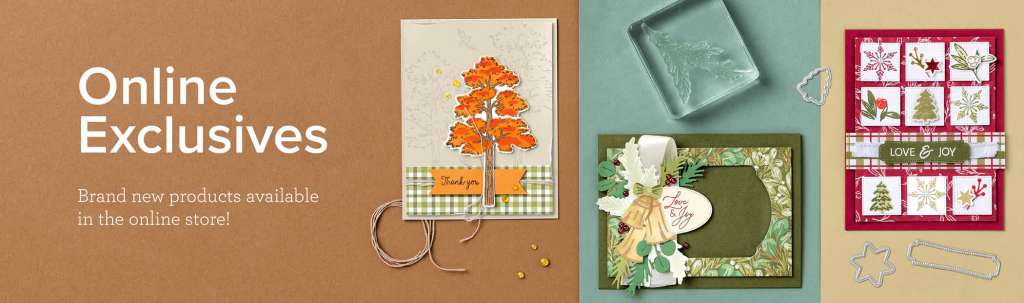
New Online Exclusives Available Now!

A new selection of Online Exclusive products was just introduced. Online Exclusives won’t appear in any catalog and are only available in the Online Store. There is no fixed end date for Online Exclusives! Some products will be reordered when inventory is low, and others will only be available while supplies last. This way Stampin’ Up! can offer even more new products throughout the year.

This release includes several items to get an early start on Fall and Christmas crafting. So check them out!


Current Host Code: XQZKDQU9

Use this host code when you order $50 or more and receive a Thank You gift from me!  The free gift is your choice of any item currently available valued up to $10.00.

If your order is over $150, please do not use the host code since you’ll receive your own Host Dollars plus I’ll still send you the Thank You gift!  This host code can be used by anyone, no club or commitment required. Let me know if you have any questions.


If you need any stamping supplies, I’d be very happy to be your Demonstrator.  Just click on the Shop Now Button on the right side of the screen to go directly to my Online store or contact me if you have any questions.  Happy Stamping!

Thanks for stopping by and have a great day!

Akiko

  • Visit my online store here
  • See the current Stampin’ Up! clearance rack specials here
  • Earn FREE Stampin’ Up! products through my Wildflower Frequent Shopper Program – my way of saying thank you to my online frequent shopper customers.
  • Have any questions? I’d be happy to help, click here to contact me.

Cardstock Cuts for this project:

  • Azure Afternoon – 4-1/4″ x 11″ card base, scored at 5-1/2″, 1-3/4″ x 3-1/2″ (two curved edge petals), 2-3/4″ x 2-3/4″ (die cut scalloped circle for rosette back)
  • Lemon Lime Twist – 2″ x 2″ (angle edge petal), 1″ x 1″ (small circle for inside)
  • Pretty Peacock – 1″ x 1″ (medium circle for rosette)
  • Berry Burst – 2″ x 2″ (angle edge petal)
  • Bubble Bath – 1-3/4″ x 1-3/4″ (curve edge petal)
  • Basic White – 3-3/4″ x 5″ (inside panel)
  • Bright and Beautiful DSP – 3-3/4″ x 5″ (front background), two 1-3/4″ x 5-1/2″ panels (3D rosette), 1/2″ x 3-3/4″ (inside trim)

Stampin’ Up! products used in this project:


Stampin’ Up! Happiest Day Card

Good Morning! The Stampin’ Up! Happiest Day stamp set is a fun photopolymer stamp set with the best sentiments and cheerful images. I used it with the colorful Bright and Beautiful 6″ x 6″ designer series paper and Countryside Corners dies for today’s card. You can find the products I used at the bottom of my post along with the card stock sizes.

I adhered a panel of Bright and Beautiful designer series paper to a Lemon Lime Twist card base with liquid glue. I stamped the sentiment from the Stampin’ Up! Happiest Day stamp set using Versamark ink on a panel of Bright and Beautiful DSP and sprinkled it with white embossing powder. I shook off the excess and heated the powder with my heat tool. I cut it out with the 4th largest die from the Countryside Corners dies. I cut a Blueberry Bushel panel with the next largest size die and adhered the label to the Blueberry Bushel die cut. I adhered the label to the card with dimensionals.

I stamped the dragonfly outline from the Stampin’ Up! Happiest Day stamp set in Memento Tuxedo Black ink three times on Basic White. I used the wing filler stamps to color the wings, using Balmy Blue and Fresh Freesia, Lost Lagoon and Lemon Lime Twist, and Berry Burst and Bubble Bath inks. I love those dotted wing filler stamps! I fussy cut the dragonflies with my paper snips and adhered them to the card with dimensionals and glue dots.

I decorated the space around the dragonflies with colorful small sequins and used Lemon Lolly baker’s twine to wrap around the top and tie a bow.

For the inside of the card I stamped the sun and sun rays from the Stampin’ Up! Happiest Day stamp set in daffodil Delight ink in the top corner of a Basic White panel. I used a Blending Brush to apply Lemon Lolly ink around the sun and trimmed the bottom with a strip of DSP. I adhered the panel to the inside of the card with Stampin’ Seal.

Isn’t that sentiment the best! The Stampin’ Up! Happiest Day stamp set is perfect for making cheerful, happy cards that make people smile.


Stampin’ Up! Bundle Sale Starting June 5, 2024!

Everyone loves a good deal, which is why Stampin’ Up! is offering an additional 10% off all stamp and die bundles! Between June 5, 2024 and June 30, 2024, take advantage of the sale and add some new bundles to your collection. Plus, save 10% on the Stampin’ Cut & Emboss Machine and the Mini Stampin’ Cut & Emboss Machine. These machines make the perfect crafting partner for stamp and die bundles.

Promotion Details:

  • Sales Period: June 5, 2024 – June 30, 2024
  • Get an additional 10% discount on stamp and die bundles only (that’s a total of 20% discount on stamp and die bundles!).
  • This excludes suite collections, stamp and punch bundles and any other bundles*.
  • Save 10% on Stampin’ Cut & Emboss Machine and Mini Stampin’ Cut & Emboss Machine (white and Boho Blue). 
  • The 10% discount applies automatically to stamp and die bundles in all orders including Starter Kit orders.

*Please note Close to My Heart products are not included in this promotion.


Current Host Code: SSMUTY4A

Use this host code when you order $50 or more and receive a Thank You gift from me!  The free gift is your choice of any item currently available valued up to $10.00.

If your order is over $150, please do not use the host code since you’ll receive your own Host Dollars plus I’ll still send you the Thank You gift!  This host code can be used by anyone, no club or commitment required. Let me know if you have any questions.


If you need any stamping supplies, I’d be very happy to be your Demonstrator.  Just click on the Shop Now Button on the right side of the screen to go directly to my Online store or contact me if you have any questions.  Happy Stamping!

Thanks for stopping by and have a great day!

Akiko

  • Visit my online store here
  • See the current Stampin’ Up! clearance rack specials here
  • Earn FREE Stampin’ Up! products through my Wildflower Frequent Shopper Program – my way of saying thank you to my online frequent shopper customers.
  • Have any questions? I’d be happy to help, click here to contact me.

Cardstock Cuts for this project:

  • Lemon Lime Twist – 4-1/4″ x 11″ card base, scored at 5-1/2″
  • Blueberry Bushel – 3″ x 4-1/2″ (sentiment mat)
  • Basic White – 3-3/4″ x 5″ (inside panel), 1-1/4″ x 6″ (fussy cut dragonflies)
  • Bright and Beautiful 6″ x 6″ DSP – 3-3/4″ x 5″ (front background), 2-1/4″ x 3-3/4″ (label)

Stampin’ Up! products used in this project:


Stampin’ Up! Carousel Horses Birthday Card

The Stampin’ Up! Carousel Horse bundle is such a cute set with stamps and dies you can use to make a pretty carousel. I used it to make a sweet birthday card with rainbow ponies and lots of pink sparkle! Plus, it’s a simple fun fold! You can find the products I used at the bottom of my post along with the card stock sizes.

I adhered a panel of Bright and Beautiful 6″ x 6″ designer series paper to a Berry Burst panel. I adhered a 2-1/2″ wide mini card base to the layered panel with liquid glue and adhered another panel of DSP to the front. I cut a Basic White panel with the second largest scalloped contours die and adhered another panel of DSP to the center.

I cut the main carousel from Melon Mambo using the pretty Stampin’ Up! Carousel Horses dies. I used the die again to cut the top two cutouts from Bubble Bath shimmer paper and cut the trim from Rose Gold iridescent foil. I adhered the post and base to the scalloped rectangle with glue dots and the shimmer paper with dimensionals.

I stamped the horses from the Stampin’ Up! Carousel Horses stamp set in Smoky Slate ink on Basic White. I stamped the saddle details in Berry Burst and colored the backgroundof the saddle with the light Bubble Bath Stampin’ Blend. I colored the manes and tales with lighht Melon Mambo, light Granny Apple Green, dark Lemon Lolly and light Balmy Blue Stampin’ Blends for a rainbow pony look. I adhered the ponies to the panel with glue dots and adhered the top foil decoration with dimensionals. I adhered the panel to the mini card front with liquid glue and finished it with silver pearls.

For the inside of the card, I stamped the sentiment from the Stampin’ Up! Carousel Horses stamp set in Berry Burst ink on a Basic White panel. I cut some balloons using the Zany Zoo balloon die from Melon Mambo, Fresh Freesia and Bubble bath and adhered them to the corner. I drew some strings with a Basic Gray Stampin’ Write marker and adhered the panel to the inside of the mini card with Stampin’ Seal.

The ponies in the Stampin’ Up! Carousel Horses bundle are just as pretty as Unicorns and are sure to delight a little girl on her birthday. And even better, you can really ride carousel horses!!


Designer Series Paper Special Release Going On Now!

A special selection of Designer Series Papers is available in the Online Exclusives section of the Online Store. These papers will be available only while supplies last, so shop early to bet yours before they’re gone. Click on the image below to download a PDF with all the details including item numbers and prices.

These papers are perfect for both holiday crafting and all occasion crafting.


World Card Making Day – October 7, 2023!

It’s time to celebrate one of our favorite days of the year—World Card Making Day! Invite your friends to craft along with Stampin’ Up! as we express our creativity and make fabulous cards! In just under three hours, we’ll create three unique cards together. Everyone is invited and welcome. And the event and registration are FREE!

Here are the Details:

  • Who: Anyone!
  • When: October 7, 2023 from 2:00 – 5:00 pm (MT)
  • Where: Online
  • Price of Event: FREE
  • Registration Dates: Sept 6 – Oct 7, 2023
    • You can participate in the event without registering. However, registration is encouraged because it’s the best way to stay up to date regarding event details. The email address provided will only be used for event communication.

Go to the World Card Making Day page in my Online Store to register and get more information. You will also find Supply Lists and Card Stock cuts that you can download to prepare.

Inkin’ Krew World Card Making Day Event

In addition to the World Card Making Day event that Stampin’ Up! is planning, The Inkin’ Krew is planning a Facebook event to celebrate World Card Making Day!! The event will be Saturday, Oct 7 and we’ll be scheduling our lives around the Stampin’ Up! event so that you’ll be able to attend both if you’d like!  We’ll be starting a new Facebook page for the event. We are planning to have as many team members as possible go live with card making presentations throughout the day. We will also have a few giveaways to keep it fun! More details will follow.


Current Host Code: 4BTBNFDU

Use this host code when you order $50 or more and receive a Thank You gift from me!  The free gift is your choice of any item currently available valued up to $10.00 .

If your order is over $150, please do not use the host code since you’ll receive your own Host Dollars plus I’ll still send you the Thank You gift!  This host code can be used by anyone, no club or commitment required. Let me know if you have any questions.


If you need any stamping supplies, I’d be very happy to be your Demonstrator.  Just click on the Shop Now button on the right side of the screen to go directly to my online store or contact me if you have any questions.  Happy Stamping!

Thanks for stopping by and have a great weekend!

Akiko

  • Visit my online store here
  • See the current Stampin’ Up! clearance rack specials here
  • Earn FREE Stampin’ Up! products through my Wildflower Frequent Shopper Program – my way of saying thank you to my online frequent shopper customers.
  • Have any questions? I’d be happy to help, click here to contact me.

Cardstock Cuts for this project:

  • Berry Burst – 4-1/4″ x 5″ card base panel, 2-1/2″ x 11″ mini-card base, scored at 5-1/2″, 1/2″ x 1″ (die cut balloonn)
  • Melon Mambo – 3″ x 4″ (die cut carousel)
  • Bubble Bath – 1/2″ x 1″ (die cut balloon)
  • Fresh Freesia – 1/2″ x 1″ (die cut balloon)
  • Bubble Bath Shimmer – 1-1/4″ x 3″ (carousel top)
  • Rose Gold Iridescent foil – 1-1/4″ x 5-1/2″ (carousel base and trim)
  • Basic White – 2-1/4″ x 5-1/4″ (inside panel), 2-3/4″ x 4″ (die cut ponies), 3-1/2″ x 4-3/4″ (die cut scalloped rectangle)
  • Bright & Beautiful 6″ x 6″ DSP – 4″ x 5-1/4″ (back panel background), 2-1/4″ x 5-1/4″ (front background), 2-3/4″ x 4″ (scalloped rectangle panel)

Stampin’ Up! products used in this project:

Stampin’ Up! Sending Smiles for the Happy Inkin’ Thursday Blog Hop

Good Morning and welcome to the Happy Inkin’ Thursday Blog Hop! The Stampin’ Up! Sending Smiles photopolymer stamp set and the coordinating Sending dies are a wonderful set for floral cards for any occasion. I used them to make a love and hugs friendship card with the Bright and Beautiful 6″ x 6″ designer series paper for today. You can find the supplies I used along with card stock cuts at the bottom of my post.

We have a color challenge this week:

I used liquid glue to adhere a panel of Bright and Beautiful designer series paper to a Blueberry Bushel mat and popped it on the front of an Azure Afternoon card base. I cut another panel of the DSP with the 5th largest Deckled Rectangles die and adhered it to another Blueberry Bushed mat.

I stamped the flowers from the Stampin’ Up! Sending Smiles stamp set in Bubble Bath ink on Basic White and stamped the centers in Lemon Lime Twist. I stamped the large stem and leaves in Pretty Peacock and cut them all out with the coordinating dies. I adhered them to the small panel with glue dots and dimensionals and popped the panel onto the card front with dimensionals. I stamped the small sentiment in Pretty Peacock ink on Lemon Lime Twist and cut it out with the short label die. I popped it on the card front with dimensionals.

I applied adhesive strips behind a strip of Blueberry Bushel and cut the detailed ‘Sending’ word out with the dies. I used another strip of Bright and Beautiful DSP to cut the background work out and adhered the word to the background. I adhered the die cut sentiment to the card with dimensionals and glue dots and finished the card with a Lemon Lime Twist bow and Bubble Bath sequins.

For the inside of the card, I stamped the flower from the Stampin’ Up! Sending Smiles stamp set in Bubble Bath and Lemon Lime Twist in corner of a Basic White panel. I covered it with a mask and stamped the stem and leaves in Pretty Peacock. I adhered the panel to a Blueberry bushel mat before adhering it to the inside of the card with Stampin’ Seal.

There are so many sentiments in the Stampin’ Up! Sending Smiles stamp set and the two label dies in the Sending dies are a perfect fit.

On with the Hop! Click on the Next Blog button to move forward to see the beautiful project Karen Ksenzakovic has created.

If you get lost along the way, here are the participants for the hop:


Kits Collection on Sale August 1 – August 31, 2023!

Save big on the Kits Collection for a limited time only! Each paper crafting kit comes with everything you need to create artistically designed handmade projects. From birthday cards to festive tags, cute treat packaging to floral wreaths, you can try something new at a great discount. Craft with friends, buy as gifts, or simply stock up on your favorites—just don’t miss out on this great deal!

Details:

  • Sales period: August 1, 2023 – August 31, 2023
  • The sale only applies to the Kits Collection by Stampin’ Up!
    • It does not include Paper Pumpkin kits
  • There is no limit to how many kits may be purchased.
  • The kits will be up to 30% off as indicated on the website.
  • No discount code necessary—the discount will be applied automatically.

Note: Discounted Kits are only available while supplies last!

Shop the Stampin’ Up! Kits Collection in my Online Store.


Bonus Days Redemption Period Going on Now!

Time to redeem those Bonus Days coupons! Make sure you save all your coupons because you can redeem them (and we mean ALL of them) between August 1 – August 31, 2023. There’s no limit to how many coupons you can earn!

Details:

Redemption Period: August 1 – August 31, 2023

  • There is no limit to the number of coupon codes participants can redeem on an order during the redemption period. If using multiple codes, they must be separated by a space. 
  • Coupons may be redeemed one time only.
  • Coupon codes may be redeemed for any product (excluding Starter Kits, demonstrator supply items, and Paper Pumpkin month-to-month subscriptions).
  • New prepaid Paper Pumpkin codes may be discounted using Bonus Days coupon codes.

Let me know if you have any questions, and have fun shopping!


Current Host Code: MK3GJ47F

Use this host code when you order $50 or more and receive a free gift from me!  The free gift is your choice of any item currently available valued up to $10.00!

If your order is over $150, please do not use the host code since you’ll receive your own Host Dollars plus I’ll still send you the free gift!  This host code can be used by anyone, no club or commitment required. Let me know if you have any questions.


If you need any stamping supplies, I’d be very happy to be your Demonstrator.  Just click on the Shop Now button on the right side of the screen to go directly to my online store or contact me if you have any questions. 

Thanks for stopping by and Happy Stamping!

Akiko

  • Visit my online store here
  • See the current Stampin’ Up! clearance rack specials here
  • Earn FREE Stampin’ Up! products through my Wildflower Frequent Shopper Program – my way of saying thank you to my online frequent shopper customers.
  • Have any questions? I’d be happy to help, click here to contact me.

Cardstock Cuts for this project:

  • Azure Afternoon – 4-1/4″ x 11″ card base scored at 5-1/2″
  • Blueberry Bushel – two 4″ x 5-1/4″ panels (inside and front mats), 2-1/4″ x 3-5/8″ (small front mat), 1-1/2″ x 3-1/2″ (die cut ‘smile’ word)
  • Lemon Lime Twist – 1″ x 3-1/2″ (label)
  • Basic White – 3-7/8″ x 5-1/8″ (inside panel), 4-1/4″ x 5-1/2″ (floral die cuts)
  • Bright and Beautiful 6″ x 6″ DSP – 3-7/8″ x 5-1/8″ (front background), 2-1/2″ x 4″ (floral background), 1-3/4″ x 3-3/4″ (die cut word background)

Stampin’ Up! products used in this project:


Stampin’ Up! Timeless Arrangements with Paper Florist Card

Good Morning! I finally pulled out my Paper Florist dies and used them with the Stampin’ Up! Timeless Arrangements stamp set to make a simple card thank you card. You can find the supplies I used at the bottom of my post along with the sizes of cardstock used.

I stamped the sentiment from the Stampin’ Up! Timeless Arrangements stamp set in Granny Apple Green ink on a Basic White strip. I embossed the strip with the Stripes 3D embossing folder and adhered it to a Granny Apple Green mat. I adhered the layered panel to a panel of Bright and Beautiful 6″ x 6″ designer series paper with liquid glue and adhered it to the front of a Granny Apple Green card base.

I cut 4 of the four petal flower dies from Balmy Blue card stock, giving me 8 large petal clusters and 8 small petal cluster. I cut centers for the flowers from Daffodil Delight card stock and adhered them with liquid glue. See the picture below for the dies I used.

I made each flower by using 4 of the same size petal clusters. I adhered each layer with a small dot of liquid glue and rotated it to offset the petals. Last, I adhered the flower center with a dot of liquid glue.

I used a large flower and two small flowers for today’s card and I saved the extra die cuts for a future project. I adhered each flower with glue dots. I didn’t use any dimensionals on the card, but the layers of flower petals gives the card texture and dimension, so I didn’t even add extra embellishments!

For the inside of the card, I stamped the sentiment from the Stampin’ Up! Timeless Arrangements stamp set in Balmy Blue on Basic White. I stamped the leaf sprig in Granny Apple Green and adhered a strip of Bright and Beautiful DSP to the bottom. I adhered the panel to the inside of the card with Stampin’ Seal.

The Paper Florist dies are so much fun to play with because you use any kind of paper and any color. There are co many different petals, leaves and centers to play and experiment with and the possibilities are endless. I chose to start simple and was thinking about Forget-Me-Nots, but I chose the wrong petal shape. Even so, the flowers still came out beautiful and the simple arrangement with the pretty DSP worked out pretty well. And of course the sentiments from the Stampin’ Up! Timeless Arrangements stamp set worked out perfect!


SAVE 15% ON SELECT DESIGNER SERIES PAPERS!

We all love beautiful Designer Series Paper, and in June, you can enjoy a 15% discount on select Designer Series Papers from our new 2023–2024 Annual Catalog and Online Exclusives. Whether you’re a scrapbooker, a card maker or simply a paper lover, this is a great time to stock up and save on gorgeous paper so you have artistic and versatile paper designs on hand for your next projects!

Here are the Details:

  • Sales Period: June 1, 2021 – June 30, 2023
  • All order types qualify for this promotion. 
  • There is no limit to how many packages of Designer Series Paper may be purchased during this promotion.
  • Only select Designer Series Papers are available at a 15% discount during this promotion.
  • Orders must be placed—and closed—during the promotion period for the 15% discount to apply.
  • Designer Series Paper ordered as part of a Starter Kit or with Stampin’ Rewards qualify for the 15% discount.
  • Designer Series Papers are from the new 2023–2024 Annual Catalog (p. 129–132) and Online Exclusives

Click on the image below to download a PDF with the list of designer series papers that are on sale and their sale prices:


Starter Kit+ Joining Promotion!

It’s a fabulous time to join Stampin’ Up! New team members will get even more FREE products in their customizable Starter Kit. Between 1–30 June, those who sign up can get $125 $155 USD worth of products for only $99 + free business supplies + free shipping + all the fun being a part of Stampin’ Up!

Starter Kit+ Promotion Details:

  • Promotion Dates: 1–30 JUNE 2023
  • When new team members purchase their Starter Kit, they will be able to redeem $125 $155 of Starter Kit eligible products for just $99.
  • New demonstrators who submit their Independent Demonstrator Agreement (IDA) before June 1 or after June 30 will not be eligible for this offer.

You can read about the benefits of being a Demonstrator on my Join My Team page. These include a minimum 20% discount on products and access to new products a month before the catalog release. Contact me if you have any questions about the benefits of being a Demonstrator and I’ll be happy to tell you all about it!


Current Host Code: 9SKETT74

Use this host code when you order $50 or more and receive a Thank You gift from me!  The free gift is your choice of any item valued up to $10.00 from the 2023-2024 Annual Catalog.

If your order is over $150, please do not use the host code since you’ll receive your own Host Dollars plus I’ll still send you the Thank You gift!  This host code can be used by anyone, no club or commitment required. Let me know if you have any questions.


If you need any stamping supplies, I’d be very happy to be your Demonstrator.  Just click on the Shop Now button on the right side of the screen to go directly to my online store or contact me if you have any questions.  Happy Stamping!

Thanks for stopping by and have a great week!

Akiko

  • Visit my online store here
  • See the current Stampin’ Up! clearance rack specials here
  • Earn FREE Stampin’ Up! products through my Wildflower Frequent Shopper Program – my way of saying thank you to my online frequent shopper customers.
  • Have any questions? I’d be happy to help, click here to contact me.

Cardstock Cuts for this project:

  • Granny Apple Green – 4-1/4″ x 11″ card base scored at 5-1/4″, 1-3/4″ x 4″ (front mat)
  • Balmy Blue – 4″ x 5″ (flower die cuts)
  • Daffodil Delight – 1″ x 2″ (flower center die cuts)
  • Basic White – 2-1/4″ x 4″ (inside panel), 1-5/8″ x 4″ (embossed strip)
  • Bright and Beautiful DSP – 4″ x 5-1/4″ (front background), 3/4″ x 4″ (inside trim)

Stampin’ Up! products used in this project:


Stampin’ Up! Share A Milkshake for the Happy Inkin’ Thursday Blog Hop

Good Morning and welcome to the Happy Inkin’ Thursday Blog Hop! The Stampin’ Up! Share A Milkshake stamp set and dies are the perfect anecdote for a hot summer day, and I chose a chocolate shake, my favorite, for today’s card. You can find the supplies I used along with card stock cuts at the bottom of my post.

We have a yummy theme challenge for our Blog Hop this week:

I cut a strip of Bubble Bath with the scalloped edge die from the Scalloped Contours dies and embossed it with the stripe embossing folder from the Stripes and Spatters 3D embossing folder. I adhered it to the side of a Bright and Beautiful 6″ x 6″ DSP panel and adhered the layered panel to the front of an Azure Afternoon card base. I embossed an Bubble Bath panel with the stripe embossing folder. I cut a Basic White panel with the third largest scalloped rectangle die and adhered the embossed panel to the inside. I adhered the rectangle to the card front with glue dots.

I stamped the glass from the Stampin’ Up! Share A Milkshake photopolymer stamp set in Crumb Cake ink on Basic White (stamp the detailed stamp first and stamp off the filler stamp before stamping over the detailed image). I cut the glass out with the coordinating die and adhered it to the card with glue dots. I stamped the shake top in Crumb Cake and the cherry and straws in Real Red. I cut these out with the coordinating dies and cut a little whipped cream from Basic White. I adhered the pieces together with glue dots and adhered the top to the card front with dimensionals.

I stamped the sentiment from the Stampin’ Up! Share A Milkshake stamp set in Versamark ink on Azure Afternoon and sprinkled it with white embossing powder. I heated the powder with my heat tool until it was bright and shiny and cut it out with the label die from the Cheerful Daisies dies. I adhered it to the card front with dimensionals and finished the card with tinsel gems.

For the inside of the card, I stamped the sentiment from the Stampin’ Up! Share A Milkshake stamp set in Azure Afternoon ink on a Basic White panel. I stamped the Cherry in real Red and the hearts in Bubble Bath and adhered a strip of Bright and Beautiful DSP to the bottom of the panel. I adhered the panel to the inside of the card with Stampin’ Seal.

The Stampin’ Up! Share A Milkshake stamp set and dies are fun way to celebrate summer and send summer greetings to friends and family. And as a bonus, they are calorie free, don’t melt in the heat, and won’t give you brain freeze. Now I’m ready for some ice cream!

On with the Hop! Click on the Next Blog button to move forward to see the beautiful project Karen Ksenzakovic has created.

If you get lost along the way, here are the participants for the hop:


Designer Series Paper Sale Going on Now!

We all love beautiful Designer Series Paper, and in June, you can enjoy a 15% discount on select Designer Series Papers from our new 2023–2024 Annual Catalog and Online Exclusives. Whether you’re a scrapbooker, a card maker or simply a paper lover, this is a great time to stock up and save on gorgeous paper so you have artistic and versatile paper designs on hand for your next projects!

Here are the Details:

  • Sales Period: June 1, 2021 – June 30, 2023
  • All order types qualify for this promotion. 
  • There is no limit to how many packages of Designer Series Paper may be purchased during this promotion.
  • Only select Designer Series Papers are available at a 15% discount during this promotion.
  • Orders must be placed—and closed—during the promotion period for the 15% discount to apply.
  • Designer Series Paper ordered as part of a Starter Kit or with Stampin’ Rewards qualify for the 15% discount.
  • Designer Series Papers are from the new 2023–2024 Annual Catalog (p. 129–132) and Online Exclusives

Click on the image below to download a PDF with the list of designer series papers that are on sale and their sale prices:


Starter Kit+ Joining Special Going on Now!

It’s a fabulous time to join Stampin’ Up! New team members will get even more FREE products in their customizable Starter Kit. Between 1–30 June, those who sign up can get $125 $155 USD worth of products for only $99 + free business supplies + free shipping + all the fun being a part of Stampin’ Up!

Starter Kit+ Promotion Details:

  • Promotion Dates: 1–30 JUNE 2023
  • When new team members purchase their Starter Kit, they will be able to redeem $125 $155 of Starter Kit eligible products for just $99.
  • New demonstrators who submit their Independent Demonstrator Agreement (IDA) before June 1 or after June 30 will not be eligible for this offer.

You can read about the benefits of being a Demonstrator on my Join My Team page. These include a minimum 20% discount on products and access to new products a month before the catalog release. Contact me if you have any questions about the benefits of being a Demonstrator and I’ll be happy to tell you all about it!


Current Host Code: 9SKETT74

Use this host code when you order $50 or more and receive a free gift from me!  The free gift is your choice of any item valued up to $10.00 from the 2023-2024 Annual Catalog!

If your order is over $150, please do not use the host code since you’ll receive your own Host Dollars plus I’ll still send you the free gift!  This host code can be used by anyone, no club or commitment required. Let me know if you have any questions.


If you need any stamping supplies, I’d be very happy to be your Demonstrator.  Just click on the Shop Now button on the right side of the screen to go directly to my online store or contact me if you have any questions. 

Thanks for stopping by and Happy Stamping!

Akiko

  • Visit my online store here
  • See the current Stampin’ Up! clearance rack specials here
  • Earn FREE Stampin’ Up! products through my Wildflower Frequent Shopper Program – my way of saying thank you to my online frequent shopper customers.
  • Have any questions? I’d be happy to help, click here to contact me.

Cardstock Cuts for this project:

  • Azure Afternoon – 4-1/4″ x 11″ card base scored at 5-1/2″, 1-1/4″ x 2-3/4″ (label)
  • Bubble Bath – 1-3/4″ x 5-1/4″ (embossed edge), 2″ x 3-5/16″ (embossed background)
  • Basic White – 4″ x 5-1/4″ (inside panel), 3-1/4″ x 4″ (milk shake die cuts), 2-3/4″ x 4-1/4″ (scalloped rectangle)
  • Bright and Beautiful 6″ x 6″ DSP – 4″ x 5-1/4″ (front background), 3/4″ x 4″ (inside trim)

Stampin’ Up! products used in this project:


Stampin’ Up! Beautiful Balloons Hip Hip Hooray for the Happy Inkin’ Thursday Blog Hop

Good Morning and welcome to the Happy Inkin’ Thursday Blog Hop! Here’s another card using the pretty Stampin’ Up! Beautiful Balloons bundle. This time I used the festive Golden Celebrations acetate to decorate my balloon and used the fun tag die with the Good Feelings cling stamp set. You can find the supplies I used along with card stock cuts at the bottom of my post.

We have a theme challenge for our Blog Hop this week, and it’s a fun one:

I stamped the medium balloon from the Stampin’ Up! Beautiful Balloons stamp set all over a Basic White panel using stamped off Azure Afternoon, stamped off Berry Burst, Lemon Lime Twist and Lemon Lolly inks. I adhered the stamped panel to a Berry Burst mat and adhered the layered panel to the front of ann Azure Afternoon card base with dimensionals.

I cut an Azure Afternoon panel of Bright and Beautiful 6″ x 6″ designer series paper with the tag die from the Stampin’ Up! Beautiful Balloons dies and cut a Basic White panel with the same die. I stamped the sentiments from the Good Feelings cling stamp set in Berry Burst and Azure Afternoon on the Basic White tag and adhered the DSP tag to the back. I looped Sweet Sorbet, Starry Sky and Parakeet Party metallic ribbons through the tag hole.

I used an adhesive sheet to adhere a panel of Golden Celebrations specialty acetate to an Azure Afternoon card stock panel and cut the layered panel with the large solid die from the Stampin’ Up! Beautiful Balloons dies. I adhered a length of gold cord to the card front with glue dots and adhered the balloon to the card with dimensionals. I adhered the layered tag to the card with dimensionals and finished the card with gold sequins.

For the inside of the card, I stamped the sentiment from the Stampin’ Up! Beautiful Balloons stamp set in Azure Afternoon on a Basic White panel. I stamped the medium balloon in Lemon Lime Twist and the balloon cord in Smoky Slate ink. I cut the bottom of the panel with the confetti die twice and adhered the panel to a Berry Burst mat. I adhered the layered panel to the inside of the card with Stampin’ Seal.

The fun Gold Celebrations acetate make the balloon so shiny and fun! And the confetti die cuts on the tag and the inside panel are perfect for the Hop’s Celebrate theme.

On with the Hop! Click on the Next Blog button to move forward to see the beautiful project Karen Ksenzakovic has created.

If you get lost along the way, here are the participants for the hop:


Current Host Code: TUMGKET9

Use this host code when you order $50 or more and receive a free gift from me!  The free gift is your choice of any item valued up to $10.00 from the 2023-2024 Annual Catalog!

If your order is over $150, please do not use the host code since you’ll receive your own Host Dollars plus I’ll still send you the free gift!  This host code can be used by anyone, no club or commitment required. Let me know if you have any questions.


If you need any stamping supplies, I’d be very happy to be your Demonstrator.  Just click on the Shop Now button on the right side of the screen to go directly to my online store or contact me if you have any questions. 

Thanks for stopping by and Happy Stamping!

Akiko

  • Visit my online store here
  • See the current Stampin’ Up! clearance rack specials here
  • Earn FREE Stampin’ Up! products through my Wildflower Frequent Shopper Program – my way of saying thank you to my online frequent shopper customers.
  • Have any questions? I’d be happy to help, click here to contact me.

Cardstock Cuts for this project:

  • Azure Afternoon – 4-1/4″ x 11″ card base scored at 5-1/2″, 1-3/4″ x 2″ (die cut balloon)
  • Berry Burst – two 3-3/4″ x 5″ panels (front and inside mats)
  • Gold Celebrations specialty paper – 1-3/4″ x 2″ (die cut balloon)
  • Basic White – two 3-5/8″ x 4-7/8″ panels (front and inside panel), 1-3/4″ x 3-1/2″ (die cut tag)
  • Bright and Beautiful 6″ x 6″ DSP – 1-3/4″ x 3-1/2″ (die cut tag)

Stampin’ Up! products used in this project:


Stampin’ Up! Crafting With You Hugs Card

Good Morning! The Stampin’ Up! Crafting With You bundle is such a fun set for all kinds of crafters! With stamps and dies for all kinds of crafting, you can make so many different cards with crafting themes! I chose the papercrafting theme for my first card using this fun bundle with a paper trimmer, cut and emboss machine and even a finished card! You can find the supplies I used at the bottom of my post along with the sizes of cardstock used.

I embossed a panel of Lemon Lolly card stock with the cross hatch embossing folder from the Basics 3D embossing folders. I adhered it to the bottom of a Bright and Beautiful designer series paper panel and adhered it to the front of a Lost Lagoon card base. I used the paper trimmer die from the Stampin’ Up! Crafting With You dies to cut a Gray Granite panel for the main trimmer and a small Basic Black panel for the trimmer blade. I slipped a panel of Bright and Beautiful DSP into the trimmer and adhered it with some liquid glue. I adhered the die cut trimmer blade with a glue dot. I cut a panel of Azure Afternoon with the ruler die and adhered the ruler and paper trimmer to the card with glue dots.

I stamped the cut & emboss machine from the Stampin’ Up! Crafting With You stamp set in Smoky Slate ink on Basic White. I colored the gray sections with the light Smoky Slate Stampin’ Blend and cut it out with the coordinating die. I popped it on the card with dimensionals. I cut three 1″ x 1″ panels of Bright and Beautiful DSP and adhered them to the card with liquid glue. For the last panel, I colored the small flower stamp from the Stampin’ Up! Crafting With You stamp set with the Lost Lagoon and Berry Burst Stampin’ Write markers and stamped multiple times, re-inking each time, on a small Basic White panel. I cut out a 1″ x 1″ square and adhered it to the card and cut another one out with the coordinating die.

I stamped the sentiment from the Stampin’ Up! Crafting With You stamp set in Lost Lagoon ink on a Lost Lagoon panel and trimmed the corners with the Very Best Trio punch. I adhered it to the card with glue dots. I stamped the heart on the inside of the scored Bright and Beautiful DSP mini card and adhered the die cut flower to the front with a glue dot. I adhered the card next to the label with a glue dots and wrapped the card front with linen thread twice and made a bow. I finished by scattering some Lemon Lolly faceted dots around the card.

For the inside of the card, I stamped the sentiment from the Stampin’ Up! Crafting With You stamp set in Lost Lagoon on a Basic White panel. I stamped the heart three times in stamped off Berry Burst ink and trimmed the bottom with the Bright and Beautiful DSP. I adhered the panel to the inside of the card with Stampin’ Seal.

I love the Stampin’ Up! Crafting With You bundle since I’ve been crafting since I was a little girl and this bundle captures so many different crafts – sewing, knitting, embroidery, painting and cardmaking. It brings back so many memories of good times!


The June Paper Pumpkin Kit is Welcome Inn!

Show hospitality to all your guests with the Welcome Inn Paper Pumpkin Kit! This kit includes nine elegant and detailed cards—three each of three designs. Whether you’re hosting friends and family, or want to invite someone over, this kit has what you need to create sophisticated and elegant cards! This kit also perfectly coordinates with the Countryside Inn Suite from the 2023-2024 Annual Catalog! The refined colors and beautiful details will take your paper crafting projects from simple to stunning.

You can also pair this kit with a coordinating die add-on! Stamp and die cut your vase and floral images for extra elegant centerpieces on your cards! The add-on is available while supplies last. Stampin’ Cut & Emboss Machine sold separately.

The June Kit Includes:

  • All the supplies you need to create 9 elegant and sophisticated cards: 3 each of 3 designs plus 9 coordinating envelopes. 
    • Finished card size: 5-1/2″ x 4-1/4″
  • A coordinating photopolymer stamp set with floral designs and friendly, hospitality-themed sentiments.
  • A Night of Navy Stampin’ Spot and beautiful embellishments
  • Lovely floral details and precut vases
  • Adhesives to complete the projects

Welcome Inn Dies Add-On:

A set of three coordinating dies – a vase, flower and leaf!

  • Item number: 163192
  • Available starting May 11, 2023, while supplies last
  • Price: $6

Coordinating Colors: Balmy Blue, Boho Blue, Calypso Coral, Daffodil Delight, Early Espresso, Misty Moonlight, Night of Navy, Old Olive

If you’re interested in subscribing to Paper Pumpkin, you can either sign up for a subscription where you are billed monthly for your kit or you can purchase a prepaid subscription in my Online Store. To see more information and to sign up for the monthly subscription click here. To see the options for prepaid subscriptions in my Online Store, click here.

Sign up deadline for the June 2023 kit is June 10, 2023. Note: Supplies may be limited toward the end of the subscription period.


Current Host Code: TUMGKET9

Use this host code when you order $50 or more and receive a Thank You gift from me!  The free gift is your choice of any currently available item valued up to $10.00.

If your order is over $150, please do not use the host code since you’ll receive your own Host Dollars plus I’ll still send you the Thank You gift!  This host code can be used by anyone, no club or commitment required. Let me know if you have any questions.


If you need any stamping supplies, I’d be very happy to be your Demonstrator.  Just click on the Shop Now button on the right side of the screen to go directly to my online store or contact me if you have any questions.  Happy Stamping!

Thanks for stopping by and have a great week!

Akiko

  • Visit my online store here
  • See the current Stampin’ Up! clearance rack specials here
  • Earn FREE Stampin’ Up! products through my Wildflower Frequent Shopper Program – my way of saying thank you to my online frequent shopper customers.
  • Have any questions? I’d be happy to help, click here to contact me.

Cardstock Cuts for this project:

  • Lost Lagoon – 4-1/4″ x 11″ card base scored at 5-1/2″, 1-1/4″ x 2-3/4″ (label)
  • Azure Afternoon – 1/2″ x 3″ (ruler)
  • Gray Granite – 1-3/4″ x 2-1/2″ ( trimmer)
  • Basic Black – 1/2″ x 1/2″ (trimmer blade)
  • Lemon Lolly – 1-1/2″ x 4″ (embossed front bottom)
  • Basic White -4″ x 5-1/4″ (inside panel), 2″ x 2-1/2″ (cut & emboss machine die cut), 1″ x 1″ (faux DSP)
  • Bright and Beautiful 6″ x 6″ DSP – 4″ x 5-1/4″ (front background), three 1″ x 1″ panels (DSP sheets), 1″ x 1-1/4″ panel scored at 5/8″ (mini card), 1-1/4″ x 1-3/4″ (paper trimmer DSP), 3/4″ x 4″ (inside trim)

Stampin’ Up! products used in this project:


Stampin’ Up! Places in the Heart Baby Card

Happy Mother’s Day! I used the sweet Stampin’ Up! Places in the Heart cling stamp set to make a quick card for a new Mom. You can find the supplies I used at the bottom of my post along with the sizes of cardstock used.

I went with a monotone theme in Misty Moonlight, so I adhered a panel of Misty Moonlight Bright and Beautiful designer series paper to a Basic White mat and adhered the layered panel to the front of a Misty Moonlight card base with liquid glue.

I used a blending brush to apply Misty Moonlight ink to a Basic White panel and stamped the pretty Mom from the Stampin’ Up! Places in the Heart cling stamp set in Misty Moonlight ink. I adhered the panel to a Misty Moonlight mat and wrapped a length of white baker’s twine around the panel and made a bow. I adhered the panel to the front of the card with dimensionals.

I stamped the sentiment from the Stampin’ Up! Places in the Heart stamp set in Misty Moonlight ink on Basic White and punched the bottom with the Banners Pick A Punch. I trimmed the top and adhered it to the card with glue dots. I colored a small clear rhinestone with the light Misty Moonlight Stampin’ Blend and adhered it to the label to finish the card.

For the inside of the card, I stamped the sentiment from the Stampin’ Up! Places in the Heart stamp set in Misty Moonlight ink on a Basic White panel. I inked the spatter stamp and stamped off before stamping around the sentiment. I trimmed the bottom with a strip of Bright and Beautiful DSP and adhered the panel to the inside of the card with Stampin’ Seal.

The sweet images from the Stampin’ Up! Places in the Heart stamp set perfectly capture a mother’s love. And the sentiments are wonderful too. One of the nice things about the stamped images is that they are beautiful without additional coloring, so it’s a perfect set for a handmade card when you’re short on time.


The June Paper Pumpkin Kit is Welcome Inn!

Show hospitality to all your guests with the Welcome Inn Paper Pumpkin Kit! This kit includes nine elegant and detailed cards—three each of three designs. Whether you’re hosting friends and family, or want to invite someone over, this kit has what you need to create sophisticated and elegant cards! This kit also perfectly coordinates with the Countryside Inn Suite from the 2023-2024 Annual Catalog! The refined colors and beautiful details will take your paper crafting projects from simple to stunning.

You can also pair this kit with a coordinating die add-on! Stamp and die cut your vase and floral images for extra elegant centerpieces on your cards! The add-on is available while supplies last. Stampin’ Cut & Emboss Machine sold separately.

The June Kit Includes:

  • All the supplies you need to create 9 elegant and sophisticated cards: 3 each of 3 designs plus 9 coordinating envelopes. 
    • Finished card size: 5-1/2″ x 4-1/4″
  • A coordinating photopolymer stamp set with floral designs and friendly, hospitality-themed sentiments.
  • A Night of Navy Stampin’ Spot and beautiful embellishments
  • Lovely floral details and precut vases
  • Adhesives to complete the projects

Welcome Inn Dies Add-On:

A set of three coordinating dies – a vase, flower and leaf!

  • Item number: 163192
  • Available starting May 11, 2023, while supplies last
  • Price: $6

Coordinating Colors: Balmy Blue, Boho Blue, Calypso Coral, Daffodil Delight, Early Espresso, Misty Moonlight, Night of Navy, Old Olive

If you’re interested in subscribing to Paper Pumpkin, you can either sign up for a subscription where you are billed monthly for your kit or you can purchase a prepaid subscription in my Online Store. To see more information and to sign up for the monthly subscription click here. To see the options for prepaid subscriptions in my Online Store, click here.

Sign up deadline for the June 2023 kit is June 10, 2023. Note: Supplies may be limited toward the end of the subscription period.


Current Host Code: TUMGKET9

Use this host code when you order $50 or more and receive a Thank You gift from me!  The free gift is your choice of any currently available item valued up to $10.00.

If your order is over $150, please do not use the host code since you’ll receive your own Host Dollars plus I’ll still send you the Thank You gift!  This host code can be used by anyone, no club or commitment required. Let me know if you have any questions.


If you need any stamping supplies, I’d be very happy to be your Demonstrator.  Just click on the Shop Now button on the right side of the screen to go directly to my online store or contact me if you have any questions.  Happy Stamping!

Thanks for stopping by and have a great week!

Akiko

  • Visit my online store here
  • See the current Stampin’ Up! clearance rack specials here
  • Earn FREE Stampin’ Up! products through my Wildflower Frequent Shopper Program – my way of saying thank you to my online frequent shopper customers.
  • Have any questions? I’d be happy to help, click here to contact me.

Cardstock Cuts for this project:

  • Misty Moonlight – 4-1/4″ x 11″ card base scored at 5-1/2″, 2-3/8″ x 4-1/8″ (art panel mat)
  • Basic White – two 4″ x 5-1/4″ panels (front mat and inside panel), 2-1/4″ x 4″ (art panel), 3/4″ x 2″ (label)
  • Bright and Beautiful 6″ x 6″ DSP – 3-7/8″ x 5-1/8″ (front background), 1/2″ x 4″ (inside trim)

Stampin’ Up! products used in this project:


Stampin’ Up! Beautiful Balloons for the Happy Inkin’ Thursday Blog Hop

Good Morning and welcome to the Happy Inkin’ Thursday Blog Hop! Here’s another card using the pretty Stampin’ Up! Beautiful Balloons bundle. I used the large balloon with the Charming Sentiments stamp set and Bright and Beautiful designer series paper for a Bubble Bath and Fresh Freesia card. You can find the supplies I used along with card stock cuts at the bottom of my post.

We have a sketch challenge for our Blog Hop this week, and here’s the pretty sketch we’re using:

I adhered a striped panel of Bright and Beautiful designer series paper to the front of a Bubble Bath card base. I adhered another panel with little dots to a Fresh Freesia mat and adhered it to the card base with liquid glue.

I stamped the speckles for the large balloon from the Stampin’ Up! Beautiful Balloons photopolymer stamp set in Fresh Freesia ink on Basic White. I stamped the large solid balloon in Bubble Bath over the speckles and cut the balloon with the coordinating die. I cut a tassel from Fresh Freesia card stock and colored a length of white Baker’s Twine with a dark Fresh Freesia Stampin’ Blend. I adhered the twine and tassel to the card with glue dots and popped the balloon on with dimensionals.

I stamped the sentiment from the Charming Sentiments stamp set in Fresh Freesia ink on Basic White and cut it out with the coordinating die. I adhered the sentiment to the card front with dimensionals and finished the card with pink iridescent sequins.

For the inside of the card, I stamped the sentiment from the Charming Sentiments stamp set in Fresh Freesia ink on a Basic White panel. I stamped the medium balloons from the Stampin’ Up! Beautiful Balloons stamp set in Bubble Bath ink and stamped the strings in Smoky Slate. I trimmed the bottom with a strip of Bright and Beautiful DSP and adhered the panel to the inside of the card with Stampin’ Seal.

Bubble Bath and Fresh Freesia are so pretty together! The colors are so soft and I love how they layered to make the large balloon from the Stampin’ Up! Beautiful Balloons bundle.

On with the Hop! Click on the Next Blog button to move forward to see the beautiful project Karen Ksenzakovic has created.

If you get lost along the way, here are the participants for the hop:


Current Host Code: TUMGKET9

Use this host code when you order $50 or more and receive a free gift from me!  The free gift is your choice of any item valued up to $10.00 from the 2023-2024 Annual Catalog!

If your order is over $150, please do not use the host code since you’ll receive your own Host Dollars plus I’ll still send you the free gift!  This host code can be used by anyone, no club or commitment required. Let me know if you have any questions.


If you need any stamping supplies, I’d be very happy to be your Demonstrator.  Just click on the Shop Now button on the right side of the screen to go directly to my online store or contact me if you have any questions. 

Thanks for stopping by and Happy Stamping!

Akiko

  • Visit my online store here
  • See the current Stampin’ Up! clearance rack specials here
  • Earn FREE Stampin’ Up! products through my Wildflower Frequent Shopper Program – my way of saying thank you to my online frequent shopper customers.
  • Have any questions? I’d be happy to help, click here to contact me.

Cardstock Cuts for this project:

  • Bubble Bath – 4-1/4″ x 11″ card base scored at 5-1/2″
  • Fresh Freesia – 2-7/8″ x 3-5/8″ (front mat), 1″ x 2″ (balloon tassel)
  • Basic White – 4″ x 5-1/4″ (inside panel), 2-1/2 x 3-1/2″ (embossed panel), 1″ x 2″ (die cut sentiment)
  • Bright and Beautiful 6″ x 6″ DSP – 3″ x 4-1/4″ (striped panel), 2-1/2″ x 3-1/2″ (dotted panel), 1/2″ x 4″ (inside trim)

Stampin’ Up! products used in this project: