Stampin’ Up! Autumn Leaves I’m Thankful Card

Good Morning! We just got back to Pennsylvania after spending a few weeks in Arizona and luckily we made it before the Fall foliage peaked (I think). So I was inspired to pull out the Stampin’ Up! Autumn Leaves bundle along with the beautiful All About Autumn 6″ x 6″ specialty designer series paper (Yay – It’s back in stock!!) to make a quick fall card. You can find the products I used at the bottom of my post along with the card stock sizes.

I used the pretty sketch in the Paper Players Sketch Challenge: PP663.

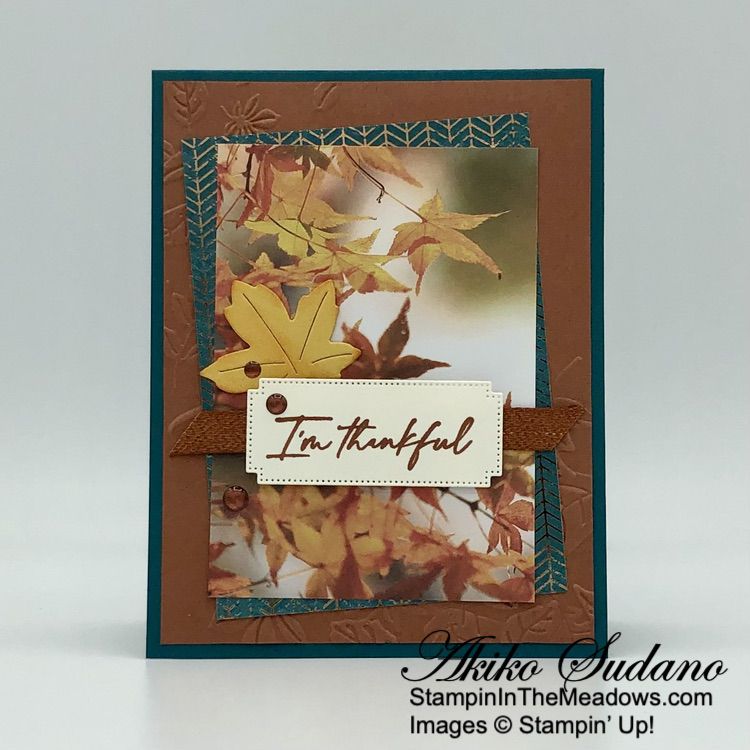
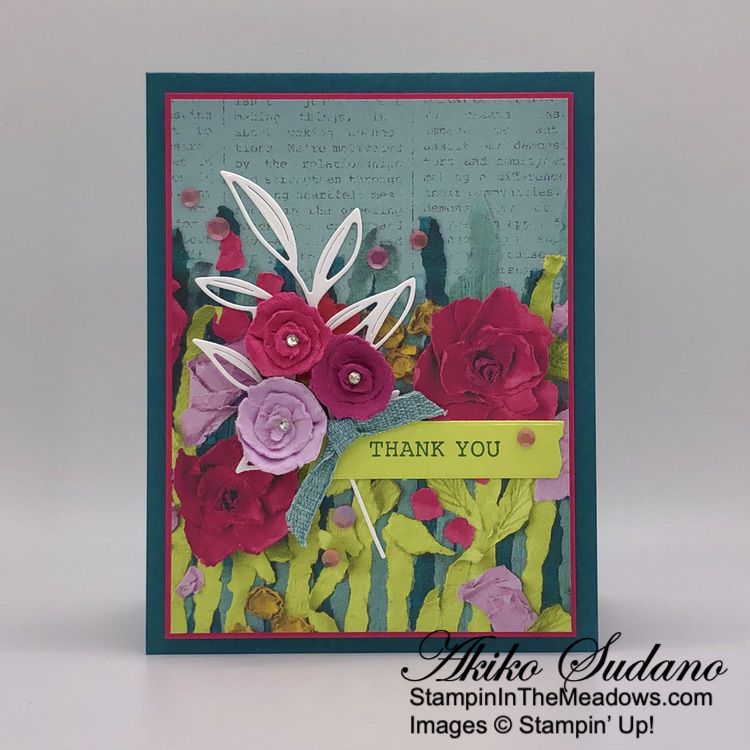
I embossed a panel of Copper Clay with the beautiful Leaf Fall 3D embossing folder and adhered it to the front of a Copper Clay card base. I cut two panels of All About Autumn 6″ x 6″ specialty designer series paper and adhered them to the card front with liquid glue.

I cut a maple leaf using the small die from the Stampin’ Up! Autumn Leaves dies from Crushed Curry card stock and I used a sponge dauber to add some Pumpkin Pie ink to the die cut. I adhered a length of Copper Clay ribbon to the card front with Stampin’ Seal and adhered the die cut leaf on top with glue dots.

I stamped the sentiment from the Stampin’ Up! Autumn Leaves photopolymer stamp set in Copper Clay ink on Very Vanilla. I cut the label out with the label die and adhered it to the card with dimensionals. I finished the card with Copper Clay dots.

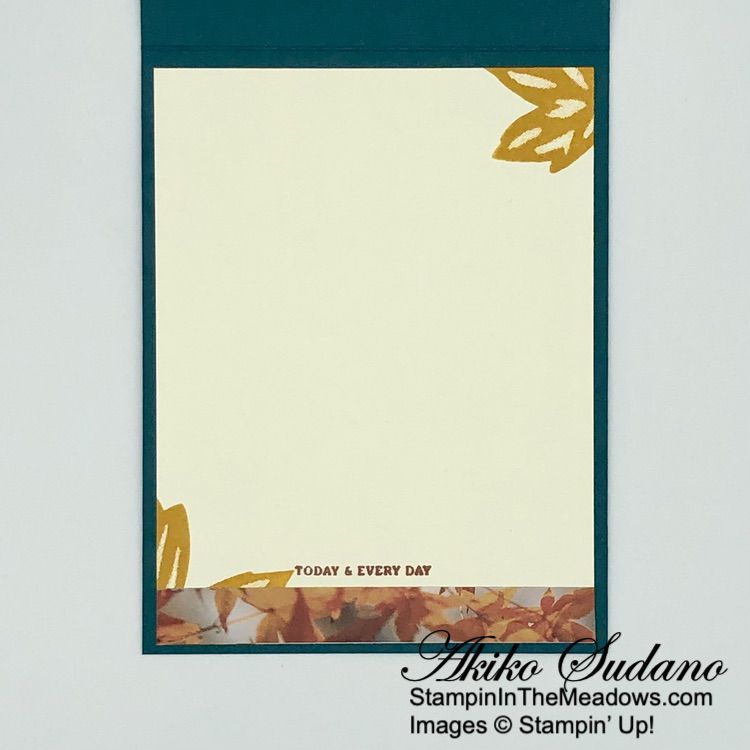
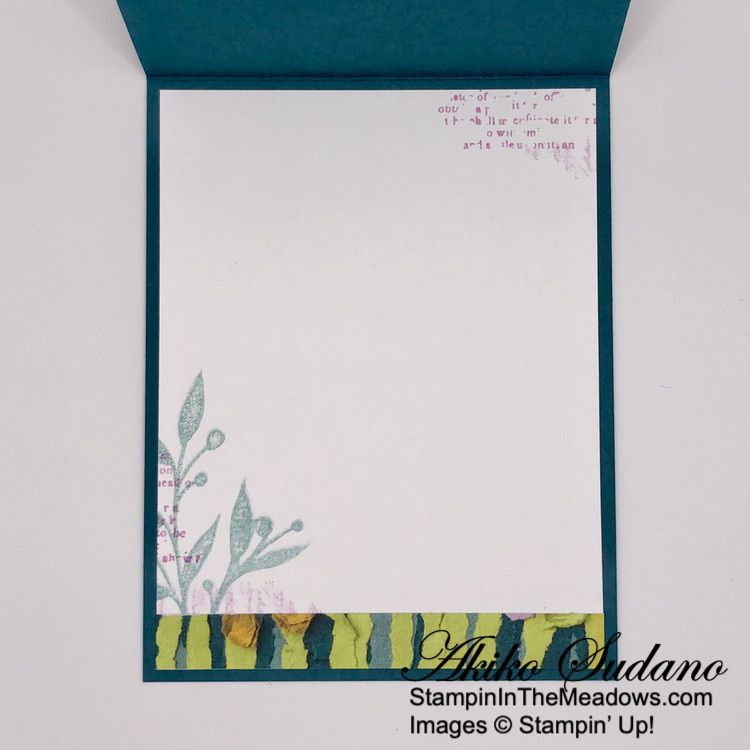
For the inside of the card, I stamped the large maple leaf from the Stampin’ Up! Autumn Leaves stamp set in Crushed Curry ink in the corners of a Very Vanilla Panel. I stamped the sentiment in Copper clay and adhered a strip of leafy DSP to the bottom. I adhered the panel to the inside of the card with Stampin’ Seal.

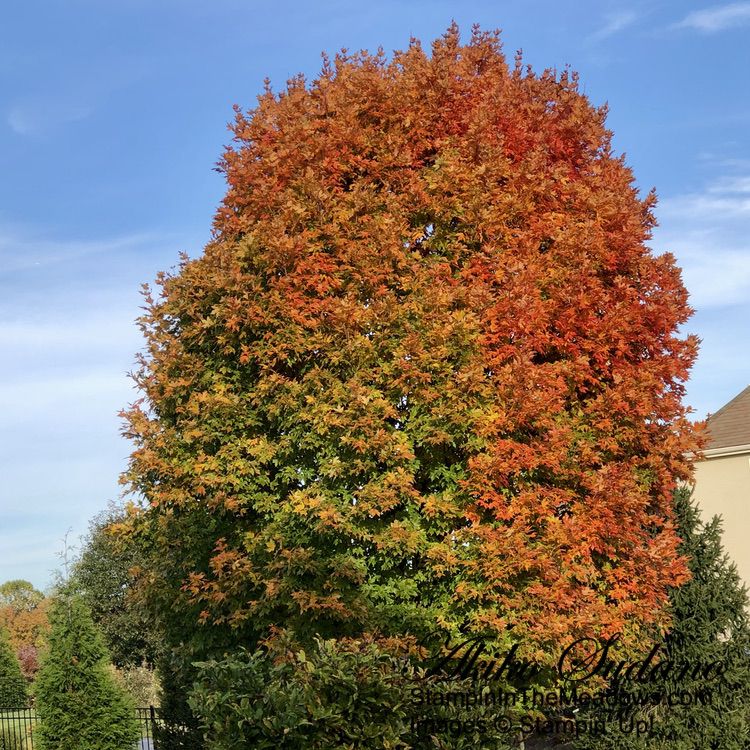
I love how all the different types of maples have different colors for fall. Here’s the Sugar Maple in our yard, just starting to peak – so pretty! But, I’m sure this is going to leave us a mess to rake next week.

The beautiful scenes in the All About Autumn DSP make it so easy to create pretty cards. And the images, sentiments and dies in the Stampin’ Up! Autumn Leaves bundle are perfect with them!


Celebrate 35 Years Joining Special!

Stampin’ Up!’s is celebrating their 35th anniversary in style! From October 3 – October 31 2023, anyone who joins our fun crafting community as a new demonstrator can choose either 35% OFF the cost of their Starter Kit or get 35% MORE product with their Starter Kit!

Promotion Details:

  • Promotion Period: October 3 – October 31, 2023
  • Deadline to Join: October 31, 2023; 11:59 PM (MT)
  • New demonstrators can choose one of the following options for their Starter Kit:
    • Option 1: Get 35% OFF the normal cost of a Stampin’ Up! Starter Kit. Those who select this option will receive $125 worth of product for only $64.35!
    • Option 2: Get 35% MORE product with their Starter Kit. Those who select this option will receive $168.75 worth of product by spending $99!

No matter which option you choose for your Starter Kit, you will receive free business supplies and free shipping on your Starter Kit—not to mention all the fun that comes with being part of Stampin’ Up!

FREE OnStage@Home Registration

It gets better! Those who sign up for a Starter Kit during this offer will also be automatically registered for FREE to our virtual OnStage event on November 11 – a $77 value!

  • Those who sign up for this offer have the opportunity to watch the event independently, gathered together with other demonstrators, or with their Team Leader.
  • Demonstrators who join during this promotion will be automatically added to the OnStage attendees; they do not need to register separately.
  • Demonstrators who join during this promotion will also receive an email with all the information about this event.

Yay!  Stampin’ Up! events are always SO much fun!!  Bonus that you can join and attend your first even for free!!

Come Join Us!

If you’d like to join our team, we’d love to have you!  Once you join, you’ll get at least a 20% discount on all of your Stampin’ Up! purchases and you can preorder from the upcoming catalogs!

We welcome all types of Demonstrators from those only purchasing to get the discount for themselves to those who want to run a business and those anywhere in between!  We’re a relaxed group that loves to stamp with no pressure to sell!

Contact me at apsudano@stampininthemeadows.com if you have questions.


Current Host Code: CD4VVKRG

Use this host code when you order $50 or more and receive a Thank You gift from me!  The free gift is your choice of any item currently available valued up to $10.00 .

If your order is over $150, please do not use the host code since you’ll receive your own Host Dollars plus I’ll still send you the Thank You gift!  This host code can be used by anyone, no club or commitment required. Let me know if you have any questions.


If you need any stamping supplies, I’d be very happy to be your Demonstrator.  Just click on the Shop Now button on the right side of the screen to go directly to my online store or contact me if you have any questions.  Happy Stamping!

Thanks for stopping by and have a great weekend!

Akiko

  • Visit my online store here
  • See the current Stampin’ Up! clearance rack specials here
  • Earn FREE Stampin’ Up! products through my Wildflower Frequent Shopper Program – my way of saying thank you to my online frequent shopper customers.
  • Have any questions? I’d be happy to help, click here to contact me.

Cardstock Cuts for this project:

  • Pretty Peacock – 4-1/4″ x 11″ card base scored at 5-1/2″
  • Copper Clay – 4″ x 5-1/4″ (embossed front)
  • Crushed Curry – 1-1/2″ x 1-3/4″ (die cut leaf)
  • Very Vanilla – 4″ x 5-1/4″ (inside panel), 1-1/4″ x 2-3/4″ (label)
  • All About Autumn 6″ x 6″ specialty DSP – 3-1/4″ x 4-1/2″ (Pretty Peacock panel), 3″ x 4-1/4″ (leaf panel), 1/2″ x 4″ (inside trim)

Stampin’ Up! products used in this project:


Stampin’ Up! Christmas Classics Christmas Card

Good Morning! Here’s another Christmas card made with the beautiful Stampin’ Up! Christmas Classics bundle and the pretty Joy of Christmas designer series paper. This card adds lots of gold touches from the ribbon, More Dazzle & Joyful specialty papers. You can find the products I used at the bottom of my post along with the card stock sizes.

I embossed a panel of Garden Green with the Distressed Tile 3D embossing folder and adhered it to the right side of a Real Red mat. I adhered a strip of Joy of Christmas designer series paper to the left side and a thin strip of More Dazzle specialty paper in the middle. I popped the panel to the front of a Thick Basic White card base with dimensionals.

I used the pine bough die from the Joy of Noel dies to cut three boughs from the gold woodgrain paper from the Joyful specialty paper pack and adhered them to the card front with glue dots. I stamped two pine boughs from the Stampin’ Up! Christmas Classics stamp set in Versamark ink on Garden Green card stock. I sprinkled them with gold embossing powder and heated it with my heat tool until the powder was bright and shiny. I cut them out with the coordinating dies and adhered them to the card with glue dots.

Iused the smaller holly die from the Magical Meadow dies to cut two holly heaves from Basic White and adhered them to the card front with glue dots. I stamped the sentiment from the Stampin’ Up! Christmas Classics stamp set in Versamark ink on Basic Black and sprinkled it with white embossing powder. I shook off the excess and heated the powder with my heat tool until it was bright and shiny. I fussy cut the sentiment with my paper snips. I applied Stampin’ Seal to the back of the sentiment and wrapped it with gold trim, simulating a bow. I adhered the sentiment to the card with dimensionals and glue dots and finished with large red rhinestones.

For the inside of the card, I stamped the holly leaves from the Stampin’ Up! Christmas Classics stamp set in Garden Green ink on Basic White. I stamped the Merry in Memento Tuxedo Black and the Christmas in Real Red. I adhered the panel to a Real Red mat before adhering it to the inside of the card.

The sentiments from the Stampin’ Up! Christmas Classics are full of Christmas warmth and are perfect with the traditional colors of the Joy of Christmas designer series paper. The pine boughs in are pretty, both stamped and die cut and they work so well together!


Celebrate 35 Years Joining Special!

Stampin’ Up!’s is celebrating their 35th anniversary in style! From October 3 – October 31 2023, anyone who joins our fun crafting community as a new demonstrator can choose either 35% OFF the cost of their Starter Kit or get 35% MORE product with their Starter Kit!

Promotion Details:

  • Promotion Period: October 3 – October 31, 2023
  • Deadline to Join: October 31, 2023; 11:59 PM (MT)
  • New demonstrators can choose one of the following options for their Starter Kit:
    • Option 1: Get 35% OFF the normal cost of a Stampin’ Up! Starter Kit. Those who select this option will receive $125 worth of product for only $64.35!
    • Option 2: Get 35% MORE product with their Starter Kit. Those who select this option will receive $168.75 worth of product by spending $99!

No matter which option you choose for your Starter Kit, you will receive free business supplies and free shipping on your Starter Kit—not to mention all the fun that comes with being part of Stampin’ Up!

FREE OnStage@Home Registration

It gets better! Those who sign up for a Starter Kit during this offer will also be automatically registered for FREE to our virtual OnStage event on November 11 – a $77 value!

  • Those who sign up for this offer have the opportunity to watch the event independently, gathered together with other demonstrators, or with their Team Leader.
  • Demonstrators who join during this promotion will be automatically added to the OnStage attendees; they do not need to register separately.
  • Demonstrators who join during this promotion will also receive an email with all the information about this event.

Yay!  Stampin’ Up! events are always SO much fun!!  Bonus that you can join and attend your first even for free!!

Come Join Us!

If you’d like to join our team, we’d love to have you!  Once you join, you’ll get at least a 20% discount on all of your Stampin’ Up! purchases and you can preorder from the upcoming catalogs!

We welcome all types of Demonstrators from those only purchasing to get the discount for themselves to those who want to run a business and those anywhere in between!  We’re a relaxed group that loves to stamp with no pressure to sell!

Contact me at apsudano@stampininthemeadows.com if you have questions.


Current Host Code: CD4VVKRG

Use this host code when you order $50 or more and receive a Thank You gift from me!  The free gift is your choice of any item currently available valued up to $10.00 .

If your order is over $150, please do not use the host code since you’ll receive your own Host Dollars plus I’ll still send you the Thank You gift!  This host code can be used by anyone, no club or commitment required. Let me know if you have any questions.


If you need any stamping supplies, I’d be very happy to be your Demonstrator.  Just click on the Shop Now button on the right side of the screen to go directly to my online store or contact me if you have any questions.  Happy Stamping!

Thanks for stopping by and have a great weekend!

Akiko

  • Visit my online store here
  • See the current Stampin’ Up! clearance rack specials here
  • Earn FREE Stampin’ Up! products through my Wildflower Frequent Shopper Program – my way of saying thank you to my online frequent shopper customers.
  • Have any questions? I’d be happy to help, click here to contact me.

Cardstock Cuts for this project:

  • Thick Basic White – 5-1/2″ x 8-1/2″ card base scored at 4-1/4″
  • Garden Green – 2-3/4″ x 5″ (embossed front), 3″ x 3″ (die cut boughs)
  • Real Red – two 3-7/8″ x 5-1/8″ panels (front and inside mats)
  • More Dazzle specialty paper – 1/4″ x 5″ (front trim)
  • Joyful specialty paper – 2-1/4″ x 5″ (die cut pine boughs)
  • Basic Black – 1-1/4″ x 2-1/4″ (label)
  • Basic White – 4″ x 5-1/4″ (inside panel), 1-1/4″ x 2-1/2″ (die cut holly leaves)
  • Joy of Christmas DSP – 3/4″ x 5″ (front trim)

Stampin’ Up! products used in this project:


Stampin’ Up! Christmas Classics Seasons Greetings Card

Good Morning! The Stampin’ Up! Christmas Classics bundle has wonderful Christmas sentiments with gorgeous foliage die cut label frames. I used one of the frames and sentiments with the pretty Joy of Christmas designer series paper for a festive Seasons Greetings Christmas card. You can find the products I used at the bottom of my post along with the card stock sizes.

I cut a panel of More Dazzle specialty paper with the two open leaf dies from the Stampin’ Up! Christmas Classics dies. I cut the holly leaf twice from a Shaded Spruce panel of Joy of Christmas designer series paper. I cut the large foliage label from Garden Green and the berries from Real Red. I trimmed the berries and adhered them to the foliage on the label.

I stamped the Seasons Greetings sentiment from the Stampin’ Up! Christmas Classics stamp set in Real Red ink on Basic White and cut it out with the long label die. I adhered the label to the foliage label with liquid glue. I embossed a Garden Green panel with the pretty Distressed Tile embossing folder and adhered it to the front of a Garden Green card base. I adhered a panel of Joy of Christmas designer series paper to a Real Red mat and and adhered it to the card front.

I adhered die cut sprigs and holly leaves to the card with liquid glue and popped the layered label on top with dimensionals. I used glue dots to adhere a real Red bow and red rhinestones to finish the card.

For the inside of the card, I stamped the holly leaves from the Stampin’ Up! Christmas Classics stamp set in Garden Green ink on Basic White. I stamped the sentiment from the Brightest Glow stamp set in Real Red ink and trimmed the bottom with DSP. I adhered the panel to the inside of the card with Stampin’ Seal.

The gorgeous label dies from the Stampin’ Up! Christmas Classics bundle really make your handmade Christmas cards stunning! Christmas is coming up fast, so I need to get to work to finish in time.


Celebrate 35 Years Joining Special!

Stampin’ Up!’s is celebrating their 35th anniversary in style! From October 3 – October 31 2023, anyone who joins our fun crafting community as a new demonstrator can choose either 35% OFF the cost of their Starter Kit or get 35% MORE product with their Starter Kit!

Promotion Details:

  • Promotion Period: October 3 – October 31, 2023
  • Deadline to Join: October 31, 2023; 11:59 PM (MT)
  • New demonstrators can choose one of the following options for their Starter Kit:
    • Option 1: Get 35% OFF the normal cost of a Stampin’ Up! Starter Kit. Those who select this option will receive $125 worth of product for only $64.35!
    • Option 2: Get 35% MORE product with their Starter Kit. Those who select this option will receive $168.75 worth of product by spending $99!

No matter which option you choose for your Starter Kit, you will receive free business supplies and free shipping on your Starter Kit—not to mention all the fun that comes with being part of Stampin’ Up!

FREE OnStage@Home Registration

It gets better! Those who sign up for a Starter Kit during this offer will also be automatically registered for FREE to our virtual OnStage event on November 11 – a $77 value!

  • Those who sign up for this offer have the opportunity to watch the event independently, gathered together with other demonstrators, or with their Team Leader.
  • Demonstrators who join during this promotion will be automatically added to the OnStage attendees; they do not need to register separately.
  • Demonstrators who join during this promotion will also receive an email with all the information about this event.

Yay!  Stampin’ Up! events are always SO much fun!!  Bonus that you can join and attend your first even for free!!

Come Join Us!

If you’d like to join our team, we’d love to have you!  Once you join, you’ll get at least a 20% discount on all of your Stampin’ Up! purchases and you can preorder from the upcoming catalogs!

We welcome all types of Demonstrators from those only purchasing to get the discount for themselves to those who want to run a business and those anywhere in between!  We’re a relaxed group that loves to stamp with no pressure to sell!

Contact me at apsudano@stampininthemeadows.com if you have questions.


Current Host Code: CD4VVKRG

Use this host code when you order $50 or more and receive a Thank You gift from me!  The free gift is your choice of any item currently available valued up to $10.00 .

If your order is over $150, please do not use the host code since you’ll receive your own Host Dollars plus I’ll still send you the Thank You gift!  This host code can be used by anyone, no club or commitment required. Let me know if you have any questions.


If you need any stamping supplies, I’d be very happy to be your Demonstrator.  Just click on the Shop Now button on the right side of the screen to go directly to my online store or contact me if you have any questions.  Happy Stamping!

Thanks for stopping by and have a great weekend!

Akiko

  • Visit my online store here
  • See the current Stampin’ Up! clearance rack specials here
  • Earn FREE Stampin’ Up! products through my Wildflower Frequent Shopper Program – my way of saying thank you to my online frequent shopper customers.
  • Have any questions? I’d be happy to help, click here to contact me.

Cardstock Cuts for this project:

  • Garden Green – 4-1/4″ x 11″ card base, scored at 5-1/2″, 4-1/4″ x 5-1/2″ (embossed front), 4″ x 4-1/4″ (greenery die cut)
  • Real Red – 2-1/8″ x 5-1/8″ (DSP mat), 2-1/4″ x 2-1/2″ (berry die cuts)
  • More Dazzle paper – 2-1/2″ x 2-1/2″ (leaf die cuts)
  • Basic White – 4″ x 5-1/4″ (inside panel), 1-1/4″ x 4″ (label)
  • Joy of Christmas DSP – 2″ x 5″ (front background), 2-3/4″ x 3″ (die cut holly leaves), 1/2″ x 5-1/4″ (inside trim)

Stampin’ Up! products used in this project:


Stampin’ Up! Magical Meadow for the Happy Inkin’ Thursday Blog Hop

Good Morning and welcome to the Happy Inkin’ Thursday Blog Hop! The Stampin’ Up! Magical Meadow bundle has pretty winter greenery stamps and dies and I used it today with the beautiful Winter Meadow designer series paper for a Thinking of You card. You can find the supplies I used along with card stock cuts at the bottom of my post.

We have a color challenge this week and I used most of the colors in my card:

I also used the pretty sketch from the TGIF #442 Sketch Challenge for today’s layered card:

I adhered a panel of Winder Meadow designer series paper to the front of a Blueberry Bushed card base. I adhered two more panels to Misty Moonlight mats and adhered the larger one to the card base with liquid glue.

I cut a Lost Lagoon panel twice with the sprig from the Stampin’ Up! Magical Meadow dies. I cut the sprigs with my paper snips and adhered them to the top and bottom of the DSP panel as pictured below. I used the berry dies to cut a Moody Mauve panel and adhered the berries to the sprigs with liquid glue.

I inked the leaf stamp from the Stampin’ Up! Magical Meadow cling stamp set with Lost Lagoon ink and used a sponge dauber to apply Garden Green ink in areas. I stamped it on Basic White and cut it out with the coordinating die. I made another die cut leaf sprig and adhered them both to the card with liquid glue.

I adhered the small DSP panel to the card with dimensionals over the die cut greenery. I stamped the sentiment from the Go To Greetings stamp set using Blueberry Bushel ink on Basic White. I cut it out with the long skinny banner die from the Stylish Shapes dies and adhered it to the card with dimensionals and glue dots.

For the inside of the card, I stamped the small forest scene from the Stampin’ Up! Magical Meadow stamp set in Blueberry Bushel ink across the bottom of a Basic White panel. I used a Blender Pen to smear the edges of the stamped images and apply Misty Moonlight ink to highlight some of the forest. I love the way this tied the inside to the small DSP panel on the card front. I adhered the panel to a Real Red mat before adhering it to the inside of the card.

I love the different stamps and dies in the Stampin’ Up! Magical Meadow bundle and I love the way it coordinates with the Winter Meadow DSP!

On with the Hop! Click on the Next Blog button to move forward to see the beautiful project Karen Ksenzakovic has created.

If you get lost along the way, here are the participants for the hop:


Current Host Code: CD4VVKRG

Use this host code when you order $50 or more and receive a free gift from me!  The free gift is your choice of any item currently available valued up to $10.00!

If your order is over $150, please do not use the host code since you’ll receive your own Host Dollars plus I’ll still send you the free gift!  This host code can be used by anyone, no club or commitment required. Let me know if you have any questions.


If you need any stamping supplies, I’d be very happy to be your Demonstrator.  Just click on the Shop Now button on the right side of the screen to go directly to my online store or contact me if you have any questions. 

Thanks for stopping by and Happy Stamping!

Akiko

  • Visit my online store here
  • See the current Stampin’ Up! clearance rack specials here
  • Earn FREE Stampin’ Up! products through my Wildflower Frequent Shopper Program – my way of saying thank you to my online frequent shopper customers.
  • Have any questions? I’d be happy to help, click here to contact me.

Cardstock Cuts for this project:

  • Blueberry Bushel – 4-1/4″ x 11″ card base scored at 5-1/2″
  • Misty Moonlight – 3-1/8″ x 3-7/8″ (front mat), 2-5/8″ x 2-5/8″ (small front mat)
  • Lost Lagoon – 1-3/4″ x 5″ (die cut sprigs)
  • Basic White – 4″ x 5-1/4″ (inside panel), 1″ x 3-1/2″ (label), 1-3/4″ x 5-1/2″ (die cut leaves)
  • Winter Meadow DSP – 4″ x 5-1/4″ (front background), 3″ x 3-3/4″ (DSP panel), 2-1/2″ x 2-1/2″ (small DSP panel)

Stampin’ Up! products used in this project:


Stampin’ Up! Magical Meadow Fall Note Card

Good Morning! The Stampin’ Up! Magical Meadow stamp set has pretty foliage and sentiments, and while the coordinating designer series paper (Winter Meadow) has a decidedly winter feel, the foliage is also great for fall. So I checked into the Color Coach and found the combination of Calypso Coral, Wild Wheat and Mossy Meadow and decided to make a Fall card in this palette. You can find the products I used at the bottom of my post along with the card stock sizes.

I stamped the greenery from the Stampin’ Up! Magical Meadow stamp set in Wild Wheat, Calypso Coral and Mossy Meadow on a Very Vanilla Panel. I used Wild Wheat on the berry sprig, Mossy Meadow on the long skinny leaf branch and Calypso Coral on the sprig with the long leaves.

I stamped the arrangement first with the colors full strength and then filled in with stamped off images. I stamped mostly on the bottom left corner and a little bit in the top right corner. I stamped the sentiment from the Go To Greetings stamp set in Mossy Meadow in the empty center area.

I adhered the panel to a Mossy Meadow mat and wrapped it with the pretty Natural Wavy trim and tied a knot. I adhered the panel to the front of a Calypso Coral card base with dimensionals and finished added a Calypso Coral iridescent gem next to the sentiment.

For the inside of the card, I stamped the foliage from the Stampin’ Up! Magical Meadow stamp set in the same colors as the front, except that I only used stamped off inks. I adhered the panel to the inside of the card with Stampin’ Seal.

This is simple card using just stamped images from the Stampin’ Up! Magical Meadow stamp set. The Color Coach I found my palette in can be found HERE. This was the perfect aid to figuring out how to use the stamp set for Fall, because I’m not ready for winter yet!


Celebrate 35 Years Joining Special!

Stampin’ Up!’s is celebrating their 35th anniversary in style! From October 3 – October 31 2023, anyone who joins our fun crafting community as a new demonstrator can choose either 35% OFF the cost of their Starter Kit or get 35% MORE product with their Starter Kit!

Promotion Details:

  • Promotion Period: October 3 – October 31, 2023
  • Deadline to Join: October 31, 2023; 11:59 PM (MT)
  • New demonstrators can choose one of the following options for their Starter Kit:
    • Option 1: Get 35% OFF the normal cost of a Stampin’ Up! Starter Kit. Those who select this option will receive $125 worth of product for only $64.35!
    • Option 2: Get 35% MORE product with their Starter Kit. Those who select this option will receive $168.75 worth of product by spending $99!

No matter which option you choose for your Starter Kit, you will receive free business supplies and free shipping on your Starter Kit—not to mention all the fun that comes with being part of Stampin’ Up!

FREE OnStage@Home Registration

It gets better! Those who sign up for a Starter Kit during this offer will also be automatically registered for FREE to our virtual OnStage event on November 11 – a $77 value!

  • Those who sign up for this offer have the opportunity to watch the event independently, gathered together with other demonstrators, or with their Team Leader.
  • Demonstrators who join during this promotion will be automatically added to the OnStage attendees; they do not need to register separately.
  • Demonstrators who join during this promotion will also receive an email with all the information about this event.

Yay!  Stampin’ Up! events are always SO much fun!!  Bonus that you can join and attend your first even for free!!

Come Join Us!

If you’d like to join our team, we’d love to have you!  Once you join, you’ll get at least a 20% discount on all of your Stampin’ Up! purchases and you can preorder from the upcoming catalogs!

We welcome all types of Demonstrators from those only purchasing to get the discount for themselves to those who want to run a business and those anywhere in between!  We’re a relaxed group that loves to stamp with no pressure to sell!

Contact me at apsudano@stampininthemeadows.com if you have questions.


Current Host Code: CD4VVKRG

Use this host code when you order $50 or more and receive a Thank You gift from me!  The free gift is your choice of any item currently available valued up to $10.00 .

If your order is over $150, please do not use the host code since you’ll receive your own Host Dollars plus I’ll still send you the Thank You gift!  This host code can be used by anyone, no club or commitment required. Let me know if you have any questions.


If you need any stamping supplies, I’d be very happy to be your Demonstrator.  Just click on the Shop Now button on the right side of the screen to go directly to my online store or contact me if you have any questions.  Happy Stamping!

Thanks for stopping by and have a great weekend!

Akiko

  • Visit my online store here
  • See the current Stampin’ Up! clearance rack specials here
  • Earn FREE Stampin’ Up! products through my Wildflower Frequent Shopper Program – my way of saying thank you to my online frequent shopper customers.
  • Have any questions? I’d be happy to help, click here to contact me.

Cardstock Cuts for this project:

  • Calypso Coral – 4-1/4″ x 11″ card base, scored at 5-1/2″
  • Mossy Meadow – 3-1/2″ x 4-3/4″ (front mat)
  • Very Vanilla – 3-1/4″ x 4-1/2″ (front panel), 3-3/4″ x 5″ (inside panel)

Stampin’ Up! products used in this project:


Stampin’ Up! Gorgeously Made Thank You Card

Good Morning! Here’s another card made with the pretty Stampin’ Up! Gorgeously Made bundle and the colorful Masterfully Made designer series paper. This time I was inspired by the pretty torn floral designs to make torn floral embellishments to decorate the card! You can find the products I used at the bottom of my post along with the card stock sizes.

I adhered a pretty floral panel of Masterfully Made designer series paper to a Melon Mambo mat with liquid glue. I adhered the panel to the front of a Pretty Peacock card base with dimensionals.

I cut a Basic White panel with the broad leaf sprig die from the Stampin’ Up! Gorgeously Made dies and adhered it to the card front with dots of liquid glue. I tore a rough circle from Fresh Freesia and tore it again in a spiral. Starting in the center, I wrapped the spiral into a flower, using liquid glue to adhere the layers underneath. I tore another small crescent of Fresh Freesia and wrapped it in a cone and adhered it to the center of the flower. I finished the flower with a rhinestone. I made similar flowers from Berry Burst and Melon Mambo and adhered the flowers to the die cut leaf sprig with glue dots.

I stamped the sentiment from the Stampin’ Up! Gorgeously Made stamp set in Pretty Peacock ink on Lemon Lime Twist. I cut it out with the label die and adhered it to the card with glue dots. I made a knot with a small length of Lost Lagoon ribbon and adhered it to the card with a glue dot. I finished the card with pink adhesive sequins.

For the inside of the card, I stamped the bold leaf image from the Stampin’ Up! Gorgeously Made stamp set in stamped-off Lost Lagoon ink on a Basic White panel. I stamped the script stamp in twice stamped-off Berry Burst ink and the long line stamp in Fresh Freesia. I trimmed the bottom with a strip of DSP and adhered the panel to the inside of the card with Stampin’ Seal.

Another simple and pretty card made with the Stampin’ Up! Gorgeously Made bundle. The beautiful and colorful Masterfully Made designer series paper is such an inspiration for trying different techniques. It inspired these flowers along with the old spiral flower dies and each flower comes out different. It was fun to make – give it a try!


Celebrate 35 Years Joining Special!

Stampin’ Up!’s is celebrating their 35th anniversary in style! From October 3 – October 31 2023, anyone who joins our fun crafting community as a new demonstrator can choose either 35% OFF the cost of their Starter Kit or get 35% MORE product with their Starter Kit!

Promotion Details:

  • Promotion Period: October 3 – October 31, 2023
  • Deadline to Join: October 31, 2023; 11:59 PM (MT)
  • New demonstrators can choose one of the following options for their Starter Kit:
    • Option 1: Get 35% OFF the normal cost of a Stampin’ Up! Starter Kit. Those who select this option will receive $125 worth of product for only $64.35!
    • Option 2: Get 35% MORE product with their Starter Kit. Those who select this option will receive $168.75 worth of product by spending $99!

No matter which option you choose for your Starter Kit, you will receive free business supplies and free shipping on your Starter Kit—not to mention all the fun that comes with being part of Stampin’ Up!

FREE OnStage@Home Registration

It gets better! Those who sign up for a Starter Kit during this offer will also be automatically registered for FREE to our virtual OnStage event on November 11 – a $77 value!

  • Those who sign up for this offer have the opportunity to watch the event independently, gathered together with other demonstrators, or with their Team Leader.
  • Demonstrators who join during this promotion will be automatically added to the OnStage attendees; they do not need to register separately.
  • Demonstrators who join during this promotion will also receive an email with all the information about this event.

Yay!  Stampin’ Up! events are always SO much fun!!  Bonus that you can join and attend your first even for free!!

Come Join Us!

If you’d like to join our team, we’d love to have you!  Once you join, you’ll get at least a 20% discount on all of your Stampin’ Up! purchases and you can preorder from the upcoming catalogs!

We welcome all types of Demonstrators from those only purchasing to get the discount for themselves to those who want to run a business and those anywhere in between!  We’re a relaxed group that loves to stamp with no pressure to sell!

Contact me at apsudano@stampininthemeadows.com if you have questions.


The November Paper Pumpkin Kit is Warm Wishes!

Surprise friends and loved ones with Christmas surprises in a box! Spread the light of Christmas this season with a gift box! The Warm Wishes Paper Pumpkin Kit includes a traditional and festively designed treat packaging box perfect for gifting warm Christmas wishes. Fill up the box with small goodies, treats, and more. It’s a wonderful way to make the season shine even brighter for the people you love!

This month’s kit coordinates with the October Home for the Holidays Paper Pumpkin Kit! If you can’t get enough of this traditional Christmas scene and need more cozy crafts, then make sure to check the October Refill’s availability and spend more time crafting this holiday season! Plus, you can get the Warm Wishes Cards & Envelopes Add-On to take your Christmas crafting even further (available while supplies last).

The November Paper Pumpkin Kit Includes:

  • 8 boxes – 4 each of 2 designs
  • 1 Mossy Meadow Stampin’ Spot
  • Iridescent glitter accents on paper
  • Precut paper pieces
  • Linen thread
  • 8 clear food safe bags
  • Warm Wishes photopolymer stamp set
  • Completed box sizes: 4-1/4″ x 4-1/2″ x 1-1/2″ and 4/1/4″ x 3-3/4″ x 1-1/2″

Coordinating Colors: Balmy Blue, Blueberry Bushel, Cherry Cobbler, Crushed Curry, Daffodil Delight, Lemon Lolly, Mossy Meadow, Night of Navy, Old Olive, Pecan Pie, Real Red

Add-On Details:

  • Warm Wishes Cards & Envelopes – item number 163985 ($14)
  • Includes 20 Cards & Envelopes
  • Iridescent glitter accents on paper
  • Folded Card Size: 5″ x 7″

If you’re interested in subscribing to Paper Pumpkin, you can either sign up for a subscription where you are billed monthly for your kit or you can purchase a prepaid subscription in my Online Store. To see more information and to sign up for the monthly subscription click here. To see the options for prepaid subscriptions in my Online Store, click here.

Sign up deadline for the November 2023 kit is November 10, 2023. Note: Supplies may be limited toward the end of the subscription period.


Current Host Code: CD4VVKRG

Use this host code when you order $50 or more and receive a Thank You gift from me!  The free gift is your choice of any item currently available valued up to $10.00 .

If your order is over $150, please do not use the host code since you’ll receive your own Host Dollars plus I’ll still send you the Thank You gift!  This host code can be used by anyone, no club or commitment required. Let me know if you have any questions.


If you need any stamping supplies, I’d be very happy to be your Demonstrator.  Just click on the Shop Now button on the right side of the screen to go directly to my online store or contact me if you have any questions.  Happy Stamping!

Thanks for stopping by and have a great weekend!

Akiko

  • Visit my online store here
  • See the current Stampin’ Up! clearance rack specials here
  • Earn FREE Stampin’ Up! products through my Wildflower Frequent Shopper Program – my way of saying thank you to my online frequent shopper customers.
  • Have any questions? I’d be happy to help, click here to contact me.

Cardstock Cuts for this project:

  • Pretty Peacock – 4-1/4″ x 11″ card base, scored at 5-1/2″
  • Lemon Lime Twist – 1″ x 3″ (label)
  • Melon Mambo – 3-7/8″ x 5-1/8″ (front mat), 1-1/2″ x 1-1/2″ (flower)
  • Berry Burst – 1-1/2″ x 1-1/2″ (flower)
  • Fresh Freesia – 1-1/2″ x 1-1/2″ (flower)
  • Basic White – 4″ x 5-1/4″ (inside panel), 2-1/2″ x 4-1/4″ (die cut leaf sprig)
  • Masterfully Made DSP – 3-3/4″ x 5″ (front background), 1/2″ x 4″ (inside trim)

Stampin’ Up! products used in this project:


Stampin’ Up! Gorgeously Made Friendship Note Card

Good Morning and Happy Saturday! Today’s card uses the pretty Stampin’ Up! Gorgeously Made bundle with the colorful Masterfully Made designer series paper for a Friendship Note card. You can also find the products I used at the bottom of my post along with the card stock sizes.

I adhered a panel of Masterfully Made designer series paper to the front of an Azure Afternoon card base with liquid glue. I cut another panel of the DSP with the Stampin’ Up! Gorgeously Made border dies, the notebook die at the top and the crooked border at the bottom. I stamped the bold leaf image from the Stampin’ Up! Gorgeously Made cling stamp set on the panel in Daffodil Delight ink and adhered the panel to the card front.

I cut a panel of Pretty Peacock shimmer paper with the leafy sprig die from the Stampin’ Up! Gorgeously Made dies and adhered it to the card front. I cut a Melon Mambo panel with the open leaf spig die and adhered the die cut to the card front.

I stamped the sentiment from the Stampin’ Up! Gorgeously Made stamp set in Versamark ink on Pretty Peacock and sprinkled it with white embossing powder. I shook off the excess and heated the powder with my heat tool. I cut the sentiment out with the label die. I adhered folded Bubble Bath ribbon to the card front and adhered the label over it with dimensionals. I finished the card with Fresh Freesia Tinsel Gems.

For the inside of the card, I stamped the bold leaf image from the Stampin’ Up! Gorgeously Made stamp set in stamped-off Daffodil Delight ink on a Basic White panel. I stamped the script stamp in Bubble Bath ink in the corners and trimmed the bottom with a strip of DSP. I adhered the panel to the inside of the card with Stampin’ Seal.

The Masterfully Made designer series paper is full of beautiful, colorful flowers and is a wonderful compliment to the Stampin’ Up! Gorgeously Made bundle. I love the dies in the bundle, they give a nice casual look to the layers on the card front and go well with the torn edge designs in the beautiful designer series paper.


Celebrate 35 Years Joining Special!

Stampin’ Up!’s is celebrating their 35th anniversary in style! From October 3 – October 31 2023, anyone who joins our fun crafting community as a new demonstrator can choose either 35% OFF the cost of their Starter Kit or get 35% MORE product with their Starter Kit!

Promotion Details:

  • Promotion Period: October 3 – October 31, 2023
  • Deadline to Join: October 31, 2023; 11:59 PM (MT)
  • New demonstrators can choose one of the following options for their Starter Kit:
    • Option 1: Get 35% OFF the normal cost of a Stampin’ Up! Starter Kit. Those who select this option will receive $125 worth of product for only $64.35!
    • Option 2: Get 35% MORE product with their Starter Kit. Those who select this option will receive $168.75 worth of product by spending $99!

No matter which option you choose for your Starter Kit, you will receive free business supplies and free shipping on your Starter Kit—not to mention all the fun that comes with being part of Stampin’ Up!

FREE OnStage@Home Registration

It gets better! Those who sign up for a Starter Kit during this offer will also be automatically registered for FREE to our virtual OnStage event on November 11 – a $77 value!

  • Those who sign up for this offer have the opportunity to watch the event independently, gathered together with other demonstrators, or with their Team Leader.
  • Demonstrators who join during this promotion will be automatically added to the OnStage attendees; they do not need to register separately.
  • Demonstrators who join during this promotion will also receive an email with all the information about this event.

Yay!  Stampin’ Up! events are always SO much fun!!  Bonus that you can join and attend your first even for free!!

Come Join Us!

If you’d like to join our team, we’d love to have you!  Once you join, you’ll get at least a 20% discount on all of your Stampin’ Up! purchases and you can preorder from the upcoming catalogs!

We welcome all types of Demonstrators from those only purchasing to get the discount for themselves to those who want to run a business and those anywhere in between!  We’re a relaxed group that loves to stamp with no pressure to sell!

Contact me at apsudano@stampininthemeadows.com if you have questions.


New Online Exclusives are Coming Nov 7, 2023

A new selection of pretty Springtime Online Exclusive products will be available next month. Online Exclusives won’t appear in any catalog and are only available in the Online Store while supplies last. Click on the image below to download a PDF with a sneak peek:

Don’t forget the special selection of Designer Series Papers is available in the Online Exclusives section of the Online Store. These papers will be available only while supplies last, so shop early to bet yours before they’re gone. Click on the image below to download a PDF with all the details including item numbers and prices.

These papers are perfect for both holiday crafting and all occasion crafting.


Current Host Code: CD4VVKRG

Use this host code when you order $50 or more and receive a Thank You gift from me!  The free gift is your choice of any item currently available valued up to $10.00 .

If your order is over $150, please do not use the host code since you’ll receive your own Host Dollars plus I’ll still send you the Thank You gift!  This host code can be used by anyone, no club or commitment required. Let me know if you have any questions.


If you need any stamping supplies, I’d be very happy to be your Demonstrator.  Just click on the Shop Now button on the right side of the screen to go directly to my online store or contact me if you have any questions.  Happy Stamping!

Thanks for stopping by and have a great weekend!

Akiko

  • Visit my online store here
  • See the current Stampin’ Up! clearance rack specials here
  • Earn FREE Stampin’ Up! products through my Wildflower Frequent Shopper Program – my way of saying thank you to my online frequent shopper customers.
  • Have any questions? I’d be happy to help, click here to contact me.

Cardstock Cuts for this project:

  • Azure Afternoon – 4-1/4″ x 11″ card base, scored at 5-1/2″
  • Pretty Peacock – 1″ x 3″ (label)
  • Melon Mambo – 2-1/2″ x 4-1/4″ (die cut leaf sprig)
  • Pretty Peacock Shimmer – 3″ x 4-1/2″ (die cut leaf sprig)
  • Basic White – 3-3/4″ x 5″ (inside panel)
  • Masterfully Made DSP – 4-1/4″ x 5-1/2″ (front background), 2-3/4″ x 4″ (die cut panel), 1/2″ x 3-3/4″ (inside trim)

Stampin’ Up! products used in this project:


Stampin’ Up! Brightest Glow Christmas Card for the Happy Inkin’ Thursday Blog Hop

Good Morning and welcome to the Happy Inkin’ Thursday Blog Hop! The Stampin’ Up! Brightest Glow cling stamp set has some of the prettiest Christmas greetings and I used it with some of the pretty new Holiday papers for a simple Christmas card. You can find the supplies I used along with card stock cuts at the bottom of my post.

We have a sketch challenge this week:

I embossed a Basic White panel with the Merry Melody 3D embossing folder and adhered it to the front of a Real Red mat. I adhered the layered embossed panel to the front of a Thick Basic White card base with dimensionals.

I trimmed the bottom of a strip of Joyful Specialty DSP, Joy Of Christmas DSP and More Dazzle specialty paper with my paper snips to make fishtail banners. I adhered the banners to the card front with liquid glue.

I stamped the sentiment from the Stampin’ Up! Brightest Glow stamp set in Versamark ink on Basic White. I sprinkled it with gold embossing powder and shook off the excess. I heated the powder with my heat tool until it was bright and shiny. I cut it out with the pretty circle die from the Labels Aglow dies. I wrapped gold twine around the back and adhered the label to the card with dimensionals. I adhered holly leaf sequins and a gem to the label with glue dots.

For the inside of the card, I stamped the sentiment from the Stampin’ Up! Brightest Glow stamp set in Real Red ink on Basic White. I trimmed the bottom with a strip of Joy of Christmas DSP and adhered the panel to a Real Red mat before adhering it to the inside of the card.

The Merry Melody embossing folder is perfect for Christmas cards and pretty Christmas papers are perfecty for this week’s card sketch. All it needs is a pretty sentiment from the Stampin’ Up! Brightest Glow stamp set!

On with the Hop! Click on the Next Blog button to move forward to see the beautiful project Karen Ksenzakovic has created.

If you get lost along the way, here are the participants for the hop:


Current Host Code: CD4VVKRG

Use this host code when you order $50 or more and receive a free gift from me!  The free gift is your choice of any item currently available valued up to $10.00!

If your order is over $150, please do not use the host code since you’ll receive your own Host Dollars plus I’ll still send you the free gift!  This host code can be used by anyone, no club or commitment required. Let me know if you have any questions.


If you need any stamping supplies, I’d be very happy to be your Demonstrator.  Just click on the Shop Now button on the right side of the screen to go directly to my online store or contact me if you have any questions. 

Thanks for stopping by and Happy Stamping!

Akiko

  • Visit my online store here
  • See the current Stampin’ Up! clearance rack specials here
  • Earn FREE Stampin’ Up! products through my Wildflower Frequent Shopper Program – my way of saying thank you to my online frequent shopper customers.
  • Have any questions? I’d be happy to help, click here to contact me.

Cardstock Cuts for this project:

  • Thick Basic White – 5-1/2″ x 8-1/2″ card base scored at 4-1/4″
  • Real Red – two 4″ x 5-1/4″ panels (front and inside mats)
  • More Dazzle specialty paper – 1/2″ x 3-1/2″ (front banner)
  • Basic White – two 3-7/8″ x 5-1/8″ panels (front background and inside panel), 2-1/4″ x 2-1/4″ (label)
  • Joy of Christmas DSP – 1″ x 4-1/2″ (front banner), 1/2″ x 3-7/8″ (inside trim)
  • Joyful specialty DSP – 3/4″ x 4″ (front banner)

Stampin’ Up! products used in this project:


Stampin’ Up! Pick Of The Patch for the Inkin’ Krew Blog Hop

Good Morning! Welcome to the September Inkin’ Krew Team Blog Hop! The theme for this month’s hop is “Giving Thanks” and I used the Stampin’ Up! Pick of The Patch bundle to make today’s card. You can find the supplies I used at the bottom of my post and I included the card stock cuts in the description of each card

I embossed a Crumb Cake panel with the Exposed Brick 3D embossing folder and adhered it to the front of a Pecan Pie card base. I adhered a Pecan Pie plaid panel of the Lets Go Fishing designer series paper to the embossed panel with liquid glue.

I stamped a little fall pumpkin scene on Very Vanilla with the Stampin’ Up! Pick Of The Patch stamp set. I stamped the tree in Pecan Pie and the leaves in Daffodil Delight. I stamped the smaller pumpkins in stamped off Wild Wheat, Calypso Coral and Petal Pink. I cut masks and used them to stamp the stems in Pecan Pie. I stamped more leaves in Daffodil Delight on the ground and cut the scene out with the largest circle from the Stylish Shapes dies.

I adhered the circle to the card with liquid glue. I stamped the larger pumpkins from the Stampin’ Up! Pick Of The Patch stamp set in Calypso Coral, stamped off Lost Lagoon and stamped off Crumb Cake on Very Vanilla and punched them out. I stamped speckles on the pumpkins using the same colors. I punched out stems from Pecan Pie card stock and adhered them to the back of the pumpkins. I adhered the two smaller pumpkins to the card with glue dots and the larger pumpkin with dimensionals.

I stamped the sentiment from the Stampin’ Up! Pick Of The Patch stamp set in Pecan Pie ink on Very Vanilla and cut it out with the long skinny die from the Stylish Shapes dies using the two step method. I adhered it to the card with dimensionals and glue dots and adhered a loopy Linen Thread bow underneath. I finished the card with Very Vanilla dots.

For the inside of the card, I stamped the sentiment from the Stampin’ Up! Pick Of The Patch stamp set in Pecan Pie on a Very Vanilla Panel. I stamped the pumpkin in Calypso Coral ink and covered it with a mask before stamping the stem in Pecan Pie. I stamped speckles on the pumpkin and adhered a strip of DSP to the bottom before adhering the Very Vanilla panel to the inside of the card with Stampin’ Seal.

I just love the Stampin’ Up! Pick Of The Patch bundle – it has so many pretty pumpkin stamps! And I love the coordinating stamps and great sentiments too!

On With The Hop! Click on the Next Blog button to move forward to Carol Buckalew’s project or click the Previous Blog button to move back to see the project that Tara Carpenter created.

If you get lost along the way, here are the participants for the hop:


Free Shipping from Stampin’ Up! Oct 9 – 11, 2023!

Stampin’ Up! is offering free shipping on all orders of $75+ placed between October 9-11!  So get your lists ready and save on shipping fees today and tomorrow!

Details:

  • Free shipping offer begins:  October 9 at 12:01 AM MT
  • Ordering Deadline:  October 11 at 11:59 PM MT
  • Free shipping applies after the qualifying amount has been met.
  • The minimum qualifying amount to receive free shipping is $75 or more (before tax).
  • Free shipping only applies during the three-day period the promotion is live; this means that the order must be opened and closed between October 9-11.
  • With the exception of a one-time monthly Paper Pumpkin subscription, all Stampin’ Up! products qualify for the promotion. Subscriptions billed and shipped this month will be charged for the normal amount ($24.50 shipping included) + tax.
  • Prepaid 3, 6, or 12 month Paper Pumpkin subscriptions are eligible for FREE shipping under the same rules as all other Stampin’ Up! items during the promotion.
  • The free shipping promotion does not cover the additional cost for expedited shipping.
  • Please keep in mind, that with any product launch, the distribution center may fall behind our typical shipping timeframes.

Let me know if you have any questions. You can find my online store here.


Current Host Code: CD4VVKRG

Use this host code when you order $50 or more and receive a Thank You gift from me!  The free gift is your choice of any currently available item valued up to $10.00.

If your order is over $150, please do not use the host code since you’ll receive your own Host Dollars plus I’ll still send you the Thank You gift!  This host code can be used by anyone, no club or commitment required. Let me know if you have any questions.


If you need any stamping supplies, I’d be very happy to be your Demonstrator.  Just click on the Shop Now button on the right side of the screen to go directly to my online store or contact me if you have any questions.  Happy Stamping!

Thanks for stopping by and have a great week!

Akiko

  • Visit my online store here
  • See the current Stampin’ Up! clearance rack specials here
  • Earn FREE Stampin’ Up! products through my Wildflower Frequent Shopper Program – my way of saying thank you to my online frequent shopper customers.
  • Have any questions? I’d be happy to help, click here to contact me.

Cardstock Cuts for this project:

  • Pecan Pie – 4-1/4″ x 11″ card base scored at 5-1/2″, 1/2″ x 2-1/2″ (punched stems)
  • Crumb Cake – 4″ x 5-1/4″ (embossed background)
  • Very Vanilla – 4″ x 5-1/4″ (inside panel), 3-1/4″ x 3-1/4″ (die cut circle), 1-1/2″ x 5″ (punched pumpkins), 1″ x 3-1/4″ (label)
  • Let’s Go Fishing DSP – 2-1/2″ x 4″ (front stripe), 1/2″ x 4″ (inside trim)

Stampin’ Up! products used in this project:

Stampin’ Up! Textured Floral for World Card Making Day with Video

Good Morning and Happy Monday! I hope you had a great Fall weekend! If you happened to catch the Inkin’ Krew World Card Making Day Event, maybe you got a chance to see the video for my Stampin’ Up! Textured Floral fun fold card. If not, I’ve linked up the video below so you can check it out. You can also find the products I used at the bottom of my post along with the card stock sizes.

Here is the video that I made for the Inkin’ Krew WCMD event. You can also view it on my YouTube Channel:

I adhered the floral panels of Garden Walk 6″ x 6″ designer series paper to the inside and short front flap of the Calypso Coral card base with liquid glue. I adhered the dotted DSP to the short Calypso Coral panel that I cut off the front flap.

After adhering the floral DSP to the card base, I worked on the inside. I stamped the flowers from the Stampin’ Up! Textured Florals stamp set in Calypso Coral ink in the lower corner of a Basic White panel. I stamped the stems in Garden green ink and then adhered the panel to a Calypso Coral mat with Stampin’ Seal. I then adhered the layered inside panel to the floral inside of the card, centering the panel on the designer series paper.

Then I adhered the layered dotted designer series paper panel to the short front flap with liquid glue, being careful to apply glue to only the left half of the panel. I also wanted to make sure that the inside panel was covered and the liquid glue gave me the wiggle room to make sure it was placed properly.

I cut the wide leaf sprig die from the Stampin’ Up! Textured Floral dies from Garden Green and the small leaf sprig die from Lost lagoon. I adhered the leaf sprigs to the dotted panel with bits of glue dots (I think liquid glue would work too). I stamped the flowers from the Stampin’ Up! Textured Floral stamp set in Calypso Coral ink on Basic White and stamped the stems in Garden Green. I cut out the flowers with the coordinating die and adhered it to the panel with dimensionals.

I stamped the sentiment from the Stampin’ Up! Textured Floral stamp set in Lost Lagoon ink on Basic White and cut it out with the long skinny banner die from the Stylish Shapes dies. I adhered the label to the card front with dimensionals and finished the card with Calypso Coral Iridescent gems and a knotted length of Lost Lagoon ribbon.

I love how the greenery dies and stamped flowers in the Stampin’ Up! Textured Florals bundle compliment the Garden Walk 6″ x 6″ designer series paper. And the simple fun fold gives the card just a little something extra.


Free Shipping from Stampin’ Up! Starts Today!

Stampin’ Up! is offering free shipping on all orders of $75+ placed between October 9-11!  So get your lists ready and save on shipping fees Today, Tuesday and Wednesday!

Details:

  • Free shipping offer begins:  October 9 at 12:01 AM MT
  • Ordering Deadline:  October 11 at 11:59 PM MT
  • Free shipping applies after the qualifying amount has been met.
  • The minimum qualifying amount to receive free shipping is $75 or more (before tax).
  • Free shipping only applies during the three-day period the promotion is live; this means that the order must be opened and closed between October 9-11.
  • With the exception of a one-time monthly Paper Pumpkin subscription, all Stampin’ Up! products qualify for the promotion. Subscriptions billed and shipped this month will be charged for the normal amount ($24.50 shipping included) + tax.
  • Prepaid 3, 6, or 12 month Paper Pumpkin subscriptions are eligible for FREE shipping under the same rules as all other Stampin’ Up! items during the promotion.
  • The free shipping promotion does not cover the additional cost for expedited shipping.
  • Please keep in mind, that with any product launch, the distribution center may fall behind our typical shipping timeframes.

Let me know if you have any questions. You can find my online store here.


Celebrate 35 Years Joining Special!

Stampin’ Up!’s is celebrating their 35th anniversary in style! From October 3 – October 31 2023, anyone who joins our fun crafting community as a new demonstrator can choose either 35% OFF the cost of their Starter Kit or get 35% MORE product with their Starter Kit!

Promotion Details:

  • Promotion Period: October 3 – October 31, 2023
  • Deadline to Join: October 31, 2023; 11:59 PM (MT)
  • New demonstrators can choose one of the following options for their Starter Kit:
    • Option 1: Get 35% OFF the normal cost of a Stampin’ Up! Starter Kit. Those who select this option will receive $125 worth of product for only $64.35!
    • Option 2: Get 35% MORE product with their Starter Kit. Those who select this option will receive $168.75 worth of product by spending $99!

No matter which option you choose for your Starter Kit, you will receive free business supplies and free shipping on your Starter Kit—not to mention all the fun that comes with being part of Stampin’ Up!

FREE OnStage@Home Registration

It gets better! Those who sign up for a Starter Kit during this offer will also be automatically registered for FREE to our virtual OnStage event on November 11 – a $77 value!

  • Those who sign up for this offer have the opportunity to watch the event independently, gathered together with other demonstrators, or with their Team Leader.
  • Demonstrators who join during this promotion will be automatically added to the OnStage attendees; they do not need to register separately.
  • Demonstrators who join during this promotion will also receive an email with all the information about this event.

Yay!  Stampin’ Up! events are always SO much fun!!  Bonus that you can join and attend your first even for free!!

Come Join Us!

If you’d like to join our team, we’d love to have you!  Once you join, you’ll get at least a 20% discount on all of your Stampin’ Up! purchases and you can preorder from the upcoming catalogs!

We welcome all types of Demonstrators from those only purchasing to get the discount for themselves to those who want to run a business and those anywhere in between!  We’re a relaxed group that loves to stamp with no pressure to sell!

Contact me at apsudano@stampininthemeadows.com if you have questions.


Designer Series Paper Special Release Going On Now!

A special selection of Designer Series Papers is available in the Online Exclusives section of the Online Store. These papers will be available only while supplies last, so shop early to bet yours before they’re gone. Click on the image below to download a PDF with all the details including item numbers and prices.

These papers are perfect for both holiday crafting and all occasion crafting.


Current Host Code: 4BTBNFDU

Use this host code when you order $50 or more and receive a Thank You gift from me!  The free gift is your choice of any item currently available valued up to $10.00 .

If your order is over $150, please do not use the host code since you’ll receive your own Host Dollars plus I’ll still send you the Thank You gift!  This host code can be used by anyone, no club or commitment required. Let me know if you have any questions.


If you need any stamping supplies, I’d be very happy to be your Demonstrator.  Just click on the Shop Now button on the right side of the screen to go directly to my online store or contact me if you have any questions.  Happy Stamping!

Thanks for stopping by and have a great weekend!

Akiko

  • Visit my online store here
  • See the current Stampin’ Up! clearance rack specials here
  • Earn FREE Stampin’ Up! products through my Wildflower Frequent Shopper Program – my way of saying thank you to my online frequent shopper customers.
  • Have any questions? I’d be happy to help, click here to contact me.

Cardstock Cuts for this project:

  • Calypso Coral – 4-1/4″ x 8-1/4″ card base, scored at 5-1/2″, two 2-3/4″ x 4-1/4″ panels (front flap and inside mat)
  • Garden Green – 1-1/2″ x 3-1/2″ (die cut leaf sprig)
  • Lost Lagoon – 2″ x 3-1/4″ (die cut leaf sprig)
  • Basic White – 2-1/2″ x 4″ (inside panel), 1″ x 3-1/4″ (label), 2″ x 3″ (die cut flower)
  • Garden Walk 6″ x 6″ DSP – 4″ x 5-1/4″ (inside background), two 2-1/2″ x 4″ panels (front panels)

Stampin’ Up! products used in this project: