Stampin’ Up! Thoughtful Expressions Card

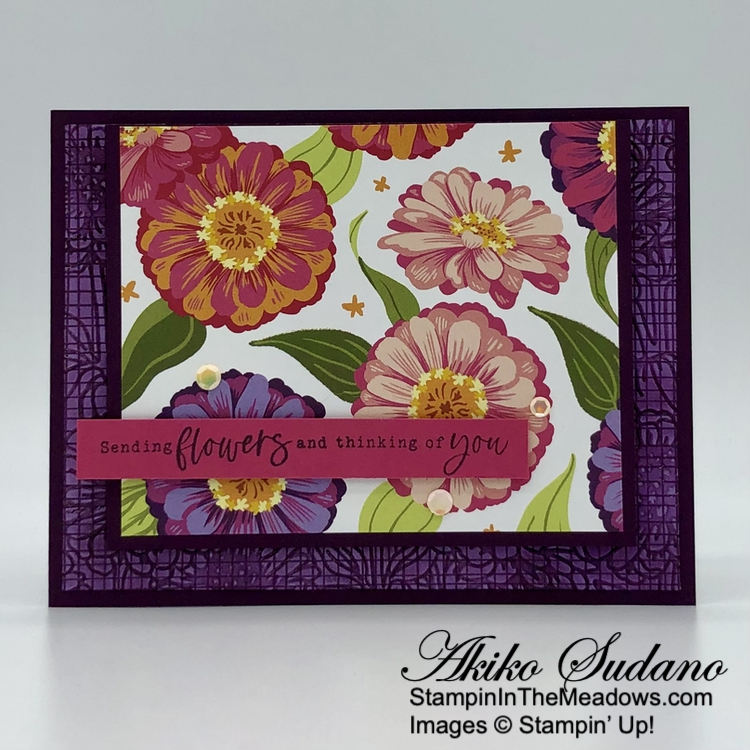
Good Morning! The Stampin’ Up! Thoughtful Expressions stamp set has beautiful images, but today I focused on the great sentiments and paired it with the beautiful Thoughtful Journey 6″ x 6″ designer series paper to make a sympathy card. You can find the products I used at the bottom of my post along with the card stock sizes.

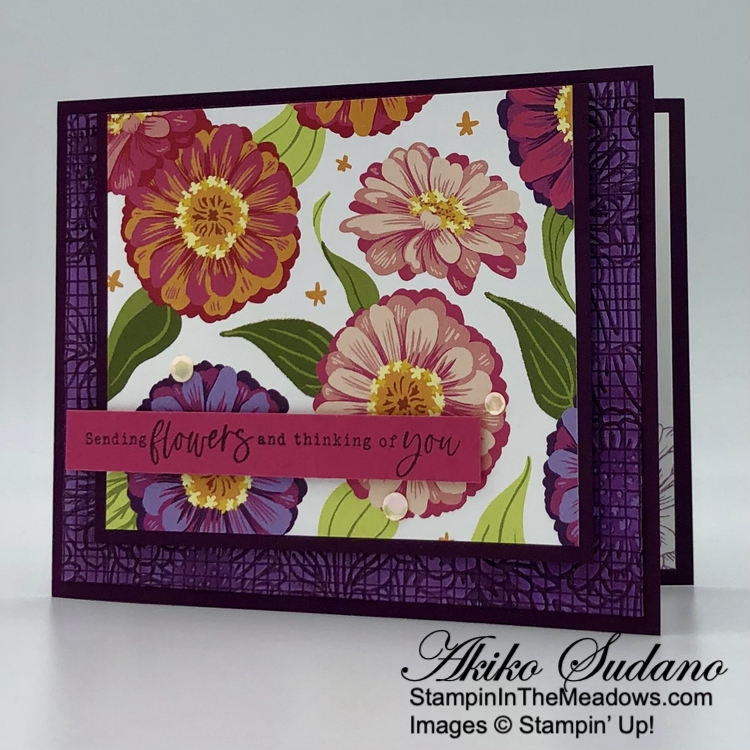
I adhered a strip of pretty Thoughtful Designs specialty 6″ x 6″ designer series paper to the front of a Wild Wheat card base with liquid glue. I adhered a pretty panel of Thougthful Journey 6″ x 6″ DSP on top of it with liquid glue.

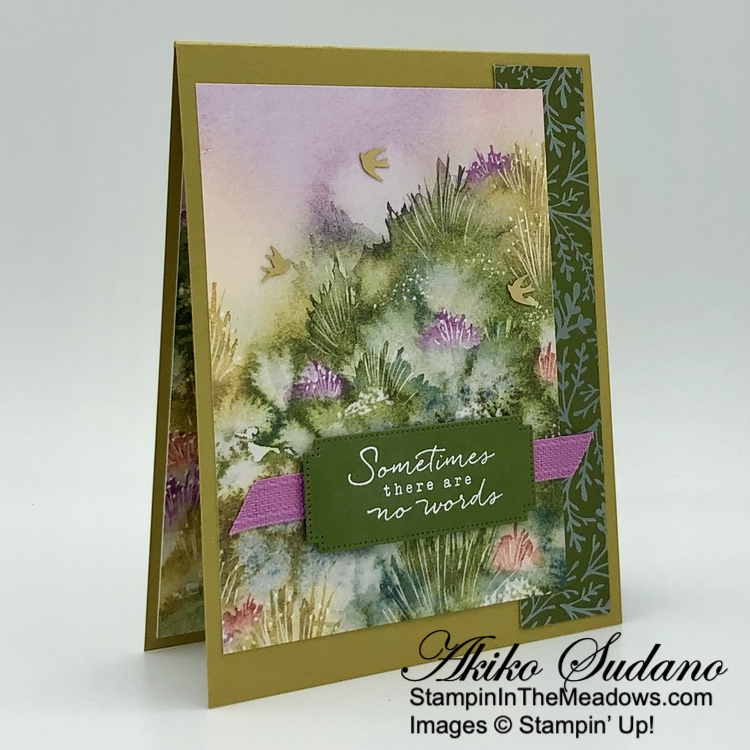
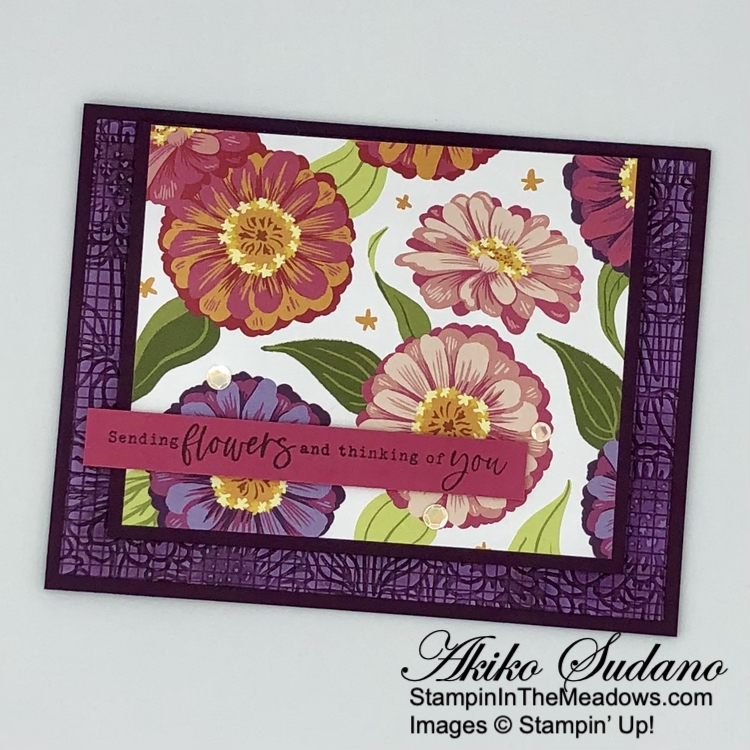
I stamped the sentiment from the Stampin’ Up! Thoughtful Expressions stamp set in Versamark ink on a Mossy Meadow panel. I sprinkled it with white embossing powder and shook off the excess. I heated it until it was bright and shiny and cut it out with the long label die from the Autumn Leaves dies.

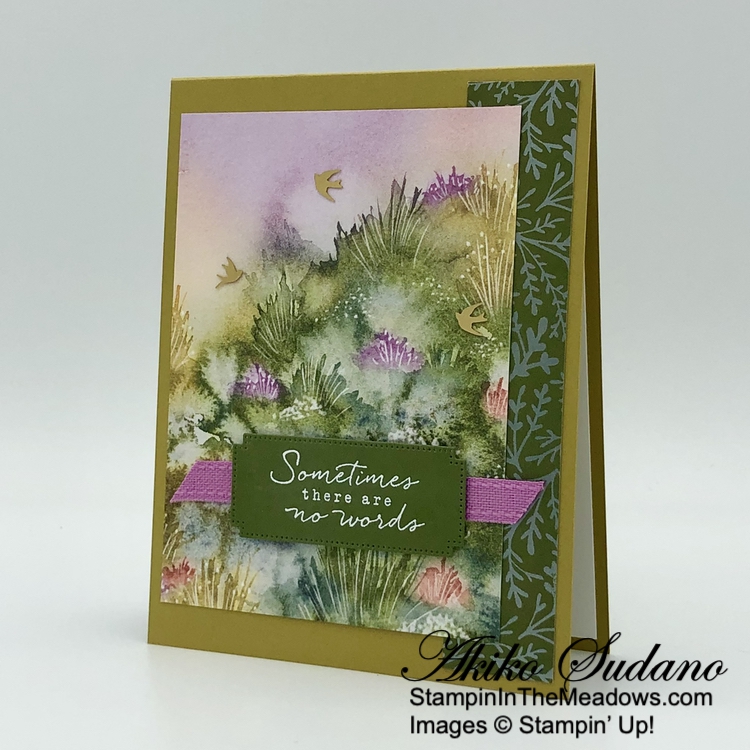
I adhered a length of Petunia Pop ribbon to the card with Stampin’ Seal and adhered the label on top with dimensionals. I finished the card with three brass birds.

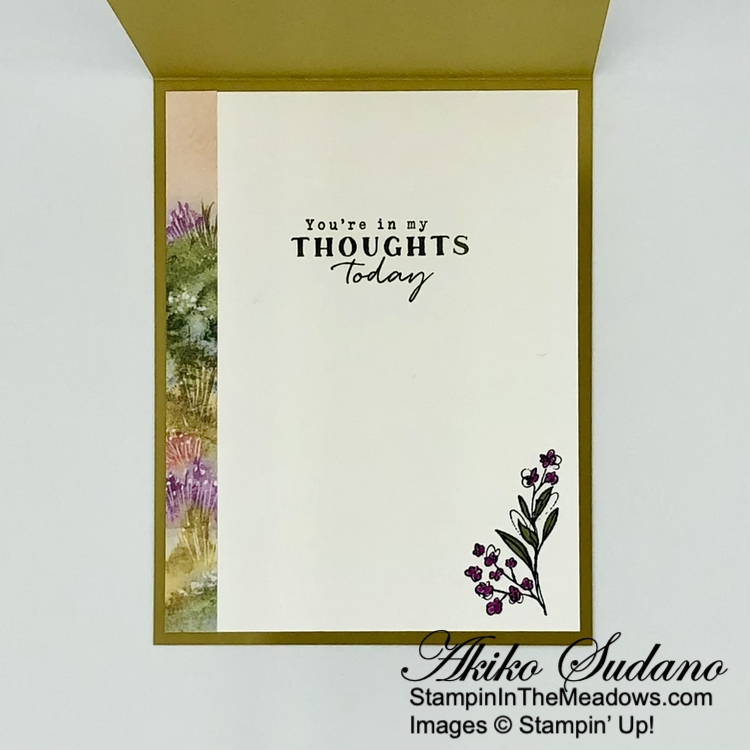
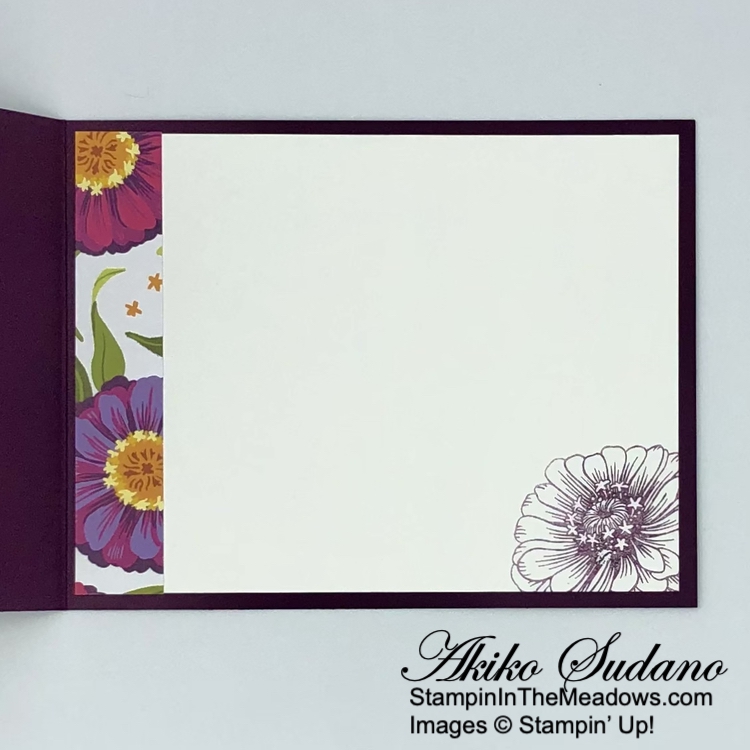
For the inside of the card, I the flower sprig from the Stampin’ Up! Thoughtful Expressions stamp set in Memento Tuxedo Black ink on a Basic White panel. I colored the flowers with light Petunia Pop Stampin’ Blend and the leaves with light Mossy Meadow. I stamped the sentiment using Mossy Meadow ink and trimmed the side with DSP. I adhered the panel to the inside of the card with Stampin’ Seal.

Sympathy cards are hard to make and the sentiments in the Stampin’ Up! Thoughtful Expressions stamp set are simple and pretty. Paired with pretty designer series paper, it becomes easier.


Stampin’ Up! May Joining Special!

Exciting News! Between May 1 and May 31, anyone who becomes a Stampin’ Up! demonstrator will receive four 2024–2026 In Color products in their Starter Kit for FREE! This is one of our richest offerings yet!

Promotion Details:

  • Dates: May 1, 2024 – May 31, 2024
  • New Demonstrators will receive the following products in their Starter Kit at no additional cost:
    • 2024–2026 In Color Classic Stampin’ Pad Bundle
    • 2024–2026 In Color 8-1/2″ x 11″ Cardstock
    • 2024–2026 In Color 6″ x 6″ Designer Series Paper
    • 2024–2026 In Color Stampin’ Write Markers
  • New team members may not use their team leader’s shipping address to ship their kit. 
  • New team members may only pay for their kit using a credit card on which they are listed as an authorized user. 
  • All orders should be closed by 31 May. 
  • New demonstrators who submit their Independent Demonstrator Agreement (IDA) before 1 May or after 31 May will not be eligible for this Starter Kit offer.

Click on the picture below to download a flyer to see more:

In addition to the In Color products, new Demonstrators will pick $125 USD worth of products of their choice for $99! When you join, the In Color products will be automatically added to your Starter Kit. You will also receive free business supplies with your order and free shipping. Not to mention all the fun that comes with being a part of our wonderful crafting community. Click the button below to Join Now, or get additional details on my Join My Team page


Current Host Code: SSMUTY4A

Use this host code when you order $50 or more and receive a Thank You gift from me!  The free gift is your choice of any item currently available valued up to $10.00.

If your order is over $150, please do not use the host code since you’ll receive your own Host Dollars plus I’ll still send you the Thank You gift!  This host code can be used by anyone, no club or commitment required. Let me know if you have any questions.


If you need any stamping supplies, I’d be very happy to be your Demonstrator.  Just click on the Shop Now Button on the right side of the screen to go directly to my Online store or contact me if you have any questions.  Happy Stamping!

Thanks for stopping by and have a great day!

Akiko

  • Visit my online store here
  • See the current Stampin’ Up! clearance rack specials here
  • Earn FREE Stampin’ Up! products through my Wildflower Frequent Shopper Program – my way of saying thank you to my online frequent shopper customers.
  • Have any questions? I’d be happy to help, click here to contact me.

Cardstock Cuts for this project:

  • Wild Wheat – 4-1/4″ x 11″ card base, scored at 5-1/2″
  • Mossy Meadow – 1-1/2″ x 3″ (label)
  • Basic White – 4″ x 5-1/4″ x 4″ (inside panel)
  • Thoughtful Designs specialty DSP – 1″ x 5-1/4″
  • Thoughtful Journey 6″ x 6″ DSP – 3-1/2″ x 4-3/4″ (front background), 1/2″ x 5-1/4″ (inside trim)

Stampin’ Up! products used in this project:


Stampin’ Up! Simply Zinnia Sending Flowers for the Happy Inkin’ Thursday Blog Hop

Good Morning and welcome to the Happy Inkin’ Thursday Blog Hop! One of my current favorites is the Stampin’ Up! Simply Zinnia bundle because of it’s beautiful flowers. But today, I focused on the sentiments to go with the beautiful Flowering Zinnias designer series paper. You can find the supplies I used along with card stock cuts at the bottom of my post.

We have a pretty sketch challenge this week:

I embossed a panel of Flowering Zinnias designer series paper with the Zinnias 3D embossing folder. I used a sponge dauber to apply Blackberry Bliss ink to the raised edges of the panel – It makes the embossed flowers pop and provides an interesting effect with the background grid. I adhered the panel to the front of a Blackberry Bliss card base with liquid glue.

I adhered a floral panel of Flowering Zinnias designer series paper to a Blackberry Bliss mat so that it just showed on the sides and bottom. I popped the layered DSP panel onto the card with dimensionals, lining the top edge up to match the card sketch.

I stamped the sentiment from the Stampin’ Up! Simply Zinnia stamp set using Blackberry Bliss ink on a Melon Mambo strip and adhered it to the card with dimensionals. I finished the card with three shiny sequins.

For the inside of the card, I stamped the single flower from the Stampin’ Up! Simply Zinnia stamp set using three times stamped off Blackberry Bliss ink. I trimmed the side with a strip of DSP and adhered the panel to the inside of the card with Stampin’ Seal.

The Stampin’ Up! Simply Zinnia bundle is part of the Online Exclusives Flowering Zinnias Suite. It’s a beautiful and colorful suite that is so versatile and any card you make with these products is sure to bring a smile!

On with the Hop! Click on the Next Blog button to move forward to see the beautiful project Karen Ksenzakovic has created.

If you get lost along the way, here are the participants for the hop:


Current Host Code: SSMUTY4A

Use this host code when you order $50 or more and receive a free gift from me!  The free gift is your choice of any item currently available valued up to $10.00!

If your order is over $150, please do not use the host code since you’ll receive your own Host Dollars plus I’ll still send you the free gift!  This host code can be used by anyone, no club or commitment required. Let me know if you have any questions.


If you need any stamping supplies, I’d be very happy to be your Demonstrator.  Just click on the Shop Now button on the right side of the screen to go directly to my online store or contact me if you have any questions. 

Thanks for stopping by and Happy Stamping!

Akiko

  • Visit my online store here
  • See the current Stampin’ Up! clearance rack specials here
  • Earn FREE Stampin’ Up! products through my Wildflower Frequent Shopper Program – my way of saying thank you to my online frequent shopper customers.
  • Have any questions? I’d be happy to help, click here to contact me.

Cardstock Cuts for this project:

  • Blackberry Bliss – 4-1/4″ x 11″ card base, scored at 5-1/2″
  • Melon Mambo – 1/2″ x 4″ (label)
  • Basic White – 4″ x 5-1/4″ (inside panel)
  • Flowering Zinnia DSP – 4″ x 5-1/4″ (front background), 3-1/2″ x 4-1/4″ (floral panel), 3/4″ x 4″ (inside trim)

Stampin’ Up! products used in this project:


Stampin’ Up! Country Flowers Friendship Card

Good Morning! The Stampin’ Up! Country Flowers bundle has pretty flowers, greenery and containers and sweet sentiments. One of the containers is a teapot and for today’s card, I stamped it on a panel of Country Woods designer series paper for a rustic look. You can find the products I used at the bottom of my post along with the card stock sizes.

I embossed a panel of Crumb Cake card stock with the Eyelet 3D embossing folder and adhered it to a Crumb Cake card base with liquid glue. I stamped the teapot from the Stampin’ Up! Country Flowers stamp set using Memento Tuxedo Black ink on a panel of Country Woods designer series paper. I colored it with a Blender Pen and Gray Granite ink and adhered the panel to a Crumb Cake mat.

I stamped the flowers from the Stampin’ Up! Country Flowers on another panel of Country Woods designer series paper using Memento Tuxedo Black ink. I colored the flowers with a Blender Pen using Petunia Pop, Peach Pie, Lost Lagoon, Lemon Lime Twist, Melon Mambo and Daffodil Delight inks. I cut out the flowers with the coordinating die and adhered it to the DSP panel with dimensionals. I adhered the decorated panel to the card with dimensionals.

I stamped sentiment from the Stampin’ Up! Country Flowers stamp set using Memento Tuxedo Black ink on Gray Granite and popped it on the card with dimensionals. I used white baker’s twine to make a small bow and adhered it with a glue dot and finished the card with Brushed Brass Butterflies.

For the inside of the card, I stamped the little eyelet design from the Stampin’ Up! Country Flowers stamp set using Gray Granite ink on a Basic White panel. I adhered the panel to a mat using the same Country Woods designer series paper as the card front and adhered the layered panel to the inside of the card.

Today’s card was inspired by the images for the Stampin’ Up! Country Flowers bundle in the new Annual Catalog. The images on the wood grain DSP remind me of paintings on wood like you would find in an old country farmhouse.


Stampin’ Up! May Joining Special!

Exciting News! Between May 1 and May 31, anyone who becomes a Stampin’ Up! demonstrator will receive four 2024–2026 In Color products in their Starter Kit for FREE! This is one of our richest offerings yet!

Promotion Details:

  • Dates: May 1, 2024 – May 31, 2024
  • New Demonstrators will receive the following products in their Starter Kit at no additional cost:
    • 2024–2026 In Color Classic Stampin’ Pad Bundle
    • 2024–2026 In Color 8-1/2″ x 11″ Cardstock
    • 2024–2026 In Color 6″ x 6″ Designer Series Paper
    • 2024–2026 In Color Stampin’ Write Markers
  • New team members may not use their team leader’s shipping address to ship their kit. 
  • New team members may only pay for their kit using a credit card on which they are listed as an authorized user. 
  • All orders should be closed by 31 May. 
  • New demonstrators who submit their Independent Demonstrator Agreement (IDA) before 1 May or after 31 May will not be eligible for this Starter Kit offer.

Click on the picture below to download a flyer to see more:

In addition to the In Color products, new Demonstrators will pick $125 USD worth of products of their choice for $99! When you join, the In Color products will be automatically added to your Starter Kit. You will also receive free business supplies with your order and free shipping. Not to mention all the fun that comes with being a part of our wonderful crafting community. Click the button below to Join Now, or get additional details on my Join My Team page


Current Host Code: SSMUTY4A

Use this host code when you order $50 or more and receive a Thank You gift from me!  The free gift is your choice of any item currently available valued up to $10.00.

If your order is over $150, please do not use the host code since you’ll receive your own Host Dollars plus I’ll still send you the Thank You gift!  This host code can be used by anyone, no club or commitment required. Let me know if you have any questions.


If you need any stamping supplies, I’d be very happy to be your Demonstrator.  Just click on the Shop Now Button on the right side of the screen to go directly to my Online store or contact me if you have any questions.  Happy Stamping!

Thanks for stopping by and have a great day!

Akiko

  • Visit my online store here
  • See the current Stampin’ Up! clearance rack specials here
  • Earn FREE Stampin’ Up! products through my Wildflower Frequent Shopper Program – my way of saying thank you to my online frequent shopper customers.
  • Have any questions? I’d be happy to help, click here to contact me.

Cardstock Cuts for this project:

  • Crumb Cake – 5-1/2″ x 8-1/2″ card base, scored at 4-1/4″, 3-1/2″ x 4-3/4″ (embossed panel), 3-1/8″ x 3-1/8″ (DSP mat)
  • Gray Granite – 3/8″ x 1-1/4″ (label)
  • Basic White – 2-3/4″ x 4″ (inside panel)
  • Country Woods DSP – 3″ x 3″ (tea pot panel), 2″ x 2-1/4″ (die cut flowers), 3-1/2″ x 4-3/4″ (inside mat)

Stampin’ Up! products used in this project:


Stampin’ Up! Simply Zinnia Thank You Card

Good Morning! The Stampin’ Up! Simply Zinnia bundle is such a pretty bundle with beautiful zinnias, both stamped and die cut. I used a die cut zinnia for the card front and stamped a few on the inside and I paired them with the pretty Flowering Zinnias designer series paper to make a layered thank you card. You can find the products I used at the bottom of my post along with the card stock sizes.

I adhered a striped panel of Flowering Zinnias designer series paper to a floral panel and then adhered them to a Blackberry Bliss mat. I popped it on the front of a Melon Mambo card base with dimensionals. I adhered another panel of Flowering Zinnias DSP to a Blackberry Bliss mat and adhered it to the card with liquid glue. I embossed a Basic White panel with the Zinnias 3D embossing folder and adhered it to a Blackberry Bliss mat before adhering it to the card front.

I cut two of the smaller petal clusters from the Stampin’ Up! Simply Zinnia dies from Flirty Flamingo card stock and used a sponge dauber to apply some Flirty Flaming ink to the petals of one. I cut one of the larger petal dies from Melon Mambo card stock and adhered the sponged petal cluster on top with liquid glue. I adhered the flirty Flamingo cluster on top spacing the petals to fill out the flower. I cut a flower center from Crushed Curry and a ring of small petals from Lemon Lolly and adhered them to the center of the flower. I cut two leave from Granny Apple Green and a stem from Mossy Meadow. I adhered the stem to the card with liquid glue and the leaves with glue dots. I adhered the leaves and flower with glue dots.

I stamped the sentiment from the Stampin’ Up! Simply Zinnia stamp set in Versamark Ink on a Blackberry Bliss panel. I sprinkled it with white embossing powder and shook off the excess. I heated the powder until it was bright and shiny and cut out the sentiment with the small rectangle die from the Everyday Details dies. I adhered the label to the card with dimensionals (doubling up on the far right end) and finished the card with Melon Mambo shiny sequins.

For the inside of the card, I stamped the zinnias from the Stampin’ Up! Simply Zinnia stamp set on a Basic White panel using twice stamped off Melon Mambo ink. I trimmed the bottom of the panel with DSP and adhered it to the inside of the card with Stampin’ Seal.

The Stampin’ Up! Simply Zinnia bundle is part of the Online Exclusives that were released this spring and it has been so popular! With Springtime planting nearly done, it’s time for the garden zinnias to shine. And I remember when I was little, cutting zinnias in our garden and putting them in vases – they’re so prolific and come in so many different colors.


Get Free Shipping on Orders of $75 or More Tomorrow!

Surprise! It’s time for FREE SHIPPING! On 21 May 2024, you can shop and save on all qualifying orders of $75 or more. What a great way to stock up on all your favorite products from the catalog, Online Exclusives, kits, and more! This incredible deal only lasts for 24 hours, so don’t miss out!

Promotion Details:

  • Dates: May 21, 2024
  • Free shipping is for 24 hours only. Orders must be opened and closed on 21 May 2024.
  • Free shipping automatically applies to your cart after the qualifying amount has been met, which is $75 USD (before tax).
  • Coupon codes and product credits are non-commissionable and will lower your order’s retail amount. Orders must meet the qualifying amount to be eligible for free shipping.
  • The additional cost for expedited shipping is not covered by this promotion.
  • Prepaid 3-, 6-, or 12-month Paper Pumpkin subscriptions can contribute to the qualifying amount for free shipping (Month-to-month subscriptions do not qualify). Subscriptions billed and shipped this month will be charged for the normal amount ($24.50 USD) + tax.

Current Host Code: SSMUTY4A

Use this host code when you order $50 or more and receive a Thank You gift from me!  The free gift is your choice of any item currently available valued up to $10.00.

If your order is over $150, please do not use the host code since you’ll receive your own Host Dollars plus I’ll still send you the Thank You gift!  This host code can be used by anyone, no club or commitment required. Let me know if you have any questions.


If you need any stamping supplies, I’d be very happy to be your Demonstrator.  Just click on the Shop Now Button on the right side of the screen to go directly to my Online store or contact me if you have any questions.  Happy Stamping!

Thanks for stopping by and have a great day!

Akiko

  • Visit my online store here
  • See the current Stampin’ Up! clearance rack specials here
  • Earn FREE Stampin’ Up! products through my Wildflower Frequent Shopper Program – my way of saying thank you to my online frequent shopper customers.
  • Have any questions? I’d be happy to help, click here to contact me.

Cardstock Cuts for this project:

  • Melon Mambo – 4-1/4″ x 11″ card base, scored at 5-1/2″, 2″ x 2-1/4″ (die cut petal cluster)
  • Blackberry Bliss – 4″ x 5-1/4″ (front background mat), 2-1/2″ x 2-1/2″ (DSP mat), 2″ x 3-1/2″ (embossed panel mat)
  • Flirty Flamingo – 2-1/4″ x 3-1/2″ (die cut petal clusters)
  • Crushed Curry – 3/4″ x 1″ (die cut flower center)
  • Lemon Lolly – 1″ x 1″ (die cut flower center)
  • Mossy Meadow – 3/4″ x 4″ (die cut stem)
  • Granny Apple Green – 1-1/2″ x 2-1/2″ (die cut leaves)
  • Basic White – 4″ x 5-1/4″ (inside panel), 1-7/8″ x 3-3/8″ (embossed panel)
  • Flowering Zinnias DSP – 3-7/8″ x 5-1/8″ (front background), 1 ” x 4″ (front stripe), 2-3/8″ x 2-3/8″ (small DSP panel), 3/4″ x 4″ (inside trim)

Stampin’ Up! products used in this project:


Stampin’ Up! Latte Love Thank You Card

Good Morning! The Stampin’ Up! Latte Love bundle is such a fun set for coffee lovers with great dies to make coffee pots and wonderful coffee sentiments. I paired it with the pretty A Little Latte designer series paper to make a simple fun fold thank you card. You can find the products I used at the bottom of my post along with the card stock sizes.

For my card base, I started out with a standard 4-1/4″ x 11 inch Lost Lagoon top fold card base and cut the front flap in half, resulting in a 4-1/4″ x 8-1/4″ card base and a 2-3/4″ x 4-1/4″ panel. I adhered panels of A Little Latte DSP to the large back panel and both sides of the front flap. I adhered another panel to the little Lost Lagoon card stock.

I love this coffee pot – it takes me back to all the mornings of making coffee in my Mr. Coffee coffee makers! I used the dies from the Stampin’ Up! Latte Love dies to cut the pot from a Window Sheet, the lid and handle from Basic Black and the coffee from Early Espresso. I adhered the handle and lid to the die cut carafe with glue dots and adhered the coffee to the small panel with liquid glue. I placed more glue dots on the window sheet, lid and handle and adhered the carafe to the panel, positioning it over the die cut coffee – this way the adhesives don’t show.

I stamped the coffee stamp from the Stampin’ Up! Latte Love stamp set twice using Pecan Pie ink on Crumb Cake. I used the little coffee disk die cuts to cut out coffee. I cut two small cups from Petal Pink and adhered the coffee disks to the top. I popped the coffee cups onto the panel with dimensionals. I stamped the sentiment from the Stampin’ Up! Latte Love stamp set using Lost Lagoon ink on a Lemon Lolly panel and cut it out with the label die from the Unbounded Love dies. I adhered the label to the panel with glue dots and adhered the panel to the front flap of the card base with liquid glue. I finished the front with three Pecan Pie dots.

For the inside of the card, I stamped the coffee beans from the Stampin’ Up! Latte Love stamp set in the corners of a Basic White panel using Pecan Pie ink. I colored the beans with the dark Crumb Cake Stampin’ Blend and adhered it to the back panel with Stampin’ Seal.

It’s too bad that pictures don’t capture the Window sheet very well, because the die cut coffee pot is so cute!! The Stampin’ Up! Latte Love bundle is the perfect way to start the day!


Free Shipping on Orders of $75 or More on May 21, 2024!

Surprise! It’s time for FREE SHIPPING! On 21 May 2024, you can shop and save on all qualifying orders of $75 or more. What a great way to stock up on all your favorite products from the catalog, Online Exclusives, kits, and more! This incredible deal only lasts for 24 hours, so don’t miss out!

Promotion Details:

  • Dates: May 21, 2024
  • Free shipping is for 24 hours only. Orders must be opened and closed on 21 May 2024.
  • Free shipping automatically applies to your cart after the qualifying amount has been met, which is $75 USD (before tax).
  • Coupon codes and product credits are non-commissionable and will lower your order’s retail amount. Orders must meet the qualifying amount to be eligible for free shipping.
  • The additional cost for expedited shipping is not covered by this promotion.
  • Prepaid 3-, 6-, or 12-month Paper Pumpkin subscriptions can contribute to the qualifying amount for free shipping (Month-to-month subscriptions do not qualify). Subscriptions billed and shipped this month will be charged for the normal amount ($24.50 USD) + tax.

Current Host Code: SSMUTY4A

Use this host code when you order $50 or more and receive a Thank You gift from me!  The free gift is your choice of any item currently available valued up to $10.00.

If your order is over $150, please do not use the host code since you’ll receive your own Host Dollars plus I’ll still send you the Thank You gift!  This host code can be used by anyone, no club or commitment required. Let me know if you have any questions.


If you need any stamping supplies, I’d be very happy to be your Demonstrator.  Just click on the Shop Now Button on the right side of the screen to go directly to my Online store or contact me if you have any questions.  Happy Stamping!

Thanks for stopping by and have a great day!

Akiko

  • Visit my online store here
  • See the current Stampin’ Up! clearance rack specials here
  • Earn FREE Stampin’ Up! products through my Wildflower Frequent Shopper Program – my way of saying thank you to my online frequent shopper customers.
  • Have any questions? I’d be happy to help, click here to contact me.

Cardstock Cuts for this project:

  • Lost Lagoon – 4-1/4″ x 8-1/4″ card base, scored at 5-1/2″, 2-3/4″ x 4-1/4″ (front panel)
  • Window Sheet – 2-1/2″ x 2-1/2″ (coffee pot)
  • Basic Black – 1-1/4″ x 3″ (coffee pot handle & lid)
  • Early Espresso – 1-1/4″ x 2″ (die cut coffee in pot)
  • Petal Pink – 1″ x 2-1/2″ (die cut coffee cups)
  • Crumb Cake – 3/4″ x 2-1/2″ (coffee in cups)
  • Lemon Lolly – 1″ x 2-1/2″ (label)
  • Basic White – 2-3/4″ x 4-1/4″ (inside panel)
  • A Little Latte DSP – 4″ x 5-1/4″ (inside background), three 2-1/2″ x 4″ panels (front flaps and inside panel)

Stampin’ Up! products used in this project:


Stampin’ Up! Grassy Grove for the Happy Inkin’ Thursday Blog Hop

Good Morning and welcome to the Happy Inkin’ Thursday Blog Hop! The Stampin’ Up! Grassy Grove stamp set and Grove dies are a wonderful set for creating natural outdoors scenes and dioramas. I used it with the pretty new Thoughtful Journey 6″ x 6″ designer series paper to make a thank you card and it was pretty simple to do. You can find the supplies I used along with card stock cuts at the bottom of my post.

We have a theme challenge this week and the Stampin’ Up! Grassy Grove stamps set and Grove dies were perfect!

I adhered a panel of Thoughtful Journey to the front of a Pretty Peacock card base with liquid glue. I cut an old Olive panel with the large tree frame die from the Grove dies. I felt it was kind of plain, so I used a sponge dauber to add some ink. I used Mossy Meadow on the tree trunks and Pretty Peacock on the leafy canopy and ground cover. I finished with Wild Wheat around the edge of the frame.

I adhered the frame to the card front with dimensionals. I cut the doe and fawn from Pecan Pie card stock using the Grove dies and adhered them to the card with glue dots, tucking them under the frame ground cover.

I stamped the sentiment from the Stampin’ Up! Grassy Grove stamp set using Versamark ink on a Pretty Peacock panel. I sprinkled it with gold embossing powder and shook off the excess and heated it with my heat tool until it was bright and shiny. I cut it out with the label die from the Unbounded Love dies using a two step method, so it was a little shorter. I adhered it to the card with dimensionals and finished it with a small green Blooming Pearl.

I left the inside of the card blank, and simply trimmed the side of a Basic White panel with Thoughtful Journey DSP. I adhered the panel to the inside of the card with Stampin’ Seal.

The natural scenes in the Thoughtful Journey designer series paper go perfect with nature frame dies like the one in the Grove dies. And it saves time, because you don’t need to create a background scene for the frame. Just pop on some cute die cut deer!

On with the Hop! Click on the Next Blog button to move forward to see the beautiful project Karen Ksenzakovic has created.

If you get lost along the way, here are the participants for the hop:


Current Host Code: SSMUTY4A

Use this host code when you order $50 or more and receive a free gift from me!  The free gift is your choice of any item currently available valued up to $10.00!

If your order is over $150, please do not use the host code since you’ll receive your own Host Dollars plus I’ll still send you the free gift!  This host code can be used by anyone, no club or commitment required. Let me know if you have any questions.


If you need any stamping supplies, I’d be very happy to be your Demonstrator.  Just click on the Shop Now button on the right side of the screen to go directly to my online store or contact me if you have any questions. 

Thanks for stopping by and Happy Stamping!

Akiko

  • Visit my online store here
  • See the current Stampin’ Up! clearance rack specials here
  • Earn FREE Stampin’ Up! products through my Wildflower Frequent Shopper Program – my way of saying thank you to my online frequent shopper customers.
  • Have any questions? I’d be happy to help, click here to contact me.

Cardstock Cuts for this project:

  • Pretty Peacock – 5-1/2″ x 8-1/2″ card base, scored at 4-1/4″
  • Old Olive – 3-3/4″ x 5″ (die cut tree frame)
  • Pecan Pie – 1-1/2″ x 3″ (die cut deer)
  • Basic White – 4″ x 5-1/4″ (inside panel)
  • Thoughtful Journey 6″ x 6″ DSP – 4″ x 5-1/4″ (front background), 3/4″ x 4″ (inside trim)

Stampin’ Up! products used in this project:


Stampin’ Up! Feathered Flight for the Inkin’ Krew Blog Hop

Good Morning! Welcome to the May Inkin’ Krew Team Blog Hop! The theme for this month’s hop is “For the Boys/Men” so I pulled out my Feathered Flight stamp set to make a simple, masculine thinking of you card. The beautiful Thoughtful Journey 6″ x 6″ designer series paper makes a wonderful background for the ducks in the stamp set. You can find the supplies I used along with card stock cuts at the bottom of my post.

I stamped the small flying ducks from the Stampin’ Up! Feathered Flight cling stamp set using Wild Wheat ink on a panel of Thoughtful Journey designer series paper. I adhered the stamped DSP to a Misty Moonlight mat using liquid glue.

I separated a length of Wild Wheat jute and wrapped a single strand around the DSP panel and tied a knot. I adhered the panel to the front of a Boho Blue card base with dimensionals.

I cut two pine sprigs from the Encircled In Nature dies and adhered them to the card with glue dots, tucking them under the jute.

I stamped the sentiment from the Stampin’ Up! Feathered Flight stamp set using Wild Wheat ink on a Boho Blue panel. I cut out the sentiment with the Deckled Rectangles dies using a two step method, lining up one corner and cutting two sides and then cutting the opposite corner and the remaining sides. I adhered the label to the card using dimensionals over the jute and die cut sprigs.

For the inside of the card, I stamped the sentiment from the Stampin’ Up! Feathered Flight stamp set in Wild Wheat ink on a Basic White panel. I used twice stamped off Misty Moonlight ink to stamp the large duck and trimmed the side with DSP. I adhered the panel to a Misty Moonlight mat and then to the inside of the card with Stampin’ Seal.

The Thoughtful Journey 6″ x 6″ designer series paper is so beautiful and I love how it looks with the flying ducks from the Stampin’ Up! Feathered Flight stamp set. A quiet, beautiful morning in the woods with a loved one!

On With The Hop! Click on the Next Blog button to move forward to Carol Buckalew’s project or click the Previous Blog button to move back to see the project that Ann Louise Fodgaard created.

If you get lost along the way, here are the participants for the hop:


Current Host Code: SSMUTY4A

Use this host code when you order $50 or more and receive a Thank You gift from me!  The free gift is your choice of any currently available item valued up to $10.00.

If your order is over $150, please do not use the host code since you’ll receive your own Host Dollars plus I’ll still send you the Thank You gift!  This host code can be used by anyone, no club or commitment required. Let me know if you have any questions.


If you need any stamping supplies, I’d be very happy to be your Demonstrator.  Just click on the Shop Now button on the right side of the screen to go directly to my online store or contact me if you have any questions.  Happy Stamping!

Thanks for stopping by and have a great week!

Akiko

  • Visit my online store here
  • See the current Stampin’ Up! clearance rack specials here
  • Earn FREE Stampin’ Up! products through my Wildflower Frequent Shopper Program – my way of saying thank you to my online frequent shopper customers.
  • Have any questions? I’d be happy to help, click here to contact me.

Cardstock Cuts for this project:

  • Boho Blue – 5-1/2″ x 8-1/2″ card base scored at 4-1/4″, 1″ x 3″ (label)
  • Misty Moonlight – two 4″ x 5-1/4″ panels (front mat and inside mat)
  • Wild Wheat – 1-3/4″ x 2-3/4″ (die cut pine sprigs)
  • Basic White – 3-7/8″ x 5-1/8″ (inside panel)
  • Thoughtful Journey 6″ x 6″ DSP – 3-7/8″ x 5-1/8″ (front background), 1/2″ x 5-1/8″ (inside trim)

Stampin’ Up! products used in this project:

Stampin’ Up! Thoughtful Wishes Thinking Of You Card

Good Morning! The Stampin’ Up! Thoughtful Wishes bundle is a really sweet wildflower themed bundle with wonderful sentiments and great dies. I used it with the Beautiful Thoughtful Journey 6″ x 6″ designer series paper to make a thinking of you card with watercolor techniques. You can find the products I used at the bottom of my post along with the card stock sizes.

I adhered pretty panel of Thoughtful Journey 6″ x 6″ designer series paper to a Mossy Meadow mat with liquid glue. I cut a panel of Lost Lagoon with the leaf dies from the Stampin’ Up! Thoughtful Journey dies and adhered two of them to the DSP panel with glue dots.

I cut a Basic White panel with the thistle dies from the Stampin’ Up! Thoughtful Journey dies twice. I used a water painter and Heather Highland ink to color the flowers and Lost Lagoon and Mossy Meadow inks to color the stems. I did this quickly so that it has a splotchy look with different shades of color. After they dried, I adhered them to the DSP panel with dots of liquid glue. I adhered the last two Lost Lagoon die cut leaves on top with glue dots.

I used my light Mossy Meadow Stampin’ Blend to color a length of Linen Thread and wrapped it around the panel twice and made a bow and adhered the panel to the front of a Boho Blue card base. I stamped the sentiment from the Stampin’ Up! Thoughtful Wishes stamp set in Mossy Meadow ink on Wild Wheat and cut it out with the label die from the Perennial Postage dies. I adhered the label to the card with dimensionals and finished with several brass dragonfly embellishments.

For the inside of the card I used Highland Heather and Lost Lagoon Stampin’ Write markers to ink up the thistle stamp from the Stampin’ Up! Thoughtful Wishes stamp set. I used a sponge dauber to add touches of Mossy Meadow to the stamp. I lightly spritzed the stamp with water and stamped the side of a Basic White panel. I used the spatter stamp to apply some twice stamped off Wild Wheat ink to the corner before adhering it to the inside of the card.

I was inspired by the beautiful watercolor look of the Thoughtful Journey 6″ x 6″ DSP to use water techniques to make todays card. It’s a lot of fun to use different coloring techniques and get nice results. And water coloring with ink is pretty easy on small cuts like these thistle from the Stampin’ Up! Thoughtful Wishes bundle. Give it a try!


The June Paper Pumpkin Kit – Life Is Sweet!

Celebrate the sweet things in life with textured, artistic cards.

  • Makes 9 cards: 3 each of 3 designs with 9 coordinating envelopes
  • Iridescent glimmer sentiments and precut paper pieces
  • Vellum accents, iridescent pearls, and linen thread
  • Shy Shamrock Classic Stampin’ Spot

Coordinating Colors: Poppy Parade, Peach Pie, Lemon Lolly, Shy Shamrock, Pool Party, Pretty In Pink

And the coordinating add-on is the Thanks and Beyond dies. These dies coordinate with the Best There Is kit and will also coordinate with the June kit.

If you’re interested in subscribing to Paper Pumpkin, you can either sign up for a subscription where you are billed monthly for your kit or you can purchase a prepaid subscription in my Online Store. To see more information and to sign up for the monthly subscription click here. To see the options for prepaid subscriptions in my Online Store, click here.

Sign up deadline for the June 2024 kit is June 10, 2024. Note: Supplies may be limited toward the end of the subscription period.


Stampin’ Up! May Joining Special!

Exciting News! Between May 1 and May 31, anyone who becomes a Stampin’ Up! demonstrator will receive four 2024–2026 In Color products in their Starter Kit for FREE! This is one of our richest offerings yet!

Promotion Details:

  • Dates: May 1, 2024 – May 31, 2024
  • New Demonstrators will receive the following products in their Starter Kit at no additional cost:
    • 2024–2026 In Color Classic Stampin’ Pad Bundle
    • 2024–2026 In Color 8-1/2″ x 11″ Cardstock
    • 2024–2026 In Color 6″ x 6″ Designer Series Paper
    • 2024–2026 In Color Stampin’ Write Markers
  • New team members may not use their team leader’s shipping address to ship their kit. 
  • New team members may only pay for their kit using a credit card on which they are listed as an authorized user. 
  • All orders should be closed by 31 May. 
  • New demonstrators who submit their Independent Demonstrator Agreement (IDA) before 1 May or after 31 May will not be eligible for this Starter Kit offer.

Click on the picture below to download a flyer to see more:

In addition to the In Color products, new Demonstrators will pick $125 USD worth of products of their choice for $99! When you join, the In Color products will be automatically added to your Starter Kit. You will also receive free business supplies with your order and free shipping. Not to mention all the fun that comes with being a part of our wonderful crafting community. Click the button below to Join Now, or get additional details on my Join My Team page


Current Host Code: SSMUTY4A

Use this host code when you order $50 or more and receive a Thank You gift from me!  The free gift is your choice of any item currently available valued up to $10.00.

If your order is over $150, please do not use the host code since you’ll receive your own Host Dollars plus I’ll still send you the Thank You gift!  This host code can be used by anyone, no club or commitment required. Let me know if you have any questions.


If you need any stamping supplies, I’d be very happy to be your Demonstrator.  Just click on the Shop Now Button on the right side of the screen to go directly to my Online store or contact me if you have any questions.  Happy Stamping!

Thanks for stopping by and have a great day!

Akiko

  • Visit my online store here
  • See the current Stampin’ Up! clearance rack specials here
  • Earn FREE Stampin’ Up! products through my Wildflower Frequent Shopper Program – my way of saying thank you to my online frequent shopper customers.
  • Have any questions? I’d be happy to help, click here to contact me.

Cardstock Cuts for this project:

  • Boho Blue – 5-1/2″ x 8-1/2″ card base, scored at4-1/4″, 1-1/4″ x 2-1/2″ (label)
  • Mossy Meadow – 4″ x 5-1/4″ (front Mat)
  • Lost Lagoon – 1″ x 5″ (die cut leaves)
  • Wild Wheat – 1-1/4″ x 2-1/2″
  • Basic White – 4″ x 5-1/4″ (inside panel), 2″ x 6″ (die cut flowers)
  • Thoughtful Journey 6″ x 6″ DSP – 3-7/8″ x 5-1/8″ (front background)

Stampin’ Up! products used in this project:


Stampin’ Up! Magnolia Mood Birthday Card

Good Morning! The Stampin’ Up! Magnolia Mood bundle has some of the best images and dies for magnolias ever. These magnificent trees and flowers are special to me because of my memories of living in the South in my youth and having these in my yard. So I had to have this bundle when it came out in the Online Exclusives. You can find the products I used at the bottom of my post along with the card stock sizes.

I adhered a panel of Country Woods designer series paper to an Early Espresso mat with liquid glue and popped it on the front of a Basic Beige card base. I cut the large floral die from the Stampin’ Up! Magnolia Mood dies from Mossy Meadow card stock and adhered it to the card with glue dots.

I stamped the large bouquet from the Stampin’ Up! Magnolia Mood stamp set on a Basic White panel using Memento Tuxedo Black ink. I stamped the seed pod as well and colored the images with Stampin’ Blends. I used light Mossy Meadow on the top of the leaves and light Old Olive and Wild Wheat on the undersides. I used dark Daffodil Delight on the flower center and the seed pod and also shaded the seed pod with light Wild Wheat. I used light Petal Pink on the flower petals and used Wink of Stella on the flowers and seed pod to add a touch of sparkle. I cut the flowers out with the coordinating dies and popped the large flower on the card with dimensionals and adhered the seed pod with glue dots.

I cut some extra leaves from Mossy Meadow using the leaf dies from the Stampin’ Up! Magnolia Mood dies and tucked them under the flowers, adhering them with glue dots. I stamped the sentiment using Mossy Meadow ink on Pool Party and cut it out with the long label die from the Wonderful Thoughts dies. I adhered the label to the card with dimensionals and finished with Shiny Sequins.

For the inside of the card I stamped the sentiment from the Stampin’ Up! Magnolia Mood stamp set in Mossy Meadow ink on a Basic White panel. I stamped the flowers in Memento Tuxedo Black ink and colored it with Mossy Meadow and Petal Pink Stampin’ Blends . I adhered the panel to the inside of the card with Stampin’ Seal.

The images in the Stampin’ Up! Magnolia Mood stamp set are gorgeous!! The dies are modern and fun and compliment the stamped images nicely. The set is a must have for anyone who likes magnolias!


Stampin’ Up! May Joining Special!

Exciting News! Between May 1 and May 31, anyone who becomes a Stampin’ Up! demonstrator will receive four 2024–2026 In Color products in their Starter Kit for FREE! This is one of our richest offerings yet!

Promotion Details:

  • Dates: May 1, 2024 – May 31, 2024
  • New Demonstrators will receive the following products in their Starter Kit at no additional cost:
    • 2024–2026 In Color Classic Stampin’ Pad Bundle
    • 2024–2026 In Color 8-1/2″ x 11″ Cardstock
    • 2024–2026 In Color 6″ x 6″ Designer Series Paper
    • 2024–2026 In Color Stampin’ Write Markers
  • New team members may not use their team leader’s shipping address to ship their kit. 
  • New team members may only pay for their kit using a credit card on which they are listed as an authorized user. 
  • All orders should be closed by 31 May. 
  • New demonstrators who submit their Independent Demonstrator Agreement (IDA) before 1 May or after 31 May will not be eligible for this Starter Kit offer.

Click on the picture below to download a flyer to see more:

In addition to the In Color products, new Demonstrators will pick $125 USD worth of products of their choice for $99! When you join, the In Color products will be automatically added to your Starter Kit. You will also receive free business supplies with your order and free shipping. Not to mention all the fun that comes with being a part of our wonderful crafting community. Click the button below to Join Now, or get additional details on my Join My Team page


Current Host Code: SSMUTY4A

Use this host code when you order $50 or more and receive a Thank You gift from me!  The free gift is your choice of any item currently available valued up to $10.00.

If your order is over $150, please do not use the host code since you’ll receive your own Host Dollars plus I’ll still send you the Thank You gift!  This host code can be used by anyone, no club or commitment required. Let me know if you have any questions.


If you need any stamping supplies, I’d be very happy to be your Demonstrator.  Just click on the Shop Now Button on the right side of the screen to go directly to my Online store or contact me if you have any questions.  Happy Stamping!

Thanks for stopping by and have a great day!

Akiko

  • Visit my online store here
  • See the current Stampin’ Up! clearance rack specials here
  • Earn FREE Stampin’ Up! products through my Wildflower Frequent Shopper Program – my way of saying thank you to my online frequent shopper customers.
  • Have any questions? I’d be happy to help, click here to contact me.

Cardstock Cuts for this project:

  • Basic Beige – 5-1/2″ x 8-1/2″ card base, scored at 4-1/4″
  • Early Espresso – 4″ x 5-1/4″ (front mat)
  • Mossy Meadow – 4″ x 4-1/2″ (die cut flowers and leaves)
  • Pool Party – 1″ x 3-1/4″ (label)
  • Basic White – 4″ x 5-1/4″ (inside panel), 3-1/4″ x 3-3/4″ (large die cut flower), 2-1/4″ x 2-1/2″ (seed pod)
  • Country Woods DSP – 3-7/8″ x 5-1/8″ (front background)

Stampin’ Up! products used in this project:


Stampin’ Up! Simply Zinnia for the Happy Inkin’ Thursday Blog Hop

Good Morning and welcome to the Happy Inkin’ Thursday Blog Hop! The Stampin’ Up! Simply Zinnia bundle is one of the Online Exclusives and it’s such a beautiful set. I’ve used it with the Flowering Zinnias designer series paper for a very colorful Mother’s Day card that is full of flowers. You can find the supplies I used along with card stock cuts at the bottom of my post.

We have a fun sketch challenge this week:

I adhered a panel of Flowering Zinnias designer series paper to the front of a Flirty Flamingo card base with liquid glue. I cut two banners from Petal Pink Glimmer paper using the Nested Essentials dies and adhered them to the card with glue dots.

I used the largest circle die from the Everyday Details dies to cut a Highland Heather panel. I stamped tree single flowers from the Stampin’ Up! Simply Zinnia stamp set using Memento Tuxedo Black ink on Basic White. I colored the flowers with Stampin’ Blends – using Petal Pink, Flirty Flamingo and Melon Mambo for the petals and Peach Pie and Lemon Lolly for the centers. I cut them out with the coordinating die and adhered the Petal Pink and Flirty Flamingo flowers to the die cut circle with glue dots and the Melon Mambo flower with dimensionals.

I stamped four leaf clusters from the Stampin’ Up! Simply Zinnia stamp set using Memento Tuxedo Black ink on Basic White and colored two with Lemon Lime Twist and two with Mossy Meadow Stampin’ Blends. I cut them out with the coordinating die and adhered them to the Highland Heather circle with glue dots, tucking them under the flowers. I stamped the sentiment from the Flower Cart stamp set using Melon Mambo ink on Petal Pink card stock and cut it out with the long label die from the Autumn Leaves dies. I adhered it to the circle with glue dots and dimensionals. I adhered the Highland Heather circle to the card with dimensionals and added bling with adhesive sequins.

For the inside of the card, I stamped the flower from the Stampin’ Up! Simply Zinnia stamp set in Melon Mambo ink on a Basic White panel. I stamped the sentiment from the Flower Cart stamp set in Mossy Meadow ink and trimmed the bottom with DSP. I adhered the panel to the inside of the card with Stampin’ Seal.

Those stamped flowers in the Stampin’ Up! Simply Zinnia bundle are just gorgeous colored with Stampin’ Blends. And Happy Mother’s Day – Do something special for yourself!

On with the Hop! Click on the Next Blog button to move forward to see the beautiful project Karen Ksenzakovic has created.

If you get lost along the way, here are the participants for the hop:


Current Host Code: YEPTJAZ9

Use this host code when you order $50 or more and receive a free gift from me!  The free gift is your choice of any item currently available valued up to $10.00!

If your order is over $150, please do not use the host code since you’ll receive your own Host Dollars plus I’ll still send you the free gift!  This host code can be used by anyone, no club or commitment required. Let me know if you have any questions.


If you need any stamping supplies, I’d be very happy to be your Demonstrator.  Just click on the Shop Now button on the right side of the screen to go directly to my online store or contact me if you have any questions. 

Thanks for stopping by and Happy Stamping!

Akiko

  • Visit my online store here
  • See the current Stampin’ Up! clearance rack specials here
  • Earn FREE Stampin’ Up! products through my Wildflower Frequent Shopper Program – my way of saying thank you to my online frequent shopper customers.
  • Have any questions? I’d be happy to help, click here to contact me.

Cardstock Cuts for this project:

  • Flirty Flamingo – 4-1/4″ x 11″ card base, scored at 5-1/2″
  • Highland Heather – 3-1/2″ x 3-1/2″ (die cut circle)
  • Petal Pink Glimmer – 1-1/4″ x 4″ (banners)
  • Petal Pink – 1-1/2″ x 3″ (label)
  • Basic White – 4″ x 5-1/4″ (inside panel), 2-3/4″ x 6-1/2″ (die cut flowers), 2″ x 6″ (die cut leaf clusters)
  • Flowering Zinnias DSP – 4-1/4″ x 5-1/2″ (front background), 1/2″ x 4″ (inside trim)

Stampin’ Up! products used in this project: