Stampin’ Up! Regal Flora Thank You Card

Good morning and Happy December! The Regal Winter designer series paper is so beautiful and it goes perfectly with the Stampin’ Up! Regal Flora bundle. This bundle has pretty flowers and sentiments and the dies include a beautiful label die. I used the bundle and DSP to make a Thank You card. You can find the products I used at the bottom of my post along with the card stock sizes.

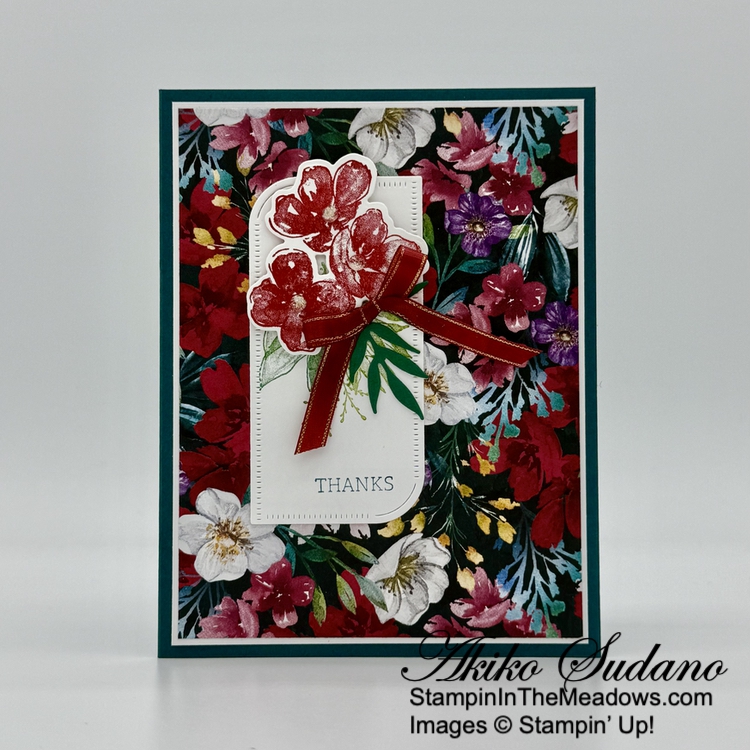
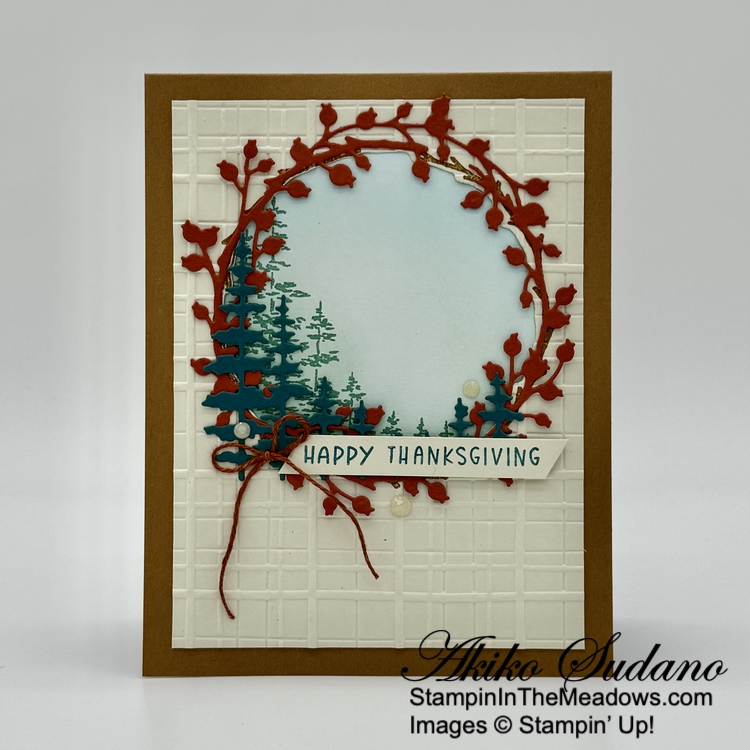
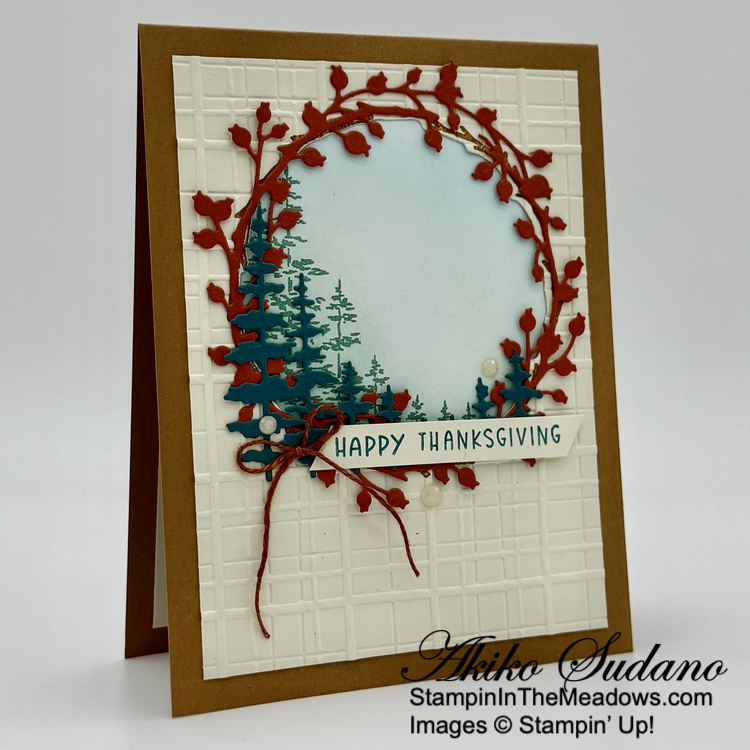
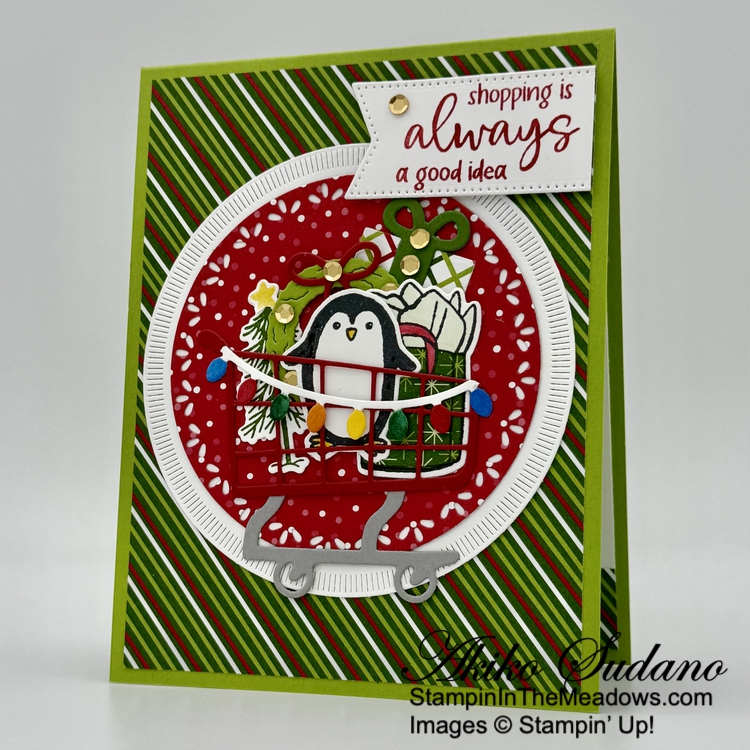
I adhered a panel of Regal Winter designer series paper to a Basic White mat and then to the front of a Pretty Peacock card base with liquid glue.

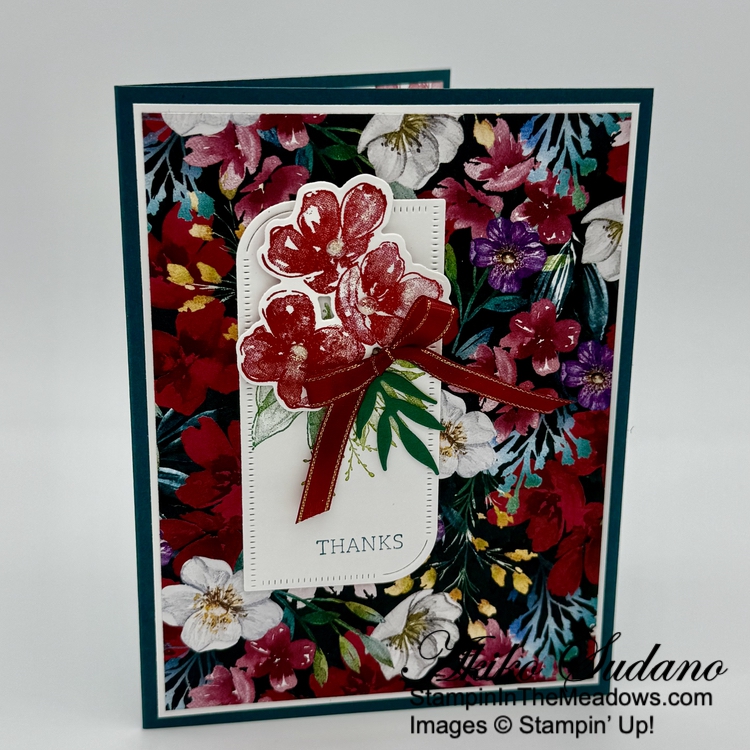
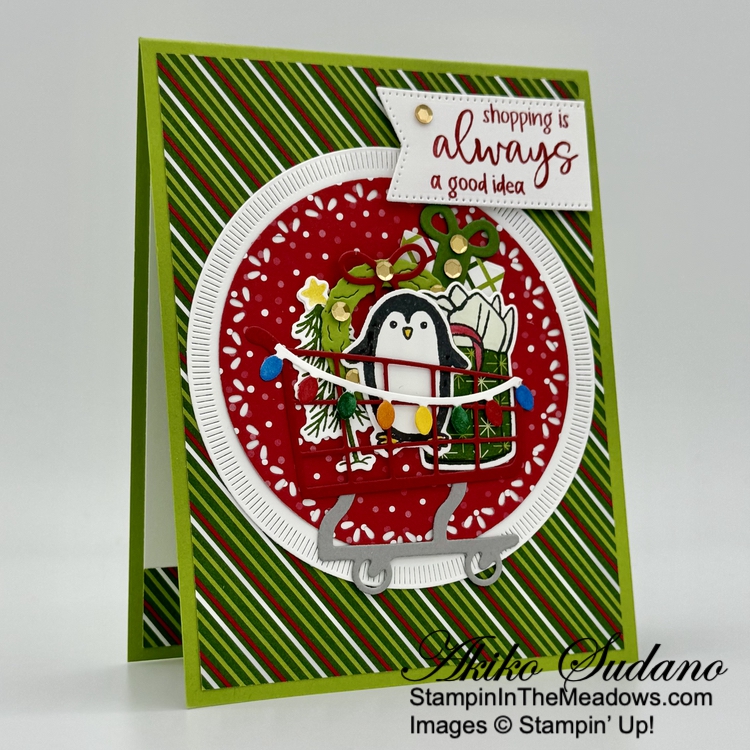
I cut the pretty label die from the Stampin’ Up! Regal Flora dies from Basic White and stamped the leaf and twig cluster in Granny Apple Green. I stamped the sentiment using Pretty Peacock ink and adhered the label to the card with liquid glue.

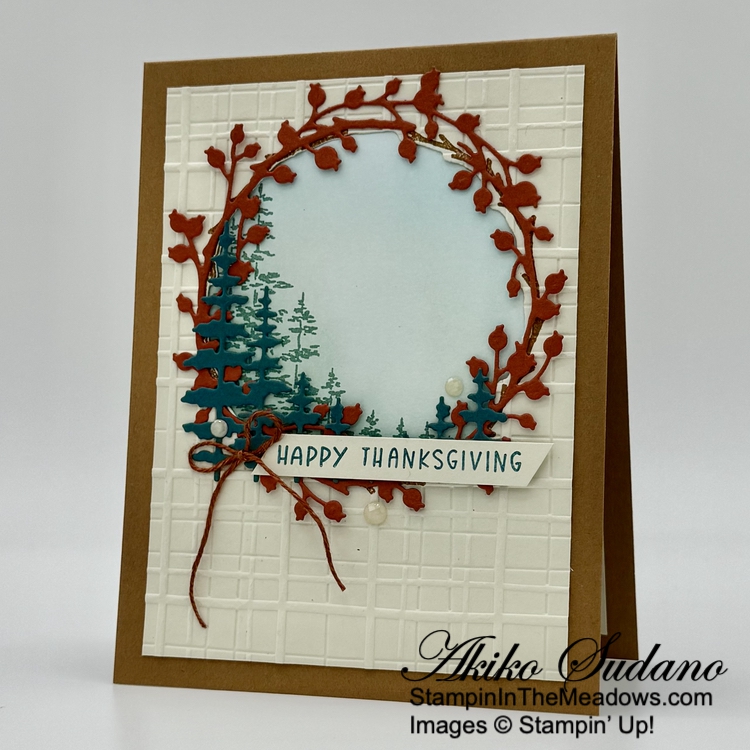
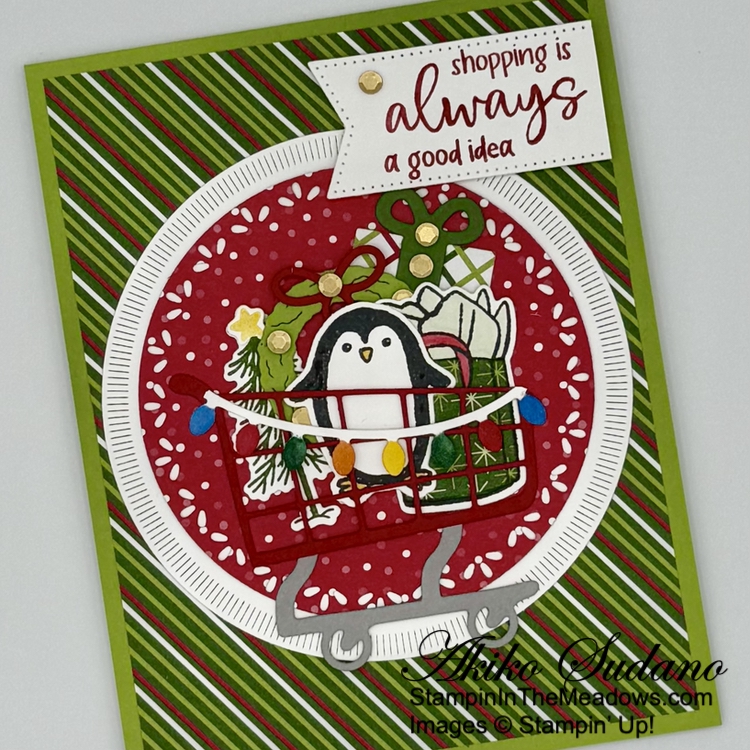
I stamped the triple flower cluster from the Stampin’ Up! Regal Flora stamp set using Real Red ink on Basic White andcut them out with the coordinating die. I adhered the flowers to the label with dimensionals. I used the Layers of Beauty dies to cut the long skinny leaf sprigs from Shaded Spruce and adhered them under the flowers with liquid glue. I finished with a Cherry Cobbler bow and iridescent foil gems in the flower centers.

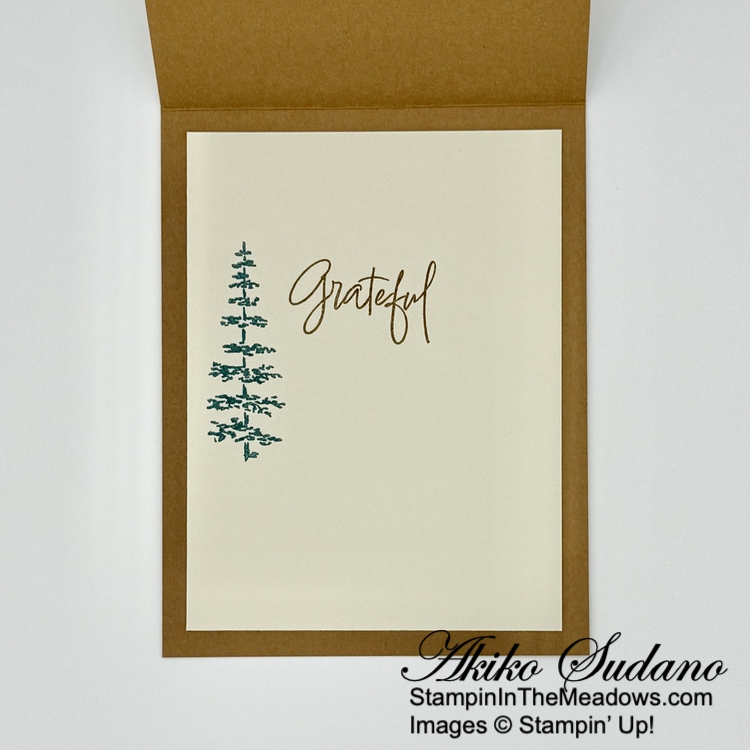
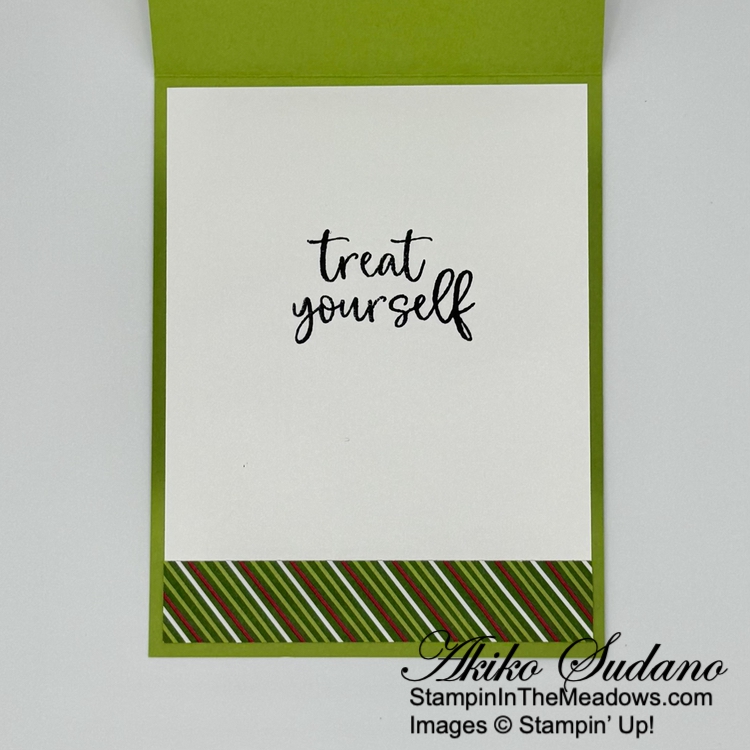
For the inside of the card, I stamped the flowers from the Stampin’ Up! Regal Flora stamp set using Real Red ink in the corner of a Basic White panel. I trimmed the bottom with DSP and adhered the panel the inside of the card with Stampin’ Seal.

The Regal Winter designer series paper is so rich and colorful, it’s just beautiful! It’s perfect for making quick cards and the Stampin’ Up! Regal Flora bundle stamps and dies make the perfect embellishments.


Designer Series Paper Special Release Coming December 3, 2024

As a special release, Stampin’ Up! is offering three previously released Designer Series Papers with a twist: they’ve recolored them! Here are the papers:

  • Serene Love is recolored from True Love.
  • Refreshed Beauty is recolored from Blackberry Beauty.
  • Shades & Hues is recolored from Color Theory.

These paper packs will be available in the Online Exclusives category of the Online Store while supplies last. Click on the picture below to download a brochure with the details:


Current Host Code: VT29C2UC

Use this host code when you order $50 or more and receive a Thank You gift from me!  The free gift is your choice of any item currently available valued up to $10.00.

If your order is over $150, please do not use the host code since you’ll receive your own Host Dollars plus I’ll still send you the Thank You gift!  This host code can be used by anyone, no club or commitment required. Let me know if you have any questions.


If you need any stamping supplies, I’d be very happy to be your Demonstrator.  Just click on the Shop Now Button on the right side of the screen to go directly to my Online store or contact me if you have any questions.  Happy Stamping!

Thanks for stopping by and have a great day!

Akiko

  • Visit my online store here
  • See the current Stampin’ Up! clearance rack specials here
  • Earn FREE Stampin’ Up! products through my Wildflower Frequent Shopper Program – my way of saying thank you to my online frequent shopper customers.
  • Have any questions? I’d be happy to help, click here to contact me.

Cardstock Cuts for this project:

  • Pretty Peacock – 5-1/2″ x 8-1/2″ card base, scored at 4-1/4″
  • Shaded Spruce – 1-4/4″ x 2″ (die cut leaf sprigs)
  • Basic White – two 4″ x 5-1/4″ panels (inside panel and front mat), 2-1/2″ x 4″ (label), 2″ x 2-1/4″ (flowers
  • Regal Winter DSP – 3-7/8″ x 5-1/8″ (front background), 1-1/2″ x 4″ (inside trim)

Stampin’ Up! products used in this project:


Stampin’ Up! Attention Shoppers Card

Good Morning and Happy Black Friday! I used to always go shopping on Black Friday – crazy isn’t it! I’m not crazy anymore, but I just had to use the Stampin’ Up! Attention Shoppers bundle to make a card to celebrate the day. You can find the products I used at the bottom of my post along with the card stock sizes.

I adhered a panel of Take a Bow 6″ x 6″ designer series paper to the front of a Granny Apple Green card base. I used the circle dies from the Spotlight On Nature dies to cut Basic White and Real Red Take a Bow DSP circles, adhered them together and adhered them to the card. I stamped the Christmas Tree and star from the Reindeer Fun stamp set and used the dies to cut it them out, along with a Granny Apple Green wreath, Real Red bow and Garden Green bow. I cut a rectangle present and assembled the tree, wreath and present, decorating them with gold sequins.

I stamped the shopping bag from the Stampin’ Up! Attention Shoppers stamp set using Memento Tuxedo Black ink on Basic White and stamped it again on a DSP panel. I fussy cut the DSP panel and adhered it to the bag with liquid glue. I colored the handles with the Real Red Stampin’ Blend and the tissue with the Soft Sea Foam Stampin’ Blend. I stamped the penguin from the Snowy Wonder stamp set (because I need a Squishmallow) and colored it’s beak and feet with the Daffodil Delight Stampin’ Blend. I arranged all my goodies on the card to fit in the shopping cart and adhered them with glue dots.

I cut the shopping cart dies from the Stampin’ Up! Attention Shoppers dies from Real Red and Smoky Slate and adhered them to the card with glue dots. I cut the Reindeer Fun light string from Basic White and used Azure Afternoon, Shaded Spruce, Real Red, Daffodil Delight Stampin’ Blends to color the lights. I adhered the lights to the shopping card, trimming the ends. I stamped the sentiment using Real Red ink on Basic White and cut it out with the Stylish Shapes dies large banner. I adhered it to the card with dimensionals and finished with a gold sequin.

For the inside of the card, I stamped the sentiment from the Stampin’ Up! Attention Shoppers stamp set using Memento Tuxedo Black in ink on a Basic White panel. I trimmed the bottom with DSP and adhered the panel to the inside of the card with Stampin’ Seal.

It was so much fun to fill my shopping cart with Christmas goodies. The best part was that there was no crowd, traffic or long checkout lines, thanks to the Stampin’ Up! Attention Shoppers bundle! Take care – it’s only going to get crazier out there, so remember to have fun and treat yourself! I think I need to add the bottle of wine to the cart!


Last Chance Products Arrive December 3, 2024!

Stampin’ Up! is making some changes to their product retirement process. They are introducing a new Last Chance Products category in the Online Store on December 3, 2024. This will include retiring products from the current 2024 September-December Mini Catalog and Online Exclusives items that are being discontinued. The Last Chance Products category will replace the current Clearance Rack and will be updated every two months.

Here are the details:

  • Last Chance Products include retiring products from both catalogs and online releases, excluding Paper Pumpkin.
  • Last Chance Products are available while supplies last and will be discontinued when they sell out. Items will be automatically removed from the category and the online store when they are discontinued.
  • Discounts vary and are subject to change. Also, depending on inventory, these products may or may not have discounts.
  • The Last Chance Products category will be updated every other month. Updates happen at the beginning of the month and may include additional products in the category and any adjustments to product discounts.

This change aligns with Stampin’ Up!’s product release strategy of new Online Exclusives every two months and unifies the retirement process for Online Exclusive and Catalog products. The goal is to keep product offerings fresh, trendy and exciting for Stampin’ Up! customers.


Current Host Code: GBVHGQ4W

Use this host code when you order $50 or more and receive a Thank You gift from me!  The free gift is your choice of any item currently available valued up to $10.00.

If your order is over $150, please do not use the host code since you’ll receive your own Host Dollars plus I’ll still send you the Thank You gift!  This host code can be used by anyone, no club or commitment required. Let me know if you have any questions.


If you need any stamping supplies, I’d be very happy to be your Demonstrator.  Just click on the Shop Now Button on the right side of the screen to go directly to my Online store or contact me if you have any questions.  Happy Stamping!

Thanks for stopping by and have a great day!

Akiko

  • Visit my online store here
  • See the current Stampin’ Up! clearance rack specials here
  • Earn FREE Stampin’ Up! products through my Wildflower Frequent Shopper Program – my way of saying thank you to my online frequent shopper customers.
  • Have any questions? I’d be happy to help, click here to contact me.

Cardstock Cuts for this project:

  • Granny Apple Green – 4-1/4″ x 11″ card base, scored at 5-1/2″, 1-1/2″ x 1-1/2″ (die cut wreath)
  • Real Red – 2″ x 3″ (shopping cart), 1″ x 1″ (wreath bow)
  • Smoky Slate – 1-1/4″ x 2″ (shopping cart wheels)
  • Garden Green – 1″ x 1″ (present bow)
  • Basic White – 4″ x 5-1/4″ (inside panel), 4″ x 4″ (die cut circle), 1-1/4″ x 2-1/2″ (label), 1-3/4″ x 5″ (die cut tree, shopping bag and penguin), 1″ x 3″ (lights)
  • Take A Bow 6″ x 6″ DSP – 4″ x 5-1/4″ (front background), 3-1/2″ x 3-1/2″ (die cut circle), 1-1/4″ x 1-1/2″ (fussy cut shopping bag), 1/2″ x 1″ (wrapped present), 3/4″ x 4″ (inside trim)

Stampin’ Up! products used in this project:


Stampin’ Up! Encircled In Nature for the Happy Inkin’ Thursday Blog Hop

Happy Thanksgiving and welcome to the Happy Inkin’ Thursday Blog Hop! I used the pretty Stampin’ Up! Encircled in Nature bundle to make a Thanksgiving card for today. You can find the supplies I used along with card stock cuts at the bottom of my post.

We have a theme challenge this week and my Thanksgiving card fits with the theme. Yay!

I stamped the twig wreath from the Stampin’ Up! Encircled in Nature stamp set on a Basic Beige panel and cut the inside out with the coordinating die. I embossed the panel with the Forever Plaid 3D embossing folder. I used Blending Brushes to color a sky on the Basic White panel using Pool Party and Balmy Blue inks. I blended some Lost Lagoon ink at the bottom and stamped the Trees using Pretty Peacock ink.

I adhered the stamped panel to the back of the embossed panel using liquid glue in the corners and then adhered the layered panel to the front of a Pecan Pie card base. I cut the berry wreath using the large die from the Stampin’ Up! Encircled in Nature dies from Cajun Craze and adhered it around the circle glue dots. I cut the two sets of tree line dies from Pretty Peacock and adhered them to the bottom of the circle with glue dots.

I stamped the sentiment using Pretty Peacock ink on Basic Beige. I used the ‘Happy‘ from the Labeled with Love stamp set and the ‘Thanksgiving‘ from the Choose Happy stamp set. I was surprised and pleased that the fonts work together as well as they do and I was glad to have a greeting small enough to work with the card. I finished the front with Basic Beige shimmer gems and a Copper Clay linen thread bow.

For the inside panel, I stamped the large evergreen from the Stampin’ Up! Encircled in Nature stamp set using Pretty Peacock ink on Basic Beige. I stamped the sentiment from the Iconic Imagery stamp set using Pecan Pie ink next to the tree and adhered the panel to the inside of the card with Stampin’ Seal.

Thanks so much for stopping by today!! I hope you have a Happy Thanksgiving, surrounded by loved ones!

On with the Hop! Click on the Next Blog button to move forward to see the beautiful project Karen Ksenzakovic has created.

If you get lost along the way, here are the participants for the hop:


Current Host Code: GBVHGQ4W

Use this host code when you order $50 or more and receive a free gift from me!  The free gift is your choice of any item currently available valued up to $10.00!

If your order is over $150, please do not use the host code since you’ll receive your own Host Dollars plus I’ll still send you the free gift!  This host code can be used by anyone, no club or commitment required. Let me know if you have any questions.


If you need any stamping supplies, I’d be very happy to be your Demonstrator.  Just click on the Shop Now button on the right side of the screen to go directly to my online store or contact me if you have any questions. 

Thanks for stopping by and Happy Stamping!

Akiko

  • Visit my online store here
  • See the current Stampin’ Up! clearance rack specials here
  • Earn FREE Stampin’ Up! products through my Wildflower Frequent Shopper Program – my way of saying thank you to my online frequent shopper customers.
  • Have any questions? I’d be happy to help, click here to contact me.

Cardstock Cuts for this project:

  • Pecan Pie – 4-1/4″ x 11″ card base, scored at 5-1/2″
  • Pretty Peacock – 2-1/4″ x 2-1/2″ (die cut trees)
  • Cajun Craze – 4″ x 4″ (die cut wreath)
  • Basic White – 3-3/4″ x 3-3/4″ (circle background)
  • Basic Beige – two 3-3/4″ x 5″ panels (inside panel and front embossed background), 3/8″ x 3″ (label)

Stampin’ Up! products used in this project:


Stampin’ Up! Reindeer Fun Christmas Money Holder

Good Morning! One of the things that I need for Christmas are money holders. You know the story, Grandma doesn’t know what the kids are interested in, so she sends money so that they can get something they really want. And I guess I’m kind of old fashioned, because I think of sending money instead of gift cards or Amazon codes, so I decided I would make money holders and use the seriously cute Stampin’ Up! Reindeer Fun die cut reindeer. You can find the products I used at the bottom of my post along with the card stock sizes.

I used a 8-1/2″ x 7″ Poppy Parade panel, scored at 2″ and 5-1/4″ on the long side to make the base. I used Tear & Tape along the sides to secure the inside pocket and cut Garden Green mats for the pretty holly pattern in the Snowy Scenes designer series paper. I adhered the DSP to the mats and adhered them to the front and pocket.

I used the cute die cut reindeer from the Stampin’ Up! Reindeer Fun dies as the focal point for my money holder. I used Early Espresso, Basic Beige and Pecan Pie to make the reindeer and Poppy Parade for his nose. I did cut two extra Basic Beige ovals so that his snout and nose would be higher than his face. After assembling the deer, I cut a Garden Green wreath and Poppy Parade bow and adhered it to the deer with glue dots.

I used the Stylish Shapes dies to cut a Pool Party circle and adhered the deer to the circle with glue dots. I used a Spotlight on Nature circle die to cut a Poppy Parade panel and adhered it to the front with liquid glue. I taped a long length of Real Red Baker’s twine to the center and tied a bow at the bottom. I adhered the deer on top with dimensionals.

For the inside of the money holder, I stamped the sentiment from the Stampin’ Up! Reindeer Fun stamp set using Poppy Parade ink on a Pool Party strip and cut it out with the Stylish Shapes die. I adhered the label to the pocket with liquid glue. I stamped the longer sentiment using Poppy Parade ink on a Basic White panel. I stamped the holly leaves in Garden Green and the berries in Poppy Parade. I adhered the panel to a Garden Green mat and then to the top flap of the money holder.

The little deer is so cute and really looks impressive in person! It’s sure to delight anyone receiving money at Christmas.


Current Host Code: GBVHGQ4W

Use this host code when you order $50 or more and receive a Thank You gift from me!  The free gift is your choice of any item currently available valued up to $10.00.

If your order is over $150, please do not use the host code since you’ll receive your own Host Dollars plus I’ll still send you the Thank You gift!  This host code can be used by anyone, no club or commitment required. Let me know if you have any questions.


If you need any stamping supplies, I’d be very happy to be your Demonstrator.  Just click on the Shop Now Button on the right side of the screen to go directly to my Online store or contact me if you have any questions.  Happy Stamping!

Thanks for stopping by and have a great day!

Akiko

  • Visit my online store here
  • See the current Stampin’ Up! clearance rack specials here
  • Earn FREE Stampin’ Up! products through my Wildflower Frequent Shopper Program – my way of saying thank you to my online frequent shopper customers.
  • Have any questions? I’d be happy to help, click here to contact me.

Cardstock Cuts for this project:

  • Poppy Parade – 7″ x 8-1/2″ base, scored at 2″ and 5-1/4″, 3″ x 3″ (die cut circle), 1″ x 1″ (die cut bow)
  • Garden Green – two 3″ x 6-3/4″ panels (front and inside mats), 1-3/4″ x 6-3/4″ (pocket DSP mat), 1-1/2″ x 1-1/2″ (die cut wreath)
  • Early Espresso – 1-3/4″ x 2-1/4″ (die cut deer w/ antlers)
  • Basic Beige – 1-3/4″ x 1-3/4″ (die cut deer – middle layer)
  • Pecan Pie – 1-3/4″ x 1-3/4″ (die cut deer – top layer)
  • Pool Party – 2-1/2″ x 2-1/2″ (die cut circle), 1-1/4″ x 3″ (label)
  • Basic White – 2-3/4″ x 6-1/2″ (inside panel)
  • Snowy Scenes DSP – 2-3/4″ x 6-1/2″ (front background), 1-1/2″ x 6-1/2″ (pocket background)

Stampin’ Up! products used in this project:


Stampin’ Up! November Paper Pumpkin Kit – Filled With Joy

Good Morning! Last week I got my November Paper Pumpkin kit – Filled With Joy and I really love those little stockings! Here are four of the stockings that I made.

Here’s the November 2024 Paper Pumpkin kit unboxing video from the Paper Pumpkin YouTube channel. It shows the kit contents and steps for making the cute stockings. To be honest, I didn’t really follow the instructions. But the instructions had had so many cute designs for stamping the ornaments and tags, that I just looked at the pictured and stamped the designs that I liked best.

The stamp set that is included has so many cute sentiments. The retro ornament theme plays well with both non-traditional colors and the traditional Christmas red and green. The muslin and Poppy Parade ticking design also goes well with rustic designs. So I used the clothes pins and embellishments from the Rustic Christmas Countdown kit to decorate some of the stockings for a different look.

These cute stockings are big enough to hold a gift card and there are enough of them that you could incorporate them into your Christmas decorations as tree ornaments or on a swag. They also coordinate with all the current Stampin’ Up! Holiday themes! I think the sweet birds from the Nests of Winter, the sweet reindeer from the Reindeer Days or the snowman and penguins from the Snowy Scenes suites would be cute substitutes if your Christmas themes don’t coordinate with retro ornaments.

The kit comes with four extra ornaments you can use for other projects. I popped one on a Basic White note card with the Pool Party tag from the kit. I covered the tag hole with a Shaded Spruce ribbon and used the merry die from the current Paper Pumpkin add-on dies to cut a Poppy Parade sentiment.

Here is the Poppy Parade ink spot and the stamp set included in the kit – see all those great sentiments!

I hope you have fun with this kit as there are so many ways to use it and the stockings inside. There’s a refill kit available – item 165641 ($12.00). I need to get back to making Christmas cards. I still have more to make and I am definitely behind this year! Happy Stamping!


The December Paper Pumpkin Kit – Notes From The Heart!

Create Cards with hand-sketched botanical designs!

Details:

  • Makes 9 projects: 3 each of 3 designs
  • Precut vellum pieces and sparkling gems
  • Scalloped card bases and coordinating envelopes
  • Blackberry Bliss Classic Stampin’ Spot

Coordinating Colors: Blackberry Bliss, Flirty Flamingo, Old Olive, Pecan Pie, Pretty in Pink, Very Vanilla

And the coordinating add-on is the Merry Tags & More dies – item #165639 for $12 (available while supplies last).

If you’re interested in subscribing to Paper Pumpkin, you can either sign up for a subscription where you are billed monthly for your kit or you can purchase a prepaid subscription in my Online Store. To see more information and to sign up for the monthly subscription click here. To see the options for prepaid subscriptions in my Online Store, click here.

Sign up deadline for the December 2024 kit is December 10, 2024. Note: Supplies may be limited toward the end of the subscription period.


Current Host Code: GBVHGQ4W

Use this host code when you order $50 or more and receive a free gift from me!  The gift is your choice of any currently available item valued up to $10.00!

If your order is over $150, please do not use the host code since you’ll receive your own Host Dollars plus I’ll still send you the free gift!  This host code can be used by anyone, no commitment required.  Let me know if you have any questions.


If you need any stamping supplies, I’d be very happy to be your Demonstrator.  Just click on the Shop Now Button on the right side of the screen to go directly to my Online store or contact me if you have any questions.  Happy Stamping!

Thanks for stopping by and have a great day!

Akiko

  • Visit my online store here
  • See the current Stampin’ Up! clearance rack specials here
  • Earn FREE Stampin’ Up! products through my Wildflower Frequent Shopper Program – my way of saying thank you to my online frequent shopper customers.
  • Have any questions? I’d be happy to help, click here to contact me.

Stampin’ Up! Prepaid Paper Pumpkin Subscription Options:


Stampin’ Up! Happy Hibiscus for the Happy Inkin’ Thursday Blog Hop

Good Morning and welcome to the Happy Inkin’ Thursday Blog Hop! I used the Stampin’ Up! Happy Hibiscus bundle to make a congratulations card for today. You can find the supplies I used along with card stock cuts at the bottom of my post.

We have a fun sketch challenge this week and my interpretation was to use the three flowers in the bundle as the flourishes!

I stamped the triple flower stamp in the Stampin’ Up! Happy Hibiscus stamp set using Poppy Parade ink on Basic White and I used stamped off Poppy Parade for the fill of each flower. I used the hybrid embossing folder and dies to cut the flowers out, but I had to cut the flowers apart before die cutting and embossing – I found it so much easier to line up the flower, die and embossed image one at a time.

I used the large leaf die from the Stampin’ Up! Happy Hibiscus dies to cut four leaves from Garden Green and adhered them to the card with glue dots. I used the sprig die from the Cheerful Daisies dies to cut two sprigs from Pecan Pie and adhered them to the card. I cut two of the small leaves from the Stampin’ Up! Happy Hibiscus dies from Lost Lagoon and adhered them. Finally I adhered the die cut/embossed flowers using glue dots on the two side flowers and dimensionals on the center flower.

I cut three small flowers from Petal Pink using the small flower die from the Stampin’ Up! Happy Hibiscus dies and adhered them to the card. I added Crumb Cake shimmer gems to the flower centers and adhered a quadruple loop linen thread bow to the bottom.

For the inside panel, I stamped the sentiment from the Stampin’ Up! Happy Hibiscus stamp set using Pecan Pie ink on Basic White. I stamped the flower twice stamped off Poppy Parade ink and the leaves in twice stamped off Garden Green ink. I adhered the panel to the inside of the card with Stampin’ Seal.

There are so many ways to color the pretty flowers in the Stampin’ Up! Happy Hibiscus bundle and so many pretty coordinating dies.

On with the Hop! Click on the Next Blog button to move forward to see the beautiful project Karen Ksenzakovic has created.

If you get lost along the way, here are the participants for the hop:


Current Host Code: GBVHGQ4W

Use this host code when you order $50 or more and receive a free gift from me!  The free gift is your choice of any item currently available valued up to $10.00!

If your order is over $150, please do not use the host code since you’ll receive your own Host Dollars plus I’ll still send you the free gift!  This host code can be used by anyone, no club or commitment required. Let me know if you have any questions.


If you need any stamping supplies, I’d be very happy to be your Demonstrator.  Just click on the Shop Now button on the right side of the screen to go directly to my online store or contact me if you have any questions. 

Thanks for stopping by and Happy Stamping!

Akiko

  • Visit my online store here
  • See the current Stampin’ Up! clearance rack specials here
  • Earn FREE Stampin’ Up! products through my Wildflower Frequent Shopper Program – my way of saying thank you to my online frequent shopper customers.
  • Have any questions? I’d be happy to help, click here to contact me.

Cardstock Cuts for this project:

  • Crumb Cake – 5-1/2″ x 8-1/2″ card base, scored at 4-1/4″
  • Petal Pink – 1″ x 3″ (die cut flowers)
  • Garden Green – 1-3/4″ x 4″ (die cut leaves)
  • Pecan Pie – 2-1/4″ x 3″ (die cut sprigs)
  • Lost Lagoon – 1-1/4″ x 2-1/2″ (die cut leaves)
  • Basic White – 4″ x 5-1/4″ (inside panel), 3″ x 4-1/2″ (flowers)
  • Perennial Lavender DSP – 4″ x 5-1/4″ (front background)

Stampin’ Up! products used in this project:


Stampin’ Up! Golden Greenery Christmas Card

Good Morning! The Stampin’ Up! Golden Greenery bundle and the Season of Green and Gold specialty designer series paper make the most elegant Christmas cards! I’ve made several Christmas cards with these items along with the beautiful Greetings of the Season sentiments and I love them all. You can find the products I used at the bottom of my post along with the card stock sizes.

I adhered a gorgeous greenery panel from the Season of Green and Gold specialty designer series paper to the front of a Very Vanilla card base. I adhered another panel to a Mossy Meadow mat and adhered it to the card front with dimensionals.

I used the pine outline die from the Stampin’ Up! Golden Greenery dies to cut pine sprigs from the Graceful Greenery vellum and adhered them to the card with glue dots. I cut a greenery sprig from the Season of Green and Gold specialty designer series paper with the coordinating die and adhered it to the card with glue dots. The dies from the Stampin’ Up! Golden Greenery bundle can cut some of the images from both of these DSP packs – I love it!

I stamped the sentiments from the Greetings of the Season stamp set using Versamark ink on Old Olive card stock. I sprinkled it with Gold embossing powder and shook off the excess. I heated the powder with my heat tool until it was bright and shiny. I cut it out with the Labeled with Love die and adhered it to the card with dimensionals. I finished the card with gold faceted gems and a gold thread bow.

For the inside of the card, I stamped the sentiment from the Greetings of the Season stamp set using Mossy Meadow ink on a Basic White panel. I stamped the leaf sprig with the stem from the Stampin’ Up! Golden Greenery stamp set using Old Olive ink and the berries in Wild Wheat. For both of these, I used full strength ink on one stamp and stamped off ink on the second stamp. I trimmed the bottom with DSP and adhered the panel to the inside of the card with Stampin’ Seal. I wasn’t sure about mixing Very Vanilla and Basic White, but it’s done in the DSP and so I went ahead and tried it for my inside panel. What do you think?

Another elegant Christmas card made with the Stampin’ Up! Golden Greenery bundle and Season of Green and Gold DSP.


Current Host Code: GBVHGQ4W

Use this host code when you order $50 or more and receive a Thank You gift from me!  The free gift is your choice of any item currently available valued up to $10.00.

If your order is over $150, please do not use the host code since you’ll receive your own Host Dollars plus I’ll still send you the Thank You gift!  This host code can be used by anyone, no club or commitment required. Let me know if you have any questions.


If you need any stamping supplies, I’d be very happy to be your Demonstrator.  Just click on the Shop Now Button on the right side of the screen to go directly to my Online store or contact me if you have any questions.  Happy Stamping!

Thanks for stopping by and have a great day!

Akiko

  • Visit my online store here
  • See the current Stampin’ Up! clearance rack specials here
  • Earn FREE Stampin’ Up! products through my Wildflower Frequent Shopper Program – my way of saying thank you to my online frequent shopper customers.
  • Have any questions? I’d be happy to help, click here to contact me.

Cardstock Cuts for this project:

  • Very Vanilla – 4-1/4″ x 11″ card base, scored at 5-1/2″
  • Mossy Meadow – 3″ x 4″ (DSP mat)
  • Old Olive – 1-1/2″ x 3″ (label)
  • Basic White – 3-3/4″ x 5″ (inside panel)
  • Graceful Greenery Vellum – die cut pine sprigs
  • Season of Green & Gold specialty DSP – 4″ x 5-1/4″ (front background), 2-3/4″ x 3-3/4″ (center panel), 1/2″ x 3-3/4″ (inside trim)

Stampin’ Up! products used in this project:


Stampin’ Up! Autumn Expressions Card

Happy Saturday Morning! The Stampin’ Up! Autumn Expressions bundle is one of the pretty fall bundles the last mini catalog and it goes so well with the beautiful Splendid Autumn designer series paper. The weather has turned cold, so I was inspired to pull these out and make a fall friendship card. You can find the products I used at the bottom of my post along with the card stock sizes.

I adhered a pretty fall landscape panel of Splendid Autumn designer series paper to the right side of a Wild Wheat mat. I embossed a strip of Cajun Craze card stock with the Distressed Tile 3D embossing folder and adhered it to the left side. I wrapped a length of Garden Green Linen Thread around the seam and made a bow and popped the layered panel on the front of a Copper Clay card base.

I adhered two gold metallic mesh leaves to the card with glue dots. I used the leaf dies from the Stampin’ Up! Autumn Expressions dies to cut Cajun Craze and Garden Green card stock. I cut a maple leaf using the Autumn Leaves dies and adhered the leaves on top of the mesh leaves with glue dots and dimensionals.

I stamped the sentiment from the Stampin’ Up! Autumn Expressions stamp set using Cajun Craze ink on Wild Wheat. I cut it out with the small label die from the Iconic Images dies and adhered it to the card glue dots. I finished the card with faux glass gems.

For the inside of the card, I stamped the sentiment from the Stampin’ Up! Autumn Expressions stamp set Cajun Craze ink on a Basic White panel. I stamped the oak leaves using twice stamped off Pecan Pie ink and the wood cut using stamped off Basic Beige ink. I adhered the panel to the inside of the card with Stampin’ Seal.

The Splendid Autumn designer series paper has such pretty landscapes that you can make pretty Fall cards real quick! And the pretty sentiments and die cuts from the Stampin’ Up! Autumn Expressions bundle make nice embellishments to customize the cards and make them extra special!


Current Host Code: GBVHGQ4W

Use this host code when you order $50 or more and receive a Thank You gift from me!  The free gift is your choice of any item currently available valued up to $10.00.

If your order is over $150, please do not use the host code since you’ll receive your own Host Dollars plus I’ll still send you the Thank You gift!  This host code can be used by anyone, no club or commitment required. Let me know if you have any questions.


If you need any stamping supplies, I’d be very happy to be your Demonstrator.  Just click on the Shop Now Button on the right side of the screen to go directly to my Online store or contact me if you have any questions.  Happy Stamping!

Thanks for stopping by and have a great day!

Akiko

  • Visit my online store here
  • See the current Stampin’ Up! clearance rack specials here
  • Earn FREE Stampin’ Up! products through my Wildflower Frequent Shopper Program – my way of saying thank you to my online frequent shopper customers.
  • Have any questions? I’d be happy to help, click here to contact me.

Cardstock Cuts for this project:

  • Copper Clay – 4-1/4″ x 11″ card base, scored at 5-1/2″
  • Wild Wheat – 4″ x 5-1/4″ (front mat), 1″ x 2″ (label)
  • Cajun Craze – 7/8″ x 5-1/8″ (embossed strip), 1″ x 1-1/2″ (die cut leaf)
  • Daffodil Delight – 1-3/4″ x 1-3/4″ (die cut leaf)
  • Garden Green – 1″ x 1-3/4″ (die cut leaf)
  • Basic White – 4″ x 5-1/4″ (inside panel)
  • Splendid Autumn 6″ x 6″ DSP – 3″ x 5-1/8″ (front background)

Stampin’ Up! products used in this project:


Stampin’ Up! Sophisticated Sled for the Happy Inkin’ Thursday Blog Hop

Good Morning and welcome to the Happy Inkin’ Thursday Blog Hop! Here’s a Christmas card with the pretty Stampin’ Up! Sophisticated Sled bundle with the pretty Nests of Winter designer series paper in a book Z-fold card. I used the awesome die cut sled and skates reminiscent of Christmas door front displays. You can find the supplies I used along with card stock cuts at the bottom of my post.

We have a color challenge this week and I used most of the colors in the card:

I scored and burnished the folds in the card base and glued the left side together to make the book bind end. I adhered panels of the Nests of Winter designer series paper to the ends and middle panel with liquid glue. I embossed the light side of the Pool Party two tone card stock (from the Scrapbooking Brochure) with the Snowflake Sky 3D embossing folder and adhered it to a panel of Pool Party card stock. I adhered the layered embossed panel to the center flap of the Z-fold, centering it on the card front. I love the embossed light Pool Party against the panel!

I die cut the sections of the sled and skates using the dies from the Stampin’ Up! Sophisticated Sled bundle. I used Real Red for the sled rails and Pecan Pie for the slats. For the skates, I used Real Red for the laces, silver foil for the blades and Basic White for the boots. I also cut two of the greenery boughs using Granny Apple Green and Garden Green card stock. I assembled the skates and sled with liquid glue. I tied a short length of Linen Thread to the sled handles (through the little holes on the side) and adhered the skates to a short length of Linen Thread and to the sled with glue dots. I adhered the Garden Green bough to the sled with a glue dot and cut the Granny Apple Green bough in half before adhering it . I finished with the triple berries.

I adhered the decorated sled to the middle section of the card with dimensionals. I stamped the sentiment from the Stampin’ Up! Sophisticated Sled stamp set in Real Red ink on a Pool Party panel and cut it out with the small banner die from the Stylish Shapes dies. I adhered it to the card with glue dots and dimensionals.

For the inside panel, I stamped the sentiment from the Stampin’ Up! Sophisticated Sled stamp set using Real Red ink on Basic White. I stamped the cardinal in Memento Tuxedo Black ink and colored it with the Real Red and Daffodil Delight Stampin Blends. I adhered the panel to the inside of the card with Stampin’ Seal next to the DSP strip.

The Stampin’ Up! Sophisticated Sled bundle is just beautiful and definitely one of my all time favorites! The die cut sled is so realistic and well done and it’s pretty easy and fun to assemble. I used to decorate my husband’s childhood sled and prop it on the front porch for Christmas, and it looked pretty much like this one.

On with the Hop! Click on the Next Blog button to move forward to see the beautiful project Karen Ksenzakovic has created.

If you get lost along the way, here are the participants for the hop:


Current Host Code: GBVHGQ4W

Use this host code when you order $50 or more and receive a free gift from me!  The free gift is your choice of any item currently available valued up to $10.00!

If your order is over $150, please do not use the host code since you’ll receive your own Host Dollars plus I’ll still send you the free gift!  This host code can be used by anyone, no club or commitment required. Let me know if you have any questions.


If you need any stamping supplies, I’d be very happy to be your Demonstrator.  Just click on the Shop Now button on the right side of the screen to go directly to my online store or contact me if you have any questions. 

Thanks for stopping by and Happy Stamping!

Akiko

  • Visit my online store here
  • See the current Stampin’ Up! clearance rack specials here
  • Earn FREE Stampin’ Up! products through my Wildflower Frequent Shopper Program – my way of saying thank you to my online frequent shopper customers.
  • Have any questions? I’d be happy to help, click here to contact me.

Cardstock Cuts for this project:

  • Pool Party – 5-1/2″ x 8-1/2″ card base, scored at 4-1/4″, 5-1/4″ and 7″, 3″ x 5-1/2″ (front Z-fold panel), 1-1/4″ x 2″ (label)
  • Light Pool Party – 2-3/4″ x 5-1/4″ (embossed panel)
  • Garden Green – 1-1/2″ x 2-1/2″ (die cut bough)
  • Granny Apple Green – 1-1/2″ x 2-1/2″ (die cut bough)
  • Real Red – 2″ x 4″ (sled rails, skate laces)
  • Pecan Pie – 2-1/4″ x 3″ (sled slats)
  • Silver Foil – 1″ x 1-1/2″ (skate blades)
  • Basic White – 2-1/4″ x 5-1/4″ (inside panel), 1-1/2″ x 2″ (skates)
  • Nests of Winter DSP – two 3/4″ x 5-1/4″ panels (side panels), 1-3/4″ x 5-1/4″ (middle panel)

Stampin’ Up! products used in this project:


Stampin’ Up! Decorative Trees for the Inkin’ Krew Blog Hop

Good Morning! Welcome to the November Inkin’ Krew Team Blog Hop! The theme for this month’s hop is “Merry Christmas or Happy Holidays” and I used the pretty Stampin’ Up! Decorative Trees bundle with the Snowy Scenes designer series paper to make a Z Fold Christmas card. You can find the supplies I used along with card stock cuts at the bottom of my post.

I scored and burnished a 5-1/2″ x 8-1/4″ Poppy Parade card base at 4-1/4″ and 7″ to make a Z fold card with a skinny front section. This 1-1/4″ front section is in the middle of the card, so I had to trim 1/4″ off the normal card length, but it’s nice and symmetric! I adhered the panels of Snowy Scenes designer series paper to the different sections of the card base.

I used the third largest octagon die from the Countryside Corners die to cut a Pool Party panel and the next smallest size to cut a Basic White panel. I embossed the Basic White panel with the Snowflake Sky 3D embossing folder and adhered it to the mat. I adhered the layered octagons to the skinny front panel with liquid glue.

I used the solid tree die from the Stampin’ Up! Decorative Trees dies to cut a Garden Green panel. I applied an adhesive sheet to the back of a Basic White panel and cut it with the snowflake overlay tree die. I pulled off the adhesive backing and adhered the snowflake overlay to the Garden Green tree. I applied adhesive sheets to the back of a Poppy Parade panel and cut the garland dies. I removed the adhesive sheet backing and adhered the garlands to the tree. I cut a Daffodil Delight star and adhered it to the top of the tree and popped the tree onto the octagons with dimensionals. I finished the tree with iridescent faceted gems.

I stamped part of the sentiment from the Stampin’ Up! Decorative Trees stamp set using Poppy Parade ink on a Pool Party panel. I cut it out with the small octagon from the Countryside Corners dies and adhered it to the skinny front panel.

For the inside of the card, I stamped the sentiment from the Stampin’ Up! Decorative Trees stamp set in Poppy Parade ink on a Basic White panel. I stamped the holly leaves and berries from the Snowy Wonder stamp set in Garden Green and Poppy Parade ink in the corner and adhered the panel to the inside of the card with Stampin’ Seal, butting it up next to the DSP trim

The Stampin’ Up! Decorative Trees bundle is one of my favorite Christmas tree bundles of all time! There are so many different looks with the overlays, and even with plain cardstock, the trees are beautiful! They’re also fun to make!!

On With The Hop! Click on the Next Blog button to move forward to Ann Louise’s project or click the Previous Blog button to move back to see the project that Christie created.

If you get lost along the way, here are the participants for the hop:

  1. Tara Carpenter 
  2. Mary Deatherage 
  3. Christie King 
  4. Akiko Sudano  <– you are here
  5. Ann Louise Fodgaard 
  6. Shirley Gentry 
  7. Karen Ksenzakovic 
  8. Sue Prather 
  9. Karen Finkle 
  10. Carol Buckalew 
  11. Amy Koenders

Current Host Code: GBVHGQ4W

Use this host code when you order $50 or more and receive a Thank You gift from me!  The free gift is your choice of any currently available item valued up to $10.00.

If your order is over $150, please do not use the host code since you’ll receive your own Host Dollars plus I’ll still send you the Thank You gift!  This host code can be used by anyone, no club or commitment required. Let me know if you have any questions.


If you need any stamping supplies, I’d be very happy to be your Demonstrator.  Just click on the Shop Now button on the right side of the screen to go directly to my online store or contact me if you have any questions.  Happy Stamping!

Thanks for stopping by and have a great week!

Akiko

  • Visit my online store here
  • See the current Stampin’ Up! clearance rack specials here
  • Earn FREE Stampin’ Up! products through my Wildflower Frequent Shopper Program – my way of saying thank you to my online frequent shopper customers.
  • Have any questions? I’d be happy to help, click here to contact me.

Cardstock Cuts for this project:

  • Poppy Parade – 5-1/2-1/4″ x 8-1/4″ card base, scored at 4-1/4″ and 7″, 1″ x 2-1/2″ (garland die cuts)
  • Pool Party – 2-3/4″ x 4-1/4″ (octagon mat), 1″ x 3″ (label)
  • Garden Green – 2-1/2″ x 3-1/2″ (die cut tree)
  • Daffodil Delight – 1″ x 1″ (die cut star)
  • Basic White – 2-1/2″ x 5-1/4″ (inside panel), 2-1/4″ x 3-3/4″ (embossed octagon), 2-1/2″ x 3-1/2″ (die cut tree overlay)
  • Snowy Scenes DSP – two 2-1/2″ x 5-1/4″ panels (front and back of middle section), 1-1/2″ x 5-1/4″ (inside trim), 1″ x 5-1/4″ (front section background)

Stampin’ Up! products used in this project: