Stampin’ Up! Autumn Leaves for the Happy Inkin’ Thursday Blog Hop

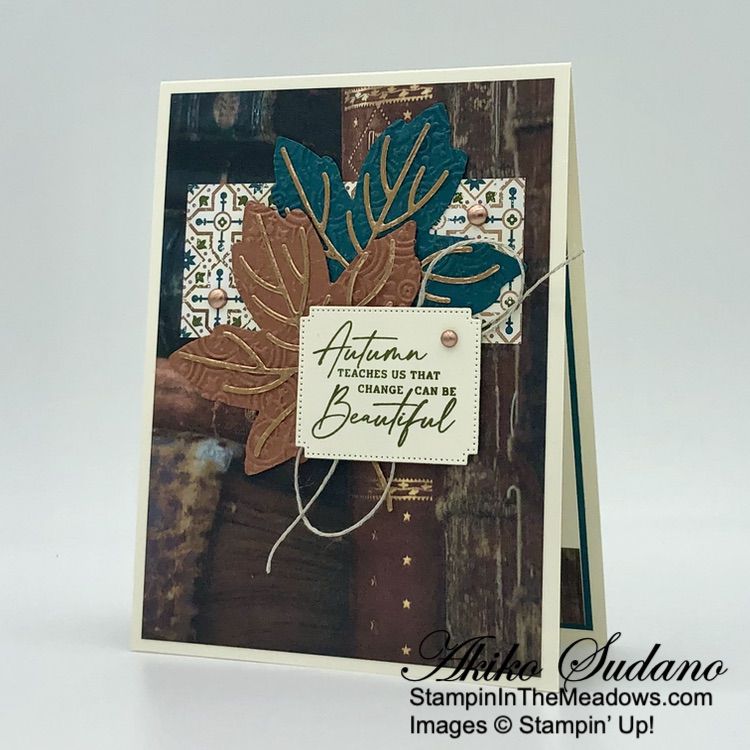
Good Morning and welcome to the Happy Inkin’ Thursday Blog Hop! Here’s another simple Thank You card made with the beautiful Stampin’ Up! Autumn Leaves bundle and the All About Autumn 6″ x 6″ specialty designer series paper. This is a very simple and elegant Z-Fold card that focuses on a beautiful woodland morning scene in the DSP. You can find the supplies I used along with card stock cuts at the bottom of my post.

We have a theme challenge this week:

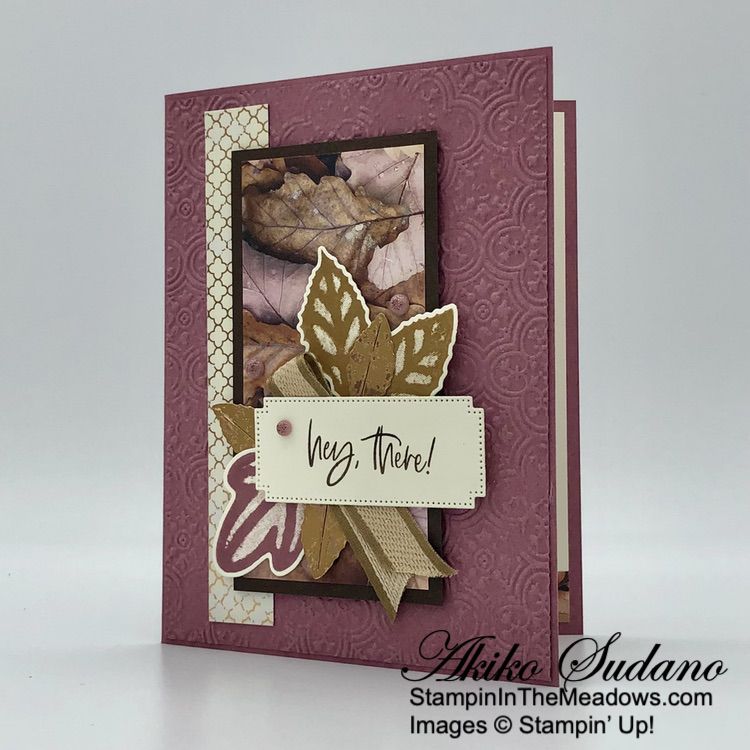
This beautiful DSP looks nice when folded, but I cut the panels so that they would flow together forming a nice wide woodland scene with the inside panel in the center. I started by cutting the bottom so that the length was 5-1/4″. Then I cut 2″ from the right side and 1-7/8″ twice. This gives me my three panels for the card and leaves little strips for my pretty scrap bin.

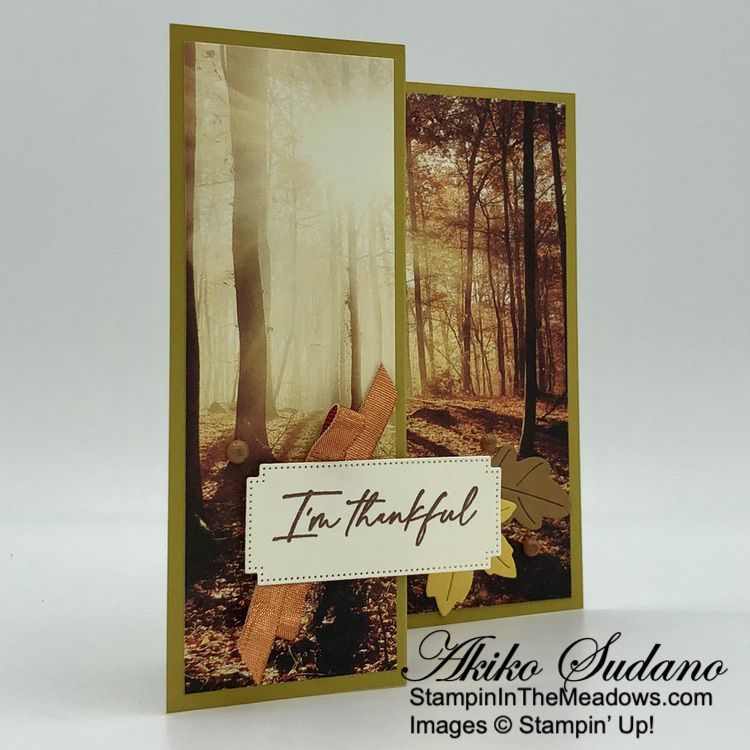
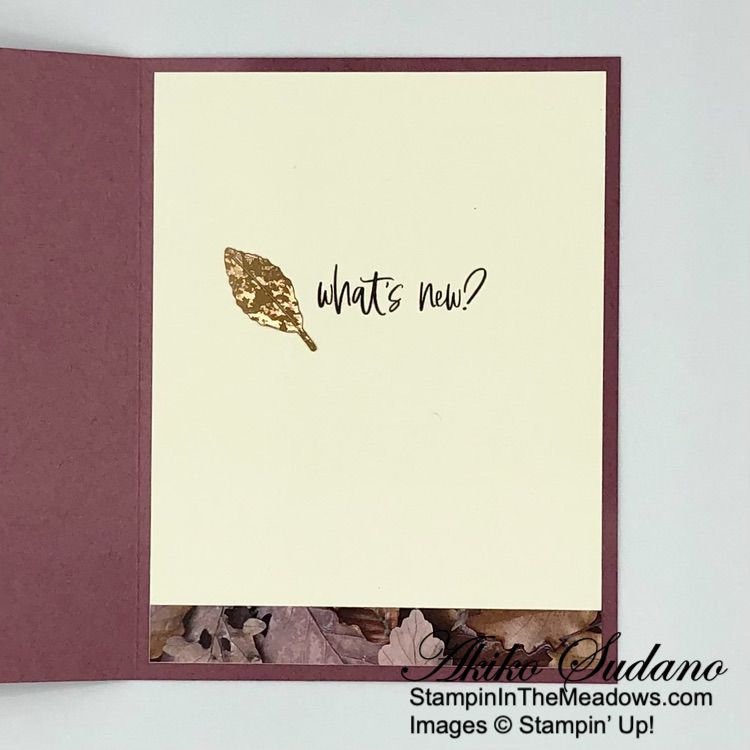
I adhered the right panel to the right side of the Very Vanilla panel and stamped the sentiment from the Stampin’ Up! Autumn Leaves stamp set in Copper Clay ink on the bottom of the Very Vanilla panel. I adhered the panel to the right side of a Wild Wheat Z-Fold card base with Stampin’ Seal.

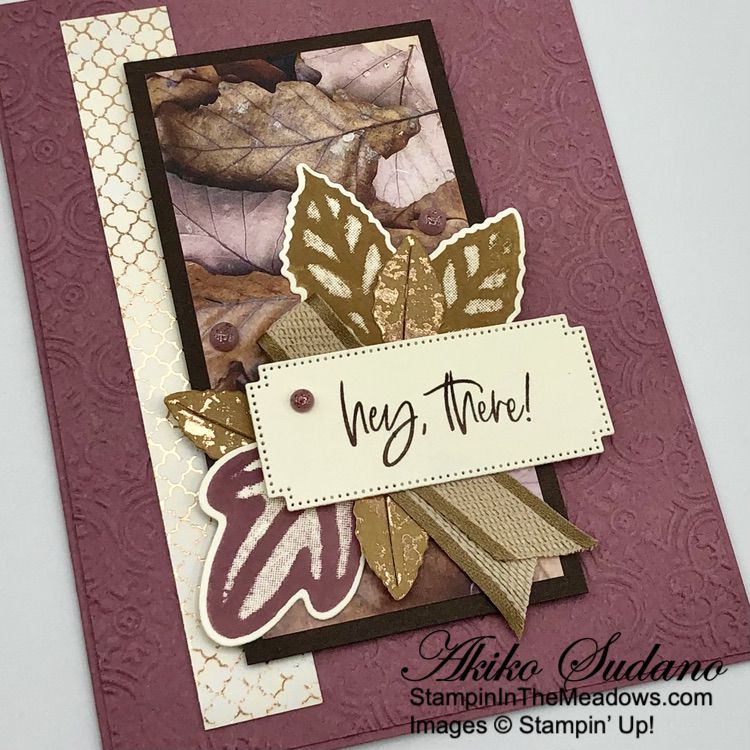
I adhered the two 1-7/8″ wide All About Autumn DSP panels to the left and middle sections of the card base with liquid glue. I stamped the sentiment from the Stampin’ Up! Autumn Leaves stamp set in Versamark ink on a Very Vanilla panel. I sprinkled it with copper embossing powder and shook off the excess. I heated it with my heat tool until it was bright and shiny and cut it out with the label die from the Stampin’ Up! Autumn Leaves dies.

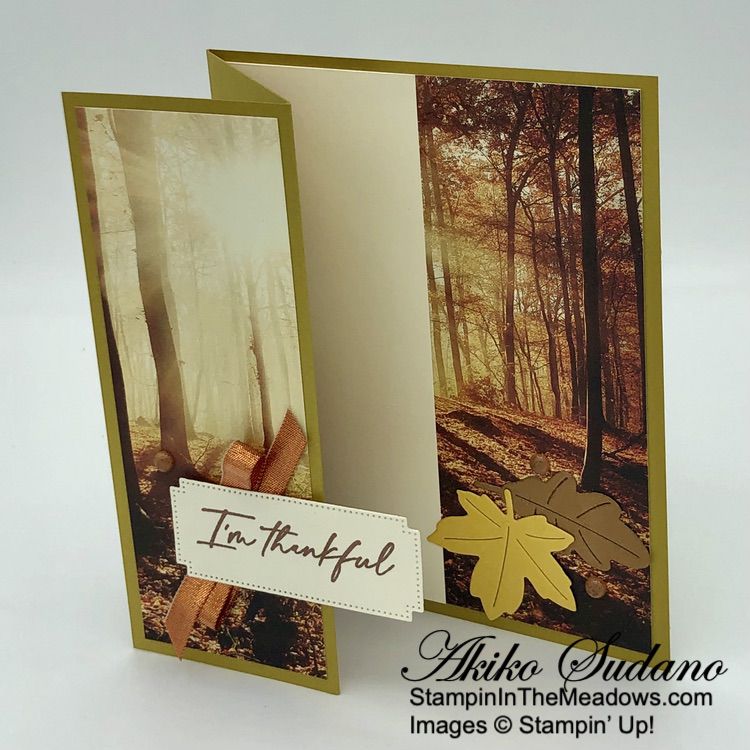
I folded a length of copper ribbon and adhered it to the back of the label with Stampin’ Seal. I adhered the label to the front flap with dimensionals. I cut Crushed Curry and Pecan Pie panels with the leaf dies from the Stampin’ Up! Autumn Leaves dies and adhered them to the right side, positioning them under the label.

I finished the card with Crumb Cake dots. The All About Autumn 6″ x 6″ specialty DSP is so pretty and it’s sad that it sold so quickly. Hopefully it will be re-stocked next week as scheduled.

On with the Hop! Click on the Next Blog button to move forward to see the beautiful project Karen Ksenzakovic has created.

If you get lost along the way, here are the participants for the hop:


Current Host Code: ATSGGVYD

Use this host code when you order $50 or more and receive a free gift from me!  The free gift is your choice of any item currently available valued up to $10.00!

If your order is over $150, please do not use the host code since you’ll receive your own Host Dollars plus I’ll still send you the free gift!  This host code can be used by anyone, no club or commitment required. Let me know if you have any questions.


If you need any stamping supplies, I’d be very happy to be your Demonstrator.  Just click on the Shop Now button on the right side of the screen to go directly to my online store or contact me if you have any questions. 

Thanks for stopping by and Happy Stamping!

Akiko

  • Visit my online store here
  • See the current Stampin’ Up! clearance rack specials here
  • Earn FREE Stampin’ Up! products through my Wildflower Frequent Shopper Program – my way of saying thank you to my online frequent shopper customers.
  • Have any questions? I’d be happy to help, click here to contact me.

Cardstock Cuts for this project:

  • Wild Wheat – 5-1/2″ x 8-1/2″ card base scored at 2-1/8″ and 4-1/4″
  • Crushed Curry – 2″ x 2″ (die cut leaf)
  • Pecan Pie – 1″ x 2″ (die cut leaf)
  • Very Vanilla – 4″ x 5-1/4″ (inside panel), 1-1/2″ x 3″ (label)
  • All About Autumn Specialty DSP – 2″ x 5-1/4″ (inside panel), two 1-7/8″ x 5-1/4″ panels (front and middle panels)

Stampin’ Up! products used in this project:


Stampin’ Up! Autumn Leaves Hello Card

Good Morning! Today is the big day – the Stampin’ Up! September-December Mini Catalog is open for ordering!! To celebrate, I made a card with the beautiful Stampin’ Up Autumn Leaves bundle and the Charming Sentiments photopolymer stamp set. You can find the products I used at the bottom of my post along with the card stock sizes.

I embossed a Moody Mauve panel with the Distressed Tile embossing folder and adhered it to the front of a Moody Mauve card base. I adhered a strip of All About Autumn specialty designer series paper to the side and adhered another panel of the DSP to an Early Espresso mat. I popped the DSP on the front of the card with dimensionals.

I stamped the leaves from the Stampin’ Up! Autumn Leaves stamp set in Moody Mauve and Pecan Pie inks on Very Vanilla and cut them out with the coordinating dies. I adhered them to the card front with glue dots. I stamped the sentiment from the Charming Sentiments in Early Espresso ink on Very Vanilla and cut it out with the label die from the Stampin’ Up! Autumn Leaves dies.

I folded a short length of Pecan Pie ribbon and adhered it to the back of the label with glue dots. I adhered the layered label to the card front with dimensionals and used a double layer of dimensionals on the right side. I cut four of the little leaf dies from the Stampin’ Up! Autumn Leaves dies from Oxidized Copper specialty paper and tucked three of them behind the label. I finished the card front with Moody Mauve dots.

For the inside of the card, I stamped the sentiment from the Charming Sentiments stamp set in Early Espresso ink on a Very Vanilla panel. I adhered the last leaf next to the sentiment with a glue dot and trimmed the bottom with a strip of All About Autumn DSP. I adhered the panel to the inside of the card with Stampin’ Seal.

The Stampin’ Up! Autumn Leaves bundle is a beautiful and versatile set. The sentiments in the stamp set are beautiful, but if you need another greeting, check your stash, because the label dies fit a lot of sentiments well, and the leaves will make beautiful Autumn cards for any occasion!


The Sept-Dec 2023 Mini Catalog is Open for Ordering!!

The time has finally arrived for the Stampin’ Up! Sept-Dec 2023 Mini Catalog to go live. I hope you have enjoyed all the sneak peeks – there are so many beautiful new products for Holiday crafting. If your lists are ready, head over to my Online Store to shop now, or click on the picture above to download a PDF of the new mini catalog to browse. Happy Shopping!


Current Host Code: ATSGGVYD

Use this host code when you order $50 or more and receive a Thank You gift from me!  The free gift is your choice of any item currently available valued up to $10.00 .

If your order is over $150, please do not use the host code since you’ll receive your own Host Dollars plus I’ll still send you the Thank You gift!  This host code can be used by anyone, no club or commitment required. Let me know if you have any questions.


If you need any stamping supplies, I’d be very happy to be your Demonstrator.  Just click on the Shop Now button on the right side of the screen to go directly to my online store or contact me if you have any questions.  Happy Stamping!

Thanks for stopping by and have a great weekend!

Akiko

  • Visit my online store here
  • See the current Stampin’ Up! clearance rack specials here
  • Earn FREE Stampin’ Up! products through my Wildflower Frequent Shopper Program – my way of saying thank you to my online frequent shopper customers.
  • Have any questions? I’d be happy to help, click here to contact me.

Cardstock Cuts for this project:

  • Moody Mauve – 5-1/2″ x 8-1/2″ card base, scored at 4-1/4″, 4-1/8″ x 5-3/8″ (embossed background)
  • Early Espresso – 2-1/4″ x 4-1/4″ (DSP mat)
  • Oxidized Copper specialty – 1-1/2″ x 3″ (die cut small leaves)
  • Very Vanilla – 4″ x 5-1/4″ (inside panel), 2″ x 5″ (stamped leaves), 1-1/2″ x 3″ (label)
  • All About Autumn 6″ x 6″ specialty DSP – 2″ x 4″ (front panel), 3/4″ x 5″ (front stripe), 1/2″ x 4″ (inside trim)

Stampin’ Up! products used in this project:


Stampin’ Up! Joy of Noel Sneak Peek

Good Morning! The Stampin’ Up! Joy of Noel bundle has beautiful holiday greenery and sentiments and I used it with the beautiful Joy of Christmas designer series paper for a Christmas card sneak peek. These products are from the new September – December Mini catalog which will open for orders on Wednesday! Yay!! You can find the currently available products I used at the bottom of my post along with the card stock sizes.

I embossed a Shaded Spruce panel with the star embossing folder from the Basics 3D embossing folders and adhered it to the front of a Shaded Spruce card base with liquid glue. I adhered a musical panel of Joy of Christmas DSP to a Real Red mat and adhered the panel to the card front with liquid glue.

I stamped the large greenery image from the Stampin’ Up! Joy of Noel photopolymer stamp set in Memento Tuxedo Black ink on a Basic White panel. I colored the Berries in Real Red Stampin’ Blends and the leaves in Granny Apple Green and Shaded Spruce Stampin’ Blends. I used the Lost Lagoon blend to trace over the pine needles to add some color there and cut the image out with the coordinating die. I popped the die cut onto the card front with dimensionals.

I stamped the sentiment from the Stampin’ Up! Joy of Noel stamp set in Versamark ink on Real Red and sprinkled it with white embossing powder. I shook off the excess and heated the powder with my heat tool until it was bright and shiny. I cut the label out with the long plain die from the Christmas Classics dies and looped some thin gold ribbon around the back, adhering it with glue dots. I adhered the label to the card front with dimensionals and glue dots and finished the card with gold pearls.

For the inside of the card, I stamped the sentiment from the Christmas Classics stamp set in Real Red ink on a Basic White panel. I stamped the greenery from the Stampin’ Up! Joy of Noel stamp set in Memento Tuxedo Black ink in the corner and colored them with Real Red and Shaded Spruce Stampin’ Blends. I adhered the panel to the inside of the card with Stampin’ Seal.

Isn’t the greenery from the Stampin’ Up! Joy of Noel stamp set pretty? It’s so easy to color with blends, but would look great in watercolor too. And I love the sentiments and can’t wait to use the large NOEL stamp! Here’s a picture of the bundle:

And here is the Christmas Classics bundle – they go so well together!

And here is the beautiful Joy of Christmas designer series paper with it’s classic Christmas Colors and patterns.

Remember that all of these new products will be available when the new Mini Catalog goes live for ordering on September 6, 2023.


Designer Series Paper Special Release Starts September 6, 2023!

A special selection of Designer Series Papers will be available in the Online Exclusives section of the Online Store beginning September 6, 2023. These papers will be available only while supplies last, so shop early to bet yours before they’re gone. Click on the image below to download a PDF with all the details including item numbers and prices.

These papers are perfect for both holiday crafting and all occasion crafting.


The September Paper Pumpkin Kit is With Love & Gratitude!

Express your love and gratitude in elegant style with the September Paper Pumpkin Kit inspired by Shelli! This kit includes eight treat packages (you can also use for small gifts) and eight miniature note cards with matching envelopes and specialty gold foil embellishments. Whether you’re needing a hostess gift, a sweet surprise for dinner guests, or have another reason to give love and thanks, this kit has you covered.

The September Kit Includes:

  • All the supplies you need to create 8 treat packages and note cards
    • 8 treat packages – Finished Size: 3-1/2″ x 5″ x 2″
    • 8 note cards – Card Size: 3-1/2″ x 3-1/2″
    • 8 coordinating envelopes
  • 1 photopolymer stamp set
  • 1 Lost Lagoon Ink Spot
  • Specialty gold foil, precut embellishments
  • Adhesives

Coordinating Colors: Copper Clay, Crumb Cake, gold foil, Lost Lagoon, Mossy Meadow, Pebbled Path

Plus, don’t miss the Thoughts of Thanks Journal! It matches both the design and intent of the kit, giving you an even more personal way to document and express your gratitude. It’s available as an add-on, but only while supplies last!

Thoughts of Thanks Journal

  • 8” x 10” journal
  • 2 specialty gold foil sticker sheets
  • Item number 163270
  • $15.00

If you’re interested in subscribing to Paper Pumpkin, you can either sign up for a subscription where you are billed monthly for your kit or you can purchase a prepaid subscription in my Online Store. To see more information and to sign up for the monthly subscription click here. To see the options for prepaid subscriptions in my Online Store, click here.

Sign up deadline for the September 2023 kit is September 10, 2023. Note: Supplies may be limited toward the end of the subscription period.


Current Host Code: ATSGGVYD

Use this host code when you order $50 or more and receive a Thank You gift from me!  The free gift is your choice of any item currently available valued up to $10.00 .

If your order is over $150, please do not use the host code since you’ll receive your own Host Dollars plus I’ll still send you the Thank You gift!  This host code can be used by anyone, no club or commitment required. Let me know if you have any questions.


If you need any stamping supplies, I’d be very happy to be your Demonstrator.  Just click on the Shop Now button on the right side of the screen to go directly to my online store or contact me if you have any questions.  Happy Stamping!

Thanks for stopping by and have a great weekend!

Akiko

  • Visit my online store here
  • See the current Stampin’ Up! clearance rack specials here
  • Earn FREE Stampin’ Up! products through my Wildflower Frequent Shopper Program – my way of saying thank you to my online frequent shopper customers.
  • Have any questions? I’d be happy to help, click here to contact me.

Cardstock Cuts for this project:

  • Shaded Spruce – 4-1/4″ x 11″ card base, scored at 5-1/2″, 4-1/4″ x 5-1/2″ (embossed background)
  • Real Red – 3-1/4″ x 3-3/4″ (DSP mat), 1-1/4″ x 4-1/2″ (label)
  • Basic White – 4″ x 5-1/4″ (inside panel), 3″ x 3-3/4″ (die cut greenery)
  • Joy of Christmas DSP – 3″ x 3-1/2″ (front background)

Stampin’ Up! products used in this project:


Stampin’ Up! Sending Cheer for the Happy Inkin’ Thursday Blog Hop

Good Morning and welcome to the Happy Inkin’ Thursday Blog Hop! Today I’m sharing another sneak peek from the upcoming September-December 2023 Mini Catalog. It’s a Christmas card made with the Stampin’ Up! Sending Cheer bundle. This is a fun bundle that’s great for making Christmas tags as well with bold Holiday images and I paired it with the new Merry Bright & Bold designer series paper. You can find the currently avaliable supplies I used along with card stock cuts at the bottom of my post.

We have a pretty sketch challenge this week:

I embossed a Granny Apple Green panel with the new Christmas Tidings embossing folder (available Sept 6). I adhered a panel of Merry Bold & Bright DSP to a Basic White mat and adhered the embossed panel over it. I adhered the layered panel to the front of a Real Red card base with dimensionals.

I stamped the stocking from the Stampin’ Up! Sending Cheer photopolymer stamp set in Poppy Parade ink on Basic White. I cut it out with the coordinating die and I cut out the stocking toe and heel from Lemon Lime Twist and adhered it to the stocking with liquid glue. I cut the cuff from Basic White and popped it on the stocking with dimensionals. I stamped the present in Poppy Parade and decided to fussy cut it instead of using the die. I cut the bow from Lemon Lime Twist using the die and adhered it to the present and finished it with a rhinestone.. I adhered the present and stocking to the card with liquid glue.

I stamped the sentiment from the Ringed with Nature stamp set in Real Red ink on Basic White and cut it out with the label from the Meadow dies using the two step method. I popped it on the card front with dimensionals.

For the inside of the card, I stamped the sentiment from the Very Best Occasions stamp set in Memento Tuxedo Black ink on Basic White. I colored the greenery with Lemon Lime Twist, Poppy Parade and Shaded Spruce Stampin’ Blends and trimmed the bottom with DSP. I adhered the panel to the inside of the card with Stampin’ Seal.

The stocking and present from the Stampin’ Up! Sending Cheer stamp set are fun and festive. I love that the dies make tags and that the sentiments are tag friendly. This makes the set so versatile. Here is the bundle:

And here are the different patterns in the Merry Bold & Bright designer series paper. They go perfect together.

On with the Hop! Click on the Next Blog button to move forward to see the beautiful project Karen Ksenzakovic has created.

If you get lost along the way, here are the participants for the hop:


Last Day for Kits Collection Sale!

Today is the last day to get kits on sale! Shop the Stampin’ Up! Kits Collection in my Online Store.


Last Day to Redeem Bonus Days Coupons!

Today is the last day to redeem your Bonus Day Coupons! Let me know if you have any questions, and have fun shopping!


Current Host Code: ATSGGVYD

Use this host code when you order $50 or more and receive a free gift from me!  The free gift is your choice of any item currently available valued up to $10.00!

If your order is over $150, please do not use the host code since you’ll receive your own Host Dollars plus I’ll still send you the free gift!  This host code can be used by anyone, no club or commitment required. Let me know if you have any questions.


If you need any stamping supplies, I’d be very happy to be your Demonstrator.  Just click on the Shop Now button on the right side of the screen to go directly to my online store or contact me if you have any questions. 

Thanks for stopping by and Happy Stamping!

Akiko

  • Visit my online store here
  • See the current Stampin’ Up! clearance rack specials here
  • Earn FREE Stampin’ Up! products through my Wildflower Frequent Shopper Program – my way of saying thank you to my online frequent shopper customers.
  • Have any questions? I’d be happy to help, click here to contact me.

Cardstock Cuts for this project:

  • Real Red – 4-1/4″ x 11″ card base scored at 5-1/2″
  • Granny Apple Green – 1-1/2″ x 5-1/8″ (embossed panel)
  • Lemon Lime Twist – 1-1/2″ x 2-1/2″ (die cuts)
  • Basic White – two 4″ x 5-1/4″ panels (inside and front mats), 2-1/2″ x 5″ (stocking and present), 1-1/4″ x 3-1/2″ (label)
  • Merry Bold & Bright DSP – 2-1/2″ x 5-1/8″ (front background), 1/2″ x 4″ (inside trim)

Stampin’ Up! products used in this project:


Stampin’ Up! Autumn Leaves Sneak Peek

Good Morning! The Stampin’ Up! Autumn Leaves bundle is one of the prettiest new sets from the upcoming September-December 2023 Mini Catalog that goes live on September 6, 2023. The photopolymer stamp set has beautiful sentiments and pretty Distinktive leaves that are great for two step stamping. There are dies to cut out the stamped leaves and dies to add detailed veins to the leaves, coordinating detailed leaf dies, label dies and deboss dies to add texture. So many creative options!! I paired the bundle with the beautiful new All About Autumn 6″ x 6″ specialty designer series paper for today’s card. You can find the currently available products I used at the bottom of my post along with the card stock sizes.

I adhered a panel of All About Autumn 6″ x 6″ specialty designer series paper to the front of a Thick Very Vanilla card base. I adhered another strip of the DSP across the front with the foil side up. I cut two large leaves from the Stampin’ Up! Autumn Leaves dies from Pretty Peacock and Copper Clay card stock and embossed them with the pretty new Distressed Tile 3D embossing folder (available Sept 6, 2023).

I applied some adhesive strip to the back of Oxidized Copper specialty paper (avaliable Sept 6, 2023) and used the large leaf vein dies from the Stampin’ Up! Autumn Leaves dies to cut it out. I pulled off the adhesive backing from the die cuts and adhered them to the front of the embossed leaves. I adhered the leaves to the card front with liquid glue.

I stamped the sentiment from the Stampin’ Up! Autumn Leaves stamp set in Mossy Meadow ink on Very Vanilla. I cut it out with the label die and adhered some loops of Linen thread to the back with Stampin’ Seal. I adhered the label to the card front with dimensionals and finished it with three brushed copper dots.

For the inside of the card, I stamped the large leaves from the Stampin’ Up! Autumn Leaves stamp set in Copper Clay ink in the corners of a Very Vanilla panel. I trimmed the bottom with a strip of the DSP and adhered the panel to a Pretty Peacock mat before adhering it to the inside of the card with Stampin’ Seal.

I love the look of the embossed, die cut leaves overlaid with the distressed copper die cut veins. And the hint of the pretty Distinktive stamped leaves on the inside coordinate perfectly!

Here is the pretty Stampin’ Up! Autumn Leaves bundle. See all the different dies that go with the stamps!

And here is the beautiful All About Autumn 6″ x 6″ specialty designer series paper. I used the large books and the back of the tufted leather patterns on the right side.

These beautiful products will be available on Sept 6, 2023 when the new Sept-Dec 2023 Mini Catalog goes live.


Bonus Days Redemption Period Going on Now!

Time to redeem those Bonus Days coupons! Make sure you save all your coupons because you can redeem them (and we mean ALL of them) between August 1 – August 31, 2023. There’s no limit to how many coupons you can earn!

Promotion Details:

Redemption Period: August 1 – August 31, 2023

  • There is no limit to the number of coupon codes participants can redeem on an order during the redemption period. If using multiple codes, they must be separated by a space. 
  • Coupons may be redeemed one time only.
  • Coupon codes may be redeemed for any product (excluding Starter Kits, demonstrator supply items, and Paper Pumpkin month-to-month subscriptions).
  • New prepaid Paper Pumpkin codes may be discounted using Bonus Days coupon codes.

Let me know if you have any questions, and have fun shopping!


Kits Collection on Sale August 1 – August 31, 2023!

Save big on the Kits Collection for a limited time only! Each paper crafting kit comes with everything you need to create artistically designed handmade projects. From birthday cards to festive tags, cute treat packaging to floral wreaths, you can try something new at a great discount. Craft with friends, buy as gifts, or simply stock up on your favorites—just don’t miss out on this great deal!

Details:

  • Sales period: August 1, 2023 – August 31, 2023
  • The sale only applies to the Kits Collection by Stampin’ Up!
    • It does not include Paper Pumpkin kits
  • There is no limit to how many kits may be purchased.
  • The kits will be up to 30% off as indicated on the website.
  • No discount code necessary—the discount will be applied automatically.

Note: Discounted Kits are only available while supplies last!

Shop the Stampin’ Up! Kits Collection in my Online Store.


Current Host Code: MK3GJ47F

Use this host code when you order $50 or more and receive a Thank You gift from me!  The free gift is your choice of any item currently available valued up to $10.00 .

If your order is over $150, please do not use the host code since you’ll receive your own Host Dollars plus I’ll still send you the Thank You gift!  This host code can be used by anyone, no club or commitment required. Let me know if you have any questions.


If you need any stamping supplies, I’d be very happy to be your Demonstrator.  Just click on the Shop Now button on the right side of the screen to go directly to my online store or contact me if you have any questions.  Happy Stamping!

Thanks for stopping by and have a great weekend!

Akiko

  • Visit my online store here
  • See the current Stampin’ Up! clearance rack specials here
  • Earn FREE Stampin’ Up! products through my Wildflower Frequent Shopper Program – my way of saying thank you to my online frequent shopper customers.
  • Have any questions? I’d be happy to help, click here to contact me.

Cardstock Cuts for this project:

  • Thick Very Vanilla – 4-1/4″ x 11″ card base, scored at 5-1/2″
  • Pretty Peacock – 4″ x 5-1/4″ (inside mat), 3″ x 3-1/4″ (die cut leaf)
  • Copper Clay – 3″ x 3-1/4″ (die cut leaf)
  • Oxidized Copper specialty paper – 2-3/4″ x 5″ (leaf veins)
  • Very Vanilla – 3-7/8″ x 5-1/8″ (inside panel), 2″ x 2-1/2″ (label)
  • All About Autumn 6″ x 6″ specialty DSP – 4″ x 5-1/4″ (front background), 1-1/2″ x 3-1/2″ (front stripe), 3/4″ x 3-7/8″ (inside trim)

Stampin’ Up! products used in this project:


Stampin’ Up! Christmas Classics Sneak Peek

Good Morning! The Stampin’ Up! Christmas Classics bundle is one of the pretty new Christmas sets from the upcoming September-December 2023 Mini Catalog that goes live on September 6, 2023. The photopolymer stamp set is full of wonderful Christmas greetings and the dies are wonderful for creating fancy foliage filled labels. I paired it with the beautiful new Joy of Christmas designer series paper for a simple Christmas card. You can find the currently available products I used at the bottom of my post along with the card stock sizes.

I adhered a panel of Joy of Christmas designer series paper to a Real Red mat and adhered it to the front of a Garden Green card base. I cut a Shaded Spruce panel of Joy of Christmas DSP with the large square foliage die from the Stampin’ Up! Christmas Classics die.

I stamped the sentiment from the Stampin’ Up! Christmas Classics stamp set in Real Red ink on Basic White. I cut it out with the square label die and adhered it to the front of the large foliage die cut with liquid glue and popped it on the card front with dimensionals.

I decorated the front with three Poppy Parade iridescent discs (available Sept 6) and a Real Red bow. So simple and quick!! I love how the gorgeous DSP contrasts with the fancy die cuts!

For the inside of the card, I stamped the pine branch from the Stampin’ Up! Christmas Classics stamp set in Shaded Spruce ink twice (without reinking) on a Basic White panel. stamped the berries in Real Red ink along with the sentiment . I trimmed the bottom with a strip of the DSP and adhered the panel to the inside of the card with Stampin’ Seal.

Here is the pretty Stampin’ Up! Christmas Classics bundle – the sentiments are perfect to mix-n-match and I love the musical themes!

And here is the beautiful Joy of Christmas designer series paper. Oops – my music is upside down!

These beautiful products will be available in just a few weeks when the new Sept-Dec 2023 Mini Catalog goes live.


Bonus Days Redemption Period Going on Now!

Time to redeem those Bonus Days coupons! Make sure you save all your coupons because you can redeem them (and we mean ALL of them) between August 1 – August 31, 2023. There’s no limit to how many coupons you can earn!

Promotion Details:

Redemption Period: August 1 – August 31, 2023

  • There is no limit to the number of coupon codes participants can redeem on an order during the redemption period. If using multiple codes, they must be separated by a space. 
  • Coupons may be redeemed one time only.
  • Coupon codes may be redeemed for any product (excluding Starter Kits, demonstrator supply items, and Paper Pumpkin month-to-month subscriptions).
  • New prepaid Paper Pumpkin codes may be discounted using Bonus Days coupon codes.

Let me know if you have any questions, and have fun shopping!


Kits Collection on Sale August 1 – August 31, 2023!

Save big on the Kits Collection for a limited time only! Each paper crafting kit comes with everything you need to create artistically designed handmade projects. From birthday cards to festive tags, cute treat packaging to floral wreaths, you can try something new at a great discount. Craft with friends, buy as gifts, or simply stock up on your favorites—just don’t miss out on this great deal!

Details:

  • Sales period: August 1, 2023 – August 31, 2023
  • The sale only applies to the Kits Collection by Stampin’ Up!
    • It does not include Paper Pumpkin kits
  • There is no limit to how many kits may be purchased.
  • The kits will be up to 30% off as indicated on the website.
  • No discount code necessary—the discount will be applied automatically.

Note: Discounted Kits are only available while supplies last!

Shop the Stampin’ Up! Kits Collection in my Online Store.


Current Host Code: MK3GJ47F

Use this host code when you order $50 or more and receive a Thank You gift from me!  The free gift is your choice of any item currently available valued up to $10.00 .

If your order is over $150, please do not use the host code since you’ll receive your own Host Dollars plus I’ll still send you the Thank You gift!  This host code can be used by anyone, no club or commitment required. Let me know if you have any questions.


If you need any stamping supplies, I’d be very happy to be your Demonstrator.  Just click on the Shop Now button on the right side of the screen to go directly to my online store or contact me if you have any questions.  Happy Stamping!

Thanks for stopping by and have a great weekend!

Akiko

  • Visit my online store here
  • See the current Stampin’ Up! clearance rack specials here
  • Earn FREE Stampin’ Up! products through my Wildflower Frequent Shopper Program – my way of saying thank you to my online frequent shopper customers.
  • Have any questions? I’d be happy to help, click here to contact me.

Cardstock Cuts for this project:

  • Garden Green – 4-1/4″ x 11″ card base, scored at 5-1/2″
  • Real Red – 4″ x 5-1/4″ (DSP mat)
  • Basic White – 4″ x 5-1/4″ (inside panel), 2-1/2″ x 2-1/2″ (label)
  • Joy of Christmas DSP – 3-7/8″ x 5-1/8″ (front background), 4″ x 4″ (label die cut), 3/4″ x 4″ (inside trim)

Stampin’ Up! products used in this project:


Stampin’ Up! Autumn Leaves Note Cards Sneak Peek

Good Morning! The Stampin’ Up! September-December 2023 Mini Catalog will be open for orders beginning September 6, 2023 and it is chock full of fun products for fall and holiday crafting. I used one of the new bundles, the Stampin’ Up! Autumn Leaves bundle to make some thank you cards along with the beautiful All About Autumn 6″ x 6″ specialty designer series paper. You can find the currently available products I used at the bottom of my post along with the card stock sizes.

I adhered the picture side of the All About Autumn specialty 6″ x 6″ designer series paper to the right side of a fall colored card stock and a strip of the foil side to the left side. I used Crushed Curry and Mossy Meadow card stock as my mats, but you can pick any color that goes with the images.

I adhered the layered DSP panel to the front of a Basic White note card. The note cards come pre-scored, but I did find that it was better to score them with my scoreboard (or your paper trimmer scoring blade) before burnishing with my bone folder – don’t know why it took me so long to try this. The note cards are pretty thick, they come with envelopes and they can be mailed!

I stamped the sentiment from the new Stampin’ Up! Autumn Leaves photopolymer stamp set in Copper Clay ink on Basic White and cut the label out with the long die from the Autumn Leaves dies. I adhered the label to the card front. I cut a small maple leaf from fall colored card stock and adhered it to the card front, either behind or on top of the label.

So quick and simple – and pretty! The All About Autumn patterns that I used are multi directional, so you can get 4 panels from each sheet with a little square left over. So it’s perfect for making multiples. I left the insides blank so there’s room for writing a message. And if you need something more, add an embellishment and bow!

Here is the Stampin’ Up! Autumn Leaves bundle. I barely scratched the surface of the creative potential of this bundle.

And here is the beautiful All About Autumn 6″ x 6″ specialty designer series paper. The copper foil accents are so pretty!

Are you excited for Fall crafting? If so consider the Stampin’ Up! Autumn Leaves bundle and the beautiful All About Autumn 6″ x 6″ specialty designer series paper. These will be available on September 6, 2023 when the new Mini Catalog opens for ordering!


Bonus Days Redemption Period Going on Now!

Time to redeem those Bonus Days coupons! Make sure you save all your coupons because you can redeem them (and we mean ALL of them) between August 1 – August 31, 2023. There’s no limit to how many coupons you can earn!

Promotion Details:

Redemption Period: August 1 – August 31, 2023

  • There is no limit to the number of coupon codes participants can redeem on an order during the redemption period. If using multiple codes, they must be separated by a space. 
  • Coupons may be redeemed one time only.
  • Coupon codes may be redeemed for any product (excluding Starter Kits, demonstrator supply items, and Paper Pumpkin month-to-month subscriptions).
  • New prepaid Paper Pumpkin codes may be discounted using Bonus Days coupon codes.

Let me know if you have any questions, and have fun shopping!


Kits Collection on Sale August 1 – August 31, 2023!

Save big on the Kits Collection for a limited time only! Each paper crafting kit comes with everything you need to create artistically designed handmade projects. From birthday cards to festive tags, cute treat packaging to floral wreaths, you can try something new at a great discount. Craft with friends, buy as gifts, or simply stock up on your favorites—just don’t miss out on this great deal!

Details:

  • Sales period: August 1, 2023 – August 31, 2023
  • The sale only applies to the Kits Collection by Stampin’ Up!
    • It does not include Paper Pumpkin kits
  • There is no limit to how many kits may be purchased.
  • The kits will be up to 30% off as indicated on the website.
  • No discount code necessary—the discount will be applied automatically.

Note: Discounted Kits are only available while supplies last!

Shop the Stampin’ Up! Kits Collection in my Online Store.


Current Host Code: MK3GJ47F

Use this host code when you order $50 or more and receive a Thank You gift from me!  The free gift is your choice of any item currently available valued up to $10.00 .

If your order is over $150, please do not use the host code since you’ll receive your own Host Dollars plus I’ll still send you the Thank You gift!  This host code can be used by anyone, no club or commitment required. Let me know if you have any questions.


If you need any stamping supplies, I’d be very happy to be your Demonstrator.  Just click on the Shop Now button on the right side of the screen to go directly to my online store or contact me if you have any questions.  Happy Stamping!

Thanks for stopping by and have a great weekend!

Akiko

  • Visit my online store here
  • See the current Stampin’ Up! clearance rack specials here
  • Earn FREE Stampin’ Up! products through my Wildflower Frequent Shopper Program – my way of saying thank you to my online frequent shopper customers.
  • Have any questions? I’d be happy to help, click here to contact me.

Cardstock Cuts for this project:

  • Basic White Note Card – 5″ x 7″ card base scored at 3-1/2″
  • Basic White – 1-1/2″ x 3″ (label)
  • Mossy Meadow – 2-5/8″ x 4-1/8″ (DSP mat)
  • Blackberry Bliss – 2″ x 2″ (die cut leaf)
  • All About Autumn 6″ x 6″ specialty DSP – 2″ x 4″ (right panel), 1/2″ x 4″ (left strip)

Stampin’ Up! products used in this project:


Stampin’ Up! Translucent Florals Sneak Peek

Good Morning! Last Weekend Stampin’ Up! held a virtual event called Creativity Now featuring the Stampin’ Up! Translucent Florals bundle, a bundle from the upcoming September – December 3032 Mini Catalog. Earlier in the week, I made another card in Lemon Lolly featuring the bundle and today I’m sharing all the cards that I made during the event. You can find the supplies I used at the bottom of my post along with the sizes of cardstock used.

Card 1 – You’re the Best

  • Stamp the flowers randomly in Poppy Parade ink around the edge of a Poppy Parade card base
  • Stamp the flowers in Poppy Parade and Leaves in Garden Green on a Basic White panel
  • Cut the panel with the third largest Deckled Rectangles Die
  • Adhere the the die-cut panel to the card front with dimensionals
  • Stamp the sentiment in PoppyParade ink on a strip of Basic White
  • Trim both ends at an angle with Paper Snips
  • Adhere the sentiment to the card with dimensionals
  • Apply white Classic Matte Dots to the card front

Card 2 – Congratulations

  • Stamp the thin leaf image three times in Gray Granite ink on the front of a Gray Granite card base
  • Stamp two branches in Garden Green ink on Basic White
  • Cut the branches with the coordinating dies and adhere them to the card with dimensionals
  • Stamp the sentiment in Gray Granite ink at the top of a Basic White strip
  • Choose a larger die from the Deckled Rectangles dies. Line up the die along the bottom of the sentiment and cut
  • Trim the ends of the sentiment with paper snips and adhere it to the card with dimensionals and glue dots
  • Apply Basic Gray Classic Matte Dots to the card front

Card 3 – Wishing You All The Happiness

  • Die cut a Basic White panel with the fourth largest Deckled Rectangles die
  • Emboss the die cut with the Splatters 3D embossing folder
  • Adhere the panel to the front of a Basic White card base with dimensionals
  • Stamp the sentiment in Gray Granite ink on Basic White and cut it out with the smallest Deckled Rectangles die and adhere it to the card front with glue dots
  • Stamp two sets of leaves in Granny Apple Green ink on Basic White
  • Cut out the leaves with the coordinating die
  • Color the back of the leaf-pattern Vellum Basics DSP with a Dark Granny Apple Green Stampin’ Blend.
  • On the back of the dot-pattern Vellum Basics DSP , color one section with a Light Calypso Coral Stampin’ Blend. Color a larger section with a Dark Calypso Coral Stampin’ Blend.
  • Cut two leaves from the Dark Granny Apple Green colored vellum
  • Cut two smaller flower pieces from the Light Calypso Coral colored vellum
  • Cut two larger flower pieces from the Dark Calypso Coral colored vellum
  • Assemble the die-cut flower pieces and glue them together with glue dots
  • Adhere the leaves and flowers to the card using glue dots
  • Apply Black Classic Matte Dots to the center of each flower

I love these projects because they show you how to use these pretty stamps and dies in different creative ways with minimal supplies. Here are the stamp set and dies:

The Stampin’ Up! Translucent florals bundle will be available on September 6, 2023 when the Mini Catalog launches.

Join me for a Facebook Live This Afternoon!

I’ll be going live on my Facebook Business Page this afternoon to make a yummy Summer card. I hope you can join me at 1:00 ET today!


New Online Exclusives Available July 6, 2023!

A new drop of Online Exclusives products will be available on July 6, 2023 with fresh, never-before-seen products to spark your creativity and expand your collection! And this drop will include some new Christmas products to help jumpstart holiday crafting!


Bonus Days Starts July 6, 2023!

Stampin’ Up! is bringing back a favorite promotion—BONUS DAYS! Because do you know what’s a great deal? Getting rewarded for all the crafting supplies you’re already going to buy! When you shop between July 6 – July 31, 2023 and spend $50, you will earn a $5 coupon! Make sure you save all your coupons because you can redeem them (and we mean ALL of them) between August 1 – August 31, 2023. There’s no limit to how many coupons you can earn!

Promotion Details:

Earning Period: July 6, 2023 – July 31, 2023

  • Earn a $5 coupon for every $50 spent (before shipping and tax). 
  • All coupon codes will be emailed right after a qualifying purchase has been made.
  • If you earn multiple codes from a single order, you will receive one email with multiple codes. If you earn multiple codes from multiple orders, you will receive separate emails for each code earned.
  • All order types qualify for this promotion.
  • Orders that are started before the promotion begins will not count toward earning coupon codes. For example, if you add items to your cart before 6 July and wait to purchase until that date or later, then those items will not qualify towards earning coupons. You must add items to your cart and complete your purchase during the earning period. 
  • There is no limit to the number of coupon codes participants can earn per order or throughout the duration of the earning period. 
  • Ordering Deadline: July 31, 2023 at 11:59 p.m. (MT)

Redemption Period: August 1 – August 31, 2023

  • There is no limit to the number of coupon codes participants can redeem on an order during the redemption period. If using multiple codes, they must be separated by a space. 
  • Coupons may be redeemed one time only.
  • Coupon codes may be redeemed for any product (excluding Starter Kits, demonstrator supply items, and Paper Pumpkin month-to-month subscriptions).
  • New prepaid Paper Pumpkin codes may be discounted using Bonus Days coupon codes.

Let me know if you have any questions, and have fun shopping!


Current Host Code: P7SWY6DS

Use this host code when you order $50 or more and receive a Thank You gift from me!  The free gift is your choice of any item valued up to $10.00 from the 2023-2024 Annual Catalog.

If your order is over $150, please do not use the host code since you’ll receive your own Host Dollars plus I’ll still send you the Thank You gift!  This host code can be used by anyone, no club or commitment required. Let me know if you have any questions.


If you need any stamping supplies, I’d be very happy to be your Demonstrator.  Just click on the Shop Now button on the right side of the screen to go directly to my online store or contact me if you have any questions.  Happy Stamping!

Thanks for stopping by and have a great week!

Akiko

  • Visit my online store here
  • See the current Stampin’ Up! clearance rack specials here
  • Earn FREE Stampin’ Up! products through my Wildflower Frequent Shopper Program – my way of saying thank you to my online frequent shopper customers.
  • Have any questions? I’d be happy to help, click here to contact me.

Cardstock Cuts for this project:

  • Card 1 – You’re the Best
    • Poppy Parade – 5-1/2″ x 8-1/2″ card base scored at 4-1/4″
    • Basic White – 4″ x 5-1/4″, 3/8″ x 4″
  • Card 2 – Congratulations
    • Gray Granite – 5-1/2″ x 8-1/2″ card base scored at 4-1/4″
    • Basic White – 3-1/2″ x 5″, 1″ x 4″
  • Card 3 – Wishing You All The Happiness
    • Basic White – 5-1/2″ x 8-1/2″ card base scored at 4-1/4″, 3″ x 4-1/2″, 2″ x 3-1/4″, 2″ x 2″
    • Vellum Basics – 2″ x 2″, 3″ x 9″

Stampin’ Up! products used in this project: