Stampin’ Up! With You In Mind Thank You Card

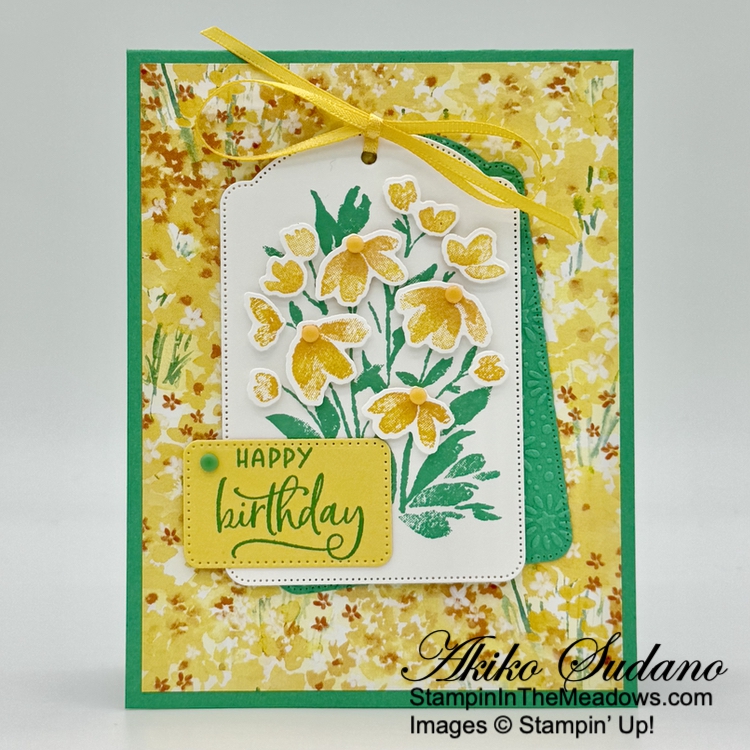
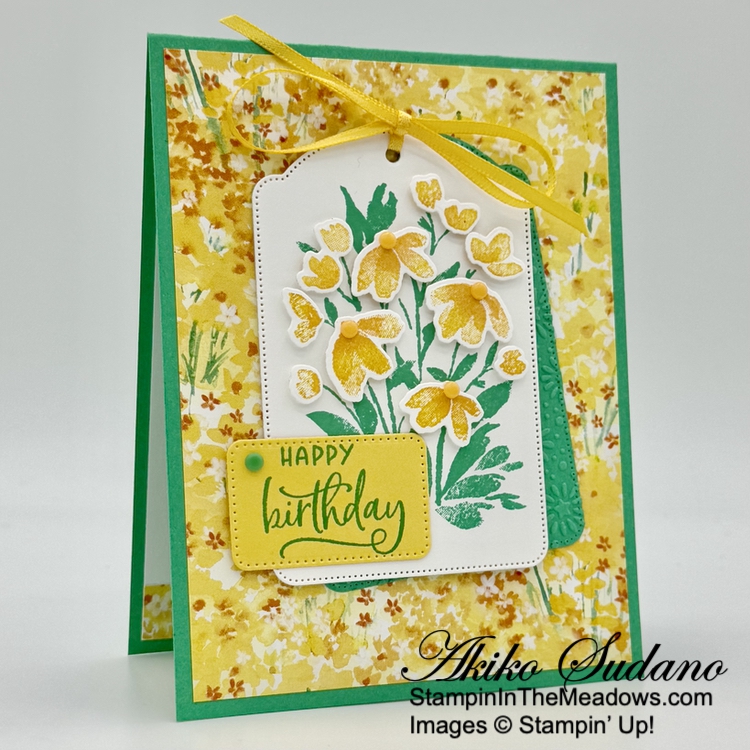
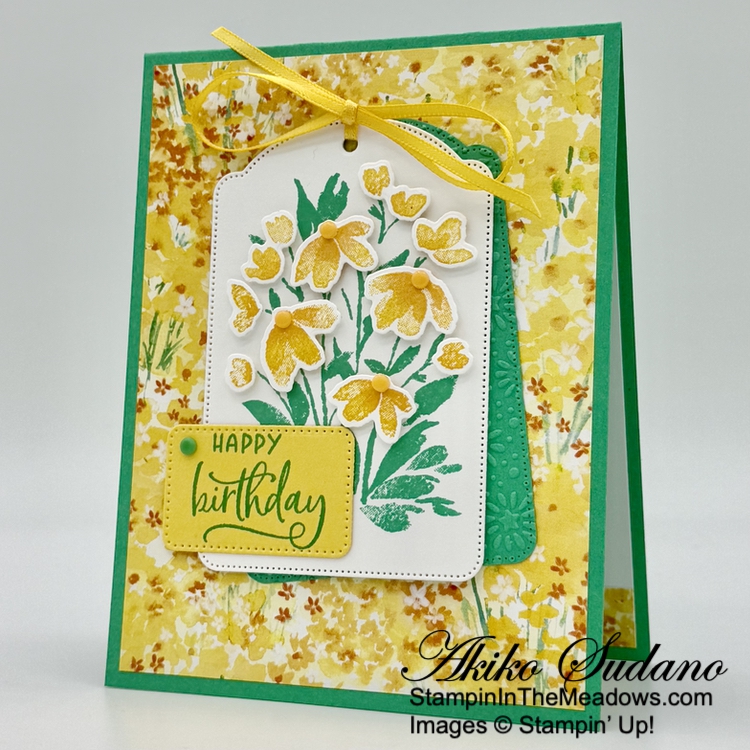
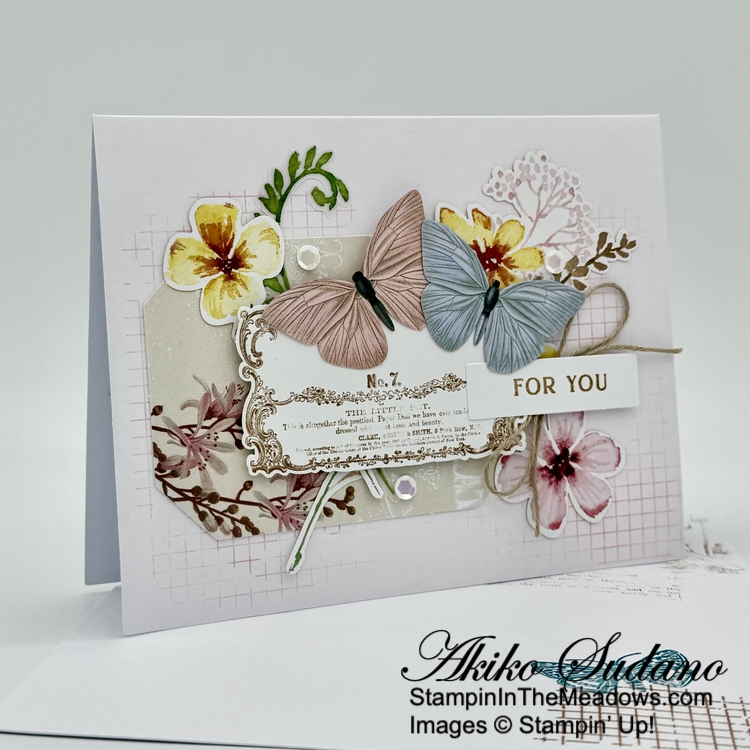
Good Morning! Here’s a simple thank you card made with the pretty Stampin’ Up! With You In Mind stamp set and the beautiful Lovely Garden designer series paper. The big, bold sentiments in the stamp set go well with thebold and beautiful flowers in the DSP. You can find the products I used at the bottom of my post along with the card stock sizes.

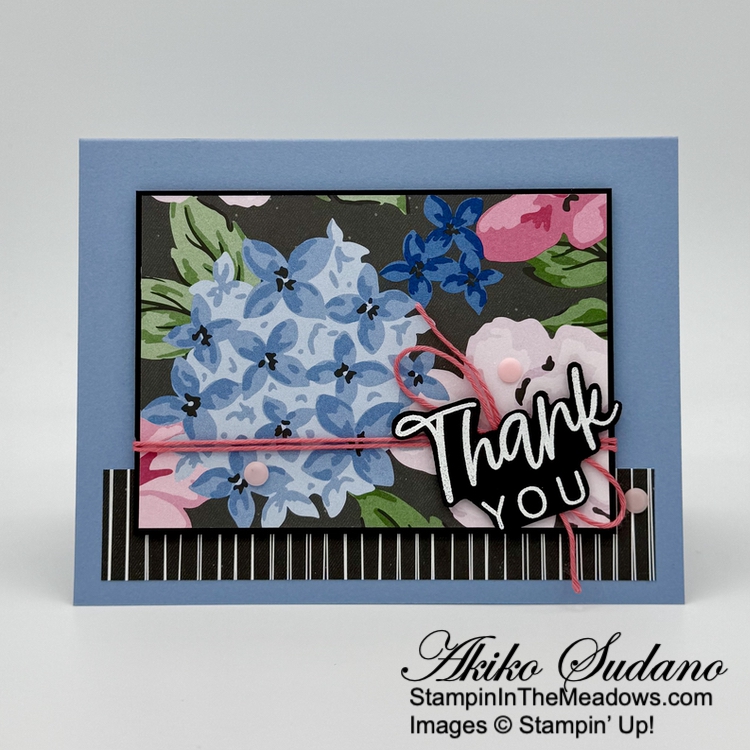
Adhere a striped strip of Lovely Garden designer series paper to the bottom of a retiring Boho Blue card base with liquid glue.

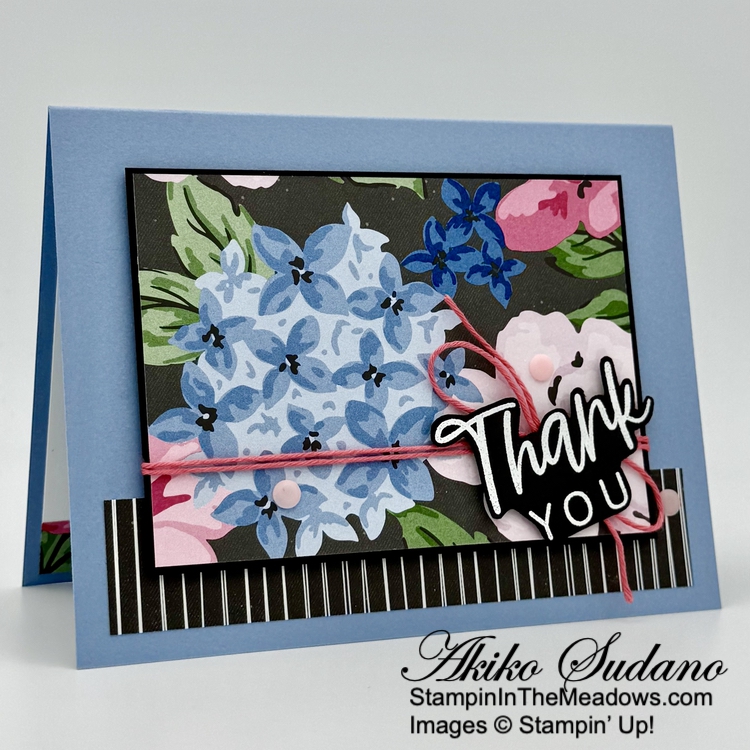
Adhere another floral pattern of the Lovely Garden DSP to a Basic Black mat and wrap it with Strawberry Slush baker’s twine and make a bow on the right side. Adhere the layered panel to the card with dimensionals.

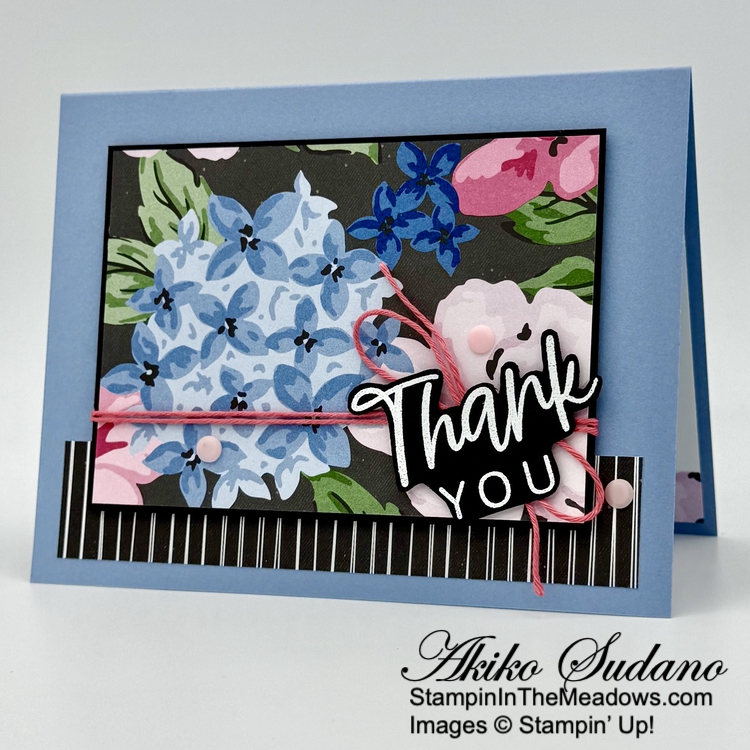
Stamp the sentiment from the Stampin’ Up! With You In Mind stamp set using Versamark Ink on Basic Black. Sprinkle it with white embossing powder, shake off the excess and heat the powder with a heat tool until it is bright and shiny. Fussy cut the sentiment with paper snips. Adhere the sentiment to the card over the bow with dimensionals. Finish with three Pretty In Pink dots.

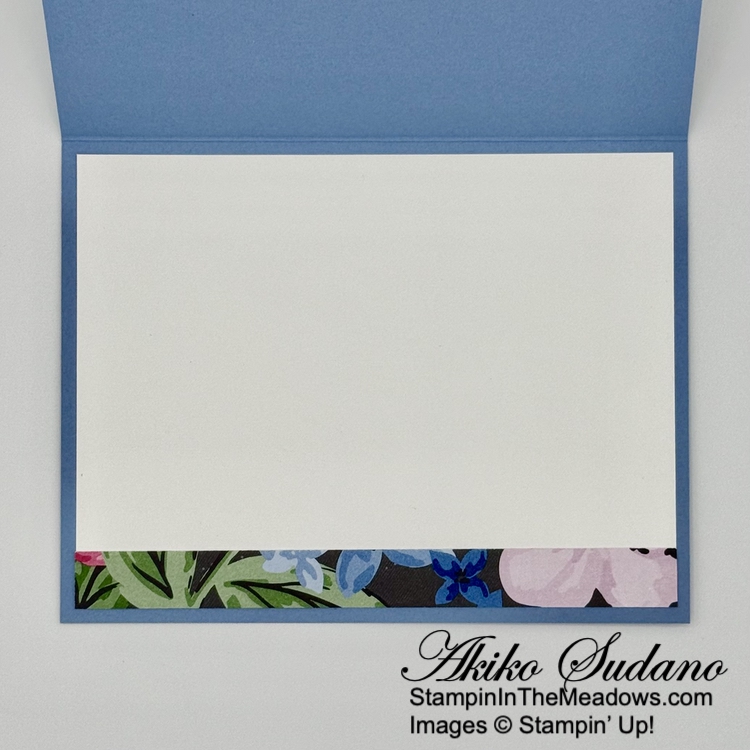
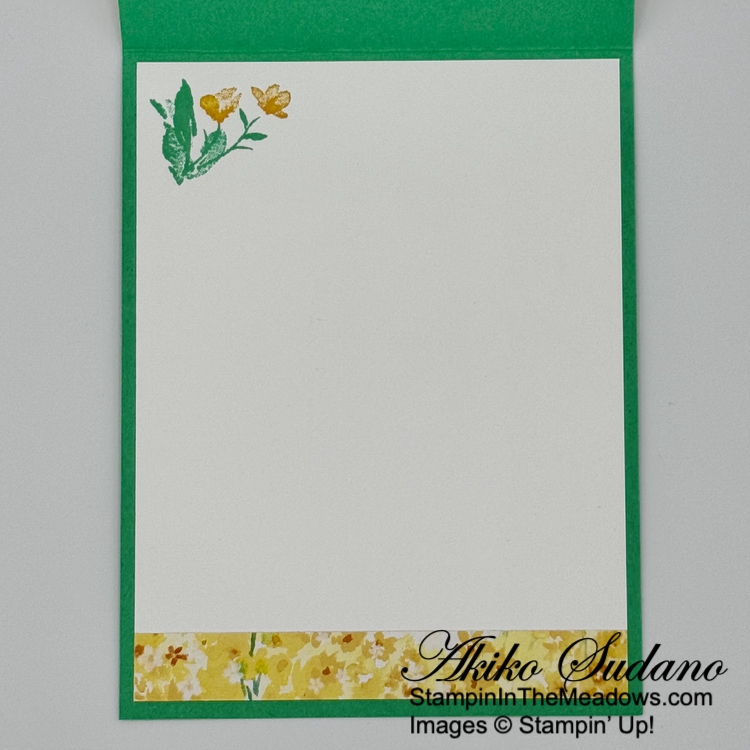
For the inside of the card, adhere a strip of DSP to the bottom of a Basic White panel and adhere the panel to the inside of the card with Stampin’ Seal.

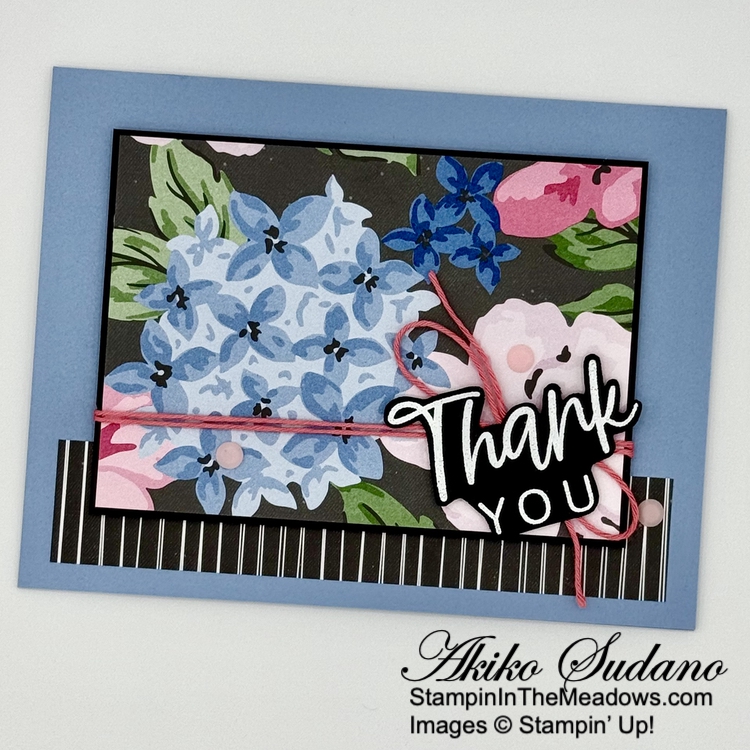
The pretty Lovely Garden designer series paper makes for quick & easy pretty layered cards. And I love the casual bold sentiments in the Stampin’ Up! With You In Mind stamp set. It is perfect for many occasions and has simple images that can be stamped for a DIY DSP in any color palette.


If you need any stamping supplies, I’d be very happy to be your Demonstrator.  Just click on the Shop Now Button on the right side of the screen to go directly to my Online store or contact me if you have any questions.  Happy Stamping!

Thanks for stopping by and have a great day!

Akiko

  • Visit my online store here
  • See the current Stampin’ Up! Last Chance items here
  • Have any questions? I’d be happy to help, click here to contact me.

Cardstock Cuts for this project:

  • Boho Blue – 5-1/2″ x 8-1/2″ card base scored at 4-1/4″
  • Basic Black – 3-1/8″ x 4-3/8″ (DSP mat), 2″ x 3″ (label)
  • Basic White – 4″ x 5-1/2″ (inside panel)
  • Lovely Garden DSP – 3″ x 4-1/4″ (floral panel), 1″ x 5″ (striped strip), 1/2″ x 5-1/4″ (inside trim)

Stampin’ Up! products used in this project:


Stampin’ Up! Heirloom Arrangements Kit

Good Morning and Happy March! Hopefully Spring arrives soon. I used the beautiful Stampin’ Up! Heirloom Arrangements kit for today’s cards and it was so much fun and creative relaxation to arrange the die cuts and make the cards!

The kit comes with detailed instructions for two cards and shows examples that are pretty easy to re-create for the rest. There are several die cuts left over, and I just added them to the existing designs so they were all used. I did add baker’s twine and sequins from my stash to each of the cards and used Pretty Peacock ink to stamp the butterfly with the Pecan Pie grid. Here’s a closer look at each of my cards.

Aren’t the vintage die cuts from the Stampin’ Up! Heirloom Arrangements kit so pretty? There are other sentiments in the stamp set, but I decided to only use the ‘for you‘ sentiment on the cards. I love how you can make each card unique and that there are 8 cards. This kit was just added to the Stampin’ Up! Kits Collection last month and is only available in the Online Store. New kits are added each month in a variety of styles to meet different crafting tastes and needs. Be sure to check them out.


Last Month To Earn Wildflower Rewards Points

There are exciting changes coming to the Stampin’ Rewards program in April, so sadly, this means my Wildflower Points Frequent Shopper Program is coming to an end.  March 2025 is the last month to earn Wildflower Points and all Wildflower Rewards earned must be redeemed before December 31, 2025.  If you have any questions about your current Wildflower Points status, please contact me.

Stay tuned for the exciting new Stampin’ Rewards program that will begin April 15, 2025!


Current Host Code: CCXFTCJQ

Use this host code when you order $50 or more and receive a Thank You gift from me – a pack of pretty Tinsel Gems Three-Pack (item 161624).

161624 – Tinsel Gems Three-Pack

When I am notified of your order, I will pack your embellishments and send them to your shipping address along with a handmade thank you card!


If you need any stamping supplies, I’d be very happy to be your Demonstrator.  Just click on the Shop Now Button on the right side of the screen to go directly to my Online store or contact me if you have any questions.  Happy Stamping!

Thanks for stopping by and have a great day!

Akiko

  • Visit my online store here
  • See the current Stampin’ Up! Last Chance items here
  • Have any questions? I’d be happy to help, click here to contact me.

Stampin’ Up! products used in this project:


Stampin’ Up! Pretty Petals for the Inkin’ Krew Blog Hop

Good Morning! Welcome to the February Inkin’ Krew Team Blog Hop! The theme for this month’s hop is “Birthday” and I used the Stampin’ Up! Pretty Petals bundle with the Sale-A-Bration Bloom Impressions designer series paper to make a tag birthday card. You can find the supplies I used along with card stock cuts at the bottom of my post.

I adhered a floral panel of the Sale-A-Bration Bloom Impressions designer series paper to the front of a Shy Shamrock card base with liquid glue. I stamped the large leaf cluster stamp from the Stampin’ Up! Pretty Petals stamp set using Shy Shamrock ink on Basic White and cut it out with the large tag die from the Greetings of the Season dies.

I used the same die to cut a Shy Shamrock panel and embossed the die cut tag with the Sale-A-Bration Starstruck embossing folder. I inked up the large floral spray stamp from the Stampin’ Up! Pretty Petals stamp set using Daffodil Delight ink and used a sponge dauber to apply Peach Pie ink to the flower centers and bases. I cut the flowers out with the coordinating die and adhered them to the stamped tag with pieces of dimensionals.

I looped a length of Daffodil Delight ribbon through the tag holes and tied them together, making a loopy bow. I offset the tags, securing them with glue dots and adhered the tags to the card with glue dots. I finished the flower centers with Peach Pie dots.

I stamped the pretty sentiment from the Labeled with Love stamp set using Shy Shamrock ink on Daffodil Delight and cut it out with the small rectangle from the Nested Essentials die. I adhered it to the card with glue dots and finished it with a Shy Shamrock dot.

For the inside of the card, I stamped the small leaf cluster from the Stampin’ Up! Pretty Petals stamp set using Shy Shamrock ink on a Basic White panel. I inked up the double flower stamp with Daffodil Delight ink and applied Peach Pie ink with a sponge dauber and stamped it on the panel. I trimmed the bottom with DSP and adhered the panel to the inside of the card with Stampin’ Seal.

I used so many products for today’s card and it shows how you can coordinate different Stampin’ Up! Products. And many of the products I used are either discounted Last Chance products or Sale-A-Bration items. The Stampin’ Up! Pretty Petals stamp set and dies are on the Last Chance products list (with a big discount!) along with the Greetings of the Season dies. The beautiful Bloom Impressions designer series paper and the Starstruck embossing folder are Sale-A-Bration items that you can choose for FREE with a $60 order. These specially priced items are available while supplies last.

On With The Hop! Click on the Next Blog button to move forward to Karen Ksenzakovic’s project or click the Previous Blog button to move back to see the project that Ann Louise Fodgaard created.

If you get lost along the way, here are the participants for the hop:

  1. Tara Carpenter
  2. Karen Finkle 
  3. Terry Lynn Bright 
  4. Christie King 
  5. Mary Deatherage 
  6. Ann Louise Fodgaard 
  7. Akiko Sudano  <— you are here
  8. Karen Ksenzakovic 
  9. Amy Koenders

Current Host Code: FYMGA4AN

Use this host code when you order $50 or more and receive a Thank You gift from me!  The free gift is your choice of any currently available item valued up to $10.00.

If your order is over $150, please do not use the host code since you’ll receive your own Host Dollars plus I’ll still send you the Thank You gift!  This host code can be used by anyone, no club or commitment required. Let me know if you have any questions.


If you need any stamping supplies, I’d be very happy to be your Demonstrator.  Just click on the Shop Now button on the right side of the screen to go directly to my online store or contact me if you have any questions.  Happy Stamping!

Thanks for stopping by and have a great week!

Akiko

  • Visit my online store here
  • See the current Stampin’ Up! Last Chance items here
  • Earn FREE Stampin’ Up! products through my Wildflower Frequent Shopper Program – my way of saying thank you to my online frequent shopper customers.
  • Have any questions? I’d be happy to help, click here to contact me.

Cardstock Cuts for this project:

  • Shy Shamrock – 4-1/4″ x 11″ card base, scored at 5-1/2″, 2-3/4″ x 4-1/4″ (embossed tag)
  • Daffodil Delight – 1-1/2″ x 2-1/2″ (label)
  • Basic White – 4″ x 5-1/4″ (inside panel), 2-1/4″ x 2-1/4″ (die cut flowers), 2-3/4″ x 4-1/4″ (tag)
  • Bloom Impressions DSP – 4″ x 5-1/4″ (front background), 1/2″ x 4″ (inside trim)

Stampin’ Up! products used in this project:

Stampin’ Up! Mixed Florals for the Happy Inkin’ Thursday Blog Hop

Good Morning and welcome to the Happy Inkin’ Thursday Blog Hop! I used the pretty Stampin’ Up! Mixed Florals bundle with the beautiful Floral Delight designer series paper for a fun fold card today. You can find the supplies I used along with card stock cuts at the bottom of my post.

We have a color challenge this week:

I adhered a panel of Floral Delight to a Lemon Lolly panel with liquid glue. I adhered Pool Party gingham vellum to a Basic White panel with Stampin’ Seal (be sure to get the corners) and was pleased that it didn’t show through the vellum. I adhered the layered panel to the front of the Lemon Lolly card base with liquid glue and adhered the card base to the layered DSP panel.

I stamped the flower from the Stampin’ Up! Mixed Florals stamp set using Pecan Pie ink on Basic White. I colored the image with Stampin’ Blends – light Pecan Pie, light Daffodil Delight, light Peach Pie, light Old Olive and dark Pool Party. I cut the flowers out with the coordinating die. I cut the large leaf spray using the die from the Stampin’ Up! Mixed Florals die and adhered it to the card with glue dots. I popped the flower on top with dimensionals.

I stamped the sentiment from the Mixed Labels stamp set using Pecan Pie ink on Pool Party and cut it out with the coordinating die. I adhered Daffodil Delight ribbon to the card with Stampin’ Seal and adhered the label over the ribbon with glue dots and dimensionals. I finished the card with glossy dots.

For the inside, I stamped the little floral sprig from the Mixed Labels stamp set using Pecan Pie ink on Basic White. I colored it with dark Pool Party and light Old Olive Stampin’ Blends and trimmed the bottom with DSP. I adhered the panel to the inside of the card with Stampin’ Seal.

I love the beautiful flowers from the Stampin’ Up! Mixed Florals bundle and I’m so happy I finally got to use the daisy spray. And while my flowers look like Black Eyed Susans and the end of Summer, I think this is a pretty Spring card!

On with the Hop! Click on the Next Blog button to move forward to see the beautiful project Karen Ksenzakovic has created.

If you get lost along the way, here are the participants for the hop:


Current Host Code: FYMGA4AN

Use this host code when you order $50 or more and receive a free gift from me!  The free gift is your choice of any item currently available valued up to $10.00!

If your order is over $150, please do not use the host code since you’ll receive your own Host Dollars plus I’ll still send you the free gift!  This host code can be used by anyone, no club or commitment required. Let me know if you have any questions.


If you need any stamping supplies, I’d be very happy to be your Demonstrator.  Just click on the Shop Now button on the right side of the screen to go directly to my online store or contact me if you have any questions. 

Thanks for stopping by and Happy Stamping!

Akiko

  • Visit my online store here
  • See the current Stampin’ Up! Last Chance items here
  • Earn FREE Stampin’ Up! products through my Wildflower Frequent Shopper Program – my way of saying thank you to my online frequent shopper customers.
  • Have any questions? I’d be happy to help, click here to contact me.

Cardstock Cuts for this project:

  • Lemon Lolly – 4-1/4″ x 5-1/2″ (card base back), 2-3/4″ x 11″ card base, scored at 5-1/2″
  • Gingham Vellum – 2-1/2″ x 5-1/4″ (front background)
  • Pool Party – 1-1/4″ x 2-1/4″ (label)
  • Basic White – two 2-1/2″ x 5-1/4″ panels (inside panel and front background), 3″ x 5-1/4″ (floral die cut)
  • Floral Delight DSP – 4″ x 5-1/4″ (front background), 3″ x 5-1/4″ (die cut leaves), 1/2″ x 2-1/2″ (inside trim)

Stampin’ Up! products used in this project:

Stampin’ Up! Last Chance Products Updated And More!

Hello!! Stampin’ Up! has several new things happening today, so I just needed to get the word out. Unfortunately, I don’t have a pretty card to share, but the new updates are so exciting!

The Last Chance Products items have been updated! Items from last Fall’s Online Exclusives releases have been added to the lists and some items have bigger discounts. I did notice that in some cases, it’s better to order bundled items separately since the bundled prices are not discounted while the separate items are. It’s a great time to pick up some discounted Christmas items! These items are available while supplies last.

Shop the Last Chance items in the Online Store HERE.


Sale-A-Bration Additional Products

Ready for more? There are EVEN MORE PRODUCTS available to shop, earn, and redeem during Sale-A-Bration. We don’t want you to miss out on these great products and incredible deals, so take a look at our newly added products by clicking on the picture below to download the Sale-A-Bration Additional Products Flyer.

Remember, you must use the item numbers in the flyer in order to redeem these products as Sale-A-Bration items. These products have different item numbers in the catalog, which won’t register as part of Sale-A-Bration.

We’ve included two kits as part of our Sale-A-Bration newly added products. Once the kits sell out, they will be discontinued. If they do not sell out during Sale-A-Bration, they may be discounted at a later date.

Note: The newly added products that are now redeemable during Sale-A-Bration are part of Stampin’ Up!’s existing product offering.


New Online Exclusives Coming March 4!

The Stampin’ Up! Demonstrator Pre-Order period has begun for a new release on Online Exclusives. These new Online Exclusives will be available for everyone to order beginning March 4, 2025. Click on the picture below to download a flyer to get a peek of some of the new items that will be available. This is only a partial list of the new release, so be sure to check back on March 4!

New Kits in Kits Collection!

And Stampin’ Up! has added two new kits in the Kits Collection – The So Much To Celebrate Kit and the Heirloom Arrangements Kit! These are both card kits that are perfect for Spring!


Creative Challenge: Making Gift Boxes from Cards

And since I didn’t have a card, I decided to share this pretty alternative to the Heirloom Arrangements Kit created by the Stampin’ Up! artists. They even provided step-by-step instructions!

  1. Stamp the grid image in tone-on-tone color on the back of the Pretty in Pink and Crumb Cake cards, stamping off first. (The Blueberry Bushel and Cajun Craze cards are already printed on the back.)
  2. With the printed side facing up, score 8-1/2″ x 5-1/2″ card bases at 1/2″, then cut at 8″. Rotate cards clockwise one quarter turn and score at 1/2″ and 3-3/4″.
  3. Rotate cards back and cut 1-3/4″ down from the top edge of the card on the existing center score line. Cut a 1/2″ x 1-3/4″ piece out of the top right corner. Cut a 1/2″ x 1/2″ square from the bottom right corner and an additional diagonal notch off the bottom right corner. Cut a triangle notch out of the bottom 1/2″ tab at the existing center score line. Cut a small diagonal notch out of the bottom left corner. Fold on all the score lines.
  4. Cut a piece of Basic Beige Cardstock to 3-3/4″ x 3-3/4″ for the bottom of each box.
  5. Add Tear & Tape Adhesive to the bottom 1/2″ tabs and right edge 1/2″ tab on each card and assemble the boxes, using two cards for each box.
  6. Tie Black & Very Vanilla 3/8″ Large Check Ribbon around each box. Create gift tags using kit contents and tie them to the ribbon using twine from the Baker’s Twine Essentials Pack.

Sale-A-Bration Is Going On Now!!

Sale-A-Bration is the biggest Stampin’ Up! promotion of the year. The best part of Sale-A-Bration is that you earn FREE items for every $60 worth of products you purchase. There are items that you get for $60 and there are items you can get for $120. All the details are in the Sale-A-Bration Brochure. Click on the picture of the brochure below to download a copy to view the items and details. And don’t miss the flyer above to see the new Sale-A-Bration items!

Another benefit of Sale-A-Bration is when you host a workshop with sales over $300 or have an individual order over $300, you get to choose an additional $30 worth of products from the Stampin’ Up! catalog or Online Store for FREE!

And Sale-A-Bration is the best time to join Stampin’ Up! as a new Demonstrator. During Sale-A-Bration, new Demonstrators who purchase a starter kit by choosing $125 worth of products for only $99 (includes shipping) have two FREE bonus options to add to your starter kit.

  • Option 1: Your choice of TWO marker sets from our Stampin’ Write Marker Assortments (Brights, Neutrals, Regals, Subtles), PLUS the Handmade Designs stamp set, a beautiful stamp set exclusively designed to work with them.
  • Option 2: Your Choice of an additional $30 in FREE products

Sale-A-Bration runs through February 28, 2025. Visit my Online Store to start shopping now.


The February 2025 Paper Pumpkin Kit is Hello Spring!

Say goodbye to chilly days and let a little sunshine in with the Hello Spring Paper Pumpkin Kit! This kit comes with all the components to create cheerful, garden-inspired cards, including printed card bases, precut paper pieces featuring lush green herbs, bronze foil for an eye-catching sheen, and earthy linen thread. Seed packet envelopes bring a special touch of botanical whimsy. These handmade cards are sure to delight gardening enthusiasts and anyone with a green thumb!

Details:

  • Makes 9 cards: 3 each of 3 designs
  • Precut pieces with bronze foil
  • Unique spring-themed envelopes
  • Petunia Pop Classic Stampin’ Spot

Coordinating Colors:  Basic Beige, Bubble Bath, Lemon Lime Twist, Lost Lagoon, Old Olive, Petunia Pop

And the coordinating add-on is the Spring is in the Air dies – item #166237 for $12 (available while supplies last).

If you’re interested in subscribing to Paper Pumpkin, you can either sign up for a subscription where you are billed monthly for your kit or you can purchase a prepaid subscription in my Online Store. To see more information and to sign up for the monthly subscription click here. To see the options for prepaid subscriptions in my Online Store, click here.

Sign up deadline for the February 2025 kit is February 10, 2025. Note: Supplies may be limited toward the end of the subscription period.


Current Host Code: FYMGA4AN

Use this host code when you order $50 or more and receive a Thank You gift from me!  The free gift is your choice of any item currently available valued up to $10.00.

If your order is over $150, please do not use the host code since you’ll receive your own Host Dollars plus I’ll still send you the Thank You gift!  This host code can be used by anyone, no club or commitment required. Let me know if you have any questions.


If you need any stamping supplies, I’d be very happy to be your Demonstrator.  Just click on the Shop Now Button on the right side of the screen to go directly to my Online store or contact me if you have any questions.  Happy Stamping!

Thanks for stopping by and have a great day!

Akiko

  • Visit my online store here
  • See the current Stampin’ Up! Last Chance items here
  • Earn FREE Stampin’ Up! products through my Wildflower Frequent Shopper Program – my way of saying thank you to my online frequent shopper customers.
  • Have any questions? I’d be happy to help, click here to contact me.

Stampin’ Up! Mixed Labels Thank You Card

Good Morning! Today’s thank you card is CASE’d from a sample on the website for the Stampin’ Up! Mixed Labels bundle. It’s a fun card with layered labels that really show off the pretty label dies and the bold Plaster Painting 3D embossing folder. You can find the products I used at the bottom of my post along with the card stock sizes.

I embossed a panel of Soft Sea Foam with the Plaster Painting 3D embossing folder and cut it into thirds. I adhered the embossed panels to the front of a Soft Sea Foam card base with liquid glue.

I stamped the sentiment from the Stampin’ Up! Mixed Labels stamp set using Memento Tuxedo Black ink on Basic white and cut it out with the coordinating die. I stamped the banner using the same colors and cut it out as well. I cut a panel of Mixed Media Florals designer series paper with the next largest label die. I adhered the DSP label to the banner with liquid glue.

I used Shy Shamrock and Old Olive Stampin’ Blends to roughly color a Basic White strip with the brush ends and cut four leaf clusters using the Stampin’ Up! Mixed Labels die. I used the die from the Heart Shaped dies to cut two flowers from Petal Pink. I adhered three die cut leaves to the DSP label with liquid glue and popped the stamped label and die cut flower on top. I adhered the layered label to the card with glue dots and added a Flirty Flamingo dot to the flower center.

For the inside panel, I adhered the last die cut leaf and flower with liquid glue. I used the light Flirty Flamingo Stampin’ Blend to color the flower center and trimmed the side with DSP. I adhered the panel to the inside of the card with Stampin’ Seal.

The Stampin’ Up! Mixed Labels bundle is part of the latest release of Online Exclusives and has wonderful sentiments and labels.


Sale-A-Bration Is Going On Now!!

Sale-A-Bration is the biggest Stampin’ Up! promotion of the year. The best part of Sale-A-Bration is that you earn FREE items for every $60 worth of products you purchase. There are items that you get for $60 and there are items you can get for $120. All the details are in the Sale-A-Bration Brochure. Click on the picture of the brochure below to download a copy to view the items and details.

Another benefit of Sale-A-Bration is when you host a workshop with sales over $300 or have an individual order over $300, you get to choose an additional $30 worth of products from the Stampin’ Up! catalog or Online Store for FREE!

And Sale-A-Bration is the best time to join Stampin’ Up! as a new Demonstrator. During Sale-A-Bration, new Demonstrators who purchase a starter kit by choosing $125 worth of products for only $99 (includes shipping) have two FREE bonus options to add to your starter kit.

  • Option 1: Your choice of TWO marker sets from our Stampin’ Write Marker Assortments (Brights, Neutrals, Regals, Subtles), PLUS the Handmade Designs stamp set, a beautiful stamp set exclusively designed to work with them.
  • Option 2: Your Choice of an additional $30 in FREE products

Sale-A-Bration runs through February 28, 2025. Visit my Online Store to start shopping now.


Current Host Code: FYMGA4AN

Use this host code when you order $50 or more and receive a Thank You gift from me!  The free gift is your choice of any item currently available valued up to $10.00.

If your order is over $150, please do not use the host code since you’ll receive your own Host Dollars plus I’ll still send you the Thank You gift!  This host code can be used by anyone, no club or commitment required. Let me know if you have any questions.


If you need any stamping supplies, I’d be very happy to be your Demonstrator.  Just click on the Shop Now Button on the right side of the screen to go directly to my Online store or contact me if you have any questions.  Happy Stamping!

Thanks for stopping by and have a great day!

Akiko

  • Visit my online store here
  • See the current Stampin’ Up! Last Chance items here
  • Earn FREE Stampin’ Up! products through my Wildflower Frequent Shopper Program – my way of saying thank you to my online frequent shopper customers.
  • Have any questions? I’d be happy to help, click here to contact me.

Cardstock Cuts for this project:

  • Soft Sea Foam – 5-1/2″ x 8-1/2″ card base, scored at 4-1/4″, 3-1/2″ x 4-1/2″ (embossed panels, cut into three 1-1/2″ strips)
  • Petal Pink – 1″ x 2″ (die cut flowers)
  • Basic White – 3-3/4″ x 5″ (inside panel), 1″ x 1-3/4″ (label), 1″ x 4-1/2″ (banner), 1″ x 4″ (die cut leaves)
  • Mixed Media Florals DSP – 1-1/4″ x 2″ (label mat), 3/4″ x 3-3/4″ (inside trim)

Stampin’ Up! products used in this project:


Stampin’ Up! Grow With Love Thank You Card

Good Morning! The Stampin’ Up! Grow With Love bundle is a wonderful set with pretty herb stamps and dies and a fun mini envelope die. I used it to make a basil thank you card and a mini note card with a coordinating envelope. You can find the products I used at the bottom of my post along with the card stock sizes.

For my thank you card, I adhered a panel of Timeless Plaid 6″ x 6″ DSP to a Mossy Meadow mat and adhered it to the front of a Lost Lagoon card base. I stamped the frame and basil from the Stampin’ Up! Grow With Love stamp set using Pecan Pie ink on Basic White and cut it out with the rectangle die. I stamped the basil again using Mossy Meadow ink on Basic White and cut it out with the basil die and popped it over the Pecan Pie basil with dimensionals. I adhered the panel to the card with liquid glue.

I stamped part of the sentiment from the Stampin’ Up! Grow With Love stamp set using Mossy Meadow ink on Basic White. I cut it out with the small label die and adhered a Linen Thread bow to the back before adhering it to the card with dimensionals. I finished the card with textured metallic dots.

I used the envelope die from the Stampin’ Up! Grow With Love dies to cut a panel of Timeless Plaid DSP and burnished the score lines. I adhered the envelope together with liquid glue. I adhered a short length of linen thread to the envelope flap with a glue dot and cut the envelope clasps from Lost Lagoon. I adhered the large circles to the envelope with mini dimensionals, topped them with dots and looped the Linen Thread to secure it. I stamped the basil and frame again using Pecan Pie ink on Basic White and cut it out with the rectangle die. I adhered it to the front of a mini card made with the Timeless Plaid DSP.

For the inside panel of the main card, I trimmed the bottom of a Basic White panel with DSP. I stamped another basil from the Stampin’ Up! Grow With Love stamp set using Mossy Meadow ink on Basic White and cut it out with the coordinating die. I adhered it to the inside panel and trimmed the side before adhering the panel to the inside of the card with Stampin’ Seal.

For the inside of the mini card, I simply stamped the frame from the Stampin’ Up! Grow With Love stamp set using Pecan Pie ink and cut it out with the coordinating die. I adhered it to the inside of the mini card with Stampin’ Seal.

The Stampin’ Up! Grow With Love is one of the new Online Exclusives bundles that came out at the beginning of the month. The herb stamp images are just gorgeous with intricate details and shading and it was hard to choose which herb to use. The little envelope is pretty easy to put together and it’s so cute! It’s supposed to be for seeds, but it fits a gift card and is perfect for a little note card or tag to accompany a gift.


Sale-A-Bration Is Going On Now!!

Sale-A-Bration is the biggest Stampin’ Up! promotion of the year. The best part of Sale-A-Bration is that you earn FREE items for every $60 worth of products you purchase. There are items that you get for $60 and there are items you can get for $120. All the details are in the Sale-A-Bration Brochure. Click on the picture of the brochure below to download a copy to view the items and details.

Another benefit of Sale-A-Bration is when you host a workshop with sales over $300 or have an individual order over $300, you get to choose an additional $30 worth of products from the Stampin’ Up! catalog or Online Store for FREE!

And Sale-A-Bration is the best time to join Stampin’ Up! as a new Demonstrator. During Sale-A-Bration, new Demonstrators who purchase a starter kit by choosing $125 worth of products for only $99 (includes shipping) have two FREE bonus options to add to your starter kit.

  • Option 1: Your choice of TWO marker sets from our Stampin’ Write Marker Assortments (Brights, Neutrals, Regals, Subtles), PLUS the Handmade Designs stamp set, a beautiful stamp set exclusively designed to work with them.
  • Option 2: Your Choice of an additional $30 in FREE products

Sale-A-Bration runs through February 28, 2025. Visit my Online Store to start shopping now.


Current Host Code: S37YBRUS

Use this host code when you order $50 or more and receive a Thank You gift from me!  The free gift is your choice of any item currently available valued up to $10.00.

If your order is over $150, please do not use the host code since you’ll receive your own Host Dollars plus I’ll still send you the Thank You gift!  This host code can be used by anyone, no club or commitment required. Let me know if you have any questions.


If you need any stamping supplies, I’d be very happy to be your Demonstrator.  Just click on the Shop Now Button on the right side of the screen to go directly to my Online store or contact me if you have any questions.  Happy Stamping!

Thanks for stopping by and have a great day!

Akiko

  • Visit my online store here
  • See the current Stampin’ Up! Last Chance items here
  • Earn FREE Stampin’ Up! products through my Wildflower Frequent Shopper Program – my way of saying thank you to my online frequent shopper customers.
  • Have any questions? I’d be happy to help, click here to contact me.

Cardstock Cuts for this project:

  • Lost Lagoon – 5-1/2″ x 8-1/2″ card base, scored at 4-1/4″, 1″ x 1″ (envelope clasp)
  • Mossy Meadow – 2-1/2″ x 4-1/4″ (DSP mat)
  • Basic White – 3-3/4″ x 5″ (inside panel), three 2-1/2″ x 4″ panels (basil panels), two 2″ x 3″ panels (Mossy Meadow basil)
  • Timeless Plaid 6″ x 6″ DSP – 2-3/8″ x 4-1/4″ (front background), 5-1/2″ x 6″ (envelope), 1/2″ x 3-3/4″ (inside trim), 3-1/2″ x 4-1/2″, mini card base, scored at 2-1/4

Stampin’ Up! products used in this project:


Stampin’ Up! Cake Celebrations Birthday Card

Good Morning! Sale-A-Bration starts tomorrow and one of the items you can choose for FREE with a $60 order is the Bloom Impressions designer series paper pack. It’s a beautiful floral pack of double sided 12″ x 12″ patterned paper and I’ve chosen one of the patterns for the background of today’s birthday card using the Stampin’ Up! Cake Celebrations bundle. You can find the currently available supplies I used along with card stock cuts at the bottom of my post.

I adhered a panel of Bloom Impressions Sale-A-Brations DSP to a Basic White mat. I adhered a contrasting stripe of the DSP to another Basic White mat and adhered them both to the layered DSP. I tied Basic White baker’s twine around the layered panel and tied a bow and popped it on the front of a Melon Mambo card base with dimensionals.

I stamped the cake stand from the Stampin’ Up! Cake Celebrations stamp set using Smoky Slate ink at the bottom of a Basic White panel. I stamped the long cake using Flirty Flamingo ink on top of the cake stand and stamped the double layer icing on top using Melon Mambo ink. I repeated stamping the cake and icing, so I would have a tall cake with several layers! I stamped the candles on top using Melon Mambo ink and topped it with Daffodil Delight candle flames. I used stamped off Smoky Slate ink to fill in the background with the sparkle stamp.

I cut out the cake with a Deckled Rectangle die and adhere it to a Summer Splash mat. I adhered the cake panel to the card with dimensionals and added tinsel gems for additional sparkle.

For the inside of the card, I stamped the birthday sentiment from the Happiest Day stamp set using Melon Mambo ink. I added some more stamped off Smoky Slate sparkles from the Stampin’ Up! Cake Celebrations stamp set and trimmed the bottom of the panel with DSP. I adhered the panel to the inside of the card with Stampin’ Seal.

I love the Stampin’ Up! Cake Celebrations bundle because it’s so versatile in making your cake cards! I’ve made die cut cakes and stamped cakes and used all the different icing options and it always comes great – like I want a slice! And speaking of celebrating with cake, be sure to check out awesome new Wildflower Birthday Celebrations Suite in the Stampin’ Up! January-April 2025 Mini Catalog that’s coming out tomorrow.


Last Chance Products Now Available!

Retiring products for the current September-December 2024 Mini Catalog are now available in the Last Chance Products category in the Online Store.

Stampin’ Up! is making some changes to their product retirement process. They are introducing a new Last Chance Products category in the Online Store today that will include retiring products from the current 2024 September-December Mini Catalog and Online Exclusives items that are being discontinued. The Last Chance Products category is replacing the current Clearance Rack and will be updated every two months.

Here are the details:

  • Last Chance Products include retiring products from both catalogs and online releases, excluding Paper Pumpkin.
  • Last Chance Products are available while supplies last and will be discontinued when they sell out. Items will be automatically removed from the category and the online store when they are discontinued.
  • Discounts vary and are subject to change. Also, depending on inventory, these products may or may not have discounts.
  • The Last Chance Products category will be updated every other month. Updates happen at the beginning of the month and may include additional products in the category and any adjustments to product discounts.

This change aligns with Stampin’ Up!’s product release strategy of new Online Exclusives every two months and unifies the retirement process for Online Exclusive and Catalog products. The goal is to keep product offerings fresh, trendy and exciting for Stampin’ Up! customers.

If you have any questions, let me know.


New January-April 2025 Mini Catalog and Sale-A-Bration Coming Tomorrow!

Tomorrow is the big day!! Sale-A-Bration begins, the new January-April 2025 Mini Catalog debuts and a new selection of Online Exclusives will be available for even more wonderful new products. Scrapbooking crafters will be treated to a new Scrapbooking Brochure, too! And finally, three new kits will be available in the Kits Collection! Happy Shopping!!


Current Host Code: S37YBRUS

Use this host code when you order $50 or more and receive a Thank You gift from me!  The free gift is your choice of any item currently available valued up to $10.00.

If your order is over $150, please do not use the host code since you’ll receive your own Host Dollars plus I’ll still send you the Thank You gift!  This host code can be used by anyone, no club or commitment required. Let me know if you have any questions.


If you need any stamping supplies, I’d be very happy to be your Demonstrator.  Just click on the Shop Now Button on the right side of the screen to go directly to my Online store or contact me if you have any questions.  Happy Stamping!

Thanks for stopping by and have a great day!

Akiko

  • Visit my online store here
  • See the current Stampin’ Up! Last Chance items here
  • Earn FREE Stampin’ Up! products through my Wildflower Frequent Shopper Program – my way of saying thank you to my online frequent shopper customers.
  • Have any questions? I’d be happy to help, click here to contact me.

Cardstock Cuts for this project:

  • Melon Mambo – 5-1/2″ x 11″ card base, scored at 4-1/4″”
  • Summer Splash – 2-3/4″ x 4-1/8″ (cake mat)
  • Basic White – 3-3/4″ x 5″ (inside panel), 1″ x 3-3/4″ (DSP stripe mat), 3-7/8″ x 5-1/8″ (front mat), 3″ x 4-1/4″ (cake panel)
  • Bloom Impressions DSP – 3-3/4″ x 5″ (front background), 7/8″ x 3-3/4″ (striped accent), 31/2″ x 3-3/4″ (inside trim)

Stampin’ Up! products used in this project:


Stampin’ Up! Happy Hibiscus Thank You Card

Good Morning! Are you ready for a Tropical Escape? I love tropical stamp sets like the Stampin’ Up! Happy Hibiscus bundle for this time of year, because it reminds me of warm sunshine and tropical beaches at this cold time of year – and I’m ready to escape there! So I put together a fun little thank you card using the Stampin’ Up! Happy Hibiscus bundle to warm me up. You can find the products I used at the bottom of my post along with the card stock sizes.

I embossed a panel of light Pool Party card stock with the Stampin’ Up! Happy Hibiscus embossing folder. The light Pool Party is from the two-tone scrapbooking collection card stock and makes a nice subtle contrast with regular Pool Party card stock. And I love that you can use the hybrid embossing folder without the dies! I adhered the embossed panel to the front of a Pool Party card base.

I stamped the three flowers from the Stampin’ Up! Happy Hibiscus stamp set using Memento Tuxedo Black ink on Basic White and cut it out with the coordinating die. I stamped the detailed stamp for each flower using Poppy Parade ink. I used the dark Daffodil Delight Stampin’ Blend to color the centers and stamen and the Flirty Flamingo Stampin’ Blends to fill in the white spaces. Finally, I used the dark Poppy Parade Stampin’ Blend to intensify the color in the centers of the flowers. After all the coloring, I carefully placed each flower back in the embossing folder and ran it through my Stampin’ Cut & Emboss machine to give the flowers dimension.

I stamped the sentiment from the Stampin’ Up! Happy Hibiscus stamp set using Memento Tuxedo Black ink on Basic White and cut it out with the circle die. I adhered the label to the card with glue dots. I adhered the middle sized flower with glue dots and the large flower with dimensionals. I cut four leaves from Garden Green and adhered them with glue dots, tucking the stems under the flowers. I cut three small flowers from Petal Pink and adhered them with glue dots and accented the centers with yellow sequins. I adhered additional green sequins around the flowers to add a touch more shine.

I left the inside of the card pretty simple, trimming a Basic White panel with an embossed strip of light Pool Party and adhering another die cut leaf and flower from the Stampin’ Up! Happy Hibiscus dies to the corner (I even added a little sequin to the flower center, I hope it doesn’t poke through the front. I adhered the panel to the inside of the card with Stampin’ Seal.

The Stampin’ Up! Happy Hibiscus bundle is a wonderful tropical floral bundle from the Online Exclusives collection. It has two-step stamping flowers and leaves in different sizes and pretty sentiments. And it has the hybrid embossing folder with the three flower die to cut and emboss at the same time, along with additional dies for labels and die cut accent flowers and leaves.


Last Chance Products Now Available!

Retiring products for the current September-December 2024 Mini Catalog are now available in the Last Chance Products category in the Online Store.

Stampin’ Up! is making some changes to their product retirement process. They are introducing a new Last Chance Products category in the Online Store today that will include retiring products from the current 2024 September-December Mini Catalog and Online Exclusives items that are being discontinued. The Last Chance Products category is replacing the current Clearance Rack and will be updated every two months.

Here are the details:

  • Last Chance Products include retiring products from both catalogs and online releases, excluding Paper Pumpkin.
  • Last Chance Products are available while supplies last and will be discontinued when they sell out. Items will be automatically removed from the category and the online store when they are discontinued.
  • Discounts vary and are subject to change. Also, depending on inventory, these products may or may not have discounts.
  • The Last Chance Products category will be updated every other month. Updates happen at the beginning of the month and may include additional products in the category and any adjustments to product discounts.

This change aligns with Stampin’ Up!’s product release strategy of new Online Exclusives every two months and unifies the retirement process for Online Exclusive and Catalog products. The goal is to keep product offerings fresh, trendy and exciting for Stampin’ Up! customers.

If you have any questions, let me know.


New January-April 2025 Mini Catalog and Sale-A-Bration Coming January 7, 2025!

January 7, 2025 is the big day!! The new Stampin’ Up! January-April 2025 Mini Catalog will be available and Sale-A-Bration 2025 will begin. The new Mini Catalog will feature lots of new products that will be great for the upcoming holidays and Spring months. Sale-A-Bration will be returning with lots of great items that you will be able to choose for FREE with each $60 order and a wonderful new Starter Kit bonus offer. Sale-A-Bration will run through February 28, 2025.

In addition to Sale-A-Bration and the new Mini Catalog, a new selection of Online Exclusives will be available for even more exciting new products. And scrapbooking crafters will be treated to a new Scrapbooking Brochure.


Current Host Code: S37YBRUS

Use this host code when you order $50 or more and receive a Thank You gift from me!  The free gift is your choice of any item currently available valued up to $10.00.

If your order is over $150, please do not use the host code since you’ll receive your own Host Dollars plus I’ll still send you the Thank You gift!  This host code can be used by anyone, no club or commitment required. Let me know if you have any questions.


If you need any stamping supplies, I’d be very happy to be your Demonstrator.  Just click on the Shop Now Button on the right side of the screen to go directly to my Online store or contact me if you have any questions.  Happy Stamping!

Thanks for stopping by and have a great day!

Akiko

  • Visit my online store here
  • See the current Stampin’ Up! Last Chance items here
  • Earn FREE Stampin’ Up! products through my Wildflower Frequent Shopper Program – my way of saying thank you to my online frequent shopper customers.
  • Have any questions? I’d be happy to help, click here to contact me.

Cardstock Cuts for this project:

  • Pool Party – 4-1/4″ x 11″ card base, scored at 5-1/2″
  • Two-Tone Pool Party – 3-3/4″ x 5″ (embossed background), 1/2″ x 3-3/4″ (embossed inside trim)
  • Garden Green – 1-1/4″ x 5″ (die cut leaves)
  • Petal Pink – 1″ x 4″ (die cut flowers)
  • Basic White – 3-3/4″ x 5″ (inside panel), 3″ x 4-1/2″ (stamped flowers), 2″ x 2″ (label)

Stampin’ Up! products used in this project:


Stampin’ Up! Mixed Labels Sneak Peek

Good Morning! The Stampin’ Up! Mixed Labels bundle is pretty sentiment bundle with pretty label dies that is part of the mixed Media Florals Suite coming in the January Online Exclusives release on January 7, 2025. I’ve used it with a pretty floral pattern from the Mixed Media Florals designer series paper pack that is part of the suite. You can find the currently available products I used at the bottom of my post along with the card stock sizes. And you can download a flyer with pictures of the bundle and designer series paper below.

I adhered a panel of Mixed Media Florals designer series paper to a Basic Black mat with liquid glue and wrapped it with Basic Black baker’s twine and tied a bow. I adhered the background panel to the front of a Calypso Coral card base with dimensionals.

I stamped the sentiment from the Stampin’ Up! Mixed Labels stamp set using Versamark ink on a Basic Black panel. I sprinkled it with white embossing powder and shook off the excess. I heated it with my heat tool until it was bright and shiny and cut it out with the pretty label die. Isn’t the die cut border so pretty!

I adhered a butterfly accent to the card with small cut up pieces of dimensionals, carefully hidden behind the wings and glue dots on the body. I finished the card with iridescent faceted gems.

For the inside of the card, I stamped the little flowers from the Stampin’ Up! Mixed Labels stamp set in Memento Tuxedo Black ink on a Basic White panel. I trimmed the bottom with DSP and adhered the panel to a Basic Black mat before adhering it to the inside of the card with Stampin’ Seal.

The beautiful Mixed Media Florals Suite will be available on January 7, 2025 with a new selection of Online Exclusives. Click on the picture below to download a flyer and get the details on the Stampin’ Up! Mixed Labels bundle and the Mixed Media Florals designer series paper pack (and the other pretty items in the Suite).

The new Online Exclusives release is in addition to the January-April 2025 Mini Catalog and will include two product suites, five bundles and additional stamp sets and embellishments. I can’t wait for January 7, 2025!


Last Chance Products Now Available!

Retiring products for the current September-December 2024 Mini Catalog are now available in the Last Chance Products category in the Online Store.

Stampin’ Up! is making some changes to their product retirement process. They are introducing a new Last Chance Products category in the Online Store today that will include retiring products from the current 2024 September-December Mini Catalog and Online Exclusives items that are being discontinued. The Last Chance Products category is replacing the current Clearance Rack and will be updated every two months.

Here are the details:

  • Last Chance Products include retiring products from both catalogs and online releases, excluding Paper Pumpkin.
  • Last Chance Products are available while supplies last and will be discontinued when they sell out. Items will be automatically removed from the category and the online store when they are discontinued.
  • Discounts vary and are subject to change. Also, depending on inventory, these products may or may not have discounts.
  • The Last Chance Products category will be updated every other month. Updates happen at the beginning of the month and may include additional products in the category and any adjustments to product discounts.

This change aligns with Stampin’ Up!’s product release strategy of new Online Exclusives every two months and unifies the retirement process for Online Exclusive and Catalog products. The goal is to keep product offerings fresh, trendy and exciting for Stampin’ Up! customers.

If you have any questions, let me know.


Current Host Code: VT29C2UC

Use this host code when you order $50 or more and receive a Thank You gift from me!  The free gift is your choice of any item currently available valued up to $10.00.

If your order is over $150, please do not use the host code since you’ll receive your own Host Dollars plus I’ll still send you the Thank You gift!  This host code can be used by anyone, no club or commitment required. Let me know if you have any questions.


If you need any stamping supplies, I’d be very happy to be your Demonstrator.  Just click on the Shop Now Button on the right side of the screen to go directly to my Online store or contact me if you have any questions.  Happy Stamping!

Thanks for stopping by and have a great day!

Akiko

  • Visit my online store here
  • See the current Stampin’ Up! Last Chance items here
  • Earn FREE Stampin’ Up! products through my Wildflower Frequent Shopper Program – my way of saying thank you to my online frequent shopper customers.
  • Have any questions? I’d be happy to help, click here to contact me.

Cardstock Cuts for this project:

  • Calypso Coral – 4-1/4″ x 11″ card base, scored at 5-1/2″
  • Basic Black – two 3-7/8″ x 5-1/8″ panels (front mat and inside mat), 2″ x 3″ (label)
  • Basic White – 3-3/4″ x 5″ (inside panel)
  • Mixed Media Florals DSP – 3-3/4″ x 5″ (front background), 1/2″ x 3-3/4″ (inside trim)

Stampin’ Up! products used in this project: