Stampin’ Up! Thankful Garden Hello Card for the Happy Inkin’ Thursday Blog Hop

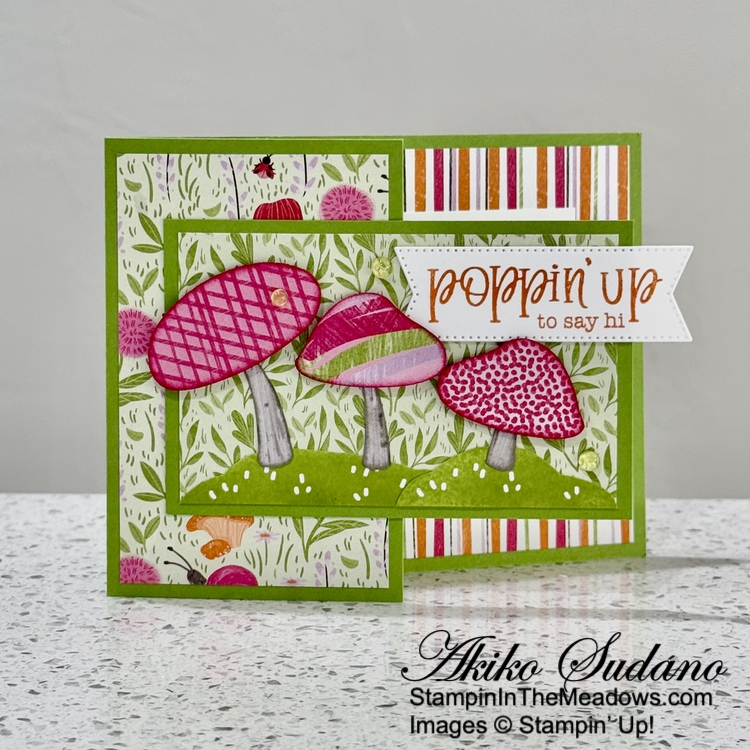
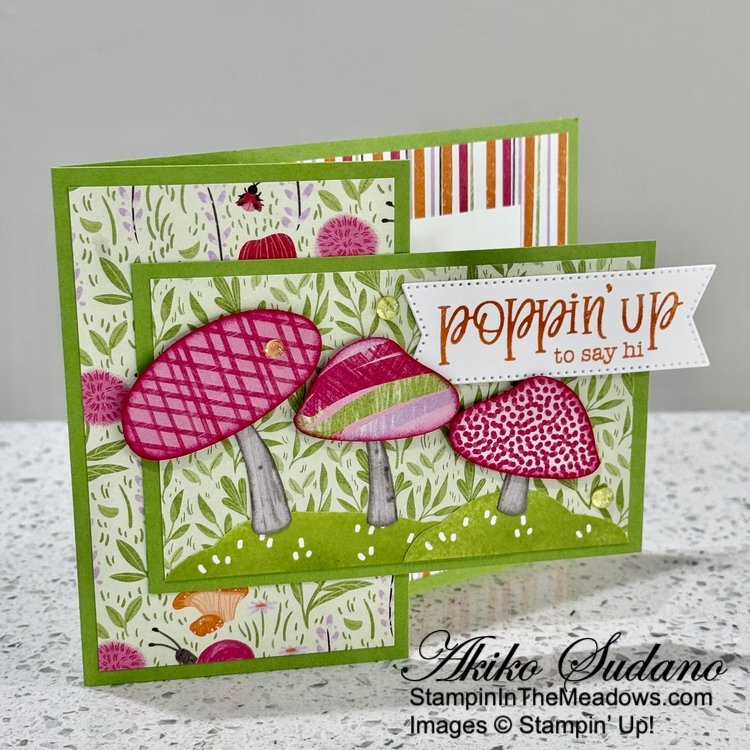
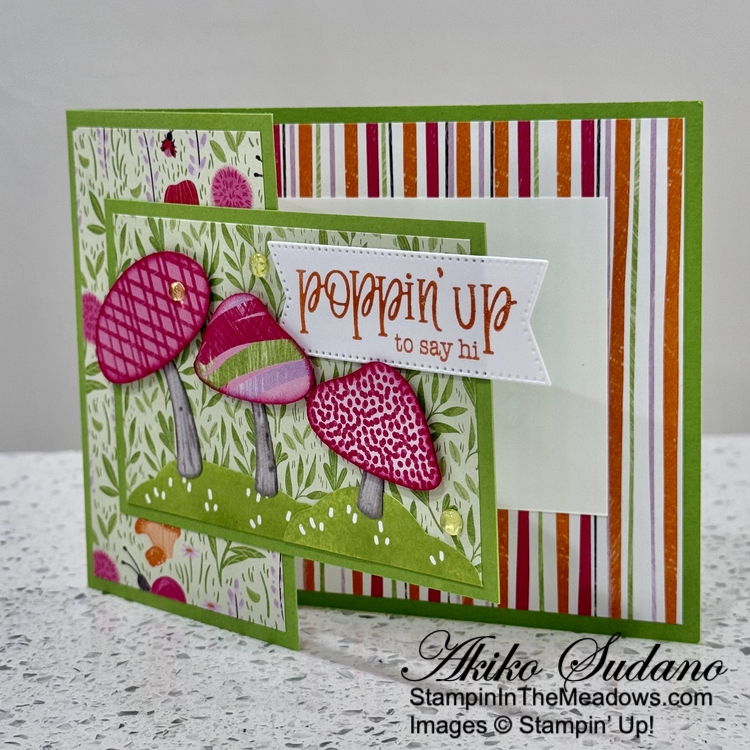
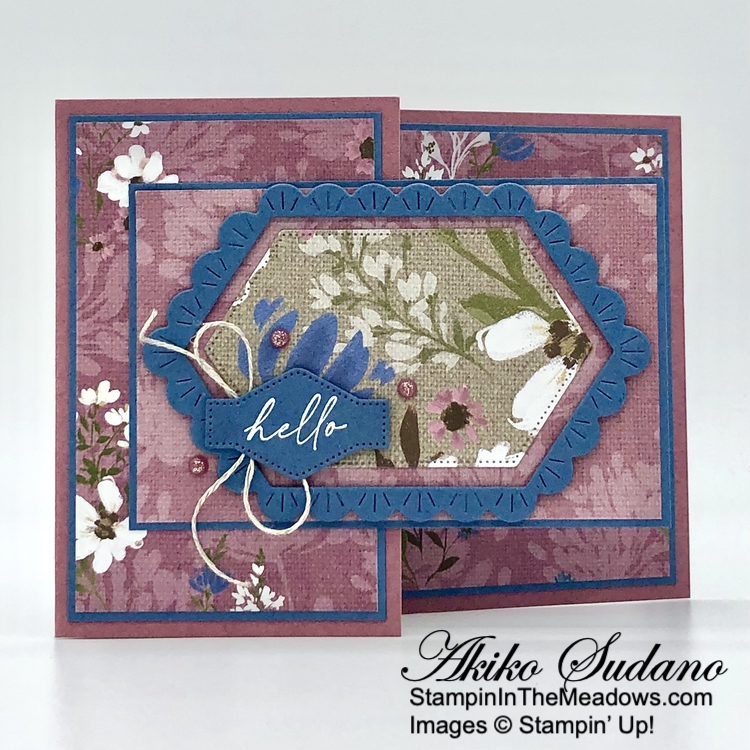
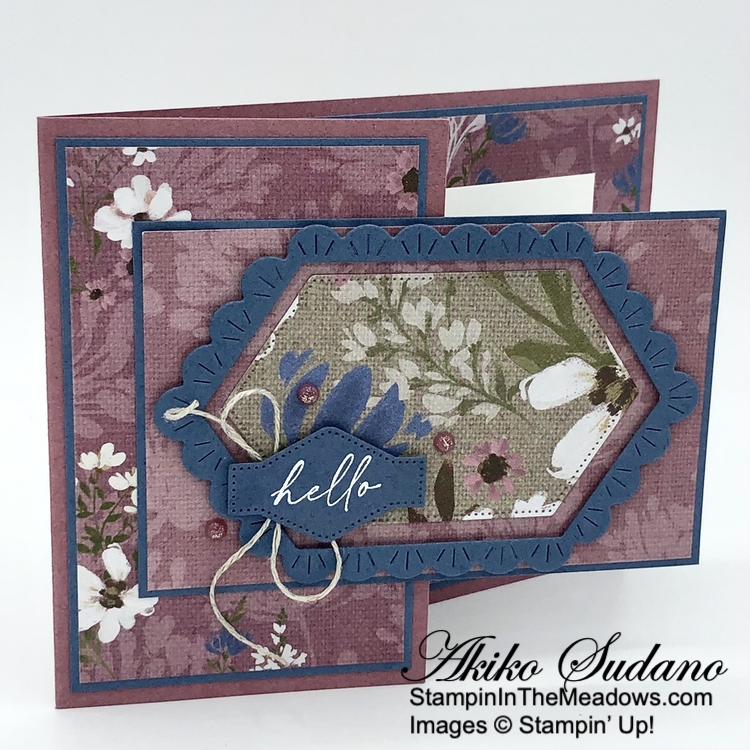
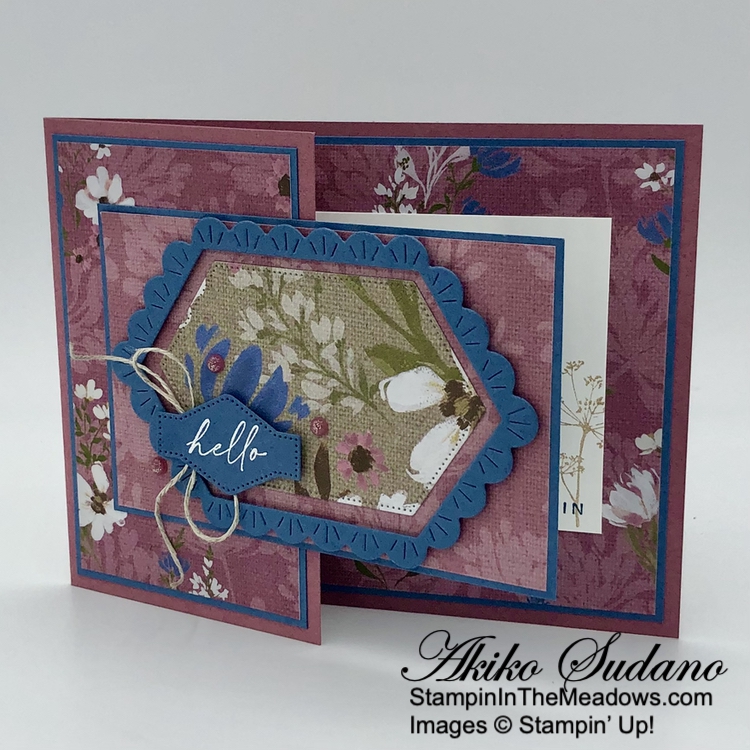
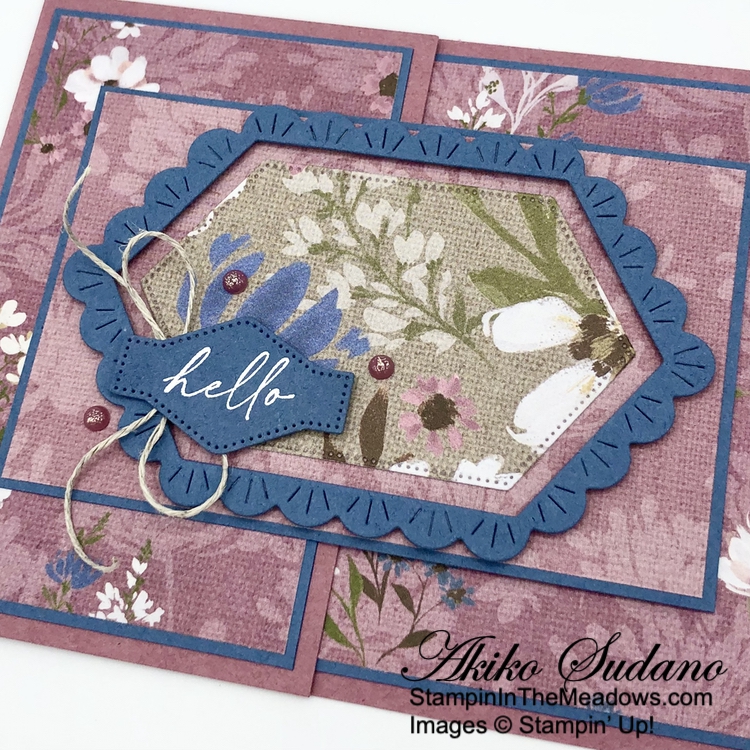
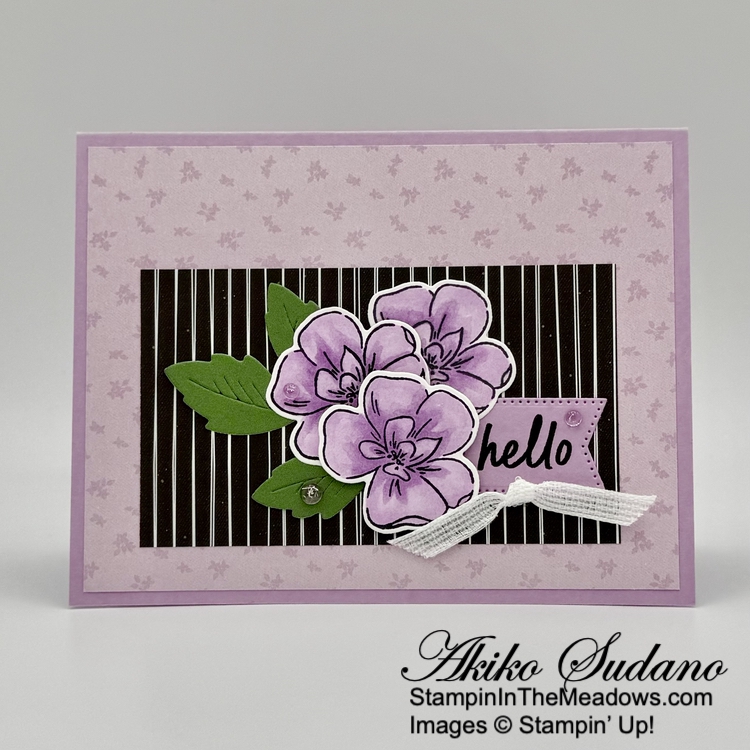
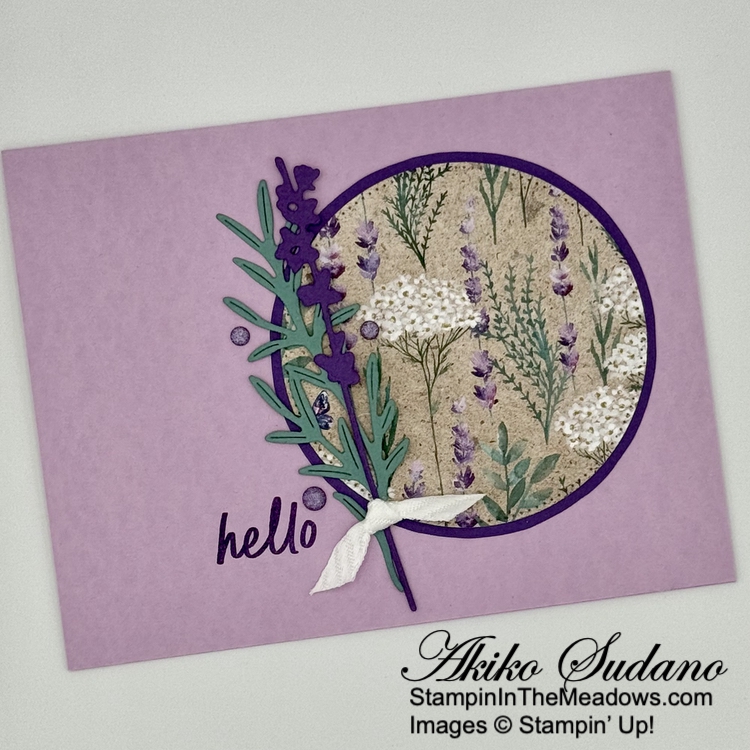
Good Morning and welcome to the Happy Inkin’ Thursday Blog Hop! I used the Stampin’ Up! Thankful Garden bundle with the Simply Said stamp set and Lovely Garden designer series paper to make a Hello card for today. You can find the supplies I used along with card stock cuts at the bottom of my post.

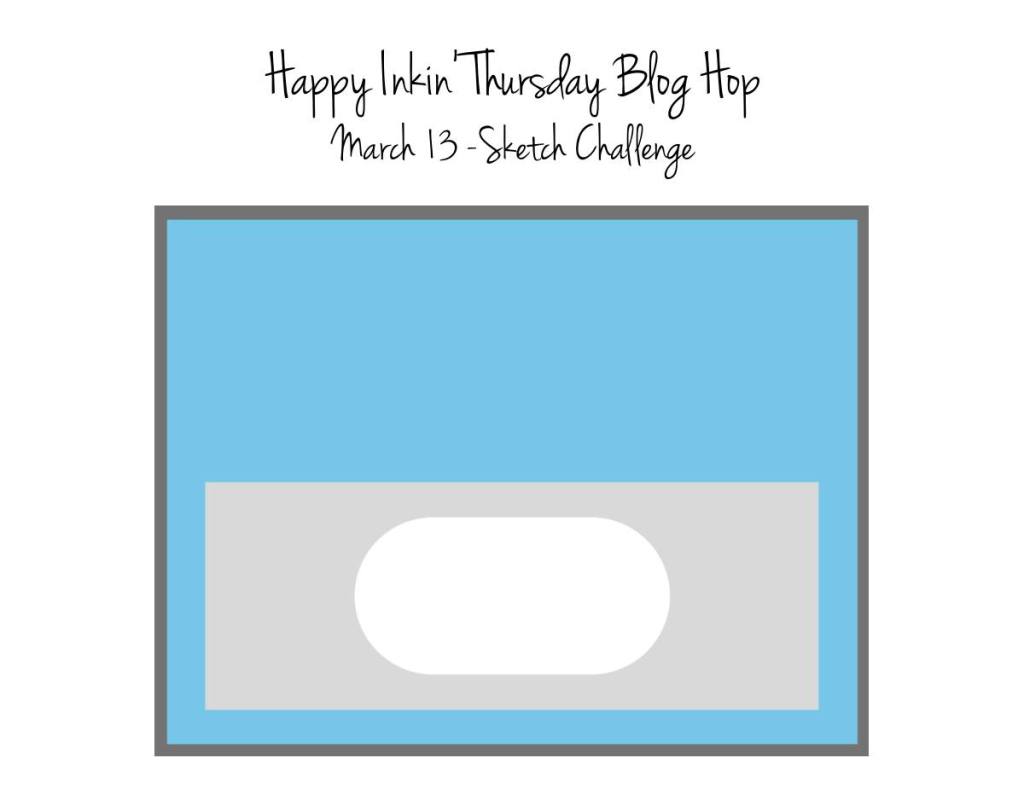
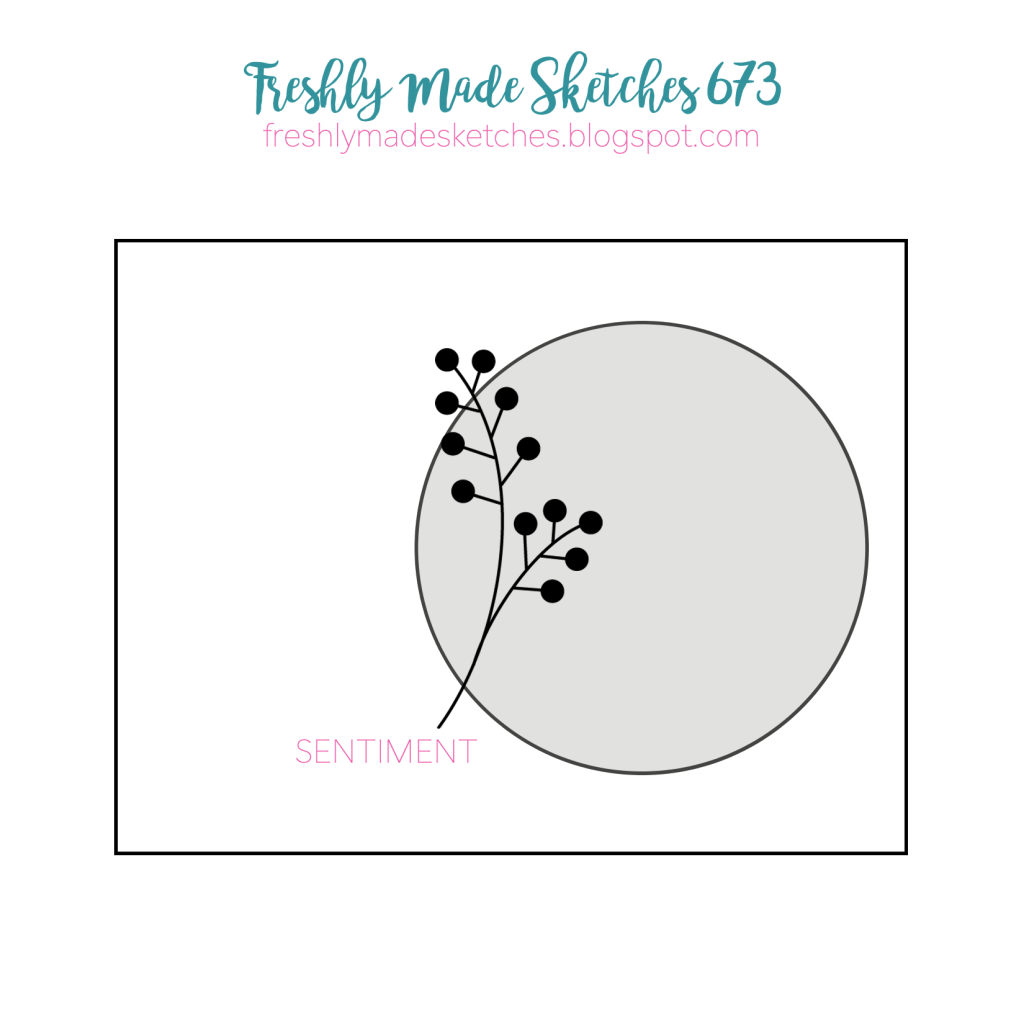
We have a sketch challenge this week and I interpreted the flowers as the oval.

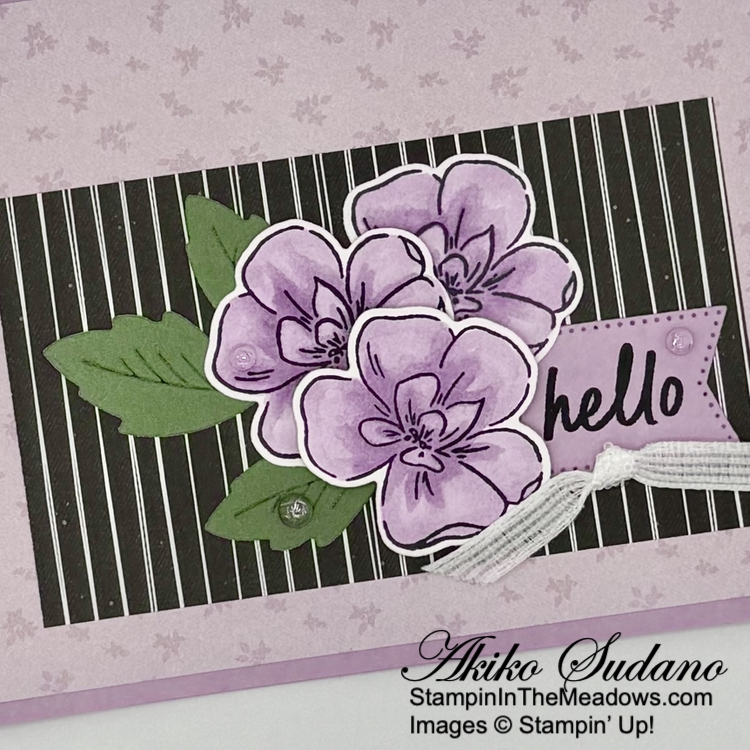
I adhered a panel of Lovely Garden designer series paper to the front of a Fresh Freesia card base with liquid glue and adhered a contrasting black and white striped panel on top.

I stamped the flower from the Stampin’ Up! Thankful Garden stamp set using Memento Tuxedo Black ink on Basic White four times amd cut it out with the small flower die. I partially inked the smaller flower with the ink and stamped it on one side of a Basic White strip and then flipped it, inked it up again and stamped the other side, so I get a clean stamped flower. I colored the flowers with Fresh Freesia Stampin’ Blends and cut them out with the coordinating small single flower die.

I used the leaf die from the Stampin’ Up! Thankful Garden dies to cut the light side of Garden Green Two-Tone card stock and adhered it to the card with glue dots. I stamped the sentiment from the Simply Said stamp set on Fresh Freesia and cut it out with the banner die fromt eh Stylish Shapes dies. I adhered the label to the card with glue dots and also used glue dots to adhere two of the die cut flowers. I popped the last flower on the card with dimensionals and finished with Fresh Freesia dots and a white ribbon tie.

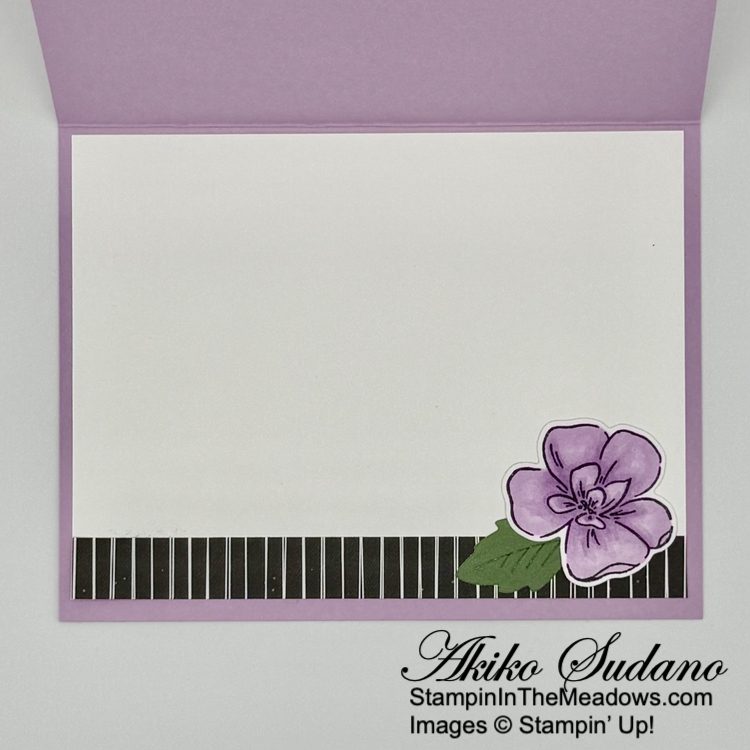
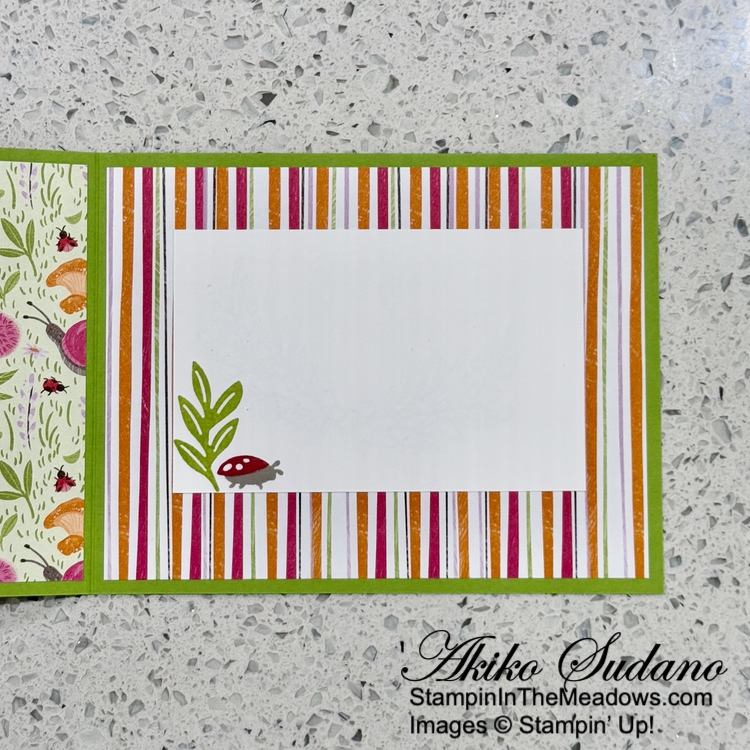
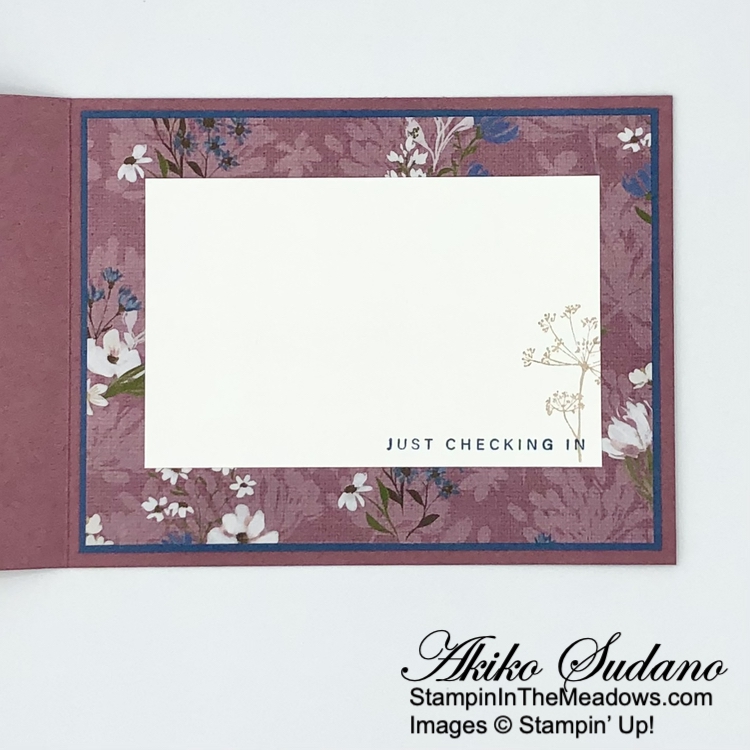
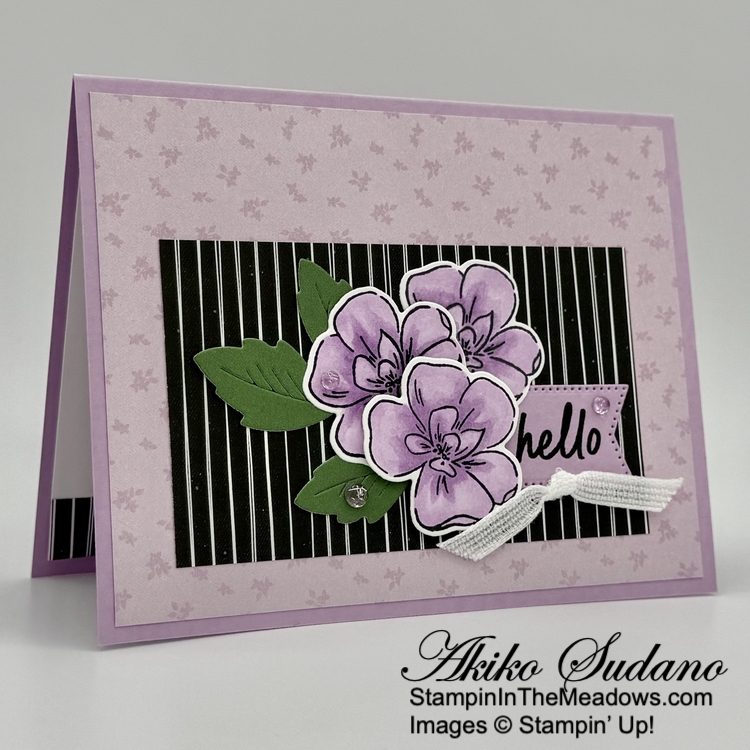
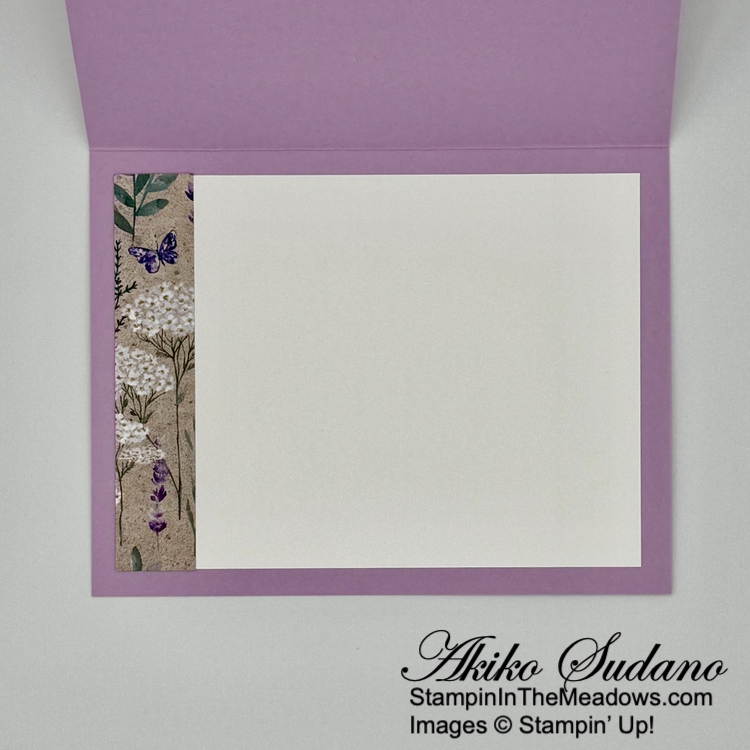
For the inside, I adhered a strip of DSP to the bottom of a Basic White panel. I cut a single leaf from the Stampin’ Up! Thankful Garden leaf cluster die and adhered it and the last flower to the panel. I adhered the panel to the inside of the card with Stampin’ Seal.

The flowers from the Stampin’ Up! Thankful Garden bundle are so pretty and can be colored in so many ways! I also love how you have dies to cut single flowers from the bouquets because it gives you more options to use the stamp set. It’s a wonderful bundle!

On with the Hop! Click on the Next Blog button to move forward to see the beautiful project Karen Ksenzakovic has created.

If you get lost along the way, here are the participants for the hop:


If you need any stamping supplies, I’d be very happy to be your Demonstrator.  Just click on the Shop Now button on the right side of the screen to go directly to my online store or contact me if you have any questions. 

Thanks for stopping by and Happy Stamping!

Akiko

  • Visit my online store here
  • See the current Stampin’ Up! Last Chance items here
  • Have any questions? I’d be happy to help, click here to contact me.

Cardstock Cuts for this project:

  • Fresh Freesia -5-1/2″ x 8-1/2″ card base, scored at 4-1/4″, 1-1/4″ x 2-1/2″ (label)
  • Garden Green Two-Tone – 2-1/2″ x 3″ (die cut leaves)
  • Basic White – 4″ x 5-1/4″ (inside panel), two 2-1/2″ x 3-1/2″ (die cut flowers)
  • Lovely Garden DSP – 4″ x 5-1/4″ (front background), 1/2″ x 5-1/4″ (inside trim), 2-1/2″ x 4-1/4″ (contrasting DSP panel)

Stampin’ Up! products used in this project:

Stampin’ Up! Terrific Toadstools Fun Fold Card

Good Morning! The Stampin’ Up! Terrific Toadstools bundle is from the new Mini Catalog is a whimsical and fun mushroom themed stamp set that coordinates with the Sale-A-Bration Toadstool Gardens designer series paper. Sale-A-Bration is ending soon, so I decided to make this fun-fold hello card with these products. You can find the products I used at the bottom of my post along with the card stock sizes.

I adhered panels of Toadstool Gardens designer series paper to Pebbled Path mats before adhering them to the front and end sections of a Melon Mambo card base. I adhered striped patterns of the DSP to the middle sections (see picture below). I used the second largest circle from the Stylish Shapes dies to cut a Gray Granite panel of the DSP and adhered it to the center panel with liquid glue.

I used the leaf sprigs from the Delicate Forest dies to cut a granny Apple Green panel and adhered them to the card with liquid glue. I stamped the mushroom caps from the Stampin’ Up! Terrific Toadstools bundle using Melon Mambo and Pumpkin Pie inks on Basic White and punched them out with the Terrific Toadstools punch. I stamped the mushroom stems using Gray Granite ink on Basic White and fussy cut them with my paper snips. I adhered the stems to the caps with liquid glue and popped them on the card with dimensionals.

I stamped the sentiment from the Stampin’ Up! Terrific Toadstools stamp set using Versamark ink on Pebbled Path card stock. I sprinkled it with white embossing powder, shook off the excess and heated it with my heat tool. I cut it out with the short label die from the Delicate Forest dies. I folded a length of Peach Pie ribbon and adhered it to the back of the label with glue dots and popped the label on the card with dimensionals. I finished the card with Melon Mambo glossy dots.

The inside panel is on the back of the front center panel and I stamped the mushroom, stems and leaf sprig from the Stampin’ Up! Terrific Toadstools stamp set in Melon Mambo, Gray Granite and Granny Apple Green inks on Basic White. I adhered the panel to the card and adhered panels of the striped Toadstool Gardens DSP to each of the back panels.

The Stampin’ Up! Terrific Toadstools bundle has different style mushroom tops and stems for you to mix and match to create your own mushrooms. And there are cute little ladybugs that you can stamp too! The punch punches out the mushrooms without the white border, so it’s pretty easy to use. This is the last week to get the Toadstool Gardens 6″ x 6″ designer series paper for FREE as a Sale-A-Bration item. It is a bright and colorful set of papers that are perfect for Spring. This is part of the reason I like this fun fold card so much, it shows off the pretty DSP!


Last Week for Sale-A-Bration !!

Sale-A-Bration is the biggest Stampin’ Up! promotion of the year. The best part of Sale-A-Bration is that you earn FREE items for every $60 worth of products you purchase. There are items that you get for $60 and there are items you can get for $120. You can select your FREE Sale-A-Bration items when you checkout.

Another benefit of Sale-A-Bration is when you host a workshop with sales over $300 or have an individual order over $300, you get to choose an additional $30 worth of products from the Stampin’ Up! catalog or Online Store for FREE!

And Sale-A-Bration is the best time to join Stampin’ Up! as a new Demonstrator. During Sale-A-Bration, new Demonstrators who purchase a starter kit by choosing $125 worth of products for only $99 (includes shipping) have two FREE bonus options to add to your starter kit.

  • Option 1: Your choice of TWO marker sets from our Stampin’ Write Marker Assortments (Brights, Neutrals, Regals, Subtles), PLUS the Handmade Designs stamp set, a beautiful stamp set exclusively designed to work with them.
  • Option 2: Your Choice of an additional $30 in FREE products

Sale-A-Bration runs through February 28, 2025. Visit my Online Store to start shopping now.


Current Host Code: FYMGA4AN

Use this host code when you order $50 or more and receive a Thank You gift from me!  The free gift is your choice of any item currently available valued up to $10.00.

If your order is over $150, please do not use the host code since you’ll receive your own Host Dollars plus I’ll still send you the Thank You gift!  This host code can be used by anyone, no club or commitment required. Let me know if you have any questions.


If you need any stamping supplies, I’d be very happy to be your Demonstrator.  Just click on the Shop Now Button on the right side of the screen to go directly to my Online store or contact me if you have any questions.  Happy Stamping!

Thanks for stopping by and have a great day!

Akiko

  • Visit my online store here
  • See the current Stampin’ Up! Last Chance items here
  • Earn FREE Stampin’ Up! products through my Wildflower Frequent Shopper Program – my way of saying thank you to my online frequent shopper customers.
  • Have any questions? I’d be happy to help, click here to contact me.

Cardstock Cuts for this project:

  • Melon Mambo – 4-1/4″ x 11″ card base scored at 2-1/4″, 3-5/8″, 7-3/8″ and 8-3/4″
  • Pebbled Path – 3-1/2″ x 4″ (front center panel mat), two 2″ x 4″ panels (side DSP mats), 1-1/4″ x 3-1/4″ (label)
  • Granny Apple Green – 2″ x 2-3/4″ (die cut leaf sprigs)
  • Basic White – 3-1/2″ x 4″ (back center panel), 1-1/4″ x 4-1/2″ (punched mushroom caps), 1″ x 3-1/2″ (fussy cut mushroom stems)
  • Toadstool Gardens 6″ x 6″ DSP – 3-3/8″ x 3-7/8″ (center panel background), two 1-7/8″ x 3-7/8″ (side panels), two 2″ x 4″ panels (back side panels), four 1-1/4″ x 4″ (front and back middle panels), 2-3/4″ x 2-3/4″ (die cut circle)

Stampin’ Up! products used in this project:


Stampin’ Up! Simply Said Hello Card

Good Morning! Here’s a simple hello card made with the Stampin’ Up! Simply Said stamp set, featuring the pretty Perennial Lavender designer series paper and the pretty Painted Lavender dies from the current annual catalog. You can find the products I used at the bottom of my post along with the card stock sizes.

My design was inspired by the current challenge in Freshly Made Sketches #673:

I stamped the sentiment from the Stampin’ Up! Simply Said stamp set using Gorgeous Grape ink on the front of a Fresh Freesia card base. This stamp set has several simple sentiments that go well with many different designs for any occasion.

I cut a panel of Perennial Lavender designer series paper with the largest circle die from the Stylish Shapes dies. I traced the outline of the die on Gorgeous Grape card stock and fussy cut the circle for a perfect mat. I adhered the DSP to the mat with liquid glue and adhered them both to the card front.

I cut the leaf sprig from the Painted Lavender dies from Lost Lagoon and the double flower stems from Gorgeous Grape. I adhered the leaves and one of the flowers to the card with glue dots. I finished with Purple shimmer gems and a length of white ribbon tied in a knot.

For the inside panel, I left it simple, just trimming the side of a Basic White panel with DSP and adhering the panel to the inside of the card with Stampin’ Seal. This leaves plenty of room for a personal message.

The Stampin’ Up! Simply Said stamp set is my go to stamp set for a simple front of card sentiment. And the Challenge inspired me to pull out and use some old favorites – the pretty Perennial Lavender designer series paper and Painted Lavender stamp and dies.


Sale-A-Bration Is Going On Now!!

Sale-A-Bration is the biggest Stampin’ Up! promotion of the year. The best part of Sale-A-Bration is that you earn FREE items for every $60 worth of products you purchase. There are items that you get for $60 and there are items you can get for $120. All the details are in the Sale-A-Bration Brochure. Click on the picture of the brochure below to download a copy to view the items and details.

Another benefit of Sale-A-Bration is when you host a workshop with sales over $300 or have an individual order over $300, you get to choose an additional $30 worth of products from the Stampin’ Up! catalog or Online Store for FREE!

And Sale-A-Bration is the best time to join Stampin’ Up! as a new Demonstrator. During Sale-A-Bration, new Demonstrators who purchase a starter kit by choosing $125 worth of products for only $99 (includes shipping) have two FREE bonus options to add to your starter kit.

  • Option 1: Your choice of TWO marker sets from our Stampin’ Write Marker Assortments (Brights, Neutrals, Regals, Subtles), PLUS the Handmade Designs stamp set, a beautiful stamp set exclusively designed to work with them.
  • Option 2: Your Choice of an additional $30 in FREE products

Sale-A-Bration runs through February 28, 2025. Visit my Online Store to start shopping now.


Current Host Code: FYMGA4AN

Use this host code when you order $50 or more and receive a Thank You gift from me!  The free gift is your choice of any item currently available valued up to $10.00.

If your order is over $150, please do not use the host code since you’ll receive your own Host Dollars plus I’ll still send you the Thank You gift!  This host code can be used by anyone, no club or commitment required. Let me know if you have any questions.


If you need any stamping supplies, I’d be very happy to be your Demonstrator.  Just click on the Shop Now Button on the right side of the screen to go directly to my Online store or contact me if you have any questions.  Happy Stamping!

Thanks for stopping by and have a great day!

Akiko

  • Visit my online store here
  • See the current Stampin’ Up! Last Chance items here
  • Earn FREE Stampin’ Up! products through my Wildflower Frequent Shopper Program – my way of saying thank you to my online frequent shopper customers.
  • Have any questions? I’d be happy to help, click here to contact me.

Cardstock Cuts for this project:

  • Fresh Freesia – 5-1/2″ x 8-1/2″ card base, scored at 4-1/4″
  • Gorgeous Grape – 1″ x 4-1/2″ (die cut flower), 3-1/2″ x 3-1/2″ (fussy cut circle mat)
  • Lost Lagoon – 1-1/2″ x 4″ (die cut leaves
  • Basic White – 3-3/4″ x 5″ (inside panel)
  • Perennial Lavender DSP – 3-1/4″ x 3-1/4″ (die cut circle), 3/4″ x 3-3/4″ (inside trim)

Stampin’ Up! products used in this project:


Stampin’ Up! Terrific Toadstools Hello Card

Good Morning! Today is the big day – the premiere of the new Stampin’ Up! January – April Mini Catalog! It is also the start of Sale-A-Bration and the release of a new set of Online Exclusives and a new Scrapbooking Brochure!

To celebrate, I made this hello card with the cute new Stampin’ Up! Terrific Toadstools bundle from the new mini catalog and the Sale-A-Bration Toadstool Gardens 6″ x 6″ designer series paper. You can find the products I used at the bottom of my post along with the card stock sizes.

I made my Granny Apple Green card base by scoring a 4-1/4″ x 11″ panel and cutting off half of the front flap (cut at 2-3/4″). I covered the card base with Toadstool Gardens 6″ x 6″ designer series paper panels, the leafy panel for the small front panel, two garden panels for the short front flap and the stripe panel for the inside. I stamped the ground from the Stampin’ Up! Terrific Toadstools stamp set using Granny Apple Green ink twice on Basic White and fussy cut it with my paper snips. I adhered them to bottom of the front panel with liquid glue.

I used the Stampin’ Up! Terrific Toadstools punch to punch three mushroom caps from strips of Toadstool Gardens DSP. I used a sponge dauber to apply Melon Mambo ink to the edge of the punched caps to make them stand out against the DSP. I used a Gray Granite strip of the DSP to punch mushroom stems and fussy cut one with my paper snips so that it is larger. I used a sponge dauber to apply Gray Granite ink to the outsides.

I stamped the sentiment from the Stampin’ Up! Terrific Toadstools stamp set using Pumpkin Pie ink on Basic White and cut it out with a banner die from the Stylish Shapes dies using a two step method so it was long enough. I adhered the label to the panel with glue dots and adhered the toadstool stems with liquid glue. I popped the toadstool caps on with dimensionals and finished with three green Tinsel Gems. I adhered the panel to the short front flap with liquid glue applied to the left side of the panel.

For the inside panel, I stamped the leaf sprig from the Stampin’ Up! Terrific Toadstools stamp set using Granny Apple Green ink on a Basic White panel. I stamped the little bug next to it using Gray Granite ink. I stamped the wings on Basic White using Real Red ink and fussy cut it with my paper snips. I adhered the wings with liquid glue and adhered the panel to the inside with Stampin’ Seal so that it’s covered by the decorated panel.

The Stampin’ Up! Terrific Toadstools bundle is a fun bundle and makes cheerful cards when used with the Toadstool Gardens Sale-A-Bration DSP. They’re both perfect for Springtime cards!


Last Chance Products Now Available!

Retiring products for the current September-December 2024 Mini Catalog are now available in the Last Chance Products category in the Online Store.

Stampin’ Up! is making some changes to their product retirement process. They are introducing a new Last Chance Products category in the Online Store today that will include retiring products from the current 2024 September-December Mini Catalog and Online Exclusives items that are being discontinued. The Last Chance Products category is replacing the current Clearance Rack and will be updated every two months.

Here are the details:

  • Last Chance Products include retiring products from both catalogs and online releases, excluding Paper Pumpkin.
  • Last Chance Products are available while supplies last and will be discontinued when they sell out. Items will be automatically removed from the category and the online store when they are discontinued.
  • Discounts vary and are subject to change. Also, depending on inventory, these products may or may not have discounts.
  • The Last Chance Products category will be updated every other month. Updates happen at the beginning of the month and may include additional products in the category and any adjustments to product discounts.

This change aligns with Stampin’ Up!’s product release strategy of new Online Exclusives every two months and unifies the retirement process for Online Exclusive and Catalog products. The goal is to keep product offerings fresh, trendy and exciting for Stampin’ Up! customers.

If you have any questions, let me know.


New January-April 2025 Mini Catalog and Sale-A-Bration is Here!

All the new products and specials are available now. See my earlier post for all the details. It includes links to download copies of the catalogs and brochures, but the best way to see everything is to visit my Online Store.


Current Host Code: S37YBRUS

Use this host code when you order $50 or more and receive a Thank You gift from me!  The free gift is your choice of any item currently available valued up to $10.00.

If your order is over $150, please do not use the host code since you’ll receive your own Host Dollars plus I’ll still send you the Thank You gift!  This host code can be used by anyone, no club or commitment required. Let me know if you have any questions.


If you need any stamping supplies, I’d be very happy to be your Demonstrator.  Just click on the Shop Now Button on the right side of the screen to go directly to my Online store or contact me if you have any questions.  Happy Stamping!

Thanks for stopping by and have a great day!

Akiko

  • Visit my online store here
  • See the current Stampin’ Up! Last Chance items here
  • Earn FREE Stampin’ Up! products through my Wildflower Frequent Shopper Program – my way of saying thank you to my online frequent shopper customers.
  • Have any questions? I’d be happy to help, click here to contact me.

Cardstock Cuts for this project:

  • Granny Apple Green – 4-1/4″ x 11″ card base, scored at 5-1/2″; cut front flap at 2-3/4″ and turn panel sideways
  • Basic White – 2-1/2″ x 4″ (inside panel), 1/2″ x 6″ (ground ), 1-1/4″ x 3″ (label)
  • Toadstool Gardens 6″ x 6″ DSP – three 2-1/2″ x 4″ panels (two front panels and inside flap), 4″ x 5-1/4″ (striped inside panel), 1″ strips for mushroom caps, 1/2″ strip for mushroom stems

Stampin’ Up! products used in this project:


Stampin’ Up! Wildflower Designs Hello Card for the Happy Inkin’ Thursday Blog Hop

Good Morning and welcome to the Happy Inkin’ Thursday Blog Hop! I used the Stampin’ Up! Wildflower Designs bundle and the pretty Wildly Flowering designer series paper with the sentiments from the Citrus Blooms stamp sets for a simple fun fold Hello card. You can find the supplies I used along with card stock cuts at the bottom of my post.

We have a or challenge this week and it’s perfect for the Wildly Flowering designer series paper!

I cut panels of Moody Mauve Wildly Flowering designer series paper and adhered them to Misty Moonlight mats before adhering them to the inside and front flap of a Moody Mauve card base. Instead of using a Moody Mauve panel, I cut a Misty Moonlight panel to adhere to the front flap. I cut a panel of Moody Mauve DSP and adhered it to the Misty Moonlight panel with liquid glue. And I used the panel without the little bouquets.

I cut a Misty Moonlight panel with the scalloped frame die from the Stampin’ Up! Wildflower Designs dies and adhered it to the panel with dimensionals. I used the small hexagon panel to cut a panel of Wildly Flowering DSP and adhered it to the center with liquid glue.

I stamped the hello sentiment from the Citrus Blooms stamp set using Versamark ink on a Misty Moonlight panel. I sprinkled it with white embossing powder and shook off the excess. I heated the powder with my heat tool until it was bright and shiny and cut it out with the little diamond die from the Unbounded Love dies. I made a bow with linen thread and adhered it to the back of the label and adhered the label to the card front with Dimensionals and glue dots. I finished the card with Moody Mauve dots.

For the Inside of the card, I stamped the sentiment from the Citrus Blooms stamp set in Misty Moonlight ink on a Basic White panel. I used Crumb Cake ink to ink up the flower from the Stampin’ Up! Wildflower Designs stamp set and stamped it off before stamping it over the sentiment. I adhered the panel to the inside panel with liquid glue, being careful to line it up under the front panel so is hidden when the card is closed.

I love how the Stampin’ Up! Wildflower Designs bundle looks with the Wildly Flowering DSP and I finally figured out why I love this paper so much. It looks just like wallpaper I had in my house 30 years ago! Definitely vintage! LOL.

On with the Hop! Click on the Next Blog button to move forward to see the beautiful project Karen Ksenzakovic has created.

If you get lost along the way, here are the participants for the hop:


Current Host Code: 37AE7ZXV

Use this host code when you order $50 or more and receive a free gift from me!  The free gift is your choice of any item currently available valued up to $10.00!

If your order is over $150, please do not use the host code since you’ll receive your own Host Dollars plus I’ll still send you the free gift!  This host code can be used by anyone, no club or commitment required. Let me know if you have any questions.


If you need any stamping supplies, I’d be very happy to be your Demonstrator.  Just click on the Shop Now button on the right side of the screen to go directly to my online store or contact me if you have any questions. 

Thanks for stopping by and Happy Stamping!

Akiko

  • Visit my online store here
  • See the current Stampin’ Up! clearance rack specials here
  • Earn FREE Stampin’ Up! products through my Wildflower Frequent Shopper Program – my way of saying thank you to my online frequent shopper customers.
  • Have any questions? I’d be happy to help, click here to contact me.

Cardstock Cuts for this project:

  • Moody Mauve – 4-1/4″ x 8-1/4″ card base, scored 2-3/4″
  • Misty Moonlight – 4″ x 5-1/4″ (inside mat), 2-1/2″ x 4″ (front flap mat), 2-3/4″ x 4-1/4″ (front panel), 3″ x 4-1/4″ (scalloped frame die cut), 1-1/4″ x 1-3/4″ (label)
  • Basic White – 2-5/8″ x 4-1/8″ (inside panel)
  • Wildly Flowering DSP – 3-7/8″ x 5-1/8″ (inside background), 2-3/8″ x 3-7/8″ (front flap background), 2-5/8″ x 4-1/8″ (front panel background), 2-1/4″ x 3-1/2″ (die cut middle panel)

Stampin’ Up! products used in this project:


Stampin’ Up! Flowers of Beauty Hello Card

Good Morning! I pulled out the Stampin’ Up! Flowers of Beauty bundle for today’s Hello card and boy, I really love this set! I used the tall stamped leaves and small flowers – both two step stamping images with coordinating dies. I also used the Unbounded Beauty designer series paper and the Dashing Designs 3D embossing folder. You can find the products I used at the bottom of my post along with the card stock sizes.

I embossed a panel of Petunia Pop with the Dashing Designs 3D embossing Folder and adhered it to the front of a Petunia Pop card base with liquid glue. I adhered a panel of Unbounded Beauty designer series paper to a Berry Burst mat and adhered it to the card front.

I cut a Pretty Peacock panel with the leaf sprig die from the Stampin’ Up! Flowers of Beauty dies and adhered it to the card with glue dots. I stamped the tall leafy stems using Pretty Peacock ink on Basic White, using full strength for the detailed stamp and stamped off ink for the filler. I found it easiest to stamp the detailed stamp first and the filler stamp on top. I stamped the small flowers using Petunia Pop ink – full strength for the detail and stamped off for the filler.I cut the stems and flowers out with the coordinating dies and adhered the flowers to the leaves with dots of liquid glue. I popped the flowers on the card with dimensionals, leaving room for the label on the bottom.

I stamped the sentiment from the Unbounded Love stamp set in Pretty Peacock ink on Basic White and cut it out with the small circle label die. I cut a large circle from Berry Burst and adhered it to the back and adhered it to the card with liquid glue, tucking it under the flowers. I finished the label with a shimmery Petunia Pop dot and adhered a Petunia Pop bow with a glue dot.

For the inside of the card I stamped the the stem and leaves from the Stampin’ Up! Flowers of Beauty stamp set in Pretty Peacock ink on the side of a Basic White panel – full strength for the detailed stamp and stamped off for the filler stamp. I used the same technique for the flowers using Petunia Pop ink, and then added more flowers with the triple flower stamps to fill in some of the blank spots. I adhered the panel to a Berry Burst mat and adhered the layered paenls to the inside of the card with Stampin’ Seal.

The Stampin’ Up! Flowers Of Beauty bundle is so versatile with so many different flowers and dies. I really love how this set of stamped and die cut flowers and stems look, even though it takes a little time to line up the stamps and dies. And of course I love the larger flowers too – they’re a little easier to line up. You can get so many different looks with this bundle!


Free Shipping On Orders Of $75 Or More !

Yay!! Stampin’ Up! has announced another Free Shipping Day! Get Free Shipping on Tuesday July 23, 2024 on orders of $75 or more.

Details:

  • Free shipping is for 24 hours only. Orders must be opened and closed on 23 July 2024.
  • Free shipping automatically applies to your cart after the qualifying amount has been met, which is $75 (before tax).
  • Orders must meet the qualifying amount to be eligible for free shipping.
  • The additional cost for expedited shipping is not covered by this promotion.
  • Prepaid 3-, 6-, or 12-month Paper Pumpkin subscriptions can contribute to the qualifying amount for free shipping (Month-to-month subscriptions do not qualify). Subscriptions billed and shipped this month will be charged for the normal amount ($25.00 shipping included) + tax.
  • Ordering Deadline: July 23, 2024 at 11:59 p.m. (MT)

Bonus Days Earning Period – Now Through July 31!

It’s time for one of our favorite promotions—BONUS DAYS! Because do you know what’s a great deal? Getting rewarded for all the crafting supplies you’re already going to buy! When you shop between 3–31 July and spend $50 you will earn a $5 coupon! Make sure you save all your coupons because you can redeem them (and we mean ALL of them) between August 1 and August 31. There’s no limit to how many coupons you can earn! 

Promotion Details:

Earning Period: July 3 – July 31 2024

  • Earn a $5 coupon for every $50 spent (before shipping and tax). 
  • All coupon codes will be emailed right after a qualifying purchase has been made. Customers must have a customer account with a valid email address to earn coupons when they shop. If you don’t already have an account, you can easily create one in the Online store – contact me if you have any questions. 
  • If you earn multiple codes from a single order, you will receive one email with multiple codes. If you earn multiple codes from multiple orders, you will receive separate emails for each code earned.
  • All order types qualify for this promotion. Phone and email orders still require an email address.
  • Orders started before the promotion begins will not count toward earning coupon codes. For example, if you add items to your cart before July 3 and wait to purchase until that date or later, then those items will not qualify towards earning coupons. You must add items to your cart and complete your purchase during the earning period. 
  • There is no limit to the number of coupon codes participants can earn per order or throughout the duration of the earning period. 
  • Customers must use a valid email address during checkout in order to receive their coupon code. If a customer places an order over the phone, they must still provide a valid email address to receive their coupon code.
  • Starter Kit orders are excluded from this offer.

Redemption Period: August 1 – August 31, 2024

  • There is no limit to the number of coupon codes you can redeem on an order during the redemption period. If using multiple codes, they must be separated by a space. 
  • Coupon codes may be redeemed one time only. They cannot be redeemed after August 31, 2024.
  • Coupon codes may be redeemed for any product (excluding Starter Kits). They cannot be used on exchanges.
  • Bonus Days coupon codes can be applied to month-to-month Paper Pumpkin subscriptions and new prepaid subscriptions.

Current Host Code: DWUSFG7T

Use this host code when you order $50 or more and receive a Thank You gift from me!  The free gift is your choice of any item currently available valued up to $10.00.

If your order is over $150, please do not use the host code since you’ll receive your own Host Dollars plus I’ll still send you the Thank You gift!  This host code can be used by anyone, no club or commitment required. Let me know if you have any questions.


If you need any stamping supplies, I’d be very happy to be your Demonstrator.  Just click on the Shop Now Button on the right side of the screen to go directly to my Online store or contact me if you have any questions.  Happy Stamping!

Thanks for stopping by and have a great day!

Akiko

  • Visit my online store here
  • See the current Stampin’ Up! clearance rack specials here
  • Earn FREE Stampin’ Up! products through my Wildflower Frequent Shopper Program – my way of saying thank you to my online frequent shopper customers.
  • Have any questions? I’d be happy to help, click here to contact me.

Cardstock Cuts for this project:

  • Petunia Pop – 4-1/4″ x 11″ card base scored at 5-1/2″, 4-1/4″ x 5-1/2″ (embossed panel)
  • Berry Burst – 2″ x 4-1/4″ (DSP mat), 1-1/2″ x 1-1/2″ (die cut circle), 3-3/4″ x 5″ (inside mat)
  • Pretty Peacock – 2-1/2″ x 3″ (die cut sprig)
  • Basic White – 3-5/8″ x 4-7/8″ (inside panel), 3″ x 4-1/2″ (die cut stems and flowers), 1-1/2″ x 1-1/2″ (label)
  • Unbounded Beauty DSP – 1-7/8″ x 4-1/8″ (DSP panel)

Stampin’ Up! products used in this project:


Stampin’ Up! Country Birdhouse for the Happy Inkin’ Thursday Blog Hop

Good Morning and welcome to the Happy Inkin’ Thursday Blog Hop! I finally got to play with the pretty Stampin’ Up! Country Birdhouse bundle and made this sweet hello card. You can find the supplies I used along with card stock cuts at the bottom of my post.

We have a pretty color challenge this week and I think I used all the colors:

I embossed a strip of Country Lace designer series paper with the Eyelet 3D embossing folder and adhered it to another panel of Country Lace DSP. I adhered the layered panel to the front of a Basic Beige card base with liquid glue. I used the Stampin’ Up! Country Birdhouse dies to cut out different panels of Country Woods DSP to make the birdhouse. I used liquid glue to adhere the die cuts together and adhered the birdhouse to the card with dimensionals.

I stamped the bird and flowers from the Stampin’ Up! Country Birdhouse stamp set in Memento Tuxedo Black ink on Basic White. I colored the bird with light Boho Blue and light Petal Pink Stampin’ Blends and I used Flirty Flamingo, Peach Pie, dark Daffodil Delight and light Lemon Lime Twist Stampin’ Blends to color the flowers. I cut out the birds and floweers with the coordinating dies. I also die cut some leaves and a flower from Basic White and colored them with light Lemon Lime Twist and Light Boho Blue Stampin’ Blends.

I stamped the sentiment from the Stampin’ Up! Country Birdhouse stamp set. in Misty Moonlight ink on a Basic Beige panel. I used one of the new tag dies from the upcoming Greetings of the Season dies (available July 3) to cut it out. I colored a length of Linen Trhead with the light Misty Moonlight Stampin’ Blend and looped it through the hole, tying a knot. I adhered it to the card with glue dots and dimensionals. I adhered the bird to and flowers to the card with glue dots and dimensionals and finished with metallic textured dots.

For the inside of the card, I stamped the flower bouquet from the Stampin’ Up! Country Birdhouse stamp set across the bottom of a Basic White panel using Memento Tuxedo Black ink. I colored the flowers like the flowers on the front and adhered the panel to the inside of the card with Stampin’ Seal.

The die cut birdhouse from the Stampin’ Up! Country Birdhouse bundle is really wonderful and fun to make. And the sweet images and pretty sentiments make this a pretty versatile bundle.

On with the Hop! Click on the Next Blog button to move forward to see the beautiful project Karen Ksenzakovic has created.

If you get lost along the way, here are the participants for the hop:


Current Host Code: XQZKDQU9

Use this host code when you order $50 or more and receive a free gift from me!  The free gift is your choice of any item currently available valued up to $10.00!

If your order is over $150, please do not use the host code since you’ll receive your own Host Dollars plus I’ll still send you the free gift!  This host code can be used by anyone, no club or commitment required. Let me know if you have any questions.


If you need any stamping supplies, I’d be very happy to be your Demonstrator.  Just click on the Shop Now button on the right side of the screen to go directly to my online store or contact me if you have any questions. 

Thanks for stopping by and Happy Stamping!

Akiko

  • Visit my online store here
  • See the current Stampin’ Up! clearance rack specials here
  • Earn FREE Stampin’ Up! products through my Wildflower Frequent Shopper Program – my way of saying thank you to my online frequent shopper customers.
  • Have any questions? I’d be happy to help, click here to contact me.

Cardstock Cuts for this project:

  • Basic Beige – 5-1/2″ x 8-1/2″ card base, scored at 4-1/4″, 1-1/4″ x 2-1/2″ (label)
  • Pecan Pie – 2-1/4″ x 3-1/4″ (birdhouse trim)
  • Basic White – 4″ x 5-14″ (inside panel), 1-1/4″ x 4″ (die cut birds, flowers and leaves)
  • Country Woods DSP – 3-1/4″ x 4″ (die cut birdhouse), 2″ x 3-1/4″ (birdhouse roof), 3/4″ x 3-1/4″ (birdhouse ledge)
  • Country Lace DSP – 4″ x 5-1/4″ (front background), 2″ x 4″ (embossed strip)

Stampin’ Up! products used in this project:


Stampin’ Up! Country Flowers Hello Card

Good Morning! Here’s another card made with the pretty new Stampin’ Up! Country Flowers bundles. And I used the new neutral color Basic Beige with Petal Pink, Lost Lagoon and Gray Granite for a soft look. You can find the products I used at the bottom of my post along with the card stock sizes.

I adhered a strip of Country Lace designer series paper to the front of a Basic Beige card base with liquid glue. I adhered another panel to a Lost Lagoon mat and wrapped a length of Petal Pink ribbon around it. I tied the ribbon on the side with Gray Granite baker’s twine making a bow and adhered the panel to the the side of the card with dimensionals.

I stamped the sentiment from the Country Birdhouse stamp set using Lost Lagoon ink on Basic Beige and cut it out with the Stylish Shapes dies. I stamped the can and flowers from the Stampin’ Up! Country Flowers stamp set using Gray Granite ink on Basic White. I colored the can with the light Gray Granite Stampin’ Blend and the flowers with Petal Pink, light Lost Lagoon and Lemon Lolly Stampin’ Blends and cut them out with the coordinating dies.

I adhered the can to the card with glue dots and popped the flowers on with dimensionals. I cut the double flower die from the Stampin’ Up! Country Flowers Dies from Petal Pink card stock and a set of leaves from Lost Lagoon. I adhered the die cut flowers and leaves to the card with glue dots and finished the flower centers with small Lemon Lolly dots.

For the inside of the card I stamped the sentiment from the Stampin’ Up! Country Flowers stamp set in Lost Lagoon ink on a Basic White panel. I stamped the flowers in Petal Pink ink and trimmed the bottom with a strip of DSP . I adhered the panel to the inside of the card with Stampin’ Seal.

I love the farmhouse look of the Stampin’ Up! Country Flowers bundle and the new Basic Beige color gives the card a light and clean look, even with layers and ribbons!


New Stampin’ Up! 2024-2025 Annual Catalog is Now Open for Orders!

The new Stampin’ Up! 2024-2025 Annual Catalog is now open for orders! Click on the image below to download a copy to view.

The new catalog is a little different from previous Annual Catalogs, but it’s chock full of new creative ideas and inspiration. And there’s a new product line – the Mix & Match products on p 18 – with more options for quick and easy card making for all occasions. So take your time and check out the new catalog and HAVE FUN!


Stampin’ Up! May Joining Special!

Exciting News! Between May 1 and May 31, anyone who becomes a Stampin’ Up! demonstrator will receive four 2024–2026 In Color products in their Starter Kit for FREE! This is one of our richest offerings yet!

Promotion Details:

  • Dates: May 1, 2024 – May 31, 2024
  • New Demonstrators will receive the following products in their Starter Kit at no additional cost:
    • 2024–2026 In Color Classic Stampin’ Pad Bundle
    • 2024–2026 In Color 8-1/2″ x 11″ Cardstock
    • 2024–2026 In Color 6″ x 6″ Designer Series Paper
    • 2024–2026 In Color Stampin’ Write Markers
  • New team members may not use their team leader’s shipping address to ship their kit. 
  • New team members may only pay for their kit using a credit card on which they are listed as an authorized user. 
  • All orders should be closed by 31 May. 
  • New demonstrators who submit their Independent Demonstrator Agreement (IDA) before 1 May or after 31 May will not be eligible for this Starter Kit offer.

Click on the picture below to download a flyer to see more:

In addition to the In Color products, new Demonstrators will pick $125 USD worth of products of their choice for $99! When you join, the In Color products will be automatically added to your Starter Kit. You will also receive free business supplies with your order and free shipping. Not to mention all the fun that comes with being a part of our wonderful crafting community. Click the button below to Join Now, or get additional details on my Join My Team page


Current Host Code: YEPTJAZ9

Use this host code when you order $50 or more and receive a Thank You gift from me!  The free gift is your choice of any item currently available valued up to $10.00.

If your order is over $150, please do not use the host code since you’ll receive your own Host Dollars plus I’ll still send you the Thank You gift!  This host code can be used by anyone, no club or commitment required. Let me know if you have any questions.


If you need any stamping supplies, I’d be very happy to be your Demonstrator.  Just click on the Shop Now Button on the right side of the screen to go directly to my Online store or contact me if you have any questions.  Happy Stamping!

Thanks for stopping by and have a great day!

Akiko

  • Visit my online store here
  • See the current Stampin’ Up! clearance rack specials here
  • Earn FREE Stampin’ Up! products through my Wildflower Frequent Shopper Program – my way of saying thank you to my online frequent shopper customers.
  • Have any questions? I’d be happy to help, click here to contact me.

Cardstock Cuts for this project:

  • Basic Beige – 4-1/4″ x 11″ card base, scored at 5-1/2″, 1-1/4″ x 2-1/2″ (label)
  • Lost Lagoon – 3-5/15″ x 3-7/8″ (small DSP mat), 1″ x 1-1/4″ (die cut leaves)
  • Petal Pink – 1″ x 1-1/4″ (die cut flowers)
  • Basic White – 4″ x 5-1/4″ (inside panel), 3-1/4″ x 3-3/4″ (die cut can and flowers)
  • Country Lace DSP – 4″ x 5-1/4″ (front background), 3-1/4″ x 3-3/4″ (small panel), 1/2″ x 4″ (inside trim)

Stampin’ Up! products used in this project:


Stampin’ Up! Flowers of Beauty Sneak Peek

Good morning! I finally got my pre-order for the new Stampin’ Up! 2024-2025 Annual Catalog and I made my first card with the pretty Stampin’ Up! Flowers of Beauty bundle. You can find the currently available products I used at the bottom of my post along with the card stock sizes along with pictures of the new products. All the new products will be available on May 1, 2024.

I adhered a panel of the new Unbounded Beauty designer series paper to the front of a Summer Splash (one of the new 2024-2026 In Colors) card base. I embossed another panel of the DSP with one of the Fun Patterns embossing folder and adhered it to a mat and then to the card front.

I cut a circle using one of the Stylish Shapes dies and stamped the sentiment in Petunia Pop. The sentiment is from the pretty Unbounded Love bundle and Petunia Pop is another new In Color. I used a Blending Brush to apply Sunny Splash ink to the circle and popped it on the card with dimensionals.

I stamped the flowers and leaves from the new Stampin’ Up! Flowers of Beauty stamp set and cut them out with the coordinating dies. I used another new In Color, Pretty In Pink to color the flowers and Summer Splash for the leaves. These stamps are two-step, so I used the full strength ink for the line images and stamped off ink for the fill. I used Petunia Pop for the large flower center. I adhered the small flowers and leaves to the circle with glue dots and adhered the large flower with dimensionals. I made a bow with the new Pretty In Pink ribbon and used Sunny Splash shimmer dots to finish the front.

For the inside of the card, I simply trimmed the bottom of a Basic White panel with DSP and adhered the panel to the inside of the card with Stampin’ Seal.

The pretty Stampin’ Up! Flowers of Beauty bundle are part of the Unbounded Beauty Suite in the new Annual Catalog and use all the new 2024-2026 In Colors. Here is the stamp set and dies that are included in the bundle:

Here are the new stamp pads, ribbon and pretty shimmer dots that I used for today’s card:

Here is the pretty Unbounded Beauty designer series paper. The colors are Berry Burst, Cajun Craze, Peach Pie, Pretty In Pink, Pretty Peacock, Shy Shamrock and Summer Splash.

And here is the back sides of the DSP.

And here is the pretty Unbounded Love bundle that the sentiment came from. This bundle is also part of the Unbounded Beauty Suite, so they compliment the florals in the DSP and the Stampin’ Up! Flowers of Beauty bundle. I love these sentiments – the fonts are so pretty and there is a huge range of messages! I can’t wait to use these pretty label dies.

All of these new items will be available on May 1, 2024 when the new Stampin’ Up! 2024-2025 Annual Catalog opens for ordering.


Current Catalogs Retiring Lists Announced!

There is a retiring list for the 2023-2024 Annual Catalog and the January-April 2024 Mini Catalog and annual catalog. These lists detail the products that will no longer be available once the catalogs are gone on April 30. Items are only available while supplies last. Note – The Sale Prices don’t start until April 9th.

Click HERE to download a PDF of the retiring items from the Annual Catalog.

Click HERE to download an excel spreadsheet of the Annual Catalog retiring items.

Click HERE to download a PDF of the retiring items from the Mini Catalog.

Click HERE to download an excel spreadsheet of the Mini Catalog retiring items.

Click HERE to go to my online store to shop now.

Introducing the new 2024-2026 In Colors: Peach Pie, Petunia Pop, Pretty In Pink, Shy Shamrock and Summer Splash.


Current Host Code: 9WAA9JP9

Use this host code when you order $50 or more and receive a Thank You gift from me!  The free gift is your choice of any item currently available valued up to $10.00.

If your order is over $150, please do not use the host code since you’ll receive your own Host Dollars plus I’ll still send you the Thank You gift!  This host code can be used by anyone, no club or commitment required. Let me know if you have any questions.


If you need any stamping supplies, I’d be very happy to be your Demonstrator.  Just click on the Shop Now Button on the right side of the screen to go directly to my Online store or contact me if you have any questions.  Happy Stamping!

Thanks for stopping by and have a great day!

Akiko

  • Visit my online store here
  • See the current Stampin’ Up! clearance rack specials here
  • Earn FREE Stampin’ Up! products through my Wildflower Frequent Shopper Program – my way of saying thank you to my online frequent shopper customers.
  • Have any questions? I’d be happy to help, click here to contact me.

Cardstock Cuts for this project:

  • Summer Splash – 4-1/4″ x 11″ card base, scored at 5-1/2″, 1-5/8″ x 4-1/8″ (embossed panel mat)
  • Basic White – 4″ x 5-1/4″ (inside panel), 3″ x 3″ (die cut circle), 2″ x 5-1/2″ (die cut flowers and leaves)
  • Unbounded Beauty DSP – 4″ x 5-1/4″ (front background), 1-1/2″ x 4″ (embossed panel), 1/2″ x 4″ (inside trim)

Stampin’ Up! products used in this project:


Stampin’ Up! Enduring Beauty for the Happy Inkin’ Thursday Blog Hop

Good Morning and welcome to the Happy Inkin’ Thursday Blog Hop! The Stampin’ Up! Enduring Beauty bundle is a beautiful bundle with a large floral bouquet and pretty sentiments. The dies cut out the flowers and have complimentary bud and leaf dies and includes a pretty label. And it also includes a set of masks that you can use to color the flowers! You can find the supplies I used along with card stock cuts at the bottom of my post.

We have a pretty sketch challenge this week:

I adhered a panel of striped Lemon Lolly Lighter than Air 6″ x 6″ designer series paper to a Basic White mat and popped it on the front of a Lemon Lolly card base.

I stamped the large bouquet from the Stampin’ Up! Enduring Beauty stamp set using Memento Tuxedo Black ink on a Basic White panel. I colored the flowers with the light Lemon Lolly Stampin’ Blend and the Leaves with the light Lost Lagoon Stampin’ Blend and cut it out with the coordinating die. I used my paper trimmer to cut the bouquet in half and trimmed off a small corner of each piece. I adhered the panels to the corners of my card using dimensionals, aligning the corners with the DSP.

I stamped the sentiment from the Stampin’ Up! Enduring Beauty stamp set using Versamark ink on a Lemon Lolly panel. I sprinkled it with silver embossing powder and shook off the excess. I heated the powder with my heat tool until it was bright and shiny. I cut out the label with the label die and adhered it with dimensionals and glue dots. I cut out some leaves from Lost Lagoon and flower buds from Lemon Lolly using the Stampin’ Up! Enduring Beauty dies. I tucked the flowers and leaves under the bouquet, adhering them with liquid glue. I finished the card with a Lemon Lolly bow and clear rhinestone gems.

For the inside of the card, I stamped the large flower bouquet from the Stampin’ Up! Enduring Beauty stamp set in Memento Tuxedo Black ink in the corners of a Basic White panel. I colored the flowers using the light Lemon Lolly Stampin’ Blend and the leaves using the light Lost Lagoon Stampin’ Blend. I adhered the panel to the inside of the card with Stampin’ Seal.

The pretty line images in the Stampin’ Up! Enduring Beauty bundle can be colored in so many ways. I was pleased that it made such pretty corners to fit with today’s card sketch, but next time, I need to use the pretty bouquet in the center of my card.

On with the Hop! Click on the Next Blog button to move forward to see the beautiful project Karen Ksenzakovic has created.

If you get lost along the way, here are the participants for the hop:


Current Host Code: 9WAA9JP9

Use this host code when you order $50 or more and receive a free gift from me!  The free gift is your choice of any item currently available valued up to $10.00!

If your order is over $150, please do not use the host code since you’ll receive your own Host Dollars plus I’ll still send you the free gift!  This host code can be used by anyone, no club or commitment required. Let me know if you have any questions.


If you need any stamping supplies, I’d be very happy to be your Demonstrator.  Just click on the Shop Now button on the right side of the screen to go directly to my online store or contact me if you have any questions. 

Thanks for stopping by and Happy Stamping!

Akiko

  • Visit my online store here
  • See the current Stampin’ Up! clearance rack specials here
  • Earn FREE Stampin’ Up! products through my Wildflower Frequent Shopper Program – my way of saying thank you to my online frequent shopper customers.
  • Have any questions? I’d be happy to help, click here to contact me.

Cardstock Cuts for this project:

  • Lemon Lolly – 5-1/2″ x 8-1/2″ card base, scored at 4-1/4″, 1-1/2″ x 3″ (label), 1-1/2″ x 2-1/2″ (die cut flowers)
  • Lost Lagoon – 1-1/2″ x 4″ (die cut leaf sprigs)
  • Basic White – three 3-3/4″ x 5″ panels (inside panel, front mat and flower bouquet)
  • Lighter Than Air 6″ x 6″ DSP – 3-5/8″ x 4-7/8″ (front background)

Stampin’ Up! products used in this project: