Stampin’ Up! Spooky Halloween Card

Good Morning! Are you ready for Halloween? The Stampin’ Up! Spooky Halloween bundle is such a cute set for Halloween and I’m using it with the Celebratory Sips designer series paper to make a Halloween card. You can find the card stock cuts along with the supplies at the bottom of my post.

Adhere a strip of Secret Sea Celebratory Sips DSP to a striped Timid Tiger panel with liquid glue and adhere them both to the light side of a Timid Tiger two-tone card stock mat. Adhere the layered DSP to the front of a Timid Tiger card base with liquid glue.

Cut the haunted house from Secret Sea card stock using the die from the Stampin’ Up! Spooky Halloween dies. Fussy cut a Daffodil Delight panel to cover the back of the die cut holes and adhere it to the back of the house. Use blending brushes to apply Granny Apple Green, Daffodil Delight, Timid Tiger, Berry Burst and Secret Sea inks to a Basic White panel. This makes a simple outdoor sunset background. Stamp the bats in the corner using Secret Sea ink. Adhere the blended panel to a Secret Sea mat and adhere the layered panel to the card front.

Adhere the haunted house to the blended panel with dimensionals. Use the bare tree die from the Loveliest Tree dies to cut an Early Espresso panel and adhere it next to the house. Stamp the sentiment from the Stampin’ Up! Spooky Halloween stamp set using Granny Apple Green ink on Basic White and cut it out using the Stylish Shapes banner die. Adhere the label with dimensionals and finish with tiny white glitter stars.

For the inside panel, stamp the sentiment from the Stampin’ Up! Spooky Halloween stamp set using Timid Tiger ink on a Basic White panel. Stamp the bats in Secret Sea and adhere DSP to the bottom. Adhere the panel to the inside of the card with Stampin’ Seal.

The haunted house from the Stampin’ Up! Spooky Halloween dies is just wonderful (along with the rest of the stamps and dies in the great little bundle)! But did you ever think the Celebratory Sips DSP could be used for a Halloween card? The Timid Tiger stripes make a perfect backdrop. And I love to do blended nighttime backgrounds with a haunted house for Halloween card. This one was super simple!

Thanks so much for stopping by and Happy Stamping!!

Akiko

Cardstock Cuts for this project:

  • Timid Tiger – 5-1/2″ x 8-1/2″ card base, scored at 4-1/4″
  • Two-tone Timid Tiger – 4″ x 5-1/2″ (front mat)
  • Secret Sea – 2″ x 3″ (die cut haunted house), 2-3/4″ x 3-1/2″ (blended background mat)
  • Daffodil Delight – 1-1/4″ x 2-1/4″ (haunted house lights)
  • Early Espresso – 1″ x 2″ (die cut tree)
  • Basic White – 4″ x 5-1/4″ (inside panel), 2-1/2″ x 3-1/4″ (blended background), 1″ x 3″ (label)
  • Celebratory Sips DSP – 3-7/8″ x 5-1/8″(front background), 1-1/4 x 5-1/8″ (Secret Sea front stripe), 1/2″ x 5-1/4″ (inside trim)

Stampin’ Up! products used in this project:

Product List

Stampin’ Up! Spooky Halloween No Tricks Card

Good Morning! The Stampin’ Up! Spooky Halloween bundle is such a cute set for Halloween. Unfortunately, I did not get the seriously cute Spooky Sweet specialty designer series paper to go with it, so I paired it with some retired Cute Halloween 6″ x 6″ DSP from a few years back that I had in my stash. You can find the card stock cuts along with the supplies at the bottom of my post.

Adhere a Pumpkin Pie panel of DSP to a Basic Black mat and adhere it to a Basic Gray patterned panel of DSP. Adhere the layered DSP to another Basic Black mat and then to the front of a Basic Gray card base.

Stamp the cute kitty and puppy from the Stampin’ Up! Spooky Halloween stamp set on Basic White using Memento Tuxedo Black ink. Color the kitty with light Gray Granite, dark Highland Heather, dark Pumpkin Pie and light Granny Apple Green Stampin’ Blends. Color the nose and ears with the light Petal Pink Stampin’ Blend. Color the puppy with the light Crumb Cake, light Pecan Pie, light Granny Apple Green and dark Pumpkin Pie Stampin’ Blends. Cut them out with the coordinating dies Cut the fence and bats from Basic Black and adhere the fence to the card with liquid glue.

Adhere the kitty and puppy to the card with dimensionals. Stamp the broom and pumpkin from the Stampin’ Up! Spooky Halloween stamp set using Memento Tuxedo Black ink and color them with Pumpkin Pie and Pecan Pie Stampin’ Blends. Cut them out with the coordinating dies and adhere them to the card using dimensionals and glue dots. Stamp the sentiment using Versamark ink on Basic Black and sprinkle it with white embossing powder. Heat set the powder and trim the ends with the Happy Labels Pick A Punch. Adhere the label and die cut bats to the card with dimensionals and finish with Sparkle foam stars.

For the inside panel, stamp the sentiment from the Stampin’ Up! Spooky Halloween stamp set using Pumpkin Pie ink on a Basic White panel. Stamp the bats in Memento Tuxedo Black and adhere DSP to the bottom. Adhere the panel to the inside of the card with Stampin’ Seal.

Even without the coordinating DSP the card was fun to make and is so cute because of the wonderful critters from the Stampin’ Up! Spooky Halloween bundle. I love the Halloween costumes!! The sentiments in the set are great too, along with the accent stamps and dies. It’s a great fun Halloween set!

Thanks so much for stopping by and Happy Stamping!!

Akiko

Cardstock Cuts for this project:

  • Basic Gray – 5-1/2″ x 8-1/2″ card base, scored at 4-1/4″
  • Basic Black – 4″ x 5-1/2″ (front mat), 2″ x 5-1/8″ (DSP stripe mat), 1″ x 3″ (label), 1-1/2″ x 4-1/2″ (die cut fence and bats)
  • Basic White – 3-3/4″ x 5″ (inside panel), 3-1/2″ x 5″ (die cut critters, broom and pumpkin pail)
  • (retired) Cute Halloween 6″ x 6″ DSP – 3-7/8″ x 5-1/8″(front background), 1-7/8 x 5-1/8″ (DSP stripe), 1/2″ x 3-3/4″ (inside trim)

Stampin’ Up! products used in this project:


Stampin’ Up! Haunted Home Kit for the Inkin’ Krew Blog Hop

Good Morning! Welcome to the September Inkin’ Krew Team Blog Hop! The theme for this month’s hop is “Halloween” and one of the coolest Halloween ideas from last year is the Stampin’ Up! Haunted Halloween kit. It sold out quickly last year, but it’s back in stock (YAY!!) and I finally got the chance to put it together – It’s so cute!

Here’s my results and I pretty much followed the instructions that come with the kit and the instructional video on YouTube. I did supply my own hot glue gun which I used to assemble the house and roof.

Here’s the instructional video put together by Stampin’ Up!. I found it VERY beneficial to watch the video before and during assembly, especially since the roof is a bit tricky. It’s been a while since I’ve used a hot glue gun, so I was especially cautious at first. There was a little difference between the instructions and the video, so having both on hand was helpful.

Here’s one of the sides. The house is made of corrugated paper and the bats, trees and fence are made of chipboard. The accent pieces are card stock and vellum. Tear & Tape, glue dots and black dimensionals are included to adhere the accents.

Here’s the other side. When adhering the windows, make sure the shiny side of the vellum shows on the outside, and the center window over the door is shorter than the first floor windows. So it’s perfect for the chandelier and shutters. And the silver skull door knocker is totally awesome!

The house has four sides and is open on the bottom. The side walls have no windows, but there are three more in the back. So, I used multicolor LED tea lights to illuminate the windows (one behind each window).

I think it would also be perfect to add additional spooky touches from die cuts or embellishments you have in your stash. Like we still need a witch, broom, skeleton, graveyard and monsters. So have fun and go all out. It’s a fun project with great results!

On With The Hop! Click on the Next Blog button to move forward to Christie King’s project or click the Previous Blog button to move back to see the project that Karen Finkle created.

If you get lost along the way, here are the participants for the hop:

  1. Mary Deatherage 
  2. Karen Ksenzakovic 
  3. Tara Carpenter 
  4. Karen Finkle 
  5. Akiko Sudano <– you are here
  6. Christie King 
  7. Ann Louise Fodgaard 
  8. Nicole Bloxom 
  9. Amy Koenders

Thanks for stopping by and have a great week!

Akiko


Stampin’ Up! products used in this project:

Stampin’ Up! Choose Happy for the Inkin’ Krew Blog Hop

Good Morning! Welcome to the September Inkin’ Krew Team Blog Hop! The theme for this month’s hop is “Halloween Fun” and I used the sweet Stampin’ Up! Choose Happy stamp set along with the Frosted Forest dies to create a spooky Halloween scene. You can find the supplies I used along with card stock cuts at the bottom of my post.

I adhered a panel of Flowering Zinnias designer series paper to the front of a Pumpkin Pie card base with liquid glue. I cut a mask of the moon using the third smallest circle die from the Stylish shapes dies and adhered the background to a Basic White panel. I used a sponge dauber to apply Lemon Lolly ink to the open circle to make the moon. I removed the mask and covered the moon with the die cut circle. I tore a piece of printer paper and covered the top of the panel and applied Mossy Meadow ink to the bottom edge with a sponge dauber to color the ground. I removed the printer paper and used the other panel cover the ground so I could color the sky.

For the sky, I carefully applied a thin layer of Pumpkin Pie ink next to the ground and colored the rest of the sky lightly with Balmy Blue ink. I used another sponge dauber to apply Blueberry Bushel ink to darken the sky and finally applied Night of Navy ink to intensify the color until I got the look I wanted. I spritzed some water over the sky and blotted it with a paper towel. I removed the mask covering the moon and adhered the panel to a Basic Black mat.

I stamped four pumpkins from the Stampin’ Up! Choose Happy stamp set in Memento Tuxedo Black ink on Basic White. I colored them with Mossy Meadow and Pumpkin Pie Stampin’ Blends. I stamped Jack-O-Lantern faces on two pumpkins and fussy cut them with my paper snips. I used a Basic Black Stampin’ Write marker to color the edges of the card stock, so the white would not show. I used the bare tree die from the Frosted Forest dies to cut a Basic Black panel and adhered the trees to the background with tiny dots of liquid glue.

I arranged the pumpkins on the panel and stamped the ‘Boo‘ sentiment from the Stampin’ Up! Choose Happy stamp set using Memento tuxedo Black ink. I adhered the pumpkins to the panel with dimensionals and adhered the panel to the card front with more dimensionals. I wrapped the top of the card with black baker’s twine, making a bow and added black sparkle dots to the trees.

For the inside of the card, I stamped the ‘happy‘ sentiment from the Stampin’ Up! Choose Happy stamp set in Memento Tuxedo Black ink on a Basic White panel. I used the Mini Alphabet dies to cut letters to spell ‘Halloween‘ from Pumpkin Pie card stock and adhered them with liquid glue. I adhered the Jack-O-Lantern, trimmed the bottom with DSP and adhered the panel to the inside of the card with Stampin’ Seal.

I haven’t done a sponged night scene in a long time, and it was fun to go back to an old technique. This was the first time that I’ve spritzed it with water, and I love how it came out. There are so many Stampin’ Up! dies (and stamp sets) that could be used with this old school technique, and the beauty is that because it’s made by hand, the sky will be different and unique every time!

On With The Hop! Click on the Next Blog button to move forward to Karen Finkle’s project or click the Previous Blog button to move back to see the project that Tara Carpenter created.

If you get lost along the way, here are the participants for the hop:


Current Host Code: 37AE7ZXV

Use this host code when you order $50 or more and receive a Thank You gift from me!  The free gift is your choice of any currently available item valued up to $10.00.

If your order is over $150, please do not use the host code since you’ll receive your own Host Dollars plus I’ll still send you the Thank You gift!  This host code can be used by anyone, no club or commitment required. Let me know if you have any questions.


If you need any stamping supplies, I’d be very happy to be your Demonstrator.  Just click on the Shop Now button on the right side of the screen to go directly to my online store or contact me if you have any questions.  Happy Stamping!

Thanks for stopping by and have a great week!

Akiko

  • Visit my online store here
  • See the current Stampin’ Up! clearance rack specials here
  • Earn FREE Stampin’ Up! products through my Wildflower Frequent Shopper Program – my way of saying thank you to my online frequent shopper customers.
  • Have any questions? I’d be happy to help, click here to contact me.

Cardstock Cuts for this project:

  • Pumpkin Pie – 4-1/4″ x 11″ card base, 5-1/2″ , 1″ x 6″ (die cut letters)
  • Basic Black – 3-5/8″ x 4-1/4″ (front mat), 3″ x 4-1/4″ (die cut trees)
  • Basic White – 3-3/4″ x 5″ (inside panel), 3-1/2″ x 4-1/4″ (art panel), 1-1/2″ x 4″ (fussy cut pumpkins)
  • Flowering Zinnias DSP DSP – 4-1/4″ x 5-1/2″ (front background), 1/2″ x 3-3/4″ (inside trim)

Stampin’ Up! products used in this project:

Stampin’ Up! Bag Of Bones Halloween Card

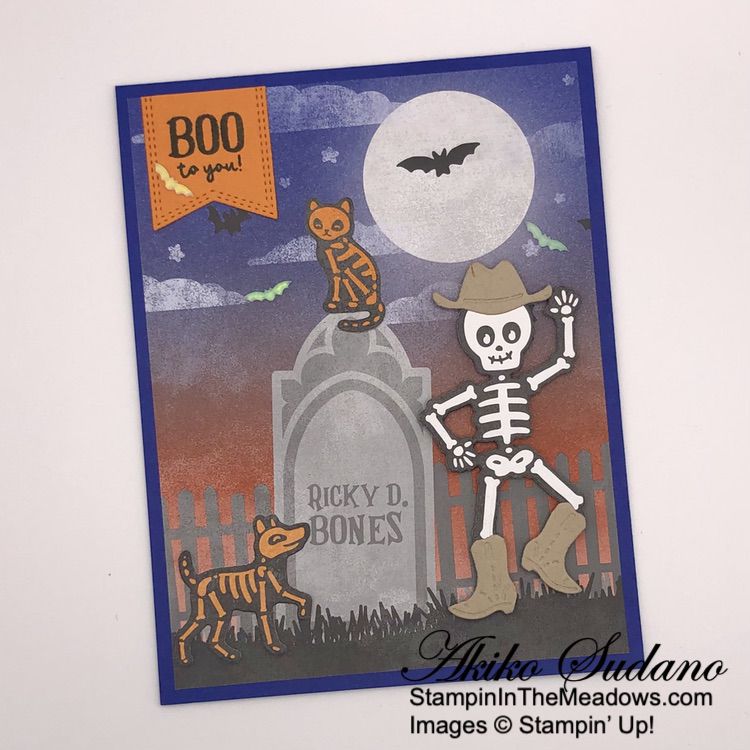
Good Morning! Tomorrow is Halloween – are you ready? I picked up my candy this weekend so I’m set. I’m so glad that we still get trick-or-treaters! So I pulled out the fun Stampin’ Up! Bag of Bones bundle and the Them Bones designer series paper to make a final Halloween card for the season. You can find the products I used at the bottom of my post along with the card stock sizes.

I used the pretty sketch in the Freshly Made Sketches 609.

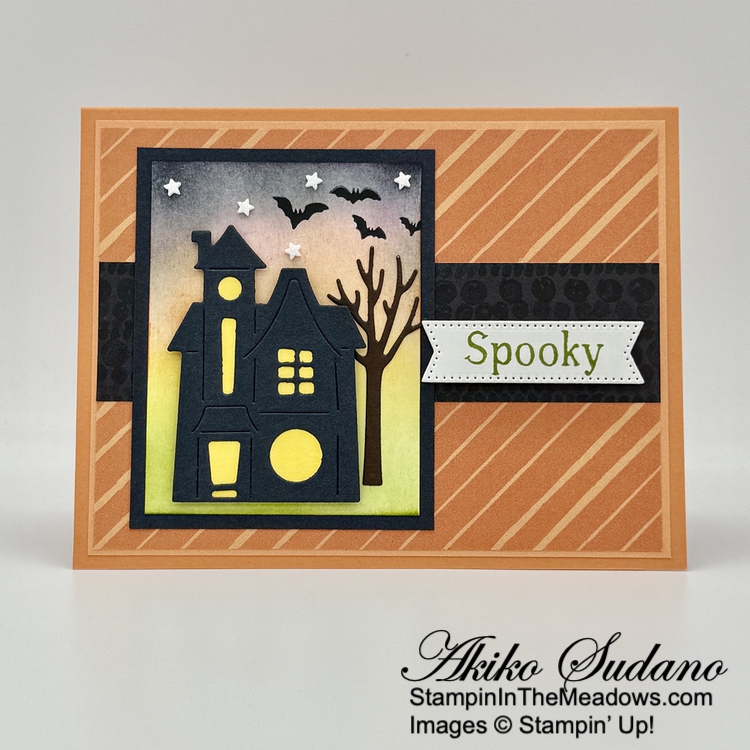
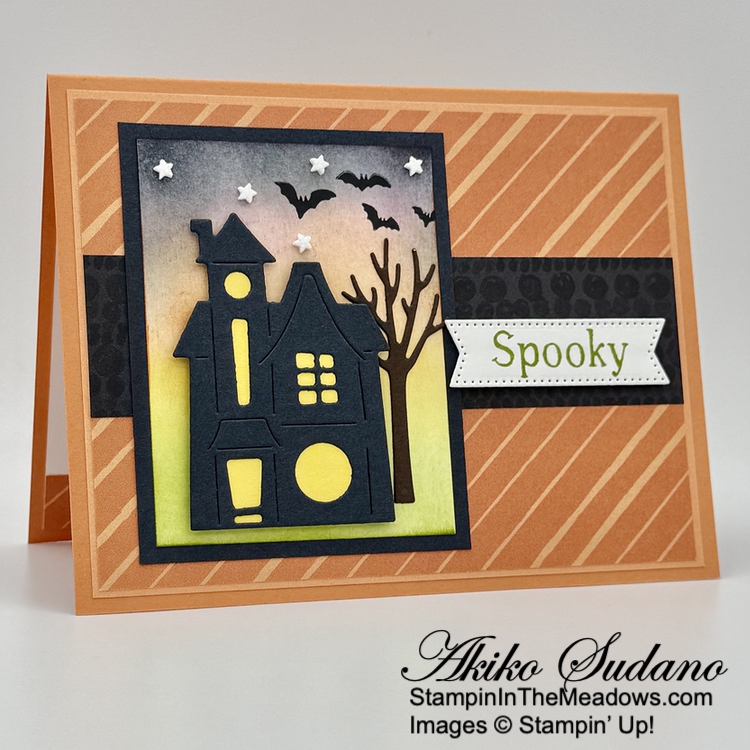
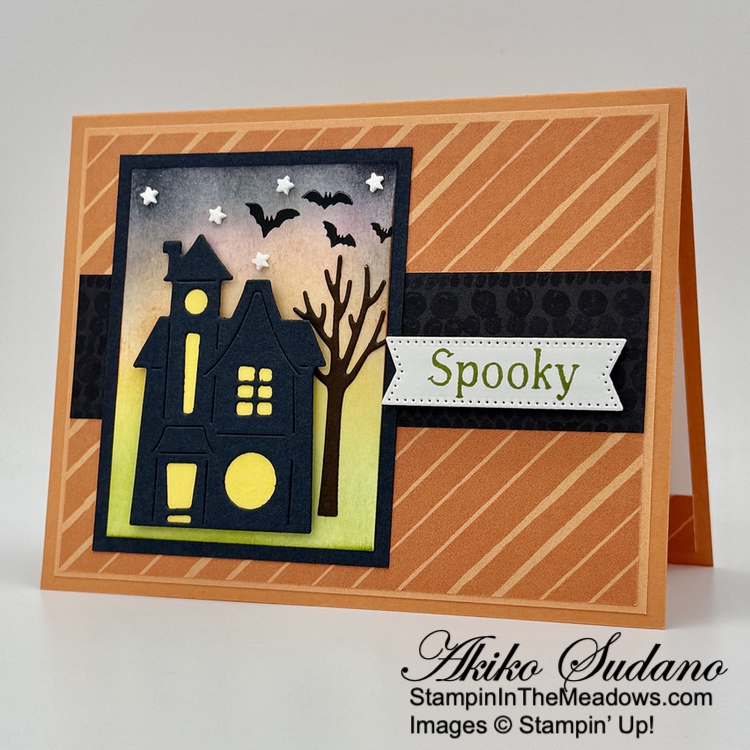
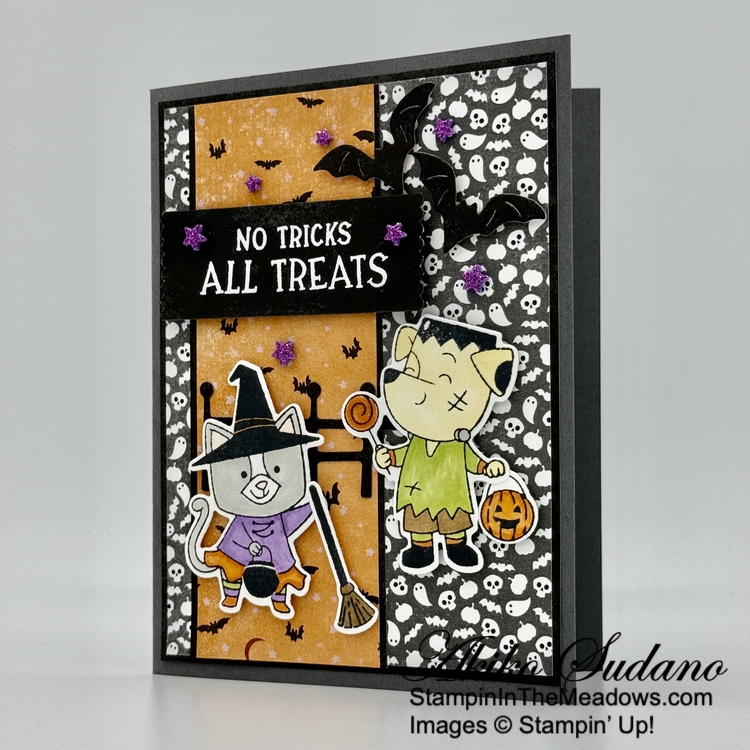
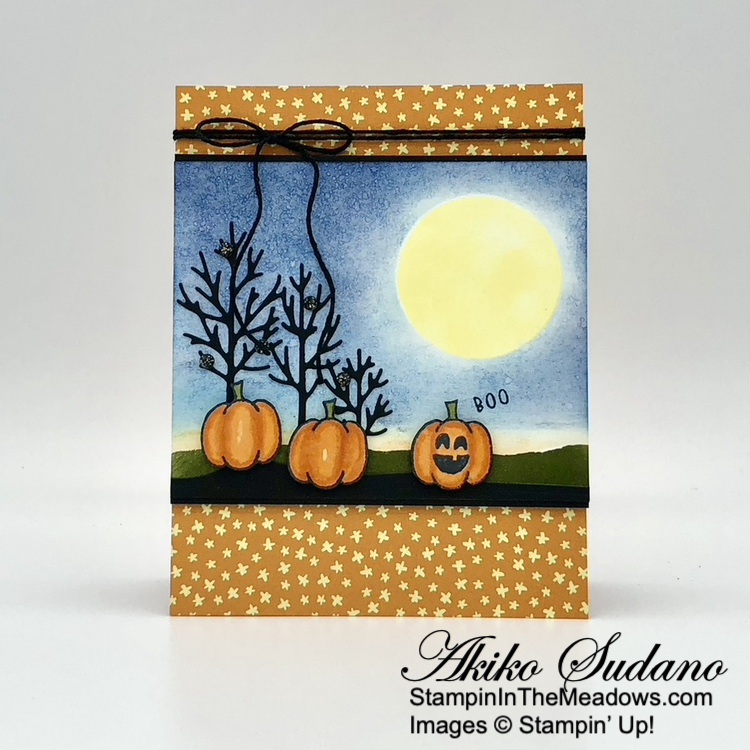
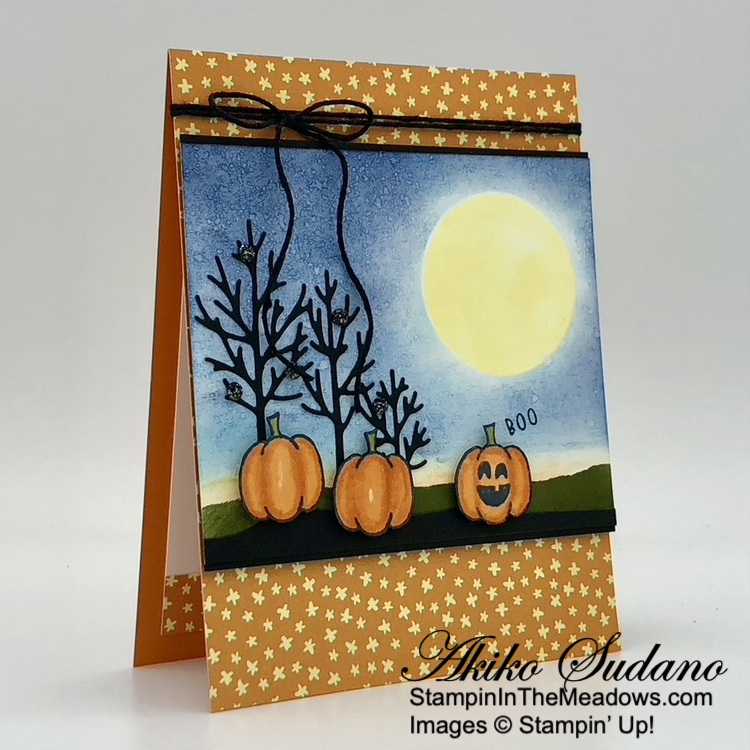
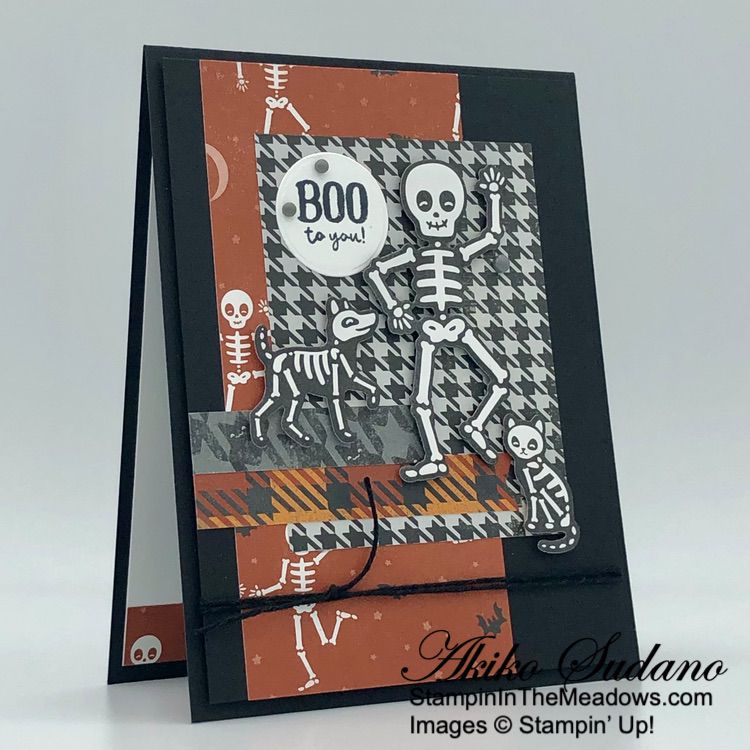
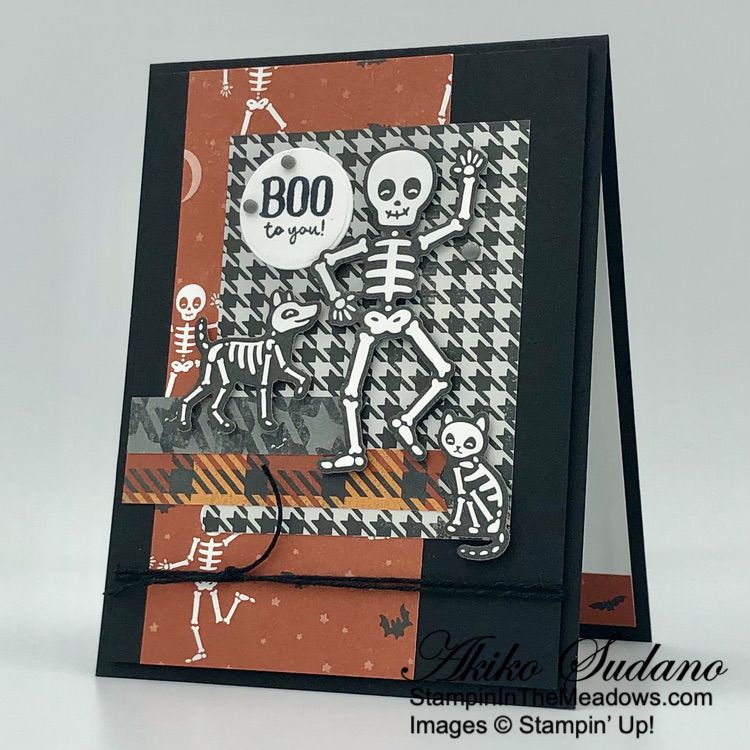
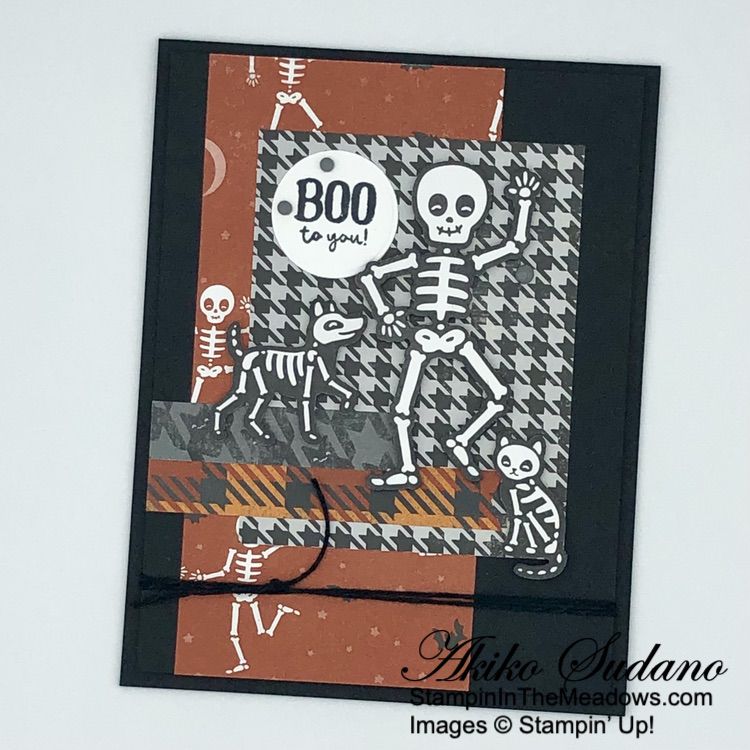
I adhered a Cajun Craze skeleton panel of Them Bones designer series paper to a Basic Black Panel with liquid glue. I adhered a plaid panel on top with liquid glue – doesn’t this look like bats! I used the Banners Pick A Punch to trim the ends of 2 strips of DSP and adhered them to the panel. I wrapped the panel twice with black baker’s twine and popped it on the front of a Basic Black card base with dimensionals.

I cut three skeletons, a person, cat and dog using the Stampin’ Up! Bag of Bones dies from the Them Bones DSP and used black dimensionals to pop them on the card front. Isn’t it great to have black dimensionals? They’re perfect for these dark intricate die cuts!

I stamped the sentiment from the Stampin’ Up! Bag of Bones photopolymer stamp set in Memento Tuxedo Black ink on Basic White. I cut the label out with second largest circle die from the Reach for the Stars dies. These dies are perfect for cutting out planets as well as nested circles – check them out. I adhered the label to the card with liquid glue and finished with gray matte dots.

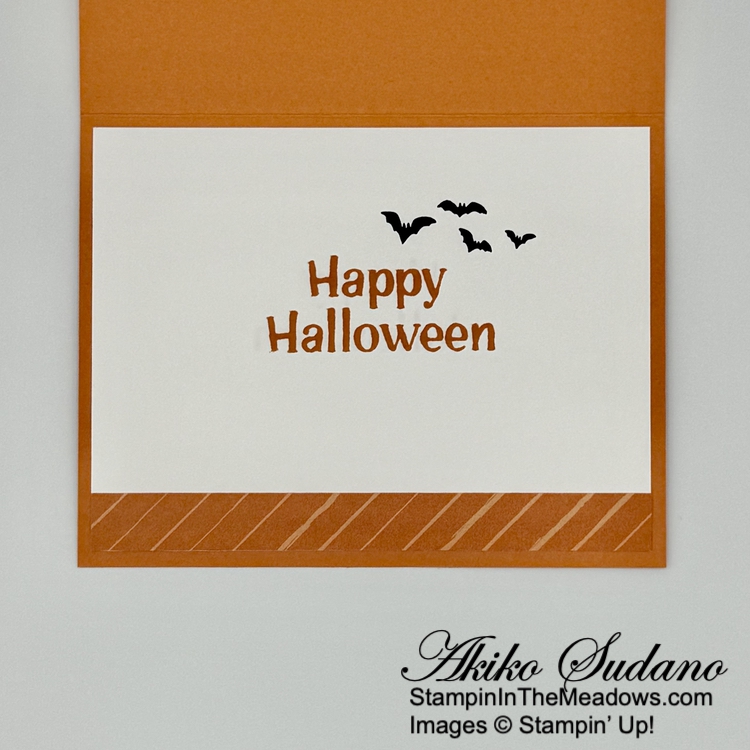
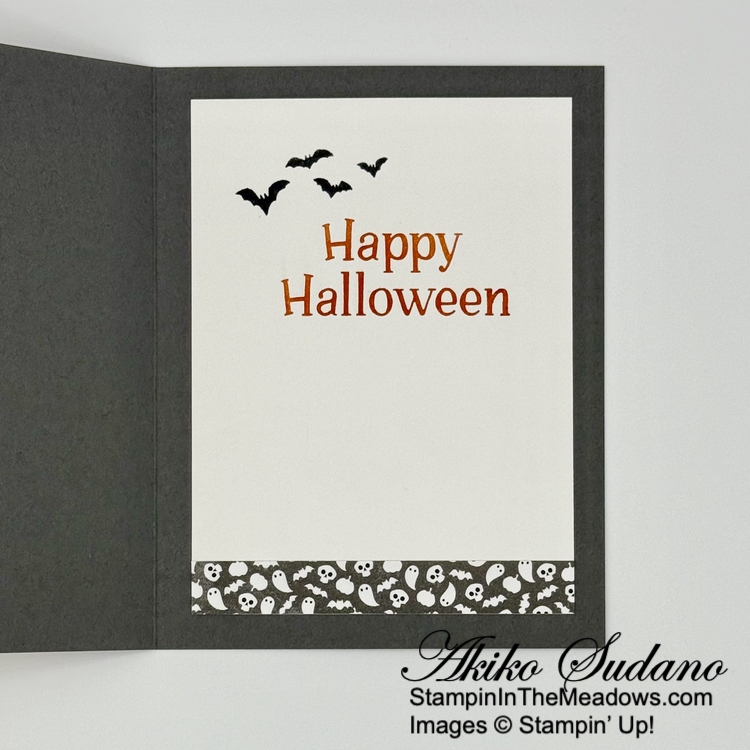
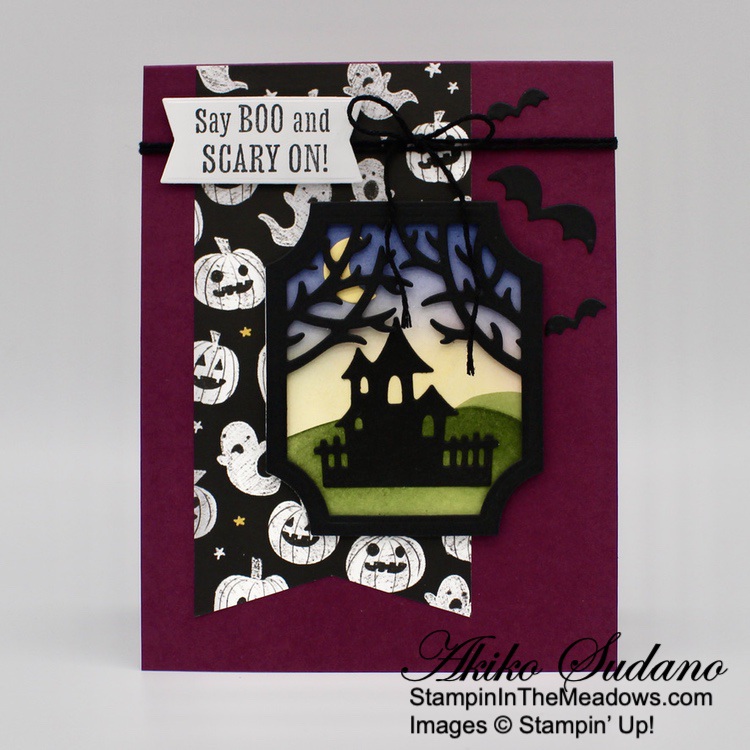
For the inside of the card, I stamped the sentiment from the Stampin’ Up! Bag of Bones stamp set in Cajun Craze ink on a Basic White panel. I stamped the three bats in Memento Tuxedo Black ink and adhered a strip of DSP to the bottom. I adhered the panel to the inside of the card with Stampin’ Seal.

Skeletons and bats are perfect for Halloween and the Stampin’ Up! Bag of Bones bundle is one of the cutest sets ever. And when paired with the fun Them Bones designer series paper, it makes Halloween crafting easy as well as fun.


Stampin’ Up! 35 Years Joining Special Ends Soon!

Stampin’ Up!’s is celebrating their 35th anniversary in style! From October 3 – October 31 2023, anyone who joins our fun crafting community as a new demonstrator can choose either 35% OFF the cost of their Starter Kit or get 35% MORE product with their Starter Kit!

Promotion Details:

  • Promotion Period: October 3 – October 31, 2023
  • Deadline to Join: October 31, 2023; 11:59 PM (MT)
  • New demonstrators can choose one of the following options for their Starter Kit:
    • Option 1: Get 35% OFF the normal cost of a Stampin’ Up! Starter Kit. Those who select this option will receive $125 worth of product for only $64.35!
    • Option 2: Get 35% MORE product with their Starter Kit. Those who select this option will receive $168.75 worth of product by spending $99!

No matter which option you choose for your Starter Kit, you will receive free business supplies and free shipping on your Starter Kit—not to mention all the fun that comes with being part of Stampin’ Up!

FREE OnStage@Home Registration

It gets better! Those who sign up for a Starter Kit during this offer will also be automatically registered for FREE to our virtual OnStage event on November 11 – a $77 value!

  • Those who sign up for this offer have the opportunity to watch the event independently, gathered together with other demonstrators, or with their Team Leader.
  • Demonstrators who join during this promotion will be automatically added to the OnStage attendees; they do not need to register separately.
  • Demonstrators who join during this promotion will also receive an email with all the information about this event.

Yay!  Stampin’ Up! events are always SO much fun!!  Bonus that you can join and attend your first even for free!!

Come Join Us!

If you’d like to join our team, we’d love to have you!  Once you join, you’ll get at least a 20% discount on all of your Stampin’ Up! purchases and you can preorder from the upcoming catalogs!

We welcome all types of Demonstrators from those only purchasing to get the discount for themselves to those who want to run a business and those anywhere in between!  We’re a relaxed group that loves to stamp with no pressure to sell!

Contact me at apsudano@stampininthemeadows.com if you have questions.


Current Host Code: CD4VVKRG

Use this host code when you order $50 or more and receive a Thank You gift from me!  The free gift is your choice of any item currently available valued up to $10.00 .

If your order is over $150, please do not use the host code since you’ll receive your own Host Dollars plus I’ll still send you the Thank You gift!  This host code can be used by anyone, no club or commitment required. Let me know if you have any questions.


If you need any stamping supplies, I’d be very happy to be your Demonstrator.  Just click on the Shop Now button on the right side of the screen to go directly to my online store or contact me if you have any questions.  Happy Stamping!

Thanks for stopping by and have a great weekend!

Akiko

  • Visit my online store here
  • See the current Stampin’ Up! clearance rack specials here
  • Earn FREE Stampin’ Up! products through my Wildflower Frequent Shopper Program – my way of saying thank you to my online frequent shopper customers.
  • Have any questions? I’d be happy to help, click here to contact me.

Cardstock Cuts for this project:

  • Basic Black – 4-1/4″ x 11″ card base scored at 5-1/2″, 4″ x 5-1/4″ (front background)
  • Basic White – 4″ x 5-1/4″ (inside panel), 1-1/2″ x 1-1/2″ (label)
  • Them Bones DSP – 2-1/4″ x 5-1/4″ (front stripe), 2-3/4″ x 3-1/2″ (small panel), 1/2″ x 3-1/4″ (front banner), 1/2″ x 2-1/2″ (front banner), 1/2″ x 4″ (inside trim), 3 die cut skeletons

Stampin’ Up! products used in this project:


Stampin’ Up! Bag of Bones for the Happy Inkin’ Thursday Blog Hop

Good Morning and welcome to the Happy Inkin’ Thursday Blog Hop! The Stampin’ Up! Bag Of Bones bundle is a fun Halloween theme stamp and die bundle that has the best skeleton stamps and dies for a Haunted Halloween. I paired this bundle with the wonderful Them Bones designer series paper for a card depicting a spooky night of fun. You can find the supplies I used along with card stock cuts at the bottom of my post.

We have a theme challenge this week and and I chose Halloween:

I adhered a panel of the night time graveyard Them Bones designer series paper to the front of a Starry Sky card base. I stamped the sentiment from the Stampin’ Up! Bag Of Bones photopolymer stamp set in Memento Tuxedo Black ink on Pumpkin Pie and cut it out with the second smallest banner from the Nested Essentials dies. I adhered it to the card with liquid glue.

I cut a skeleton from the Them Bones designer series paper with the Stampin’ Up! Bag Of Bones dies. I cut the cowboy hat and boots from Crumb Cake and adhered them to the skeleton with liquid glue and adhered the skeleton to the card front with pieces of dimensionals.

I use the cat and dog skeleton dies to cut skeletons from the Them Bones designer series paper and adhered them to the card front with liquid glue. I finished the card front with glow in the dark bats.

For the inside of the card, I stamped the sentiment from the Stampin’ Up! Bag Of Bones stamp set in Cajun Craze ink on Basic White. I stamped the bats in Memento Tuxedo Black and trimmed the bottom with a strip of DSP. I adhered the panel to the inside of the card with Stampin’ Seal.

Thanks to the coordination between the dies in the Stampin’ Up! Bag Of Bones bundle and the Them Bones designer series paper, this card came together pretty quickly! Alternatively, when I finish cutting the skeleton images from the DSP, I can stamp them and cut them out with the dies. So this is going to provide Halloween crafting fun for a long time!

On with the Hop! Click on the Next Blog button to move forward to see the beautiful project Karen Ksenzakovic has created.

If you get lost along the way, here are the participants for the hop:


Current Host Code: 4BTBNFDU

Use this host code when you order $50 or more and receive a free gift from me!  The free gift is your choice of any item currently available valued up to $10.00!

If your order is over $150, please do not use the host code since you’ll receive your own Host Dollars plus I’ll still send you the free gift!  This host code can be used by anyone, no club or commitment required. Let me know if you have any questions.


If you need any stamping supplies, I’d be very happy to be your Demonstrator.  Just click on the Shop Now button on the right side of the screen to go directly to my online store or contact me if you have any questions. 

Thanks for stopping by and Happy Stamping!

Akiko

  • Visit my online store here
  • See the current Stampin’ Up! clearance rack specials here
  • Earn FREE Stampin’ Up! products through my Wildflower Frequent Shopper Program – my way of saying thank you to my online frequent shopper customers.
  • Have any questions? I’d be happy to help, click here to contact me.

Cardstock Cuts for this project:

  • Starry Sky- 4-1/4″ x 11″” card base scored at 5-1/2″
  • Pumpkin Pie – 1-1/2″ x 1-1/2″ (label)
  • Crumb Cake – 1-1/2″ x 2″ (boots and hat die cuts)
  • Basic White – 4″ x 5-1/4″ (inside panel)
  • Them Bones DSP – 4″ x 5-1/4″ (front background), 1/2″ x 4″ (inside trim), die cut skeletons

Stampin’ Up! products used in this project:


Stampin’ Up! Bag of Bones Halloween Note Cards for the Inkin’ Krew Blog Hop

Good Morning! Welcome to the September Inkin’ Krew Team Blog Hop! The theme for this month’s hop is “Halloween Fun” and the Stampin’ Up! Bag of Bones bundle fits the bill perfectly with all the skeletons and costumes! And I used the bundle with the fun Them Bones designer series paper and Basic White Note Cards and Envelopes to make a simple set of note cards. You can find the supplies I used at the bottom of my post and I included the card stock cuts in the description of each card

One of the designs in the Them Bones DSP pack is a multi panel sheet with cute backgrounds that I cut up and adhered to the front of a Basic White note card. I then decorated it with the wonderful glow in the dark embellishments and designer series paper die cuts – yes the Stampin’ Up! Bag of Bones dies can be used to cut out the DSP! Here are the note cards that I made.

Here is the multiple panel sheet of Them Bones designer series paper. I started by cutting each panel out with my paper trimmer. One of the coolest things about this DSP is that the houndstooth like plaid pattern is actually little bats and they match one of the little bat stamps!

For the first card, I trimmed the ‘Boo‘ panel to 2-3/4″ x 4″ and adhered it to a Starry Sky striped 3″ x 4-1/4″ panel before adhering it to the front of the note card. I decorated it with some glow in the dark bat embellishments and stamped the sentiment from the Stampin’ Up! Bag of Bones stamp set in Starry Sky ink on the inside.

For this card, I cut the fence panel in half and used the right side with the moon, trimming it to 3″ x 4-3/4″ before adhering it to the note card. I die cut a skeleton dog and cat from another panel of the DSP and adhered to the card. I stamped the sentiment from the Stampin’ Up! Bag of Bones stamp set in Memento Tuxedo Black ink on a 1-1/2″ x 1-1/2″ Pumpkin Pie panel and cut it out with the second largest banner from the Nested Essentials dies. I adhered it to the card and finished it with glow in the dark bats and ghosts. I stamped bats in Memento Tuxedo Black the top corner of the inside.

I trimmed the spotlight panel to 3″ x 4-1/2″ and adhered it to the front of a note card. I used the Stampin’ Up! Bag of Bones skeleton die to cut a DSP skeleton and adhered it to the panel. I stamped the sentiment in Memento Tuxedo Black on Pumpkin Pie and cut it out with the second smallest circle from the Stylish Shapes dies. I ahdered it to the card and finished with glow in the dark ghosts. I stamped bats in the top corner of the inside and found half a skeleton at the bottom of the DSP and cut it out to adhere to the bottom corner.

I fussy cut some gravestones from a pannel of Them Bones DSP and adhered it to the left side of the fence panel that I split. I should have picked up some glow in the dark paper (it’s expected to be back in stock at the beginning of October), but I didn’t. So I used the moon and stars die from the Stampin’ Up! Bag of Bones dies to cut a 1-1/2″ x 1-1/2″ panel of white Textured Shimmer paper (I remembered to put adhesive sheets behind it first). I adhered the decorated panel to a note card and finished it with glow in the dark ghosts. I stamped the sentiment in Memento Tuxedo Black on the inside and adhered another fussy cut gravestone to the bottom.

This was the easiest – I trimmed the ‘Trick or Treat‘ panel to 3″ x 4-1/2″, adhered it to the front of a note card and adhered some glow in the dark bats. I stamped some bats on the inside and decided to use the Mini Pocket Envelope dies to make a gift card pocked with a 4-3/4″ x 5-3/4″ DSP panel. This make quick fun gift card holder – definitely a treat!

No, this was the easiest. I trimmed the cat and gravestone panel to 3″ x 4-1/2″ and adhered it to the front of a note card. I adhered glow in the dark bats and a ghost to the front and stamped the sentiment in Pumpkin Pie on the inside. My stamp pad needs re-inking, so the color is uneven, but it goes with the ghostly Halloween theme!

See how great those glow in the dark embellishments work?

These note cards were such a fun project and would be great for quick greetings or gifts for co-workers, friends and family. This would also be a fun project to make with children!

On With The Hop! Click on the Next Blog button to move forward to Mary Deatherage’s project or click the Previous Blog button to move back to see the project that Karen Ksenzakovic created.

If you get lost along the way, here are the participants for the hop:


Current Host Code: ATSGGVYD

Use this host code when you order $50 or more and receive a Thank You gift from me!  The free gift is your choice of any currently available item valued up to $10.00.

If your order is over $150, please do not use the host code since you’ll receive your own Host Dollars plus I’ll still send you the Thank You gift!  This host code can be used by anyone, no club or commitment required. Let me know if you have any questions.


If you need any stamping supplies, I’d be very happy to be your Demonstrator.  Just click on the Shop Now button on the right side of the screen to go directly to my online store or contact me if you have any questions.  Happy Stamping!

Thanks for stopping by and have a great week!

Akiko

  • Visit my online store here
  • See the current Stampin’ Up! clearance rack specials here
  • Earn FREE Stampin’ Up! products through my Wildflower Frequent Shopper Program – my way of saying thank you to my online frequent shopper customers.
  • Have any questions? I’d be happy to help, click here to contact me.

Stampin’ Up! products used in this project:


Stampin’ Up! Scary Cute for the Inkin’ Krew Blog Hop

Good morning! Welcome to the September Inkin’ Krew Team Blog Hop! The theme for this month’s hop is “Halloween Fun” and I am using the wonderful Stampin’ Up! Scary Cute bundle for my Halloween Card. You can find the supplies I used at the bottom of my post along with the sizes of cardstock used.

I cut a fishtail bottom on a panel of Celebrate Everything designer series paper to make a banner and adhered it to the front of a Rich Razzleberry card base.

I used blending brushes to create the background for the haunted house. I applied Daffodil Delight, Pumpkin Pie, Rich Razzleberry and Night of Navy in layers building up the sky. I cut a mask for the hills and used it to cover the sky and applied Mossy Meadow ink with a blending brush to the bottom for the ground. I cut it out with the outline frame die from the Stampin’ Up! Scary Cute bundle. I cut out the haunted house from Basic Black and the moon from So Saffron and adhered them to the blended background die cut with liquid glue. I cut the frame from Basic Black and adhered it to the background with black dimensionals.

I adhered the little scene to the card front with liquid glue. I cut the bats from the Stampin’ Up! Scary Cute bundle from Basic Black and adhered three of them to the card front.

I wrapped the card front twice with black baker’s twine and made a bow. I stamped the sentiment from the Stampin’ Up! Scary Cute cling stamp set in Memento Tuxedo Black ink on Basic White and adhered it over the baker’s twine with black dimensionals.

For the inside of the card, I stamped little trick or treaters from the Stampin’ Up! Scary Cute stamp set in Rick Razzleberry ink on the bottom of a Basic White panel. I stamped the moon in Daffodil Delight and the sentiment in Memento Tuxedo Black. I adhered the rest of the bats with liquid glue and trimmed the bottom with a strip of Celebrate Everything DSP. I adhered the panel to the inside of the card.

The Stampin’ Up! Scary Cute bundle is such a cute and versatile Halloween set. The dies are wonderful, the trick or treater stamps are so cute in their costumes and the sentiments are perfect! They’re great for cards, tags and treat bag decorations.

On With The Hop! Click on the Next Blog button to move forward to Karen Finkle’s project or click the Previous Blog button to move back to see the project that Jillian Good created.

If you get lost along the way, here are the participants for the hop:


Current Host Code: JSUNSU6D

Use this host code when you order $50 or more and receive a free gift from me!  The free gift is your choice of any item currently available valued up to $10.00 in the 2022-2023 Annual Catalog or the July-December 2022 Mini Catalog!

If your order is over $150, please do not use the host code since you’ll receive your own Host Dollars plus I’ll still send you the free gift!  This host code can be used by anyone, no club or commitment required. Let me know if you have any questions


If you need any stamping supplies, I’d be very happy to be your Demonstrator.  Just click on the Shop Now button on the right side of the screen to go directly to my online store or contact me if you have any questions. 

Thanks for stopping by and Happy Stamping!

Akiko

  • Visit my online store here
  • See the current Stampin’ Up! clearance rack specials here
  • Earn FREE Stampin’ Up! products through my Wildflower Frequent Shopper Program – my way of saying thank you to my online frequent shopper customers.
  • Have any questions? I’d be happy to help, click here to contact me.

Cardstock Cuts for this project:

  • Rich Razzleberry – 4-1/4″ x 11″ card base scored at 5-1/2″
  • So Saffron – 1″ x 1″ (die cut moon)
  • Basic Black – 3″x 4″ (die cut frame and bats), 2″ x 2″ (die cut haunted house)
  • Basic White – 4″ x 5-1/4″ (inside panel), 3″ x 3-1/2″ (haunted house background), 1-1/4″ x 2-1/2″ (label)
  • Celebrate Everything DSP – 2-1/2″ x 5″ (front banner), 1/2″ x 4″ (inside trim)

Stampin’ Up! products used in this project:


Stampin’ Up! Pretty Pillow Box Halloween Treat Holders

Good Morning! Tomorrow is Halloween and I am ready! Candy is bought, porch is decorated and I just finished these cute treat boxes made with the Stampin’ Up! Pretty Pillow Box Dies and Cute Halloween designer series paper. You can find the supplies I used at the bottom of my post along with the sizes of cardstock used.

I cut the panels of Cute Halloween designer series paper with the Stampin’ Up! Pretty Pillow Box die for each container. I used the cat punch from the Halloween punch to make thumb notches to make the boxes easy to open from the sides (see picture below). I folded the containers on the score lines and adhered the top flaps with a glue dot.

Then comes the fun part! These boxes are decorated with punched cat faces using the Halloween Punch and Cute Halloween DSP. I added tags die cut with the little tag die from the Stampin’ Up! Pretty Pillow Box dies from both card stock and DSP. I stamped sentiments from the Cutest Halloween stamp set on card stock tags.

I wrapped the boxes with twine or ribbon that coordinated with colors in the DSP and added iridescent star sequins to the flaps. Here is a pumpkin punched from the Cute Halloween DSP along side a stamped pumpkin made from the Cutest Halloween stamp set.

And the cute little ghosts from the Cute Halloween DSP – one is punched and one is fussy cut. Both sweet and so cute. And I used a blending brush with Pumpkin Pie ink to turn the black and white DSP to black and orange DSP.

Creating the little treat holders was easy and fun. The images in Cute Halloween designer series paper are perfect for Halloween Fun!


Eden’s Garden Is Coming on November 2!

Enter and explore Eden with the Eden’s Garden Collection! This delightful and desirable collection includes early-release products from the January–June 2022 Mini Catalog—a bundle of stamps and dies that’s blooming with beauty and bounty. Plus, exclusive products you can’t uncover anywhere else—a pack of paper patterned with green and gold, a set of specialty sheets for gift-giving and textured touches, and a sparkling set of gleaming gems!

Click on the image below to download a flyer with the details:


Current Host Code: PYA3MMQ6

Use this host code when you order $50 or more and receive a free gift from me!  The free gift is your choice of any item valued up to $10.00 in the 2021-2022 Annual Catalog or the July – December 2021 Mini Catalog!

If your order is over $150, please do not use the host code since you’ll receive your own Host Dollars plus I’ll still send you the free gift!  This host code can be used by anyone, no club or commitment required. Let me know if you have any questions.


If you need any stamping supplies, I’d be very happy to be your Demonstrator.  Just click on the Shop Now button on the right side of the screen to go directly to my online store or contact me if you have any questions.  Happy Stamping!

Thanks for stopping by and have a great week!

Akiko

  • Visit my online store here
  • See the current Stampin’ Up! clearance rack specials here
  • Earn FREE Stampin’ Up! products through my Wildflower Frequent Shopper Program – my way of saying thank you to my online frequent shopper customers.
  • Have any questions? I’d be happy to help, click here to contact me.

Cardstock Cuts for this project:

  • Cute Halloween – 4-1/2″ x 6″ (pillow box die cut), 1-1/2″ x 2″ (tag die cuts), punched and fussy cut images
  • Old Olive – 1-1/2″ x 2″ (tag die cuts)
  • Pumpkin Pie – 1-1/2″ x 2″ (tag die cuts)
  • Highland Heather – 1-1/2″ x 2″ (tag die cuts)

Stampin’ Up! products used in this project:


Stampin’ Up! Cutest Halloween Treat Yourself card

Good Morning! Are you ready for another Halloween card made with the Stampin’ Up! Cutest Halloween bundle? Today I used the sentiments from the stamp set and the punch along with the Stampin’ Up! Cute Halloween 6″ x 6″ designer series paper to make this cute little Halloween card. You can find the supplies I used at the bottom of my post along with the sizes of cardstock used.

I’m entering today’s card in a couple of challenges. First is the theme (Halloween) challenge in TGIF Challenges #TGIFC338

And of course, the pretty sketch challenge in the Global Design Project #314:

I embossed a panel of the black Cute Halloween 6″ x 6″ designer series paper with the Tasteful Textile 3D embossing folder. This paper is really cool, because it’s black, but has gray distressing, so it has a lot more character than plain black card stock. So after embossing, I adhered it to the front of a Basic Black card base.

I adhered another panel of Cute Halloween DSP to a Pumpkin Pie mat and die cut a third with the third largest layering circles die. I adhered the circle die cut to an Old Olive scalloped circle die cut and adhered the layered circle to the layered square with glue dots. I popped them both on the card front with dimennsionals.

I stamped the sentiment from the Stampin’ Up! Cutest Halloween photopolymer stamp set in Memento Tuxedo Black ink on a strip of Pumpkin Pie and cut it out with the die from the Tasteful Labels dies. I used the Halloween Punch to cut out three black cats, three jack-o-lanterns and three ghosts from the Cute Halloween DSP and adhered them together then adhered them to the card front with dimensionals. I adhered the label with a dimensional and glue dots and finished with a black and white twine bow.

For the inside of the card, I stamped the sentiment from the Stampin’ Up! Cutest Halloween stamp set in Memento Tuxedo Black ink on a Basic White panel. I punched out an additional black cat, ghost and jack-o-lantern and adhered them to the panel with liquid glue. I trimmed the bottom with another strip of cute Halloween DSP and adhered the panel to the inside of the card.

The sweet images and sentiments in the Stampin’ Up! Cutest Halloween bundle and the Cute Halloween 6″ x 6″ designer series paper are a fun way to celebrate the spookiness of Halloween. Are you ready for Halloween? It’s about 1-1/2 weeks away, so time is running out!


Stampin’ Up! 24 Hour Sale on Wednesday, October 20!

Can’t stop staring at a certain stamp set (or two, or three)? Stock up on stamp sets at a stellar price! For one day only, you can snag select cling stamp sets at a 15% discount. This short and stamp-tacular sale only happens once a year, so get in gear—it’s time to shop ’til you drop!

Promotion Details:

  • The sale will run for One Day Only – Wednesday, October 20, 2021 12:00 AM MT – 11:50 PM MT
  • The 15% discount will apply to select cling stamp sets only.
  • Every cling stamp set from the 2021–2022 Annual Catalog (excluding the Host stamp sets) will be discounted!

Click HERE to download a PDF with the all the stamp sets that will be on sale along with the sale prices.


Current Host Code: 29VEKU9M

Use this host code when you order $50 or more and receive a free gift from me!  The free gift is your choice of any item valued up to $10.00 in the 2021-2022 Annual Catalog or the July – December 2021 Mini Catalog!

If your order is over $150, please do not use the host code since you’ll receive your own Host Dollars plus I’ll still send you the free gift!  This host code can be used by anyone, no club or commitment required. Let me know if you have any questions.


If you need any stamping supplies, I’d be very happy to be your Demonstrator.  Just click on the Shop Now button on the right side of the screen to go directly to my online store or contact me if you have any questions.  Happy Stamping!

Thanks for stopping by and have a great week!

Akiko

  • Visit my online store here
  • See the current Stampin’ Up! clearance rack specials here
  • Earn FREE Stampin’ Up! products through my Wildflower Frequent Shopper Program – my way of saying thank you to my online frequent shopper customers.
  • Have any questions? I’d be happy to help, click here to contact me.

Cardstock Cuts for this project:

  • Basic Black – 4-1/4″ x 11″ card base scored at 5-1/2″
  • Pumpkin Pie – 2-3/4″ x 2-3/4″ (DSP mat), 1″ x 3″ (label)
  • Old Olive – 3″ x 3″ (scalloped circle)
  • Basic White – 4″ x 5-1/4″ (inside panel)
  • Cute Halloween 6″ x 6″ DSP – 4-1/4″ x 5-1/2″ (embossed background), 2-5/8″ x 2-5/8″ (square panel), 2-3/4″ x 2-3/4″ (die cut circle), 1/2″ x 4″ (inside trim), four each of the punched ghost, jack-o-lantern and black cat

Stampin’ Up! products used in this project: