Stampinโ€™ Up! Cutest Halloween Treat Yourself card

Good Morning! Are you ready for another Halloween card made with the Stampin’ Up! Cutest Halloween bundle? Today I used the sentiments from the stamp set and the punch along with the Stampin’ Up! Cute Halloween 6″ x 6″ designer series paper to make this cute little Halloween card. You can find the supplies I used at the bottom of my post along with the sizes of cardstock used.

I’m entering today’s card in a couple of challenges. First is the theme (Halloween) challenge in TGIF Challenges #TGIFC338

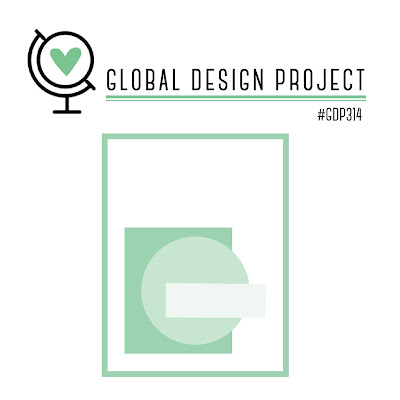
And of course, the pretty sketch challenge in the Global Design Project #314:

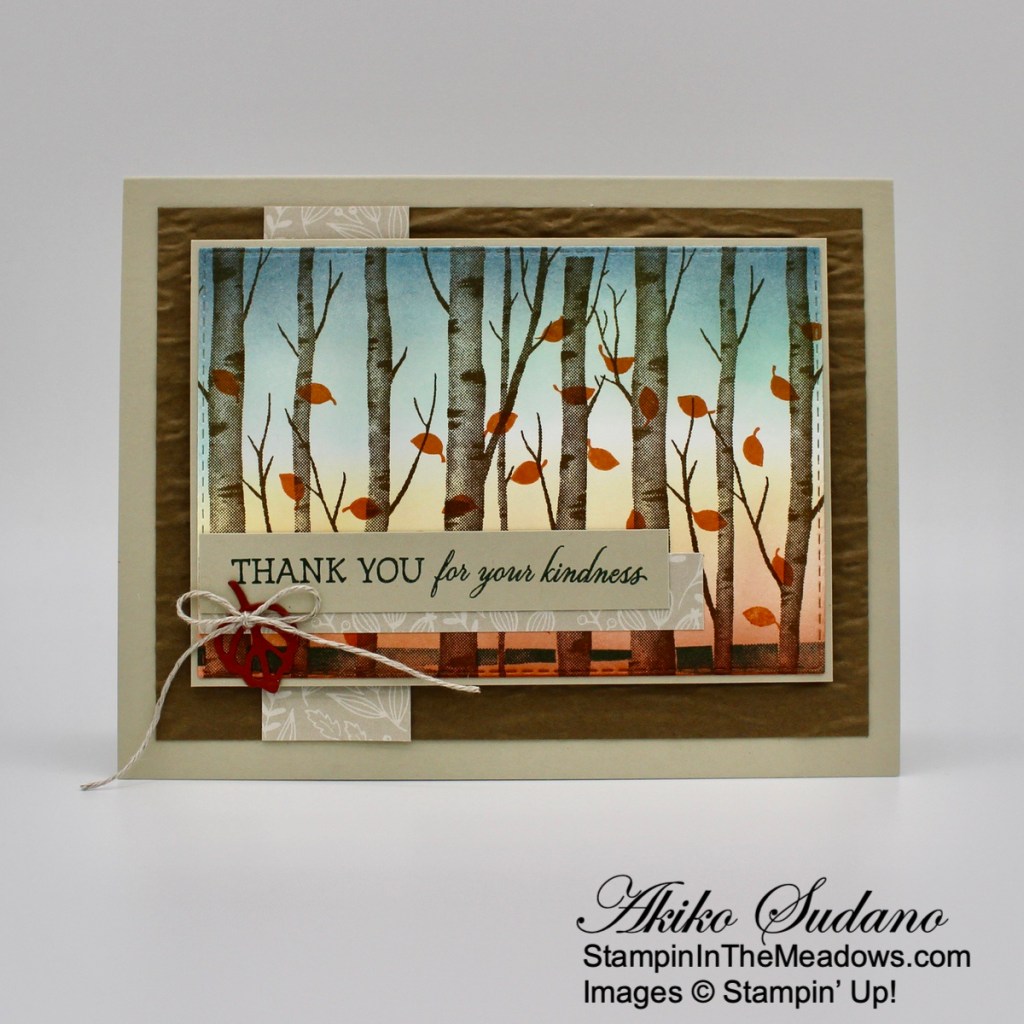
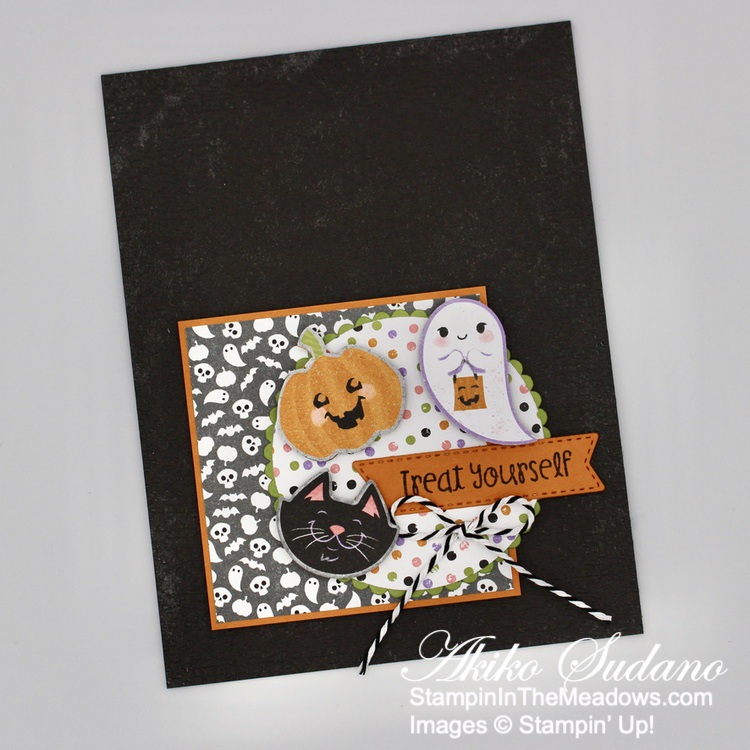
I embossed a panel of the black Cute Halloween 6″ x 6″ designer series paper with the Tasteful Textile 3D embossing folder. This paper is really cool, because it’s black, but has gray distressing, so it has a lot more character than plain black card stock. So after embossing, I adhered it to the front of a Basic Black card base.

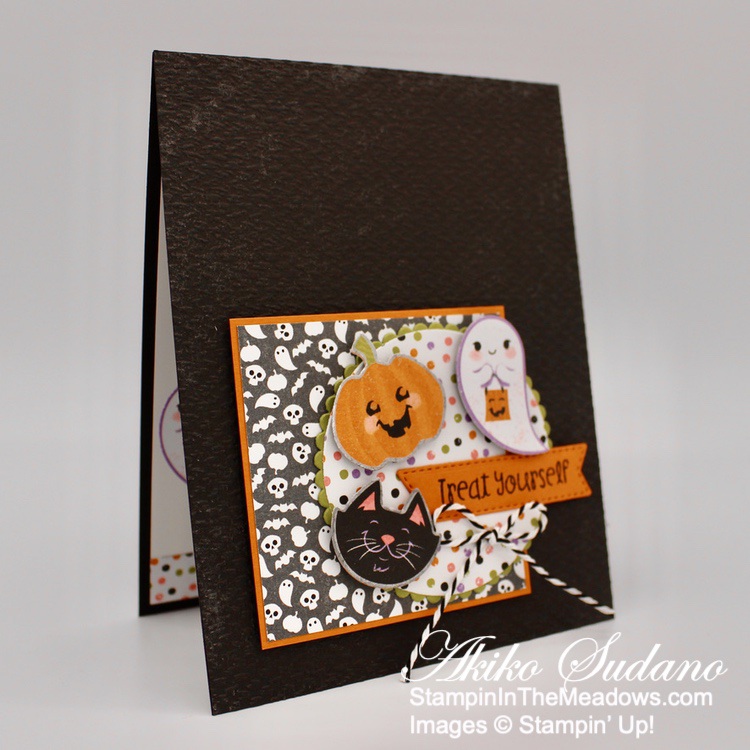
I adhered another panel of Cute Halloween DSP to a Pumpkin Pie mat and die cut a third with the third largest layering circles die. I adhered the circle die cut to an Old Olive scalloped circle die cut and adhered the layered circle to the layered square with glue dots. I popped them both on the card front with dimennsionals.

I stamped the sentiment from the Stampin’ Up! Cutest Halloween photopolymer stamp set in Memento Tuxedo Black ink on a strip of Pumpkin Pie and cut it out with the die from the Tasteful Labels dies. I used the Halloween Punch to cut out three black cats, three jack-o-lanterns and three ghosts from the Cute Halloween DSP and adhered them together then adhered them to the card front with dimensionals. I adhered the label with a dimensional and glue dots and finished with a black and white twine bow.

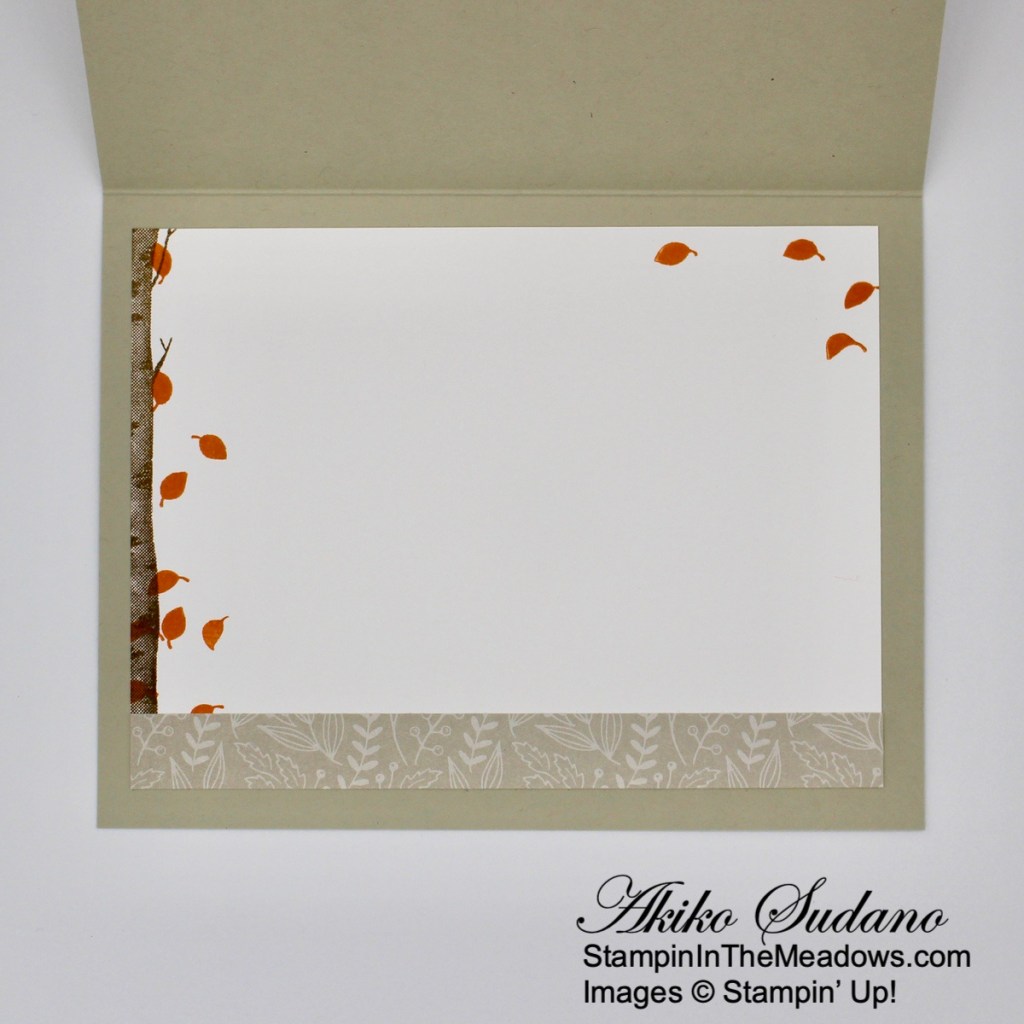
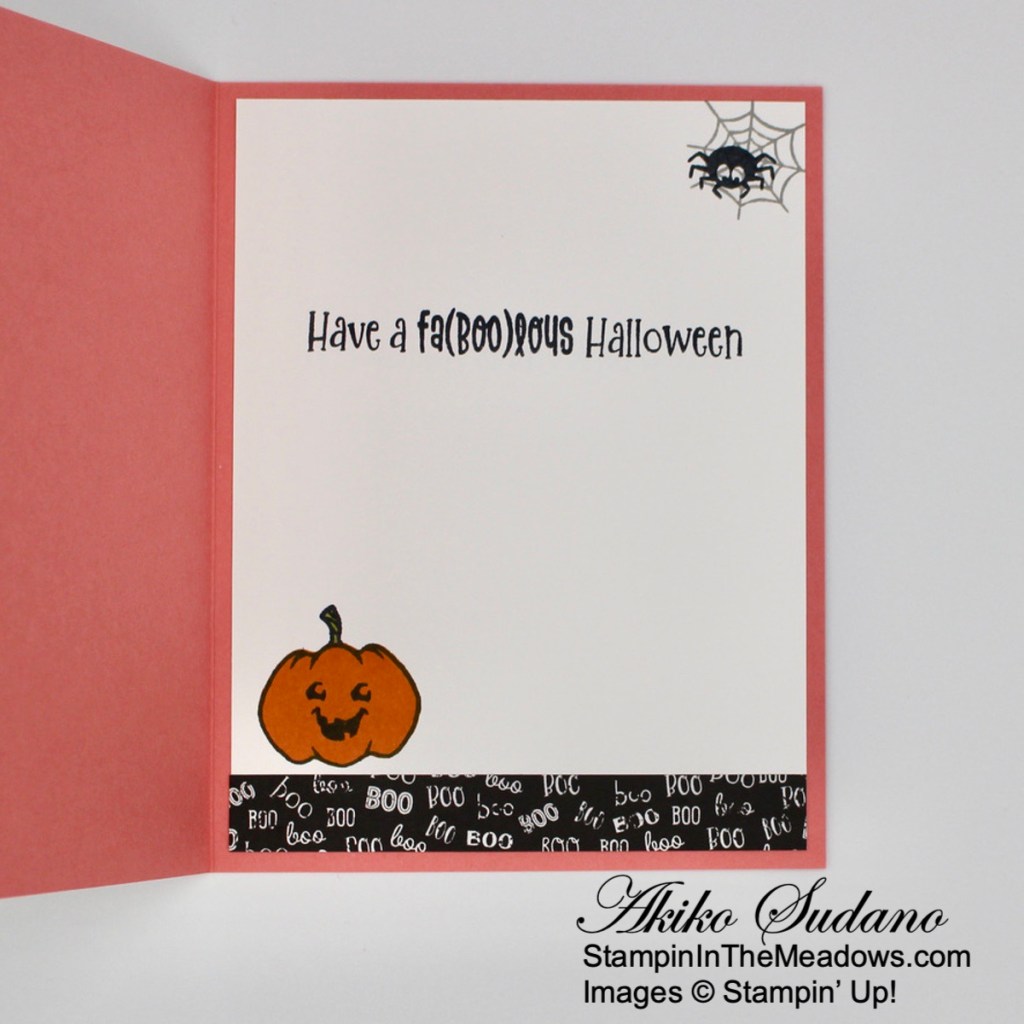
For the inside of the card, I stamped the sentiment from the Stampin’ Up! Cutest Halloween stamp set in Memento Tuxedo Black ink on a Basic White panel. I punched out an additional black cat, ghost and jack-o-lantern and adhered them to the panel with liquid glue. I trimmed the bottom with another strip of cute Halloween DSP and adhered the panel to the inside of the card.

The sweet images and sentiments in the Stampin’ Up! Cutest Halloween bundle and the Cute Halloween 6″ x 6″ designer series paper are a fun way to celebrate the spookiness of Halloween. Are you ready for Halloween? It’s about 1-1/2 weeks away, so time is running out!


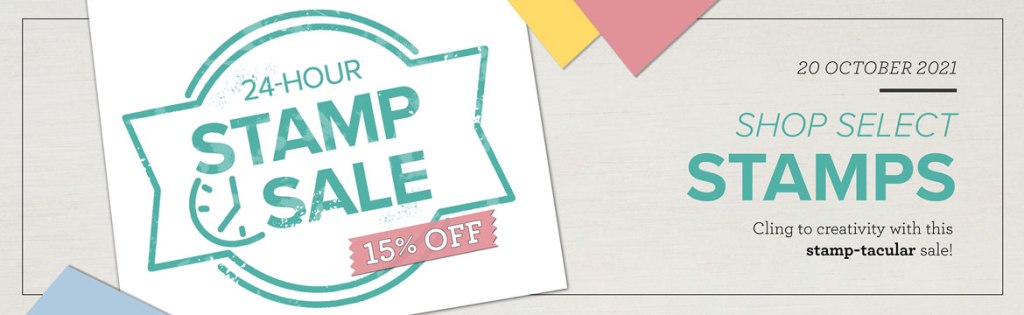
Stampin’ Up! 24 Hour Sale on Wednesday, October 20!

Canโ€™t stop staring at a certain stamp set (or two, or three)? Stock up on stamp sets at a stellar price! For one day only, you can snag select cling stamp sets at a 15% discount. This short and stamp-tacular sale only happens once a year, so get in gearโ€”itโ€™s time to shop โ€™til you drop!

Promotion Details:

  • The sale will run for One Day Only – Wednesday, October 20, 2021 12:00 AM MT – 11:50 PM MT
  • The 15% discount will apply to select cling stamp sets only.
  • Every cling stamp set from the 2021โ€“2022 Annual Catalog (excluding the Host stamp sets) will be discounted!

Click HERE to download a PDF with the all the stamp sets that will be on sale along with the sale prices.


Current Host Code: 29VEKU9M

Use this host code when you order $50 or more and receive a free gift from me!  The free gift is your choice of any item valued up to $10.00 in the 2021-2022 Annual Catalog or the July โ€“ December 2021 Mini Catalog!

If your order is over $150, please do not use the host code since you’ll receive your own Host Dollars plus I’ll still send you the free gift!  This host code can be used by anyone, no club or commitment required. Let me know if you have any questions.


If you need any stamping supplies, Iโ€™d be very happy to be your Demonstrator.  Just click on the Shop Now button on the right side of the screen to go directly to my online store or contact me if you have any questions.  Happy Stamping!

Thanks for stopping by and have a great week!

Akiko

  • Visit my online store here
  • See the current Stampinโ€™ Up! clearance rack specials here
  • Earn FREE Stampinโ€™ Up! products through my Wildflower Frequent Shopper Program – my way of saying thank you to my online frequent shopper customers.
  • Have any questions? I’d be happy to help, click here to contact me.

Cardstock Cuts for this project:

  • Basic Black โ€“ 4-1/4″ x 11″ card base scored at 5-1/2″
  • Pumpkin Pie – 2-3/4″ x 2-3/4″ (DSP mat), 1″ x 3″ (label)
  • Old Olive – 3″ x 3″ (scalloped circle)
  • Basic White – 4″ x 5-1/4″ (inside panel)
  • Cute Halloween 6″ x 6″ DSP – 4-1/4″ x 5-1/2″ (embossed background), 2-5/8″ x 2-5/8″ (square panel), 2-3/4″ x 2-3/4″ (die cut circle), 1/2″ x 4″ (inside trim), four each of the punched ghost, jack-o-lantern and black cat

Stampinโ€™ Up! products used in this project:


Stampinโ€™ Up! Christmas Season for Thanksgiving Video Tutorial

Good Morning! Have you seen the Stampin’ Up! Christmas Season photopolymer stamp set used for Fall cards? Last week I made a #simplestamping Christmas card with this set and I wanted to keep playing with this set and make a Thanksgiving card. I have seen a few and I was also inspired by a thank you card that I saw in the store, so I decided to give it a try. Here is the result. You can find the supplies I used at the bottom of my post along with the sizes of cardstock used.

I couldn’t post my Facebook Live video, but I posted a copy of the video in my YouTube channel and here it is:

I stamped the leaves from the Stampin’ Up! Christmas Season stamp set in Soft Succulent, Bumblebee and Cinnamon Cider on a Very Vanilla panel. For each image, I did a second generation (aka stamp off once) stamping over the first leaf, but slightly offset. This made the ‘bouquet’ look fuller. Then I stamped the berries in Merry Merlot.

I embossed the panel using the Timber 3D embossing folder to give it more texture and I adhered it to a Merry Merlot mat with liquid glue. I wrapped the panel with Very Vanilla Baker’s twine twice and made a bow on the side.

I stamped the sentiment from the Sparkle of the Season stamp set in Merry Merlot on a Cinnamon Cider panel and cut it out with the die from the Seasonal Labels bundle using the two step method. In the video, I made the first cut all the way, and it worked beautifully with this label die. But you have to be careful if using a stitched label die, because you will get stitching all the way to the end. I should have mentioned this in the video, but I didn’t think about it until afterwards.

I adhered the label over the vanilla twine with dimensionals and added three clear Genial Gems around the label. I popped the panel on the front of a Cinnamon Cider card base with dimensionals and trimmed the bow ends.

For the inside of the card, I stamped the images from the Stampin’ Up! Christmas Season stamp set in the corners of a Very Vanilla panel. I adhered the panel to the inside of the card with Stampin’ Seal.

The Stampin’ Up! Christmas Season images are beautiful in fall colors! The shadow stamping technique works very well with these beautiful images as well. Give it a try!


Current Host Code: 29VEKU9M

Use this host code when you order $50 or more and receive a free gift from me!  The free gift is your choice of any item valued up to $10.00 in the 2021-2022 Annual Catalog or the July โ€“ December 2021 Mini Catalog!

If your order is over $150, please do not use the host code since you’ll receive your own Host Dollars plus I’ll still send you the free gift!  This host code can be used by anyone, no club or commitment required. Let me know if you have any questions.


If you need any stamping supplies, Iโ€™d be very happy to be your Demonstrator.  Just click on the Shop Now button on the right side of the screen to go directly to my online store or contact me if you have any questions.  Happy Stamping!

Thanks for stopping by and have a great week!

Akiko

  • Visit my online store here
  • See the current Stampinโ€™ Up! clearance rack specials here
  • Earn FREE Stampinโ€™ Up! products through my Wildflower Frequent Shopper Program – my way of saying thank you to my online frequent shopper customers.
  • Have any questions? I’d be happy to help, click here to contact me.

Cardstock Cuts for this project:

  • Cinnamon Cider โ€“ 4-1/4″ x 11″ card base scored at 5-1/2″, 1-1/4″x 2-1/2″ (label)
  • Merry Merlot – 3-5/8″ x 4-7/8″ (front mat)
  • Very Vanilla – 3-1/2″ x 4-3/4″ (front panel), 3-3/4″ x 5″ (inside panel)

Stampinโ€™ Up! products used in this project:


Stampinโ€™ Up! Poinsettia Christmas To Remember Card

Happy Saturday! I pulled out the pretty Stampin’ Up! Poinsettia dies along with the Stampin’ Up! Christmas To Remember cling stamp set to make today’s Christmas card. You can find the supplies I used at the bottom of my post along with the sizes of cardstock used.

Today’s card was inspired by a couple of challenges and was a lot of fun! First is the pretty sketch challenge in Hand Stamped Sentiments #374:

But I was also intrigued by the wonderful color challenge in the Global Design Project #313:

I adhered a panel of Sahara Sand Tidings of Christmas 6″ x 6″ designer series paper to a Basic Black mat. I adhered another strip of the same DSP to another mat and adhered them both to a panel of black and white gingham Pattern Party Host designer series paper. I adhered the layered panel to the larger Sahara Sand DSP panel and popped it on the front of a Real Red card base.

I die cut another Real Red panel with the Stampin’ Up! Poinsettia dies – the largest petal cluster, the medium cluster and the tiny petal cluster. I used the embossing petal die inserts to give the flower texture when die cutting. I adhered the petal clusters together with glue dots. I cut one of each of the poinsettia leaves with the leaf dies and their embossing insets and adhered the leaves to the back of the flower with glue dots. I adhered the flower to the card front with glue dots.

I stamped the sentiment from the Stampin’ Up! Christmas To Remember stamp set in Memento Tuxedo Black on Basic white and cut it out with the label from the Seasonal Labels dies. I adhered it to the card front, overlapping the flower with dimensionals and glue dots. I added Bumblebee matte dots to the flower center, black dots to the card front and a bow made from black and white gingham to finish the card front.

For the inside of the card, I stamped the sentiment from the Stampin’ Up! Christmas To Remember stamp set in Real Red on a Basic White panel. I stamped a leaf sprig from the Tidings and Trimmings photopolymer stamp set in Mossy Meadow under the sentiment and adhered a strip of Tidings of Christmas DSP to the bottom of the panel. I adhered the panel to a Basic Black mat and then to the inside of the card.

I love the rustic feel that the Sahara Sand and black and white gingham give this card! Reminds me of handmade Christmas ornaments and popcorn garland on a Christmas tree. And I love the flowers that the Stampin’ Up! Poinsettia dies make – they are the best ever!! But let’s have fun with Halloween first!


Current Host Code: 29VEKU9M

Use this host code when you order $50 or more and receive a free gift from me!  The free gift is your choice of any item valued up to $10.00 in the 2021-2022 Annual Catalog or the July โ€“ December 2021 Mini Catalog!

If your order is over $150, please do not use the host code since you’ll receive your own Host Dollars plus I’ll still send you the free gift!  This host code can be used by anyone, no club or commitment required. Let me know if you have any questions.


If you need any stamping supplies, Iโ€™d be very happy to be your Demonstrator.  Just click on the Shop Now button on the right side of the screen to go directly to my online store or contact me if you have any questions.  Happy Stamping!

Thanks for stopping by and have a great week!

Akiko

  • Visit my online store here
  • See the current Stampinโ€™ Up! clearance rack specials here
  • Earn FREE Stampinโ€™ Up! products through my Wildflower Frequent Shopper Program – my way of saying thank you to my online frequent shopper customers.
  • Have any questions? I’d be happy to help, click here to contact me.

Cardstock Cuts for this project:

  • Real Red โ€“ 4-1/4″ x 11″ card base scored at 5-1/2″, 3-1/4″ x 4-3/4″ (poinsettia die cuts)
  • Basic Black – 3-3/8″ x 4-5/8″ (DSP mat), 1-1/4″ x 3-1/2″ (DSP stripe mat), 4″ x 5-1/4″ (inside mat)
  • Mossy Meadow – 2-1/4″ x 2-1/2″ (die cut leaves)
  • Basic White – 3-7/8″ x 5-1/8″ (inside panel), 1″ x 3″ (label)
  • Tidings of Christmas 6″ x 6″ DSP – 3-1/4″ x 4-1/2″ (front background), 1-1/8″ x 3-1/2″ (front stripe), 1/2″ x 3-7/8″ (inside trim)
  • Pattern Party Host DSP – 2″ x 3-1/2″ (gingham panel)

Stampinโ€™ Up! products used in this project:

Christmas To Remember Cling Stamp Set (English)
$22.00
Tidings & Trimmings Photopolymer Stamp Set (English)
$18.00
Poinsettia Dies
$36.00
Tidings Of Christmas 6" X 6" (15.2 X 15.2 Cm) Designer Series Paper
$11.50
Pattern Party 12" X 12" (30.5 X 30.5 Cm) Host Designer Series Paper
$18.00
Real Red 8-1/2" X 11" Cardstock
$8.75
Basic Black 8-1/2" X 11" Cardstock
$8.75
Mossy Meadow 8-1/2" X 11" Cardstock
$8.75
Basic White 8 1/2" X 11" Cardstock
$9.75
Decorative Matte Dots
$8.00
Matte Black Dots
$7.00
Black & White 1/4" (6.4 Mm) Gingham Ribbon
$7.00
Multipurpose Liquid Glue
$4.00
Stampin' Dimensionals
$4.00
Stampin' Seal
$8.00
Mini Glue Dots
$5.25
Stampin' Cut & Emboss Machine
$120.00

Stampinโ€™ Up! Christmas Season Card

Good Morning! I wanted to make a Christmas Card with stamped Christmas greenery and the pretty Stampin’ Up! Christmas Season photopolymer stamp set was perfect. And I did not use any dies – I just stamped the images on Basic White and I’m pretty happy with how it came out. You can find the supplies I used at the bottom of my post along with the sizes of cardstock used.

I started by stamping the sentiment from the Christmas To Remember stamp set in Cherry Cobbler on a Basic White panel and proceeded to stamp the greenery along the side and bottom of the panel.

I first stamped the large pinecone from the Stampin’ Up! Christmas Season stamp set in Crumb Cake and Soft Suede – this a two step stamping image that comes out pretty nice. Then I stamped the leaves next to the pinecone in Pear Pizzazz, masking the top cluster so it would appear behind the pinecone. I added pine sprigs in Soft Succulent and berries in Cherry Cobbler. I added some filler greenery and finished it with some Bumblebee dots.

I adhered the panel to a Cherry Cobbler mat with liquid glue and adhered it to the front of a Pear Pizzazz card base with dimensionals. I finished the card front with Old Olive matte dots.

For the inside of the card, I stamped some greenery and berries from the Stampin’ Up! Christmas Season stamp set in the corners of a Basic White panel and stamped the sentiment in Cherry Cobbler. I adhered the panel to the inside of the card.

This was so easy and fun to do. I was surprised at how nice the Stampin’ Up! Christmas Season images look when they’re stamped on top of each other because I’m usually worried about positioning the stamp perfectly. I don’t know if it’s the shading in each stamp or the casualness of the images, but it’s very forgiving and looks very artistic. And did I say it was easy? Give it a try!


Current Host Code: 29VEKU9M

Use this host code when you order $50 or more and receive a free gift from me!  The free gift is your choice of any item valued up to $10.00 in the 2021-2022 Annual Catalog or the July โ€“ December 2021 Mini Catalog!

If your order is over $150, please do not use the host code since you’ll receive your own Host Dollars plus I’ll still send you the free gift!  This host code can be used by anyone, no club or commitment required. Let me know if you have any questions.


If you need any stamping supplies, Iโ€™d be very happy to be your Demonstrator.  Just click on the Shop Now button on the right side of the screen to go directly to my online store or contact me if you have any questions.  Happy Stamping!

Thanks for stopping by and have a great week!

Akiko

  • Visit my online store here
  • See the current Stampinโ€™ Up! clearance rack specials here
  • Earn FREE Stampinโ€™ Up! products through my Wildflower Frequent Shopper Program – my way of saying thank you to my online frequent shopper customers.
  • Have any questions? I’d be happy to help, click here to contact me.

Cardstock Cuts for this project:

  • Pear Pizzazz โ€“ 5-1/2″ x 8-1/2″ card base scored at 4-1/4″
  • Cherry Cobbler – 3-7/8″ x 5-1/8″ (front mat)
  • Basic White – 3-3/4″ x 5″ (front panel), 3-3/4″ x 5″ (inside panel)

Stampinโ€™ Up! products used in this project:

Christmas Season Photopolymer Stamp Set
$22.00
Christmas To Remember Cling Stamp Set (English)
$22.00
Pear Pizzazz 8-1/2" X 11" Cardstock
$8.75
Cherry Cobbler 8-1/2" X 11" Cardstock
$8.75
Basic White 8 1/2" X 11" Cardstock
$9.75
Cherry Cobbler Classic Stampin' Pad
$7.50
Crumb Cake Classic Stampin' Pad
$7.50
Soft Suede Classic Stampin' Pad
$7.50
Pear Pizzazz Classic Stampin' Pad
$7.50
Soft Succulent Classic Stampin' Pad
$7.50
Bumblebee Classic Stampin' Pad
$7.50
Decorative Matte Dots
$8.00
Multipurpose Liquid Glue
$4.00
Stampin' Dimensionals
$4.00
Stampin' Seal
$8.00

Stampinโ€™ Up! Lovely You for the Happy Inkinโ€™ Thursday Blog Hop

Good morning and welcome to the Happy Inkin’ Thursday Blog Hop! I used the Stampin’ Up! Lovely You cling stamp set to make a simple, elegant thinking of you card for today. You can find the supplies I used at the bottom of my post along with the sizes of cardstock used.

We have a sketch challenge this week and here is the pretty sketch we are using:

I embossed a panel of Mossy Meadow with the Timber 3D embossing folder and adhered it to the front of a Mossy Meadow card base with liquid glue.

I cut a panel of Brushed Gold metallic foil with the Stitched Rectangle die. I used the Stitched Greenery die on another Mossy Meadow panel to get the die cut leafy texture on the center panel. I cut it down to 2-13/16″ x 4-3/16″ making sure I had a 5-1/4″ strip for the inside trim and adhered it to the Brushed Gold panel with liquid glue. I adhered the layered panel to the card front with dimensionals.

I stamped the sentiment from the Stampin’ Up! Lovely You stamp set on a Basic White panel and cut it out with the long label from the Stitched Rectangles dies. I adhered it to the card front with glue dots and cut the small leaf from cork paper using the stitched leaves dies. I adhered the leaf with a glue dot, tucking it under the label. I finished the card front with Gold Metallic dots and a Linen Thread bow.

For the inside of the card, I stamped the branch from the Stampin’ Up! Lovely You stamp set in Bumblebee on a Basic White panel. I stamped part of the sentiment from the Art Gallery stamp set in Mossy Meadow next to the branch. I cut down the remaining die cut leafy Mossy Meadow panel to 1/2″ x 5-1/4″ and adhered it to the bottom. I adhered the panel to the inside of the card.

Don’t you think the embossed background goes really well with the die cut panel? And I love the sentiments in the Stampin’ Up! Lovely You stamp set. I think this design would also make a wonderful masculine birthday card with the appropriate sentiments.

On with the Hop! Click on the Next Blog button to move forward to see the beautiful project Karen Ksenzakovic has created.

If you get lost along the way, here are the participants for the hop:


Current Host Code: 29VEKU9M

Use this host code when you order $50 or more and receive a free gift from me!  The free gift is your choice of any item valued up to $10.00 in the 2021 – 2022 Annual Catalog or the July – December 2021 Mini Catalog including some of the host stamp sets!

If your order is over $150, please do not use the host code since you’ll receive your own Host Dollars plus I’ll still send you the free gift!  This host code can be used by anyone, no club or commitment required. Let me know if you have any questions.


If you need any stamping supplies, Iโ€™d be very happy to be your Demonstrator.  Just click on the Shop Now button on the right side of the screen to go directly to my online store or contact me if you have any questions. 

Thanks for stopping by and Happy Stamping!

Akiko

  • Visit my online store here
  • See the current Stampinโ€™ Up! clearance rack specials here
  • Earn FREE Stampinโ€™ Up! products through my Wildflower Frequent Shopper Program – my way of saying thank you to my online frequent shopper customers.
  • Have any questions? I’d be happy to help, click here to contact me.

Cardstock Cuts for this project:

  • Mossy Meadow โ€“ 5-1/2″ x 8-1/2″ card base scored at 4-1/4″, 4-1/4″ x 5-1/2″ (embossed Background), 4″ x 5-1/4″ (die cut background and inside trim)
  • Brushed Gold Foil – 3-1/4″ x 4-3/4″ (die cut stitched frame)
  • Cork Specialty Paper – 1-1/2″ x 1-1/2″ (die cut leaf)
  • Basic White – 4″ x 5-1/4″ (inside panel), 1-1/4″ x 3-1/4″ (label)

Stampinโ€™ Up! products used in this project:

Lovely You Cling Stamp Set (English)
$24.00
Art Gallery Photopolymer Stamp Set
$22.00
Stitched Rectangles Dies
$35.00
Stitched Greenery Die
$32.00
Timber 3 D Embossing Folder
$10.00
Mossy Meadow 8-1/2" X 11" Cardstock
$8.75
Cork 12" X 12" (30.5 X 30.5 Cm) Specialty Paper
$7.50
Brushed Metallic Cardstock
$15.00
Basic White 8 1/2" X 11" Cardstock
$9.75
Bumblebee Classic Stampin' Pad
$7.50
Mossy Meadow Classic Stampin' Pad
$7.50
Brushed Metallic Adhesive Backed Dots
$9.00
Linen Thread
$5.00
Multipurpose Liquid Glue
$4.00
Mini Glue Dots
$5.25
Stampin' Dimensionals
$4.00
Stampin' Seal
$8.00
Stampin' Cut & Emboss Machine
$120.00

Stampinโ€™ Up! Gorgeous Leaves for the Inkin’ Krew Blog Hop

Good morning! Welcome to the Inkinโ€™ Krew Monthly Blog Hop! The theme for this monthโ€™s hop is “Giving Thanks” and I’m using the Stampin’ Up! Gorgeous Leaves bundle to make a Thanksgiving card. You can find the supplies I used at the bottom of my post along with the sizes of cardstock used.

I embossed a panel of Very Vanilla with the Timber 3D embossing folder and adhered it to a Merry Merlot mat with liquid glue. I adhered the embossed pane to the front of a Merry Merlot card base with dimensionals. I stamped the sentiment from the Sparkle of the Season photopolymer stamp set in Early Espresso on Very Vanilla and cut it out with the label die from the Tasteful Labels dies. I cut the larger label from Merry Merlot and adhered them together with liquid glue.

I stamped the leaves from the Stampin’ Up! Gorgeous Leaves cling stamp set in Daffodil Delight, Cajun Craze and Cinnamon cider and cut them out with the coordinating dies. I used the Intricate Leaves dies from the bundle to cut out the remaining detailed leaves from Crumb Cake, Soft Succulent and Pear Pizzazz card stock and arranged them cascading down the side of the card.

I adhered the leaves to the card front with liquid glue, and adhered the layered label over the leaves with dimensionals. I made a triple bow with linen thread and adhered it under the label with a glue dot. I finished the card front with three brushed copper metallic dots.

For the inside of the card, I stamped the leaves from the Stampin’ Up! Gorgeous Leaves stamp set around the bottom and top of a Very Vanilla panel in Daffodil Delight, Cajun Craze and Cinnamon Cider. I stamped the sentiment from the Sparkle of the Season stamp set in Early Espresso next to the leaves and adhered the panel to the inside of the card.

Every card I see made with the Stampin’ Up! Gorgeous Leaves bundle is beautiful, and the bundle is really easy to play with! There are no sentiments, but the combination of the artistic stamps and detailed dies is perfect for creating all kinds of fall masterpieces!

On With The Hop! Click on the Next Blog button to move forward to Mary Deatherage’s project or click the Previous Blog button to move back to see the project that Karen Finkle created.

If you get lost along the way, here are the participants for the hop:

  1. Jaimie Babarczyย 
  2. Tara Carpenter
  3. Jillian Goodย 
  4. Karen Ksenzakovicย 
  5. Karen Finkleย 
  6. Akiko Sudanoย 
  7. Mary Deatherageย 
  8. Donna Leonardย 
  9. Terry Lynn Bright
  10. Amy Koenders

Current Host Code: 29VEKU9M

Use this host code when you order $50 or more and receive a free gift from me!  The free gift is your choice of any item valued up to $10.00 in the 2021 – 2022 Annual Catalog or the July – December 2021 Mini Catalog!

If your order is over $150, please do not use the host code since you’ll receive your own Host Dollars plus I’ll still send you the free gift!  This host code can be used by anyone, no club or commitment required. Let me know if you have any questions


If you need any stamping supplies, Iโ€™d be very happy to be your Demonstrator.  Just click on the Shop Now button on the right side of the screen to go directly to my online store or contact me if you have any questions. 

Thanks for stopping by and Happy Stamping!

Akiko

  • Visit my online store here
  • See the current Stampinโ€™ Up! clearance rack specials here
  • Earn FREE Stampinโ€™ Up! products through my Wildflower Frequent Shopper Program – my way of saying thank you to my online frequent shopper customers.
  • Have any questions? I’d be happy to help, click here to contact me.

Cardstock Cuts for this project:

  • Merry Merlot โ€“ 5-1/2″ x 8-1/2″ card base scored at 4-1/4″, 3-3/4 x 5″ (front mat), 2″ x 4″ (large label)
  • Very Vanilla – 4″ x 5-1/4″ (inside panel), 3-5/8″ x 4-7/8″ (embossed background), 1-1/2″ x 3-1/4″ (label), 2″ x 6″ (die cut stamped leaves)
  • Pear Pizzazz – 1-1/2″ x 3″ (die cut detailed leaf)
  • Soft Succulent – 1-1/2″ x 2″ (die cut detailed leaves)
  • Crumb Cake – 1″ x 2-1/4″ (die cut detailed leaves)

Stampinโ€™ Up! products used in this project:

Gorgeous Leaves Bundle
$44.00
Gorgeous Leaves Cling Stamp Set
$21.00
Intricate Leaves Dies
$28.00
Sparkle Of The Season Photopolymer Stamp Set (English)
$17.00
Tasteful Labels Dies
$31.00
Timber 3 D Embossing Folder
$10.00
Merry Merlot 8-1/2" X 11" Cardstock
$8.75
Very Vanilla 8-1/2" X 11" Cardstock
$9.75
Pear Pizzazz 8-1/2" X 11" Cardstock
$8.75
Soft Succulent 8 1/2" X 11" Cardstock
$8.75
Crumb Cake 8-1/2" X 11" Cardstock
$8.75
Early Espresso Classic Stampin' Pad
$7.50
Cajun Craze Classic Stampin' Pad
$7.50
Daffodil Delight Classic Stampin' Pad
$7.50
Cinnamon Cider Classic Stampin' Pad
$7.50
Brushed Metallic Adhesive Backed Dots
$9.00
Linen Thread
$5.00
Multipurpose Liquid Glue
$4.00
Mini Glue Dots
$5.25
Stampin' Dimensionals
$4.00
Stampin' Seal
$8.00
Stampin' Cut & Emboss Machine
$120.00

Stampinโ€™ Up! Cutest Halloween Card

Good Morning! I hope you had a wonderful weekend. Can you believe that Halloween is only 3 weeks away? Time to get ready! The Stampin’ Up! Cutest Halloween bundle and the Cute Halloween 6″ x 6″ designer series paper are so sweet and I’ve used them on a Halloween Card for for a simple card to share today. You can find the supplies I used at the bottom of my post along with the sizes of cardstock used.

I adhered a square panel of the Cute Halloween designer series paper with the vampires to Basic Black and Old Olive mats – Aren’t these the sweetest vampires ever! And I adhered a panel of the Boo! DSP to the front of a Flirty Flamingo card base. Then I adhered the layered DSP square to the card front with dimensionals.

I made a jack-o-lantern from the Stampin’ Up! Cutest Halloween photopolymer stamp set by stamping in Memento Tuxedo Black and Pumpkin Pie on Basic White. I stamped the pumpkin outline in Tuxedo Black, then the solid pumpkin in Pumpkin Pie and then the jack-o-lantern face in Tuxedo Black. I colored the stem in Old Olive and used the Halloween Punch from the bundle to cut it out.

I stamped the sentiment from the Banner Year photopolymer stamp set in Memento Tuxedo Black on a Highland Heather strip and trimmed the end with the Banners Pick A Punch. I adhered the other end to the back of the jack-o-lantern and tucked a folded length of black glitter ribbon behind too. I adhered the label to the card front with dimensionals, just under the vampires and finished it with three star sequins.

For the inside of the card, I stamped the spider web from the Banner Year stamp set in Smoky Slate in the top corner of a Basic White panel. I stamped the spider from the Stampin’ Up! Cutest Halloween stamp set in Memento Tuxedo Black in the web and the sentiment in Tuxedo Black across the panel. I stamped the jack-o-lantern in the lower corner just like the front and trimmed he bottom with a strip of boo DSP from the Cute Halloween paper pack. I adhered the panel to the inside of the card.

The Flirty Flamingo is not traditional for a Halloween Card, but the Cute Halloween vampire paper is so pretty, so I wanted to give it a try. There are so many fun items currently for Halloween crafting, and the Stampin’ Up! Cutest Halloween bundle will will coordinate with them all.


Current Host Code: 29VEKU9M

Use this host code when you order $50 or more and receive a free gift from me!  The free gift is your choice of any item valued up to $10.00 in the 2021-2022 Annual Catalog or the July โ€“ December 2021 Mini Catalog!

If your order is over $150, please do not use the host code since you’ll receive your own Host Dollars plus I’ll still send you the free gift!  This host code can be used by anyone, no club or commitment required. Let me know if you have any questions.


If you need any stamping supplies, Iโ€™d be very happy to be your Demonstrator.  Just click on the Shop Now button on the right side of the screen to go directly to my online store or contact me if you have any questions.  Happy Stamping!

Thanks for stopping by and have a great week!

Akiko

  • Visit my online store here
  • See the current Stampinโ€™ Up! clearance rack specials here
  • Earn FREE Stampinโ€™ Up! products through my Wildflower Frequent Shopper Program – my way of saying thank you to my online frequent shopper customers.
  • Have any questions? I’d be happy to help, click here to contact me.

Cardstock Cuts for this project:

  • Flirty Flamingo โ€“ 5-1/2″ x 8-1/2″ card base scored at 4-1/4″
  • Basic Black – 3-1/16″ x 3-1/16″ (mat)
  • Old Olive – 3-1/4″ x 3-1/4″ (mat)
  • Highland Heather – 1/2″ x 2-1/2″ (label)
  • Basic White – 3-3/4″ x 5″ (inside panel), 2-1-1/2″ x 2″ (jack-o-lantern)
  • Cute Halloween 6″ x 6″ DSP – 4″ x 5-1/4″ (front background), 3″ x 3″ (vampires), 1/2″ x 4″ (inside trim)

Stampinโ€™ Up! products used in this project:

Cutest Halloween Bundle
$31.50
Cutest Halloween Photopolymer Stamp Set
$17.00
Halloween Punch
$18.00
Banner Year Photopolymer Stamp Set (English)
$17.00
Banners Pick A Punch
$23.00
Cute Halloween 6" X 6" (15.2 X 15.2 Cm) Designer Series Paper
$11.50
Flirty Flamingo 8-1/2" X 11" Cardstock
$8.75
Basic Black 8-1/2" X 11" Cardstock
$8.75
Old Olive 8-1/2" X 11" Cardstock
$8.75
Highland Heather 8-1/2" X 11" Cardstock
$8.75
Basic White 8 1/2" X 11" Cardstock
$9.75
Tuxedo Black Memento Ink Pad
$6.00
Pumpkin Pie Classic Stampin' Pad
$7.50
Smoky Slate Classic Stampin' Pad
$7.50
Old Olive Stampin' Blends Combo Pack
$9.00
Black 5/8" (1.6 Cm) Glittered Organdy Ribbon
$8.50
Cute Stars Adhesive Backed Sequins
$7.50
Multipurpose Liquid Glue
$4.00
Stampin' Dimensionals
$4.00
Stampin' Seal
$8.00
Mini Glue Dots
$5.25

Stampinโ€™ Up! Inspired Thoughts Christmas Card

Good Morning! It’s been such a busy week, I haven’t been able to keep up with my cards, but I was finally able to sneak in a quick card for today. I used the Stampin’ Up! Inspired Thoughts bundle to make this sparkly Christmas Card that is full of texture with the Ombre specialty paper and White Velvet sheets. You can find the supplies I used at the bottom of my post along with the sizes of cardstock used.

I used the smallest Layering Circle die to cut out a moon with the lightest yellow Ombre specialty paper and adhered it to the dark blue Ombre specialty paper panel with liquid glue. I applied adhesive sheets to the back of a Basic white panel and used the Inspiring Canopy dies from the Stampin’ Up! Inspired Thoughts bundle to cut out the trees. I inked up the trees with Versamark ink directly from the pad and sprinkled them with white embossing powder. I shook off the excess and heat set the powder with my heat tool. I removed the backing from the adhesive sheet and adhered the trees to the panel over the moon. This results in a shiny white trees that really pop against the sparkly background night sky.

I used the ground die from the Inspiring Canopy dies to cut the ground from a strip of Snowy White velvet paper and adhered it to the bottom of the panel. I adhered the panel to a Smoky Slate mat and wrapped a length of silver cord around the bottom and made a bow.

I stamped the sentiment from the Stampin’ Up! Inspired Thoughts cling stamp set in Night of Navy on a Basic White panel. I cut it out with the pretty Encircled in Beauty die and popped it on the panel with dimensionals. I popped the panel on the front of a Night of Navy card base. I accented the sentiment with two Night of Navy Holiday Rhinestones.

For the inside of the card, I stamped the tree from the Beauty of Friendship stamp set in Night of Navy ink on the side of a Basic White panel. I stamped the sentiment from the Stampin’ Up! Inspired Thoughts stamp set in Smoky Slate next to the tree and adhered the panel to the inside of the card.

Nighttime snowy scenes are one of my favorite themes for Christmas Cards. In this card, there is so much contrasting texture from the sparkly background to the shiny trees to the velvety snow. I was surprised how easy it was to emboss the trees – I just held them at the bottom where they are covered up with the snow – but they really make a statement with the embossed shine. The sentiments from the Stampin’ Up! Inspired Thoughts stamp set are simple and elegant and complement the scene perfectly.


Current Host Code: 29VEKU9M

Use this host code when you order $50 or more and receive a free gift from me!  The free gift is your choice of any item valued up to $10.00 in the 2021-2022 Annual Catalog or the July โ€“ December 2021 Mini Catalog!

If your order is over $150, please do not use the host code since you’ll receive your own Host Dollars plus I’ll still send you the free gift!  This host code can be used by anyone, no club or commitment required. Let me know if you have any questions.


If you need any stamping supplies, Iโ€™d be very happy to be your Demonstrator.  Just click on the Shop Now button on the right side of the screen to go directly to my online store or contact me if you have any questions.  Happy Stamping!

Thanks for stopping by and have a great week!

Akiko

  • Visit my online store here
  • See the current Stampinโ€™ Up! clearance rack specials here
  • Earn FREE Stampinโ€™ Up! products through my Wildflower Frequent Shopper Program – my way of saying thank you to my online frequent shopper customers.
  • Have any questions? I’d be happy to help, click here to contact me.

Cardstock Cuts for this project:

  • Night of Navy โ€“ 5-1/2″ x 8-1/2″ card base scored at 4-1/4″
  • Ombre Specialty – 3-5/8″ x 4-7/8″ (front background), 1-3/8″ x 1-3/8″ (moon)
  • Smoky Slate – 3-3/4″ x 5″ (front mat)
  • Basic White – 3-3/4″ x 5″ (inside panel), 3-1/2″ x 3-1/2″ (die cut trees), 2″ x 2″ (label)
  • Snowy White Velvet – 3/4″ x 4-7/8″ (snowy ground)

Stampinโ€™ Up! products used in this project:

Inspired Thoughts Bundle
$45.75
Inspired Thoughts Cling Stamp Set
$19.00
Inspiring Canopy Dies
$32.00
Beauty Of Friendship Photopolymer Stamp Set
$22.00
Layering Circles Dies
$35.00
Encircled In Beauty Dies
$34.00
Night Of Navy 8-1/2" X 11" Cardstock
$8.75
Smoky Slate 8-1/2" X 11" Cardstock
$8.75
Ombre 12" X 12" (30.5 X 30.5 Cm) Specialty Paper
$10.00
Snowy White 12" X 12" (30.5 X 30.5 Cm) Velvet Sheets
$5.00
Basic White 8 1/2" X 11" Cardstock
$9.75
Night Of Navy Classic Stampin' Pad
$7.50
Smoky Slate Classic Stampin' Pad
$7.50
Versamark Pad
$9.50
Basics Embossing Powders
$18.00
Holiday Rhinestone Basic Jewels
$6.00
Simply Elegant Trim
$7.50
Heat Tool (Us And Canada)
$30.00
Stampin' Dimensionals
$4.00
Multipurpose Liquid Glue
$4.00
Adhesive Sheets
$10.00
Stampin' Seal
$8.00
Stampin' Cut & Emboss Machine
$120.00

Stampinโ€™ Up! Welcoming Woods Thank You Card

Good Morning! Have you seen the beautiful Stampin’ Up! Welcoming Woods photopolymer stamp set? I finally got a chance to play with it this week and I love it!! I have seen several cards with a beautiful sunset and I wanted to make one and I am so happy with how it came out and how easy it was to do! You can find the supplies I used at the bottom of my post along with the sizes of cardstock used.

I was inspired by the As You See It Challenge #260 – Perpendicular for my card design:

I started by using Blending Brushes to apply So Saffron, Pumpkin Pie, Cajun Craze inks on a Basic White panel, blending them darker towards the bottom of the panel. Then I blended Pool Party, Bermuda Bay and Misty Moonlight to create the sky. This was so pretty and so easy! I stamped the trees from the Stampin’ Up! Welcoming Woods stamp set twice across the panel in Soft Suede to create the woods and cut it out with the third largest Stitched Rectangles die.

I stamped the leaves from the Stampin’ Up! Welcoming Woods stamp set in Pumpkin Pie and stamped the ground in Evening Evergreen. Note that I masked the tree from the second stamping each time so the ground would be behind the trees. I adhered the panel to a Sahara Sand mat. I stamped the sentiment in Evening Evergreen on a Sahara Sand strip and adhered it to a strip of Sahara Sand Tidings of Christmas DSP. I finished the panel with a small Cajun Craze leaf die cut from the Intricate Leaves dies and a Linen Thread bow.

I embossed a Soft Suede panel with the Bark 3D embossing folder and adhered a strip of Tidings of Christmas DSP to the side with liquid glue. I adhered the panel to the front of a Sahara Sand card base with liquid glue and adhered the art panel on top with dimensionals.

For the inside of the card, I stamped the last tree from the Stampin’ Up! Welcoming Woods stamp set in Soft Suede on the side of a Basic White panel. I stamped some Pumpkin Pie leaves by the tree and in the top corner and adhered another strip of Christmas Tidings DSP to the bottom. I adhered the panel to the inside of the card.

I drove on some of the country roads by my house this morning and saw so many of the trees starting to change color, so the pretty Fall Foliage is on it’s way! The Stampin’ Up! Welcoming Woods stamp set perfectly captures that look and feel. And this stamp set has some of the most beautiful sentiments!


Current Host Code: 29VEKU9M

Use this host code when you order $50 or more and receive a free gift from me!  The free gift is your choice of any item valued up to $10.00 in the 2021-2022 Annual Catalog or the July โ€“ December 2021 Mini Catalog!

If your order is over $150, please do not use the host code since you’ll receive your own Host Dollars plus I’ll still send you the free gift!  This host code can be used by anyone, no club or commitment required. Let me know if you have any questions.


If you need any stamping supplies, Iโ€™d be very happy to be your Demonstrator.  Just click on the Shop Now button on the right side of the screen to go directly to my online store or contact me if you have any questions.  Happy Stamping!

Thanks for stopping by and have a great week!

Akiko

  • Visit my online store here
  • See the current Stampinโ€™ Up! clearance rack specials here
  • Earn FREE Stampinโ€™ Up! products through my Wildflower Frequent Shopper Program – my way of saying thank you to my online frequent shopper customers.
  • Have any questions? I’d be happy to help, click here to contact me.

Cardstock Cuts for this project:

  • Sahara Sand โ€“ 5-1/2″ x 8-1/2″ card base scored at 4-1/4″, 3-1/8″ x 4-1/2″ (front mat), 1/2″ 3-1/4″ (front label)
  • Cajun Craze – 1″ x 1″ (die cut leaf)
  • Soft Suede – 3-3/4″ x 5″ (front embossed panel after embossing)
  • Basic White – 3-3/4″ x 5″ (inside panel)
  • Tidings of Christmas DSP โ€“ 1″ x 3-3/4″ (front strip), 1/2″ x 3-1/2″ (label backing), 1/2″ x 5″ (inside trim)

Stampinโ€™ Up! products used in this project:

Welcoming Woods Photopolymer Stamp Set
$21.00
Stitched Rectangles Dies
$35.00
Intricate Leaves Dies
$28.00
Bark 3 D Embossing Folder
$10.00
Tidings Of Christmas 6" X 6" (15.2 X 15.2 Cm) Designer Series Paper
$11.50
Sahara Sand 8-1/2" X 11" Cardstock
$8.75
Cajun Craze 8-1/2" X 11" Cardstock
$8.75
Soft Suede 8-1/2" X 11" Cardstock
$8.75
Basic White 8 1/2" X 11" Cardstock
$9.75
So Saffron Classic Stampin' Pad
$7.50
Pumpkin Pie Classic Stampin' Pad
$7.50
Cajun Craze Classic Stampin' Pad
$7.50
Pool Party Classic Stampin' Pad
$7.50
Bermuda Bay Classic Stampin' Pad
$7.50
Misty Moonlight Classic Stampin' Pad
$7.50
Soft Suede Classic Stampin' Pad
$7.50
Evening Evergreen Classic Stampin' Pad
$7.50
Blending Brushes
$12.00
Linen Thread
$5.00
Stampin' Dimensionals
$4.00
Multipurpose Liquid Glue
$4.00
Mini Glue Dots
$5.25
Stampin' Seal
$8.00
Stampin' Cut & Emboss Machine
$120.00

Stampin’ Up! News

Hello! Stampin’ Up! has a couple of exciting new things starting tomorrow!

Tomorrow morning the Stampin’ Up! Clearance Rack will be updated with new items! Yay!! Supplies are limited, and with discounts up to 60%, products will go quickly.ย So head over there early to get some great deals!


Love, Santa Tag Kit Coming to the Kits Collection!

Santaโ€™s back in a fun and easy tag kit to spruce up your Christmas gifting! The Love, Santa Tag Kit (item 158375) has everything you need to create 12 whimsically designed tags.

That means youโ€™ll find printed die-cut tags and labels, sequin embellishments, pink and white bakerโ€™s twine, an exclusive stamp set, a Night of Navy Classic Stampinโ€™ Spot, and more in this all-inclusive kit! You can sleigh ride right in without the prep work. This is the exclusive photopolymer stamp set included in the Love, Santa Kit.

To make Christmas gifting even easier, the Love, Santa Treat Bags (item 158381, available for purchase separately) are food-safe cellophane bags that coordinate with the Love, Santa tags! The treat bags come in a pack of 12โ€”3 each of 4 festive designs.

Thatโ€™s rightโ€”figuring out how to dress up your gifts this year is no longer a โ€œClausโ€ for concern! But donโ€™t relax too soon as these products are based on availability!

Check out the unboxing and instructional video here:


Current Host Code: 29VEKU9M

Use this host code when you order $50 or more and receive a free gift from me!  The free gift is your choice of any item valued up to $10.00 in the 2021-2022 Annual Catalog or the July โ€“ December 2021 Mini Catalog!

If your order is over $150, please do not use the host code since youโ€™ll receive your own Host Dollars plus Iโ€™ll still send you the free gift!  This host code can be used by anyone, no club or commitment required. Let me know if you have any questions.


If you need any stamping supplies, Iโ€™d be very happy to be your Demonstrator.  Just click on the Shop Now button on the right side of the screen to go directly to my online store or contact me if you have any questions.  Happy Stamping!

Thanks for stopping by and have a great week!

Akiko

  • Visit my online store here
  • See the current Stampinโ€™ Up! clearance rack specials here
  • Earn FREE Stampinโ€™ Up! products through my Wildflower Frequent Shopper Program โ€“ my way of saying thank you to my online frequent shopper customers.
  • Have any questions? Iโ€™d be happy to help, click here to contact me.