Stampin’ Up! Simply Zinnia Sending Flowers for the Happy Inkin’ Thursday Blog Hop

Good Morning and welcome to the Happy Inkin’ Thursday Blog Hop! One of my current favorites is the Stampin’ Up! Simply Zinnia bundle because of it’s beautiful flowers. But today, I focused on the sentiments to go with the beautiful Flowering Zinnias designer series paper. You can find the supplies I used along with card stock cuts at the bottom of my post.

We have a pretty sketch challenge this week:

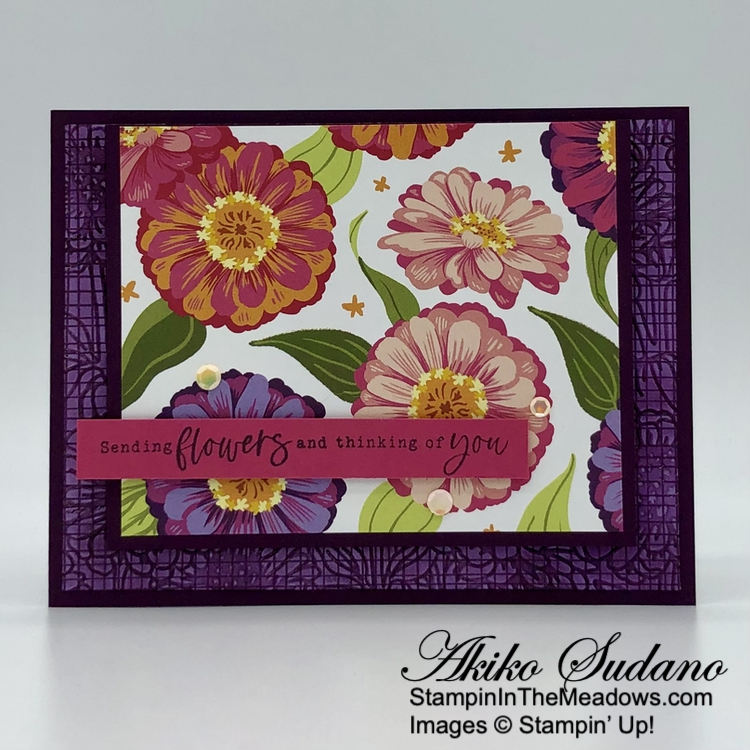
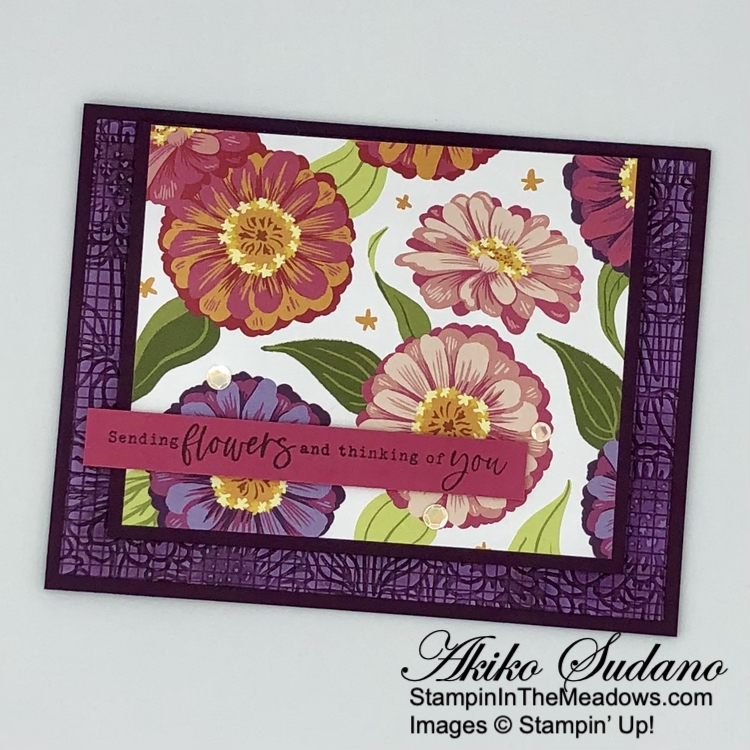
I embossed a panel of Flowering Zinnias designer series paper with the Zinnias 3D embossing folder. I used a sponge dauber to apply Blackberry Bliss ink to the raised edges of the panel – It makes the embossed flowers pop and provides an interesting effect with the background grid. I adhered the panel to the front of a Blackberry Bliss card base with liquid glue.

I adhered a floral panel of Flowering Zinnias designer series paper to a Blackberry Bliss mat so that it just showed on the sides and bottom. I popped the layered DSP panel onto the card with dimensionals, lining the top edge up to match the card sketch.

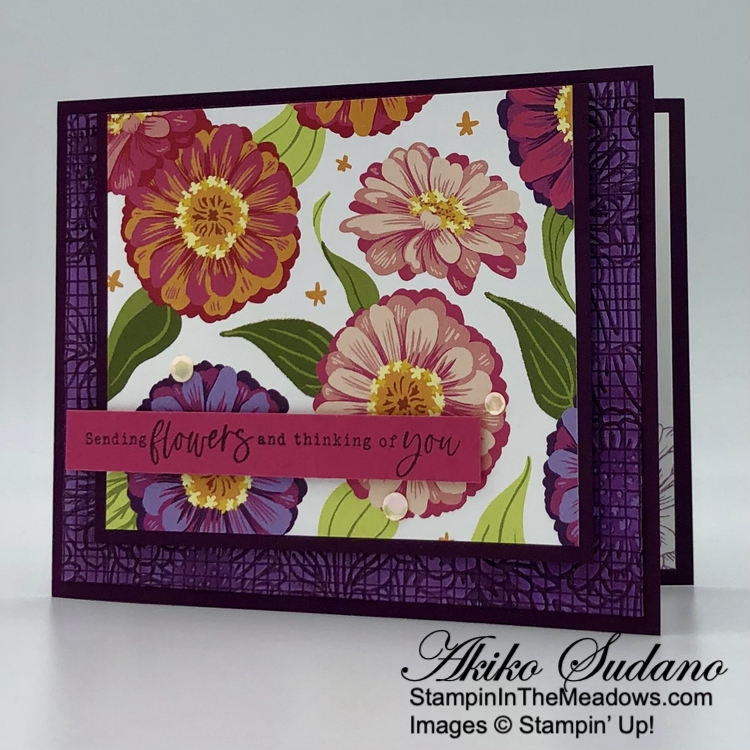
I stamped the sentiment from the Stampin’ Up! Simply Zinnia stamp set using Blackberry Bliss ink on a Melon Mambo strip and adhered it to the card with dimensionals. I finished the card with three shiny sequins.

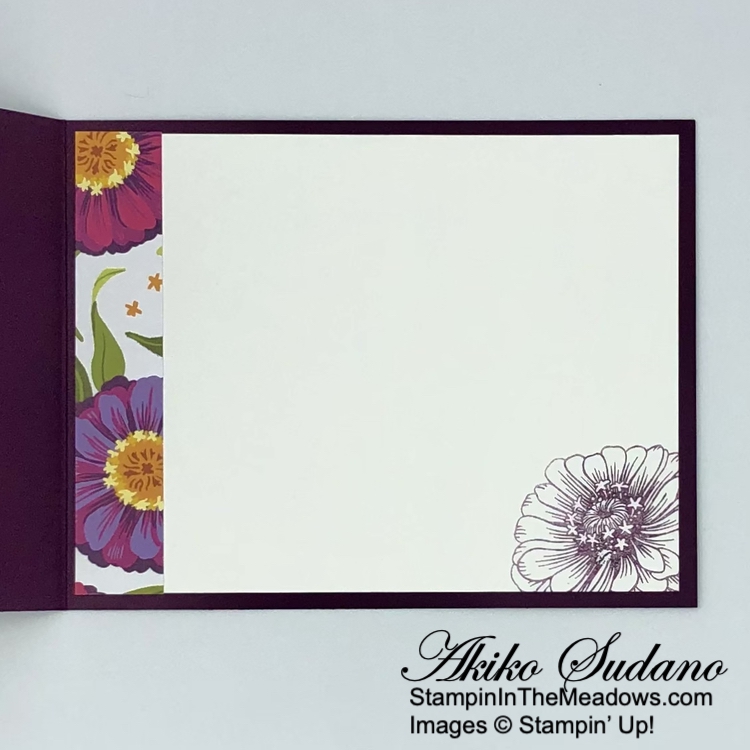
For the inside of the card, I stamped the single flower from the Stampin’ Up! Simply Zinnia stamp set using three times stamped off Blackberry Bliss ink. I trimmed the side with a strip of DSP and adhered the panel to the inside of the card with Stampin’ Seal.

The Stampin’ Up! Simply Zinnia bundle is part of the Online Exclusives Flowering Zinnias Suite. It’s a beautiful and colorful suite that is so versatile and any card you make with these products is sure to bring a smile!

On with the Hop! Click on the Next Blog button to move forward to see the beautiful project Karen Ksenzakovic has created.

If you get lost along the way, here are the participants for the hop:


Current Host Code: SSMUTY4A

Use this host code when you order $50 or more and receive a free gift from me!  The free gift is your choice of any item currently available valued up to $10.00!

If your order is over $150, please do not use the host code since you’ll receive your own Host Dollars plus I’ll still send you the free gift!  This host code can be used by anyone, no club or commitment required. Let me know if you have any questions.


If you need any stamping supplies, I’d be very happy to be your Demonstrator.  Just click on the Shop Now button on the right side of the screen to go directly to my online store or contact me if you have any questions. 

Thanks for stopping by and Happy Stamping!

Akiko

  • Visit my online store here
  • See the current Stampin’ Up! clearance rack specials here
  • Earn FREE Stampin’ Up! products through my Wildflower Frequent Shopper Program – my way of saying thank you to my online frequent shopper customers.
  • Have any questions? I’d be happy to help, click here to contact me.

Cardstock Cuts for this project:

  • Blackberry Bliss – 4-1/4″ x 11″ card base, scored at 5-1/2″
  • Melon Mambo – 1/2″ x 4″ (label)
  • Basic White – 4″ x 5-1/4″ (inside panel)
  • Flowering Zinnia DSP – 4″ x 5-1/4″ (front background), 3-1/2″ x 4-1/4″ (floral panel), 3/4″ x 4″ (inside trim)

Stampin’ Up! products used in this project:


Stampin’ Up! Simply Zinnia Thank You Card

Good Morning! The Stampin’ Up! Simply Zinnia bundle is such a pretty bundle with beautiful zinnias, both stamped and die cut. I used a die cut zinnia for the card front and stamped a few on the inside and I paired them with the pretty Flowering Zinnias designer series paper to make a layered thank you card. You can find the products I used at the bottom of my post along with the card stock sizes.

I adhered a striped panel of Flowering Zinnias designer series paper to a floral panel and then adhered them to a Blackberry Bliss mat. I popped it on the front of a Melon Mambo card base with dimensionals. I adhered another panel of Flowering Zinnias DSP to a Blackberry Bliss mat and adhered it to the card with liquid glue. I embossed a Basic White panel with the Zinnias 3D embossing folder and adhered it to a Blackberry Bliss mat before adhering it to the card front.

I cut two of the smaller petal clusters from the Stampin’ Up! Simply Zinnia dies from Flirty Flamingo card stock and used a sponge dauber to apply some Flirty Flaming ink to the petals of one. I cut one of the larger petal dies from Melon Mambo card stock and adhered the sponged petal cluster on top with liquid glue. I adhered the flirty Flamingo cluster on top spacing the petals to fill out the flower. I cut a flower center from Crushed Curry and a ring of small petals from Lemon Lolly and adhered them to the center of the flower. I cut two leave from Granny Apple Green and a stem from Mossy Meadow. I adhered the stem to the card with liquid glue and the leaves with glue dots. I adhered the leaves and flower with glue dots.

I stamped the sentiment from the Stampin’ Up! Simply Zinnia stamp set in Versamark Ink on a Blackberry Bliss panel. I sprinkled it with white embossing powder and shook off the excess. I heated the powder until it was bright and shiny and cut out the sentiment with the small rectangle die from the Everyday Details dies. I adhered the label to the card with dimensionals (doubling up on the far right end) and finished the card with Melon Mambo shiny sequins.

For the inside of the card, I stamped the zinnias from the Stampin’ Up! Simply Zinnia stamp set on a Basic White panel using twice stamped off Melon Mambo ink. I trimmed the bottom of the panel with DSP and adhered it to the inside of the card with Stampin’ Seal.

The Stampin’ Up! Simply Zinnia bundle is part of the Online Exclusives that were released this spring and it has been so popular! With Springtime planting nearly done, it’s time for the garden zinnias to shine. And I remember when I was little, cutting zinnias in our garden and putting them in vases – they’re so prolific and come in so many different colors.


Get Free Shipping on Orders of $75 or More Tomorrow!

Surprise! It’s time for FREE SHIPPING! On 21 May 2024, you can shop and save on all qualifying orders of $75 or more. What a great way to stock up on all your favorite products from the catalog, Online Exclusives, kits, and more! This incredible deal only lasts for 24 hours, so don’t miss out!

Promotion Details:

  • Dates: May 21, 2024
  • Free shipping is for 24 hours only. Orders must be opened and closed on 21 May 2024.
  • Free shipping automatically applies to your cart after the qualifying amount has been met, which is $75 USD (before tax).
  • Coupon codes and product credits are non-commissionable and will lower your order’s retail amount. Orders must meet the qualifying amount to be eligible for free shipping.
  • The additional cost for expedited shipping is not covered by this promotion.
  • Prepaid 3-, 6-, or 12-month Paper Pumpkin subscriptions can contribute to the qualifying amount for free shipping (Month-to-month subscriptions do not qualify). Subscriptions billed and shipped this month will be charged for the normal amount ($24.50 USD) + tax.

Current Host Code: SSMUTY4A

Use this host code when you order $50 or more and receive a Thank You gift from me!  The free gift is your choice of any item currently available valued up to $10.00.

If your order is over $150, please do not use the host code since you’ll receive your own Host Dollars plus I’ll still send you the Thank You gift!  This host code can be used by anyone, no club or commitment required. Let me know if you have any questions.


If you need any stamping supplies, I’d be very happy to be your Demonstrator.  Just click on the Shop Now Button on the right side of the screen to go directly to my Online store or contact me if you have any questions.  Happy Stamping!

Thanks for stopping by and have a great day!

Akiko

  • Visit my online store here
  • See the current Stampin’ Up! clearance rack specials here
  • Earn FREE Stampin’ Up! products through my Wildflower Frequent Shopper Program – my way of saying thank you to my online frequent shopper customers.
  • Have any questions? I’d be happy to help, click here to contact me.

Cardstock Cuts for this project:

  • Melon Mambo – 4-1/4″ x 11″ card base, scored at 5-1/2″, 2″ x 2-1/4″ (die cut petal cluster)
  • Blackberry Bliss – 4″ x 5-1/4″ (front background mat), 2-1/2″ x 2-1/2″ (DSP mat), 2″ x 3-1/2″ (embossed panel mat)
  • Flirty Flamingo – 2-1/4″ x 3-1/2″ (die cut petal clusters)
  • Crushed Curry – 3/4″ x 1″ (die cut flower center)
  • Lemon Lolly – 1″ x 1″ (die cut flower center)
  • Mossy Meadow – 3/4″ x 4″ (die cut stem)
  • Granny Apple Green – 1-1/2″ x 2-1/2″ (die cut leaves)
  • Basic White – 4″ x 5-1/4″ (inside panel), 1-7/8″ x 3-3/8″ (embossed panel)
  • Flowering Zinnias DSP – 3-7/8″ x 5-1/8″ (front background), 1 ” x 4″ (front stripe), 2-3/8″ x 2-3/8″ (small DSP panel), 3/4″ x 4″ (inside trim)

Stampin’ Up! products used in this project:


Stampin’ Up! Latte Love Thank You Card

Good Morning! The Stampin’ Up! Latte Love bundle is such a fun set for coffee lovers with great dies to make coffee pots and wonderful coffee sentiments. I paired it with the pretty A Little Latte designer series paper to make a simple fun fold thank you card. You can find the products I used at the bottom of my post along with the card stock sizes.

For my card base, I started out with a standard 4-1/4″ x 11 inch Lost Lagoon top fold card base and cut the front flap in half, resulting in a 4-1/4″ x 8-1/4″ card base and a 2-3/4″ x 4-1/4″ panel. I adhered panels of A Little Latte DSP to the large back panel and both sides of the front flap. I adhered another panel to the little Lost Lagoon card stock.

I love this coffee pot – it takes me back to all the mornings of making coffee in my Mr. Coffee coffee makers! I used the dies from the Stampin’ Up! Latte Love dies to cut the pot from a Window Sheet, the lid and handle from Basic Black and the coffee from Early Espresso. I adhered the handle and lid to the die cut carafe with glue dots and adhered the coffee to the small panel with liquid glue. I placed more glue dots on the window sheet, lid and handle and adhered the carafe to the panel, positioning it over the die cut coffee – this way the adhesives don’t show.

I stamped the coffee stamp from the Stampin’ Up! Latte Love stamp set twice using Pecan Pie ink on Crumb Cake. I used the little coffee disk die cuts to cut out coffee. I cut two small cups from Petal Pink and adhered the coffee disks to the top. I popped the coffee cups onto the panel with dimensionals. I stamped the sentiment from the Stampin’ Up! Latte Love stamp set using Lost Lagoon ink on a Lemon Lolly panel and cut it out with the label die from the Unbounded Love dies. I adhered the label to the panel with glue dots and adhered the panel to the front flap of the card base with liquid glue. I finished the front with three Pecan Pie dots.

For the inside of the card, I stamped the coffee beans from the Stampin’ Up! Latte Love stamp set in the corners of a Basic White panel using Pecan Pie ink. I colored the beans with the dark Crumb Cake Stampin’ Blend and adhered it to the back panel with Stampin’ Seal.

It’s too bad that pictures don’t capture the Window sheet very well, because the die cut coffee pot is so cute!! The Stampin’ Up! Latte Love bundle is the perfect way to start the day!


Free Shipping on Orders of $75 or More on May 21, 2024!

Surprise! It’s time for FREE SHIPPING! On 21 May 2024, you can shop and save on all qualifying orders of $75 or more. What a great way to stock up on all your favorite products from the catalog, Online Exclusives, kits, and more! This incredible deal only lasts for 24 hours, so don’t miss out!

Promotion Details:

  • Dates: May 21, 2024
  • Free shipping is for 24 hours only. Orders must be opened and closed on 21 May 2024.
  • Free shipping automatically applies to your cart after the qualifying amount has been met, which is $75 USD (before tax).
  • Coupon codes and product credits are non-commissionable and will lower your order’s retail amount. Orders must meet the qualifying amount to be eligible for free shipping.
  • The additional cost for expedited shipping is not covered by this promotion.
  • Prepaid 3-, 6-, or 12-month Paper Pumpkin subscriptions can contribute to the qualifying amount for free shipping (Month-to-month subscriptions do not qualify). Subscriptions billed and shipped this month will be charged for the normal amount ($24.50 USD) + tax.

Current Host Code: SSMUTY4A

Use this host code when you order $50 or more and receive a Thank You gift from me!  The free gift is your choice of any item currently available valued up to $10.00.

If your order is over $150, please do not use the host code since you’ll receive your own Host Dollars plus I’ll still send you the Thank You gift!  This host code can be used by anyone, no club or commitment required. Let me know if you have any questions.


If you need any stamping supplies, I’d be very happy to be your Demonstrator.  Just click on the Shop Now Button on the right side of the screen to go directly to my Online store or contact me if you have any questions.  Happy Stamping!

Thanks for stopping by and have a great day!

Akiko

  • Visit my online store here
  • See the current Stampin’ Up! clearance rack specials here
  • Earn FREE Stampin’ Up! products through my Wildflower Frequent Shopper Program – my way of saying thank you to my online frequent shopper customers.
  • Have any questions? I’d be happy to help, click here to contact me.

Cardstock Cuts for this project:

  • Lost Lagoon – 4-1/4″ x 8-1/4″ card base, scored at 5-1/2″, 2-3/4″ x 4-1/4″ (front panel)
  • Window Sheet – 2-1/2″ x 2-1/2″ (coffee pot)
  • Basic Black – 1-1/4″ x 3″ (coffee pot handle & lid)
  • Early Espresso – 1-1/4″ x 2″ (die cut coffee in pot)
  • Petal Pink – 1″ x 2-1/2″ (die cut coffee cups)
  • Crumb Cake – 3/4″ x 2-1/2″ (coffee in cups)
  • Lemon Lolly – 1″ x 2-1/2″ (label)
  • Basic White – 2-3/4″ x 4-1/4″ (inside panel)
  • A Little Latte DSP – 4″ x 5-1/4″ (inside background), three 2-1/2″ x 4″ panels (front flaps and inside panel)

Stampin’ Up! products used in this project:


Stampin’ Up! Feathered Flight for the Inkin’ Krew Blog Hop

Good Morning! Welcome to the May Inkin’ Krew Team Blog Hop! The theme for this month’s hop is “For the Boys/Men” so I pulled out my Feathered Flight stamp set to make a simple, masculine thinking of you card. The beautiful Thoughtful Journey 6″ x 6″ designer series paper makes a wonderful background for the ducks in the stamp set. You can find the supplies I used along with card stock cuts at the bottom of my post.

I stamped the small flying ducks from the Stampin’ Up! Feathered Flight cling stamp set using Wild Wheat ink on a panel of Thoughtful Journey designer series paper. I adhered the stamped DSP to a Misty Moonlight mat using liquid glue.

I separated a length of Wild Wheat jute and wrapped a single strand around the DSP panel and tied a knot. I adhered the panel to the front of a Boho Blue card base with dimensionals.

I cut two pine sprigs from the Encircled In Nature dies and adhered them to the card with glue dots, tucking them under the jute.

I stamped the sentiment from the Stampin’ Up! Feathered Flight stamp set using Wild Wheat ink on a Boho Blue panel. I cut out the sentiment with the Deckled Rectangles dies using a two step method, lining up one corner and cutting two sides and then cutting the opposite corner and the remaining sides. I adhered the label to the card using dimensionals over the jute and die cut sprigs.

For the inside of the card, I stamped the sentiment from the Stampin’ Up! Feathered Flight stamp set in Wild Wheat ink on a Basic White panel. I used twice stamped off Misty Moonlight ink to stamp the large duck and trimmed the side with DSP. I adhered the panel to a Misty Moonlight mat and then to the inside of the card with Stampin’ Seal.

The Thoughtful Journey 6″ x 6″ designer series paper is so beautiful and I love how it looks with the flying ducks from the Stampin’ Up! Feathered Flight stamp set. A quiet, beautiful morning in the woods with a loved one!

On With The Hop! Click on the Next Blog button to move forward to Carol Buckalew’s project or click the Previous Blog button to move back to see the project that Ann Louise Fodgaard created.

If you get lost along the way, here are the participants for the hop:


Current Host Code: SSMUTY4A

Use this host code when you order $50 or more and receive a Thank You gift from me!  The free gift is your choice of any currently available item valued up to $10.00.

If your order is over $150, please do not use the host code since you’ll receive your own Host Dollars plus I’ll still send you the Thank You gift!  This host code can be used by anyone, no club or commitment required. Let me know if you have any questions.


If you need any stamping supplies, I’d be very happy to be your Demonstrator.  Just click on the Shop Now button on the right side of the screen to go directly to my online store or contact me if you have any questions.  Happy Stamping!

Thanks for stopping by and have a great week!

Akiko

  • Visit my online store here
  • See the current Stampin’ Up! clearance rack specials here
  • Earn FREE Stampin’ Up! products through my Wildflower Frequent Shopper Program – my way of saying thank you to my online frequent shopper customers.
  • Have any questions? I’d be happy to help, click here to contact me.

Cardstock Cuts for this project:

  • Boho Blue – 5-1/2″ x 8-1/2″ card base scored at 4-1/4″, 1″ x 3″ (label)
  • Misty Moonlight – two 4″ x 5-1/4″ panels (front mat and inside mat)
  • Wild Wheat – 1-3/4″ x 2-3/4″ (die cut pine sprigs)
  • Basic White – 3-7/8″ x 5-1/8″ (inside panel)
  • Thoughtful Journey 6″ x 6″ DSP – 3-7/8″ x 5-1/8″ (front background), 1/2″ x 5-1/8″ (inside trim)

Stampin’ Up! products used in this project:

Stampin’ Up! Magnolia Mood Birthday Card

Good Morning! The Stampin’ Up! Magnolia Mood bundle has some of the best images and dies for magnolias ever. These magnificent trees and flowers are special to me because of my memories of living in the South in my youth and having these in my yard. So I had to have this bundle when it came out in the Online Exclusives. You can find the products I used at the bottom of my post along with the card stock sizes.

I adhered a panel of Country Woods designer series paper to an Early Espresso mat with liquid glue and popped it on the front of a Basic Beige card base. I cut the large floral die from the Stampin’ Up! Magnolia Mood dies from Mossy Meadow card stock and adhered it to the card with glue dots.

I stamped the large bouquet from the Stampin’ Up! Magnolia Mood stamp set on a Basic White panel using Memento Tuxedo Black ink. I stamped the seed pod as well and colored the images with Stampin’ Blends. I used light Mossy Meadow on the top of the leaves and light Old Olive and Wild Wheat on the undersides. I used dark Daffodil Delight on the flower center and the seed pod and also shaded the seed pod with light Wild Wheat. I used light Petal Pink on the flower petals and used Wink of Stella on the flowers and seed pod to add a touch of sparkle. I cut the flowers out with the coordinating dies and popped the large flower on the card with dimensionals and adhered the seed pod with glue dots.

I cut some extra leaves from Mossy Meadow using the leaf dies from the Stampin’ Up! Magnolia Mood dies and tucked them under the flowers, adhering them with glue dots. I stamped the sentiment using Mossy Meadow ink on Pool Party and cut it out with the long label die from the Wonderful Thoughts dies. I adhered the label to the card with dimensionals and finished with Shiny Sequins.

For the inside of the card I stamped the sentiment from the Stampin’ Up! Magnolia Mood stamp set in Mossy Meadow ink on a Basic White panel. I stamped the flowers in Memento Tuxedo Black ink and colored it with Mossy Meadow and Petal Pink Stampin’ Blends . I adhered the panel to the inside of the card with Stampin’ Seal.

The images in the Stampin’ Up! Magnolia Mood stamp set are gorgeous!! The dies are modern and fun and compliment the stamped images nicely. The set is a must have for anyone who likes magnolias!


Stampin’ Up! May Joining Special!

Exciting News! Between May 1 and May 31, anyone who becomes a Stampin’ Up! demonstrator will receive four 2024–2026 In Color products in their Starter Kit for FREE! This is one of our richest offerings yet!

Promotion Details:

  • Dates: May 1, 2024 – May 31, 2024
  • New Demonstrators will receive the following products in their Starter Kit at no additional cost:
    • 2024–2026 In Color Classic Stampin’ Pad Bundle
    • 2024–2026 In Color 8-1/2″ x 11″ Cardstock
    • 2024–2026 In Color 6″ x 6″ Designer Series Paper
    • 2024–2026 In Color Stampin’ Write Markers
  • New team members may not use their team leader’s shipping address to ship their kit. 
  • New team members may only pay for their kit using a credit card on which they are listed as an authorized user. 
  • All orders should be closed by 31 May. 
  • New demonstrators who submit their Independent Demonstrator Agreement (IDA) before 1 May or after 31 May will not be eligible for this Starter Kit offer.

Click on the picture below to download a flyer to see more:

In addition to the In Color products, new Demonstrators will pick $125 USD worth of products of their choice for $99! When you join, the In Color products will be automatically added to your Starter Kit. You will also receive free business supplies with your order and free shipping. Not to mention all the fun that comes with being a part of our wonderful crafting community. Click the button below to Join Now, or get additional details on my Join My Team page


Current Host Code: SSMUTY4A

Use this host code when you order $50 or more and receive a Thank You gift from me!  The free gift is your choice of any item currently available valued up to $10.00.

If your order is over $150, please do not use the host code since you’ll receive your own Host Dollars plus I’ll still send you the Thank You gift!  This host code can be used by anyone, no club or commitment required. Let me know if you have any questions.


If you need any stamping supplies, I’d be very happy to be your Demonstrator.  Just click on the Shop Now Button on the right side of the screen to go directly to my Online store or contact me if you have any questions.  Happy Stamping!

Thanks for stopping by and have a great day!

Akiko

  • Visit my online store here
  • See the current Stampin’ Up! clearance rack specials here
  • Earn FREE Stampin’ Up! products through my Wildflower Frequent Shopper Program – my way of saying thank you to my online frequent shopper customers.
  • Have any questions? I’d be happy to help, click here to contact me.

Cardstock Cuts for this project:

  • Basic Beige – 5-1/2″ x 8-1/2″ card base, scored at 4-1/4″
  • Early Espresso – 4″ x 5-1/4″ (front mat)
  • Mossy Meadow – 4″ x 4-1/2″ (die cut flowers and leaves)
  • Pool Party – 1″ x 3-1/4″ (label)
  • Basic White – 4″ x 5-1/4″ (inside panel), 3-1/4″ x 3-3/4″ (large die cut flower), 2-1/4″ x 2-1/2″ (seed pod)
  • Country Woods DSP – 3-7/8″ x 5-1/8″ (front background)

Stampin’ Up! products used in this project:


Stampin’ Up! Simply Zinnia for the Happy Inkin’ Thursday Blog Hop

Good Morning and welcome to the Happy Inkin’ Thursday Blog Hop! The Stampin’ Up! Simply Zinnia bundle is one of the Online Exclusives and it’s such a beautiful set. I’ve used it with the Flowering Zinnias designer series paper for a very colorful Mother’s Day card that is full of flowers. You can find the supplies I used along with card stock cuts at the bottom of my post.

We have a fun sketch challenge this week:

I adhered a panel of Flowering Zinnias designer series paper to the front of a Flirty Flamingo card base with liquid glue. I cut two banners from Petal Pink Glimmer paper using the Nested Essentials dies and adhered them to the card with glue dots.

I used the largest circle die from the Everyday Details dies to cut a Highland Heather panel. I stamped tree single flowers from the Stampin’ Up! Simply Zinnia stamp set using Memento Tuxedo Black ink on Basic White. I colored the flowers with Stampin’ Blends – using Petal Pink, Flirty Flamingo and Melon Mambo for the petals and Peach Pie and Lemon Lolly for the centers. I cut them out with the coordinating die and adhered the Petal Pink and Flirty Flamingo flowers to the die cut circle with glue dots and the Melon Mambo flower with dimensionals.

I stamped four leaf clusters from the Stampin’ Up! Simply Zinnia stamp set using Memento Tuxedo Black ink on Basic White and colored two with Lemon Lime Twist and two with Mossy Meadow Stampin’ Blends. I cut them out with the coordinating die and adhered them to the Highland Heather circle with glue dots, tucking them under the flowers. I stamped the sentiment from the Flower Cart stamp set using Melon Mambo ink on Petal Pink card stock and cut it out with the long label die from the Autumn Leaves dies. I adhered it to the circle with glue dots and dimensionals. I adhered the Highland Heather circle to the card with dimensionals and added bling with adhesive sequins.

For the inside of the card, I stamped the flower from the Stampin’ Up! Simply Zinnia stamp set in Melon Mambo ink on a Basic White panel. I stamped the sentiment from the Flower Cart stamp set in Mossy Meadow ink and trimmed the bottom with DSP. I adhered the panel to the inside of the card with Stampin’ Seal.

Those stamped flowers in the Stampin’ Up! Simply Zinnia bundle are just gorgeous colored with Stampin’ Blends. And Happy Mother’s Day – Do something special for yourself!

On with the Hop! Click on the Next Blog button to move forward to see the beautiful project Karen Ksenzakovic has created.

If you get lost along the way, here are the participants for the hop:


Current Host Code: YEPTJAZ9

Use this host code when you order $50 or more and receive a free gift from me!  The free gift is your choice of any item currently available valued up to $10.00!

If your order is over $150, please do not use the host code since you’ll receive your own Host Dollars plus I’ll still send you the free gift!  This host code can be used by anyone, no club or commitment required. Let me know if you have any questions.


If you need any stamping supplies, I’d be very happy to be your Demonstrator.  Just click on the Shop Now button on the right side of the screen to go directly to my online store or contact me if you have any questions. 

Thanks for stopping by and Happy Stamping!

Akiko

  • Visit my online store here
  • See the current Stampin’ Up! clearance rack specials here
  • Earn FREE Stampin’ Up! products through my Wildflower Frequent Shopper Program – my way of saying thank you to my online frequent shopper customers.
  • Have any questions? I’d be happy to help, click here to contact me.

Cardstock Cuts for this project:

  • Flirty Flamingo – 4-1/4″ x 11″ card base, scored at 5-1/2″
  • Highland Heather – 3-1/2″ x 3-1/2″ (die cut circle)
  • Petal Pink Glimmer – 1-1/4″ x 4″ (banners)
  • Petal Pink – 1-1/2″ x 3″ (label)
  • Basic White – 4″ x 5-1/4″ (inside panel), 2-3/4″ x 6-1/2″ (die cut flowers), 2″ x 6″ (die cut leaf clusters)
  • Flowering Zinnias DSP – 4-1/4″ x 5-1/2″ (front background), 1/2″ x 4″ (inside trim)

Stampin’ Up! products used in this project:


Stampin’ Up! Frog & Friends Kit

Good Morning! We’ve been in Tucson for the past couple of weeks and last weekend, we had the pleasure of an overnight visit from our grandkids! Since we’re always looking for something to keep them busy, I picked up the Stampin’ Up! Frog & Friends Kit and my 6 year old granddaughter Amelia put it together!

I prepped everything by popping out the arms, legs and fins and cutting the strings. All the pieces are pre-loaded with tape strips, so all you have to do is pull off the coverings and stick the pieces on. The frog is the first one we assembled.

I watched the video (link below) ahead of time so I could understand how they went together. The goldfish was the second piece she put together. I put the instruction pictures in front of her with the pieces and she followed them pretty well. She pulled off the tape tabs and stuck the pieces together – the place where each arm/fin/eye goes is pretty clearly labeled.

The last one she did was the shark. I did line up the side tape since it’s not supposed to be folded the whole way and this was the most difficult part to line up. But I told Amelia to press hard after it was lined up and across the bottom and all the taped sections are still holding.

Here’s a quick video that Stampin’ Up! has put together showing how to put together the game pieces along with the contents of the kit. Playing the game is actually a little harder, but the pieces are bright and colorful and cute.

The Stampin’ Up! Kits Collections has all inclusive paper crafting kits that are easy and quick. The projects range from cards to fun kids projects and home decor items and contain everything you need to complete the project including stamps, stamp pads and stamp blocks. Click on the picture below to shop for the Stampin’ Up! Frog & Friends Kit in my Online Store:


Last Chance Products on Sale Now!

The retiring lists for the 2023-2024 Annual Catalog and the January-April 2024 Mini Catalog have been announced and some products are on sale with discounts up to 60%. These lists detail the products that will no longer be available once the catalogs retire on April 30. Items are only available while supplies last and some items are already sold out. So check it out to see if there is anything you want while it’s still available. And don’t forget the retiring 2022-2024 In Colors!

Click HERE to go to my online store to shop now.


Stampin’ Up! May Joining Special!

Exciting News! Between May 1, 2024 and May 31, 2024, anyone who becomes a Stampin’ Up! demonstrator will receive four 2024–2026 In Color products in their Starter Kit for FREE! This is one of the richest offerings yet!

Promotion Details:

  • Dates: May 1, 2024 – May 31, 2024
  • New Demonstrators will receive the following products in their Starter Kit at no additional cost:
    • 2024–2026 In Color Classic Stampin’ Pad Bundle
    • 2024–2026 In Color 8-1/2″ x 11″ Cardstock
    • 2024–2026 In Color 6″ x 6″ Designer Series Paper
    • 2024–2026 In Color Stampin’ Write Markers
  • New team members may not use their team leader’s shipping address to ship their kit. 
  • New team members may only pay for their kit using a credit card on which they are listed as an authorized user. 
  • All orders should be closed by 31 May. 
  • New demonstrators who submit their Independent Demonstrator Agreement (IDA) before 1 May or after 31 May will not be eligible for this Starter Kit offer.

Click on the picture below to download a flyer to see more:

In addition to the new In Color products, new Demonstrators will pick $125 USD worth of products of their choice for $99! When you join, the In Color products will be automatically added to your Starter Kit. You will also receive free business supplies with your order and free shipping. Not to mention all the fun that comes with being a part of our wonderful crafting community. Click the button below to Join Now, or get additional details on my Join My Team page


Stampin’ Up! 2023-2024 Annual Catalog coming May 1, 2024!

It’s sad to see items retiring, but the new Stampin’ Up! 2024-2025 Annual Catalog will be here soon! April 30 is the last day to order from the current 2023-2024 Annual Catalog and May 1 is when ordering from the new Annual Catalog begins!

And with the new Annual Catalog are the new 2024-2026 In Colors! Introducing Peach Pie, Petunia Pop, Pretty In Pink, Shy Shamrock and Summer Splash:


New Kits In Kits Collection!

The Kits Collection by Stampin’ Up! provides different options and a range of project types that allow you to choose the crafting experiences that best fits your style and needs. There’s a variety of kits to choose from and these all-inclusive project kits have everything you need in one box! You can find these kits in the Online Store.

The new kits for April are the By Your Side Kit and the Hooray For Honeycomb Kit. Click on the pictures below to see the details of the kits in the Online Store.


Current Host Code: YEPTJAZ9

Use this host code when you order $50 or more and receive a Thank You gift from me!  The free gift is your choice of any item currently available valued up to $10.00.

If your order is over $150, please do not use the host code since you’ll receive your own Host Dollars plus I’ll still send you the Thank You gift!  This host code can be used by anyone, no club or commitment required. Let me know if you have any questions.


If you need any stamping supplies, I’d be very happy to be your Demonstrator.  Just click on the Shop Now Button on the right side of the screen to go directly to my Online store or contact me if you have any questions.  Happy Stamping!

Thanks for stopping by and have a great day!

Akiko

  • Visit my online store here
  • See the current Stampin’ Up! clearance rack specials here
  • Earn FREE Stampin’ Up! products through my Wildflower Frequent Shopper Program – my way of saying thank you to my online frequent shopper customers.
  • Have any questions? I’d be happy to help, click here to contact me.

Stampin’ Up! Simply Zinnia Thank You Card

Good morning! I used the pretty Stampin’ Up! Simply Zinnia bundle with the Flowering Zinnias designer series paper to make a simple Thank You card for today. You can find the products I used at the bottom of my post along with the card stock sizes.

I adhered a panel of Flowering Zinnias designer series paper to a contrasting panel of the DSP with liquid glue and adhered them both to an Old Olive mat. I wrapped a length of Lemon Lime twist ribbon around the panel and made a bow on one side and adhered it to the front of a Melon Mambo card base.

I stamped the sentiment from the Stampin’ Up! Simply Zinnia stamp set in Mossy Meadow ink on a Basic White panel and cut it out with the small rectangle die from the Something Fancy dies. I adhered it to the card with dimensionals.

I made a little die cut flower bud and stems using the Stampin’ Up! Simply Zinnia dies. I cut the stem from Lemon Lime card stock and the flower from Real Red card stock and adhered them together with liquid glue. I used glue dots and dimensionals to adhere them to the card. I finished the card with three Melon Mambo glossy dots.

For the inside of the card, I stamped the large zinnia stamp from the Stampin’ Up! Simply Zinnia stamp set in twice stamped off Melon Mambo ink on a Basic White panel. I trimmed the bottom with DSP and adhered the panel to the inside of the card with Stampin’ Seal.

The Stampin’ Up! Simply Zinnia bundle is part of the Online Exclusives. It has beautiful images and sentiments and gorgeous die cuts to make dimensional flowers.


Last Chance Products Sale Ending Soon!

The retiring lists for the 2023-2024 Annual Catalog and the January-April 2024 Mini Catalog and annual catalog are part of the Last Chance Products Sale. Some products are discounted and all items are only available while supplies last. Many items have already sold out. The Last Chance Products sale ends on April 30.

Click HERE to go to my online store to shop now.


Stampin’ Up! May Joining Special!

Exciting News! Between May 1, 2024 and May 31, 2024, anyone who becomes a Stampin’ Up! demonstrator will receive four 2024–2026 In Color products in their Starter Kit for FREE! This is one of the richest offerings yet!

Promotion Details:

  • Dates: May 1, 2024 – May 31, 2024
  • New Demonstrators will receive the following products in their Starter Kit at no additional cost:
    • 2024–2026 In Color Classic Stampin’ Pad Bundle
    • 2024–2026 In Color 8-1/2″ x 11″ Cardstock
    • 2024–2026 In Color 6″ x 6″ Designer Series Paper
    • 2024–2026 In Color Stampin’ Write Markers
  • New team members may not use their team leader’s shipping address to ship their kit. 
  • New team members may only pay for their kit using a credit card on which they are listed as an authorized user. 
  • All orders should be closed by 31 May. 
  • New demonstrators who submit their Independent Demonstrator Agreement (IDA) before 1 May or after 31 May will not be eligible for this Starter Kit offer.

Click on the picture below to download a flyer to see more:

In addition to the new In Color products, new Demonstrators will pick $125 USD worth of products of their choice for $99! When you join, the In Color products will be automatically added to your Starter Kit. You will also receive free business supplies with your order and free shipping. Not to mention all the fun that comes with being a part of our wonderful crafting community. Click the button below to Join Now, or get additional details on my Join My Team page


Current Host Code: YEPTJAZ9

Use this host code when you order $50 or more and receive a Thank You gift from me!  The free gift is your choice of any item currently available valued up to $10.00.

If your order is over $150, please do not use the host code since you’ll receive your own Host Dollars plus I’ll still send you the Thank You gift!  This host code can be used by anyone, no club or commitment required. Let me know if you have any questions.


If you need any stamping supplies, I’d be very happy to be your Demonstrator.  Just click on the Shop Now Button on the right side of the screen to go directly to my Online store or contact me if you have any questions.  Happy Stamping!

Thanks for stopping by and have a great day!

Akiko

  • Visit my online store here
  • See the current Stampin’ Up! clearance rack specials here
  • Earn FREE Stampin’ Up! products through my Wildflower Frequent Shopper Program – my way of saying thank you to my online frequent shopper customers.
  • Have any questions? I’d be happy to help, click here to contact me.

Cardstock Cuts for this project:

  • Melon Mambo – 4-1/4″ x 11″ card base, scored at 5-1/2″
  • Old Olive – 4″ x 5-1/4″ (front mat)
  • Real Red – 1″ x 2″ (die cut zinnia buds)
  • Lemon Lime Twist – 2″ x 2″ (stem and leaf die cut)
  • Basic White – 4″ x 5-1/4″ (inside panel)
  • Flowering Zinnias DSP – 3-7/8″ x 5-1/8″ (front background), 1-1/2″ x 3-7/8″ (top front panel), 1/2″ x 4″ (inside trim)

Stampin’ Up! products used in this project:


Stampin’ Up! Happy Houseplants Kit

Good Morning! The Stampin’ Up! Happy Houseplants Kit is a Home Decor kit that was recently added to the Stampin’ Up! Kits Collection. It makes four 7″ x 7″ pictures of pretty houseplants and includes clean white frames and mats for each picture.

The frames do include plexiglass covers and I wanted to use them. So I was careful to only use a single layer of dimensionals, replacing some of the dimensionals with glue dots (note that the glue dots were from my stash).

I also placed a dimensional in each corner of the mats to pop them up and give the plants some room. I love the clean white look – it makes the plants really pop. But I’m tempted to add embellishments. Maybe later.

The frames have a built in hanger along with stand, so you can put them on a bookshelf or hang them on the wall. I’m going to hang them, but I need to get the hooks first.

The last picture still ended up flattened, so maybe I’ll end up removing the plexiglass frames. The nice thing is that I can take my time and change it up later.

I made the pictures pretty much according to the instructions, but since the kit uses Stampin’ Up! colors, you can use other items from your stash to make alternative designs if you feel creative. Here’s a quick video that Stampin’ Up! has put together showing how to put together the pictures along with the contents.

The Stampin’ Up! Kits Collections has all inclusive paper crafting kits that are easy and quick. The projects range from cards to fun kids projects and home decor items and contain everything you need to complete the project including stamps, stamp pads and stamp blocks. Click on the picture below to shop for the Stampin’ Up! Happy Houseplants Kit in my Online Store:


Last Chance Products on Sale Now!

The retiring lists for the 2023-2024 Annual Catalog and the January-April 2024 Mini Catalog have been announced and some products are on sale with discounts up to 60%. These lists detail the products that will no longer be available once the catalogs retire on April 30. Items are only available while supplies last and some items are already sold out. So check it out to see if there is anything you want while it’s still available. And don’t forget the retiring 2022-2024 In Colors!

Click HERE to go to my online store to shop now.

Click HERE to download a PDF of the retiring items from the Annual Catalog.

Click HERE to download an excel spreadsheet of the Annual Catalog retiring items.

Click HERE to download a PDF of the retiring items from the Mini Catalog.

Click HERE to download an excel spreadsheet of the Mini Catalog retiring items.


Stampin’ Up! 2023-2024 Annual Catalog coming May 1, 2024!

It’s sad to see items retiring, but the new Stampin’ Up! 2024-2025 Annual Catalog will be here soon! April 30 is the last day to order from the current 2023-2024 Annual Catalog and May 1 is when ordering from the new Annual Catalog begins!

And with the new Annual Catalog are the new 2024-2026 In Colors! Introducing Peach Pie, Petunia Pop, Pretty In Pink, Shy Shamrock and Summer Splash:


New Kits In Kits Collection!

The Kits Collection by Stampin’ Up! provides different options and a range of project types that allow you to choose the crafting experiences that best fits your style and needs. There’s a variety of kits to choose from and these all-inclusive project kits have everything you need in one box! You can find these kits in the Online Store.

The new kits for April are the By Your Side Kit and the Hooray For Honeycomb Kit. Click on the pictures below to see the details of the kits in the Online Store.


Current Host Code: YEPTJAZ9

Use this host code when you order $50 or more and receive a Thank You gift from me!  The free gift is your choice of any item currently available valued up to $10.00.

If your order is over $150, please do not use the host code since you’ll receive your own Host Dollars plus I’ll still send you the Thank You gift!  This host code can be used by anyone, no club or commitment required. Let me know if you have any questions.


If you need any stamping supplies, I’d be very happy to be your Demonstrator.  Just click on the Shop Now Button on the right side of the screen to go directly to my Online store or contact me if you have any questions.  Happy Stamping!

Thanks for stopping by and have a great day!

Akiko

  • Visit my online store here
  • See the current Stampin’ Up! clearance rack specials here
  • Earn FREE Stampin’ Up! products through my Wildflower Frequent Shopper Program – my way of saying thank you to my online frequent shopper customers.
  • Have any questions? I’d be happy to help, click here to contact me.

Stampin’ Up! Simply Zinnia for the Inkin’ Krew Blog Hop

Good Morning! Welcome to the March Inkin’ Krew Team Blog Hop! The theme for this month’s hop is “For the Ladies/Girls” and I finally got my Stampin’ Up! Simply Zinnia bundle and used it to make a Mother’s Day card. You can find the supplies I used along with card stock cuts at the bottom of my post.

I adhered a panel of Flowering Zinnias designer series paper to the front of an Old Olive card base. I cut a Basic White panel with the third largest deckled rectangles dies and embossed it with the Zinnia 3D embossing folder before adhering it to the card front wiht liquid glue.

I made a die cut zinnia flower with the Stampin’ Up! Simply Zinnia dies using Blackberry Bliss and Berry Burst petals and Mossy Meadow stems and leaves. I cut a Blackberry Bliss flower back and three Berry Burst petal clusters (1 large and 2 small) and adhered them together with liquid glue. I arranged them so that the petals on each layer fell between the petals on the lower level as much as possible. I cut the flower center from Crushed Curry and Lemon Lolly and adhered them.

I used the Stampin’ Up! Simply Zinnia dies to cut a stem from Mossy Meadow and adhered it to the back of the flower and adhered the flower & stem to the card. I adhered a die cut leaf to each side of the stem with glue dots. I stamped the sentiment from the Perennial Postage stamp set using Mossy Meadow ink on Basic White and cut it out with the fancy label die from the All That dies. I podded it on the card with dimensionals.

I used my dark Berry Burst Stampin’ Blend marker to color a length of Silver & White sheer ribbon and made a bow. I adhered the bow to the card with a glue dot and finished with Berry Burst Tinsel gems.

For the inside of the card, I stamped the sentiment from the Perennial Postage stamp set in Mossy Meadow ink on Basic White. I stamped the large zinnia from the Stampin’ Up! Simply Zinnia stamp set in Stamped off Berry Burst ink next to the sentiment. I covered it with a mask and stamped the leaves using Lemon Lime Twist ink. I trimmed the bottom with DSP and adhered the panel to the inside of the card with Stampin’ Seal.

The Stampin’ Up! Simply Zinnia bundle is so pretty and I was so happy to finally get my set. I’ve had zinnias in my summer gardens for years, and I remember my Mom having them in her garden, too. So I think they’re perfect for Mother’s Day.

On With The Hop! Click on the Next Blog button to move forward to Mary Deatherage’s project or click the Previous Blog button to move back to see the project that Ann Louise Fodgaard created.

If you get lost along the way, here are the participants for the hop:

  1. Carol Buckalew 
  2. Nel Thames 
  3. Karen Ksenzakovic 
  4. Shirley Gentry 
  5. Ann Louise Fodgaard 
  6. Akiko Sudano  <– You Are Here
  7. Mary Deatherage 
  8. Karen Finkle
  9. Tara Carpenter
  10. Amy Koenders

Current Host Code: 9WAA9JP9

Use this host code when you order $50 or more and receive a Thank You gift from me!  The free gift is your choice of any currently available item valued up to $10.00.

If your order is over $150, please do not use the host code since you’ll receive your own Host Dollars plus I’ll still send you the Thank You gift!  This host code can be used by anyone, no club or commitment required. Let me know if you have any questions.


If you need any stamping supplies, I’d be very happy to be your Demonstrator.  Just click on the Shop Now button on the right side of the screen to go directly to my online store or contact me if you have any questions.  Happy Stamping!

Thanks for stopping by and have a great week!

Akiko

  • Visit my online store here
  • See the current Stampin’ Up! clearance rack specials here
  • Earn FREE Stampin’ Up! products through my Wildflower Frequent Shopper Program – my way of saying thank you to my online frequent shopper customers.
  • Have any questions? I’d be happy to help, click here to contact me.

Cardstock Cuts for this project:

  • Old Olive – 5-1/2″ x 8-1/2″ card base scored at 4-1/4″
  • Blackberry Bliss – 2-1/4″ x 2-1/2″ (flower backing die cut)
  • Berry Burst – three 2″ x 2-1/2″ panels (flower petal die cuts)
  • Mossy Meadow – 1/2″ x 4″ (flower stem), 1-1/4″ x 2-1/2″ (leaves)
  • Crushed Curry – 1″ x 1″ (flower center)
  • Lemon Lolly – 1″ x 1″ (flower center)
  • Basic White – 4″ x 5-1/4″ (inside panel), 3-1/2″ x 4-3/4″ (embossed panel), 2-1/4″ x 3″ (label)
  • Flowering Zinnias DSP – 4″ x 5-1/4″ (front background), 1/2″ x 4″ (inside trim)

Stampin’ Up! products used in this project: