Stampin’ Up! Boo to You Little Monsters Card for the Inkin’ Krew Blog Hop

Good Morning and welcome back to another Inkin’ Krew Blog Hop! Our awesome team is doing a blog hop featuring Stampin’ Up! products with the theme “Halloween Fun”. I am using the Stampin’ Up! Boo to You stamp set to make a spooky card with little Halloween monsters! You can find the supplies used to create this card at the bottom of my post along with the sizes of cardstock used.

I started the card by using one of the layering circles dies to cut a mask for the moon on a piece of copy paper. I positioned the open circle on a Whisper White panel and sponged in Daffodil Delight for the moon. I then covered the moon with the die cut circle and lightly sponged some Calypso Coral ink around the moon. I then took some non-SU purple ink (How come I don’t have any Gorgeous Grape ink? Need to get some!) and added some touches of purple outside the Calypso Coral. I then made a mask for the ground and sponged the rest of the sky in Night of Navy, making it darker at the edges of the paper and lighter closer to the moon. I then removed the cover off the moon.

Next came the large tree from the Snow Front Stamp set, which I stamped using Memento Tuxedo Black ink. I trimmed a piece of Mossy Meadow cardstock to match the ground and adhered it to the panel. I stamped the pair of pumpkins from the Gather Together stamp set in Calypso Coral ink on Whisper White cardstock. I colored them with Old Olive and Calypso Coral Stampin’ Blends and fussy cut them and adhered them to the card front at the base of the tree. Finally I mounted the front panel on a Calypso Coral mat and a Gorgeous Grape card base using liquid glue.

Next I stamped the Frankenstein-like and the hairy horned monsters from the Stampin’ Up! Boo to You stamp set using Memento Tuxedo black ink on Thick Whisper White cardstock. I colored the monsters with Granny Apple Green, Calypso Coral, So Saffron, Soft Suede and Crumb Cake Stampin’ Blends. I fussy cut the monsters and used a black marker to color the white paper edges. And I adhered the green and yellow google eyes to them! I popped them on the card front with dimensionals.

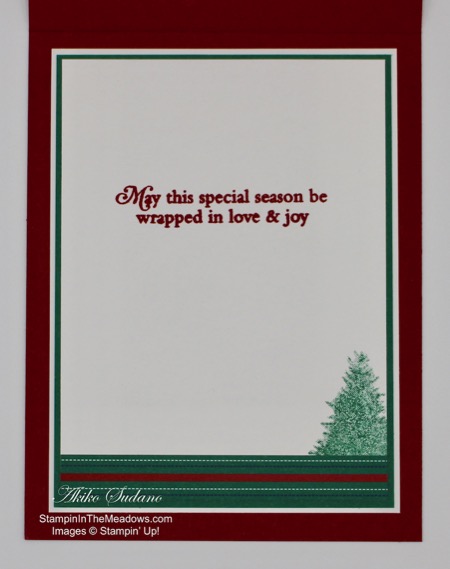
I stamped the Boo to You sentiment from the Stampin’ Up! Boo to You stamp set in Memento Tuxedo Black ink on a Whisper White panel and added another stamped and die cut set of pumpkins fro the Gather Together stamp set to the bottom left corner. I adhered the panel to a Calypso Coral mat and adhered it to the inside of the card.

Do your little ones dress as monsters or superheroes for Halloween? Either way, I bet they love to be scared by monsters on Halloween. Enjoy them!! Thanks for visiting!

Akiko


I hope you enjoyed today’s card and thanks for visiting! Be sure to check out each blog in this month’s Inkin’ Krew Team Blog Hop to see the wonderful projects created by the other team members. Click on the Next Blog button to move forward to Amy Koenders’ project or click the Previous Blog button to move back to see the project that Paula Vincent created.

If you get lost along the way here is a list of the blog hop participants:


This image has an empty alt attribute; its file name is 09-19_banner_dsp_us.jpg

Buy 3 Get 1 Free Designer Series Paper Sale

By popular demand, Stampinโ€™ Up! is bringing back the Designer Series Paper Sale! During September 4โ€“30, you can buy three packages of select Designer Series Paper, and get one FREE! See the full details on my Stampinโ€™ Up! Promotions Page.


September 1 – 15 Host Code: DHYEBG62

Use this host code when you order and receive a free gift from me!  If your order is over $150, please do not use this code, but youโ€™ll still get the free gift.  The free gift is your choice of any item valued up to $10.00 in the 2018-19 Annual Catalog or in the 2019 Occasions Catalog!  That includes some of the Host Exclusive stamp sets!


If you need any stamping supplies, Iโ€™d be very happy to be your Demonstrator.  Just click on the Shop Now button on the right side of the screen to go directly to my online store or contact me if you have any questions.  Happy Stamping!

  • Visit my online store here
  • See the current Stampin’ Up! clearance rack specials here
  • Earn FREE Stampin’ Up! products through my Wildflower Frequent Shopper Program – my way of saying thank you to my frequent shopper online customers.
  • Have any questions? I’d be happy to help, click here to contact me.

Cardstock Cuts for this project:

  • Gorgeous Grape – 4 1/4″ x 11″
  • Thick Whisper White – (2) 2″ x 3″ scraps for monsters
  • Calypso Coral – (2) 3 3/4″ x 5″
  • Whisper White – (2) 3 5/8″ x 4 7/8″, 1 1/2″ x 3″
  • Mossy Meadow – 2″ x 3 5/8″

Stampin’ Up! products used in this project:


Stampin’ Up! Nature’s Beauty Birthday Card

Good Morning! Today I have a rustic birthday card made with the Stampin’ Up! Nature’s Beauty cling stamp set. This is one of the new sets from the Stampin’ Up! 2019 Holiday Catalog. This set has 3 realistic, adorable woodland creatures – a deer, fox and this sweet bunny. You can find the supplies used to create this card at the bottom of my post along with the sizes of cardstock used.

This card uses the layout from the Sunday Stamps SSC212 Circle Around Challenge. It’s a clean and simple layout that results in lovely cards.

Here’s my card for today

I started by stamping the little bunny from the Stampin’ Up! Nature’s Beauty stamp set in Soft Suede ink on a panel of Whisper White. Next I stamped the little grass around the bottom of the bunny in Old Olive ink. Then I colored the image using light Crumb Cake, light Balmy Blue and light Old Olive Stampin’ Blends. I finished it by coloring the bunny’s eye with a journaling pen and cut it out with a circle die from the Layering Circles dies.

Then I stamped the Birch cling stamp on a Thick Whisper White panel using Crumb Cake ink. Since the stamp is so large, I used my Stamparatus so I would get a good clean image, and it came out perfect! I cut the circle using the same die I used for the bunny and then sponged the edges lightly in Crumb Cake. I then ran it through the Subtle embossing folder.

I stamped the Happy Birthday sentiment from the Country Road stamp set in Soft Suede ink on a scrap of Crumb Cake cardstock, wrapped it with white baker’s twine and clipped the ends. On a Soft Suede card base, I laid out the strip of wood grained DSP from the Pressed Petals Specialty Designer Series Paper and then adhered it with liquid glue. I positioned the birch panel and then adhered the bunny in the circle with liquid glue. I then popped on the birch panel with dimensionals and added the sentiment banner.

The inside of the card has a strip of the birch paper over a strip of the Pressed Petals DSP on a Whisper White panel.

A simple rustic birthday card for a nature lover. Thanks for visiting and have a great weekend!

Akiko


September 1 – 15 Host Code: DHYEBG62

Use this host code when you order and receive a free gift from me!  If your order is over $150, please do not use this code, but youโ€™ll still get the free gift.  The free gift is your choice of any item valued up to $10.00 in the 2018-19 Annual Catalog or in the 2019 Occasions Catalog!  That includes some of the Host Exclusive stamp sets!


If you need any stamping supplies, Iโ€™d be very happy to be your Demonstrator.  Just click on the Shop Now button on the right side of the screen to go directly to my online store or contact me if you have any questions.  Happy Stamping!

  • Visit my online store here
  • See the current Stampin’ Up! clearance rack specials here
  • Earn FREE Stampin’ Up! products through my Wildflower Frequent Shopper Program – my way of saying thank you to my frequent shopper online customers.
  • Have any questions? I’d be happy to help, click here to contact me.

Cardstock Cuts for this project:

  • Soft Suede – 4 1/4″ x 11″
  • Thick Whisper White – 3 3/8″ x 5″
  • Whisper White – 3 3/4″ x 5″, 3″ x 3″, 3/8″ x 5″
  • Crumb Cake – 1″ x 3″ scrap
  • Pressed Petals DSP – (2) 1/2″ x 5″

Stampin’ Up! products used in this project:


Stampin’ Up! Snowman Season Christmas Card

Good Morning! Today is the big day – the 2019 Stampin’ Up! Holiday Catalog is finally open for orders! Yay! To celebrate, I made a snowman Christmas card made with the Stampin’ Up! Snowman Season bundle. This includes the Snowman Season Photopolymer stamp set and the Snowman Builder punch. The Snowman Season stamp set is used for cards and tags on the cover of the new catalog.

In addition to it being the first day to order from the new catalog, today is the first day of the popular Buy 3 get 1 Free Designer Series Paper or DSP promotion. The details are on the Stampin’ Up! Promotions page.

Now, on to today’s Snowman Season Christmas card. You can find the supplies used to create this card at the bottom of my post along with the sizes of cardstock used.

I started by adhering the Let it Snow Specialty Designer Series Paper with the trees to a Real mat and then to a Coastal Cabana card base. The DSP has glitter on the pine trees, so pretty! I cut the large circle from the Stitched Shapes dies from Sparkle Glimmer paper and adhered it to the card front.

I made the snowman by stamping it in Memento Tuxedo Black ink on Thick Whisper White cardstock. I then punched it out with the Snowman Builder punch. I colored his nose with a Pumpkin Pie Stamp’ Write marker and added two large and two small coal pieces from the Let it Snow Embellishment kit to his belly. I stamped the top hat in Memento Tuxedo Black ink on Thick Whisper White, punched it out and colored it. I punched the arms in Crumb Cake and attached the red felt gloves from the Let it Snow Embellishment kit.

I stamped the Merry Christmas sentiment from the Stampin’ Up! Snowman Season stamp set in Real Red on a strip of Whisper White cardstock. I die cut the scalloped mat using the scallop die from the Budding Blooms dies on Real Red cardstock and attached the label to it. I attached it to the card with liquid glue and then attached the snowman with dimensionals.

On the inside of the card, I stamped the sentiment from the Stampin’ Up! Snowman Season stamp set in Real Red on a Whisper White panel. I added a strip of DSP to the bottom and added a Real Red mat before adhering it to the inside of the card.

The colors in the Let it Snow DSP are so cheerful and the glitter really makes it special. Coupled with the different snowmen from the Stampin’ Up! Snowman Seasons stamp set, it really makes for happy, whimsical Christmas cards.

My last few cards have been sneak peeks from the new 2019 Stampin’ Up! Holiday Catalog which is open for orders today! If you haven’t received a catalog yet but would like one, visit the Stampin’ Up! Catalogs page to request one and I’ll get it out to you. Thanks for visiting and happy holiday stamping!

Akiko


Buy 3 Get 1 Free Designer Series Paper Sale Is Back โ€“ Starting Today!

By popular demand, Stampinโ€™ Up! is bringing back the Designer Series Paper Sale! During September 4โ€“30, you can buy three packages of select Designer Series Paper, and get one FREE! See the full details on my Stampinโ€™ Up! Promotions Page.


September 1 – 15 Host Code: DHYEBG62

Use this host code when you order and receive a free gift from me!  If your order is over $150, please do not use this code, but youโ€™ll still get the free gift.  The free gift is your choice of any item valued up to $10.00 in the 2018-19 Annual Catalog or in the 2019 Occasions Catalog!  That includes some of the Host Exclusive stamp sets!


If you need any stamping supplies, Iโ€™d be very happy to be your Demonstrator.  Just click on the Shop Now button on the right side of the screen to go directly to my online store or contact me if you have any questions.  Happy Stamping!

  • Visit my online store here
  • See the current Stampin’ Up! clearance rack specials here
  • Earn FREE Stampin’ Up! products through my Wildflower Frequent Shopper Program – my way of saying thank you to my frequent shopper online customers.
  • Have any questions? I’d be happy to help, click here to contact me.

Cardstock Cuts for this project:

  • Coastal Cabana – 5 1/2″ x 8 1/2″
  • Real Red – (2) 3 3/4″ x 5″, 1″ x 3 1/4″
  • Thick Whisper White – 4″ x 2″
  • Whisper White – 3 5/8″ x 4 7/8″, 5/8″ x 3 1/4″
  • Sparkle Glimmer Paper – 3 1/4″ x 3 1/4″
  • Let it Snow Specialty DSP – 3 5/8″ x 4 7/8″, 1/2″ x 3 5/8″
  • Crumb Cake – 1″ x 2″

Stampin’ Up! products used in this project:


Stampin’ Up! Gather Together Autumn Wishes Card

Happy September! I hope you are having a wonderful, relaxing Labor Day Weekend. Today’s card welcomes the Fall season with warm wishes. It is made with the new Stampin’ Up! Gather Together photopolymer stamp set that is in the new 2019 Holiday Catalog and will be available on Sept 4! You can find the supplies used to create this card at the bottom of my post along with the sizes of cardstock used.

The inspiration for the layout of the card is CAS(E) this Sketch #337. It’s a great layout for using different DSPs in combination with stamped images. Check it out!

For today’s card, I wanted to show off some of the pretty fall designs in the Come to Gather Designer Series Paper that is in the new 2019 Stampin’ Up! Holiday Catalog. So I started by cutting the polka dot paper and mounting it on an Early Espresso mat. I Added the Pretty Peacock feather strip and set it aside to work on the die cuts.

For the large maple leaf, I sponged a Whisper White panel with Cajun Craze, Pear Pizzazz and Sahara Sand inks so that the leaf would have a mottled look like it was starting to turn color. I then stamped the large leaf image from the Stampin’ Up! Gather Together stamp set in Early Espresso and cut it out with the coordinating Gathered Leaves die. Then I took a piece of Cajun Craze cardstock and lightly misted it and cut it out with the large three lobed maple leaf leaf die. I did the same to a piece of Pretty Peacock cardstock and cut it with the small 5 lobed maple leaf die. The solid dies in the Gathered Leaves dies makes a two toned die cut when the paper is wet. It’s pretty neat isn’t it!

I stamped the sentiment from the Stampin’ Up! Gathered Together stamp set in Pretty Peacock. I stamped the wheat sheaf in Early Espresso after stamping off twice. I cut it out with one of the circle dies from the Layering Circles dies and backed it with Pretty Peacock cut in one of the scalloped circles from the Layering Circles dies. I added two small Pretty Peacock faceted gems to the label. I arranged the leaves on the DSP background panel and attached them with glue dots and added the label with dimensionals. I finished it off with a bow made with the braided linen trim. I adhered the panel to the front of a Sahara Sand card base with dimensionals.

I adhered a strip of the polka dot paper from the Come to Gather DSP to the left side of a Whisper White panel and stamped the wheat from the Stampin’ Up! Gathered Together stamp set in Early Espresso in the center of the panel after stamping off twice. I adhered it to an Early Espresso mat and attached it to the inside of the card.

Are you ready for Fall? School has started for the children in my neighborhood and some of the leaves on the trees have started turning. So it’s here whether I’m ready or not. The Gathered Together stamp set and Gathered Leaves dies will be available as a bundle in the 2019 Stampin’ Up! Holiday Catalog for a 10% discount. And it will be available on September 4th – just two days away! Yay!! I hope you liked today’s card. Thanks for visiting and have a great week!

Akiko


September 1 – 15 Host Code: DHYEBG62

Use this host code when you order and receive a free gift from me!  If your order is over $150, please do not use this code, but youโ€™ll still get the free gift.  The free gift is your choice of any item valued up to $10.00 in the 2018-19 Annual Catalog or in the 2019 Occasions Catalog!  That includes some of the Host Exclusive stamp sets!


If you need any stamping supplies, Iโ€™d be very happy to be your Demonstrator.  Just click on the Shop Now button on the right side of the screen to go directly to my online store or contact me if you have any questions.  Happy Stamping!

  • Visit my online store here
  • See the current Stampin’ Up! clearance rack specials here
  • Earn FREE Stampin’ Up! products through my Wildflower Frequent Shopper Program – my way of saying thank you to my frequent shopper online customers.
  • Have any questions? I’d be happy to help, click here to contact me.

Cardstock Cuts for this project:

  • Sahara Sand – 4 1/4″ x 11″
  • Early Espresso – (2) 3 3/4″ x 5″
  • Whisper White – 3 5/8″ x 4 7/8″, 2 3/4″ x 2 3/4″, 2 1/2″ x 2 1/2″
  • Come to Gather DSP (polka dot) – 3 5/8″ x 4 7/8″, 3/8″ x 4 7/8″
  • Come to Gather DSP (feathers) – 2″ x 3 5/8″
  • Cajun Craze – 2″ x 2″
  • Pretty Peacock – 2″ x 2″, 1 3/4″ x 2″

Stampin’ Up! products used in this project:


Stampin’ Up! Perfectly Plaid Christmas Card

Good Morning! Today I have a card that has a sneak peek of a stamp set and punch that will be coming out in the new Stampin’ Up! 2019 Holiday Catalog. The stamp set is Stampin’ Up! Perfectly Plaid photopolymer stamp set and it comes in a bundle with the coordinating Pine Tree punch at 10% off. You can find the supplies I used to create this card at the bottom of my post along with the sizes of cardstock used.

I was inspired by the sketch in The Paper Players PP456 Challenge and it worked well for showcasing the different designs in the Stampin’ UP! Wrapped in Plaid 6×6 Designer Series Paper pack.

In the Wrapped in Plaid DSP pack, there is a Christmas tree patterned paper that fits perfectly in the Pine Tree punch. So I started by punching one of these tree and punching two more trees in whisper White cardstock to give it thickness. I adhered the trees together and decorated it with Cherry Cobbler gems and a gold star sequin topped with a foil star. I selected two more of the Wrapped in Plaid papers and punched a tree from each. I cut a panel of Sparkle Glimmer paper using the large circle in the Stitched Shapes dies and adhered the trees to the circle with glue dots.

I stamped the Merry Christmas sentiment from the Stampin’ Up! Perfectly Plaid stamp set on a panel of the striped DSP in Versamark ink, sprinkled it with white embossing powder and heat set. I then adhered it to a Whisper White mat.

The background panel is double matted with the Cherry Cobbler Christmas trees DSP background, a Shaded Spruce mat and a Whisper White mat. It is mounted on a Cherry Cobbler card base with snail. I added the striped panel with snail and finally the circle with dimensionals.

I decorated the inside of the card by stamping the sentiment from the Stampin’ Up! Perfectly Plaid stamp set in Cherry Cobbler ink on a panel of Whisper White. I stamped the tree in in the lower right corner with Shaded Spruce ink after stamping off once. Doesn’t it look just like the tree in the DSP? I added a strip of the striped DSP and matted it with Shaded Spruce and Whisper White before adding it to the inside of the card.

The Stampin’ Up! Perfectly Plaid photopolymer stamp set and Pine Tree punch are perfect for creating Christmas Tree cards. And the beautiful designs with the gold foil touches in the Wrapped in Plaid 6×6 specialty designer series paper coordinates beautifully with the bundle. These are just a few of the wonderful products that will be available in the 2019 Stampin’ Up! Holiday Catalog on September 4. Thanks for visiting and have a great weekend!

Akiko


Buy 3 Get 1 Free Designer Series Paper Sale Is Back โ€“ Starting Sept 4!

By popular demand, Stampinโ€™ Up! is bringing back the Designer Series Paper Sale! During September 4โ€“30, you can buy three packages of select Designer Series Paper, and get one FREE! See the full details on my Stampinโ€™ Up! Promotions Page.


We only have a few more days in Bonus Days! Don’t forget to redeem those $5 coupons that you earned for purchases in July. See the full details on my Stampinโ€™ Up! Promotions Page.


August 16 – 30 Host Code: KHSFPFPZ

August 31 – September 15 Host Code: DHYEBG62

Use this host code when you order and receive a free gift from me!  If your order is over $150, please do not use this code, but youโ€™ll still get the free gift.  The free gift is your choice of any item valued up to $10.00 in the 2018-19 Annual Catalog or in the 2019 Occasions Catalog!  That includes some of the Host Exclusive stamp sets!


If you need any stamping supplies, Iโ€™d be very happy to be your Demonstrator.  Just click on the Shop Now button on the right side of the screen to go directly to my online store or contact me if you have any questions.  Happy Stamping!

  • Visit my online store here
  • See the current Stampin’ Up! clearance rack specials here
  • Earn FREE Stampin’ Up! products through my Wildflower Frequent Shopper Program – my way of saying thank you to my frequent shopper online customers.
  • Have any questions? I’d be happy to help, click here to contact me.

Cardstock Cuts for this project:

  • Cherry Cobbler – 4 1/4″ x 11″ card base
  • Whisper White -(2) 3 3/4″ x 5″, 2 1/8″ x 3 1/8″, 3 1/2″ x 4 3/4″
  • Shaded Spruce – (2) 3 5/8″ x 4 7/8″
  • Sparkle Glimmer Paper – 3 1/4″ x 3 1/4″
  • Wrapped in Plaid DSP – 3 1/2″ x 4 3/4″ (Cherry Cobbler tree background), 2″ x 3″, 1/2″ x 3 1/2″ (striped paper), (2) 2″ x 3″ (plaid trees)

Stampin’ Up! products used in this project: