Stampin’ Up! Day of Thanks Happy Thanksgiving Day Card

Good Morning! Today I am sharing a Thanksgiving Card made with the Stampin’ Up! Day of Thanks stamp set. This turkey looks just like the one on the Thanksgiving turkey platter that I have been using for 40 years, so I just had to get the set because it is a real traditional Thanksgiving turkey! You can find the supplies used to create this card at the bottom of my post along with the sizes of cardstock used.

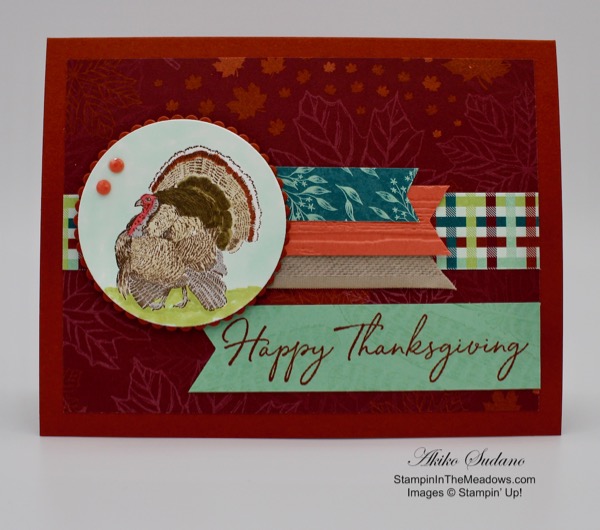
I also used the wonderful Gather Together designer series paper for the card, so I started by cutting a panel of the Merry Merlot paper with the maple leaves I took a strip of the checked paper and adhered it across the Merry Merlot panel. I cut a strip of the Gather Together Crumb cake ribbon and attached it to the panel as shown. I cut a banner of Calypso coral and ran it through the pinewood planks embossing folder to give it some texture and attached it to the panel. I topped it off with a banner of the leafy Pretty Peacock paper.

I took a strip of Mint Macaron and stamped the feather from the Stampin’ Up! Day of Thanks stamp set in Mint Macaron on it several times, each time stamping it off twice first. I stamped the sentiment on the strip in Cajun Craze. I attached it to the Merry Merlot panel, then I attached the decorated panel to a Cajun Craze card base.

I stamped the turkey image from the Stampin’ Up! Day of Thanks stamp set in Early Espresso on a panel of Whisper White. I colored the turkey with Soft Suede, Smoky Slate, Cajun Craze and Poppy Parade Stampin’ Blends. I colored the Sky with the Light Pool Party Stampin’ Blend and the ground with the Light Old Olive. I cut it out with one of the Layering Circle dies and cut a Cajun Craze mat with the scalloped circle that matched it. I adhered them together and popped it on the card front with dimensionals. I added two Terra Cotta Tile faceted dots to finish it off.

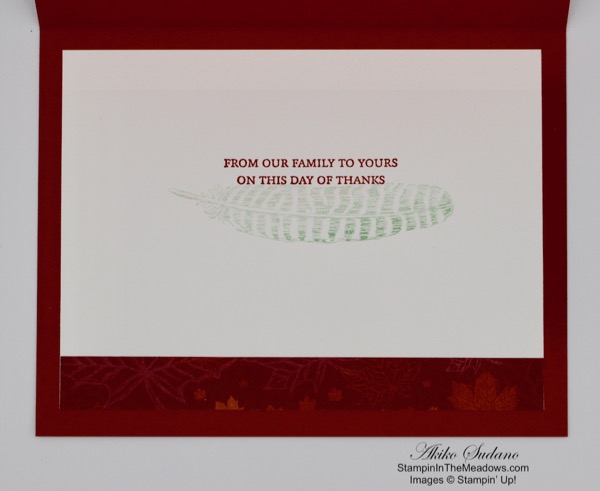
On the inside of the card, I added a strip of the Merry Merlot paper to the bottom of a Whisper White panel and stamped the sentiment in Cajun Craze. I also stamped another feather in Mint Macaron, after stamping off twice.

Next week when I get back from On Stage local, it will be time to send out all my Thanksgiving cards … and plan my Thanksgiving day menu.


November 1 – 15 Host Code: WR4KJJM4

November 16 – 30 Host Code: 462PVWKY

Use this host code when you order $50 or more and receive a free gift from me!  The gift is your choice of any item valued up to $10.00 in the 2019-20 Annual Catalog or in the 2019 Holiday Catalog!  That includes some of the Host Exclusive stamp sets!

If your order is over $150, please do not use the host code since you’ll receive your own Host Dollars plus I’ll send you the free gift!  This host code can be used by anyone, no commitment required.  Let me know if you have any questions.


If you need any stamping supplies, Iโ€™d be very happy to be your Demonstrator.  Just click on the Shop Now button on the right side of the screen to go directly to my online store or contact me if you have any questions.  Happy Stamping!

Thanks for stopping by and have a great weekend! I am spending Saturday at Stampin’ Up! On Stage Local in Hartford, CT and I am so excited!!

Akiko

  • Visit my online store here
  • See the current Stampin’ Up! clearance rack specials here
  • Earn FREE Stampin’ Up! products through my Wildflower Frequent Shopper Program – my way of saying thank you to my frequent shopper online customers.
  • Sign up for my weekly newsletter here
  • Have any questions? I’d be happy to help, click here to contact me.

Cardstock Cuts for this project:

  • Cajun Craze – 5 1/2″ x 8 1/2″, 3″ x 3″ (card base)
  • Mint Macaron – 1″ x 4 1/2″ (banner)
  • Calypso Coral – 3/4″ x 3″ (banner)
  • Whisper White – 3″ x 3″ (turkey), 3 3/4″ x 5″ (inside)
  • Gather Together –
    • 3 3/4″ x 5″, 1/2″ x 5″ (Merry Merlot)
    • 5/8″ x 3″ (Pretty Peacock)
    • 3/4″ x 5″ (Checked)

Stampin’ Up! products used in this project:


Stampin’ Up! First Frost Christmas Card for the Happy Inkin’ Thursday Blog Hop

Good Morning! Welcome to another Happy Inkin’ Thursday Blog Hop! I used the beautiful Stampin’ Up! First Frost cling stamp set for my card today. Here is my card:

We have a color challenge this week, and here is the color palette we are using:

I started with a Cherry Cobbler card base and adhered a Crumb Cake panel that was run through the Tin Tile embossing folder on top. Then I cut and embossed an oval frame from the Heirloom Frames dies in Early Espresso. I sponged some shimmery white paint on the carved part of the frame, but unfortunately, the shimmer doesn’t show very well in the pictures – in real life it has a silvery glow.

I cut a panel of very vanilla with the largest oval from the Layering Ovals dies. I stamped the long flourish stamp from the Woven Heirlooms stamp set several times across the oval with Crumb Cake ink stamped off twice. I stamped the sentiment from the Stampin’ Up! First Frost stamp set in the upper right corner of the oval with Cherry Cobbler ink. I adhered the oval to the card base with liquid glue and the frame on top of it with dimensionals.

I stamped two large roses and two small roses from the Stampin’ Up! First Frost stamp set in Cherry Cobbler ink on Whisper White and cut them out with the matching dies from the Frosted Bouquet dies. I stamped three of the long stems from the First Frost stamp set in Pear Pizzazz ink on Whisper White and cut them out with the matching die. I cut the bottoms off of two of them to shorten them. I die cut three of the leaf clusters from the Frosted Bouquet dies in Mossy Meadow and cut them in half. Finally I cut three of the sprigs from the Frosted Frames dies from gold foil.

I arranged a top and bottom halves of one of the Mossy Meadow leaves for the inside of the frame and attached them with liquid glue, tucking them under the frame. I added two of the gold foil sprigs. I arranged the Pear Pizzazz long stems and attached them with glue dots. I tucked two of the Mossy tops under the outside of the frame, adhering them with glue dots. I adhered the last gold sprig with liquid glue and the three roses with glue dots. I made a bow with linen thread (I used Mary Deatherages’s beautiful design – Thank you Mary!) and adhered it with a glue dot. I finished the card front with three Cherry Cobbler rhinestones.

I decorated the inside of the card by stamping a Very Vanilla panel with the Merry Christmas greeting from the Merry Christmas to All stamp set in Cherry Cobbler. I stamped another stem in Pear Pizzazz on the left side and the long flourish across the bottom in Crumb Cake (after stamping off twice). I added the final large die cut rose from the Stampin’ Up! First Frost stamp set with liquid glue and adhered it to a Crumb Cake mat before adding it to the inside of the card.

The First Frost stamp set and dies are so beautiful and I love every card that I’ve made with them. And this is the first time I’ve used the Woven Heirlooms bundle and it is definitely a favorite. I hope you like this card and that it inspires you to work on your own Christmas cards. We’ll need to send them out before you know it.

On with the Hop! Click the Next button below to visit Karen Ksenzakovic’s blog.

And just in case you get lost along the way, here’s a list of the team members participating in the hop today:


November 1 – 15 Host Code: WR4KJJM4

November 15 – 30 Host Code: 462PVWKY

Use this host code when you order $50.00 or more and receive a free gift from me! ย The gift isย your choice ofย any itemย valued up to $10.00 in the 2019-20 Annual Catalog or in the 2019 Holiday Catalog! ย That includes some of the Host Exclusive stamp sets!

If your order is over $150, please do not use the host code since you’ll receive your own Host Dollars plus I’ll send you the free gift!  This host code can be used by anyone, no commitment required.  Let me know if you have any questions.


If you need any stamping supplies, Iโ€™d be very happy to be your Demonstrator.  Just click on the Shop Now button on the right side of the screen to go directly to my online store or contact me if you have any questions.  Happy Stamping!

Thanks for visiting!

Akiko

  • Visit my online store here
  • See the current Stampin’ Up! clearance rack specials here
  • Earn FREE Stampin’ Up! products through my Wildflower Frequent Shopper Program – my way of saying thank you to my frequent shopper online customers.
  • Sign up for my weekly newsletter here
  • Have any questions? I’d be happy to help, click here to contact me.

Cardstock Cuts for this project:

  • Cherry Cobbler – 4 1/4″ x 11″
  • Crumb Cake – 3 3/4″ x 5″ (embossed), 3 7/8″ x 5 1/8″ (inside mat)
  • Early Espresso – 4 1/4″ x 5 1/2″
  • Very Vanilla – 3 3/4″ x 5″ (inside), 3 1/4″ x 4 1/2″
  • Whisper White – 3 3/4″ x 5″ (stems), 2″ x 6″ (roses)
  • Mossy Meadow – 3″ x 6″
  • Gold Foil – 2″ x 3″

Stampin’ Up! products used in this project:


Stampin’ Up! Perfectly Plaid White and Gold Christmas Card for the Inkin’ Krew Blog Hop

Good Morning! Welcome to the November Inkin’ Krew Monthly Blog Hop!

Our team is doing a Blog Hop with the theme “Merry Christmas or Happy Holidays” and I am making a Christmas card with the Stampin’ Up! Perfectly Plaid Stamp photopolymer bundle. You can find the supplies used to create this card at the bottom of my post along with the sizes of cardstock used.

I started with the trees. I punched two from Gold Foil card stock, one from Gold Glimmer card stock and one from Sparkle Glimmer card stock. I took one foil tree and embossed it with the Stylish Scrolls embossing folder. The last three trees were stamped and gold embossed on shimmery white paper before being punched. I used the tree stamp from the Stampin’ Up! Perfectly Plaid stamp set, the diagonal stripes from the Tiny Keepsakes stamp set and the star field from the So Many Stars stamp set. For all of these, I used my embossing buddy on the shimmery white card stock, stamped with Versamark ink, sprinkled with gold embossing powder and heat set. I then punched out the trees. Then I punched out 7 additional trees from Whisper White and adhered them to the back of the trees to add stiffness.

I took a panel of Thick Whisper White and embossed it with the Subtle embossing folder. I die cut two of the edge dies from the Christmas Rose dies from gold foil and adhered them to the back of the embossed panel on the bottom. I adhered a piece of the gold shimmer ribbon just above the edge with snail and wrapped it around, securing it in the back. I arranged the trees on the panel, adhering the ones in the back with liquid glue and popped the ones in the front with dimensionals. I then adhered the panel to a Thick Whisper White card base with dimensionals. Then I decorated the trees as shown with pearls, gold glitter enamel dots and gold metallic pearls.

I stamped the sentiment from the Itty Bitty Christmas stamp set with Versamark ink on a strip of Whisper White. I sprinkled it with embossing powder and heat set. I then curled it with my bone folder to give it some movement and adhered it to the card base with glue dots. I finished the banner with two gold metallic pearls.

I decorated the inside by embossing the sentiment and tree from the Stampin’ Up! Perfectly Plaid stamp set in gold on a Whisper White panel. I adhered it to a gold foil mat and then to the inside of the card.

I love the Stampin’ Up! Perfectly Plaid stamp set with the Pine Tree punch and wanted to try making an elegant sparkly Christmas card with it. I hope you like it.

Thanks for visiting! Click on the Next Blog button to move forward to Amy Koender’s project or click the Previous Blog button to move back to see the project that Sue Prather created.

If you get lost along the way, here are the participants for the hop:

I hope you enjoy all the beautiful holiday projects that the team has created today and that they put you in a wonderful holiday frame of mind!


November 1 – 15 Host Code: WR4KJJM4

Use this host code when you order $50 or more in Stampin’ Up! products and receive a free gift from me!  The gift is your choice of any item valued up to $10.00 in the 2019-2020 Annual Catalog or in the 2019 Holiday Catalog!  That includes some of the Host Exclusive stamp sets!

If your order is over $150, please do not use the host code since you’ll receive your own Host Dollars plus I’ll send you the free gift!  This host code can be used by anyone, no commitment required.  Let me know if you have any questions.


If you need any stamping supplies, Iโ€™d be very happy to be your Demonstrator.  Just click on the Shop Now button on the right side of the screen to go directly to my online store or contact me if you have any questions.  Happy Stamping!

Thanks for stopping by and have a great week!

Akiko

  • Visit my online store here
  • See the current Stampin’ Up! clearance rack specials here
  • Earn FREE Stampin’ Up! products through my Wildflower Frequent Shopper Program – my way of saying thank you to my frequent shopper online customers.
  • Have any questions? I’d be happy to help, click here to contact me.

Cardstock Cuts for this project:

  • Thick Whisper White – 5 1/2″ x 8 1/2″ (card base), 2 1/1″ x 5 1/4″
  • Whisper White – 3 3/4″ x 5″ (inside), 3 1/2″ x 7 1/2″ (punched trees), 1/2″ x 4″
  • Sparkle Glimmer Paper – 2 1/2″ x 3″
  • Gold Glimmer Paper – 2 1/2″ x 3″
  • Gold Foil – 3 7/8″ x 5 1/8″ (inside mat), 2 1/2″ x 4″ (trees), 1/2″ x 7″ (trim)
  • Shimmery White card stock – (3) 2 1/2″ x 3″

Stampin’ Up! products used in this project:


Stampin’ Up! Night Before Christmas Merry Christmas Card

Good Morning! Today I am sharing a video that I did yesterday during my Sunday Facebook Live session. This video focuses on making card bases, so it will probably be pretty boring for most. But the card is pretty! It is CASE’d from one that my Inkin’ Krew Team Lead Amy Koenders did a few weeks ago and you can find Amy’s card here. You can find the supplies used to create this card at the bottom of my post along with the sizes of cardstock used.

Here’s the Facebook Live video where I gave my talk about making your standard A2 card base:

I also posted the video to my YouTube channel and you can view it here.

I made two cards – an example of a top folding card and an example of a side folding card. One of the things I should have mentioned is the importance of scoring for your fold. Do you always score the folds for your cards? I guess I’m a bit obsessive and I always score my folds. Plus, the scoring tool on the new trimmer is so smooth that I just love running it back and forth. ๐Ÿ™‚

This is an example of a simple card that is pretty because it uses pretty designer series paper. I cut the Stampin’ Up! Night Before Christmas designer series paper, and cut a Crumb Cake mat that was longer so that I could stamp a sentiment on it. I stamped the Merry Christmas sentiment from the Snowman Seasons stamp set in Night of Navy ink on the bottom and then adhered the paper to the top of the mat. I tied a piece of the braided trim around the piece and made a bow. I adhered it to the card base with dimensionals and added a Night of Navy rhinestone for bling.

The insides are the same as well. I stamped the greeting from the Snowman Seasons stamp set in Night of Navy on a Very Vanilla panel and some stars from the So Many Stars Stamp set in Crushed Curry. I added a strip of Stampin’ Up! Night Before Christmas DSP to the bottom and adhered it on a Crumb Cake mat before attaching it to the inside of the card.

Two simple cards to demonstrate how to make a simple card base. I am planning to mix up my Facebook Live sessions between card making sessions and beginner technique sessions (and continue to improve my production quality). Check out my Facebook page and YouTube channel to see my videos and let me know what you’d like to see more of.

Next week I will be forgoing my Facebook Live session as I will be traveling home from the Stampin’ Up! On Stage Local event in Hartford, CT. I am so excited about seeing the new products and meeting my fellow Demonstrators.


November 1 – 15 Host Code: WR4KJJM4

Use this host code when you order $50+ and receive a free gift from me!  If your order is over $150, please do not use this code, but youโ€™ll still get the free gift.  The free gift is your choice of any item valued up to $10.00 in the 2018-19 Annual Catalog or in the 2019 Occasions Catalog!  That includes some of the Host Exclusive stamp sets!

If your order is over $150, please do not use the host code since you’ll receive your own Host Dollars plus I’ll send you the free gift!  This host code can be used by anyone, no club or commitment required.  Let me know if you have any questions.


If you need any stamping supplies, Iโ€™d be very happy to be your Demonstrator.  Just click on the Shop Now button on the right side of the screen to go directly to my online store or contact me if you have any questions.  Happy Stamping!

Thanks for stopping by and have a great week!

Akiko

  • Visit my online store here
  • See the current Stampin’ Up! clearance rack specials here
  • Earn FREE Stampin’ Up! products through my Wildflower Frequent Shopper Program – my way of saying thank you to my frequent shopper online customers.
  • Have any questions? I’d be happy to help, click here to contact me.

Cardstock Cuts for this project:

  • Night of Navy – 4 1/4″ x 11″, 5 1/2″ x 8 1/2″
  • Very Vanilla – (2) 3 5/8″ x 4 7/8″
  • Crumb Cake – (2) 3 3/4″ x 5″, (2) 3 1/4″ x 4 1/4″
  • Night Before Christmas DSP – (2) 3″ x 3″

Stampin’ Up! products used in this project:


Stampin’ Up! Night Before Christmas Card

Good Morning! I got really busy last weekend so I missed my Tuesday post and so I’m making up for it by bringing you a card today! I’m using the Stampin’ Up! Night Before Christmas Memories and More Cards and Envelopes with the Stampin’ Up! Night Before Christmas Designer Series Paper stack to make my card. You can find the supplies used to create this card at the bottom of my post along with the sizes of cardstock used.

The Stampin’ Up! Night Before Christmas Memories and More Cards and Envelopes are larger than your standard A2 sized cards at 6 1/4″ x 4 1/4″. You have a Cherry Cobbler background card with a frame of Very Vanilla stars. The envelopes are very vanilla with Poppy Parade and Cherry Cobbler diagonal stripes around the edges. You can easily use cards from the Night Before Christmas Memories and More card pack to make quick cards with them because they are perfectly sized to accent the larger card size in addition to being used for memory keeping! But I used the Stampin’ Up! Night Before Christmas DSP to build my card and I think it’s a good alternative.

I fussy cut a tree from the tree paper in the Stampin’ Up! Night Before Christmas DSP and adhered it to a panel of the diagonal checked paper. I adhered the checked panel to a Very Vanilla mat. I stamped the Joy sentiment from the So Many Stars stamp set in Cherry Cobbler ink on Very Vanilla card stock and cut it out with one of the stitched rectangle dies before I adhered it to the checked paper.

I fussy cut presents from the present paper and adhered them to the bottom of the checked panel, using dimensionals on some so they would stick out. I adhered it to the middle of the card and finished it off with some holiday rhinestones.

I attached a polka dot panel of the Stampin’ Up! Night Before Christmas DSP to the inside of the card with liquid glue. I stamped the sentiment from the Perfectly Plaid stamp set in Cherry Cobbler ink on a panel of Whisper White. I added a few more fussy cut presents and adhered it to the polka dot panel on the inside of the card.

This is a simple cute card that looks special because of the popped up presents and rhinestones. The Stampin’ Up! Night Before Christmas suite is full of retro images that bring back childhood memories of Christmas.


November 1 – 15 Host Code: WR4KJJM4

Use this host code when you order and receive a free gift from me!  If your order is over $150, please do not use this code, but youโ€™ll still get the free gift.  The free gift is your choice of any item valued up to $10.00 in the 2018-19 Annual Catalog or in the 2019 Occasions Catalog!  That includes some of the Host Exclusive stamp sets!


If you need any stamping supplies, Iโ€™d be very happy to be your Demonstrator.  Just click on the Shop Now button on the right side of the screen to go directly to my online store or contact me if you have any questions.  Happy Stamping!

Thanks for stopping by and have a great weekend!

Akiko

  • Visit my online store here
  • See the current Stampin’ Up! clearance rack specials here
  • Earn FREE Stampin’ Up! products through my Wildflower Frequent Shopper Program – my way of saying thank you to my frequent shopper online customers.
  • Have any questions? I’d be happy to help, click here to contact me.

Cardstock Cuts for this project:

  • Very Vanilla – 2 3/8″ x 3 5/8″, 2″ x 2 1/2″
  • Whisper White – 3 1/2″ x 5 1/2″
  • Night Before Christmas – 2 1/4″ x 3 1/2″ (checked), 4″ x 6″ (polkadot), 1 sheet Christmas trees, 1 sheet presents

Stampin’ Up! products used in this project:


Stampin’ Up! Snowman Season Christmas Cheer Card

Good Morning! Today I am sharing another snowman Christmas Card made with the wonderful Stampin’ Up! Snowman Season stamp set and Let it Snow designer series paper. You can find the supplies used to create this card at the bottom of my post along with the sizes of cardstock used.

I used the Mojo Monday 526 Sketch Challenge layout for this card. I love the fishtail banners in this sketch and the Let it Snow DSP has so many pretty papers that look good together that I just had to make another snowman card with the layered look. Here is the sketch:

I embossed a panel of Coastal Cabana cardstock with the Winter Knit embossing folder and adhered it to a Thick Whisper White card base with liquid glue. I cut the different pieces of Let it Snow DSP and arranged them on the embossed panel according to the sketch and adhered them with liquid glue.

I stamped the happy snowman from the Stampin’ Up! Snowman Season stamp set on a panel of Shimmery White card stock and cut it out with the large circle from the Stitched shapes dies. I colored it with Real Red, Pool Party, shaded Spruce and Soft Suede Stampin’ Blends. I added the little snow balls from the Let it Snow embellishment pack with liquid glue and then added a Real Red scalloped mat made from largest scalloped circle from the Layered circles dies. I adhered the layered circle to the card front with dimensionals.

I stamped the Christmas Cheer sentiment from the Itty Bitty Christmas stamp set using Versamark ink on a strip of Real Red card stock. I sprinkled it with white embossing powder and heat set. I trimmed the ends of the label and adhered it to the card front with liquid glue.

I stamped the sentiment from the Stampin’ Up! Snowman Season photopolymer stamp set in Real Red ink on a Whisper White panel. I added a strip of the little snowmen from the Let it Snow DSP to the bottom of the panel and adhered it to a Coastal Cabana mat before attaching it to the inside of the card.

The Stampin’ Up! Snowman Season stamp set is so cute and I have made so many different whimsical Christmas Cards with it. The Let it Snow designer series paper is also so cute and whimsical and the designs make the sweetest Christmas cards. I love the combination of the Real Red with the Coastal Cabana!


November 1 – 15 Host Code: WR4KJJM4

Use this host code when you order and receive a free gift from me! ย If your order is over $150, please do not use this code, but youโ€™ll still get the free gift. ย The free gift isย your choice ofย any itemย valued up to $10.00 in the 2019-20 Annual Catalog or in the 2019 Occasions Catalog! ย That includes some of the Host Exclusive stamp sets!


If you need any stamping supplies, Iโ€™d be very happy to be your Demonstrator.  Just click on the Shop Now button on the right side of the screen to go directly to my online store or contact me if you have any questions.  Happy Stamping!

Thanks for stopping by and have a great weekend!

Akiko

  • Visit my online store here
  • See the current Stampin’ Up! clearance rack specials here
  • Earn FREE Stampin’ Up! products through my Wildflower Frequent Shopper Program – my way of saying thank you to my frequent shopper online customers.
  • Have any questions? I’d be happy to help, click here to contact me.

Cardstock Cuts for this project:

  • Thick Whisper White – 4 1/4″ x 11″
  • Coastal Cabana – 4″ x 5 1/4″, 3 3/4″ x 5″
  • Whisper White – 3 5/8″ x 4 7/8″
  • Shimmery White – 3 1/4″ x 3 1/4″
  • Real Red – 3 1/4″ x 3 1/4″, 3/8″ x 3″
  • Let it Snow DSP – 2 1/2″ x 3 1/2″, 5/8″ x 4 1/2″, 5/8″ x 1 3/8″, 1/2″ x 3 5/8″

Stampin’ Up! products used in this project:


Stampin’ Up! Pop of Petals Christmas Card for the Happy Inkin’ Thursday Blog Hop

Good Morning! Today I made a Christmas Card using the Stampin’ Up! Pop of Petals stamp set and Four Petal Punch for the Happy Inkin’ Thursday Blog Hop. These flowers reminded me of poinsettias and I love poinsettia Christmas cards, so I made a background full of poinsettias for my card today.

We have a sketch challenge in the Blog Hop this week, and here is the sketch we are using:

I started by stamping 18 of the flowers from the Stampin’ Up! Pop of Petals stamp set in Cherry Cobbler ink on shimmery white card stock. I punched them out with the four petal punch and colored them with the Cherry Cobbler Light Stampin’ Blends. I stamped 18 of the flower centers in Mango Melody ink on shimmery white card stock and fussy cut then with my paper snips. I adhered a flower center to each Cherry Cobbler flower.

I took a panel of Whisper White and embossed it with the tufted embossing folder and arranged the flowers all over the embossed panel, going off the edges. I adhered them with liquid glue and trimmed the flowers to be even with the embossed panel. I adhered it to a Basic Black mat with liquid glue and then to a Mossy Meadow card base with dimensionals.

I die cut the medium branch from the Beautiful Boughs dies from a panel of Mossy Meadow and the small pine cone pieces from Crumb Cake and Soft Suede. I colored a strip of the Whisper White Flax ribbon with Light Mango Melody Stampin’ Blends and trimmed the ends. I stamped the Sentiment from the Peaceful Boughs stamp set in Memento Tuxedo Black ink on Cherry Cobbler and die cut it with the small label from the Beautiful Boughs dies. I arranged the pieces on the bottom of the card front and adhered them with glue dots and dimensionals. I finished off the arrangement with a tied strip of the polka dot tulle ribbon and yellow gems.

I decorated the inside of the card by adhering a small die cut Mossy Meadow branch from the Beautiful Boughs dies and another flower to a Whisper White panel. I stamped the sentiment from the Frosted Foliage stamp set in Memento Tuxedo Black ink and added a Basic Black mat before adhering it to the inside of the card.

It’s hard to see the diamond pattern from the Tufted Embossing folder or the shimmer on the flowers, but these textures add depth and richness to the background.

On with the Hop! Click the Next button below to visit Karen Ksenzakovic’s blog.

And just in case you get lost along the way, here’s a list of the team members participating in the hop today:


November 1 – 15 Host Code: WR4KJJM4

Use this host code when you order and receive a free gift from me!  If your order is over $150, please do not use this code, but youโ€™ll still get the free gift.  The free gift is your choice of any item valued up to $10.00 in the 2018-19 Annual Catalog or in the 2019 Occasions Catalog!  That includes some of the Host Exclusive stamp sets!


If you need any stamping supplies, Iโ€™d be very happy to be your Demonstrator.  Just click on the Shop Now button on the right side of the screen to go directly to my online store or contact me if you have any questions.  Happy Stamping!

Thanks for visiting!

Akiko

  • Visit my online store here
  • See the current Stampin’ Up! clearance rack specials here
  • Earn FREE Stampin’ Up! products through my Wildflower Frequent Shopper Program – my way of saying thank you to my frequent shopper online customers.
  • Have any questions? I’d be happy to help, click here to contact me.

Cardstock Cuts for this project:

  • Mossy Meadow – 5 1/2″ x 8 1/2″, 3 1/2″ x 3 1/2″
  • Shimmery White – 4 1/2″ x 11″
  • Basic Black – 4″ x 5 1/4″, 3 3/4″ x 5″
  • Whisper White – 3 7/8″ x 5 1/8″, 3 5/8″ x 4 7/8″
  • Cherry Cobbler – 1 1/2″ x 3 3/4″
  • Soft Suede – 1 1/4″ x 1 1/4″
  • Crumb Cake – 1 1/4″ x 1 1/4″

Stampin’ Up! products used in this project:


Stampin’ Up! Pop of Petals Thank You Card

Good Morning! I need some thank you cards and I have been working on a post for later this week using the Stampin’ Up! Pop of Petals stamp set. I found a pretty card on Pinterest that was made by Tammy Beard of StampinSavvy.com here and was inspired to make one similar but with fall colors. I’m not sure I succeeded, but it was a lot of fun playing with different colors and stamping a card rather than relying on die cuts.

Here’s the Facebook Live video where I demonstrated how to make the card.

In the video, I used the Stampin’ Up! Pop of Petals stamp set to make the Rich Razzleberry and Mango Melody card with the Mossy Meadow leaves. I started by stamping the Mango Melody flowers, and then the Rich Razzleberry flowers, and then filling in with leaves. I finish off the card front by stamping the sentiment from the Stampin’ Up! Love what you Do in Memento Tuxedo Black and I use the Stamparatus so that I can stamp twice to get good coverage. I also show how to curve the petals on the punched flower so that you can get a dimensional look. And I used a black sharpie so that I wouldn’t harm the tip of my Stampin’ Blend on the faceted gems to color it black before applying it to the center flower.

I also posted the video to my YouTube channel and you can view it here.

It was fun to make a card that had a lot of stamping and was not for Christmas. And you’ll note that I did make two boo boos by rocking the leaf stamp instead of bringing it straight up and down – now I have an example for why you shouldn’t do this. Finally, thank you Tammy for the wonderful inspiration!


November 1 – 15 Host Code: WR4KJJM4

Use this host code when you order and receive a free gift from me!  If your order is over $150, please do not use this code, but youโ€™ll still get the free gift.  The free gift is your choice of any item valued up to $10.00 in the 2018-19 Annual Catalog or in the 2019 Occasions Catalog!  That includes some of the Host Exclusive stamp sets!


If you need any stamping supplies, Iโ€™d be very happy to be your Demonstrator.  Just click on the Shop Now button on the right side of the screen to go directly to my online store or contact me if you have any questions.  Happy Stamping!

Thanks for stopping by and have a great week!

Akiko

  • Visit my online store here
  • See the current Stampin’ Up! clearance rack specials here
  • Earn FREE Stampin’ Up! products through my Wildflower Frequent Shopper Program – my way of saying thank you to my frequent shopper online customers.
  • Have any questions? I’d be happy to help, click here to contact me.

Cardstock Cuts for this project:

  • Rich Razzleberry – 4 1/4″ x 11″
  • Mango Melody – 4 1/4″ x 11″
  • Whisper White – (4) 3 3/4″ x 5″, (2) 2″ x 2″ scraps
  • Garden Green – 3 7/8″ x 5 1/8″
  • Mossy Meadow – 3 7/8″ x 5 1/8″

Stampin’ Up! products used in this project:


Stampin’ Up! Christmastime Is Here Birthday Card

Good Morning! The beautiful Stampin’ Up! Christmastime Is Here suite is finally available for a limited time beginning today and I made a birthday card using the beautiful Christmastime Is Here specialty designer series paper. The Christmastime Is Here DSP has three designs, one with large rose bouquets, one in Cherry Cobbler with diamonds and one with small roses. And it’s specialty because it has touches of gold foil throughout. You can find the supplies used to create this card at the bottom of my post along with the sizes of cardstock used.

I embossed a panel of Old Olive card stock with the Stylish Scrolls embossing folder and adhered it to a Cherry Cobbler mat. I covered the bottom with a panel of the Stampin’ Up! Christmastime Is Here designer series paper with the small roses and wrapped a length of the gold shimmer ribbon around the seam. I adhered it in the back with snail and added some tape to secure it.

I die cut the large rose bouquet from the Christmastime is Here DSP and die cut another piece from Whisper White and adhered it to the back to stiffen it. I added it to the panel with dimensionals. I added 5 drops of shimmer crystal effects to the large rose so it looks like dew. I made a bow from the gold shimmer ribbon and adhered it with glue dots.

I stamped the Happy Birthday sentiment from the Beautiful Bouquet stamp set in Versamark ink on a scrap of Cherry Cobbler. I sprinkled it with white embossing powder and heat set. I cut it out with the small label die from the Beautiful Boughs dies. I die cut it twice, so that it would be skinnier and fit the sentiment better. This was pretty easy since the edges are straight – I just shifted it over for the second cut, making sure the sentiment was centered. I adhered it to the card front with liquid glue and added a gold glitter enamel dot. With the front panel finished, I adhered it to a Thick Whisper White card base with dimensionals.

In the center of the inside panel, I stamped the large bouquet from the Stampin’ Up! Christmas Rose stamp set in Delicata gold ink on a Whisper White. I added a strip of the small rose paper to the bottom and adhered it to Old Olive and Cherry Cobbler mats before adhering it to the inside of the card.

The designs in the Stampin’ Up! Christmastime Is Here suite are beautiful and elegant and not just for Christmas. They will delight any lady with a winter birthday!


November 1 – 15 Host Code: WR4KJJM4

Use this host code when you order and receive a free gift from me!  If your order is over $150, please do not use this code, but youโ€™ll still get the free gift.  The free gift is your choice of any item valued up to $10.00 in the 2018-19 Annual Catalog or in the 2019 Occasions Catalog!  That includes some of the Host Exclusive stamp sets!


Christmastime is Here Product Suite is now available!

We hope youโ€™re ready to make this holiday season magical, because the Stampin’ Up! Christmastime Is Here Suite is, well . . . here!

This exclusive, limited-time collection of festive, floral coordinating products has everything you need to share love, joy, and creativity this holiday season. Products from the Stampin’ Up! Christmastime Is Here Suite will be available only while supplies last.

Click this image to open up a full size PDF flyer with all of the details for this beautiful new product suite!ย  The colors in the Designer Series Paper are:ย  Gold, Cherry Cobbler, Mossy Meadow, Poppy Parade and Early Espresso!

Drop me a note if you have any questions.


If you need any stamping supplies, Iโ€™d be very happy to be your Demonstrator.  Just click on the Shop Now button on the right side of the screen to go directly to my online store or contact me if you have any questions.  Happy Stamping!

Thanks for stopping by and have a great weekend!

Akiko

  • Visit my online store here
  • See the current Stampin’ Up! clearance rack specials here
  • Earn FREE Stampin’ Up! products through my Wildflower Frequent Shopper Program – my way of saying thank you to my frequent shopper online customers.
  • Have any questions? I’d be happy to help, click here to contact me.

Cardstock Cuts for this project:

  • Thick Whisper White – 4 1/4″ x 11″
  • Cherry Cobbler – 3 7/8″ x 5 1/8″, 3 3/4″ x 5″, 1 1/2″ x 3″
  • Old Olive – 3 3/4″ x 5″, 3 5/8″ x 4 7/8″
  • Whisper White – 3 1/2″ x 4 3/4″
  • Christmastime Is Here DSP – 4 1/2″ x 5″ (large rose centered), 2 1/4″ x 3 3/4″, 1/2″ x 3 1/2″

Stampin’ Up! products used in this project:


Stampin’ Up! Cup of Christmas Card for the Happy Inkin’ Thursday Blog Hop

Happy Halloween and welcome to another Happy Inkin’ Blog Hop! I used the Stampin’ Up! Cup of Christmas photopolymer stamp set for my card today and here is my card.

We have a color challenge this week, and here is the color palette we are using:

My card design was inspired by the Paper Players Sketch Challenge PP465:

I started by adhering a strip of striped Let it Snow specialty designer series paper to a panel of snowflake paper and then adhering them both to a Real Red mat. I die cut a stitched square from Whisper White and ran it through the Winter Knit 3D embossing folder. I adhered it to a scalloped square and then to the Let it Snow background panel.

I die cut the cup from the Cup of Cheer dies from Real Red and the poinsettia from Whisper White. I adhered these together with the fine-tip glue pen. I die cut the candy cane from Real Red and Whisper White and adhered them together with the fine tip-glue pen. I adhered the candy cane to the back of the mug and attached them to the embossed panel with dimensionals.

I stamped the Merry Christmas greeting from the Stampin’ Up! Cup of Christmas stamp set in Real Red on a panel of Whisper White and cut it out with a stitched circle die. I matted in a Real Red scalloped circle and added two Shaded Spruce die cut holly leaves and three Real Red enamel glitter dots. I adhered the label to the Let it Snow panel with dimensionals and then adhered the finished panel to a Coastal Cabana card base with dimensionals.

I decorated the inside of the card with die cut Shaded Spruce holly leaves and Real Red berries on a Whisper White panel. I stamped the sentiment from the Stampin’ Up! Cup of Christmas stamp set in Real Red and added a strip of the snowflake Let it Snow DSP to the bottom. I adhered it to a Real Red mat and then to the inside of the card with liquid glue.

On with the Hop! Click the Next button below to visit Karen Ksenzakovic’s blog.

And just in case you get lost along the way, here’s a list of the team members participating in the hop today:


October 15 – 31 Host Code: 3KQUKV9U

November 1 – 15 Host Code: WR4KJJM4

Use this host code when you order and receive a free gift from me!  If your order is over $150, please do not use this code, but youโ€™ll still get the free gift.  The free gift is your choice of any item valued up to $10.00 in the 2018-19 Annual Catalog or in the 2019 Occasions Catalog!  That includes some of the Host Exclusive stamp sets!


If you need any stamping supplies, Iโ€™d be very happy to be your Demonstrator.  Just click on the Shop Now button on the right side of the screen to go directly to my online store or contact me if you have any questions.  Happy Stamping!

Thanks for visiting!

Akiko

  • Visit my online store here
  • See the current Stampin’ Up! clearance rack specials here
  • Earn FREE Stampin’ Up! products through my Wildflower Frequent Shopper Program – my way of saying thank you to my frequent shopper online customers.
  • Have any questions? I’d be happy to help, click here to contact me.

Cardstock Cuts for this project:

  • Coastal Cabana – 4 1/4″ x 11″
  • Real Red – (2) 3 7/8″ x 5 1/8″, 3 1/2″ x 3 1/2″, 2 1/2″ x 2 1/2″, 1 1/4″ x 3″, 2″ x 2″
  • Whisper White – 3 3/4″ x 5″, 3″ x 3″, 2″ x 2 1/4″, 1 1/4″ x 3″, 2″ x 2″
  • Shaded Spruce – 1 1/4″ x 3″
  • Let it Snow DSP – 3 3/4″ x 5″, 1/2″ x 3 3/4″, 1 3/4″ x 3 3/4″

Stampin’ Up! products used in this project: