Good Morning! Today I’m sharing a Christmas card made with the Stampin’ Up! Coming Home bundle that I made during my Facebook Live video tutorial yesterday afternoon. For today’s card, I used felt for the snow! I have wanted to play with felt for a long time and I finally made it happen with this card! You can find the supplies used to create this card at the bottom of my post along with the sizes of cardstock used.
Here is the Facebook Live video showing how I made the card:
I will also edit and post a concise tutorial on my YouTube Channel, so look for that soon. You can find it here.
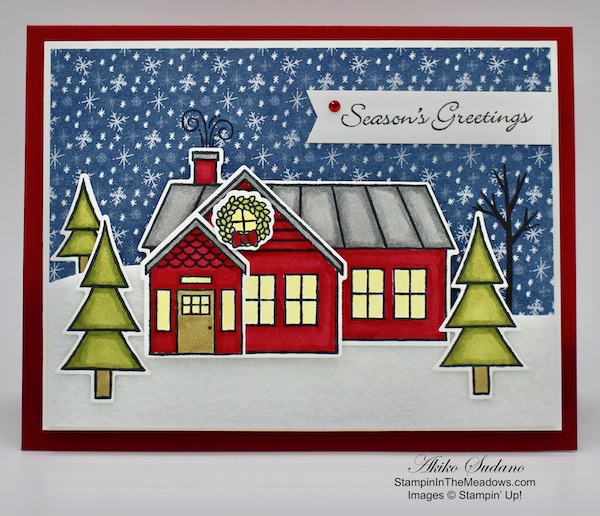
I started by cutting a 1-3/4″ x 5″ panel of while felt from the Festive Felt sheet combo pack with the rolling hillside die from the Home Together Dies. I was really pleased at how easy it was to cut!! I also cut a panel of Whisper White to match and adhered the felt to the front. This gives me a bright white snow bank as my sample card was adhered to the DSP directly and looks a little dingy.
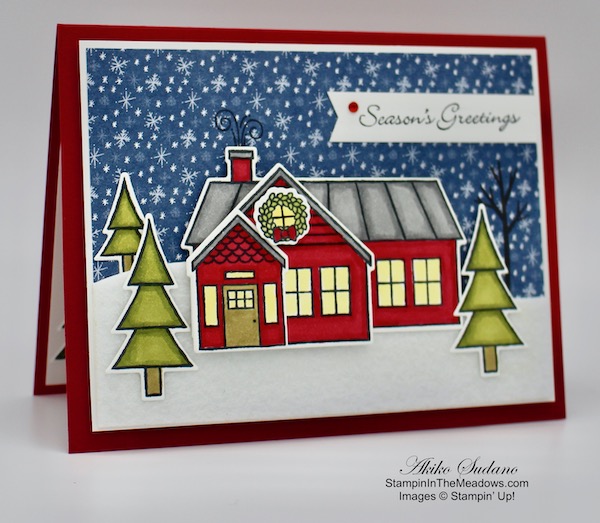
I stamped all my die cuts in Memento Tuxedo Black ink on Whisper White and cut them out with the coordinating dies. I stamped 4 houses, three large pine trees, two small pine trees and a wreath from the Stampin’ Up! Coming Home photopolymer stamp set. I colored them all with Stampin’ Blends – Old Olive, Smoky Slate, Real Red, Daffodil Delight and Soft Suede. I stamped the bare tree and adhered the snowbank to the Trimming the Town DSP and then the DSP to a Whisper White mat. I tucked the small pine tree under the snow bank, stamped the smoke and adhered the large house with dimensionals and liquid glue.

I adhered the two smaller houses together with liquid glue and popped them on the larger house with dimensionals. I added the wreath with dimensionals and the two large pine trees with dimensionals and liquid glue. I stamped the sentiment from the Itty Bitty Christmas stamp set in Tuxedo Black in on a strip of Whisper White. I trimmed the end with the new Banners Pick a Punch and adhered it to the front with liquid glue. I finished the label with a red rhinestone. I popped the little scene onto the front of a Real Red card base with dimensionals.
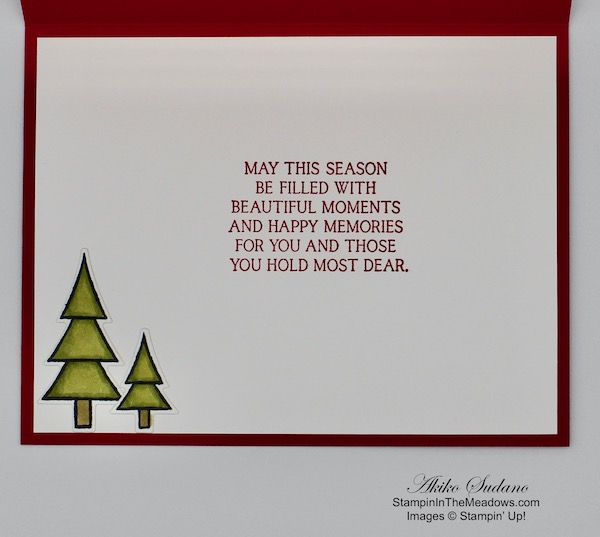
I stamped the sentiment from the Toile Christmas stamp set in real red ink and adhered the last two trees to the bottom of a Whisper White panel. I adhered the panel to the inside of the card.

The Stampin’ Up! Coming Home bundle has so many cute elements to make different kinds of houses for holidays as well as to congratulate someone who got a new home or welcome someone who just moved in next door. Click the image below to get the full details of this bundle in my Online Store.

The Stampin’ Cut & Emboss Machine is Here!
If you need a new die cutting machine, check out the new Stampin’ Cut & Emboss machine! This is a well built, smooth running machine and I used it on today’s project! Details are on my Promotions page.
The September Paper Pumpkin Kit Celebrates Fall!

September’s Paper Pumpkin kit has a multi-occasion stamp set and enough supplies to design 20 cracker box treat packages – you can create custom fall crafts to celebrate Halloween, Thanksgiving, pumpkins, and leaves.
If you’re interested in subscribing to Paper Pumpkin, you can either sign up for a subscription where you are billed monthly for your kit or you can purchase a prepaid subscription in my online store. To see more information and to sign up for the monthly subscription click here. To see the options for prepaid subscriptions in my online store, click here.
Sign up deadline for the September 2020 kit is September 10, 2020. Supplies may be limited toward the end of the subscription period.
September 1 – 15 Host Code: 9UZFD3BH
Use this host code when you order $50 or more and receive a free gift from me! The free gift is your choice of any item valued up to $10.00 in the 2019 – 2020 Annual Catalog or in the 2020 Mini Catalog! That includes some of the Host Exclusive stamp sets!
If your order is over $150, please do not use the host code since you’ll receive your own Host Dollars plus I’ll still send you the free gift! This host code can be used by anyone, no club or commitment required. Let me know if you have any questions.
If you need any stamping supplies, I’d be very happy to be your Demonstrator. Just click on the Shop Now button on the right side of the screen to go directly to my online store or contact me if you have any questions. Happy Stamping!
Thanks for stopping by and have a great week!
Akiko
- Visit my online store here
- See the current Stampin’ Up! clearance rack specials here
- Earn FREE Stampin’ Up! products through my Wildflower Frequent Shopper Program – my way of saying thank you to my online frequent shopper customers.
- Sign up for my weekly newsletter here
- Have any questions? I’d be happy to help, click here to contact me.
Cardstock Cuts for this project:
- Real Red – 5-1/2″ x 8-1/2″ card base scored at 4-1/4″
- Whisper White – 4″ x 5-1/4″ (inside panel), 3-7/8″ x 5-1/8″ (front mat), 1/2″ x 3 (label banner), 1-3/4″ x 5″ (felt lining)
- Trimming the Town DSP – 3-3/4″ x 5″
Stampin’ Up! products used in this project:

")
")


So cute!! Love your design, perfectly colored too! Sweet card! 🙂
Thank you so much!!😊
This is such a cute card Akiko 🙂 Love everything about it. Sorry I missed you live, I had to work and it was too busy to hop on. See you next Sunday
Thank you so much! Busy at work is a good thing!!😊