Stampin’ Up! Happy Labels Card

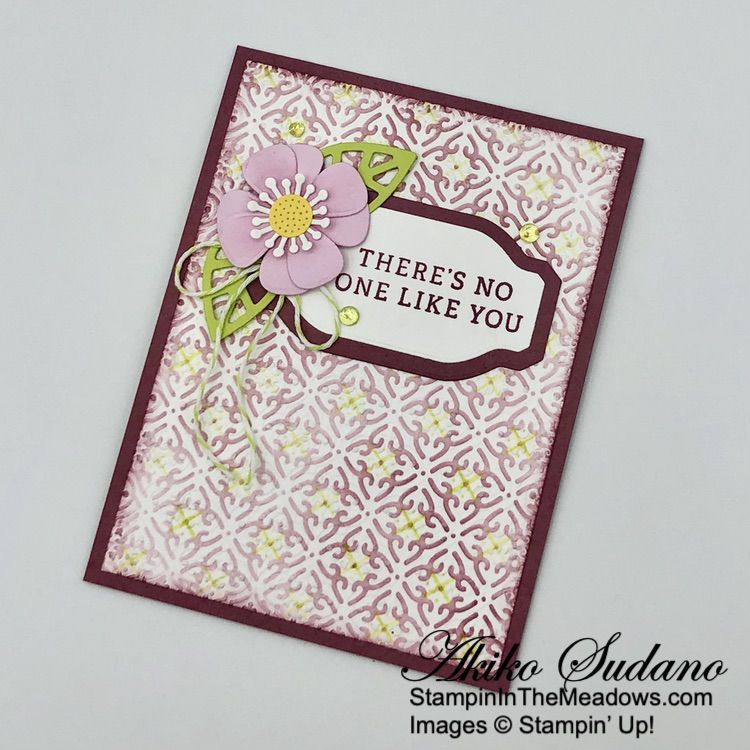
Good Morning! The pretty Stampin’ Up! Happy Labels cling stamp set is full of unique and wonderful sentiments and it’s one of my favorites. I paired it with the Paper Florist dies and and used the Foursquare masks to make a pretty background. You can find the supplies I used at the bottom of my post along with the sizes of cardstock used.

I used the fancy mask in the Foursquare mask pack to cover a Basic White panel and secured it with post-it tape. I applied Moody Mauve ink with my blending brush all over, making some areas darker. Next, I used the smaller ‘X’ mask to apply Lemon Lime Twist ink with a blending brush – the ‘X’s line up in the center of the fancy squares. I ran the panel through the Quatrefoil Tile embossing folder to add texture and used a sponge dauber to add Moody Mauve ink around the edges. I adhered the panel to the front of a Moody Mauve card base with liquid glue.

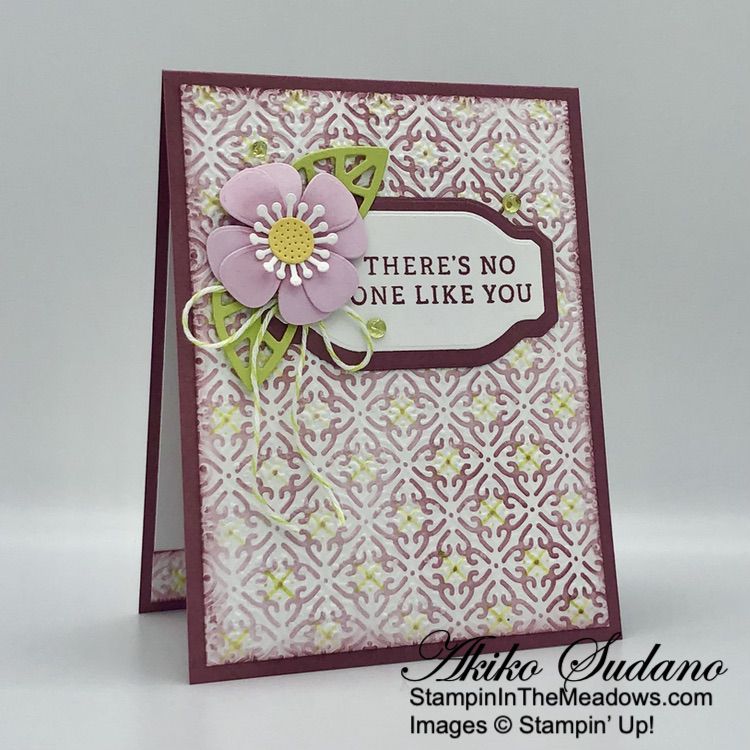
I used the large elongated label die from the Something Fancy dies to cut a Moody Mauve panel. I stamped the sentiment from the Stampin’ Up! Happy Labels dies in Moody Mauve ink on a Basic White panel. I cut it out with the smaller elongated label die and adhered it to the large die cut with liquid glue. I adhered the layered label to the card with liquid glue.

I cut a Bubble Bath panel with the Paper Florist die and applied some Moody Mauve ink to the centers of the large petal clusters with a sponge dauber. I used a Bone Folder to curve the petals down and adhered the clusters together with liquid glue. I cut centers from Basic White and Daffodil Delight and adhered them to the flower. I popped the flower on the card with dimensionals. I cut two leaves from Lemon Lime Twist card stock and tucked them under the flower with a glue dot. I finished the card with a Parakeet Party Baker’s twine bow and Lemon Lime Twist tinsel gems.

For the inside of the card, I stamped the sentiment from the Stampin’ Up! Happy Labels stamp set in Moody Mauve ink in the center of a Basic White panel. I cut the hearts from the Share A Milkshake dies from Bubble Bath and adhered them next to the sentiment. I made a strip of Basic White to match the front background and used it to trim the bottom of the panel before adhering it to the inside of the card with Stampin’ Seal.

It’s fun to use masks for creating different backgrounds and playing with different coloring techniques! I was happy to use my pretty background with the Stampin’ Up! Happy Labels stamp set – it’s an easy go-to for friendly and caring sentiments.


Bonus Days Redemption Period Going on Now!

Time to redeem those Bonus Days coupons! Make sure you save all your coupons because you can redeem them (and we mean ALL of them) between August 1 – August 31, 2023. There’s no limit to how many coupons you can earn!

Promotion Details:

Redemption Period: August 1 – August 31, 2023

  • There is no limit to the number of coupon codes participants can redeem on an order during the redemption period. If using multiple codes, they must be separated by a space. 
  • Coupons may be redeemed one time only.
  • Coupon codes may be redeemed for any product (excluding Starter Kits, demonstrator supply items, and Paper Pumpkin month-to-month subscriptions).
  • New prepaid Paper Pumpkin codes may be discounted using Bonus Days coupon codes.

Let me know if you have any questions, and have fun shopping!


Introducing the new Festive Tags Kit!

’Tis the season to start your holiday crafting! It’s easy with this all-inclusive kit. Just adhere the die cuts and embellishments and finish with a twine tie. You’ll have tags in minutes, ready for adding a handmade touch to your gifts. Here are the tags you can create and the kit supplies:

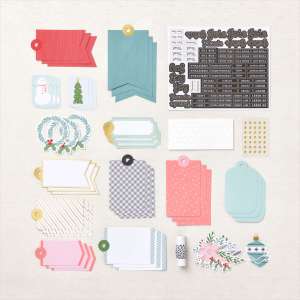
The Kits Collection Festive Tags Kit is Item# 162485 and the price is $13 (it’s on sale now for $11.70).

This Kit includes:

  • Enough supplies to make 15 tags: 3 each of 5 designs
  • Size Range: 1-1/2″ x 2″– 2-1/2″ x 3″
  • Die cut stickers and accents
  • Peel-and-stick gold dots
  • Baker’s twine

Coordinating colors: Basic Black, Flirty Flamingo, Garden Green, Lost Lagoon, Pool Party, Real Red


Current Host Code: MK3GJ47F

Use this host code when you order $50 or more and receive a Thank You gift from me!  The free gift is your choice of any item currently available valued up to $10.00 .

If your order is over $150, please do not use the host code since you’ll receive your own Host Dollars plus I’ll still send you the Thank You gift!  This host code can be used by anyone, no club or commitment required. Let me know if you have any questions.


If you need any stamping supplies, I’d be very happy to be your Demonstrator.  Just click on the Shop Now button on the right side of the screen to go directly to my online store or contact me if you have any questions.  Happy Stamping!

Thanks for stopping by and have a great weekend!

Akiko

  • Visit my online store here
  • See the current Stampin’ Up! clearance rack specials here
  • Earn FREE Stampin’ Up! products through my Wildflower Frequent Shopper Program – my way of saying thank you to my online frequent shopper customers.
  • Have any questions? I’d be happy to help, click here to contact me.

Cardstock Cuts for this project:

  • Moody Mauve – 4-1/4″ x 11″ card base scored at 5-1/2″, 2″ x 3-1/2″ (label)
  • Bubble Bath – 3″ x 3-1/4″ (die cut flowers), 1-1/4″ x 1-3/4″ (die cut hearts)
  • Daffodil Delight – 1″ x 1″ (flower center)
  • Lemon Lime Twist – 1-1/2″ x 2″ (die cut leaves)
  • Basic White – two 4″ x 5-1/4″ panels (front background and inside panel), 1-1/4″ x 1-1/4″ (die cut flower center), 1-3/4″ x 3″ (label), 1-3/4″ x 3″ (label)

Stampin’ Up! products used in this project:


Stampin’ Up! Layering Leaves for the Happy Inkin’ Thursday Blog Hop

Good Morning and welcome to the Happy Inkin’ Thursday Blog Hop! Today’s card features the pretty Countryside Inn designer series paper with the gorgeous Stampin’ Up! Layering Leaves photopolymer stamp set. You can find the supplies I used along with card stock cuts at the bottom of my post.

We have a color challenge for our Blog Hop this week:

I embossed a panel of Countryside Inn designer series paper with the Countryside Blossoms embossing folder and adhered it to a Misty Moonlight mat. This pattern fits perfectly in the embossing folder, so you add the embossed texture to the paper and it comes out so pretty! I adhered the layered panel to the front of a Boho Blue card base.

I cut a leaf cluster with the Bough punch from Misty Moonlight and cut the top section again so I had 1-1/2 leaf clusters. I stamped the flowers from the Stampin’ Up! Layering Leaves stamp set in Balmy Blue on Basic White and punched them out with the Bough Punch. I adhered the stem of the flowers to the full leaf cluster with liquid glue and adhered all the leaves to the card with glue dots.

I stamped the sentiment from the Stampin’ Up! Layering Leaves stamp set in Misty Moonlight ink on Boho Blue card stock. I cut it out with the fat, long banner die from the Stylish Shapes dies using the two step die cutting method, so that it was shorter and fit the sentiment. I adhered a length of Night of Navy ribbon to the back with glue dots and adhered it to the card front with dimensionals. I finished the card front with Boho Blue dots.

For the inside of the card, I stamped the branches from the Stampin’ Up! Layering Leaves stamp set in Boho Blue ink in the corners of a Basic White panel. I adhered the panel to the inside of the card with Stampin’ Seal.

I love how the Bough punch coordinates perfectly with the Stampin’ Up! Layering Leaves florals! And the sentiments in the stamp set are really beautiful!

On with the Hop! Click on the Next Blog button to move forward to see the beautiful project Karen Ksenzakovic has created.

If you get lost along the way, here are the participants for the hop:


Current Host Code: P7SWY6DS

Use this host code when you order $50 or more and receive a free gift from me!  The free gift is your choice of any item currently available valued up to $10.00!

If your order is over $150, please do not use the host code since you’ll receive your own Host Dollars plus I’ll still send you the free gift!  This host code can be used by anyone, no club or commitment required. Let me know if you have any questions.


If you need any stamping supplies, I’d be very happy to be your Demonstrator.  Just click on the Shop Now button on the right side of the screen to go directly to my online store or contact me if you have any questions. 

Thanks for stopping by and Happy Stamping!

Akiko

  • Visit my online store here
  • See the current Stampin’ Up! clearance rack specials here
  • Earn FREE Stampin’ Up! products through my Wildflower Frequent Shopper Program – my way of saying thank you to my online frequent shopper customers.
  • Have any questions? I’d be happy to help, click here to contact me.

Cardstock Cuts for this project:

  • Boho Blue – 4-1/4″ x 11″ card base scored at 5-1/2″, 1-1/2″ x 4″ (label)
  • Misty Moonlight – 3-3/4″ x 5″ (DSP mat), 1-1/2″ x 4″ (die cut leaves)
  • Basic White – 4″ x 5-1/4″ (inside panel), 1″ x 2-1/2″ (punched flower)
  • Countryside Inn DSP – 3-1/2″ x 4-3/4″ (front background)

Stampin’ Up! products used in this project:


Stampin’ Up! Timeless Arrangements for the Happy Inkin’ Thursday Blog Hop

Good Morning and welcome to the Happy Inkin’ Thursday Blog Hop! I am still playing with the Paper Florist dies and the Stampin’ Up! Timeless Arrangements bundle and today I combined them with the cute Les Shoppes designer series paper. You can find the supplies I used along with card stock cuts at the bottom of my post.

We have a pretty sketch challenge for our Blog Hop this week:

I adhered a panel of Les Shoppes designer series paper to a Misty Moonlight mat and adhered it to the front of a Flirty Flamingo card base with liquid glue. I embossed a panel of Balmy Blue with spray from the Elegant Eucalyptus 3D embossing folder and adhered it to a Misty Moonlight mat before adhering it to the card front with liquid glue.

I used the Paper Florist dies to cut flower petals and leaves from Petal Pink, Daffodil Delight, Flirty Flamingo, Misty Moonlight, Basic White, Granny Apple Green and Old Olive card stock. I assembled the flowers with liquid glue and adhered them to the card with glue dots. See the picture below for the dies.

Be sure to save the extra die cuts for future projects!

I stamped the sentiment from the Stampin’ Up! Timeless Arrangements photopolymer stamp set in Misty Moonlight ink on Basic White. I cut it out with the label die and adhered it to the card front with glue dots. I adhered a Balmy Blue and White bow with a glue dot.

For the inside of the card, I stamped the sentiment from the Stampin’ Up! Timeless Arrangements stamp set in Misty Moonlight ink on a Basic White panel. I stamped the flower next to the sentiment in Misty Moonlight and colored it with the dark Petal Pink and Granny Apple Green Stampin’ Blends. I adhered a strip of Les Shoppes DSP to the bottom of the panel and adhered the panel to the inside of the card with Stampin’ Seal.

The Stampin’ Up! Timeless Arrangements sentiments are perfect to coordinate with the Paper Florist dies!

On with the Hop! Click on the Next Blog button to move forward to see the beautiful project Karen Ksenzakovic has created.

If you get lost along the way, here are the participants for the hop:


Designer Series Paper Sale Going on Now!

We all love beautiful Designer Series Paper, and in June, you can enjoy a 15% discount on select Designer Series Papers from our new 2023–2024 Annual Catalog and Online Exclusives. Whether you’re a scrapbooker, a card maker or simply a paper lover, this is a great time to stock up and save on gorgeous paper so you have artistic and versatile paper designs on hand for your next projects!

Here are the Details:

  • Sales Period: June 1, 2021 – June 30, 2023
  • All order types qualify for this promotion. 
  • There is no limit to how many packages of Designer Series Paper may be purchased during this promotion.
  • Only select Designer Series Papers are available at a 15% discount during this promotion.
  • Orders must be placed—and closed—during the promotion period for the 15% discount to apply.
  • Designer Series Paper ordered as part of a Starter Kit or with Stampin’ Rewards qualify for the 15% discount.
  • Designer Series Papers are from the new 2023–2024 Annual Catalog (p. 129–132) and Online Exclusives

Click on the image below to download a PDF with the list of designer series papers that are on sale and their sale prices:


Starter Kit+ Joining Special Going on Now!

It’s a fabulous time to join Stampin’ Up! New team members will get even more FREE products in their customizable Starter Kit. Between 1–30 June, those who sign up can get $125 $155 USD worth of products for only $99 + free business supplies + free shipping + all the fun being a part of Stampin’ Up!

Starter Kit+ Promotion Details:

  • Promotion Dates: 1–30 JUNE 2023
  • When new team members purchase their Starter Kit, they will be able to redeem $125 $155 of Starter Kit eligible products for just $99.
  • New demonstrators who submit their Independent Demonstrator Agreement (IDA) before June 1 or after June 30 will not be eligible for this offer.

You can read about the benefits of being a Demonstrator on my Join My Team page. These include a minimum 20% discount on products and access to new products a month before the catalog release. Contact me if you have any questions about the benefits of being a Demonstrator and I’ll be happy to tell you all about it!


Current Host Code: 9SKETT74

Use this host code when you order $50 or more and receive a free gift from me!  The free gift is your choice of any item valued up to $10.00 from the 2023-2024 Annual Catalog!

If your order is over $150, please do not use the host code since you’ll receive your own Host Dollars plus I’ll still send you the free gift!  This host code can be used by anyone, no club or commitment required. Let me know if you have any questions.


If you need any stamping supplies, I’d be very happy to be your Demonstrator.  Just click on the Shop Now button on the right side of the screen to go directly to my online store or contact me if you have any questions. 

Thanks for stopping by and Happy Stamping!

Akiko

  • Visit my online store here
  • See the current Stampin’ Up! clearance rack specials here
  • Earn FREE Stampin’ Up! products through my Wildflower Frequent Shopper Program – my way of saying thank you to my online frequent shopper customers.
  • Have any questions? I’d be happy to help, click here to contact me.

Cardstock Cuts for this project:

  • Flirty Flamingo – 4-1/4″ x 11″ card base scored at 5-1/2″, 3-3/4″ x 4″ (flower die cuts)
  • Misty Moonlight – 3-3/8″ x 4-5/8″ (DSP mat), 2-7/8″ x 4-1/8″ (embossed panel mat), 1″ x 3″ (flower centers)
  • Balmy Blue – 2-3/4″ x 4″ (embossed panel)
  • Petal Pink – 3″ x 3″ (flower die cuts)
  • Daffodil Delight – 1″ x 4″ (flower die cuts)
  • Granny Apple Green – 1-1/2″ x 4″ (leaf die cuts)
  • Old Olive – 1-1/4″ x 3-1/2″ (stem die cuts)
  • Basic White – 4″ x 5-1/4″ (inside panel), 1″ x 3″ (label), 1″ x 1″ (flower center)
  • Les Shoppes DSP – 3-1/4″ x 4-1/4″ (front background), 1/2″ x 5-1/4″ (inside trim)

Stampin’ Up! products used in this project:


Stampin’ Up! Timeless Arrangements with Paper Florist Card

Good Morning! I finally pulled out my Paper Florist dies and used them with the Stampin’ Up! Timeless Arrangements stamp set to make a simple card thank you card. You can find the supplies I used at the bottom of my post along with the sizes of cardstock used.

I stamped the sentiment from the Stampin’ Up! Timeless Arrangements stamp set in Granny Apple Green ink on a Basic White strip. I embossed the strip with the Stripes 3D embossing folder and adhered it to a Granny Apple Green mat. I adhered the layered panel to a panel of Bright and Beautiful 6″ x 6″ designer series paper with liquid glue and adhered it to the front of a Granny Apple Green card base.

I cut 4 of the four petal flower dies from Balmy Blue card stock, giving me 8 large petal clusters and 8 small petal cluster. I cut centers for the flowers from Daffodil Delight card stock and adhered them with liquid glue. See the picture below for the dies I used.

I made each flower by using 4 of the same size petal clusters. I adhered each layer with a small dot of liquid glue and rotated it to offset the petals. Last, I adhered the flower center with a dot of liquid glue.

I used a large flower and two small flowers for today’s card and I saved the extra die cuts for a future project. I adhered each flower with glue dots. I didn’t use any dimensionals on the card, but the layers of flower petals gives the card texture and dimension, so I didn’t even add extra embellishments!

For the inside of the card, I stamped the sentiment from the Stampin’ Up! Timeless Arrangements stamp set in Balmy Blue on Basic White. I stamped the leaf sprig in Granny Apple Green and adhered a strip of Bright and Beautiful DSP to the bottom. I adhered the panel to the inside of the card with Stampin’ Seal.

The Paper Florist dies are so much fun to play with because you use any kind of paper and any color. There are co many different petals, leaves and centers to play and experiment with and the possibilities are endless. I chose to start simple and was thinking about Forget-Me-Nots, but I chose the wrong petal shape. Even so, the flowers still came out beautiful and the simple arrangement with the pretty DSP worked out pretty well. And of course the sentiments from the Stampin’ Up! Timeless Arrangements stamp set worked out perfect!


SAVE 15% ON SELECT DESIGNER SERIES PAPERS!

We all love beautiful Designer Series Paper, and in June, you can enjoy a 15% discount on select Designer Series Papers from our new 2023–2024 Annual Catalog and Online Exclusives. Whether you’re a scrapbooker, a card maker or simply a paper lover, this is a great time to stock up and save on gorgeous paper so you have artistic and versatile paper designs on hand for your next projects!

Here are the Details:

  • Sales Period: June 1, 2021 – June 30, 2023
  • All order types qualify for this promotion. 
  • There is no limit to how many packages of Designer Series Paper may be purchased during this promotion.
  • Only select Designer Series Papers are available at a 15% discount during this promotion.
  • Orders must be placed—and closed—during the promotion period for the 15% discount to apply.
  • Designer Series Paper ordered as part of a Starter Kit or with Stampin’ Rewards qualify for the 15% discount.
  • Designer Series Papers are from the new 2023–2024 Annual Catalog (p. 129–132) and Online Exclusives

Click on the image below to download a PDF with the list of designer series papers that are on sale and their sale prices:


Starter Kit+ Joining Promotion!

It’s a fabulous time to join Stampin’ Up! New team members will get even more FREE products in their customizable Starter Kit. Between 1–30 June, those who sign up can get $125 $155 USD worth of products for only $99 + free business supplies + free shipping + all the fun being a part of Stampin’ Up!

Starter Kit+ Promotion Details:

  • Promotion Dates: 1–30 JUNE 2023
  • When new team members purchase their Starter Kit, they will be able to redeem $125 $155 of Starter Kit eligible products for just $99.
  • New demonstrators who submit their Independent Demonstrator Agreement (IDA) before June 1 or after June 30 will not be eligible for this offer.

You can read about the benefits of being a Demonstrator on my Join My Team page. These include a minimum 20% discount on products and access to new products a month before the catalog release. Contact me if you have any questions about the benefits of being a Demonstrator and I’ll be happy to tell you all about it!


Current Host Code: 9SKETT74

Use this host code when you order $50 or more and receive a Thank You gift from me!  The free gift is your choice of any item valued up to $10.00 from the 2023-2024 Annual Catalog.

If your order is over $150, please do not use the host code since you’ll receive your own Host Dollars plus I’ll still send you the Thank You gift!  This host code can be used by anyone, no club or commitment required. Let me know if you have any questions.


If you need any stamping supplies, I’d be very happy to be your Demonstrator.  Just click on the Shop Now button on the right side of the screen to go directly to my online store or contact me if you have any questions.  Happy Stamping!

Thanks for stopping by and have a great week!

Akiko

  • Visit my online store here
  • See the current Stampin’ Up! clearance rack specials here
  • Earn FREE Stampin’ Up! products through my Wildflower Frequent Shopper Program – my way of saying thank you to my online frequent shopper customers.
  • Have any questions? I’d be happy to help, click here to contact me.

Cardstock Cuts for this project:

  • Granny Apple Green – 4-1/4″ x 11″ card base scored at 5-1/4″, 1-3/4″ x 4″ (front mat)
  • Balmy Blue – 4″ x 5″ (flower die cuts)
  • Daffodil Delight – 1″ x 2″ (flower center die cuts)
  • Basic White – 2-1/4″ x 4″ (inside panel), 1-5/8″ x 4″ (embossed strip)
  • Bright and Beautiful DSP – 4″ x 5-1/4″ (front background), 3/4″ x 4″ (inside trim)

Stampin’ Up! products used in this project: