Happy Saturday! Here’s a simple Christmas card made with the fun Stampin’ Up! Sweetest Star bundle. I used the punch with the pretty Take A Bow 6″ x 6″ designer series paper to make dimensional stars for the card front. You can find the products I used at the bottom of my post along with the card stock sizes.

I embossed a Real Red panel with the Forever Plaid 3D embossing folder and adhered it to the front of a Thick Basic White card base.

I used the Stampin’ Up! Sweetest Star punch to punch out three stars from the Take A Bow 6″ x 6″ designer series papers. I scored each star 5 times from the point to the opposite corner and folded it along the score lines, mountain style at the points and valley style at the corners. This makes the center pop up! I applied two dimensionals, stacked on top of each other in the center back of each star.

I stamped the sentiment from the Stampin’ Up! Sweetest Star stamp set in two steps, so that it wrapped along two lines. I inked part of the stamp using Real Red ink, stamped it on Basic White, cleaned it off and inked and stamped the remainder underneath. I cut it out with the long label die from the Happy Hibiscus dies (I love the scored ends!) and adhered it to the card. I positioned and adhered the stars and finished with a baker’s twine bow and green iridescent dots.

For the inside of the card, I stamped the sentiment from the Stampin’ Up! Sweetest Star stamp set in Garden Green ink on a Basic White panel. I stamped the star cluster from the Decorative Trees stamp set using Real Red ink in the upper corner and trimmed the bottom with DSP. I adhered the panel to a Real Red mat and adhered the layered panel to the inside of the card with Stampin’ Seal.
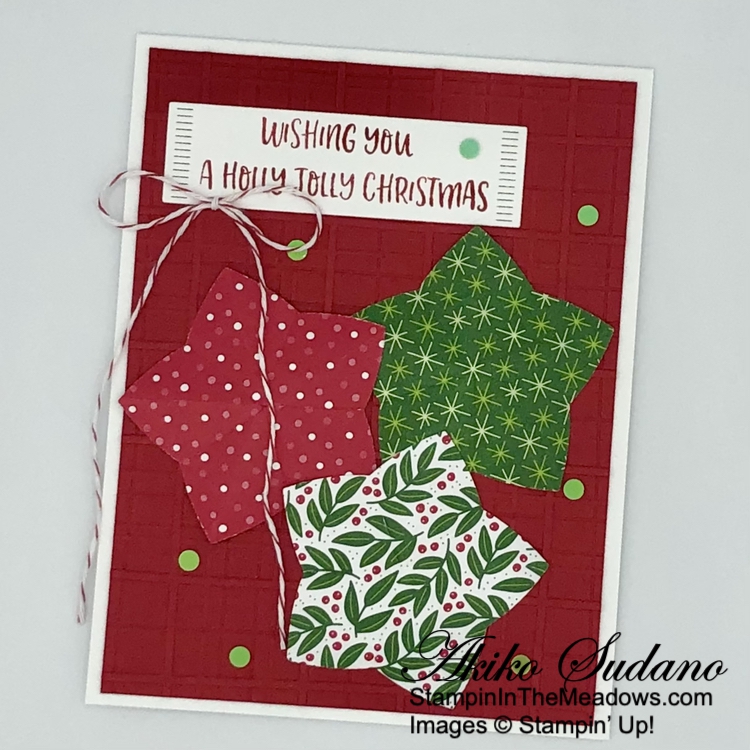
I love dimensional stars on Christmas cards and the chubby star from the Stampin’ Up! Sweetest Star bundle is perfect for this technique. The festive Take A Bow DSP is also perfect and full of holiday cheer!
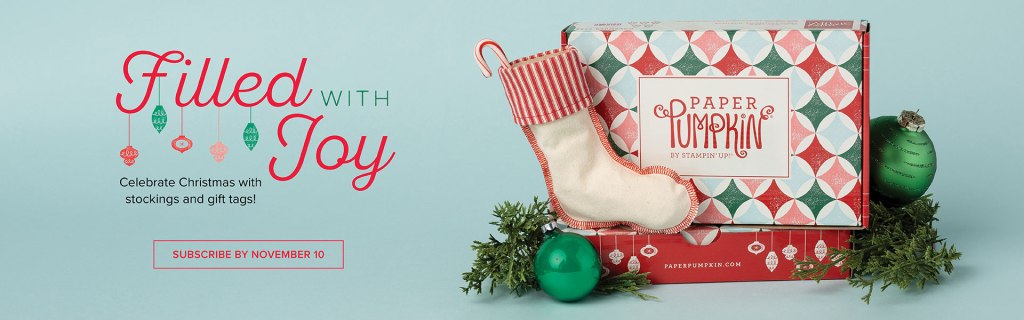
The November Paper Pumpkin Kit – Filled With Joy!
Today is the last day to sign up to receive the November Paper Pumpkin kit! Celebrate Christmas with adorable stockings and gift tags!
- Makes 8 projects: 8 stockings with 8 gift tags
- Precut paper pieces
- Safety pins and specialty gold foil
- Poppy Parade Classic Stampin’ Spot
Coordinating Colors: Flirty Flamingo, Pool Party, Poppy Parade, Shaded Spruce, Very Vanilla

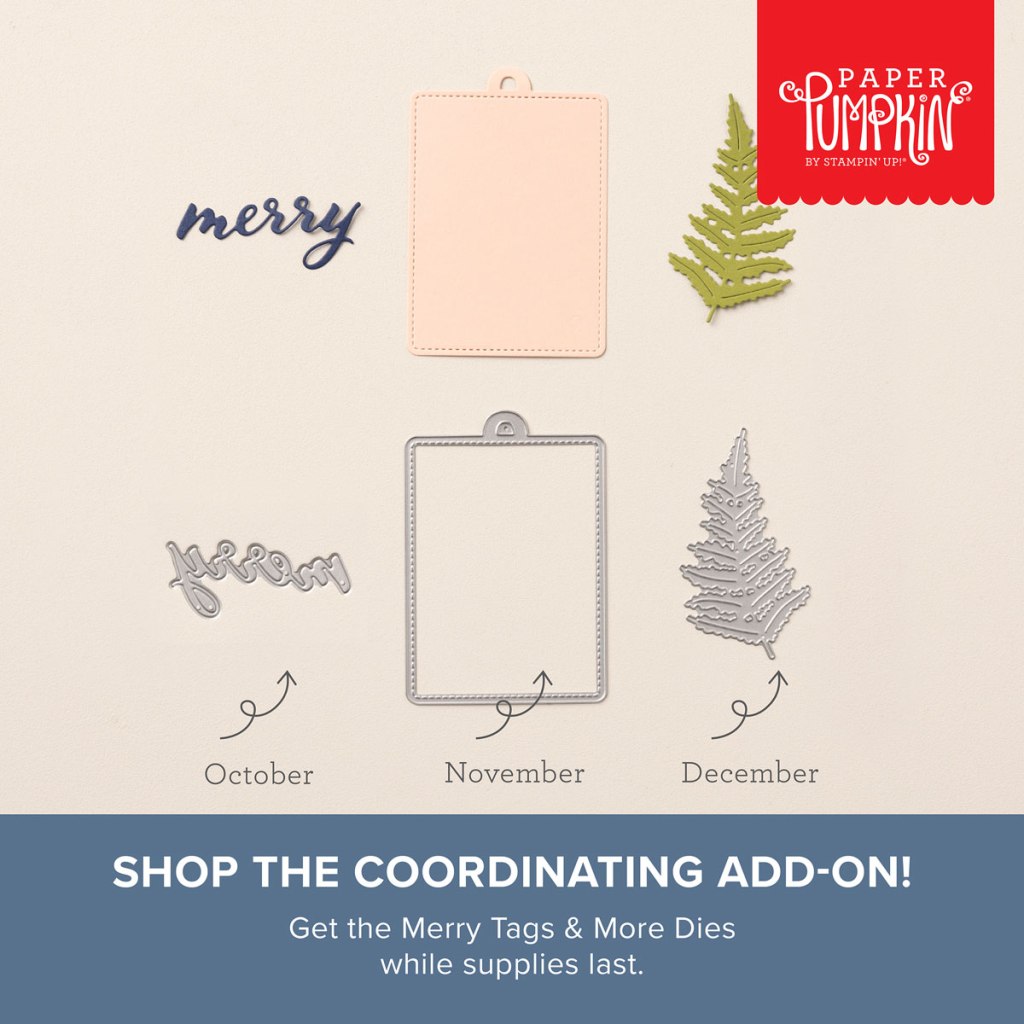
And the coordinating add-on is the Merry Tags & More dies – item #165639 for $12 (available while supplies last).
If you’re interested in subscribing to Paper Pumpkin, you can either sign up for a subscription where you are billed monthly for your kit or you can purchase a prepaid subscription in my Online Store. To see more information and to sign up for the monthly subscription click here. To see the options for prepaid subscriptions in my Online Store, click here.
Sign up deadline for the November 2024 kit is November 10, 2024. Note: Supplies may be limited toward the end of the subscription period.

Save on Select Items From the Annual Catalog During the Seasonal Sale November 13 – 15, 2024!
Create more by spending less during the Seasonal Sale! Between November 13–15, you can get 20% off all stamp bundles and Designer Series Paper and 10% off select ink and cardstock from the 2024–2025 Annual Catalog. Make sure to act quickly on this limited-time-only sale!
Details:
- Sales Period: November 13-15 2024
- From the 2024–2025 Annual Catalog:
- 10% off ink, including pads, refills, markers, and Stampin’ Blends. Ink pad bundles and third-party ink pads are NOT included.
- 10% off cardstock. Close To My Heart cardstock is NOT included.
- 20% total off all stamp and die bundles and stamp and punch bundles. (Stamp bundles are normally 10% off. With this sale you get an additional 10% off.)
- 20% off all Designer Series Paper.
- Shop online to see the full selection of discounted products available; this is a limited time offer.
- Products are available while supplies last.
- Discounts are automatically applied when sale items are added to any order, including Starter Kits.
- Ordering Deadline: November 15, 2024, at 11:59 p.m. (MT)
Current Host Code: GBVHGQ4W
Use this host code when you order $50 or more and receive a Thank You gift from me! The free gift is your choice of any item currently available valued up to $10.00.
If your order is over $150, please do not use the host code since you’ll receive your own Host Dollars plus I’ll still send you the Thank You gift! This host code can be used by anyone, no club or commitment required. Let me know if you have any questions.
If you need any stamping supplies, I’d be very happy to be your Demonstrator. Just click on the Shop Now Button on the right side of the screen to go directly to my Online store or contact me if you have any questions. Happy Stamping!
Thanks for stopping by and have a great day!
Akiko
- Visit my online store here
- See the current Stampin’ Up! clearance rack specials here
- Earn FREE Stampin’ Up! products through my Wildflower Frequent Shopper Program – my way of saying thank you to my online frequent shopper customers.
- Have any questions? I’d be happy to help, click here to contact me.
Cardstock Cuts for this project:
- Thick Basic White – 4-1/4″ x 11″ card base, scored at 5-1/2″
- Real Red – two 4″ x 5-1/4″ panels (embossed background and inside mat)
- Basic White – 3-7/8″ x 5-1/8″ (inside panel), 1-1/4″ x 3-1/2″ (label),
- Take A Bow 6″ x 6″ DSP – three 2-1/2″ x 2-1/2″ panels (punched stars), 1/2″ x 3-7/8″ (inside trim)
Stampin’ Up! products used in this project:
")
")


 Designer Series Paper")