Stampin’ Up! Cottage Wreaths Grateful Card

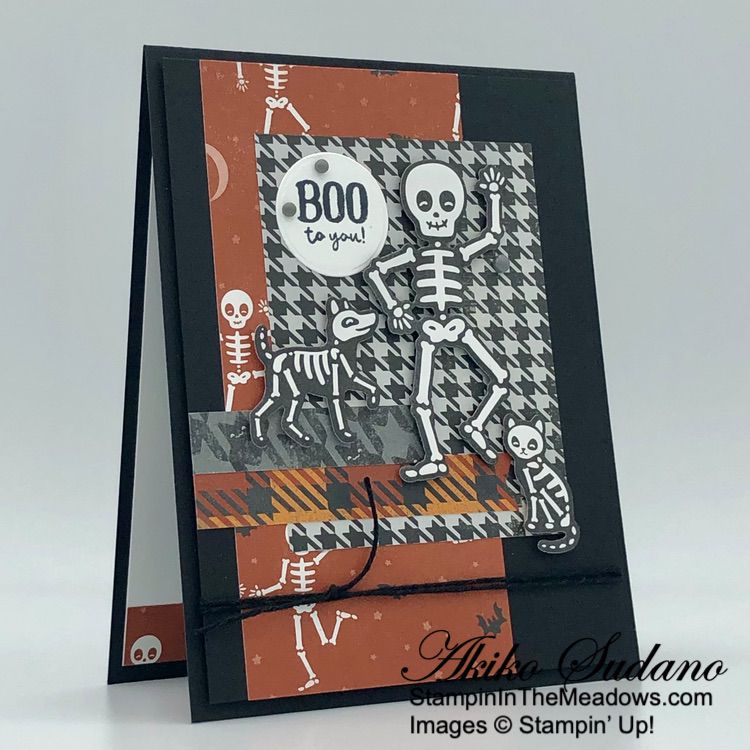
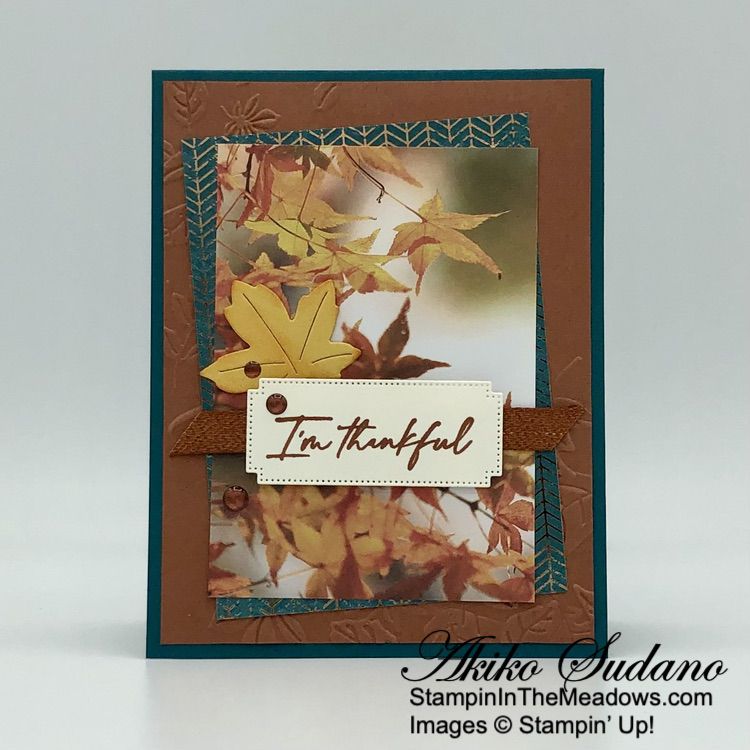
Good Morning! The Stampin’ Up! Cottage Wreaths photopolymer stamp set and coordinating Country Wreaths dies are a great set for making wreath cards. The weather has gotten cold and I wanted to make some Fall themed cards, so I pulled these out and combined them with the Inked And Tiled stamp set to make a Thanksgiving card. You can find the products I used at the bottom of my post along with the card stock sizes.

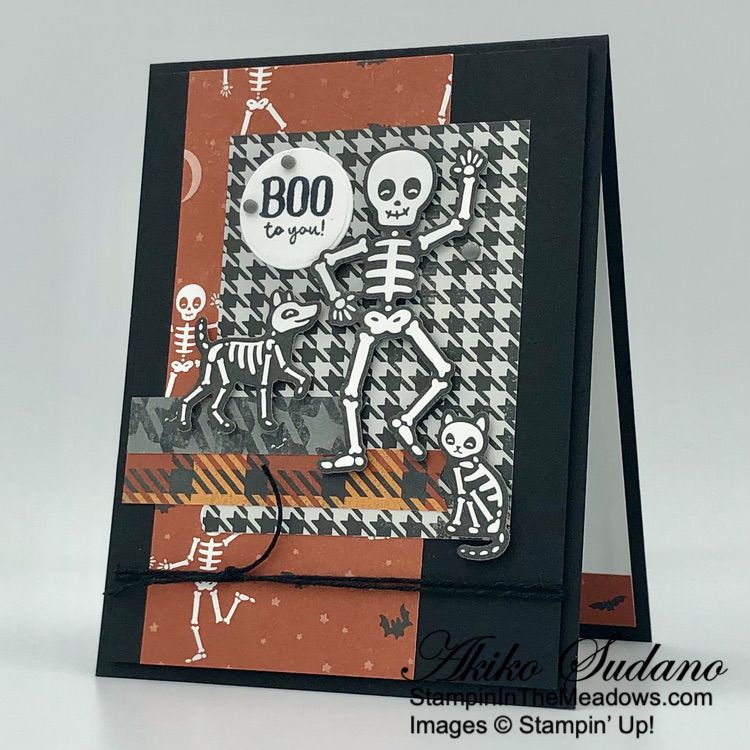
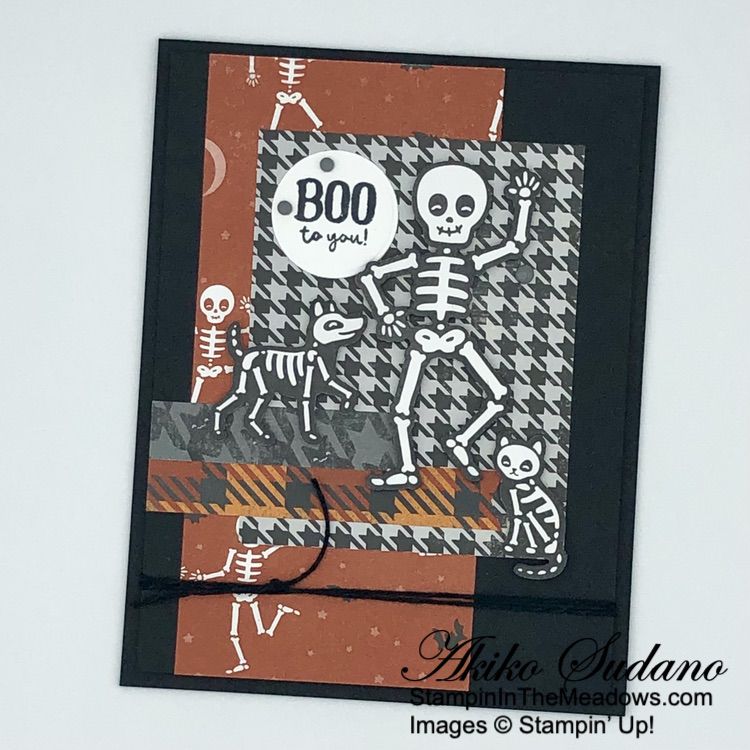
I adhered a plaid panel of Them Bones designer series paper to the front of a Cajun Craze card base with liquid glue. I wanted a floral panel to coordinate, but the Them Bones DSP only had bats and skeletons, so I decided to make one. I stamped a Pumpkin Pie panel with the flower from the Inked and Tiled stamp set in Cajun Craze ink. I stamped randomly all over the panel. I stamped the little fluff stamp in stamped off Pebbled Path ink randomly around the panel. Finally I embossed the panel with the Timeworn Type 3D embossing folder and adhered it to a Cajun Craze mat. I popped it on the card front with dimensionals.

I stamped the sentiment from the Stampin’ Up! Cottage Wreaths stamp set in Cajun Craze ink on the bottom of a Crumb Cake panel and cut it out with the tag die from the Merriest Trees dies. I cut a Cajun Craze panel with the wreath from the Country Wreath dies and adhered it to the tag with a glue dot. I looped a length of Pebbled Path jute through the tag hole and tied a knot and popped the tag on the card front with dimensionals.

I used my dark Cajun Craze Stampin’ Blend to color a length of gingham ribbon and tied a bow. I adhered the bow to the top of the wreath with a glue dot – I love how it picks up on the plaid background! I finished the wreath with Pebbled Path gems.

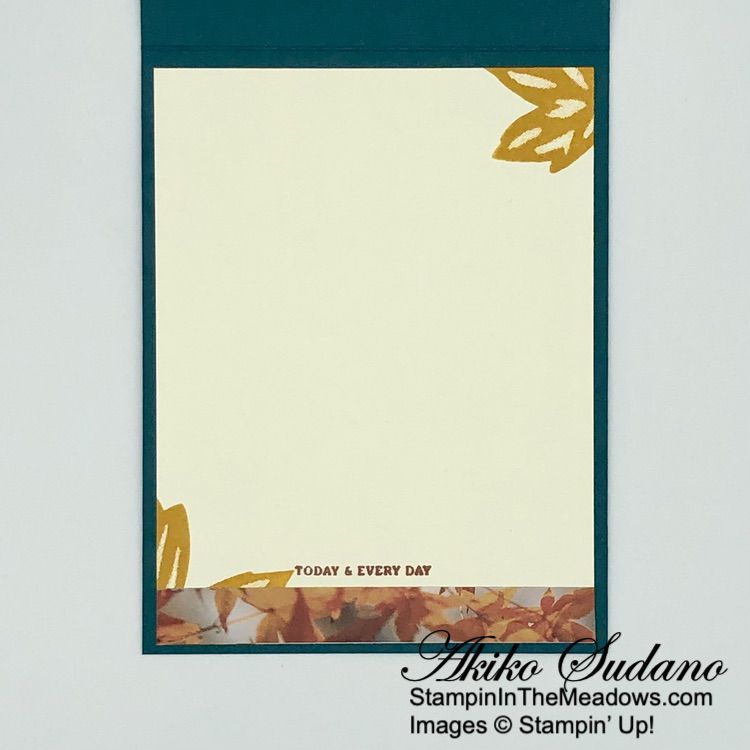
I left the inside of the card blank, and just adhered a strip of Plaid DSP to the bottom of a Very Vanilla panel before adhering it to the inside of the card with Stampin’ Seal.

This was a fun diversion from Christmas cards. Making your own DSP is always fun, and it’s great that I’m able to match ink colors to DSP and get a look that coordinates well. And I’m glad that I was able to use the Stampin’ Up! Cottage Wreaths stamp set again, it’s one of my favorites!


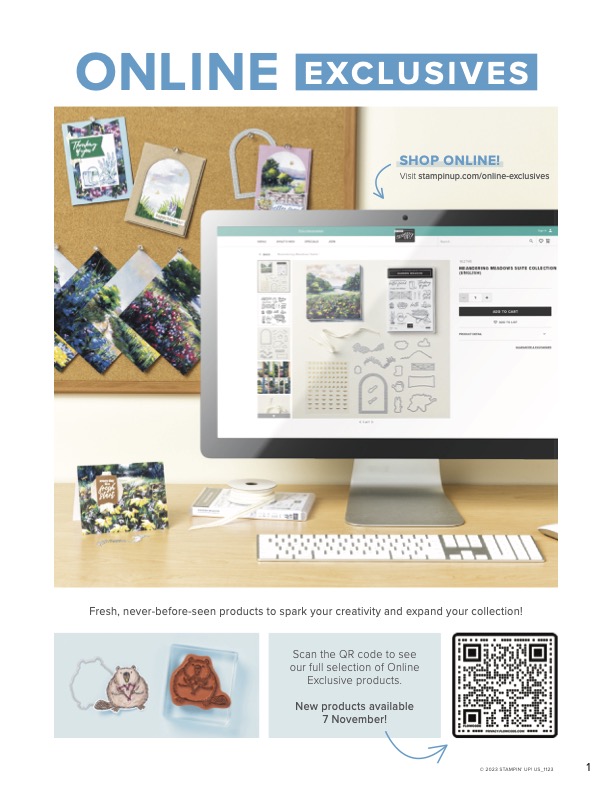
New Online Exclusives are Here!

A new selection of pretty Springtime Online Exclusive products will be available soon. Online Exclusives won’t appear in any catalog and are only available in the Online Store while supplies last. Click on the image below to download a PDF with a sneak peek:


Current Host Code: J39F9RSA

Use this host code when you order $50 or more and receive a Thank You gift from me!  The free gift is your choice of any item currently available valued up to $10.00.

If your order is over $150, please do not use the host code since you’ll receive your own Host Dollars plus I’ll still send you the Thank You gift!  This host code can be used by anyone, no club or commitment required. Let me know if you have any questions.


If you need any stamping supplies, I’d be very happy to be your Demonstrator.  Just click on the Shop Now Button on the right side of the screen to go directly to my Online store or contact me if you have any questions.  Happy Stamping!

Thanks for stopping by and have a great day!

Akiko

  • Visit my online store here
  • See the current Stampin’ Up! clearance rack specials here
  • Earn FREE Stampin’ Up! products through my Wildflower Frequent Shopper Program – my way of saying thank you to my online frequent shopper customers.
  • Have any questions? I’d be happy to help, click here to contact me.

Cardstock Cuts for this project:

  • Cajun Craze – 5-1/2″ x 8-1/2″ card base scored at 4-1/4″, 3-3/8″ x 4-3/8″ (front mat), 2-3/4″ x 2-3/4″ (die cut wreath)
  • Pumpkin Pie – 3-1/4″ x 4-1/4″ (stamped panel)
  • Crumb Cake – 2-3/4″ x 3-3/4″ (tag)
  • Very Vanilla – 4″ x 5-1/4″ (inside panel)
  • Them Bones DSP – 4-1/8″ x 5-3/8″ (plaid background), 1/2″ x 4″ (inside trim)

Stampin’ Up! products used in this project:


Stampin’ Up! Joy Of Noel for the Happy Inkin’ Thursday Blog Hop

Good Morning and welcome to the Happy Inkin’ Thursday Blog Hop! I used the pretty Stampin’ Up! Joy Of Noel bundle with the beautiful Joy of Christmas designer series paper for a gate fold Christmas card. And I also used the pretty holiday greenery frame from the Christmas Classics dies to really make it fancy. You can find the supplies I used along with card stock cuts at the bottom of my post.

We have a color challenge this week and thanks to the pretty designer series paper, I managed to get all the colors in my card!

I adhered the floral panels of Joy of Christmas designer series paper to Shaded Spruce mats and adhered them to the two front flaps of a Real Red gatefold card base. I cut a mottled Shaded Spruce panel of the DSP with the pretty square greenery frame from the Christmas Classics dies. I cut a red plaid panel of the DSP with the small square die and adhered them together with liquid glue.

I stamped the NOEL letters from the Stampin’ Up! Joy of Noel stamp set in Cherry Cobbler ink on Basic White. I cut the letters out with the coordinating die and adhered them to the DSP frame with liquid glue. I applied liquid glue to the back left side of the frame and adhered it to the card front, so that it sticks only to the left flap of the card front.

I stamped the Joyous sentiment from the Stampin’ Up! Joy of Noel stamp set in Versamark ink and sprinkled it with white embossing powder. I shook off the excess powder and heated it with my heat tool until it was bright and shiny. I fussy cut around the letters with my paper snips and popped it on the card front with dimensionals. I finished the card front with rhinestone gems.

For the inside of the card, I stamped the sentiment from the Very Best Occasions stamp set in Real Red ink on a Basic White panel. I stamped part of the small spray from the Stampin’ Up! Joy Of Noel stamp set in the corner using Pebbled Path ink and colored it with Cherry Cobbler, Old Olive and Shaded Spruce Stampin’ Blends. I adhered the panel to the inside of the card. I also adhered red plaid panels of Joy of Christmas DSP to the inside of the front flaps.

The Stampin’ Up! Joy of Noel bundle has beautiful greenery stamps and dies and the NOEL stamp is just gorgeous! It goes so well with the Christmas Classics bundle and is perfect with the Joy of Christmas designer series paper for a beautiful traditional Christmas card.

On with the Hop! Click on the Next Blog button to move forward to see the beautiful project Karen Ksenzakovic has created.

If you get lost along the way, here are the participants for the hop:


Current Host Code: J39F9RSA

Use this host code when you order $50 or more and receive a free gift from me!  The free gift is your choice of any item currently available valued up to $10.00!

If your order is over $150, please do not use the host code since you’ll receive your own Host Dollars plus I’ll still send you the free gift!  This host code can be used by anyone, no club or commitment required. Let me know if you have any questions.


If you need any stamping supplies, I’d be very happy to be your Demonstrator.  Just click on the Shop Now button on the right side of the screen to go directly to my online store or contact me if you have any questions. 

Thanks for stopping by and Happy Stamping!

Akiko

  • Visit my online store here
  • See the current Stampin’ Up! clearance rack specials here
  • Earn FREE Stampin’ Up! products through my Wildflower Frequent Shopper Program – my way of saying thank you to my online frequent shopper customers.
  • Have any questions? I’d be happy to help, click here to contact me.

Cardstock Cuts for this project:

  • Real Red – 5-1/2″ x 8-1/2″ card base scored at 2-1/8″ and 6-3/8″
  • Shaded Spruce – two 2″ x 5-3/8″ panels (front mats)
  • Basic Black – 1-1/4″ x 2″ (fussy cut Joyous)
  • Basic White – 4″ x 5-1/4″ (inside panel), 2-1/2″ x 2-1/2″ (NOEL die cuts)
  • Joy Of Christmas DSP – four 1-7/8″ x 5-1/4″ panels (two floral for the front and two plaid for the inside), 4″ x 4″ (greenery frame), 2-1/2″ x 2-1/2″ (plaid label)

Stampin’ Up! products used in this project:


Stampin’ Up! Translucent Florals for the Happy Inkin’ Thursday Blog Hop

Good Morning and welcome to the Happy Inkin’ Thursday Blog Hop! Here is a floral birthday card made with the pretty Stampin’ Up! Translucent Florals bundle. My background uses the beautiful Delightful Floral designer series paper, but it features the flip side to create an ombre color block look. You can find the supplies I used along with card stock cuts at the bottom of my post.

We have a sketch challenge this week:

I adhered three panels of Delightful Floral designer series paper to a Basic White panel with liquid glue – Pretty Peacock, Parakeet Party and Pool Party. I trimmed the ends to make sure I had clean lines (I am so bad at keeping lines straight and you may not have to do this). I stamped the sprig from the Stampin’ Up! Textured Floral stamp set in Pretty Peacock ink on the background and embossed the layered panel with the Painted Texture 3D embossing folder. I adhered the panel to the front of a Pretty Peacock card base.

I stamped the large flower from the Stampin’ Up! Translucent Floral cling stamp set in Berry Burst ink on Basic White and the middle flower in Calypso Coral. I inked up the large leaf cluster in Parakeet Party ink and used a sponge dauber to add Pretty Peacock ink around the edge. I stamped it on Basic White and cleaned up the stamp and repeated it so I had two clusters. I also used the same technique on the double leaf stamp. I cut out all the flowers and leaves with the coordinating dies.

I adhered the leaf clusters to the card front with glue dots and adhered the flowers and double leaf die cuts on top with dimensionals. I stamped the Happy Birthday sentiment from the Stampin’ Up! Translucent Floral stamp set in Pretty Peacock ink on a Pool Party panel of Delightful Floral DSP. I cut it out with the large short banner die from the Stylish Shapes dies and adhered it to the card with glue dots. I finished the arrangement with a Pool Party bow and Parakeet Party Tinsel Gems.

For the inside of the card, I stamped the sentiment from the Stampin’ Up! Translucent Floral stamp set in Pretty Peacock ink on a Basic White panel. I stamped the small flower in Perry Burst ink next to the sentiment and used a Pretty Peacock Stampin’ Write marker to make a stem and leaf. I stamped the double leaf in the corners of the panel using the same sponging technique and colors as the leaves on the front. I adhered the panel to the inside of the card with Stampin’ Seal.

The Stampin’ Up! Translucent Floral bundle is so pretty and I love the Delightful Floral designer series paper!

On with the Hop! Click on the Next Blog button to move forward to see the beautiful project Karen Ksenzakovic has created.

If you get lost along the way, here are the participants for the hop:


Current Host Code: J39F9RSA

Use this host code when you order $50 or more and receive a free gift from me!  The free gift is your choice of any item currently available valued up to $10.00!

If your order is over $150, please do not use the host code since you’ll receive your own Host Dollars plus I’ll still send you the free gift!  This host code can be used by anyone, no club or commitment required. Let me know if you have any questions.


If you need any stamping supplies, I’d be very happy to be your Demonstrator.  Just click on the Shop Now button on the right side of the screen to go directly to my online store or contact me if you have any questions. 

Thanks for stopping by and Happy Stamping!

Akiko

  • Visit my online store here
  • See the current Stampin’ Up! clearance rack specials here
  • Earn FREE Stampin’ Up! products through my Wildflower Frequent Shopper Program – my way of saying thank you to my online frequent shopper customers.
  • Have any questions? I’d be happy to help, click here to contact me.

Cardstock Cuts for this project:

  • Pretty Peacock – 4-1/4″ x 11″ card base scored at 5-1/2″
  • Basic White – two 4″ x 5-1/4″ panels (front backing and inside panel), 4″ x 7″ (floral die cuts)
  • Delightful Floral DSP – three 1-3/4″ x 4″ panels (front background), 1-1/4″ x 2-1/2″ (label)

Stampin’ Up! products used in this project:


Stampin’ Up! Merriest Trees for the Happy Inkin’ Thursday Blog Hop

Good Morning and welcome to the Happy Inkin’ Thursday Blog Hop! One of my favorite Christmas bundles is the Stampin’ Up! Merriest Trees bundle and I used it today with the beautiful Winter Meadow designer series paper for a Christmas card. You can find the supplies I used along with card stock cuts at the bottom of my post.

We have a Theme challenge this week and and it’s perfect because I have so many more Christmas cards to make!

I adhered a panel of Winder Meadow designer series paper to the front of a Lost Lagoon mat and wrapped it with Silver and Sheer White ribbon and made a bow. I popped the panel on the front of a Smoky Slate card base with dimensionals.

I stamped a panel of mottled Lost Lagoon Winter Meadow DSP with the sentiment from the Stampin’ Up! Merriest Trees bundle in Versamark ink. I sprinkled it with white embossing powder and shook off the excess. I heated the powder with my heat tool until it was bright and shiny and cut it out with the second largest tree die. I cut a small panel of silver foil with he two stars and adhered them together and adhered thhem to the tree top.

I cut a vellum panel with the third largest Scalloped Contours die. I embossed it with the pretty Snowflake Sky 3D embossing folder and adhered it to the card front with Stampin’ Seal. I popped the die cut Christmas Tree on top with dimensionals and decorated it with light green pearls.

For the inside of the card, I stamped the sentiment from the Stampin’ Up! Merriest Trees stamp set in Lost Lagoon ink on a Basic White panel. I stamped the snowflakes in Smoky Slate and trimmed the bottom of the panel with a strip of DSP. I adhered the panel to a to the inside of the card with Stampin’ Seal.

The Stampin’ Up! Merriest Trees bundle is so versatile in the variety of Christmas Trees you can make for your cards. And I love the soft colors of the Winter Meadow designer series paper.

On with the Hop! Click on the Next Blog button to move forward to see the beautiful project Karen Ksenzakovic has created.

If you get lost along the way, here are the participants for the hop:


Current Host Code: CD4VVKRG

Use this host code when you order $50 or more and receive a free gift from me!  The free gift is your choice of any item currently available valued up to $10.00!

If your order is over $150, please do not use the host code since you’ll receive your own Host Dollars plus I’ll still send you the free gift!  This host code can be used by anyone, no club or commitment required. Let me know if you have any questions.


If you need any stamping supplies, I’d be very happy to be your Demonstrator.  Just click on the Shop Now button on the right side of the screen to go directly to my online store or contact me if you have any questions. 

Thanks for stopping by and Happy Stamping!

Akiko

  • Visit my online store here
  • See the current Stampin’ Up! clearance rack specials here
  • Earn FREE Stampin’ Up! products through my Wildflower Frequent Shopper Program – my way of saying thank you to my online frequent shopper customers.
  • Have any questions? I’d be happy to help, click here to contact me.

Cardstock Cuts for this project:

  • Smoky Slate – 4-1/4″ x 11″ card base scored at 5-1/2″
  • Lost Lagoon – 4″ x 5-1/4″ (front mat)
  • Silver foil – 1″ x 2″ (die cut layered star)
  • Vellum – 2-3/4″ x 4″ (embossed panel)
  • Basic White – 4″ x 5-1/4″ (inside panel)
  • Winter Meadow DSP – 3-7/8″ x 5-1/8″ (front background), 3″ x 3-1/4″ (Christmas Tree), 1/2″ x 4″ (inside trim)

Stampin’ Up! products used in this project:


Stampin’ Up! Bag Of Bones Halloween Card

Good Morning! Tomorrow is Halloween – are you ready? I picked up my candy this weekend so I’m set. I’m so glad that we still get trick-or-treaters! So I pulled out the fun Stampin’ Up! Bag of Bones bundle and the Them Bones designer series paper to make a final Halloween card for the season. You can find the products I used at the bottom of my post along with the card stock sizes.

I used the pretty sketch in the Freshly Made Sketches 609.

I adhered a Cajun Craze skeleton panel of Them Bones designer series paper to a Basic Black Panel with liquid glue. I adhered a plaid panel on top with liquid glue – doesn’t this look like bats! I used the Banners Pick A Punch to trim the ends of 2 strips of DSP and adhered them to the panel. I wrapped the panel twice with black baker’s twine and popped it on the front of a Basic Black card base with dimensionals.

I cut three skeletons, a person, cat and dog using the Stampin’ Up! Bag of Bones dies from the Them Bones DSP and used black dimensionals to pop them on the card front. Isn’t it great to have black dimensionals? They’re perfect for these dark intricate die cuts!

I stamped the sentiment from the Stampin’ Up! Bag of Bones photopolymer stamp set in Memento Tuxedo Black ink on Basic White. I cut the label out with second largest circle die from the Reach for the Stars dies. These dies are perfect for cutting out planets as well as nested circles – check them out. I adhered the label to the card with liquid glue and finished with gray matte dots.

For the inside of the card, I stamped the sentiment from the Stampin’ Up! Bag of Bones stamp set in Cajun Craze ink on a Basic White panel. I stamped the three bats in Memento Tuxedo Black ink and adhered a strip of DSP to the bottom. I adhered the panel to the inside of the card with Stampin’ Seal.

Skeletons and bats are perfect for Halloween and the Stampin’ Up! Bag of Bones bundle is one of the cutest sets ever. And when paired with the fun Them Bones designer series paper, it makes Halloween crafting easy as well as fun.


Stampin’ Up! 35 Years Joining Special Ends Soon!

Stampin’ Up!’s is celebrating their 35th anniversary in style! From October 3 – October 31 2023, anyone who joins our fun crafting community as a new demonstrator can choose either 35% OFF the cost of their Starter Kit or get 35% MORE product with their Starter Kit!

Promotion Details:

  • Promotion Period: October 3 – October 31, 2023
  • Deadline to Join: October 31, 2023; 11:59 PM (MT)
  • New demonstrators can choose one of the following options for their Starter Kit:
    • Option 1: Get 35% OFF the normal cost of a Stampin’ Up! Starter Kit. Those who select this option will receive $125 worth of product for only $64.35!
    • Option 2: Get 35% MORE product with their Starter Kit. Those who select this option will receive $168.75 worth of product by spending $99!

No matter which option you choose for your Starter Kit, you will receive free business supplies and free shipping on your Starter Kit—not to mention all the fun that comes with being part of Stampin’ Up!

FREE OnStage@Home Registration

It gets better! Those who sign up for a Starter Kit during this offer will also be automatically registered for FREE to our virtual OnStage event on November 11 – a $77 value!

  • Those who sign up for this offer have the opportunity to watch the event independently, gathered together with other demonstrators, or with their Team Leader.
  • Demonstrators who join during this promotion will be automatically added to the OnStage attendees; they do not need to register separately.
  • Demonstrators who join during this promotion will also receive an email with all the information about this event.

Yay!  Stampin’ Up! events are always SO much fun!!  Bonus that you can join and attend your first even for free!!

Come Join Us!

If you’d like to join our team, we’d love to have you!  Once you join, you’ll get at least a 20% discount on all of your Stampin’ Up! purchases and you can preorder from the upcoming catalogs!

We welcome all types of Demonstrators from those only purchasing to get the discount for themselves to those who want to run a business and those anywhere in between!  We’re a relaxed group that loves to stamp with no pressure to sell!

Contact me at apsudano@stampininthemeadows.com if you have questions.


Current Host Code: CD4VVKRG

Use this host code when you order $50 or more and receive a Thank You gift from me!  The free gift is your choice of any item currently available valued up to $10.00 .

If your order is over $150, please do not use the host code since you’ll receive your own Host Dollars plus I’ll still send you the Thank You gift!  This host code can be used by anyone, no club or commitment required. Let me know if you have any questions.


If you need any stamping supplies, I’d be very happy to be your Demonstrator.  Just click on the Shop Now button on the right side of the screen to go directly to my online store or contact me if you have any questions.  Happy Stamping!

Thanks for stopping by and have a great weekend!

Akiko

  • Visit my online store here
  • See the current Stampin’ Up! clearance rack specials here
  • Earn FREE Stampin’ Up! products through my Wildflower Frequent Shopper Program – my way of saying thank you to my online frequent shopper customers.
  • Have any questions? I’d be happy to help, click here to contact me.

Cardstock Cuts for this project:

  • Basic Black – 4-1/4″ x 11″ card base scored at 5-1/2″, 4″ x 5-1/4″ (front background)
  • Basic White – 4″ x 5-1/4″ (inside panel), 1-1/2″ x 1-1/2″ (label)
  • Them Bones DSP – 2-1/4″ x 5-1/4″ (front stripe), 2-3/4″ x 3-1/2″ (small panel), 1/2″ x 3-1/4″ (front banner), 1/2″ x 2-1/2″ (front banner), 1/2″ x 4″ (inside trim), 3 die cut skeletons

Stampin’ Up! products used in this project:


Stampin’ Up! Autumn Leaves I’m Thankful Card

Good Morning! We just got back to Pennsylvania after spending a few weeks in Arizona and luckily we made it before the Fall foliage peaked (I think). So I was inspired to pull out the Stampin’ Up! Autumn Leaves bundle along with the beautiful All About Autumn 6″ x 6″ specialty designer series paper (Yay – It’s back in stock!!) to make a quick fall card. You can find the products I used at the bottom of my post along with the card stock sizes.

I used the pretty sketch in the Paper Players Sketch Challenge: PP663.

I embossed a panel of Copper Clay with the beautiful Leaf Fall 3D embossing folder and adhered it to the front of a Copper Clay card base. I cut two panels of All About Autumn 6″ x 6″ specialty designer series paper and adhered them to the card front with liquid glue.

I cut a maple leaf using the small die from the Stampin’ Up! Autumn Leaves dies from Crushed Curry card stock and I used a sponge dauber to add some Pumpkin Pie ink to the die cut. I adhered a length of Copper Clay ribbon to the card front with Stampin’ Seal and adhered the die cut leaf on top with glue dots.

I stamped the sentiment from the Stampin’ Up! Autumn Leaves photopolymer stamp set in Copper Clay ink on Very Vanilla. I cut the label out with the label die and adhered it to the card with dimensionals. I finished the card with Copper Clay dots.

For the inside of the card, I stamped the large maple leaf from the Stampin’ Up! Autumn Leaves stamp set in Crushed Curry ink in the corners of a Very Vanilla Panel. I stamped the sentiment in Copper clay and adhered a strip of leafy DSP to the bottom. I adhered the panel to the inside of the card with Stampin’ Seal.

I love how all the different types of maples have different colors for fall. Here’s the Sugar Maple in our yard, just starting to peak – so pretty! But, I’m sure this is going to leave us a mess to rake next week.

The beautiful scenes in the All About Autumn DSP make it so easy to create pretty cards. And the images, sentiments and dies in the Stampin’ Up! Autumn Leaves bundle are perfect with them!


Celebrate 35 Years Joining Special!

Stampin’ Up!’s is celebrating their 35th anniversary in style! From October 3 – October 31 2023, anyone who joins our fun crafting community as a new demonstrator can choose either 35% OFF the cost of their Starter Kit or get 35% MORE product with their Starter Kit!

Promotion Details:

  • Promotion Period: October 3 – October 31, 2023
  • Deadline to Join: October 31, 2023; 11:59 PM (MT)
  • New demonstrators can choose one of the following options for their Starter Kit:
    • Option 1: Get 35% OFF the normal cost of a Stampin’ Up! Starter Kit. Those who select this option will receive $125 worth of product for only $64.35!
    • Option 2: Get 35% MORE product with their Starter Kit. Those who select this option will receive $168.75 worth of product by spending $99!

No matter which option you choose for your Starter Kit, you will receive free business supplies and free shipping on your Starter Kit—not to mention all the fun that comes with being part of Stampin’ Up!

FREE OnStage@Home Registration

It gets better! Those who sign up for a Starter Kit during this offer will also be automatically registered for FREE to our virtual OnStage event on November 11 – a $77 value!

  • Those who sign up for this offer have the opportunity to watch the event independently, gathered together with other demonstrators, or with their Team Leader.
  • Demonstrators who join during this promotion will be automatically added to the OnStage attendees; they do not need to register separately.
  • Demonstrators who join during this promotion will also receive an email with all the information about this event.

Yay!  Stampin’ Up! events are always SO much fun!!  Bonus that you can join and attend your first even for free!!

Come Join Us!

If you’d like to join our team, we’d love to have you!  Once you join, you’ll get at least a 20% discount on all of your Stampin’ Up! purchases and you can preorder from the upcoming catalogs!

We welcome all types of Demonstrators from those only purchasing to get the discount for themselves to those who want to run a business and those anywhere in between!  We’re a relaxed group that loves to stamp with no pressure to sell!

Contact me at apsudano@stampininthemeadows.com if you have questions.


Current Host Code: CD4VVKRG

Use this host code when you order $50 or more and receive a Thank You gift from me!  The free gift is your choice of any item currently available valued up to $10.00 .

If your order is over $150, please do not use the host code since you’ll receive your own Host Dollars plus I’ll still send you the Thank You gift!  This host code can be used by anyone, no club or commitment required. Let me know if you have any questions.


If you need any stamping supplies, I’d be very happy to be your Demonstrator.  Just click on the Shop Now button on the right side of the screen to go directly to my online store or contact me if you have any questions.  Happy Stamping!

Thanks for stopping by and have a great weekend!

Akiko

  • Visit my online store here
  • See the current Stampin’ Up! clearance rack specials here
  • Earn FREE Stampin’ Up! products through my Wildflower Frequent Shopper Program – my way of saying thank you to my online frequent shopper customers.
  • Have any questions? I’d be happy to help, click here to contact me.

Cardstock Cuts for this project:

  • Pretty Peacock – 4-1/4″ x 11″ card base scored at 5-1/2″
  • Copper Clay – 4″ x 5-1/4″ (embossed front)
  • Crushed Curry – 1-1/2″ x 1-3/4″ (die cut leaf)
  • Very Vanilla – 4″ x 5-1/4″ (inside panel), 1-1/4″ x 2-3/4″ (label)
  • All About Autumn 6″ x 6″ specialty DSP – 3-1/4″ x 4-1/2″ (Pretty Peacock panel), 3″ x 4-1/4″ (leaf panel), 1/2″ x 4″ (inside trim)

Stampin’ Up! products used in this project:


Stampin’ Up! Christmas Classics Christmas Card

Good Morning! Here’s another Christmas card made with the beautiful Stampin’ Up! Christmas Classics bundle and the pretty Joy of Christmas designer series paper. This card adds lots of gold touches from the ribbon, More Dazzle & Joyful specialty papers. You can find the products I used at the bottom of my post along with the card stock sizes.

I embossed a panel of Garden Green with the Distressed Tile 3D embossing folder and adhered it to the right side of a Real Red mat. I adhered a strip of Joy of Christmas designer series paper to the left side and a thin strip of More Dazzle specialty paper in the middle. I popped the panel to the front of a Thick Basic White card base with dimensionals.

I used the pine bough die from the Joy of Noel dies to cut three boughs from the gold woodgrain paper from the Joyful specialty paper pack and adhered them to the card front with glue dots. I stamped two pine boughs from the Stampin’ Up! Christmas Classics stamp set in Versamark ink on Garden Green card stock. I sprinkled them with gold embossing powder and heated it with my heat tool until the powder was bright and shiny. I cut them out with the coordinating dies and adhered them to the card with glue dots.

Iused the smaller holly die from the Magical Meadow dies to cut two holly heaves from Basic White and adhered them to the card front with glue dots. I stamped the sentiment from the Stampin’ Up! Christmas Classics stamp set in Versamark ink on Basic Black and sprinkled it with white embossing powder. I shook off the excess and heated the powder with my heat tool until it was bright and shiny. I fussy cut the sentiment with my paper snips. I applied Stampin’ Seal to the back of the sentiment and wrapped it with gold trim, simulating a bow. I adhered the sentiment to the card with dimensionals and glue dots and finished with large red rhinestones.

For the inside of the card, I stamped the holly leaves from the Stampin’ Up! Christmas Classics stamp set in Garden Green ink on Basic White. I stamped the Merry in Memento Tuxedo Black and the Christmas in Real Red. I adhered the panel to a Real Red mat before adhering it to the inside of the card.

The sentiments from the Stampin’ Up! Christmas Classics are full of Christmas warmth and are perfect with the traditional colors of the Joy of Christmas designer series paper. The pine boughs in are pretty, both stamped and die cut and they work so well together!


Celebrate 35 Years Joining Special!

Stampin’ Up!’s is celebrating their 35th anniversary in style! From October 3 – October 31 2023, anyone who joins our fun crafting community as a new demonstrator can choose either 35% OFF the cost of their Starter Kit or get 35% MORE product with their Starter Kit!

Promotion Details:

  • Promotion Period: October 3 – October 31, 2023
  • Deadline to Join: October 31, 2023; 11:59 PM (MT)
  • New demonstrators can choose one of the following options for their Starter Kit:
    • Option 1: Get 35% OFF the normal cost of a Stampin’ Up! Starter Kit. Those who select this option will receive $125 worth of product for only $64.35!
    • Option 2: Get 35% MORE product with their Starter Kit. Those who select this option will receive $168.75 worth of product by spending $99!

No matter which option you choose for your Starter Kit, you will receive free business supplies and free shipping on your Starter Kit—not to mention all the fun that comes with being part of Stampin’ Up!

FREE OnStage@Home Registration

It gets better! Those who sign up for a Starter Kit during this offer will also be automatically registered for FREE to our virtual OnStage event on November 11 – a $77 value!

  • Those who sign up for this offer have the opportunity to watch the event independently, gathered together with other demonstrators, or with their Team Leader.
  • Demonstrators who join during this promotion will be automatically added to the OnStage attendees; they do not need to register separately.
  • Demonstrators who join during this promotion will also receive an email with all the information about this event.

Yay!  Stampin’ Up! events are always SO much fun!!  Bonus that you can join and attend your first even for free!!

Come Join Us!

If you’d like to join our team, we’d love to have you!  Once you join, you’ll get at least a 20% discount on all of your Stampin’ Up! purchases and you can preorder from the upcoming catalogs!

We welcome all types of Demonstrators from those only purchasing to get the discount for themselves to those who want to run a business and those anywhere in between!  We’re a relaxed group that loves to stamp with no pressure to sell!

Contact me at apsudano@stampininthemeadows.com if you have questions.


Current Host Code: CD4VVKRG

Use this host code when you order $50 or more and receive a Thank You gift from me!  The free gift is your choice of any item currently available valued up to $10.00 .

If your order is over $150, please do not use the host code since you’ll receive your own Host Dollars plus I’ll still send you the Thank You gift!  This host code can be used by anyone, no club or commitment required. Let me know if you have any questions.


If you need any stamping supplies, I’d be very happy to be your Demonstrator.  Just click on the Shop Now button on the right side of the screen to go directly to my online store or contact me if you have any questions.  Happy Stamping!

Thanks for stopping by and have a great weekend!

Akiko

  • Visit my online store here
  • See the current Stampin’ Up! clearance rack specials here
  • Earn FREE Stampin’ Up! products through my Wildflower Frequent Shopper Program – my way of saying thank you to my online frequent shopper customers.
  • Have any questions? I’d be happy to help, click here to contact me.

Cardstock Cuts for this project:

  • Thick Basic White – 5-1/2″ x 8-1/2″ card base scored at 4-1/4″
  • Garden Green – 2-3/4″ x 5″ (embossed front), 3″ x 3″ (die cut boughs)
  • Real Red – two 3-7/8″ x 5-1/8″ panels (front and inside mats)
  • More Dazzle specialty paper – 1/4″ x 5″ (front trim)
  • Joyful specialty paper – 2-1/4″ x 5″ (die cut pine boughs)
  • Basic Black – 1-1/4″ x 2-1/4″ (label)
  • Basic White – 4″ x 5-1/4″ (inside panel), 1-1/4″ x 2-1/2″ (die cut holly leaves)
  • Joy of Christmas DSP – 3/4″ x 5″ (front trim)

Stampin’ Up! products used in this project:


Stampin’ Up! Christmas Classics Seasons Greetings Card

Good Morning! The Stampin’ Up! Christmas Classics bundle has wonderful Christmas sentiments with gorgeous foliage die cut label frames. I used one of the frames and sentiments with the pretty Joy of Christmas designer series paper for a festive Seasons Greetings Christmas card. You can find the products I used at the bottom of my post along with the card stock sizes.

I cut a panel of More Dazzle specialty paper with the two open leaf dies from the Stampin’ Up! Christmas Classics dies. I cut the holly leaf twice from a Shaded Spruce panel of Joy of Christmas designer series paper. I cut the large foliage label from Garden Green and the berries from Real Red. I trimmed the berries and adhered them to the foliage on the label.

I stamped the Seasons Greetings sentiment from the Stampin’ Up! Christmas Classics stamp set in Real Red ink on Basic White and cut it out with the long label die. I adhered the label to the foliage label with liquid glue. I embossed a Garden Green panel with the pretty Distressed Tile embossing folder and adhered it to the front of a Garden Green card base. I adhered a panel of Joy of Christmas designer series paper to a Real Red mat and and adhered it to the card front.

I adhered die cut sprigs and holly leaves to the card with liquid glue and popped the layered label on top with dimensionals. I used glue dots to adhere a real Red bow and red rhinestones to finish the card.

For the inside of the card, I stamped the holly leaves from the Stampin’ Up! Christmas Classics stamp set in Garden Green ink on Basic White. I stamped the sentiment from the Brightest Glow stamp set in Real Red ink and trimmed the bottom with DSP. I adhered the panel to the inside of the card with Stampin’ Seal.

The gorgeous label dies from the Stampin’ Up! Christmas Classics bundle really make your handmade Christmas cards stunning! Christmas is coming up fast, so I need to get to work to finish in time.


Celebrate 35 Years Joining Special!

Stampin’ Up!’s is celebrating their 35th anniversary in style! From October 3 – October 31 2023, anyone who joins our fun crafting community as a new demonstrator can choose either 35% OFF the cost of their Starter Kit or get 35% MORE product with their Starter Kit!

Promotion Details:

  • Promotion Period: October 3 – October 31, 2023
  • Deadline to Join: October 31, 2023; 11:59 PM (MT)
  • New demonstrators can choose one of the following options for their Starter Kit:
    • Option 1: Get 35% OFF the normal cost of a Stampin’ Up! Starter Kit. Those who select this option will receive $125 worth of product for only $64.35!
    • Option 2: Get 35% MORE product with their Starter Kit. Those who select this option will receive $168.75 worth of product by spending $99!

No matter which option you choose for your Starter Kit, you will receive free business supplies and free shipping on your Starter Kit—not to mention all the fun that comes with being part of Stampin’ Up!

FREE OnStage@Home Registration

It gets better! Those who sign up for a Starter Kit during this offer will also be automatically registered for FREE to our virtual OnStage event on November 11 – a $77 value!

  • Those who sign up for this offer have the opportunity to watch the event independently, gathered together with other demonstrators, or with their Team Leader.
  • Demonstrators who join during this promotion will be automatically added to the OnStage attendees; they do not need to register separately.
  • Demonstrators who join during this promotion will also receive an email with all the information about this event.

Yay!  Stampin’ Up! events are always SO much fun!!  Bonus that you can join and attend your first even for free!!

Come Join Us!

If you’d like to join our team, we’d love to have you!  Once you join, you’ll get at least a 20% discount on all of your Stampin’ Up! purchases and you can preorder from the upcoming catalogs!

We welcome all types of Demonstrators from those only purchasing to get the discount for themselves to those who want to run a business and those anywhere in between!  We’re a relaxed group that loves to stamp with no pressure to sell!

Contact me at apsudano@stampininthemeadows.com if you have questions.


Current Host Code: CD4VVKRG

Use this host code when you order $50 or more and receive a Thank You gift from me!  The free gift is your choice of any item currently available valued up to $10.00 .

If your order is over $150, please do not use the host code since you’ll receive your own Host Dollars plus I’ll still send you the Thank You gift!  This host code can be used by anyone, no club or commitment required. Let me know if you have any questions.


If you need any stamping supplies, I’d be very happy to be your Demonstrator.  Just click on the Shop Now button on the right side of the screen to go directly to my online store or contact me if you have any questions.  Happy Stamping!

Thanks for stopping by and have a great weekend!

Akiko

  • Visit my online store here
  • See the current Stampin’ Up! clearance rack specials here
  • Earn FREE Stampin’ Up! products through my Wildflower Frequent Shopper Program – my way of saying thank you to my online frequent shopper customers.
  • Have any questions? I’d be happy to help, click here to contact me.

Cardstock Cuts for this project:

  • Garden Green – 4-1/4″ x 11″ card base, scored at 5-1/2″, 4-1/4″ x 5-1/2″ (embossed front), 4″ x 4-1/4″ (greenery die cut)
  • Real Red – 2-1/8″ x 5-1/8″ (DSP mat), 2-1/4″ x 2-1/2″ (berry die cuts)
  • More Dazzle paper – 2-1/2″ x 2-1/2″ (leaf die cuts)
  • Basic White – 4″ x 5-1/4″ (inside panel), 1-1/4″ x 4″ (label)
  • Joy of Christmas DSP – 2″ x 5″ (front background), 2-3/4″ x 3″ (die cut holly leaves), 1/2″ x 5-1/4″ (inside trim)

Stampin’ Up! products used in this project:


Stampin’ Up! Magical Meadow for the Happy Inkin’ Thursday Blog Hop

Good Morning and welcome to the Happy Inkin’ Thursday Blog Hop! The Stampin’ Up! Magical Meadow bundle has pretty winter greenery stamps and dies and I used it today with the beautiful Winter Meadow designer series paper for a Thinking of You card. You can find the supplies I used along with card stock cuts at the bottom of my post.

We have a color challenge this week and I used most of the colors in my card:

I also used the pretty sketch from the TGIF #442 Sketch Challenge for today’s layered card:

I adhered a panel of Winder Meadow designer series paper to the front of a Blueberry Bushed card base. I adhered two more panels to Misty Moonlight mats and adhered the larger one to the card base with liquid glue.

I cut a Lost Lagoon panel twice with the sprig from the Stampin’ Up! Magical Meadow dies. I cut the sprigs with my paper snips and adhered them to the top and bottom of the DSP panel as pictured below. I used the berry dies to cut a Moody Mauve panel and adhered the berries to the sprigs with liquid glue.

I inked the leaf stamp from the Stampin’ Up! Magical Meadow cling stamp set with Lost Lagoon ink and used a sponge dauber to apply Garden Green ink in areas. I stamped it on Basic White and cut it out with the coordinating die. I made another die cut leaf sprig and adhered them both to the card with liquid glue.

I adhered the small DSP panel to the card with dimensionals over the die cut greenery. I stamped the sentiment from the Go To Greetings stamp set using Blueberry Bushel ink on Basic White. I cut it out with the long skinny banner die from the Stylish Shapes dies and adhered it to the card with dimensionals and glue dots.

For the inside of the card, I stamped the small forest scene from the Stampin’ Up! Magical Meadow stamp set in Blueberry Bushel ink across the bottom of a Basic White panel. I used a Blender Pen to smear the edges of the stamped images and apply Misty Moonlight ink to highlight some of the forest. I love the way this tied the inside to the small DSP panel on the card front. I adhered the panel to a Real Red mat before adhering it to the inside of the card.

I love the different stamps and dies in the Stampin’ Up! Magical Meadow bundle and I love the way it coordinates with the Winter Meadow DSP!

On with the Hop! Click on the Next Blog button to move forward to see the beautiful project Karen Ksenzakovic has created.

If you get lost along the way, here are the participants for the hop:


Current Host Code: CD4VVKRG

Use this host code when you order $50 or more and receive a free gift from me!  The free gift is your choice of any item currently available valued up to $10.00!

If your order is over $150, please do not use the host code since you’ll receive your own Host Dollars plus I’ll still send you the free gift!  This host code can be used by anyone, no club or commitment required. Let me know if you have any questions.


If you need any stamping supplies, I’d be very happy to be your Demonstrator.  Just click on the Shop Now button on the right side of the screen to go directly to my online store or contact me if you have any questions. 

Thanks for stopping by and Happy Stamping!

Akiko

  • Visit my online store here
  • See the current Stampin’ Up! clearance rack specials here
  • Earn FREE Stampin’ Up! products through my Wildflower Frequent Shopper Program – my way of saying thank you to my online frequent shopper customers.
  • Have any questions? I’d be happy to help, click here to contact me.

Cardstock Cuts for this project:

  • Blueberry Bushel – 4-1/4″ x 11″ card base scored at 5-1/2″
  • Misty Moonlight – 3-1/8″ x 3-7/8″ (front mat), 2-5/8″ x 2-5/8″ (small front mat)
  • Lost Lagoon – 1-3/4″ x 5″ (die cut sprigs)
  • Basic White – 4″ x 5-1/4″ (inside panel), 1″ x 3-1/2″ (label), 1-3/4″ x 5-1/2″ (die cut leaves)
  • Winter Meadow DSP – 4″ x 5-1/4″ (front background), 3″ x 3-3/4″ (DSP panel), 2-1/2″ x 2-1/2″ (small DSP panel)

Stampin’ Up! products used in this project:


Stampin’ Up! Brightest Glow Christmas Card for the Happy Inkin’ Thursday Blog Hop

Good Morning and welcome to the Happy Inkin’ Thursday Blog Hop! The Stampin’ Up! Brightest Glow cling stamp set has some of the prettiest Christmas greetings and I used it with some of the pretty new Holiday papers for a simple Christmas card. You can find the supplies I used along with card stock cuts at the bottom of my post.

We have a sketch challenge this week:

I embossed a Basic White panel with the Merry Melody 3D embossing folder and adhered it to the front of a Real Red mat. I adhered the layered embossed panel to the front of a Thick Basic White card base with dimensionals.

I trimmed the bottom of a strip of Joyful Specialty DSP, Joy Of Christmas DSP and More Dazzle specialty paper with my paper snips to make fishtail banners. I adhered the banners to the card front with liquid glue.

I stamped the sentiment from the Stampin’ Up! Brightest Glow stamp set in Versamark ink on Basic White. I sprinkled it with gold embossing powder and shook off the excess. I heated the powder with my heat tool until it was bright and shiny. I cut it out with the pretty circle die from the Labels Aglow dies. I wrapped gold twine around the back and adhered the label to the card with dimensionals. I adhered holly leaf sequins and a gem to the label with glue dots.

For the inside of the card, I stamped the sentiment from the Stampin’ Up! Brightest Glow stamp set in Real Red ink on Basic White. I trimmed the bottom with a strip of Joy of Christmas DSP and adhered the panel to a Real Red mat before adhering it to the inside of the card.

The Merry Melody embossing folder is perfect for Christmas cards and pretty Christmas papers are perfecty for this week’s card sketch. All it needs is a pretty sentiment from the Stampin’ Up! Brightest Glow stamp set!

On with the Hop! Click on the Next Blog button to move forward to see the beautiful project Karen Ksenzakovic has created.

If you get lost along the way, here are the participants for the hop:


Current Host Code: CD4VVKRG

Use this host code when you order $50 or more and receive a free gift from me!  The free gift is your choice of any item currently available valued up to $10.00!

If your order is over $150, please do not use the host code since you’ll receive your own Host Dollars plus I’ll still send you the free gift!  This host code can be used by anyone, no club or commitment required. Let me know if you have any questions.


If you need any stamping supplies, I’d be very happy to be your Demonstrator.  Just click on the Shop Now button on the right side of the screen to go directly to my online store or contact me if you have any questions. 

Thanks for stopping by and Happy Stamping!

Akiko

  • Visit my online store here
  • See the current Stampin’ Up! clearance rack specials here
  • Earn FREE Stampin’ Up! products through my Wildflower Frequent Shopper Program – my way of saying thank you to my online frequent shopper customers.
  • Have any questions? I’d be happy to help, click here to contact me.

Cardstock Cuts for this project:

  • Thick Basic White – 5-1/2″ x 8-1/2″ card base scored at 4-1/4″
  • Real Red – two 4″ x 5-1/4″ panels (front and inside mats)
  • More Dazzle specialty paper – 1/2″ x 3-1/2″ (front banner)
  • Basic White – two 3-7/8″ x 5-1/8″ panels (front background and inside panel), 2-1/4″ x 2-1/4″ (label)
  • Joy of Christmas DSP – 1″ x 4-1/2″ (front banner), 1/2″ x 3-7/8″ (inside trim)
  • Joyful specialty DSP – 3/4″ x 4″ (front banner)

Stampin’ Up! products used in this project: