Stampin’ Up! Decorative Trees for the Happy Inkin’ Thursday Blog Hop

Good Morning and welcome to the Happy Inkin’ Thursday Blog Hop! I used the awesome Stampin’ Up! Decorative Trees bundle with the pretty Winter Meadow designer series paper to make a simple fun fold Christmas card in Pretty Peacock and gold. You can find the supplies I used along with card stock cuts at the bottom of my post.

We have a theme challenge this week:

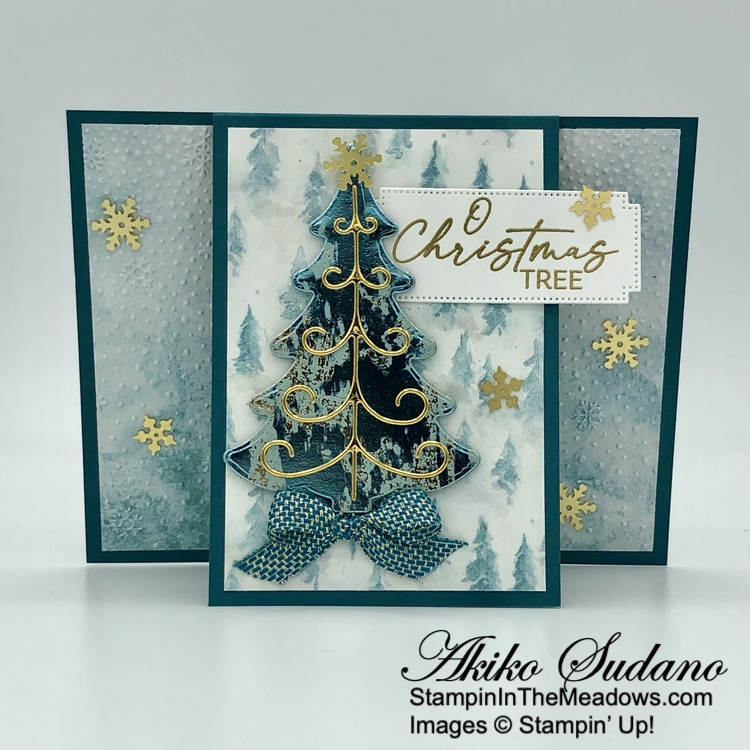
I embossed a panel of Winter Meadow designer series paper with the Snowflake Sky 3D embossing folder and adhered it to a flat pretty Peacock card base. I scored and burnished the the mini pretty peacock card base and adhered it on top with liquid glue.

I cut the plain tree from the Stampin’ Up! Decorative Trees dies from Lost Lagoon and Brushed Metallic specialty paperand adhered them together. The Brushed Metallic paper is shiny and thin, so it needs extra support with dimensionals. I applied an adhesive sheet to the back of a Textured Gold Foil panel and used the curved tree branch die to cut it out. I removed the adhesive sheet backing and adhered it to the tree. I adhered a Pretty Peacock and gold bow to the card with a glue dot and adhered the layered tree on top with dimensionals.

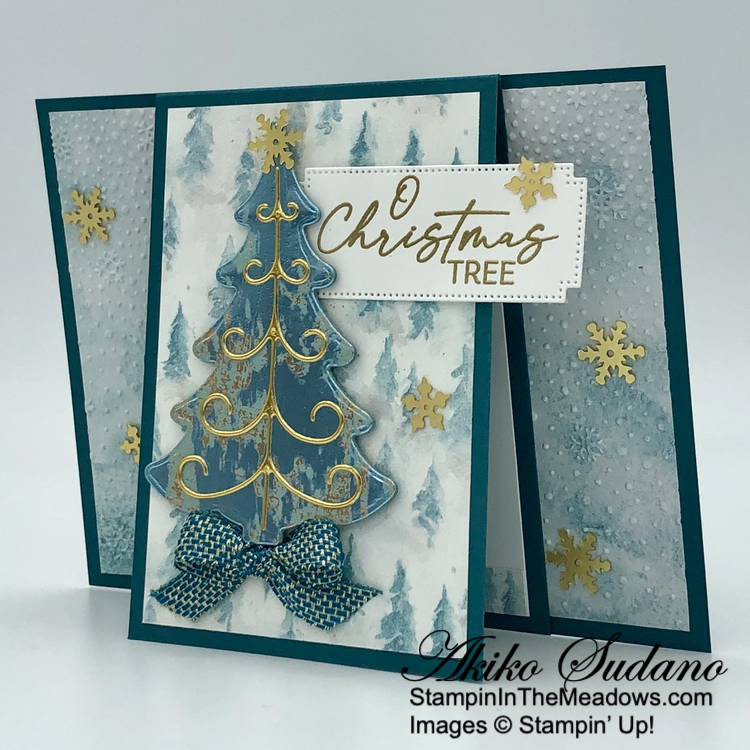
I stamped the sentiment from the Stampin’ Up! Decorative Trees stamp set in Versamark ink on a Basic White panel. I sprinkled it with gold embossing powder and shook off the excess. I heated the sentiment with my heat tool until it was bright and shiny and cut it out with the long label die from the Autumn Trees dies. I adhered the label to the mini card with glue dots and finished the card with gold adhesive snowflakes, including adhering a snowflake to the tree top.

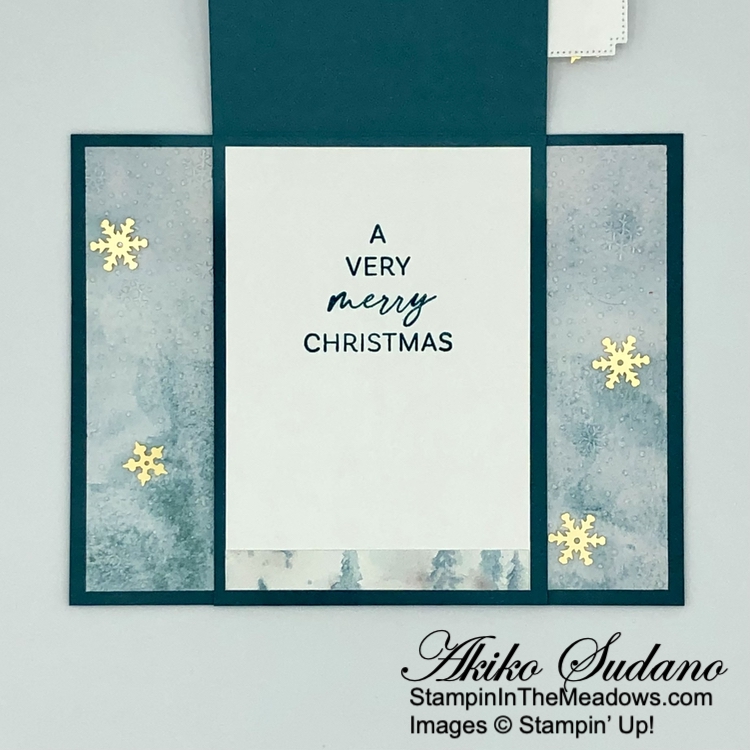
For the inside of the mini card, I stamped the sentiment from the Stampin’ Up! Decorative Trees stamp set using Pretty Peacock ink ink on a Basic White panel. I trimmed the bottom with DSP and adhered the panel to the inside of the mini card with Stampin’ Seal.

The beautiful overlay dies in the Stampin’ Up! Decorative Trees bundle are gorgeous with foil or glimmer paper and I love a Christmas card with lots of sparkle and shine. I think the Brushed Metallic paper is technically the retired Soft Succulent color, but it looks fantastic with Pretty Peacock and Lost Lagoon. Now which overlay should I use on my next card?

On with the Hop! Click on the Next Blog button to move forward to see the beautiful project Karen Ksenzakovic has created.

If you get lost along the way, here are the participants for the hop:


Current Host Code: GBVHGQ4W

Use this host code when you order $50 or more and receive a free gift from me!  The free gift is your choice of any item currently available valued up to $10.00!

If your order is over $150, please do not use the host code since you’ll receive your own Host Dollars plus I’ll still send you the free gift!  This host code can be used by anyone, no club or commitment required. Let me know if you have any questions.


If you need any stamping supplies, I’d be very happy to be your Demonstrator.  Just click on the Shop Now button on the right side of the screen to go directly to my online store or contact me if you have any questions. 

Thanks for stopping by and Happy Stamping!

Akiko

  • Visit my online store here
  • See the current Stampin’ Up! clearance rack specials here
  • Earn FREE Stampin’ Up! products through my Wildflower Frequent Shopper Program – my way of saying thank you to my online frequent shopper customers.
  • Have any questions? I’d be happy to help, click here to contact me.

Cardstock Cuts for this project:

  • Pretty Peacock – 4-1/4″ x 5-1/2″ card base, 3″ x 8-1/2″ mini card base, scored at 4-1/4″
  • Lost Lagoon – 2-1/2″ x 3-1/2″ (tree backing)
  • Textured Gold – 1-3/4″ x 3″ (detailed tree die cut)
  • Brushed Metallic specialty – 2-1/2″ x 3-1/2″ (tree)
  • Basic White – 2-3/4″ x 4″ (inside panel), 1-1/4″ x 3″ (label)
  • Winter Meadow DSP – 4″ x 5-1/4″ (embossed background), 2-3/4″ x 4″ (mini card background), 3/8″ x 2-3/4″ (inside trim)

Stampin’ Up! products used in this project:


Stampin’ Up! Sweetest Star for the Happy Inkin’ Thursday Blog Hop

Good Morning and welcome to the Happy Inkin’ Thursday Blog Hop! I used the sweet Stampin’ Up! Sweetest Star bundle with the pretty Take A Bow 6″ x 6″ designer series paper to make a Christmas card. You can find the supplies I used along with card stock cuts at the bottom of my post.

We have a sketch challenge this week and I took liberty by replacing the large square with a star:

I adhered a panel of Take A Bow 6″ x 6″ designer series paper to a the front of a Real Red card base with liquid glue. I adhered another panel to a Garden Green mat and wrapped it with red and white baker’s twine, making a bow on one side. I popped the panel on the card front with dimensionals.

I stamped Mrs. Santa Clause from the Stampin’ Up! Sweetest Star bundle using Memento Tuxedo Black ink on Basic White and colored her with Stampin’ Blends. I used light Pecan Pie, light Petal Pink, Real Red and dark Granny Apple Green. I punched her out with the Stampin’ Up! Sweetest Star punch. I stamped the sentiment using Memento Tuxedo Black ink on Basic White and cut it out with a square from the Stylish Shapes dies. I popped the star and sentiment on the card with dimensionals.

I stamped three gingerbread men from the More Than Autumn bundle using Versamark ink on Pecan Pie card stock. I sprinkled them with white embossing powder and shook off the excess. I heated them with my heat tool until they was bright and shiny and cut them out with the coordinating die. I adhered two gingerbread men to the card front with glue dots and finished with peppermints.

For the inside of the card, I stamped the sentiment from the Stampin’ Up! Sweetest Star stamp set using Real Red ink on a Basic White panel. I adhered the last gingerbread man next to the sentiment and trimmed the bottom with DSP. I adhered the panel to the inside of the card with Stampin’ Seal.

I love the Stampin’ Up! Sweetest Star bundle with it’s sweet images and fun sentiments! And I love the pudgy star punch – I think it’s perfect for punching stars for Holiday decorations. And I love how perfect the little gingerbread men from the More than Autumn bundle are for Mrs. Santa Clause with her pretty apron. I can smell the cookies baking already!

On with the Hop! Click on the Next Blog button to move forward to see the beautiful project Karen Ksenzakovic has created.

If you get lost along the way, here are the participants for the hop:


Current Host Code: BTWRDNAU

Use this host code when you order $50 or more and receive a free gift from me!  The free gift is your choice of any item currently available valued up to $10.00!

If your order is over $150, please do not use the host code since you’ll receive your own Host Dollars plus I’ll still send you the free gift!  This host code can be used by anyone, no club or commitment required. Let me know if you have any questions.


If you need any stamping supplies, I’d be very happy to be your Demonstrator.  Just click on the Shop Now button on the right side of the screen to go directly to my online store or contact me if you have any questions. 

Thanks for stopping by and Happy Stamping!

Akiko

  • Visit my online store here
  • See the current Stampin’ Up! clearance rack specials here
  • Earn FREE Stampin’ Up! products through my Wildflower Frequent Shopper Program – my way of saying thank you to my online frequent shopper customers.
  • Have any questions? I’d be happy to help, click here to contact me.

Cardstock Cuts for this project:

  • Real Red – 5-1/2″ x 8-1/2″ card base, scored at 4-1/4″
  • Garden Green – 3-1/8″ x 4-4/8″ (DSP mat)
  • Pecan Pie – 3/4″ x 3″ (gingerbread cookies)
  • Basic White – 3-3/4″ x 5″ (inside panel), 2-1/2″ x 4″ (punched star and die cut square)
  • Take A Bow 6″ x 6″ DSP – 3-3/4″ x 5″ (holly background), 3″ x 4-1/4″ (red dot background), 1/2″ x 3-5″ (inside trim)

Stampin’ Up! products used in this project:


Stampin’ Up! Snowy Wonder for the Happy Inkin’ Thursday Blog Hop

Good Morning and welcome to the Happy Inkin’ Thursday Blog Hop! I used the sweet Stampin’ Up! Snowy Wonder bundle with the festive Snowy Scenes designer series paper to make a Seasons Greetings card. You can find the supplies I used along with card stock cuts at the bottom of my post.

We have a color challenge this week and I managed to get all the colors in by die cutting the images from the Snowy Scenes DSP:

I used the large circle die from the Stylish Shapes dies to cut a circle in a Real Red panel and embossed it with the Snowflake Sky 3D embossing folder. I adhered a panel of Snowy Scenes DSP to the back of the panel. I adhered the layered panel to a holly filled Snowy Scenes DSP and adhered it to a pool party mat. I wrapped the panel twice with Real Red Baker’s twine and popped it on the front of a Real Red card base with dimensionals.

I stamped the sentiment from the Stampin’ Up! Snowy Wonder stamp set using Versamark ink on a Pool Party panel. I sprinkled it with white embossing powder and shook off the excess. I heated it with my heat tool until it was bright and shiny and cut it out with the long label die from the Autumn Leaves dies. I adhered it to the card with glue dots.

I used the Stampin’ Up! Snowy Wonder dies to cut a penguin, large tree and medium tree from Snowy Scenes DSP. I love how the dies can be used to cut the DSP images! I also fussy cut the little tree using paper snips. I adhered the two smaller trees to the card with glue dots and adhered the penguin and tree with dimensionals. I adhered loose white snowflakes with bits of glue dots.

For the inside of the card, I stamped the holly leaves and berries from the Stampin’ Up! Snowy Wonder stamp set using Garden Green and Poppy Parade inks on a Basic White panel. I stamped the sentiment from the From Our Home stamp set using Poppy Parade and adhered DSP to the bottom. I adhered the panel to the inside of the card with Stampin’ Seal.

The Stampin’ Up! Snowy Wonder bundle is full of fun Winter and holiday images that make wonderful Christmas cards that are bright and cheerful.

On with the Hop! Click on the Next Blog button to move forward to see the beautiful project Karen Ksenzakovic has created.

If you get lost along the way, here are the participants for the hop:


Current Host Code: BTWRDNAU

Use this host code when you order $50 or more and receive a free gift from me!  The free gift is your choice of any item currently available valued up to $10.00!

If your order is over $150, please do not use the host code since you’ll receive your own Host Dollars plus I’ll still send you the free gift!  This host code can be used by anyone, no club or commitment required. Let me know if you have any questions.


If you need any stamping supplies, I’d be very happy to be your Demonstrator.  Just click on the Shop Now button on the right side of the screen to go directly to my online store or contact me if you have any questions. 

Thanks for stopping by and Happy Stamping!

Akiko

  • Visit my online store here
  • See the current Stampin’ Up! clearance rack specials here
  • Earn FREE Stampin’ Up! products through my Wildflower Frequent Shopper Program – my way of saying thank you to my online frequent shopper customers.
  • Have any questions? I’d be happy to help, click here to contact me.

Cardstock Cuts for this project:

  • Poppy Parade – 5-1/2″ x 8-1/2″ card base, scored at 4-1/4″, 3-3/4″ x 3-3/4″ (embossed panel)
  • Pool Party – 3-7/8″ x 5-1/8″ (front mat), 1-1/4″ x 2-1/2″ (label)
  • Basic White – 3-3/4″ x 5″ (inside panel)
  • Snowy Scenes DSP – 3-3/4″ x 5″ (holly background), 3-1/” x 3-1/2″ (houses inset), 1/2″ x 3-3/4″ (inside trim), large tree, penguin, two small trees

Stampin’ Up! products used in this project:


Stampin’ Up! A Little Bit Festive Christmas Cards III

Good Morning! Here are a few more quick Christmas cards made with the pretty Stampin’ Up! A Little Bit Festive specialty designer series paper. You can find the products I used at the bottom of my post along with the card stock sizes.

For the first card (my YUM card), I adhered a cookie filled panel of the Stampin’ Up! A Little Bit Festive Mix & Match specialty designer series paper to a Real Red mat and popped it on the front of a Pool Party card base with dimensionals. I used the Stylish Shapes dies to cut a large circle and adhered it to the card with liquid glue. I used the Hot Cocoa cut out along with the gingerbread cookies and adhered them with dimensionals. I stamped the sentiments from the Greetings of the Season stamp set using Real Red ink on Crumb Cake and trimmed the end. I adhered it to a Real Red mat and adhered it with glue dots. I finished the card with peppermints and a double Real Red Baker’s Twine bow.

For the inside of this card I stamped the sentiment from the Greetings of the Season stamp set in Real Red ink on Basic White and accented it with a little Real Red candy cane from the More Than Autumn stamp set.

For the second card, I embossed a Pool Party panel with the Snowflake Sky 3D embossing folder and adhered it to the front of a Pool Party card base. I adhered the tree cut outs from the Stampin’ Up! A Little Bit Festive DSP with glue dots and popped the present filled sleigh on the card with dimensionals. I stamped the sentiment from the Greetings of the Season stamp set using Real Red ink on a light pool party panel (I used the new two toned paper from the Scrapbooking brochure – I like the subtle contrast it gives!) and trimmed the end before adhering it to the card with glue dots. And of course I need to add snowflake embellishemnts!

For the inside of this card I stamped the sentiment from the Greetings of the Season stamp set in Real Red ink on Basic White. I stamped a Pool Party snowflake from the Iconic Imagery stamp set. I think that I used the wrong Basic White panel for my inside because the side margin is a bit wide, but I think it still looks ok.

I’ve made several Christmas cards now with the pretty images from the Stampin’ Up! A Little Bit Festive DSP and each one has been unique! And I still have lots of pretty cut outs left over as well as plenty of patterned paper. I didn’t pick up any of the ephemera packs with the tags, sentiments and images, but all of these items coordinate and give you even more creative options. So check them out!

The Stampin’ Up! A Little Bit Festive Mix & Match specialty designer series paper makes Christmas crafting so quick and easy and the images are so pretty! It’s a great addition to your Christmas crafting stash!


Stampin’ Up! Kits Collection on Sale During October

Save up to 30% off on all your favorite kits October 1–31! The Kits Collection by Stampin’ Up! come with everything you need to create a unique paper craft. There are crafting options for card kits, treat packaging, home decor, and so much more! Start shopping today, as kits are only available while supplies last.

Details:

  • Sales Period: October 1 – 31, 2024
  • ALL kits from our collection qualify for the discount. 
  • There is no limit on how many kits you can order, as long as product is available. 
  • Orders must be opened and placed during the promotion dates. Orders opened before October 1 will not qualify for the sale. 
  • Kits can be added to a Starter Kit at their discounted rate. 
  • Coupon codes can also be used with discounted kits.
  • Ordering Deadline: October 31 at 11:59 PM (MT)

New Kits In Kits Collection!

The new kits for October are the sweet A Look Back Kit and the wonderful Alpine Air Kit. The A Look Back kit includes a variety of precut paper pieces, stickers, paper pockets, and other ephemera and a spiral-bound notebook for memory keeping, journaling, and more. The Alpine Air Kit includes everything you need to make 9 all-occasion cards with an elegant mountain theme.

To check the availability of these kits or past kits, visit my Online Store. 


The November Paper Pumpkin Kit – Filled With Joy!

Celebrate Christmas with adorable stockings and gift tags!

  • Makes 8 projects: 8 stockings with 8 gift tags
  • Precut paper pieces
  • Safety pins and specialty gold foil
  • Poppy Parade Classic Stampin’ Spot

Coordinating Colors: Flirty Flamingo, Pool Party, Poppy Parade, Shaded Spruce, Very Vanilla

And the coordinating add-on is the Merry Tags & More dies – item #165639 for $12 (available while supplies last).

If you’re interested in subscribing to Paper Pumpkin, you can either sign up for a subscription where you are billed monthly for your kit or you can purchase a prepaid subscription in my Online Store. To see more information and to sign up for the monthly subscription click here. To see the options for prepaid subscriptions in my Online Store, click here.

Sign up deadline for the November 2024 kit is November 10, 2024. Note: Supplies may be limited toward the end of the subscription period.


Current Host Code: BTWRDNAU

Use this host code when you order $50 or more and receive a Thank You gift from me!  The free gift is your choice of any item currently available valued up to $10.00.

If your order is over $150, please do not use the host code since you’ll receive your own Host Dollars plus I’ll still send you the Thank You gift!  This host code can be used by anyone, no club or commitment required. Let me know if you have any questions.


If you need any stamping supplies, I’d be very happy to be your Demonstrator.  Just click on the Shop Now Button on the right side of the screen to go directly to my Online store or contact me if you have any questions.  Happy Stamping!

Thanks for stopping by and have a great day!

Akiko

  • Visit my online store here
  • See the current Stampin’ Up! clearance rack specials here
  • Earn FREE Stampin’ Up! products through my Wildflower Frequent Shopper Program – my way of saying thank you to my online frequent shopper customers.
  • Have any questions? I’d be happy to help, click here to contact me.

Cardstock Cuts for this project:

  • Gingerbread card
    • Pool Party – 5-1/2″ x 8-1/2” card base, scored at 4-1/4″
    • Real Red – 3-7/8″ x 5-1/8″ (front mat), 1/2″ x 3-1/4″ (label mat)
    • Crumb Cake – 3/8″ x 3″ (label)
    • Basic White – 3-3/4” x 5” (inside panel), 3-1/4″ x 3-1/4″ (die cut circle)
    • A Little Bit Festive specialty DSP – gingerbread background panel, cocoa cup, gingerbread boy, tree and present
  • Sleigh card
    • Pool Party – 5-1/2″ x 8-1/2” card base, scored at 4-1/4″, 3-3/4″ x 5″ (embossed background)
    • Two Toned Pool Party – 1-1/2″ x 2-1/2″ (label)
    • Basic White – 3-3/4” x 5” (inside panel)
    • A Little Bit Festive specialty DSP – double tree in snow, large tree and sleigh cut outs

Stampin’ Up! products used in this project:


Stampin’ Up! Golden Greenery for the Happy Inkin’ Thursday Blog Hop

Good Morning and welcome to the Happy Inkin’ Thursday Blog Hop! I used the pretty Stampin’ Up! olden Greenery bundle with the elegant Season of Green and Gold designer series paper to make a Christmas card filled with holiday greenery. You can find the supplies I used along with card stock cuts at the bottom of my post.

We have a pretty challenge this week:

I adhered a panel of Season of Green and Gold designer series paper to the front of an Old Olive card base with liquid glue. I cut two additional panels of the DSP with the second largest square die from the Stylish Shapes dies and adhered them to the card with liquid glue.

I cut the large leaf sprig die from the Stampin’ Up! Golden Greenery dies from gold foil and adhered it to the card with glue dots. I cut two pine sprigs (with the touches of snow) from the Graceful Greenery vellum and adhered them with glue dots. I cut a small leaf sprig from the Season of Green and Gold specialty paper with the coordinating die and adhered it with dimensionals. I love it when dies cut out DSP images as well as stamped images!!

I stamped the sentiments from the Greetings of the Season stamp set on Very Vanilla using Versamark ink. I stamped the ‘Christmas‘ sentiment first and sprinkled it with gold embossing powder and then lined up/stamped the ‘Merry‘ sentiment on top and sprinkled more gold embossing powder. I shook off the excess and heated the powder with my heat tool until it was bright and shiny. I cut the sentiment out with the banner die from the Stylish shapes dies. I adhered the label to the card with glue dots and finished the card with a loopy gold bow and white berries.

For the inside of the card, I stamped the detailed pine sprig from the Stampin’ Up! Golden Greenery stamp set using Old Olive ink on a Very Vanilla panel. I stamped the background sprig using stamped-off Old Olive and the sentiment from the Greetings of the Season stamp set using Wild Wheat. I adhered the panel to the inside of the card with Stampin’ Seal.

The Stampin’ Up! Golden Greenery bundle has such elegant greenery, both stamps and dies! Along with the beautiful Season of Green and Gold specialty DSP, it makes beautiful Christmas cards.

On with the Hop! Click on the Next Blog button to move forward to see the beautiful project Karen Ksenzakovic has created.

If you get lost along the way, here are the participants for the hop:


Current Host Code: BTWRDNAU

Use this host code when you order $50 or more and receive a free gift from me!  The free gift is your choice of any item currently available valued up to $10.00!

If your order is over $150, please do not use the host code since you’ll receive your own Host Dollars plus I’ll still send you the free gift!  This host code can be used by anyone, no club or commitment required. Let me know if you have any questions.


If you need any stamping supplies, I’d be very happy to be your Demonstrator.  Just click on the Shop Now button on the right side of the screen to go directly to my online store or contact me if you have any questions. 

Thanks for stopping by and Happy Stamping!

Akiko

  • Visit my online store here
  • See the current Stampin’ Up! clearance rack specials here
  • Earn FREE Stampin’ Up! products through my Wildflower Frequent Shopper Program – my way of saying thank you to my online frequent shopper customers.
  • Have any questions? I’d be happy to help, click here to contact me.

Cardstock Cuts for this project:

  • Old Olive – 4-1/4″ x 11″ card base, scored at 5-1/2″
  • Gold Foil – 3″ x 4″ (die cut sprig)
  • Graceful Greenery Vellum – two pine sprigs
  • Very Vanilla – 3-3/4″ x 5″ (inside panel), 1-1/2″ x 3″ (label)
  • Season of Green & Gold specialty DSP – 4-1/4″ x 5-1/2″ (front background), two 3″ x 3″ panels (die cut squares), small sprig

Stampin’ Up! products used in this project:


Stampin’ Up! Snowy Wonder Christmas Card

Good Morning! The Stampin’ Up! Snowy Wonder bundle is a sweet, fun set filled with whimsical snow themed images, a snowman, snowflakes, snow-capped mountains, trees, a cabin and a penguin. It’s a wonderful set for Christmas and winter cards. It coordinates with the Snow Scenes designer series paper (the dies cut images from the DSP!) and I used them both to make a tag Christmas card. You can find the products I used at the bottom of my post along with the card stock sizes.

I adhered a panel of the snow scenes designer series paper to the front of a Garden Green card base. At first I wasn’t sure about green snowflakes, but now I think they’re fun – ans so Christmasy with touches of Poppy Parade! I used the Merriest trees dies to cut a Pool party tag with a Poppy Parade topper. I looped a short length of Pool Party ribbon through the hole and died a bow with Real Red Baker’s twine.

I adhered a strip of Snowy Scenes DSP to the bottom of the tag and cut a Snowman and large tree from the DSP using the Stampin’ Up! Snowy Wonder dies. I wanted to put a hat on the snowman, so I fussy cut a hat and adhered it to the snowman. I adhered the tree with glue dots and popped the snowman on the tag with dimensionals. I finished the tag by adhering snowflake trinkets with glue dots and popped the tag on the card with dimensionals.

I stamped the sentiment from the Stampin’ Up! Snowy Wonder stamp set using Versamark ink on Poppy Parade. I sprinkled it with White embossing powder and shook off the excess. I heated it with my heat tool until it was bright and shiny and cut it out with the label die from the Perennial Postage dies. I trimmed the end and adhered it to the card with glue dots.

For the inside of the card, I stamped the snowflakes from the Stampin’ Up! Snowy Wonder stamp set using Pool Party ink ( full strength and stamped off) on Basic White. I stamped the sentiments from the Greetings of the Season stamp set using Poppy Parade ink and trimmed the bottom with DSP. I adhered the panel to the inside of the card with Stampin’ Seal.

The Stampin’ Up! Snowy Wonder bundle also coordinates with the new Snow Day Scrapbooking Workshop kit. So be sure to check out the September Scrapbooking Brochure for more crafting options.


Stampin’ Up! Kits Collection on Sale During October

Save up to 30% off on all your favorite kits October 1–31! The Kits Collection by Stampin’ Up! come with everything you need to create a unique paper craft. There are crafting options for card kits, treat packaging, home decor, and so much more! Start shopping today, as kits are only available while supplies last.

Details:

  • Sales Period: October 1 – 31, 2024
  • ALL kits from our collection qualify for the discount. 
  • There is no limit on how many kits you can order, as long as product is available. 
  • Orders must be opened and placed during the promotion dates. Orders opened before October 1 will not qualify for the sale. 
  • Kits can be added to a Starter Kit at their discounted rate. 
  • Coupon codes can also be used with discounted kits.
  • Ordering Deadline: October 31 at 11:59 PM (MT)

New Kits In Kits Collection!

The new kits for October are the sweet A Look Back Kit and the wonderful Alpine Air Kit. The A Look Back kit includes a variety of precut paper pieces, stickers, paper pockets, and other ephemera and a spiral-bound notebook for memory keeping, journaling, and more. The Alpine Air Kit includes everything you need to make 9 all-occasion cards with an elegant mountain theme.

To check the availability of these kits or past kits, visit my Online Store. 


3 Day Stamp Sale Starts Tomorrow!

Find yourself staring at multiple stamp sets and can’t decide which one to get? Well, we’ve got news for you! From October 7–9, you can get those sets you’ve been wanting at a 15% discount. Act fast—this stamp-tacular sale only lasts for 3 days!

Details:

  • Sales Period:  October 7–9, 2024
  • This stamp sale only happens once a year!
  • The sale will run for three days.
  • The 15% off discount will apply to all stamp sets (photopolymer and cling) from the 2024–2025 Annual Catalog.
  • Bundles are not included in this sale.
  • Stamp sets are available while supplies last.
  • Ordering Deadline:  October 7, 2024, at 11:59 PM (MT)

Head to my Online Store to shop now!


Current Host Code: BTWRDNAU

Use this host code when you order $50 or more and receive a Thank You gift from me!  The free gift is your choice of any item currently available valued up to $10.00.

If your order is over $150, please do not use the host code since you’ll receive your own Host Dollars plus I’ll still send you the Thank You gift!  This host code can be used by anyone, no club or commitment required. Let me know if you have any questions.


If you need any stamping supplies, I’d be very happy to be your Demonstrator.  Just click on the Shop Now Button on the right side of the screen to go directly to my Online store or contact me if you have any questions.  Happy Stamping!

Thanks for stopping by and have a great day!

Akiko

  • Visit my online store here
  • See the current Stampin’ Up! clearance rack specials here
  • Earn FREE Stampin’ Up! products through my Wildflower Frequent Shopper Program – my way of saying thank you to my online frequent shopper customers.
  • Have any questions? I’d be happy to help, click here to contact me.

Cardstock Cuts for this project:

  • Garden Green – 4-1/4” x 11” card base, scored at 5-1/2″
  • Pool Party – 2-3/4″ x 3-3/4″ (die cut tag)
  • Poppy Parade – 1″ x 2″ (label), 1/2″ x 1-1/4″ (tag top)
  • Basic White – 4” x 5-1/4” (inside panel)
  • Snowy Scenes DSP – 4″ x 5-1/4″ (front background), 1/2″ x 4″ (inside trim), large tree, snowman, fussy cut hat

Stampin’ Up! products used in this project:


Stampin’ Up! A Little Bit Festive for the Happy Inkin’ Thursday Blog Hop

Good Morning and welcome to the Happy Inkin’ Thursday Blog Hop! Here’s another super simple Christmas card made with the pretty Stampin’ Up! A Little Bit Festive Mix & Match specialty designer series paper. You can find the supplies I used along with card stock cuts at the bottom of my post.

We have a fun theme challenge this week, so I decided to use the pretty wreath to make a book fold card!

After scoring and burnishing the Real Red card base I adhered the left side book bind section together with liquid glue.

I used the pretty Forever Plaid 3D embossing folder to emboss Basic White panels for the two sections of the card front. I adhered the embossed panels to the card with liquid glue. I used my Garden Green Stampin’ Write marker to color the center part of Basic White Frayed ribbon and wrapped it around the book bind edge and tied a knot.

I adhered the pretty holly wreath from the Stampin’ Up! A Little Bit Festive specialty DSP to the main section with dimensionals. I adhered three triple berries to the wreath to give it some sparkle. And that’s it – so quick and easy!! And a great way to show off the pretty wreath!

For the inside of the card, I stamped the sentiment from the Greetings of the Season stamp set using Real Red ink on a Basic White panel. I adhered the panel to the inside of the card with Stampin’ Seal.

This is such a pretty holly wreath from the Stampin’ Up! A Little Bit Festive Mix & Match specialty DSP pack and I wanted to let it stand on it’s own against a simple textured Basic White background. And the bow from the DSP pack is perfect with the wreath, so I didn’t want to make another one with ribbon. I hope you’re inspired to check out the new Mix & Match items. This DSP pack is expected to be restocked next week and it coordinates with the Christmas Ephemera packs. They’re great for quick and easy Christmas crafting of any kind!

On with the Hop! Click on the Next Blog button to move forward to see the beautiful project Karen Ksenzakovic has created.

If you get lost along the way, here are the participants for the hop:


Current Host Code: BTWRDNAU

Use this host code when you order $50 or more and receive a free gift from me!  The free gift is your choice of any item currently available valued up to $10.00!

If your order is over $150, please do not use the host code since you’ll receive your own Host Dollars plus I’ll still send you the free gift!  This host code can be used by anyone, no club or commitment required. Let me know if you have any questions.


If you need any stamping supplies, I’d be very happy to be your Demonstrator.  Just click on the Shop Now button on the right side of the screen to go directly to my online store or contact me if you have any questions. 

Thanks for stopping by and Happy Stamping!

Akiko

  • Visit my online store here
  • See the current Stampin’ Up! clearance rack specials here
  • Earn FREE Stampin’ Up! products through my Wildflower Frequent Shopper Program – my way of saying thank you to my online frequent shopper customers.
  • Have any questions? I’d be happy to help, click here to contact me.

Cardstock Cuts for this project:

  • Real Red – 4-1/4″ x 11″ card base, scored at 4-1/4″ and 5-1/2″
  • Basic White – two 4″ x 4″ panels (inside panel and embossed front), 1″ x 4″ (embossed book bind strip)
  • A Little Bit Festive specialty DSP – holly wreath cut-out, bow

Stampin’ Up! products used in this project:


Stampin’ Up! A Little Bit Festive Christmas Cards II

Happy Saturday Morning! Here are a few more quick Christmas cards made with the pretty Stampin’ Up! A Little Bit Festive specialty designer series paper. You can find the products I used at the bottom of my post along with the card stock sizes.

For both of these cards, I started by adhering the panels of the pretty Christmas tree boughs design from the Stampin’ Up! A Little Bit Festive specialty DSP to the front of Real Red card bases and adhered the striped panels across the middle.

For the first card, I wrapped a length of Real Red ribbon (Real Red ribbon is currently on discount in the Clearance Rack – Yay!!) around the card top and made a bow on the side. I embossed a Basic White panel with the Forever Plaid 3D embossing folder and adhered it to a Real Red mat. I popped the embossed panel on the card and popped a pretty Christmas Tree cut-out from the Stampin’ Up! A Little Bit Festive specialty DSP pack on top. I decorated the tree with Regal Foil Dots and a star.

For the inside of this card I stamped the sentiments from the Greetings of the Season stamp set in Real Red ink on Basic White and trimmed the bottom with DSP.

For the second card, I used the Spotlight on Nature die to cut a circle and adhered it to the card. I adhered the pinecone bough from the Stampin’ Up! A Little Bit Festive specialty DSP to the card. I gold embossed the sentiments from the Greetings of the Season stamp set on real red and cut them out with the fishtail end of the banner tag. I adhered the label to the card and popped the ornament cut-out over the end. I finished with a gold bow and added gold faceted dots to the ornament and pinecone.

For the inside of this card I stamped the sentiment from the Greetings of the Season stamp set in Real Red ink on Basic White. I trimmed the bottom with DSP and adhered another ornament cut-out from the Stampin’ Up! A Little Bit Festive specialty DSP.

It’s so quick and easy to make Christmas cards with the pretty Stampin’ Up! A Little Bit Festive specialty designer series paper. The cut-outs coordinate perfectly with the pretty patterned papers and other Stampin’ Up! card card stock and inks. And the touches of gold foil in the cut-outs make them extra special!


New Kits In Kits Collection!

The Kits Collection by Stampin’ Up! provides different options and a range of project types that allow you to choose the crafting experiences that best fits your style and needs. There’s a variety of kits to choose from and these all-inclusive project kits have everything you need in one box! You can Find these kits in the Online Store.

The new kits for September are the pretty Christmas Ornaments Kit and the wonderful Card Keeper Kit. The Christmas Ornaments kit makes 9 Christmas ornaments including precut paper greenery, pinecones, bright berries, and festive details. The Card Keeper Kit includes everything you need to make 10 beautiful all-occasion cards plus a coordinating card container to keep everything organized.

The Kits Collection offering changes frequently as new kits are released, and kit availability fluctuates. To check the availability of these new kits or past kits, visit my Online Store. 


Celebrate World Cardmaking Day with Stampin’ Up!

World Cardmaking Day is October 5, 2024, and Stampin’ Up! is celebrating with a FREE Online Virtual event! They’ll create five simple cards and show you some additional fun projects. Crafters of all skill levels are invited and welcome to join. And the event and registration are FREE! 

You must register for this event in order to receive a link to view it. Also, those who register will receive a gift after the event ends.

Register Here

Everyone is invited! The date is October 5, 2024 from 2:00 PM – 3:00 PM (MT). The event will be recorded, so if you miss it, you will be able to view it afterward.


Current Host Code: V3YZAAN7

Use this host code when you order $50 or more and receive a Thank You gift from me!  The free gift is your choice of any item currently available valued up to $10.00.

If your order is over $150, please do not use the host code since you’ll receive your own Host Dollars plus I’ll still send you the Thank You gift!  This host code can be used by anyone, no club or commitment required. Let me know if you have any questions.


If you need any stamping supplies, I’d be very happy to be your Demonstrator.  Just click on the Shop Now Button on the right side of the screen to go directly to my Online store or contact me if you have any questions.  Happy Stamping!

Thanks for stopping by and have a great day!

Akiko

  • Visit my online store here
  • See the current Stampin’ Up! clearance rack specials here
  • Earn FREE Stampin’ Up! products through my Wildflower Frequent Shopper Program – my way of saying thank you to my online frequent shopper customers.
  • Have any questions? I’d be happy to help, click here to contact me.

Cardstock Cuts for this project:

  • Christmas Tree card
    • Real Red – 4-1/4” x 11” card base, scored at 5-1/2″, 3″ x 4″ (embossed panel mat)
    • Basic White – 3-3/4” x 5” (inside panel), 2-7/8″ x 3-7/8″ (embossed panel)
    • A Little Bit Festive specialty DSP – 4″ x 5-1/4″ (front background), 1-1/2″ x 4″ (front stripe), Christmas Tree cut-out, gold star cut out
  • Ornament and Pine Bough card
    • Real Red – 4-1/4” x 11” card base, scored at 5-1/2″, 1″ x 3″ (label)
    • Basic White – 3-3/4” x 5” (inside panel), 3-1/2″ x 3-1/2″ (die cut circle)
    • A Little Bit Festive specialty DSP – 4″ x 5-1/4″ (front background), 1-1/2″ x 4″ (front stripe), two ornaments and a pine bough cut-out

Stampin’ Up! products used in this project:


Stampin’ Up! Sentimental Wishes Joy Fold Christmas Card

Good Morning! The Stampin’ Up! Sentimental Wishes bundle is such a cute, vintage inspired bundle with gorgeous images that can be cut out with coordinating dies and wonderful sentiments in a fun font. I paired it with the pretty Christmas Wishes designer series paper to make a Joy Fold Christmas card. You can find the products I used at the bottom of my post along with the card stock sizes.

I adhered a floral panel of Sentimental Christmas designer series paper to the back and front flap of a Shaded Spruce card base as well as the inside flap of the Poppy Parade mini card base. I adhered the green stripe pattern to the inside flap and to the front of the mini card base. I adhered the mini card base to the inside of the main card base. I used the dies from the Stampin’ Up! Sentimental Wishes die set to cut out a stocking and bow from the Christmas Wishes DSP and adhered them to the inside flap of the main card base.

I stamped the holly spray and two sets of candles from the Stampin’ Up! Sentimental Wishes stamp set using Memento Tuxedo Black ink on Basic White. I colored them with Stampin’ Blends – dark Lost Lagoon, Light Old Olive, light Shaded Spruce, light Pecan Pie, dark Daffodil Delight and Poppy Parade. I cut them out with the coordinating dies. I used the Spotlight On Nature dies to cut out Poppy Parade and Basic Beige panels and adhered them to the front of the mini card. I adhered the candles, and holly bough to the card with glue dots.

I stamped the ‘Celebrate‘ part of the sentiment from the Stampin’ Up! Sentimental Wishes stamp set using Versamark ink. I sprinkled the sentiment with white embossing powder and heated it with my heat tool until it was bright and shiny. I cut it out with the Something Fancy die and adhered it to the card with glue dots. I adhered a Shaded Spruce bow with a glue dot and finished with Cherry Cobbler dots.

For the inside of the card, I stamped the sentiment from the Stampin’ Up! Sentimental Wishes stamp set using Poppy Parade ink on Basic White and adhered it to the inside of the card with Stampin’ Seal. I stamped the sentiment from the Stampin’ Up! Sentimental Wishes stamp set using Poppy Parade ink on Basic White and cut it out with the small Something Fancy die. I cut a Shaded Spruce panel with the large die and adhered the sentiment to it before adhering it to the inside of the mini card front flap.

I made this card live for our quarterly Inkin’ Krew team meeting. Each month, the Stampin’ Up! Demonstrators in the Inkin’ Krew have a virtual meeting and every quarter we craft live together. I haven’t done videos in a while, so I was a bit nervous showing everyone how to make the card. But it was fun! Karen Ksenzakovic and Terry Lynn Bright also made pretty cards with this bundle for everyone. Let me know if you’re interested in learning more about joining my team and participating in the Inkin Krew activities.

I love that the Stampin’ Up! Sentimental Wishes dies can also cut images from the Christmas Wishes DSP. These vintage designs are reminiscent of the best of Christmases long ago.


New Kits In Kits Collection!

The Kits Collection by Stampin’ Up! provides different options and a range of project types that allow you to choose the crafting experiences that best fits your style and needs. There’s a variety of kits to choose from and these all-inclusive project kits have everything you need in one box! You can Find these kits in the Online Store.

The new kits for September are the pretty Christmas Ornaments Kit and the wonderful Card Keeper Kit. The Christmas Ornaments kit makes 9 Christmas ornaments including precut paper greenery, pinecones, bright berries, and festive details. The Card Keeper Kit includes everything you need to make 10 beautiful all-occasion cards plus a coordinating card container to keep everything organized.

The Kits Collection offering changes frequently as new kits are released, and kit availability fluctuates. To check the availability of these new kits or past kits, visit my Online Store. 


The October Paper Pumpkin Kit – Nests of Christmas!

Spread Christmas cheer with this cozy, all-inclusive crafting kit that coordinates with the new Nests of Winter Suite Collection

  • Makes 10 cards: 5 each of 2 designs with 10 coordinating envelopes
  • Project includes tri-fold printed card bases and precut grosgrain ribbon
  • Precut labels with specialty green foil
  • Shaded Spruce Classic Stampin’ Spot

Coordinating Colors: Basic Black, Coastal Cabana, Granny Apple Green, Night of Navy, Real Red, Shaded Spruce

And the coordinating add-on is the Merry Tags & More dies – item #165639 for $12 (available while supplies last).

If you’re interested in subscribing to Paper Pumpkin, you can either sign up for a subscription where you are billed monthly for your kit or you can purchase a prepaid subscription in my Online Store. To see more information and to sign up for the monthly subscription click here. To see the options for prepaid subscriptions in my Online Store, click here.

Sign up deadline for the October 2024 kit is October 10, 2024. Note: Supplies may be limited toward the end of the subscription period.


Current Host Code: 37AE7ZXV

Use this host code when you order $50 or more and receive a Thank You gift from me!  The free gift is your choice of any item currently available valued up to $10.00.

If your order is over $150, please do not use the host code since you’ll receive your own Host Dollars plus I’ll still send you the Thank You gift!  This host code can be used by anyone, no club or commitment required. Let me know if you have any questions.


If you need any stamping supplies, I’d be very happy to be your Demonstrator.  Just click on the Shop Now Button on the right side of the screen to go directly to my Online store or contact me if you have any questions.  Happy Stamping!

Thanks for stopping by and have a great day!

Akiko

  • Visit my online store here
  • See the current Stampin’ Up! clearance rack specials here
  • Earn FREE Stampin’ Up! products through my Wildflower Frequent Shopper Program – my way of saying thank you to my online frequent shopper customers.
  • Have any questions? I’d be happy to help, click here to contact me.

Cardstock Cuts for this project:

  • Shaded Spruce – 4-1/4” x 8-1/2” card base, scored at 3”, 2” x 3-1/2” (die cut label mat)
  • Poppy Parade – 3” x 8” mini card base, scored at 4”, 3-1/2” x 3-1/2” (die cut circle), 1” x 3” (die cut label)
  • Basic Beige – 3” x 3” (die cut circle)
  • Basic White – 2-3/4” x 3-3/4” (inside panel), 4-1/4” x 5-1/2” panel (stamped/die cut images)
  • Sentimental Christmas DSP:
    • Floral Pattern – 4” x 5-1/4” (mini card inside panel), 2-3/4” x 4” (front short flap), 2-3/4” x 3-3/4” (mini card inside)
    • Stripe Pattern – 2-3/4” x 4” (short flap inside), 2-3/4” x 3-3/4” (mini card front)
    • Die cut stocking and bow

Stampin’ Up! products used in this project:


Stampin’ Up! A Little Bit Festive Christmas Cards

Good Morning! One of the fun new items in the new Mini Catalog is the Stampin’ Up! A Little Bit Festive specialty designer series paper. This is a fun Christmas themed pack of paper with three sheets of double sided DSP and three sheets of holiday cut outs. I have combined it with the Greetings of the Season bundle, and card stock, dies and embellishments from my stash to make three quick Christmas Cards. You can find the products I used at the bottom of my post along with the card stock sizes.

The first card uses the Night of Navy gingham paper as the background – I adhered it to a Night of Navy mat and popped it onto a Thick Basic White card base. I cut the large tag from the Greetings of the Season dies, looped Real Red baker’s twine through the hold and adhered it to the card. I adhered the presents and teddy bear cut outs from the Stampin’ Up! A Little Bit Festive DSP to the tag. I stamped the sentiments from the Greetings of the Season stamp set using Night of Navy ink and cut it out with the banner die from the Stylish Shapes dies. Before adhering the label to the card, I adhered some glittered night of Navy ribbon to the back and finished the front with peppermint drops.

For the inside, I stamped the sentiment from the Greetings of the Season stamp set in Real Red on Basic White, adhered a holly cut out from the Stampin’ Up! A Little Bit Festive DSP to the corner along with some gingham trim. I adhered the panel to a Night of Navy mat before adhering it to the inside of the card.

For the second card, I used the pretty poinsettia cut outs from the Stampin’ Up! A Little Bit Festive DSP pack. I embossed a Real Red panel with the pretty Forever Plaid 3D embossing folder and adhered it to a Thick Basic White card base. I adhered the large poinsettias to the card and stamped the sentiment using Garden Green on a strip of Basic White. I trimmed the end and adhered it to the card. I made a gold bow and adhered it with the small poinsettia cut out on top. I finished the card with lots of gold faceted gems.

For the inside, I stamped the sentiment from the Greetings of the Season stamp set in Garden Green on Basic White. I adhered the panel to the inside of the card and adhered a Real Red ribbon cut out from the Stampin’ Up! A Little Bit Festive DSP pack to the corner

For the last card today, I used the ornament panel from the Stampin’ Up! A Little Bit Festive DSP pack. I simply adhered it to a Real Red mat before adhering it to a Basic Beige card base. I used gold embossing for the sentiment from the Greetings of the Season stamp set and cut it out with the small banner die from the Nested essentials dies. I adhered a little gold bow to the top and adhered faceted gold gems to the label and each ornament.

For the inside of this card, I stamped the sentiment from the Greetings of the Season stamp set using Real Red ink on a Basic White panel. I decorated the bottom with a pine sprig and ornament cutouts from the Stampin’ Up! A Little Bit Festive DSP pack before adhering it to the inside of the card with Stampin’ Seal.

The Stampin’ Up A Little Bit Festive cut outs do coordinate with the Holiday ephemera packs, so you can use them together. I stamped all my sentiments, but you could also use the sentiments from the Joyful Sayings ephemera pack (item 164109, $9.50) and save even more time. The full sheet DSP patterns are pretty and the cut outs are great for cards like these, tags and scrapbooking, so it’s a versatile pack!


The Stampin’ Up! September-December 2024 Mini Catalog is Now Open!

The Stampin’ Up! September-December 2024 Mini Catalog is open for orders! You can click on the image below to browse the catalog, or go to the Online Store to shop now!


See The New Stampin’ Up! Scrapbooking Brochure!

Stampin’ Up! is now offering Scrapbooking products! This digital-only scrapbooking brochure is full of scrapbooking essentials and exciting new products. As a companion brochure to the September–December 2024 Mini Catalog, the products inside coordinate with items from the mini catalog (and some online only products, too!). You’ll also find some new product lines like Two-Tone Cardstock in Stampin’ Up! colors. We hope this adds variety and inspiration to your holiday crafts this year! Click on the image below to browse the brochure or go to the Online Store to shop now.


Current Host Code: 37AE7ZXV

Use this host code when you order $50 or more and receive a Thank You gift from me!  The free gift is your choice of any item currently available valued up to $10.00.

If your order is over $150, please do not use the host code since you’ll receive your own Host Dollars plus I’ll still send you the Thank You gift!  This host code can be used by anyone, no club or commitment required. Let me know if you have any questions.


If you need any stamping supplies, I’d be very happy to be your Demonstrator.  Just click on the Shop Now Button on the right side of the screen to go directly to my Online store or contact me if you have any questions.  Happy Stamping!

Thanks for stopping by and have a great day!

Akiko

  • Visit my online store here
  • See the current Stampin’ Up! clearance rack specials here
  • Earn FREE Stampin’ Up! products through my Wildflower Frequent Shopper Program – my way of saying thank you to my online frequent shopper customers.
  • Have any questions? I’d be happy to help, click here to contact me.

Cardstock Cuts for this project:

  • Bear Tag Card
    • Thick Basic White – 5-1/2″” x 8-1/2″ card base, scored at 4-1/4″
    • Night of Navy – two 3-3/4″ x 5″ panels ( front and inside mats)
    • Basic White – 3-5/8″ x 4-7/8″ (inside panel), 2-3/4″ x 4″ (tag), 1-1/4″ x 3-3/4″ (label)
    • A Little Bit Festive specialty DSP – 3-5/8″ x 4-7/8″ (front background), 1/2″ x 3-5/8″ (inside trim), presents, bear and holly cut outs
  • Poinsettia Card
    • Thick Basic White – 5-1/2″” x 8-1/2″ card base, scored at 4-1/4″
    • Real Red – 4″ x 5-1/4″ (embossed background)
    • Basic White – 3-3/4″ x 5″ (inside panel),1/2″ x 3-1/2″ (label)
    • A Little Bit Festive specialty DSP – poinsettias and bow cut outs
  • Ornaments Card
    • Basic Beige – 5-1/2″ x 8-1/2″ card base, scored at 4-1/4″
    • Real Red – 3-7/8″ x 5-1/8″ (DSP mat), 1-1/2″ x 2-1/2″ (label)
    • Basic White – 3-3/4″ x 5″ (inside panel), 1-1/2″ x 3-3/4″ (label), 2-1/4″ x 4″ (die cut leaves)
    • A Little Bit Festive specialty DSP – Ornaments panel, ornament and pine sprig cut outs

Stampin’ Up! products used in this project: