Stampin’ Up! Cup of Christmas Card for the Happy Inkin’ Thursday Blog Hop

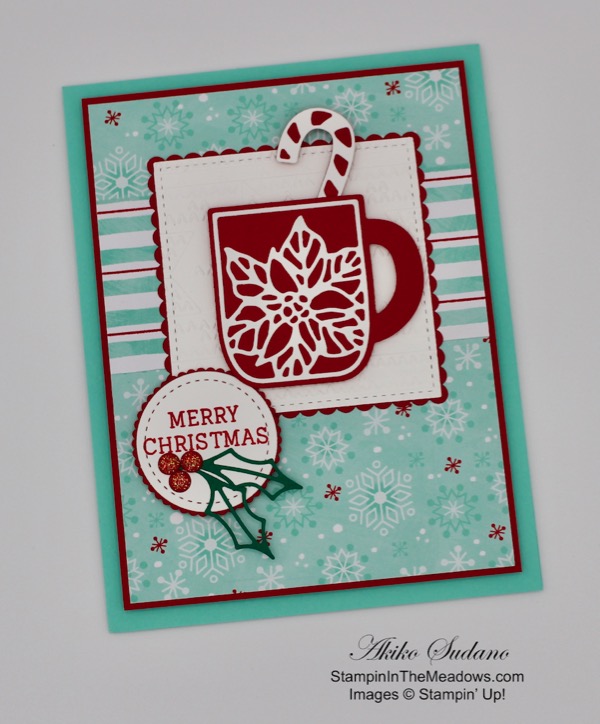
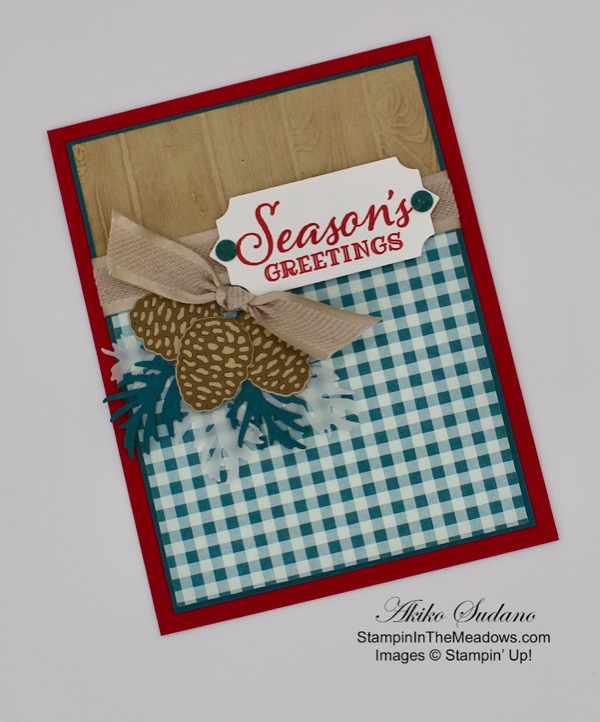
Happy Halloween and welcome to another Happy Inkin’ Blog Hop! I used the Stampin’ Up! Cup of Christmas photopolymer stamp set for my card today and here is my card.

We have a color challenge this week, and here is the color palette we are using:

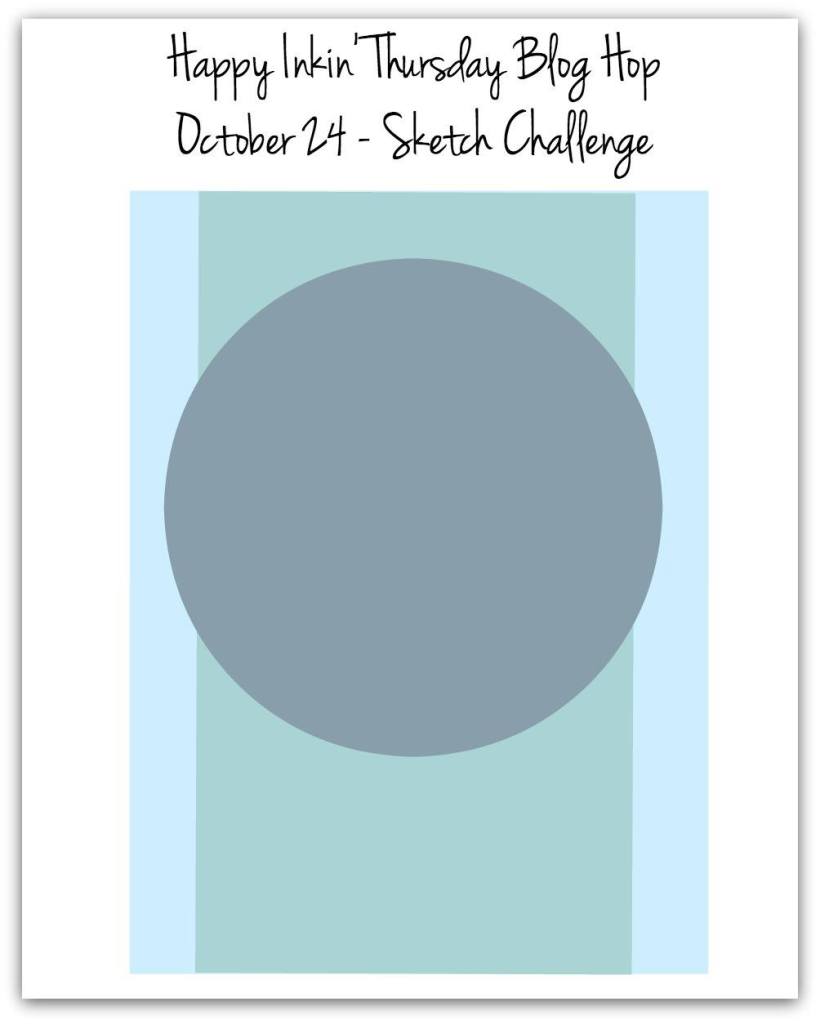
My card design was inspired by the Paper Players Sketch Challenge PP465:

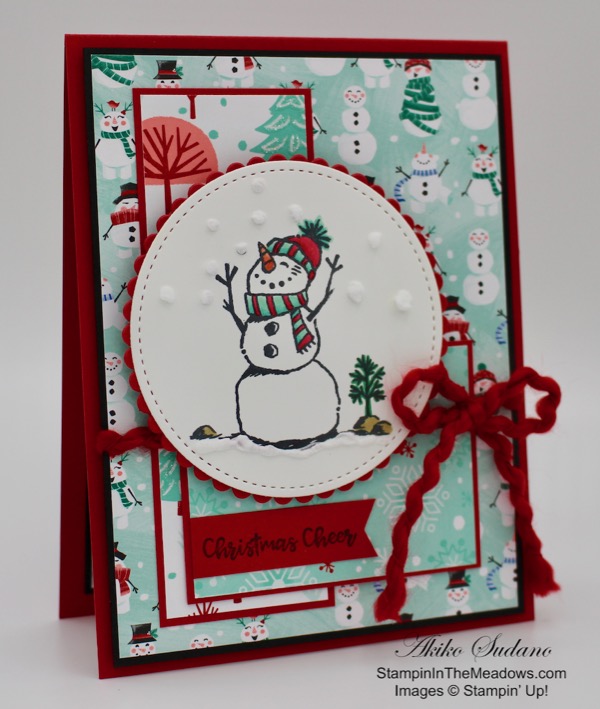
I started by adhering a strip of striped Let it Snow specialty designer series paper to a panel of snowflake paper and then adhering them both to a Real Red mat. I die cut a stitched square from Whisper White and ran it through the Winter Knit 3D embossing folder. I adhered it to a scalloped square and then to the Let it Snow background panel.

I die cut the cup from the Cup of Cheer dies from Real Red and the poinsettia from Whisper White. I adhered these together with the fine-tip glue pen. I die cut the candy cane from Real Red and Whisper White and adhered them together with the fine tip-glue pen. I adhered the candy cane to the back of the mug and attached them to the embossed panel with dimensionals.

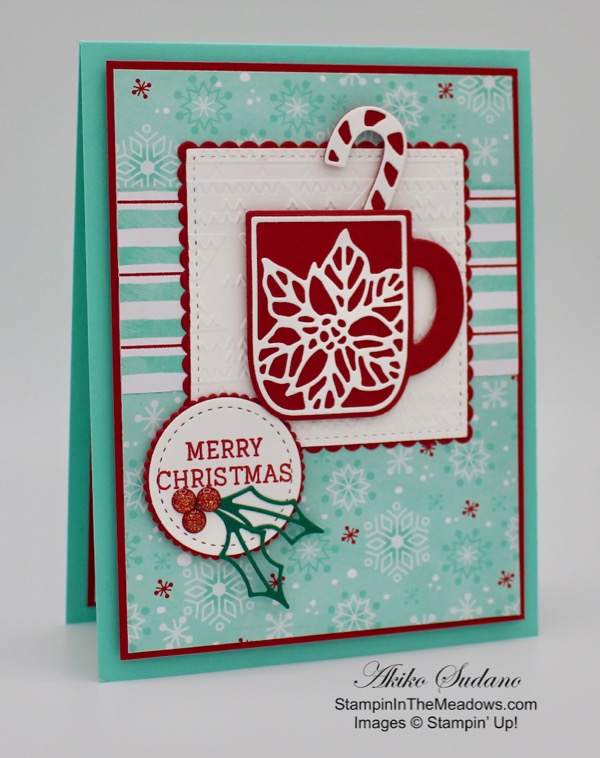
I stamped the Merry Christmas greeting from the Stampin’ Up! Cup of Christmas stamp set in Real Red on a panel of Whisper White and cut it out with a stitched circle die. I matted in a Real Red scalloped circle and added two Shaded Spruce die cut holly leaves and three Real Red enamel glitter dots. I adhered the label to the Let it Snow panel with dimensionals and then adhered the finished panel to a Coastal Cabana card base with dimensionals.

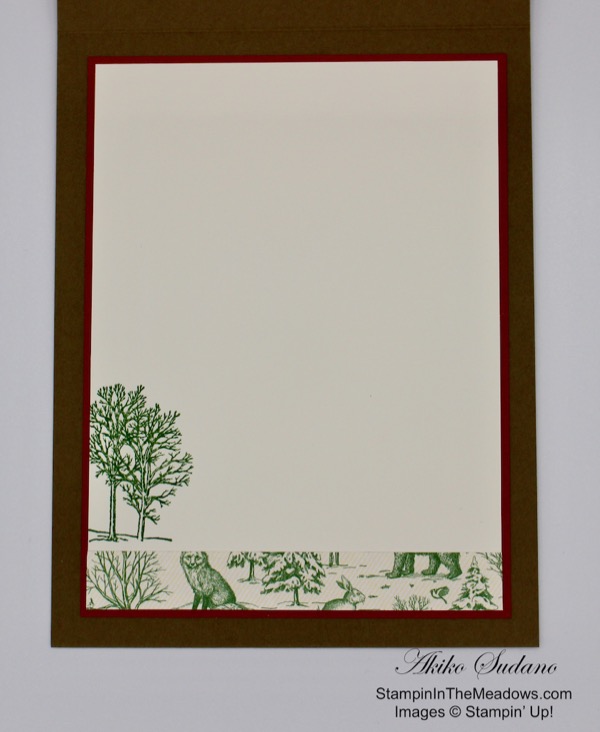
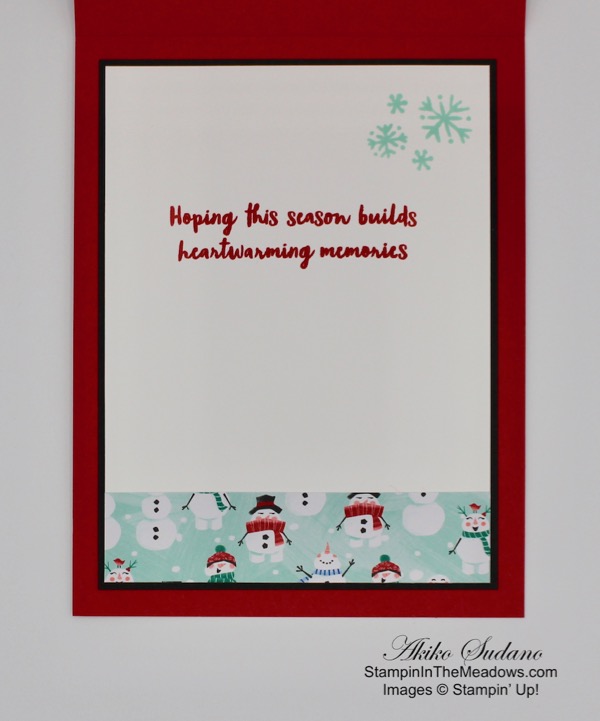
I decorated the inside of the card with die cut Shaded Spruce holly leaves and Real Red berries on a Whisper White panel. I stamped the sentiment from the Stampin’ Up! Cup of Christmas stamp set in Real Red and added a strip of the snowflake Let it Snow DSP to the bottom. I adhered it to a Real Red mat and then to the inside of the card with liquid glue.

On with the Hop! Click the Next button below to visit Karen Ksenzakovic’s blog.

And just in case you get lost along the way, here’s a list of the team members participating in the hop today:


October 15 – 31 Host Code: 3KQUKV9U

November 1 – 15 Host Code: WR4KJJM4

Use this host code when you order and receive a free gift from me!  If your order is over $150, please do not use this code, but youโ€™ll still get the free gift.  The free gift is your choice of any item valued up to $10.00 in the 2018-19 Annual Catalog or in the 2019 Occasions Catalog!  That includes some of the Host Exclusive stamp sets!


If you need any stamping supplies, Iโ€™d be very happy to be your Demonstrator.  Just click on the Shop Now button on the right side of the screen to go directly to my online store or contact me if you have any questions.  Happy Stamping!

Thanks for visiting!

Akiko

  • Visit my online store here
  • See the current Stampin’ Up! clearance rack specials here
  • Earn FREE Stampin’ Up! products through my Wildflower Frequent Shopper Program – my way of saying thank you to my frequent shopper online customers.
  • Have any questions? I’d be happy to help, click here to contact me.

Cardstock Cuts for this project:

  • Coastal Cabana – 4 1/4″ x 11″
  • Real Red – (2) 3 7/8″ x 5 1/8″, 3 1/2″ x 3 1/2″, 2 1/2″ x 2 1/2″, 1 1/4″ x 3″, 2″ x 2″
  • Whisper White – 3 3/4″ x 5″, 3″ x 3″, 2″ x 2 1/4″, 1 1/4″ x 3″, 2″ x 2″
  • Shaded Spruce – 1 1/4″ x 3″
  • Let it Snow DSP – 3 3/4″ x 5″, 1/2″ x 3 3/4″, 1 3/4″ x 3 3/4″

Stampin’ Up! products used in this project:


Stampin’ Up! Peaceful Boughs Seasons Greetings Card

Good Morning! Today made a country style Christmas card with the Come to Gather Designer Series paper, the pretty peacock gingham paper, and the Stampin’ Up! Peaceful Boughs bundle. This bundle combines the Peaceful Boughs cling stamp set and the Beautiful Boughs dies at a 10% discount. You can find the supplies used to create this card at the bottom of my post along with the sizes of cardstock used.

I started by embossing Crumb cake Card stock with the Pinewood Planks embossing folder. I lightly sponged it with crumb cake ink to enhance the texture and then adhered it to a Pretty Peacock mat. I added the Pretty Peacock gingham paper from the Come to Gather DSP pack to the bottom and wrapped a length of the Come to Gather Crumb Cake Ribbon around the seam with snail adhesive. I added tape to the back to secure it. I adhered the layered panel to a Real Red card base with liquid glue.

I die cut the following using the Beautiful Boughs dies to make the arrangement:

  • A medium branch from Vellum card stock
  • Two small branches from Pretty Peacock card stock
  • Three small solid pine cones from Crumb Cake card stock
  • Three small textured pine cones from Soft Suede card stock

I glued the Soft Suede pine cones to the Crumb cake pine cones to get the layered look. I built the arrangement using glue dots to adhere the pieces, starting with the Vellum branch on the bottom, two Pretty Peacock branches next and topped it with the pine cones. I tied a short length of the Crumb Cake ribbon in a knot to make a faux bow and adhered it to the arrangement with glue dots.

I stamped the Seasons Greetings sentiment from the Stampin’ Up! Peaceful Boughs stamp set in Real Red ink on a scrap of Whisper White. I cut it out with the small label die from the Beautiful Boughs dies. I added two Pretty Peacock faceted dots to the label and popped it on the card with dimensionals. I then nestled the pine cone arrangement under the label and adhered it with glue dots.

On the inside of the card, I added a strip of the Pretty Peacock gingham paper to the bottom of a Whisper White panel. I stamped the small branch from the Stampin’ Up! Peaceful Boughs stamp set in Pretty Peacock after stamping off twice. I stamped the sentiment from the Stampin’ Up! Peaceful Boughs stamp set in Real Red ink. I matted the panel with Pretty Peacock and adhered it to the inside of the card.

I love country decor and the gingham and natural elements of the wood planks, pine cones and branches give this card a comfy holiday feel – all you need is a warm fireplace!


October 15 – 31 Host Code: 3KQUKV9U

Use this host code when you order and receive a free gift from me!  If your order is over $150, please do not use this code, but youโ€™ll still get the free gift.  The free gift is your choice of any item valued up to $10.00 in the 2018-19 Annual Catalog or in the 2019 Occasions Catalog!  That includes some of the Host Exclusive stamp sets!


If you need any stamping supplies, Iโ€™d be very happy to be your Demonstrator.  Just click on the Shop Now button on the right side of the screen to go directly to my online store or contact me if you have any questions.  Happy Stamping!

I hope you liked my card today. Thanks for stopping by.

Akiko

  • Visit my online store here
  • See the current Stampin’ Up! clearance rack specials here
  • Earn FREE Stampin’ Up! products through my Wildflower Frequent Shopper Program – my way of saying thank you to my frequent shopper online customers.
  • Have any questions? I’d be happy to help, click here to contact me.

Cardstock Cuts for this project:

  • Real Red – 4 1/4″ x 11″
  • Pretty Peacock – 3 7/8″ x 5 1/8″, 3 3/4″ x 5″, 2″ x 3″
  • Crumb Cake – 3 3/4″ x 5″, 1 1/4″ x 3 3/4″
  • Soft Suede – 1 1/4″ x 3 3/4″
  • Come to Gather DSP – 3 3/4″ x 3 1/2″, 1/2″ x 3 1/2″
  • Vellum – 2 1/2″ x 3 1/2″
  • Whisper White – 3 1/2″ x 4 3/4″, 1 1/2″ x 3 3/4″

Stampin’ Up! products used in this project:


Stampin’ Up! Feels Like Frost Merry Christmas to All Card

Good Morning! Today I am sharing some cards that I made for my Facebook Live video yesterday afternoon. These are simple, easy to make cards that use Stampin’ Up! Feels Like Frost specialty designer series paper and the Stampin’ Up! Merry Christmas to All stamp set and coordinating dies.

The Stampin’ Up! Feels Like Frost specialty designer series paper has beautiful winter images of nature with snow and ice. The back of the paper has designs in silver foil and white. The Stampin’ Up! Merry Christmas to All photopolymer stamp set has a beautiful and elegant font and many Christmas words that can be used in combination to convey many sentiments and the coordinating dies use the same beautiful font. When used with silver foil, they look beautiful with the Feels Like Frost paper. Here’s the video. Please excuse the first few minutes when I’m trying to ‘unstick’ my computer.

I also posted the video to my YouTube channel and you can view it here.

The holidays are coming quick and high impact easy-to-make cards are real important! It gives us the opportunity to give something special to our loved ones while maintaining balance in our busy lives.


October 15 – 31 Host Code: 3KQUKV9U

Use this host code when you order and receive a free gift from me!  If your order is over $150, please do not use this code, but youโ€™ll still get the free gift.  The free gift is your choice of any item valued up to $10.00 in the 2018-19 Annual Catalog or in the 2019 Occasions Catalog!  That includes some of the Host Exclusive stamp sets!


If you need any stamping supplies, Iโ€™d be very happy to be your Demonstrator.  Just click on the Shop Now button on the right side of the screen to go directly to my online store or contact me if you have any questions.  Happy Stamping!

Thanks for stopping by and have a great week!

Akiko

  • Visit my online store here
  • See the current Stampin’ Up! clearance rack specials here
  • Earn FREE Stampin’ Up! products through my Wildflower Frequent Shopper Program – my way of saying thank you to my frequent shopper online customers.
  • Have any questions? I’d be happy to help, click here to contact me.

Cardstock Cuts for this project:

  • Seaside Spray – 4 1/4″ x 11″, 1″ x 3 1/4″
  • Purple Posey – 4 1/4″ x 11″
  • Whisper White – (2) 3 3/4″ x 5″
  • Sparkle Glimmer Paper – (2) 3 3/4″ x 5″
  • Silver Foil – 1 3/4″ x 12″
  • Feels Like Frost Specialty DSP – (2) 3 1/2″ x 4 3/4″

Stampin’ Up! products used in this project:


Stampin’ Up! Peaceful Boughs Celebrate the Season

Good Morning! Today I have another Christmas card made with the Stampin’ Up! Peaceful Boughs stamp set and Beautiful Boughs dies.

It’s in blue and gold and uses the design from this week’s Freshly Made Sketches #408. You can find the supplies used to create this card at the bottom of my post along with the sizes of cardstock used.

I started by dusting a panel of Seaside Spray card stock with with my embossing buddy and randomly stamping the 3 branch stamps from the Stampin’ Up! Peaceful Boughs stamp set in VersaMark ink. I sprinkled it with gold embossing powder and heat set. I matted it with gold foil paper and adhered it to a Seaside Spray card base with dimensionals.

I cut 2 of the small branches using the Beautiful Boughs dies in gold foil. I stamped the sentiment from the Itty Bitty Christmas stamp set in VersaMark ink on a strip of Seaside Spray cardstock, sprinkled it with gold embossing powder and heat set. I trimmed the end and backed it with a strip of gold foil and arranged it on the card with the two gold foil branches.

I finished the card front with a gold satin bow and gold glitter dots, both from the upcoming Christmastime is Here suite (available Nov 1).

On a panel of Whisper White, I stamped the corners with branches from the Stampin’ Up! Peaceful Boughs stamp set with VersaMark ink. I also stamped the sentiment from the Merry Christmas to all photopolymer stamp set in the middle. I sprinkled it with gold embossing powder and heat set. I adhered it to the inside of the card.

Embossed cards at Christmas are so elegant. And this one is a simple design that easy to make. That’s a double bonus!!


October 15 – 31 Host Code: 3KQUKV9U

Use this host code when you order and receive a free gift from me!  If your order is over $150, please do not use this code, but youโ€™ll still get the free gift.  The free gift is your choice of any item valued up to $10.00 in the 2018-19 Annual Catalog or in the 2019 Occasions Catalog!  That includes some of the Host Exclusive stamp sets!


If you need any stamping supplies, Iโ€™d be very happy to be your Demonstrator.  Just click on the Shop Now button on the right side of the screen to go directly to my online store or contact me if you have any questions.  Happy Stamping!

Thanks for stopping by and have a great weekend!

Akiko

  • Visit my online store here
  • See the current Stampin’ Up! clearance rack specials here
  • Earn FREE Stampin’ Up! products through my Wildflower Frequent Shopper Program – my way of saying thank you to my frequent shopper online customers.
  • Have any questions? I’d be happy to help, click here to contact me.

Cardstock Cuts for this project:

  • Seaside Spray – 4 1/4″ x 11″, 3 1/2″ x 4 1/2″, 1/2″ x 3 1/4″
  • Gold foil – 3 9/16″ x 4 5/8″, 1/2″ x 3 1/4″, 2″ x 3″
  • Whisper White – 3 3/4″ x 5″

Stampin’ Up! products used in this project:


Stampin’ Up! Nature’s Beauty for the Happy Inkin’ Thursday Blog Hop

Good Morning! Today is my debut with the Happy Inkin’ Thursday Blog Hop and I feel so fortunate to be joining these talented stampers! I’m using the beautiful Stampin’ Up! Nature’s Beauty cling stamp set to make a woodland Wishing You Well card. You can find the supplies used to create this card at the bottom of my post along with the sizes of cardstock used.

We have a sketch challenge this week, and here is the sketch we are using:

I started by inking up the inside of my Woodland embossing folder with Soft Suede ink and embossing a panel of Sahara Sand card stock. There are lots of card designs where this embossing folder is inked up or stamped, but this is the first time I tried it and I was surprised at how easy it was to do – I thought it would be much harder and messier, but it was not. I need to do this more! Then I adhered the embossed panel to a Soft Suede card base with liquid glue.

I adhered a panel of the Toile Tidings Designer Series Paper to a Cajun Craze mat to create the middle panel. I stamped the Wishing You Well greeting from the Gather Together stamp set using Early Espresso ink on a strip of Cajun Craze cardstock and attached it to the bottom of the middle panel. I wrapped Cajun Craze linen thread around it and tied it off. I attached the middle panel to the card front with dimensionals and finished off the label with a pearl colored with the dark Cajun Craze Stampin’ Blend.

I stamped the deer from the Stampin’ Up! Nature’s Beauty stamp set in Early Espresso ink on a panel of Very Vanilla card stock. I colored it with Soft Suede, Crumb Cake and Smoky Slate Stampin’ Blends and then fussy cut it with paper snips. I stamped the trees from the Stampin’ Up! Nature’s Beauty stamp set on a panel of Very Vanilla and cut it out with the second largest circle die from the Layering Circles dies. I cut a mat from Cajun Craze cardstock using the largest Layering circle die and adhered the trees to the mat. I cut two of the small sprigs from the Beautiful Boughs dies and arranged them under the circle. I adhered the circle to the center panel with liquid glue and then adhered the deer between the trees.

I decorated the inside of the card by stamping the trees from the Stampin’ Up! Nature’s Beauty stamp set in Garden Green on a panel of Very Vanilla. I adhered a strip of the Toile Tidings DSP to the bottom of the panel. I adhered it to a Cajun Craze mat and then to the inside of the card.

In the USA, a portion of each sale of the Stampin’ Up! Nature’s Beauty will be donated to the National Alliance on Mental Illness (NAMI). The images in the stamp set are really beautiful and coordinate with the woodland Toile Tidings.

On with the Hop! Click the Next button below to visit Karen Ksenzakovic’s blog.

And just in case you get lost along the way, here’s a list of the team members participating in the hop today:


October 15 – 31 Host Code: 3KQUKV9U

Use this host code when you order and receive a free gift from me!  If your order is over $150, please do not use this code, but youโ€™ll still get the free gift.  The free gift is your choice of any item valued up to $10.00 in the 2018-19 Annual Catalog or in the 2019 Occasions Catalog!  That includes some of the Host Exclusive stamp sets!


If you need any stamping supplies, Iโ€™d be very happy to be your Demonstrator.  Just click on the Shop Now button on the right side of the screen to go directly to my online store or contact me if you have any questions.  Happy Stamping!

Thanks for visiting!

Akiko

  • Visit my online store here
  • See the current Stampin’ Up! clearance rack specials here
  • Earn FREE Stampin’ Up! products through my Wildflower Frequent Shopper Program – my way of saying thank you to my frequent shopper online customers.
  • Have any questions? I’d be happy to help, click here to contact me.

Cardstock Cuts for this project:

  • Soft Suede – 4 1/4″ x 11″
  • Sahara Sand – 3 7/8″ x 5 1/8″
  • Cajun Craze – 3 3/4″ x 5″, 2 7/8″ x 5 1/8″, 3/4″ x 2 1/2″, 3 1/4″ x 3 1/4″
  • Very Vanilla – 3 5/8″ x 4 7/8″, 3 1/4″ x 3 1/4″, 2″ x 3″
  • Garden Green – 2″ x 3″
  • Toile Tidings DSP – 2 3/4″ x 5 1/8″, 1/2″ x 3 5/8″

Stampin’ Up! products used in this project:


Stampin’ Up! Toile Christmas Cardinal Card

Happy Friday Morning! Today I am sharing a Christmas Card made with the Stampin’ Up! Toile Christmas cling stamp bundle along with the Merry Christmas to All photopolymer stamp set and Merry Christmas dies. Cardinals bring cheer during snowy winters and I’ve loved making cardinal Christmas cards through the years. This is the first cardinal that I’ve had that has a coordinating die, so I think it’s really special. You can find the supplies used to create this card at the bottom of my post along with the sizes of cardstock used.

I started by making a framed background using two of the papers in the Toile Tidings designer series paper and the stitched rectangles dies. I used the checked Real Red paper on the outside that I cut with the largest stitched rectangle die and the Real Red leaves and berries paper on the inside that was cut with the third largest die. I adhered both of these to a Very Vanilla panel that I cut out with the largest stitched rectangle die so that I would have a stronger background panel.

I die cut the Merry word from the Merry Christmas Dies and adhered it to the bottom of the framed panel with the fine tipped glue pen. I adhered the panel to the front of a Real Red card base with dimensionals. I stamped the Christmas greeting from the Merry Christmas To All stamp set in Real Red ink on a Very Vanilla scrap and cut it out with the long small stitched rectangle die. I used the two-step partial die cutting technique so that it would be cut close. I attached the word to the card under the Merry die cut.

I stamped the cardinal and long branch from the Stampin’ Up! Toile Christmas stamp set in Memento Tuxedo Black ink on Very Vanilla card stock. I colored the cardinal with the Real Red and So Saffron Stampin’ Blends. I also used my Crushed Curry Stampin’ Write Marker to give the cardinal’s beak some shadow (I’m going to get the Mango Melody Stampin’ Blends next, so I can use this color next time). I colored the branch with the Soft Suede and Real Red Stampin’ Blends and Garden Green Stampin’ Write Marker (I hope they come out with Garden Green Stampin’ Blends soon). I cut the cardinal and branch out with the coordinating dies and popped them on the card front with dimensionals. I finished off the card front with three green glitter enamel dots.

On the inside of the card, I stamped the greeting from the Merry Christmas To All stamp set in Real Red ink on a panel of Very Vanilla. I added a strip of the checked Toile Tidings designer series paper to the bottom.

I think I’m getting spoiled because coloring is so easy with the Stampin’ Blends. I used to use my Stampin’ Write Markers and stamp pads with the Blender pen or Aqua Painters to get a blended look when coloring. That was more cost effective and the effect was also beautiful. I will do this with a project next week.

I hope you like cardinal cards at Christmas! I’ll be on the lookout for these pretty birds as I drive around this weekend. I hope you have a great one!

Akiko


October 15 – 31 Host Code: 3KQUKV9U

Use this host code when you order and receive a free gift from me!  If your order is over $150, please do not use this code, but youโ€™ll still get the free gift.  The free gift is your choice of any item valued up to $10.00 in the 2018-19 Annual Catalog or in the 2019 Occasions Catalog!  That includes some of the Host Exclusive stamp sets!


If you need any stamping supplies, Iโ€™d be very happy to be your Demonstrator.  Just click on the Shop Now button on the right side of the screen to go directly to my online store or contact me if you have any questions.  Happy Stamping!

  • Visit my online store here
  • See the current Stampin’ Up! clearance rack specials here
  • Earn FREE Stampin’ Up! products through my Wildflower Frequent Shopper Program – my way of saying thank you to my frequent shopper online customers.
  • Have any questions? I’d be happy to help, click here to contact me.

Cardstock Cuts for this project:

  • Real Red – 5 1/2″ x 8 1/2″, 2 1/4″ x 3 3/4″
  • Very Vanilla – 4″ x 5 1/4″, 3 3/4″ x 5″, 1″ x 2 1/2″, 2 1/2″ x 5″, 2 1/2″ x 4 1/2″
  • Toile Tidings DSP (checked) – 4″ x 5 1/4″, 1/2″ x 3 3/4″
  • Toile Tidings DSP (leaves and berries) – 4 3/4″ x3 1/4″

Stampin’ Up! products used in this project:


Stampin’ Up! Joy of Giving Tag Kit

Good Morning! Today’s project is not a card, but a set of Christmas Tags made with the Stampin’ Up! Joy of Giving Tag Kit. This is an all inclusive kit that comes with a everything needed to make 30 Christmas tags. There are 3 designs and enough supplies to make 10 of each design.

This is an all inclusive kit that comes with a Poppy Parade Stampin’ Spot, a 17 piece photopolymer stamp set, a stamp block, Shaded Spruce solid Baker’s twine, gold foil stickers, decorated card bases, craft paper accents and gold foil accented Whisper White labels. Mini dimensionals and glue dots are also included along with instructions. It also comes with a Poppy Parade card box to hold the finished tags.

The first design features a gold foil deer in a circle with a craft frame and a Poppy Parade and Shaded Spruce background. I added a gold metallic pearl to the circle. The second design features a craft front stamped with Have a Merry Christmas and decorated with a red and green design accented with gold foil dots. The third design also features a craft front with Shaded Spruce scrolled ends and stamped with You’ve been very Nice. I stamped an extra set of leaves on the bottom of these tags using Shaded Spruce ink.

I pretty much followed the instructions and examples in the Stampin’ Up! Joy of Giving Tag Kit and the tags were pretty easy to make. The stamp set has additional sentiments and designs that could be used to change these designs or to use on other projects. The only tricky part was separating the gold foil stickers since they have intricate curls. The best way I found to do this was to carefully pull off the outside first and use a poky tool to pull off each individual scroll. They are so elegant, so it’s worth the extra effort. Poppy Parade and Shaded Spruce make a rich traditional Christmas color combination and the addition of craft with the gold foil accents are really beautiful. Plus, the tags are folded with a nice inside for adding additional decorations or a little greeting.

Thanks for visiting!

Akiko


October 15 – 31 Host Code: 3KQUKV9U

Use this host code when you order and receive a free gift from me!  If your order is over $150, please do not use this code, but youโ€™ll still get the free gift.  The free gift is your choice of any item valued up to $10.00 in the 2018-19 Annual Catalog or in the 2019 Occasions Catalog!  That includes some of the Host Exclusive stamp sets!


If you need any stamping supplies, Iโ€™d be very happy to be your Demonstrator.  Just click on the Shop Now button on the right side of the screen to go directly to my online store or contact me if you have any questions.  Happy Stamping!

  • Visit my online store here
  • See the current Stampin’ Up! clearance rack specials here
  • Earn FREE Stampin’ Up! products through my Wildflower Frequent Shopper Program – my way of saying thank you to my frequent shopper online customers.
  • Have any questions? I’d be happy to help, click here to contact me.

Stampin’ Up! products used in this project:


Stampin’ Up! Gather Together Season of Thanks Card

Good Morning! Today I’m sharing another card made with the wonderful Stampin’ Up! Gather Together photopolymer stamp set. This set has been my go to for fall cards and with the Come to Gather Designer Series paper, beautiful fall cards are so easy to put together. You can find the supplies used to create this card at the bottom of my post along with the sizes of cardstock used.

I cut a panel of the Merry Merlot maple leaf paper from the Come To Gather DSP pack and adhered it to a Cajun Craze card base. Then I took a panel of the wood panelling paper and adhered it to the bottom. I stamped the large maple leaf from the Stampin’ Up! Gather Together stamp set in Early Espresso ink on Very Vanilla and die cut it with the coordinating die. I colored it with Old Olive, Cajun Craze and Calypso Coral Stampin’ Blends.

I stamped the pumpkins in Cajun Craze ink on Very Vanilla cardstock and cut the out with the coordinating dies. I colored the stems with Old Olive Stampin’ Blends and the pumpkins themselves with Calypso Coral Stampin’ Blends. I then die cut the other two leaves from Old Olive and Cajun Craze cardstock. I adhered the smaller leaves to the card front with liquid glue and the large leaf and pumpkins with dimensionals.

I stamped the Season of Thanks sentiment from the Stampin’ Up! Gather Together stamp set in Early Espresso ink on a strip of Cajun Craze card stock. I used the large label from the Merry Christmas dies to cut it out. I arranged the die on the left side and cut it out, leaving a large space on the right. I moved the die to make the left side the same size as the right and ran it through the die cutting machine again to get a shorter label that matched the greeting. I adhered the label to the card front with dimensionals. I made a bow with the bride copper trim and attached it to the card front with glue dots.

I stamped the maple leaf in Cajun Craze ink on a panel of Very Vanilla card stock after stamping it off 4 times. I added a strip of the same maple leaf DSP to the bottom of the panel and attached it to the inside of the card.

Thanks for visiting!

Akiko


October 1 โ€“ 15 Host Code: 44YKETNJ

October 15 – 31 Host Code: 3KQUKV9U

Use this host code when you order and receive a free gift from me!  If your order is over $150, please do not use this code, but youโ€™ll still get the free gift.  The free gift is your choice of any item valued up to $10.00 in the 2018-19 Annual Catalog or in the 2019 Occasions Catalog!  That includes some of the Host Exclusive stamp sets!


If you need any stamping supplies, Iโ€™d be very happy to be your Demonstrator.  Just click on the Shop Now button on the right side of the screen to go directly to my online store or contact me if you have any questions.  Happy Stamping!

  • Visit my online store here
  • See the current Stampin’ Up! clearance rack specials here
  • Earn FREE Stampin’ Up! products through my Wildflower Frequent Shopper Program – my way of saying thank you to my frequent shopper online customers.
  • Have any questions? I’d be happy to help, click here to contact me.

Cardstock Cuts for this project:

  • Cajun Craze – 4 1/4″ x 11″, 2″ x 2″, 2 1/4″ x 2 1/2″
  • Very Vanilla – 3 3/4″ x 5″, 3″ x 3″, 3 1/4″ x 1 1/4″
  • Come to Gather DSP – 3 3/4″ x 5″,
  • Old Olive – 2″ x 2″

Stampin’ Up! products used in this project:


Stampin’ Up! So Many Stars Christmas Card

Happy Monday morning! Today I’m sharing a sparkly card that I made during my Facebook Live presentation yesterday. I used the Stampin’ Up! So Many Stars photopolymer stamp set along with the Stitched Stars dies. These are currently available in a bundle at 10% off and I sure hope they get carried over because they are both fabulous! You can find the supplies used to create this card at the bottom of my post along with the sizes of cardstock used.

My card was inspired by a one that I made a few years back with the now retired Stampin’ Up! Christmas Star stamp. That card had a beautiful silver embossed dimensional star on a navy embossed background, but I had to cut it out by hand. Today’s card has the stitched dies that make cutting so much faster and accurate. Plus, it has the gold glitter star flourish behind the star. In the video, I show how to score and fold the star to make it 3D. It gives the card a special touch. Here’s the video.

I also posted it to my YouTube channel and you can view it here.

I hope that you like the card and enjoyed the video. I know all the glitter and sparkle may be a little too much for everyone’s tastes, but this set is so versatile that I’m sure I can come up with a star filled design that is a little simpler next time. Thanks for visiting!

Akiko


October 1 โ€“ 15 Host Code: 44YKETNJ

October 15 – 31 Host Code: 3KQUKV9U

Use this host code when you order and receive a free gift from me!  If your order is over $150, please do not use this code, but youโ€™ll still get the free gift.  The free gift is your choice of any item valued up to $10.00 in the 2018-19 Annual Catalog or in the 2019 Occasions Catalog!  That includes some of the Host Exclusive stamp sets!


If you need any stamping supplies, Iโ€™d be very happy to be your Demonstrator.  Just click on the Shop Now button on the right side of the screen to go directly to my online store or contact me if you have any questions.  Happy Stamping!

  • Visit my online store here
  • See the current Stampin’ Up! clearance rack specials here
  • Earn FREE Stampin’ Up! products through my Wildflower Frequent Shopper Program – my way of saying thank you to my frequent shopper online customers.
  • Have any questions? I’d be happy to help, click here to contact me.

Cardstock Cuts for this project:

  • Thick Very Vanilla – 4 ยผโ€ x 11โ€
  • Very Vanilla – 3 ยพโ€ x 5โ€, 1 ยผโ€ x 4 ยฝโ€, 3 ยฝโ€ x 4 ยพโ€, 2 ยพโ€ x 2 ยพโ€
  • Gold Glimmer – 3 ยพโ€ x 5โ€

Stampin’ Up! products used in this project:


Stampin’ Up! Snowman Season Christmas Card

Good Morning! Here’s a cute little snowman Christmas Card made with the Stampin’ Up! Snowman Season photopolymer stamp set. I also used the Let It Snow Speciality Designer Paper to create a layered look. This is is such a happy color combination, sure to make Christmas merry! You can find the supplies used to create this card at the bottom of my post along with the sizes of cardstock used. Here’s the card:

I started building the background by cutting the Let It Snow DSP pieces. I matted the large panel on Basic Black and the smaller layering pieces on Real Red. I adhered it all together with liquid glue.

I then stamped the snowman from the Stampin’ Up! Snowman Season stamp set in Memento Tuxedo Black ink on a Panel of Whisper White. I colored it with Real Red, Pool Party, Calypso Coral, Shaded Spruce and Soft Suede Stampin’ Blends. I then cut it out with the largest circle from the Stitched Shapes dies. I added some Snowfall Accents Puff Paint and heat set it. It is so amazing to watch it puff up!! Be careful though as it will start to turn brown if heated too much.

I used the largest scalloped circle from the Layering Circles dies to cut a Real Red mat and adhered it to the back of the circle. I created the label by stamping the Christmas Cheer sentiment from the Itty Bitty Christmas stamp set in Memento Tuxedo Black Ink on a strip of Real Red and trimmed the end. I adhered this to the layered background with liquid glue and then tied the curly ribbon around it and made a bow. I adhered the Snowman Circle to the background with dimensionals and used dimensionals to attach it all to a Real Red card base.

On the inside, I stamped the sentiment from the Stampin’ Up! Snowman Season stamp set in Real Red ink on a panel of Whisper White. I added some snowflakes in Coastal Cabana ink and added a strip of the little snowmen paper to the bottom. I adhered it to a Basic Black mat and then to the inside of the card.

Snowmen are great themes for Christmas cards and for Winter cards afterwards. The snowmen in the Stampin’ Up! Snowman Season stamp set are happy and whimsical and the Let It Snow Specialty Designer paper is a winner too! Thanks for visiting and have a great weekend!

Akiko


October 1 โ€“ 15 Host Code: 44YKETNJ

Use this host code when you order and receive a free gift from me!  If your order is over $150, please do not use this code, but youโ€™ll still get the free gift.  The free gift is your choice of any item valued up to $10.00 in the 2018-19 Annual Catalog or in the 2019 Occasions Catalog!  That includes some of the Host Exclusive stamp sets!


If you need any stamping supplies, Iโ€™d be very happy to be your Demonstrator.  Just click on the Shop Now button on the right side of the screen to go directly to my online store or contact me if you have any questions.  Happy Stamping!

  • Visit my online store here
  • See the current Stampin’ Up! clearance rack specials here
  • Earn FREE Stampin’ Up! products through my Wildflower Frequent Shopper Program – my way of saying thank you to my frequent shopper online customers.
  • Have any questions? I’d be happy to help, click here to contact me.

Cardstock Cuts for this project:

  • Real Red – 4 1/4″ x 11″, 1 5/8″ x 4 5/8″, 1/2″ x 3″, 2 1/8″ x 2 7/8″, 3 1/2″ x 3 1/2″
  • Basic Black – 4″ x 5 1/4″, 3 3/4″ x 5″
  • Whisper White – 3 5/8″ x 4 7/8″, 3 1/2″ x 3 1/2″
  • Let It Snow DSP – 3 7/8″ x 5 1/8″, 3/4″ x 3 5/8″, 1 1/2″ x 4 1/2″, 2″ x 2 3/4″

Stampin’ Up! products used in this project: