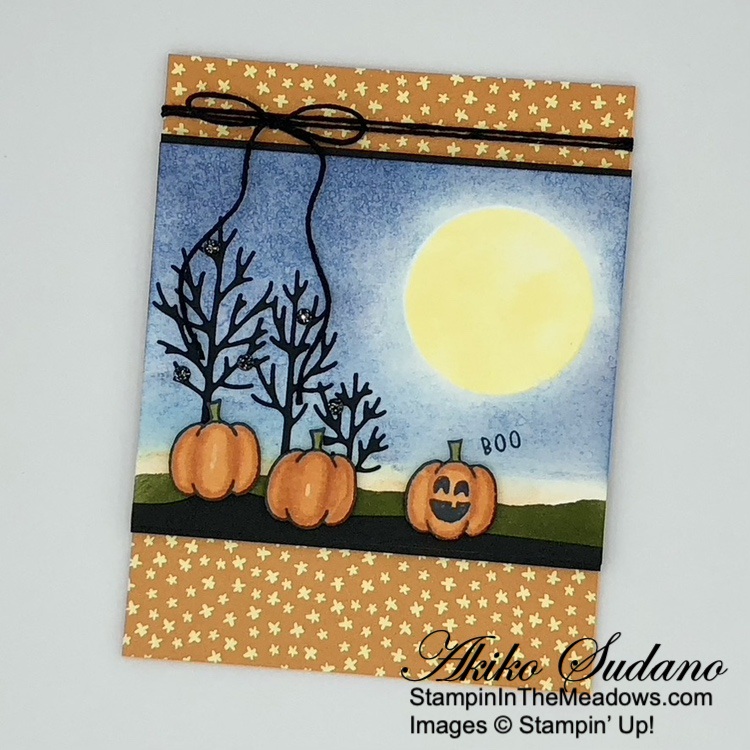
Good Morning! Welcome to the September Inkin’ Krew Team Blog Hop! The theme for this month’s hop is “Halloween Fun” and I used the sweet Stampin’ Up! Choose Happy stamp set along with the Frosted Forest dies to create a spooky Halloween scene. You can find the supplies I used along with card stock cuts at the bottom of my post.

I adhered a panel of Flowering Zinnias designer series paper to the front of a Pumpkin Pie card base with liquid glue. I cut a mask of the moon using the third smallest circle die from the Stylish shapes dies and adhered the background to a Basic White panel. I used a sponge dauber to apply Lemon Lolly ink to the open circle to make the moon. I removed the mask and covered the moon with the die cut circle. I tore a piece of printer paper and covered the top of the panel and applied Mossy Meadow ink to the bottom edge with a sponge dauber to color the ground. I removed the printer paper and used the other panel cover the ground so I could color the sky.
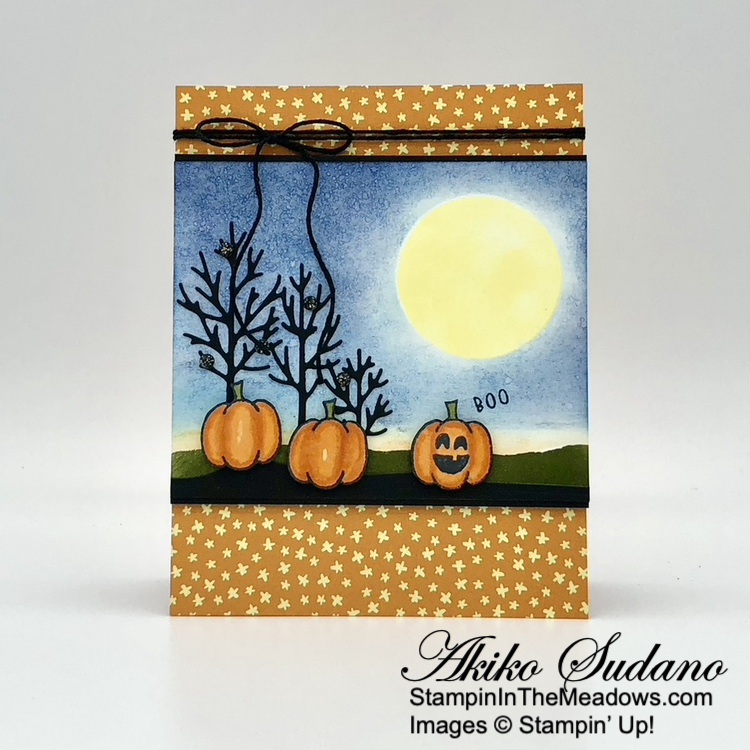
For the sky, I carefully applied a thin layer of Pumpkin Pie ink next to the ground and colored the rest of the sky lightly with Balmy Blue ink. I used another sponge dauber to apply Blueberry Bushel ink to darken the sky and finally applied Night of Navy ink to intensify the color until I got the look I wanted. I spritzed some water over the sky and blotted it with a paper towel. I removed the mask covering the moon and adhered the panel to a Basic Black mat.
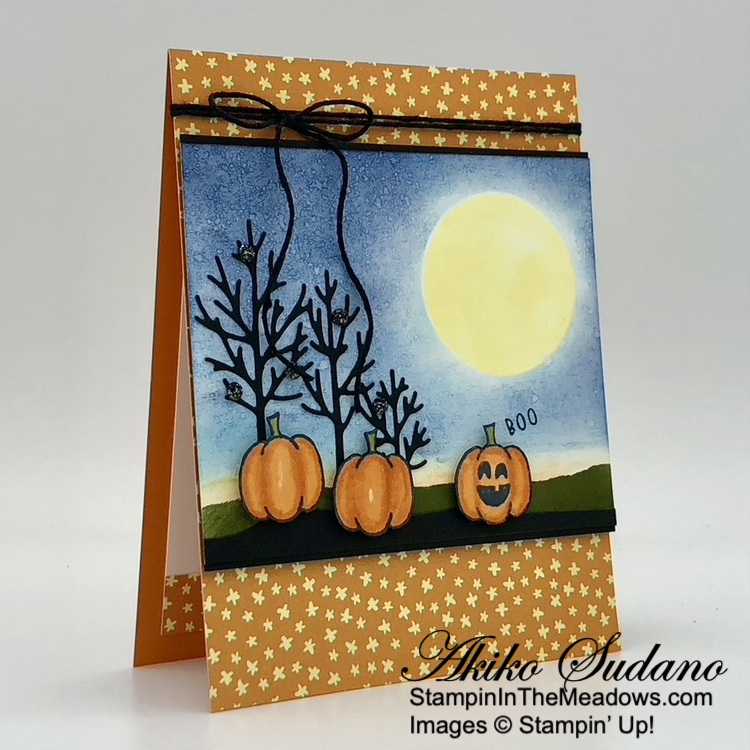
I stamped four pumpkins from the Stampin’ Up! Choose Happy stamp set in Memento Tuxedo Black ink on Basic White. I colored them with Mossy Meadow and Pumpkin Pie Stampin’ Blends. I stamped Jack-O-Lantern faces on two pumpkins and fussy cut them with my paper snips. I used a Basic Black Stampin’ Write marker to color the edges of the card stock, so the white would not show. I used the bare tree die from the Frosted Forest dies to cut a Basic Black panel and adhered the trees to the background with tiny dots of liquid glue.

I arranged the pumpkins on the panel and stamped the ‘Boo‘ sentiment from the Stampin’ Up! Choose Happy stamp set using Memento tuxedo Black ink. I adhered the pumpkins to the panel with dimensionals and adhered the panel to the card front with more dimensionals. I wrapped the top of the card with black baker’s twine, making a bow and added black sparkle dots to the trees.

For the inside of the card, I stamped the ‘happy‘ sentiment from the Stampin’ Up! Choose Happy stamp set in Memento Tuxedo Black ink on a Basic White panel. I used the Mini Alphabet dies to cut letters to spell ‘Halloween‘ from Pumpkin Pie card stock and adhered them with liquid glue. I adhered the Jack-O-Lantern, trimmed the bottom with DSP and adhered the panel to the inside of the card with Stampin’ Seal.
I haven’t done a sponged night scene in a long time, and it was fun to go back to an old technique. This was the first time that I’ve spritzed it with water, and I love how it came out. There are so many Stampin’ Up! dies (and stamp sets) that could be used with this old school technique, and the beauty is that because it’s made by hand, the sky will be different and unique every time!
On With The Hop! Click on the Next Blog button to move forward to Karen Finkle’s project or click the Previous Blog button to move back to see the project that Tara Carpenter created.


If you get lost along the way, here are the participants for the hop:
- Christie King
- Mary Deatherage
- Karen Ksenzakovic
- Tara Carpenter
- Akiko Sudano <– you are here
- Karen Finkle
- Carol Buckalew
- Terry Lynn Bright
- Amy Koenders
Current Host Code: 37AE7ZXV
Use this host code when you order $50 or more and receive a Thank You gift from me! The free gift is your choice of any currently available item valued up to $10.00.
If your order is over $150, please do not use the host code since you’ll receive your own Host Dollars plus I’ll still send you the Thank You gift! This host code can be used by anyone, no club or commitment required. Let me know if you have any questions.
If you need any stamping supplies, I’d be very happy to be your Demonstrator. Just click on the Shop Now button on the right side of the screen to go directly to my online store or contact me if you have any questions. Happy Stamping!
Thanks for stopping by and have a great week!
Akiko
- Visit my online store here
- See the current Stampin’ Up! clearance rack specials here
- Earn FREE Stampin’ Up! products through my Wildflower Frequent Shopper Program – my way of saying thank you to my online frequent shopper customers.
- Have any questions? I’d be happy to help, click here to contact me.
Cardstock Cuts for this project:
- Pumpkin Pie – 4-1/4″ x 11″ card base, 5-1/2″ , 1″ x 6″ (die cut letters)
- Basic Black – 3-5/8″ x 4-1/4″ (front mat), 3″ x 4-1/4″ (die cut trees)
- Basic White – 3-3/4″ x 5″ (inside panel), 3-1/2″ x 4-1/4″ (art panel), 1-1/2″ x 4″ (fussy cut pumpkins)
- Flowering Zinnias DSP DSP – 4-1/4″ x 5-1/2″ (front background), 1/2″ x 3-3/4″ (inside trim)
Stampin’ Up! products used in this project:
")


 Designer Series Paper")


Oh! My! Goodness!! This is so cute Akiko. Perfect background DSP, I love it!! I totally forgot about this set.
Thank you!! 😊
too cute!!! TFS
Thank you!! 😊
How cute!! Love the spooky Halloween scene that you’ve created. Fun little pumpkins! 🙂
Thank you!! 😊
I know it’s supposed to be “scary” but – it’s SO darned pretty it just can’t be! I LOVE your full moon -it’s perfect! 🙂
Great halloween card Akiko, perfect scene for the theme.
Thank you!! 😊
Absolutely adorable, Akiko! I love your ink blended sky! Perfect for a scary Halloween scene!
Thank you!! 😊
Love a smiling pumpkin! Well done!
Thank you!! 😊