
Good Morning and welcome to the Happy Inkin’ Thursday Blog Hop! We had a few snow flurries (luckily no accumulation) the day before yesterday and the timing was perfect for today’s card. I used the pretty Stampin’ Up! Sparkling Snowflakes stamp set to make this snow filled DSP for today’s card. You can find the supplies I used along with card stock cuts at the bottom of my post.
We have a theme challenge this week:
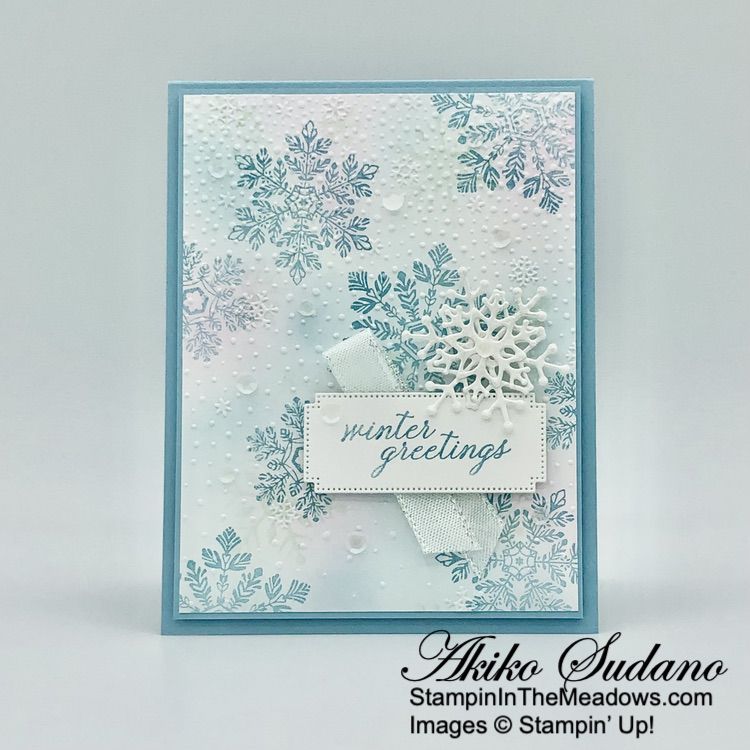
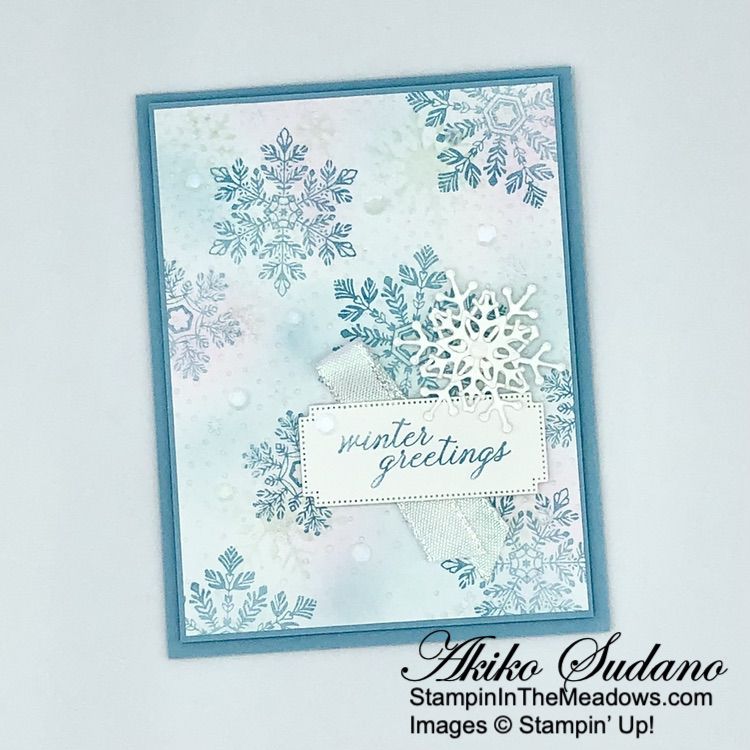
I used Blending Brushes to apply Balmy Blue and Fresh Freesia ink to a Basic White panel. Then I used the snowflake mask from the Abundant Beauty masks and another blending brush to lightly apply some pool party ink to the panel. Then I stamped the pretty snowflakes from the Stampin’ Up! Sparkling Snowflakes using Balmy Blue ink around the panel. Finally, I embossed the stamped panel with the Snowflake Sky 3D embossing folder.

I adhered the stamped and embossed panel to a Balmy Blue mat and adhered it to a Balmy Blue card base with dimensionals. I stamped the sentiment from the Stampin’ Up! Sparkling Snowflakes stamp set in Balmy Blue ink on a Basic White panel and cut it out with the label die from the Autumn Leaves dies. I folded a length of white iridescent ribbon and secured it to the back with glue dots and adhered the label to the card with dimensionals.
I cut the two large snowflakes from the Chic dies from Basic White and brushed som white Pearlized Enamel Effects over the front. After it dried (I waited about 15 minutes) I adhered them together with glue dots and popped them on the card with bits of dimensionals. It’s hard to see in the pictures, but the shimmer is pretty! I put a white sequin in the middle and scattered a bunch more around the card front.
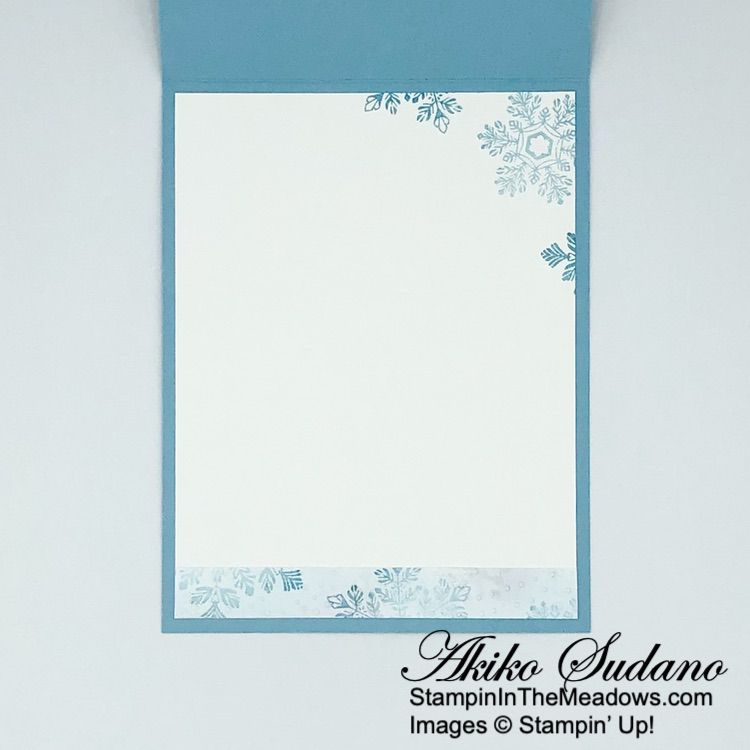
For the inside of the card, I stamped the snowflakes from the Stampin’ Up! Sparkling Snowflakes in Balmy Blue ink on a Basic White panel. I made a 1/2″ strip of Basic White paper to match the design on the card front (It would have been easier to just make a larger panel and cut off 1/2″ from the bottom) and adhered it to the bottom of the panel. I adhered the panel to the inside of the card with Stampin’ Seal.
The snowflakes in the Stampin’ Up! Sparkling Snowflakes stamp set are so beautiful and detailed! The sentiments are gorgeous too, and the set is on the Carry Over list, so Yay!
On with the Hop! Click on the Next Blog button to move forward to see the beautiful project Karen Ksenzakovic has created.

If you get lost along the way, here are the participants for the hop:
- Amy Koenders
- Mary Deatherage
- Jaimie Babarczy
- Karen Finkle
- Akiko Sudano <– You Are Here
- Karen Ksenzakovic
- Tara Carpenter
- Terry Lynn Bright
- Carol Buckalew
- Nel Thames
Current Host Code: 27CYQXTT
Use this host code when you order $50 or more and receive a free gift from me! The free gift is your choice of any item currently available valued up to $10.00!
If your order is over $150, please do not use the host code since you’ll receive your own Host Dollars plus I’ll still send you the free gift! This host code can be used by anyone, no club or commitment required. Let me know if you have any questions.
If you need any stamping supplies, I’d be very happy to be your Demonstrator. Just click on the Shop Now button on the right side of the screen to go directly to my online store or contact me if you have any questions.
Thanks for stopping by and Happy Stamping!
Akiko
- Visit my online store here
- See the current Stampin’ Up! clearance rack specials here
- Earn FREE Stampin’ Up! products through my Wildflower Frequent Shopper Program – my way of saying thank you to my online frequent shopper customers.
- Have any questions? I’d be happy to help, click here to contact me.
Cardstock Cuts for this project:
- Balmy Blue – 4-1/4″ x 11″ card base scored at 5-1/2″, 4″ x 5-1/4″ (front mat)
- Basic White – 4″ x 5-1/4″ (inside panel), 1/2″ x 4″ (inside trim), 3-7/8″ x 5-1/8″ (front background), 1-3/4″ x 2″ (large die cut snowflake), 1-1/4″ x 1-1/2″ (small die cut snowflake), 1-1/2″ x 3″ (label)
Stampin’ Up! products used in this project:
")


 Iridescent Ribbon")


WOW!! This is absolutely gorgeous Akiko 🙂 Love everything about this card, the colors are perfect. I completely forgot about that mask
Thanks so much Karen! 😊
Just beautiful Akiko! Love the soft colors and the embossed background is perfect! 🙂
Thanks so much Amy!! 😊
Simple and simply gorgeous! I love it! 🙂
Thanks so much Mary!! 😊
Absolutely stunning card, Akiko!
Thanks so much Carol!! 😊
Lovely, lovely, lovely! Great colors and fits the theme perfectly!
Thanks so much Julie!! 😊