Stampin’ Up! Welcoming Woods Winter Birthday Card

Happy Saturday! The Stampin’ Up! Welcoming Woods stamp set is one of the prettiest woodland stamp sets and it’s great for all seasons. And it has lots of sentiments that use the prettiest font that are appropriate for lots of occasions. Today’s card is an elegant Birthday Card with an embossed snowy scene that is perfect for winter birthdays. You can find the supplies I used at the bottom of my post along with the sizes of cardstock used.

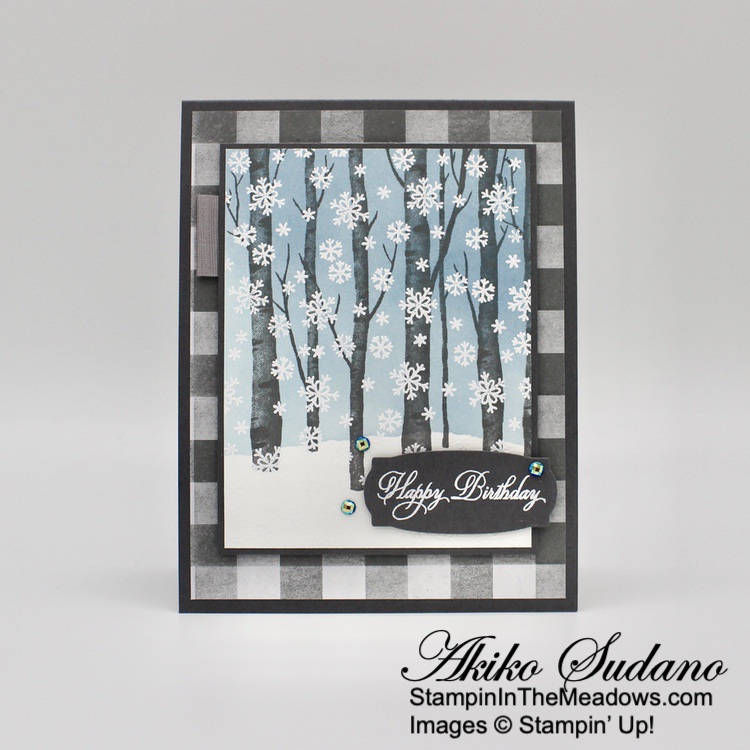
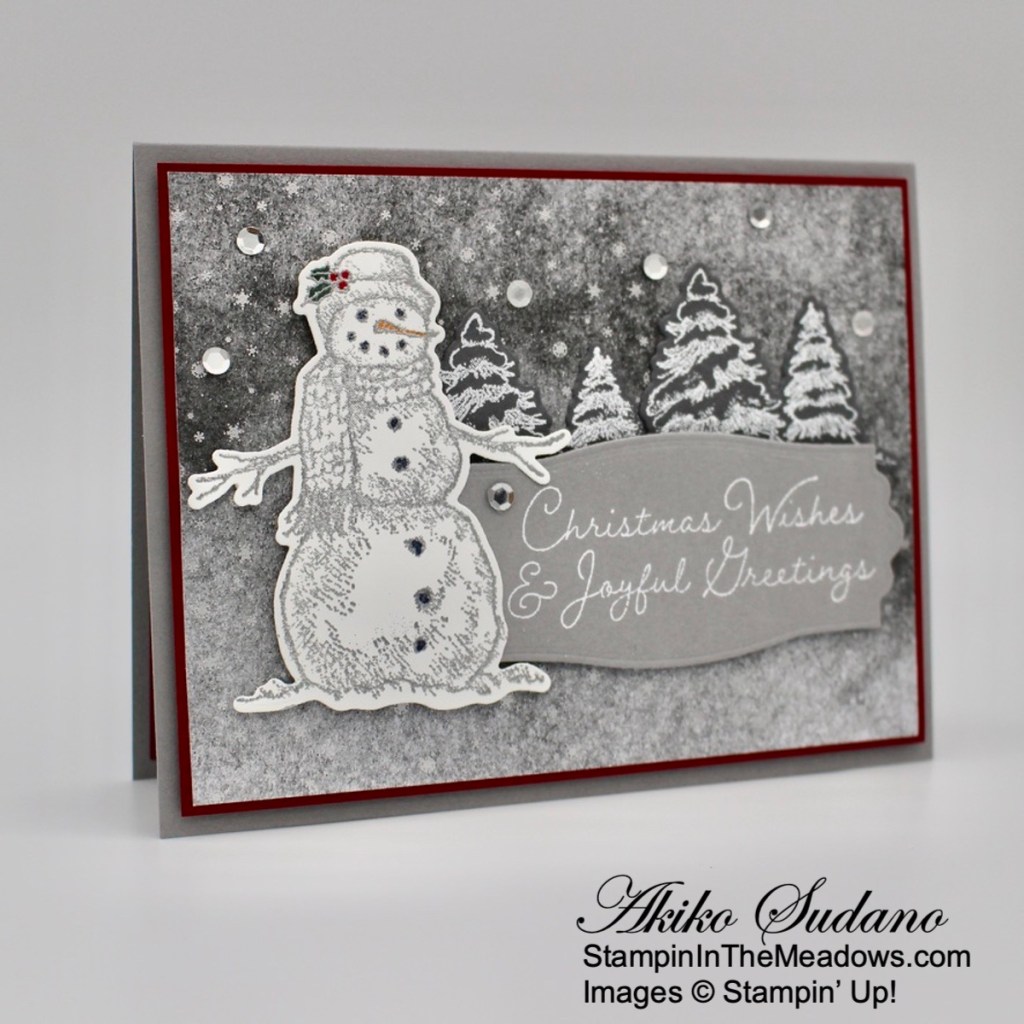
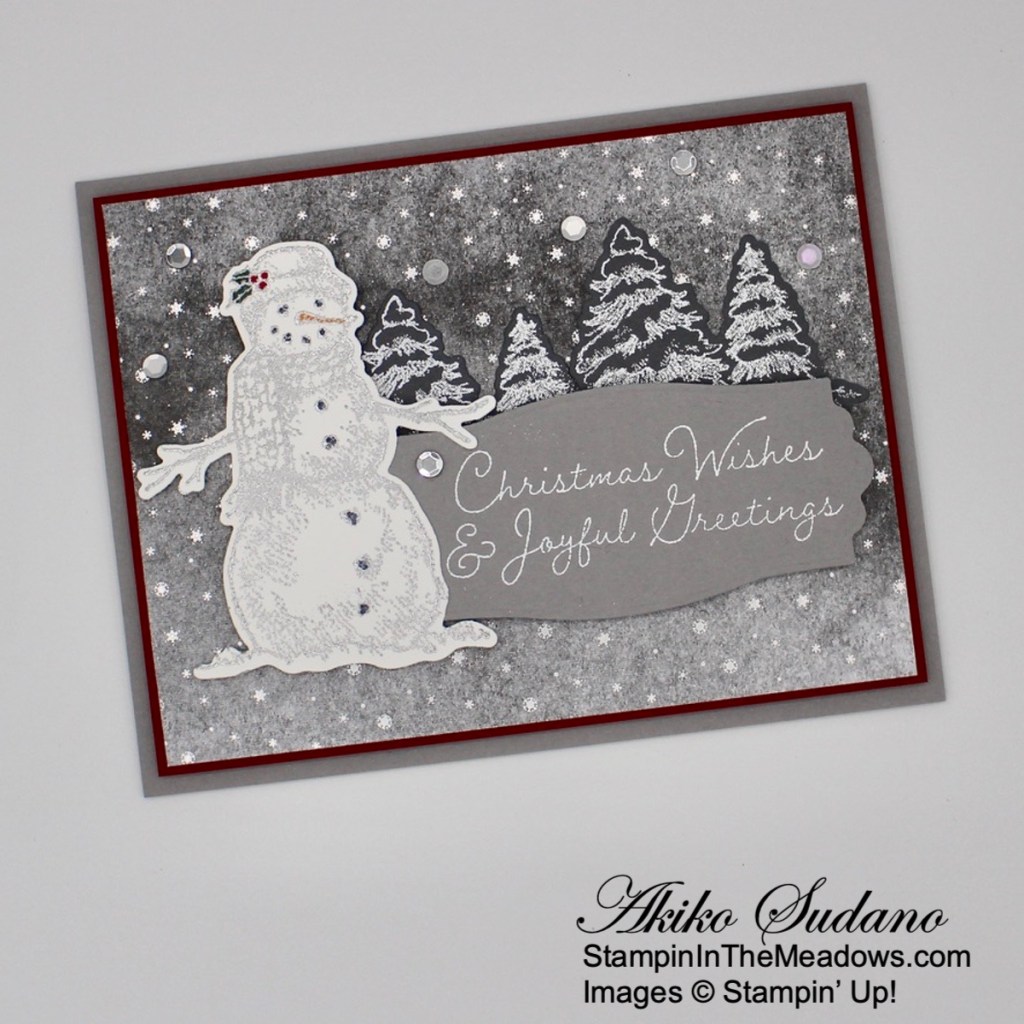
I adhered a panel of Peaceful Place specialty designer series paper to the front of a Basic Gray card base with liquid glue. I tore a couple of sticky notes to create a mask for a snowy ground and adhered them to the bottom of a Basic White panel, covering the bottom 1″ of the panel. I used blending brushes to apply Balmy Blue and Misty Moonlight ink to the top of the panel over the mask to color the sky – I love how the snowy ground reveals itself when you remove the masks.

I stamped the trees from the Stampin’ Up! Welcoming Woods photopolymer stamp set in Basic Gray so that the tree tops cover the panel top. I stamped it twice, getting a thin tree trunk on the right side, but you could center it more if you want. I let it dry for a couple of hours and then stamped the snowflakes all over the image in Versamark ink. I sprinkled the image with white embossing powder and shook off the excess. I heated the powder with my heat tool until shiny and then adhered the image to a Basic Gray mat with liquid glue.

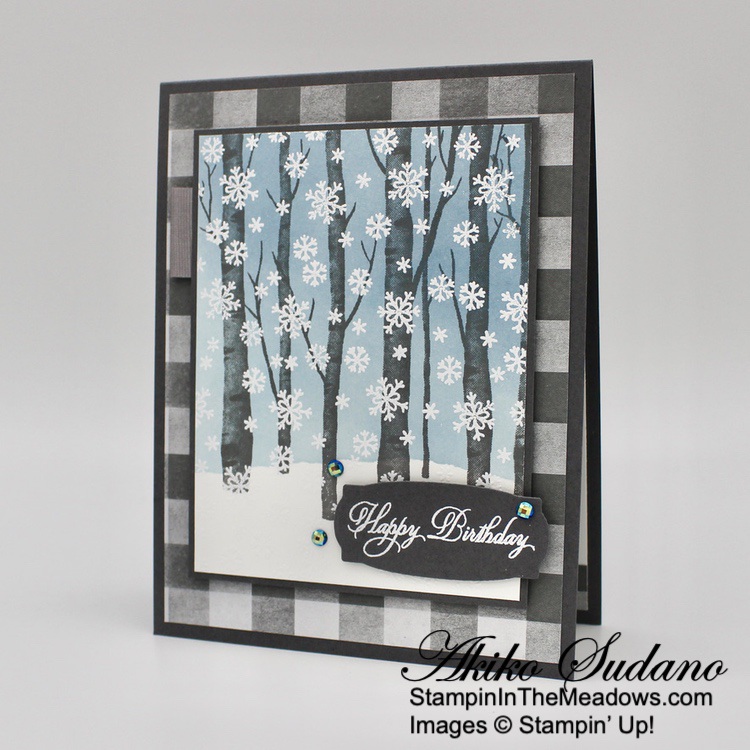
I folded a short length of Smoky slate ribbon and adhered it to the top right back of the layered stamped panel with glue dots. I adhered the panel to the front of the card with dimensionals. I stamped the sentiment from the Stampin’ Up! Welcoming Woods stamp set in Versamark ink and sprinkled it with white embossing powder. I shook off the excess and heated the powder with my heat tool until shiny. I used the Messages die to cut out the sentiment and adhered it to the front of the card with dimensionals. I finished the card with three blue gems.

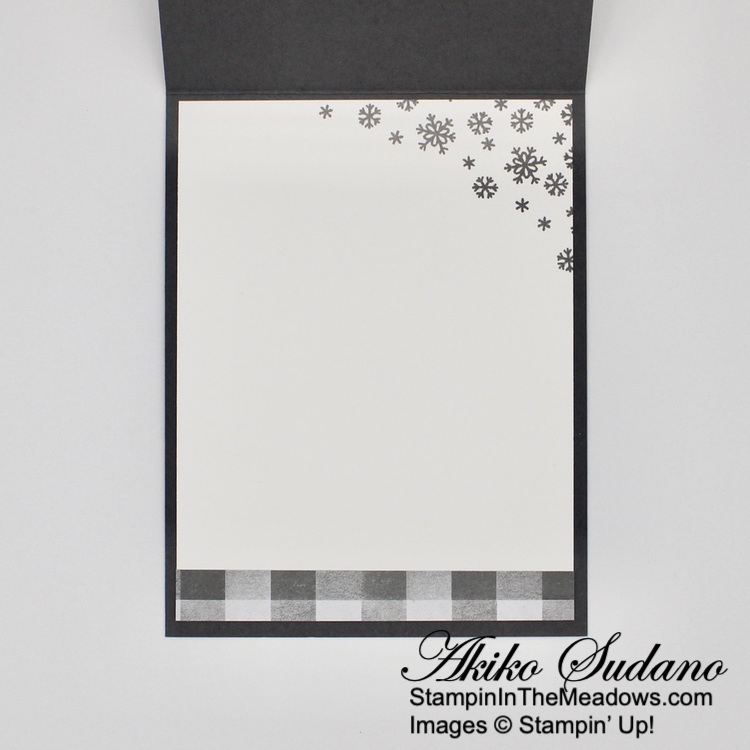
For the inside of the card, I stamped the snowflakes from the Stampin’ Up! Welcoming Woods stamp set in Basic Gray in the top corner of a Basic White panel. I adhered a strip of Peaceful Place specialty designer series paper to the bottom of the panel and adhered the panel to the inside of the card.

The Stampin’ Up! Welcoming Woods stamp set is such a pretty stamp set and it’s on the retiring list, so get it before it’s gone! So I just noticed that the Peaceful Place specialty designer series paper just sold out and is no longer available. So instead of having a gray plaid background for the scene which reminds me of a warm flannel shirt (and you may have some other retired gray plaid papers in your stash), you could use a wood themed embossing folder such as the Timber 3D or Bark 3D folders on a Basic Gray panel. Or perhaps use the Birch background stamp in Basic Gray ink on Smoky Slate card stock. The Welcoming Woods stamp set would go well against any of these backgrounds!


January’s Paper Pumpkin Kit is Kisses & Hugs!

We all know that roses are red and violets are blue—it’s time that love-themed cards got an upgrade! The Kisses & Hugs Paper Pumpkin Kit will help you express that forever kind of love with heart-shaped cards that would make Cupid jealous.

The Kisses & Hugs kit is not bound to just Valentine’s Day, it works for all love occasions year-round like anniversaries, weddings, birthdays, or those “just because” days.

Details:

  • Contains enough supplies to create 10 cards and coordinating envelopes.
  • Perfect for all love occasions throughout the year like Valentine’s Day, anniversaries, weddings, honeymoons, birthdays, and more!
  • Includes an exclusive stamp set and a Gray Granite Classic Stampin’ Spot.
  • Create matching treats with the coordinating Kisses & Hugs Mini Treat Boxes (item 160147)

f you’re interested in subscribing to Paper Pumpkin, you can either sign up for a subscription where you are billed monthly for your kit or you can purchase a prepaid subscription in my Online Store. To see more information and to sign up for the monthly subscription click here. To see the options for prepaid subscriptions in my Online Store, click here.

Sign up deadline for the January 2022 kit is January 10, 2022. Supplies may be limited toward the end of the subscription period.


Last Chance Products Sale Going on Now!

The July–December 2021 Mini Catalog will be retiring soon! It’s always bittersweet to see a classic Stampin’ Up! catalog take a trip to retirement. But, we’re looking forward to all the new products on their way—and we hope you are, too!

Stock up on your favorite products before they’re gone for good! After all, this selection of Last Chance Products is only available through January 3, 2022 or while supplies last.

Click Here to download a PDF with the retiring products.

Click Here to download a PDF with the carry over list of products.

Click Here to Shop the Last Chance Products in my Online Store now!


Current Host Code: H6UDQF6U

Use this host code when you order $50 or more and receive a free gift from me!  The free gift is your choice of any item valued up to $10.00 in the 2021-2022 Annual Catalog or the July – December 2021 Mini Catalog!

If your order is over $150, please do not use the host code since you’ll receive your own Host Dollars plus I’ll still send you the free gift!  This host code can be used by anyone, no club or commitment required. Let me know if you have any questions.


If you need any stamping supplies, I’d be very happy to be your Demonstrator.  Just click on the Shop Now button on the right side of the screen to go directly to my online store or contact me if you have any questions.  Happy Stamping!

Thanks for stopping by and have a great week!

Akiko

  • Visit my online store here
  • See the current Stampin’ Up! clearance rack specials here
  • Earn FREE Stampin’ Up! products through my Wildflower Frequent Shopper Program – my way of saying thank you to my online frequent shopper customers.
  • Have any questions? I’d be happy to help, click here to contact me.

Cardstock Cuts for this project:

  • Basic Gray – 4-1/4″ x 11″ card base scored at 5-1/2″, 3-3/8″ x 4-3/8″ (art panel mat), 1-1/4″ x 2-1/2″ (label)
  • Basic White – 4″ x 5-1/4″ (inside panel), 3-1/4″ x 4-1/4″ (art panel)
  • Peaceful Home specialty DSP – 4″ x 5-1/4″ (front background), 1/2″ x 4″ (inside trim)

Stampin’ Up! products used in this project:


Stampin’ Up! Merry Snowflakes for the Happy Inkin’ Thursday Blog Hop

Good morning and welcome to the Happy Inkin’ Thursday Blog Hop! I used the Stampin’ Up! Merry Snowflakes stamp set to make a snowflake themed Christmas card. I paired it with the beautiful Peaceful Place specialty designer series paper to create a white, silver and gray winter wonderland. You can find the supplies I used at the bottom of my post along with the sizes of cardstock used.

We have a theme challenge this week of Christmas!

I adhered a panel of Peaceful Place specialty designer series paper to a Smoky Slate mat and adhered a Wonderful Snowflake to it with liquid glue. I wrapped it with Metallic Mesh ribbon tying a knot on the side. I adhered the panel to the front of a Thick Basic White card base.

I stamped the sentiment from the Stampin’ Up! Merry Snowflakes cling stamp set in Versamark ink on a Smoky Slate panel. I sprinkled it with white embossing powder and shook off the excess. I heat set it with my heat tool until shiny and cut it out with the medium label die from the Seasonal Labels dies.

I adhered the label to the card front with dimensionals over the ribbon and snowflake. I finished the card front with silver epoxy dots.

For the inside of the card, I stamped the small snowflake from the Stampin’ Up! Merry Snowflakes stamp set in Versamark ink in the corner of a Basic White panel. I sprinkled it with silver embossing powder and and shook off the excess. I heat set it with my heat tool until shiny. I stamped the sentiment in Basic Gray and trimmed the bottom with Peaceful Place specialty DSP. I adhered the panel to the inside of the card.

The sentiments from the Stampin’ Up! Merry Snowflakes stamp set are so festive and wonderful for sending Christmas Wishes. How are your Christmas cards coming along? We have about a month left before we start mailing them!

On with the Hop! Click on the Next Blog button to move forward to see the beautiful project Karen Ksenzakovic has created.

If you get lost along the way, here are the participants for the hop:


Current Host Code: PYA3MMQ6

Use this host code when you order $50 or more and receive a free gift from me!  The free gift is your choice of any item valued up to $10.00 in the 2021 – 2022 Annual Catalog or the July – December 2021 Mini Catalog including some of the host stamp sets!

If your order is over $150, please do not use the host code since you’ll receive your own Host Dollars plus I’ll still send you the free gift!  This host code can be used by anyone, no club or commitment required. Let me know if you have any questions.


If you need any stamping supplies, I’d be very happy to be your Demonstrator.  Just click on the Shop Now button on the right side of the screen to go directly to my online store or contact me if you have any questions. 

Thanks for stopping by and Happy Stamping!

Akiko

  • Visit my online store here
  • See the current Stampin’ Up! clearance rack specials here
  • Earn FREE Stampin’ Up! products through my Wildflower Frequent Shopper Program – my way of saying thank you to my online frequent shopper customers.
  • Have any questions? I’d be happy to help, click here to contact me.

Cardstock Cuts for this project:

  • Thick Basic white – 4-1/4″ x 11″ card base scored at 5-1/2″
  • Smoky Slate – 4″ x 5-1/4″ (front mat), 2-1/2″ x 3-3/4″ (label)
  • Basic White – 4″ x 5-1/4″ (inside panel)
  • Peaceful Place specialty DSP – 3-7/8″ x 5-1/8″, 1/2″ x 4″ (inside trim)

Stampin’ Up! products used in this project:


Stampin’ Up! Snow Wonder for the Happy Inkin’ Thursday Blog Hop

Good morning and welcome to the Happy Inkin’ Thursday Blog Hop! I made a Christmas card with the pretty Stampin’ Up! Snow Wonder cling stamp set and coordinating Snow Time dies for today. I combined them with the beautiful Peaceful Place specialty designer series paper. You can find the supplies I used at the bottom of my post along with the sizes of cardstock used.

We have a sketch challenge this week and I kind of followed it:

I adhered a panel of Peaceful Place designer series paper to a Cherry Cobbler mat and adhered it to the front of a Smoky Slate card base with dimensionals. I stamped two sets of the trees from the Stampin’ Up! Snow Wonder cling stamp set in Versamark ink on Basic Gray card stock. I sprinkled them with white embossing powder and shook off the excess. I heat set the powder with my heat tool and cut the trees out with the coordinating die from the Snow Time dies. I adhered the trees to the card front with glue dots.

I stamped the sentiment from the Stampin’ Up! Snow Wonder stamp set in Versamark ink on Smoky Slate and sprinkled it with white embossing powder. I shook off the excess and heat set the powder with my heat tool. I cut it out with the large label from the Snow Time dies and adhered it to the card front with dimensionals.

I stamped the snowman from the Stampin’ Up! Snow Wonder stamp set in Versamark ink on Basic White and sprinkled in silver embossing powder. I shook off the excess and heat set the powder with my heat tool until it was shiny. I cut it out with the coordinating die and colored it with Stampin’ Blends. I used Evening Evergreen and Cherry Cobbler on the holly, Pumpkin Pie on the carrot and Basic Black on the eyes, mouth and buttons. I adhered it to the card front with dimensionals and adhered some subtle shimmer sequins around the card with glue dots – I love these pretty sequins!

It’s really hard to see, but I embossed the upper corner of a Basic White panel with the snowflake corner die from the Snow Time dies and stamped the sentiment from the Stampin’ Up! Snow Wonder stamp set in Smoky Slate. I adhered the panel to a Cherry Cobbler mat and adhered it to the inside of the card.

The snowman from the Stampin’ Up! Snow Wonder stamp set is so sweet and is wonderful for Christmas card. The Peaceful Place specialty designer series paper is so elegant with silver foil touches and makes sophisticated monochromatic Christmas cards.

On with the Hop! Click on the Next Blog button to move forward to Karen Ksenzakovic’s project.

If you get lost along the way, here are the participants for the hop:


Current Host Code: U6K4RBB4

Use this host code when you order $50 or more and receive a free gift from me!  The free gift is your choice of any item valued up to $10.00 in the 2021 – 2022 Annual Catalog or the July – December 2021 Mini Catalog including some of the host stamp sets!

If your order is over $150, please do not use the host code since you’ll receive your own Host Dollars plus I’ll still send you the free gift!  This host code can be used by anyone, no club or commitment required. Let me know if you have any questions.


If you need any stamping supplies, I’d be very happy to be your Demonstrator.  Just click on the Shop Now button on the right side of the screen to go directly to my online store or contact me if you have any questions. 

Thanks for stopping by and Happy Stamping!

Akiko

  • Visit my online store here
  • See the current Stampin’ Up! clearance rack specials here
  • Earn FREE Stampin’ Up! products through my Wildflower Frequent Shopper Program – my way of saying thank you to my online frequent shopper customers.
  • Have any questions? I’d be happy to help, click here to contact me.

Cardstock Cuts for this project:

  • Smoky Slate – 5-1/2″ x 8-1/2″ card base scored at 4-1/4″, 2″ x 4″ (label)
  • Basic Gray – 3-1/4″ x 3-1/2″ (die cut trees)
  • Cherry Cobbler – two 4″ x 5-1/4″ panels (front and inside mats)
  • Basic White – 3-7/8″ x 5-1/8″ (inside panel), 3″ x 3-3/4″ (embossed snowman)
  • Peaceful Place specialty DSP – 3-7/8″ x 5-1/8″ panel

Stampin’ Up! products used in this project: