
Good Morning and welcome to the Happy Inkin’ Thursday Blog Hop! How are you doing with your Christmas cards? Here’s a simple but elegant card using the beautiful Stampin’ Up! Merry Christmas stamp and the Peaceful Garden designer series paper. You can find the supplies I used along with card stock cuts at the bottom of my post.
We have a theme challenge this week:

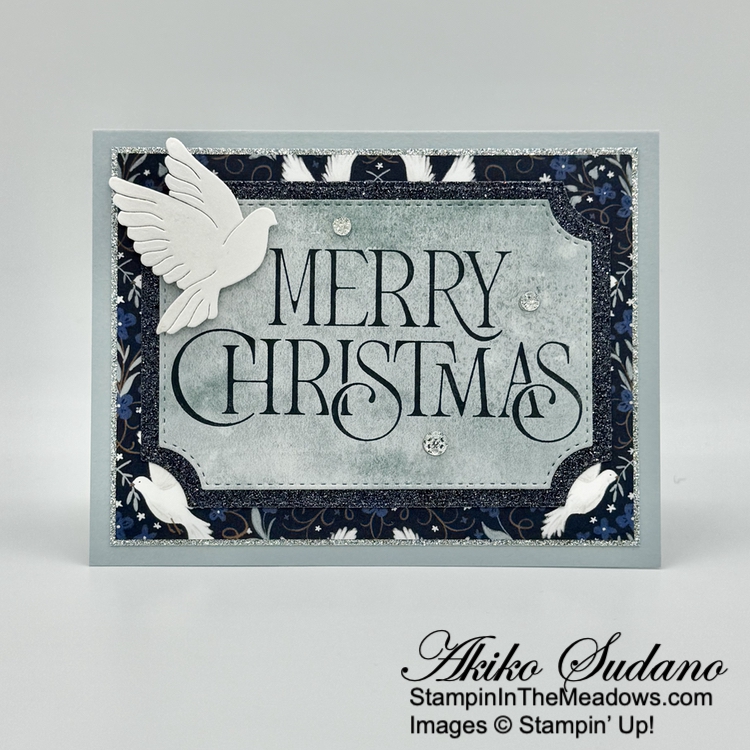
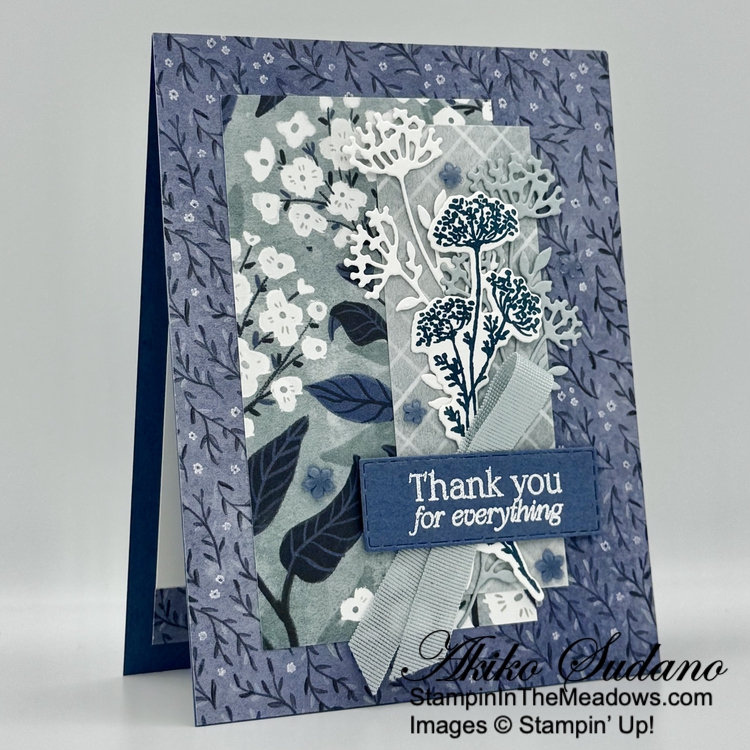
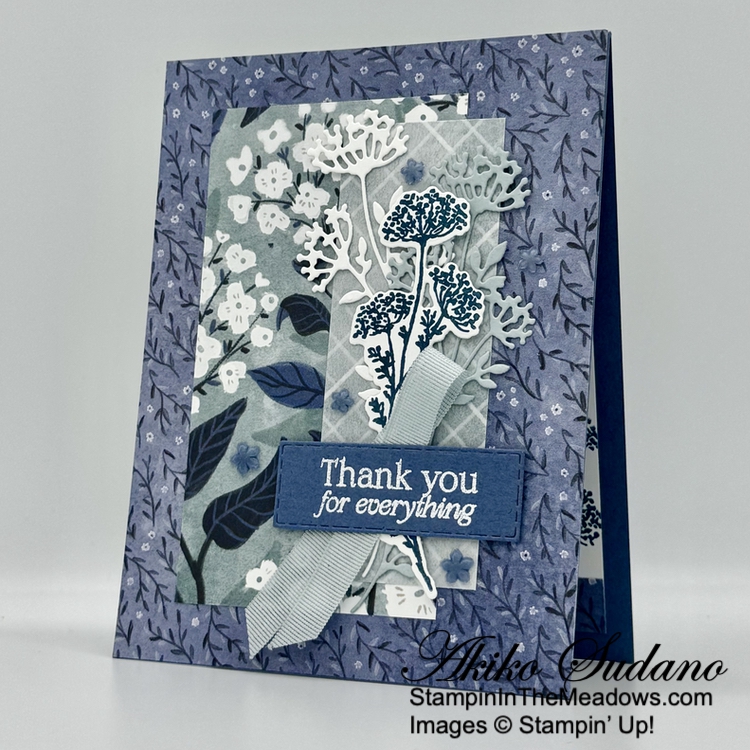
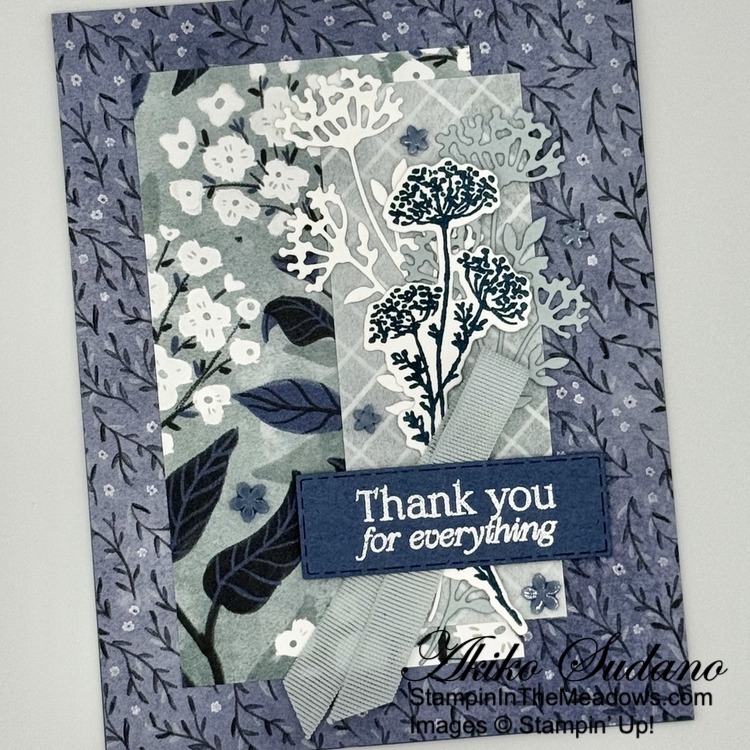
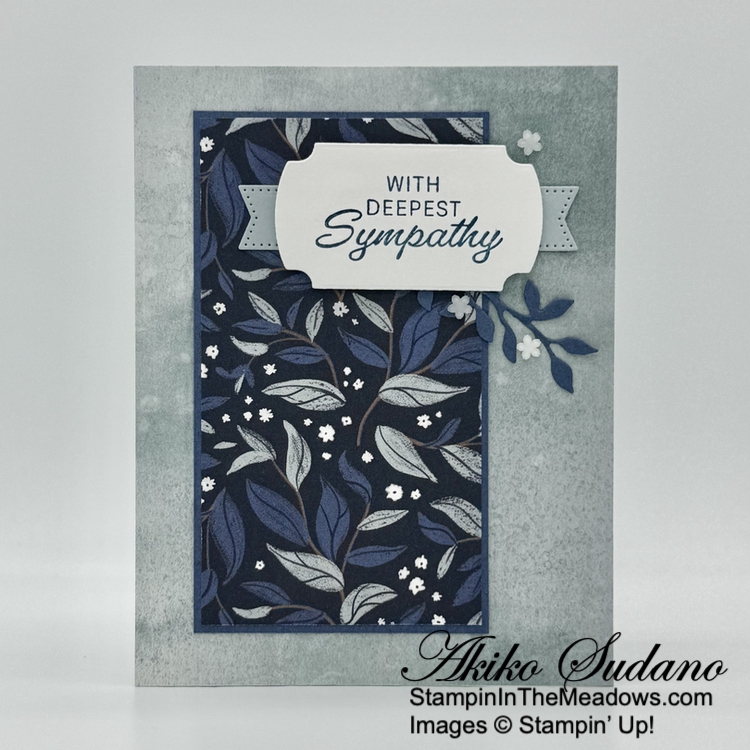
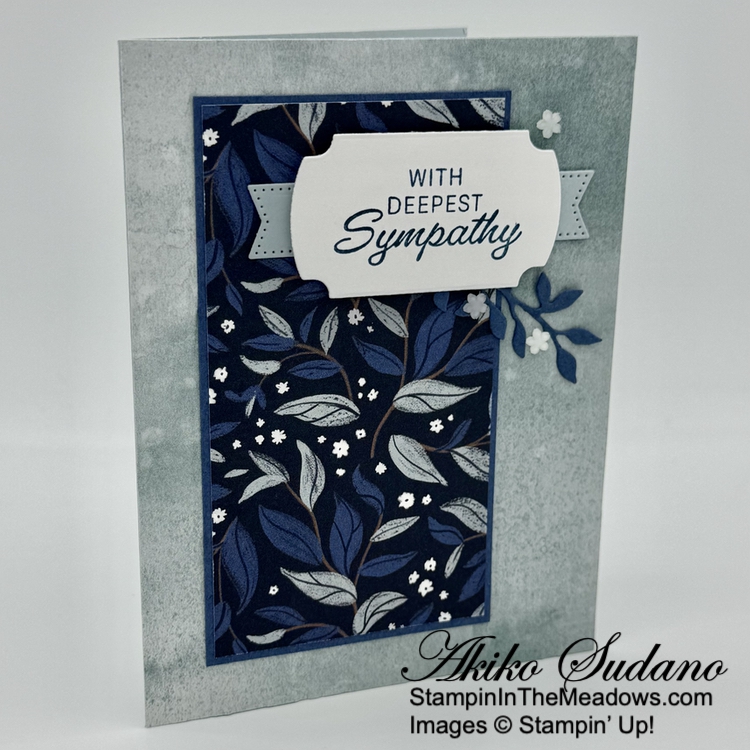
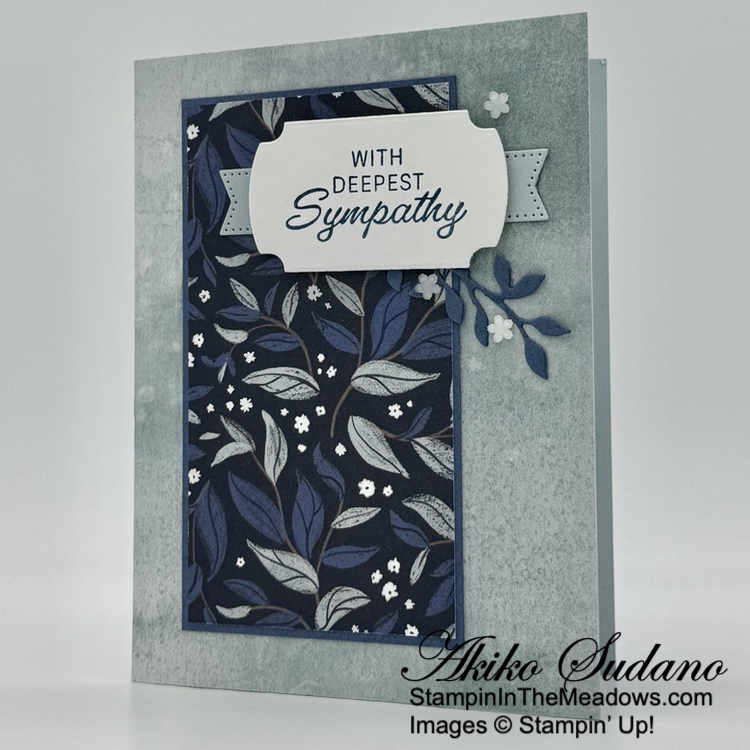
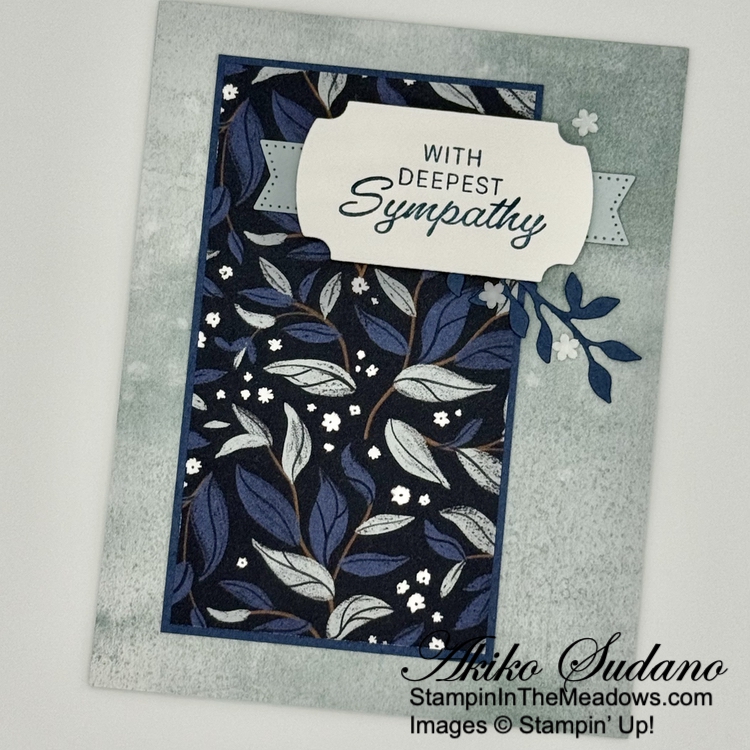
Adhere a panel of Peaceful Garden designer series paper to a Cloud Cover glimmer paper mat and then to the front of a Cloud Cover card base with liquid glue.
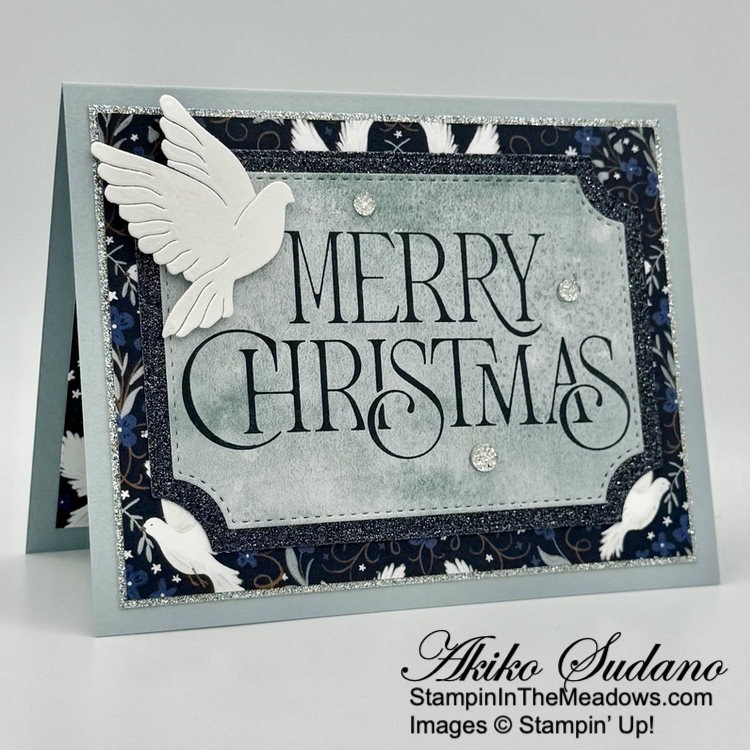
Stamp the Stampin’ Up! Merry Christmas stamp on a Cloud Cover panel of Peaceful Garden DSP using Secret Sea ink and cut it out with the third largest Branching Out rectangle die. Cut a Secret Sea glimmer paper panel with the second largest Branching Out rectangle die and adhere it to the back of the label. Adhere the label to the card with liquid glue.
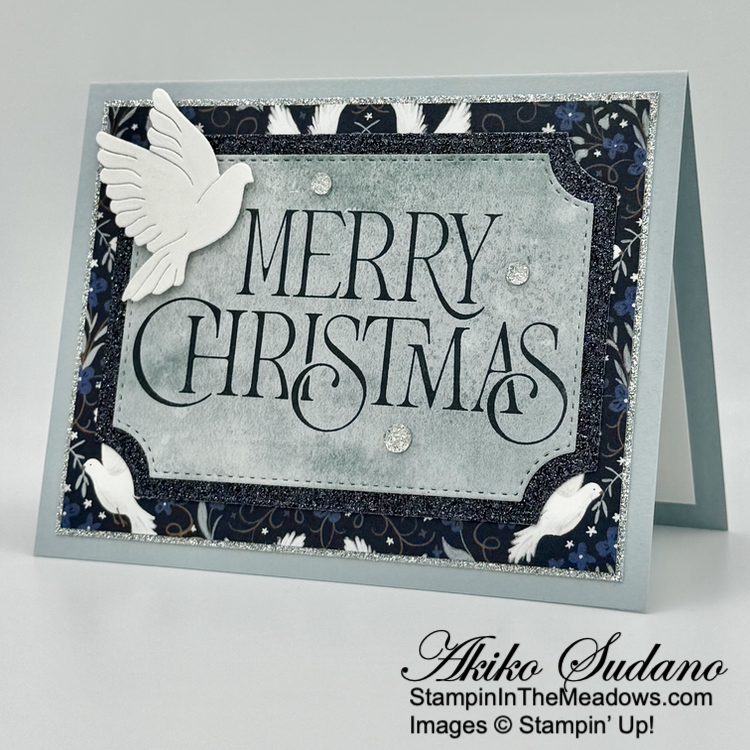
Cut the dove from Basic White using the Peace On Earth dies and brush it with Wink of Stella so it sparkles. Adhere it to the card with dimensionals. Finish with silver druzy gems.

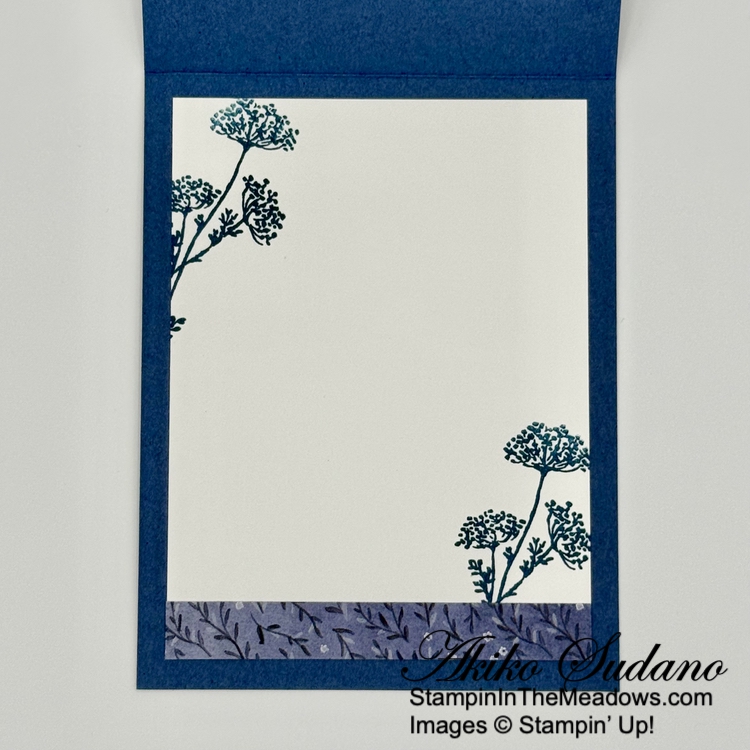
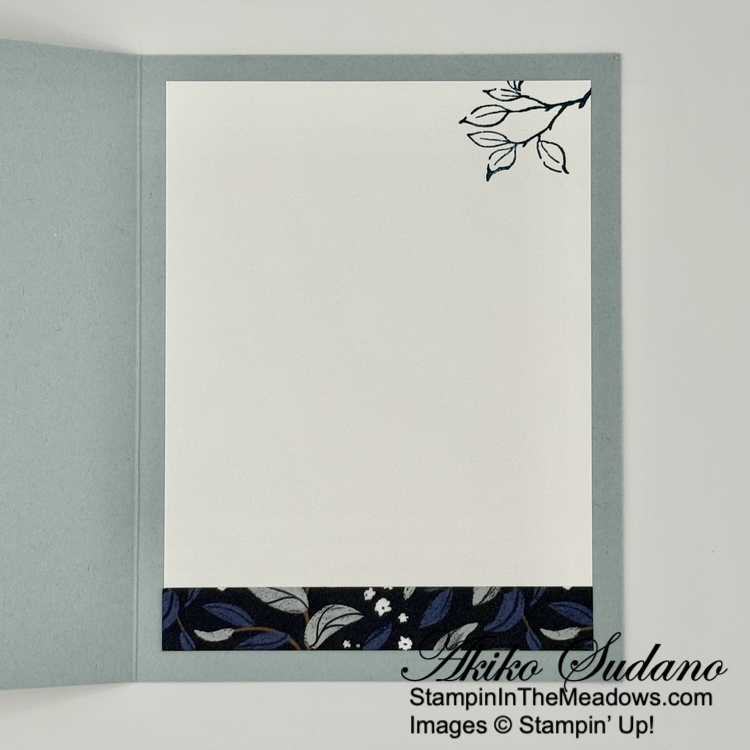
For the inside, stamp the sentiment from the Bauble Blooms stamp set using Secret Sea ink on a Basic White panel. Trim the side with DSP and adhere the panel to the inside of the card with Stampin’ Seal.
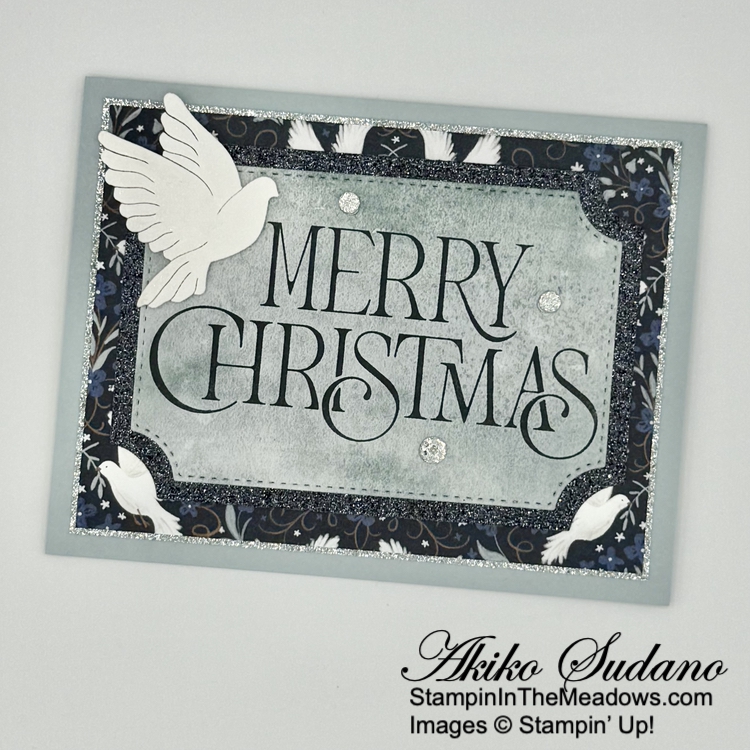
The Stampin’ Up! Merry Christmas stamp is an elegant companion to any gorgeous Christmas designer series paper. Touches of glimmer paper to add sparkle and shine to make your card extra special.
On with the Hop! Click on the Next Blog button to move forward to see the beautiful project Tara Carpenter has created.

If you get lost along the way, here are the participants for the hop:
- Amy Koenders
- Mary Deatherage
- Karen Ksenzakovic
- Akiko Sudano <– You Are Here
- Tara Carpenter
- Terry Lynn Bright
- Nicole Bloxom
Thanks for stopping by and Happy Stamping!
Akiko
Cardstock Cuts for this project:
- Cloud Cover – 5-1/2″ x 8-1/2″ card base, scored at 4-1/4″Peaceful Garden Gli
- Peaceful Garden Glimmer – 3-7/8″ x 5-1/1″ (DSP mat), 3-1/2″ x 5″ (die cut mat)
- Basic White – 3-3/4″ x 5″ (inside panel), 2″ x 2-1/2″ (die cut dove)
- Peaceful Garden DSP – 3-3/4″ x 5″ (front background), 3-1/2″ x 4-1/2″ (label), 1″ x 3-3/4″ (inside trim)
Stampin’ Up! products used in this project:
![Merry Christmas Photopolymer Stamp Set (English) [ 169233 ]](https://assets1.tamsnetwork.com/images/EC042017NF/169233s.jpg "Merry Christmas Photopolymer Stamp Set (English) [ 169233 ]")
![Bauble Blooms Photopolymer Stamp Set (English) [ 166091 ]](https://assets1.tamsnetwork.com/images/EC042017NF/166091s.jpg "Bauble Blooms Photopolymer Stamp Set (English) [ 166091 ]")
![Branching Out Dies [ 165775 ]](https://assets1.tamsnetwork.com/images/EC042017NF/165775s.jpg "Branching Out Dies [ 165775 ]")
![Peace On Earth Dies [ 165924 ]](https://assets1.tamsnetwork.com/images/EC042017NF/165924s.jpg "Peace On Earth Dies [ 165924 ]")
![Peaceful Garden 12" X 12" (30.5 X 30.5 Cm) Designer Series Paper [ 165917 ]](https://assets1.tamsnetwork.com/images/EC042017NF/165917s.jpg "Peaceful Garden 12\" X 12\" (30.5 X 30.5 Cm) Designer Series Paper [ 165917 ]")
![Cloud Cover 8 1/2" X 11" Cardstock [ 165621 ]](https://assets1.tamsnetwork.com/images/EC042017NF/165621s.jpg "Cloud Cover 8 1/2\" X 11\" Cardstock [ 165621 ]")
![Peaceful Garden 12" X 12" (30.5 X 30.5 Cm) Glimmer Paper [ 165929 ]](https://assets1.tamsnetwork.com/images/EC042017NF/165929s.jpg "Peaceful Garden 12\" X 12\" (30.5 X 30.5 Cm) Glimmer Paper [ 165929 ]")
![Basic White 8 1/2" X 11" Cardstock [ 166780 ]](https://assets1.tamsnetwork.com/images/EC042017NF/166780s.jpg "Basic White 8 1/2\" X 11\" Cardstock [ 166780 ]")
![Secret Sea Classic Stampin' Pad [ 165285 ]](https://assets1.tamsnetwork.com/images/EC042017NF/165285s.jpg "Secret Sea Classic Stampin' Pad [ 165285 ]")
![Clear Wink Of Stella Glitter Brush [ 141897 ]](https://assets1.tamsnetwork.com/images/EC042017NF/141897s.jpg "Clear Wink Of Stella Glitter Brush [ 141897 ]")
![Drusy Adhesive Backed Embellishments [ 164223 ]](https://assets1.tamsnetwork.com/images/EC042017NF/164223s.jpg "Drusy Adhesive Backed Embellishments [ 164223 ]")
![Multipurpose Liquid Glue [ 110755 ]](https://assets1.tamsnetwork.com/images/EC042017NF/110755s.jpg "Multipurpose Liquid Glue [ 110755 ]")
![Mini Glue Dots [ 103683 ]](https://assets1.tamsnetwork.com/images/EC042017NF/103683s.jpg "Mini Glue Dots [ 103683 ]")
![Stampin' Dimensionals [ 104430 ]](https://assets1.tamsnetwork.com/images/EC042017NF/104430s.jpg "Stampin' Dimensionals [ 104430 ]")
![Stampin' Seal [ 152813 ]](https://assets1.tamsnetwork.com/images/EC042017NF/152813s.jpg "Stampin' Seal [ 152813 ]")
![Stampin' Cut & Emboss Machine [ 149653 ]](https://assets1.tamsnetwork.com/images/EC042017NF/149653s.jpg "Stampin' Cut & Emboss Machine [ 149653 ]")


![Beautiful Motifs Bundle (English) [ 165206 ]](https://assets1.tamsnetwork.com/images/EC042017NF/165206s.jpg "Beautiful Motifs Bundle (English) [ 165206 ]")
![Gallery Blooms Bundle [ 165213 ]](https://assets1.tamsnetwork.com/images/EC042017NF/165213s.jpg "Gallery Blooms Bundle [ 165213 ]")
![Textured Notes Dies [ 165555 ]](https://assets1.tamsnetwork.com/images/EC042017NF/165555s.jpg "Textured Notes Dies [ 165555 ]")
![Misty Moonlight 8-1/2" X 11" Cardstock [ 153081 ]](https://assets1.tamsnetwork.com/images/EC042017NF/153081s.jpg "Misty Moonlight 8-1/2\" X 11\" Cardstock [ 153081 ]")
![Misty Moonlight Classic Stampin' Pad [ 153118 ]](https://assets1.tamsnetwork.com/images/EC042017NF/153118s.jpg "Misty Moonlight Classic Stampin' Pad [ 153118 ]")
![Versamark Pad [ 102283 ]](https://assets1.tamsnetwork.com/images/EC042017NF/102283s.jpg "Versamark Pad [ 102283 ]")
![Basics Wow! Embossing Powder [ 165679 ]](https://assets1.tamsnetwork.com/images/EC042017NF/165679s.jpg "Basics Wow! Embossing Powder [ 165679 ]")
![Hues Of Blue Flowers [ 165930 ]](https://assets1.tamsnetwork.com/images/EC042017NF/165930s.jpg "Hues Of Blue Flowers [ 165930 ]")
![Cloud Cover 3/8" (1 Cm) Faux Linen Ribbon [ 165271 ]](https://assets1.tamsnetwork.com/images/EC042017NF/165271s.jpg "Cloud Cover 3/8\" (1 Cm) Faux Linen Ribbon [ 165271 ]")

![Peace On Earth Bundle (English) [ 165925 ]](https://assets1.tamsnetwork.com/images/EC042017NF/165925s.jpg "Peace On Earth Bundle (English) [ 165925 ]")
![Charming Day Cling Stamp Set (English) [ 166126 ]](https://assets1.tamsnetwork.com/images/EC042017NF/166126s.jpg "Charming Day Cling Stamp Set (English) [ 166126 ]")
![Labeled With Love Punch [ 163569 ]](https://assets1.tamsnetwork.com/images/EC042017NF/163569s.jpg "Labeled With Love Punch [ 163569 ]")
![Birch Wood 3 D Embossing Folder [ 164069 ]](https://assets1.tamsnetwork.com/images/EC042017NF/164069s.jpg "Birch Wood 3 D Embossing Folder [ 164069 ]")


![2 3/8" (6 Cm) Circle Punch [ 161354 ]](https://assets1.tamsnetwork.com/images/EC042017NF/161354s.jpg "2 3/8\" (6 Cm) Circle Punch [ 161354 ]")
![Spotlight On Nature Dies [ 163580 ]](https://assets1.tamsnetwork.com/images/EC042017NF/163580s.jpg "Spotlight On Nature Dies [ 163580 ]")
![Secret Sea 8 1/2" X 11" Cardstock [ 165624 ]](https://assets1.tamsnetwork.com/images/EC042017NF/165624s.jpg "Secret Sea 8 1/2\" X 11\" Cardstock [ 165624 ]")
![Misty Moonlight & Silver Edged 1/2" (1.3 Cm) Ribbon [ 165931 ]](https://assets1.tamsnetwork.com/images/EC042017NF/165931s.jpg "Misty Moonlight & Silver Edged 1/2\" (1.3 Cm) Ribbon [ 165931 ]")

