Stampin’ Up! Happy Hibiscus for the Happy Inkin’ Thursday Blog Hop

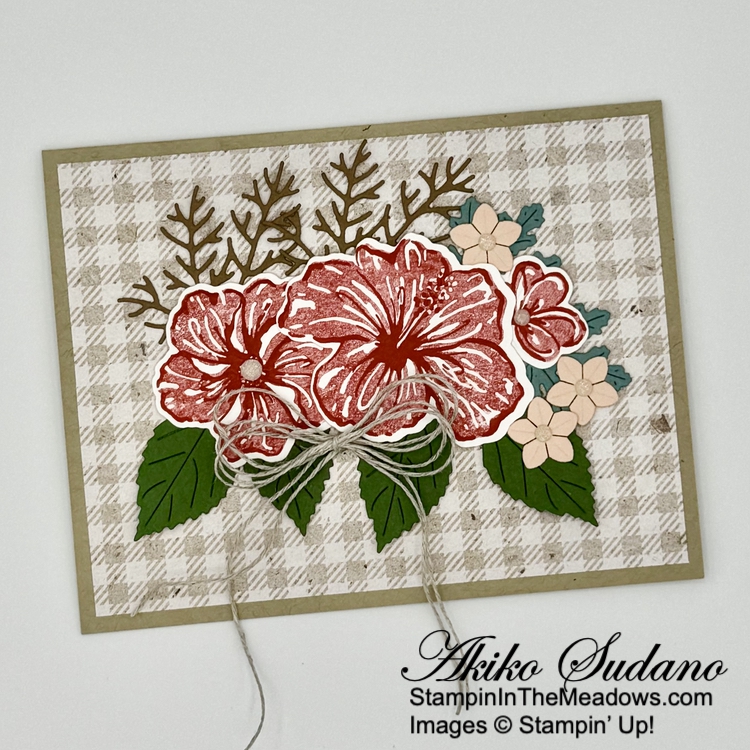
Good Morning and welcome to the Happy Inkin’ Thursday Blog Hop! I used the Stampin’ Up! Happy Hibiscus bundle to make a congratulations card for today. You can find the supplies I used along with card stock cuts at the bottom of my post.

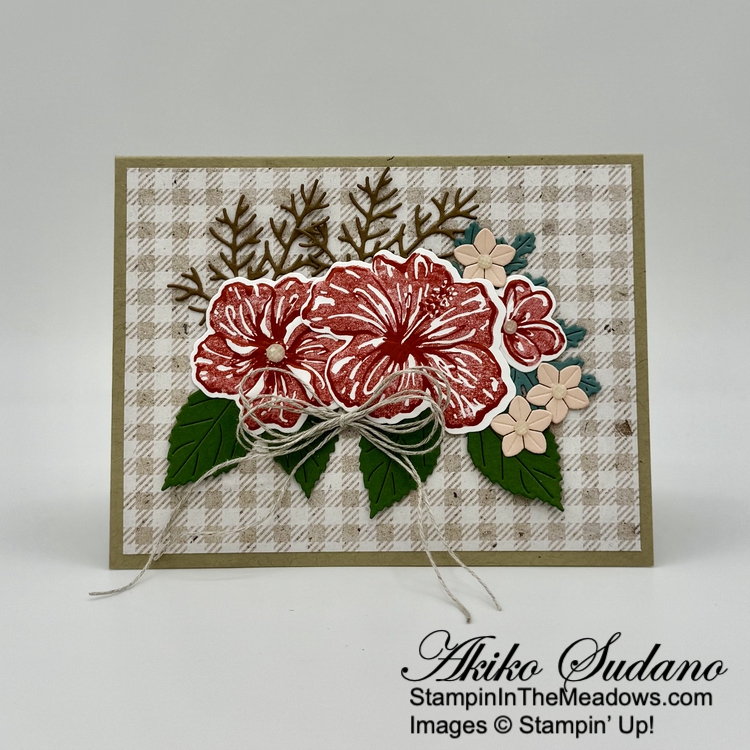
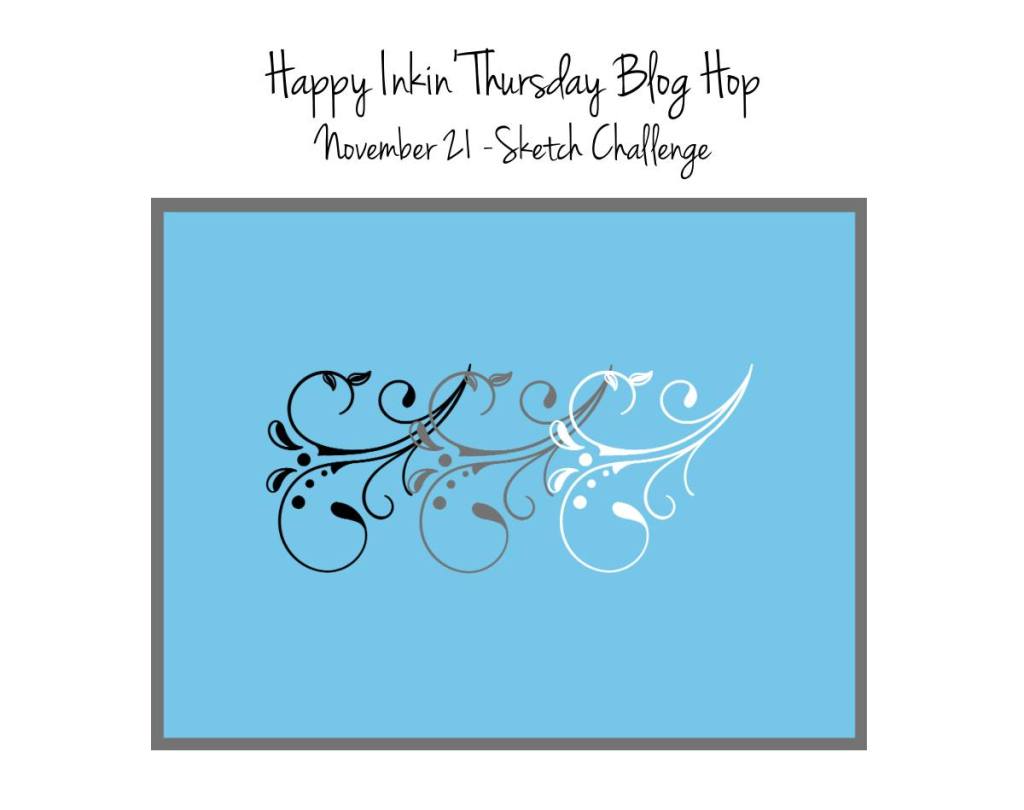
We have a fun sketch challenge this week and my interpretation was to use the three flowers in the bundle as the flourishes!

I stamped the triple flower stamp in the Stampin’ Up! Happy Hibiscus stamp set using Poppy Parade ink on Basic White and I used stamped off Poppy Parade for the fill of each flower. I used the hybrid embossing folder and dies to cut the flowers out, but I had to cut the flowers apart before die cutting and embossing – I found it so much easier to line up the flower, die and embossed image one at a time.

I used the large leaf die from the Stampin’ Up! Happy Hibiscus dies to cut four leaves from Garden Green and adhered them to the card with glue dots. I used the sprig die from the Cheerful Daisies dies to cut two sprigs from Pecan Pie and adhered them to the card. I cut two of the small leaves from the Stampin’ Up! Happy Hibiscus dies from Lost Lagoon and adhered them. Finally I adhered the die cut/embossed flowers using glue dots on the two side flowers and dimensionals on the center flower.

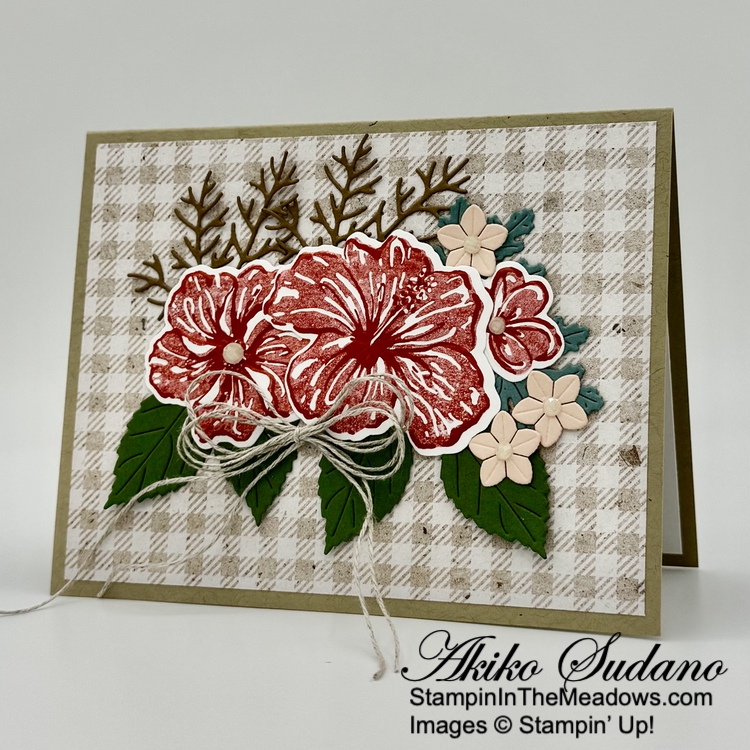
I cut three small flowers from Petal Pink using the small flower die from the Stampin’ Up! Happy Hibiscus dies and adhered them to the card. I added Crumb Cake shimmer gems to the flower centers and adhered a quadruple loop linen thread bow to the bottom.

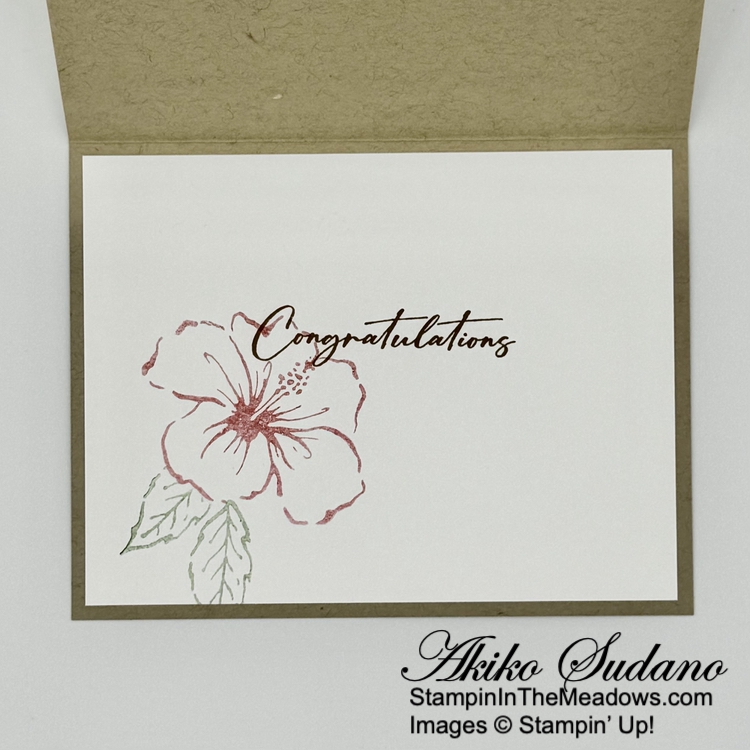
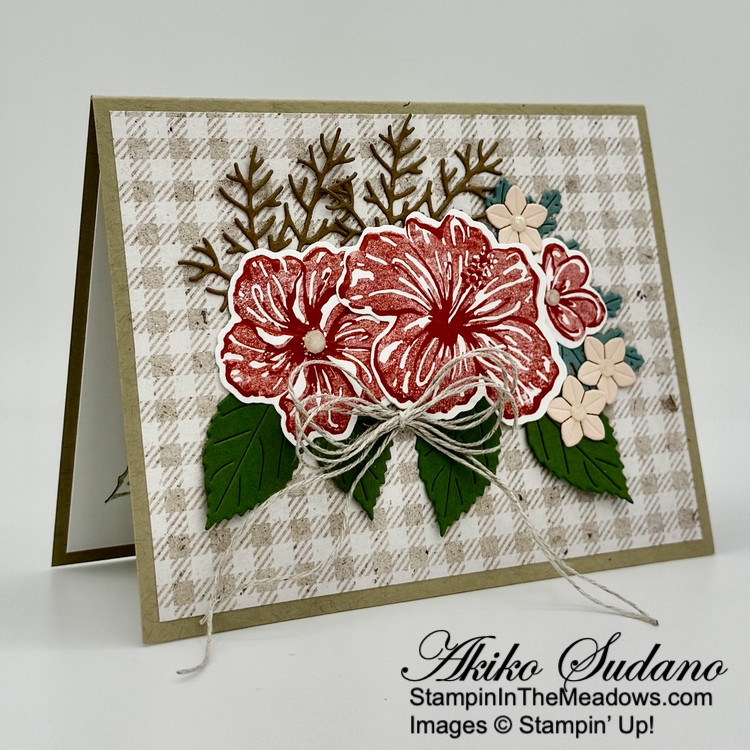
For the inside panel, I stamped the sentiment from the Stampin’ Up! Happy Hibiscus stamp set using Pecan Pie ink on Basic White. I stamped the flower twice stamped off Poppy Parade ink and the leaves in twice stamped off Garden Green ink. I adhered the panel to the inside of the card with Stampin’ Seal.

There are so many ways to color the pretty flowers in the Stampin’ Up! Happy Hibiscus bundle and so many pretty coordinating dies.

On with the Hop! Click on the Next Blog button to move forward to see the beautiful project Karen Ksenzakovic has created.

If you get lost along the way, here are the participants for the hop:


Current Host Code: GBVHGQ4W

Use this host code when you order $50 or more and receive a free gift from me!  The free gift is your choice of any item currently available valued up to $10.00!

If your order is over $150, please do not use the host code since you’ll receive your own Host Dollars plus I’ll still send you the free gift!  This host code can be used by anyone, no club or commitment required. Let me know if you have any questions.


If you need any stamping supplies, I’d be very happy to be your Demonstrator.  Just click on the Shop Now button on the right side of the screen to go directly to my online store or contact me if you have any questions. 

Thanks for stopping by and Happy Stamping!

Akiko

  • Visit my online store here
  • See the current Stampin’ Up! clearance rack specials here
  • Earn FREE Stampin’ Up! products through my Wildflower Frequent Shopper Program – my way of saying thank you to my online frequent shopper customers.
  • Have any questions? I’d be happy to help, click here to contact me.

Cardstock Cuts for this project:

  • Crumb Cake – 5-1/2″ x 8-1/2″ card base, scored at 4-1/4″
  • Petal Pink – 1″ x 3″ (die cut flowers)
  • Garden Green – 1-3/4″ x 4″ (die cut leaves)
  • Pecan Pie – 2-1/4″ x 3″ (die cut sprigs)
  • Lost Lagoon – 1-1/4″ x 2-1/2″ (die cut leaves)
  • Basic White – 4″ x 5-1/4″ (inside panel), 3″ x 4-1/2″ (flowers)
  • Perennial Lavender DSP – 4″ x 5-1/4″ (front background)

Stampin’ Up! products used in this project:


Stampin’ Up! Sophisticated Sled for the Happy Inkin’ Thursday Blog Hop

Good Morning and welcome to the Happy Inkin’ Thursday Blog Hop! Here’s a Christmas card with the pretty Stampin’ Up! Sophisticated Sled bundle with the pretty Nests of Winter designer series paper in a book Z-fold card. I used the awesome die cut sled and skates reminiscent of Christmas door front displays. You can find the supplies I used along with card stock cuts at the bottom of my post.

We have a color challenge this week and I used most of the colors in the card:

I scored and burnished the folds in the card base and glued the left side together to make the book bind end. I adhered panels of the Nests of Winter designer series paper to the ends and middle panel with liquid glue. I embossed the light side of the Pool Party two tone card stock (from the Scrapbooking Brochure) with the Snowflake Sky 3D embossing folder and adhered it to a panel of Pool Party card stock. I adhered the layered embossed panel to the center flap of the Z-fold, centering it on the card front. I love the embossed light Pool Party against the panel!

I die cut the sections of the sled and skates using the dies from the Stampin’ Up! Sophisticated Sled bundle. I used Real Red for the sled rails and Pecan Pie for the slats. For the skates, I used Real Red for the laces, silver foil for the blades and Basic White for the boots. I also cut two of the greenery boughs using Granny Apple Green and Garden Green card stock. I assembled the skates and sled with liquid glue. I tied a short length of Linen Thread to the sled handles (through the little holes on the side) and adhered the skates to a short length of Linen Thread and to the sled with glue dots. I adhered the Garden Green bough to the sled with a glue dot and cut the Granny Apple Green bough in half before adhering it . I finished with the triple berries.

I adhered the decorated sled to the middle section of the card with dimensionals. I stamped the sentiment from the Stampin’ Up! Sophisticated Sled stamp set in Real Red ink on a Pool Party panel and cut it out with the small banner die from the Stylish Shapes dies. I adhered it to the card with glue dots and dimensionals.

For the inside panel, I stamped the sentiment from the Stampin’ Up! Sophisticated Sled stamp set using Real Red ink on Basic White. I stamped the cardinal in Memento Tuxedo Black ink and colored it with the Real Red and Daffodil Delight Stampin Blends. I adhered the panel to the inside of the card with Stampin’ Seal next to the DSP strip.

The Stampin’ Up! Sophisticated Sled bundle is just beautiful and definitely one of my all time favorites! The die cut sled is so realistic and well done and it’s pretty easy and fun to assemble. I used to decorate my husband’s childhood sled and prop it on the front porch for Christmas, and it looked pretty much like this one.

On with the Hop! Click on the Next Blog button to move forward to see the beautiful project Karen Ksenzakovic has created.

If you get lost along the way, here are the participants for the hop:


Current Host Code: GBVHGQ4W

Use this host code when you order $50 or more and receive a free gift from me!  The free gift is your choice of any item currently available valued up to $10.00!

If your order is over $150, please do not use the host code since you’ll receive your own Host Dollars plus I’ll still send you the free gift!  This host code can be used by anyone, no club or commitment required. Let me know if you have any questions.


If you need any stamping supplies, I’d be very happy to be your Demonstrator.  Just click on the Shop Now button on the right side of the screen to go directly to my online store or contact me if you have any questions. 

Thanks for stopping by and Happy Stamping!

Akiko

  • Visit my online store here
  • See the current Stampin’ Up! clearance rack specials here
  • Earn FREE Stampin’ Up! products through my Wildflower Frequent Shopper Program – my way of saying thank you to my online frequent shopper customers.
  • Have any questions? I’d be happy to help, click here to contact me.

Cardstock Cuts for this project:

  • Pool Party – 5-1/2″ x 8-1/2″ card base, scored at 4-1/4″, 5-1/4″ and 7″, 3″ x 5-1/2″ (front Z-fold panel), 1-1/4″ x 2″ (label)
  • Light Pool Party – 2-3/4″ x 5-1/4″ (embossed panel)
  • Garden Green – 1-1/2″ x 2-1/2″ (die cut bough)
  • Granny Apple Green – 1-1/2″ x 2-1/2″ (die cut bough)
  • Real Red – 2″ x 4″ (sled rails, skate laces)
  • Pecan Pie – 2-1/4″ x 3″ (sled slats)
  • Silver Foil – 1″ x 1-1/2″ (skate blades)
  • Basic White – 2-1/4″ x 5-1/4″ (inside panel), 1-1/2″ x 2″ (skates)
  • Nests of Winter DSP – two 3/4″ x 5-1/4″ panels (side panels), 1-3/4″ x 5-1/4″ (middle panel)

Stampin’ Up! products used in this project:


Stampin’ Up! Winterly Tree Tops for the Happy Inkin’ Thursday Blog Hop

Good Morning and welcome to the Happy Inkin’ Thursday Blog Hop! I used the pretty Stampin’ Up! Winterly Tree Tops stamp set with the sweet Nests of Winter designer series paper to make a simplenThinking of You card today. You can find the supplies I used along with card stock cuts at the bottom of my post.

We have a pretty sketch challenge this week:

I adhered a panel of Nests of Winter designer series paper to the front of a Thick Basic White card base with liquid glue.

I adhered a birdy panel of the DSP to a Shaded Spruce mat and popped it on the card front with dimensionals. I stamped part of the sentiment from the Stampin’ Up! Winterly Tree Tops stamp set using Memento Tuxedo Black ink on a Gray Granite strip and cut it out with the skinny banner die from the Stylish Shapes dies. I popped it on the card with dimensionals.

I made a bow with Gray Granite baker’s twine and adhered it to the label with a glue dot. I finished the card with Cherry Cobbler berries.

For the inside of the card, I stamped the bird from the Stampin’ Up! Winterly Tree Tops stamp set using twice stamped off Gray Granite ink on a Basic White panel. I adhered DSP to the side before adhering the panel to the inside of the card with Stampin’ Seal..

The sentiments in the Stampin’ Up! Winterly Tree Tops stamp set are simple and perfect for use year round. The pretty Nests of Winter DSP are nice for Christmas cards, making the suite perfect for any occasion during the Winter holidays!

On with the Hop! Click on the Next Blog button to move forward to see the beautiful project Karen Ksenzakovic has created.

If you get lost along the way, here are the participants for the hop:


Current Host Code: V3YZAAN7

Use this host code when you order $50 or more and receive a free gift from me!  The free gift is your choice of any item currently available valued up to $10.00!

If your order is over $150, please do not use the host code since you’ll receive your own Host Dollars plus I’ll still send you the free gift!  This host code can be used by anyone, no club or commitment required. Let me know if you have any questions.


If you need any stamping supplies, I’d be very happy to be your Demonstrator.  Just click on the Shop Now button on the right side of the screen to go directly to my online store or contact me if you have any questions. 

Thanks for stopping by and Happy Stamping!

Akiko

  • Visit my online store here
  • See the current Stampin’ Up! clearance rack specials here
  • Earn FREE Stampin’ Up! products through my Wildflower Frequent Shopper Program – my way of saying thank you to my online frequent shopper customers.
  • Have any questions? I’d be happy to help, click here to contact me.

Cardstock Cuts for this project:

  • Thick Basic White – 5-1/2″ x 8-1/2″ card base, scored at 4-1/4″
  • Shaded Spruce – 2-3/4″ x 4″ (DSP mat)
  • Gray Granite – 1″ x 3″ (label)
  • Basic White – 3-3/4″ x 5″ (inside panel)
  • Nests of Winter DSP – 4″ x 5-1/4″ (front background), 2-5/8″ x 4-7/8″ (DSP panel), 3/4″ x 3-3/4″ (inside trim)

Stampin’ Up! products used in this project:


Stampin’ Up! Nests Of Winter for the Happy Inkin’ Thursday Blog Hop

Good Morning and welcome to the Happy Inkin’ Thursday Blog Hop! I used the pretty new Stampin’ Up! Nests of Winter designer series paper to make a Christmas card. This paper will be available with the new September-December Mini Catalog on Sept 4, 2024. You can find the supplies I used along with card stock cuts at the bottom of my post.

We have a pretty sketch challenge this week:

I adhered a panel of Stampin’ Up! Nests of Winter designer series paper to a Pebbled Path mat with liquid glue and wrapped it with Garden Green Linen Thread (available Sept 4, 2024), making a bow. I adhered it to the front of a Real Red card base with dimensionals.

I used the dies from the Winterly Tree Tops dies to cut four pine sprigs and adhered them to the card with glue dots, tucking them under the Linen Thread. I fussy cut a little greenery sprig from the Stampin’ Up! Nests of Winter DSP and adhered to the card with glue dots. I fussy cut a little bird and popped it over the greenery with dimensionals.

I stamped the sentiments from the Greetings of the Season stamp set using Real Red ink on Gray Granite card stock. I cut it out with the short fat Stylish Shapes banner die, using a two step method – note that I cut it with the left side straight. I adhered it to the card with glue dots and finished the card with red gems.

For the Inside of the card, I stamped the sentiment from the Greetings of the Season stamp set in Real Red ink on a Basic White panel. I fussy cut another greenery sprig from the Stampin’ Up! Nests of Winter DSP and adhered it to the panel with liquid glue. I adhered the panel to the inside of the card with Stampin’ Seal.

The pretty Stampin’ Up! Nests of Winter designer series paper has designs that are great for Christmas cards, but also for Fall and Winter in general. Here’s the DSP:

And here is the pretty Winterly Tree Tops bundle that goes so well with the DSP. Some of the dies will even cut out images in the paper.

All of these new products will be available when the September-December 2024 Mini Catalog is released on Sept 4, 2024.

On with the Hop! Click on the Next Blog button to move forward to see the beautiful project Karen Ksenzakovic has created.

If you get lost along the way, here are the participants for the hop:


Current Host Code: DWUSFG7T

Use this host code when you order $50 or more and receive a free gift from me!  The free gift is your choice of any item currently available valued up to $10.00!

If your order is over $150, please do not use the host code since you’ll receive your own Host Dollars plus I’ll still send you the free gift!  This host code can be used by anyone, no club or commitment required. Let me know if you have any questions.


If you need any stamping supplies, I’d be very happy to be your Demonstrator.  Just click on the Shop Now button on the right side of the screen to go directly to my online store or contact me if you have any questions. 

Thanks for stopping by and Happy Stamping!

Akiko

  • Visit my online store here
  • See the current Stampin’ Up! clearance rack specials here
  • Earn FREE Stampin’ Up! products through my Wildflower Frequent Shopper Program – my way of saying thank you to my online frequent shopper customers.
  • Have any questions? I’d be happy to help, click here to contact me.

Cardstock Cuts for this project:

  • Real Red – 4-1/4″ x 11″ card base, scored 5-1/2″
  • Pebbled Path – 3-5/8″ x 4-7/8″ (DSP mat)
  • Garden Green – 3″ x 5″ (die cut pine sprigs)
  • Gray Granite – 1-1/2″ x 3-1/2″ (label)
  • Basic White – 4″ x 4″ (inside panel)
  • Nests of Winter DSP – 3-1/2″ x 4-3/4″ (front background), two fussy cut sprigs, 1 fussy cut bird

Stampin’ Up! products used in this project:


Stampin’ Up! Winterly Tree Tops Sneak Peek

Good Morning! I got an opportunity to get the Stampin’ Up! Winterly Tree Tops bundle from the Upcoming September-December 2024 Mini Catalog and attend the Stampin’ Up! Creativity Now event. During the event we made some projects with this pretty new bundle and I’m sharing one of those cards today. You can find the currently avaliable products I used at the bottom of my post along with the card stock sizes. And I’ve also included some pictures of this pretty bundle and the Nests of Winter designer series paper that I used.

I adhered a panel of Nests of Winter designer series paper filled with pussy willows to a Basic Black mat and adhered it to the front of a Moody Mauve card base with liquid glue. I stamped the pair of birds from the Stampin’ Up! Winterly Tree Tops stamp set using Memento Tuxedo Black ink on a Basic White panel. I colored the birds with Balmy Blue, Petal Pink, Poppy Parade and Pecan Pie Stampin’ Blends and cut it out with the coordinating die.

I stamped three pussy willows from the Stampin’ Up! Winterly Tree tops stamp set in Memento Tuxedo Black ink on Basic White and colored the stems using the light Pecan Pie Stampin’ Blend. I cut them out with the coordinating die and adhered them to the back of the birds with glue dots. I adhered the layered die cuts to the card with dimensionals.

I stamped the sentiment from the Stampin’ Up! Winterly Tree Tops stamp set in Memento Tuxedo Black ink on Basic White. I wrapped a length of black baker’s twine around one end and tied a bow. I adhered the label to the card with dimensionals and finished the card with Moody Mauve dots.

For the inside of the card I stamped the pussy willows from the Stampin’ Up! Winterly Tree Tops stamp set in Memento Tuxedo Black ink in the corners of a Basic White panel. I colored the stems with the light Pecan Pie Stampin’ Blend and a adhered the panel to the inside of the card with Stampin’ Seal.

The birds in the Stampin’ Up! Winterly Tree Tops bundle are so cute and the sentiments are nice and can be used all year long. Here is the bundle:

And here is the Nests of Winter designer series paper:

There are coordinating embellishments in the Nests of Winter Suite that can be used throughout the Fall and Winter months as well as during the Holidays. These products will be available September 4, 2024.


Bonus Days Coming July 3, 2024!

It’s time for one of our favorite promotions—BONUS DAYS! Because do you know what’s a great deal? Getting rewarded for all the crafting supplies you’re already going to buy! When you shop between 3–31 July and spend $50 you will earn a $5 coupon! Make sure you save all your coupons because you can redeem them (and we mean ALL of them) between August 1 and August 31. There’s no limit to how many coupons you can earn! 

Promotion Details:

Earning Period: July 3 – July 31 2024

  • Earn a $5 coupon for every $50 spent (before shipping and tax). 
  • All coupon codes will be emailed right after a qualifying purchase has been made. Customers must have a customer account with a valid email address to earn coupons when they shop. If you don’t already have an account, you can easily create one in the Online store – contact me if you have any questions. 
  • If you earn multiple codes from a single order, you will receive one email with multiple codes. If you earn multiple codes from multiple orders, you will receive separate emails for each code earned.
  • All order types qualify for this promotion. Phone and email orders still require an email address.
  • Orders started before the promotion begins will not count toward earning coupon codes. For example, if you add items to your cart before July 3 and wait to purchase until that date or later, then those items will not qualify towards earning coupons. You must add items to your cart and complete your purchase during the earning period. 
  • There is no limit to the number of coupon codes participants can earn per order or throughout the duration of the earning period. 
  • Customers must use a valid email address during checkout in order to receive their coupon code. If a customer places an order over the phone, they must still provide a valid email address to receive their coupon code.
  • Starter Kit orders are excluded from this offer.

Redemption Period: August 1 – August 31, 2024

  • There is no limit to the number of coupon codes you can redeem on an order during the redemption period. If using multiple codes, they must be separated by a space. 
  • Coupon codes may be redeemed one time only. They cannot be redeemed after August 31, 2024.
  • Coupon codes may be redeemed for any product (excluding Starter Kits). They cannot be used on exchanges.
  • Bonus Days coupon codes can be applied to month-to-month Paper Pumpkin subscriptions and new prepaid subscriptions.

Current Host Code: XQZKDQU9

Use this host code when you order $50 or more and receive a Thank You gift from me!  The free gift is your choice of any item currently available valued up to $10.00.

If your order is over $150, please do not use the host code since you’ll receive your own Host Dollars plus I’ll still send you the Thank You gift!  This host code can be used by anyone, no club or commitment required. Let me know if you have any questions.


If you need any stamping supplies, I’d be very happy to be your Demonstrator.  Just click on the Shop Now Button on the right side of the screen to go directly to my Online store or contact me if you have any questions.  Happy Stamping!

Thanks for stopping by and have a great day!

Akiko

  • Visit my online store here
  • See the current Stampin’ Up! clearance rack specials here
  • Earn FREE Stampin’ Up! products through my Wildflower Frequent Shopper Program – my way of saying thank you to my online frequent shopper customers.
  • Have any questions? I’d be happy to help, click here to contact me.

Cardstock Cuts for this project:

  • Moody Mauve – 4-1/4″ x 11″ card base, scored at 5-1/2″
  • Basic Black – 3-5/8″ x 4-1/8″ (front mat)
  • Basic White – 4″ x 5-1/4″ (inside panel), 4-1/4″ x 4-1/4″ (die cut birds and pussy willows), 5/8″ x 3-3/4″ (label)
  • Nests of Winter DSP – 3-1/2″ x 4″ (front background)

Stampin’ Up! products used in this project: