Stampin’ Up! Merriest Trees Christmas Cards

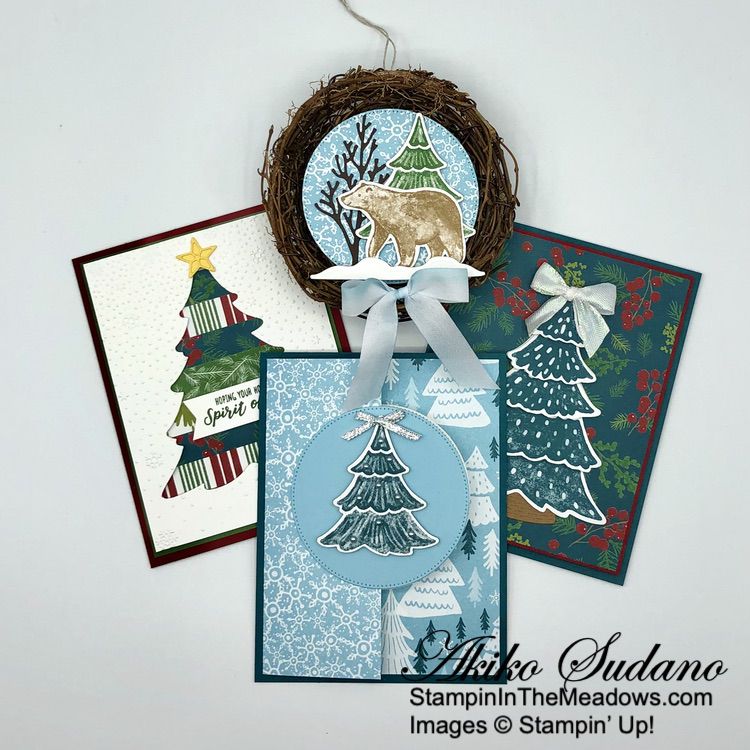
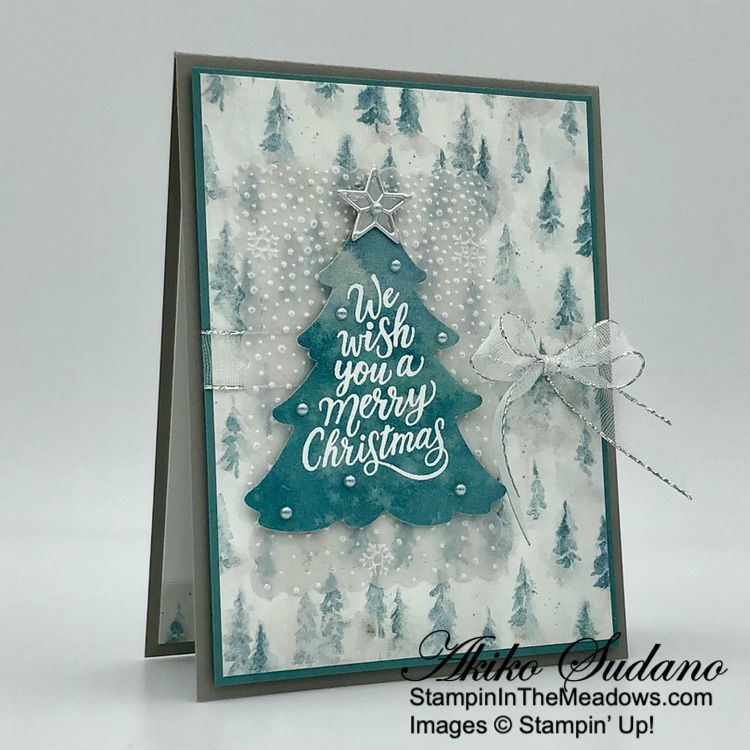
Good Morning! Last weekend the Inkin’ Krew had a Quarterly Team meeting and after finishing the Stampin’ Up! Business portion, we made some Christmas cards with the Stampin’ Up! Merriest Trees bundle! Mary Deatherage, Karen Ksenzakovic and Rosie Kean designed cards and taught us how to make them. Here are the cards I made based on their designs. Since I have barely cracked open my A Walk in the Forest designer series paper, I adapted their designs to using these papers. You can find the products I used at the bottom of my post along with the card stock sizes.

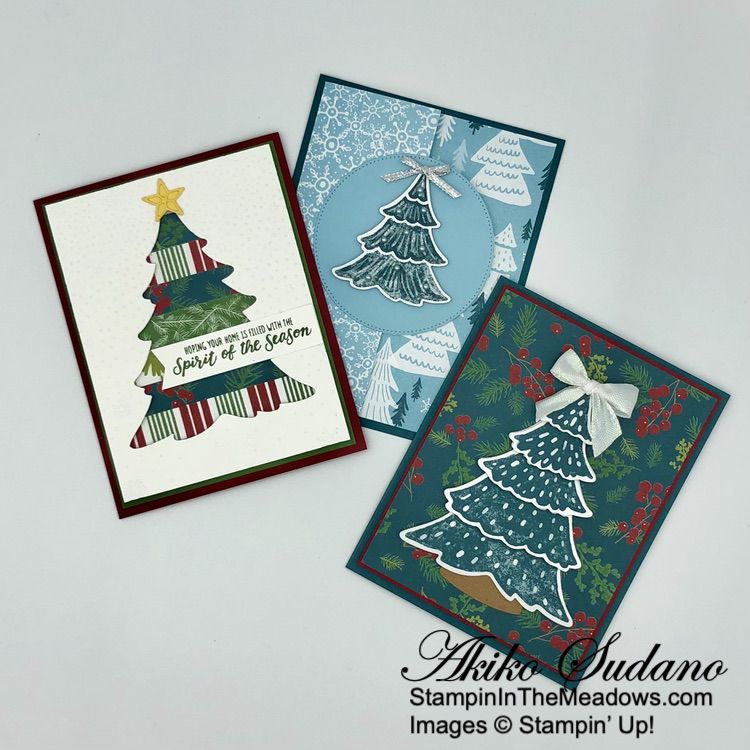
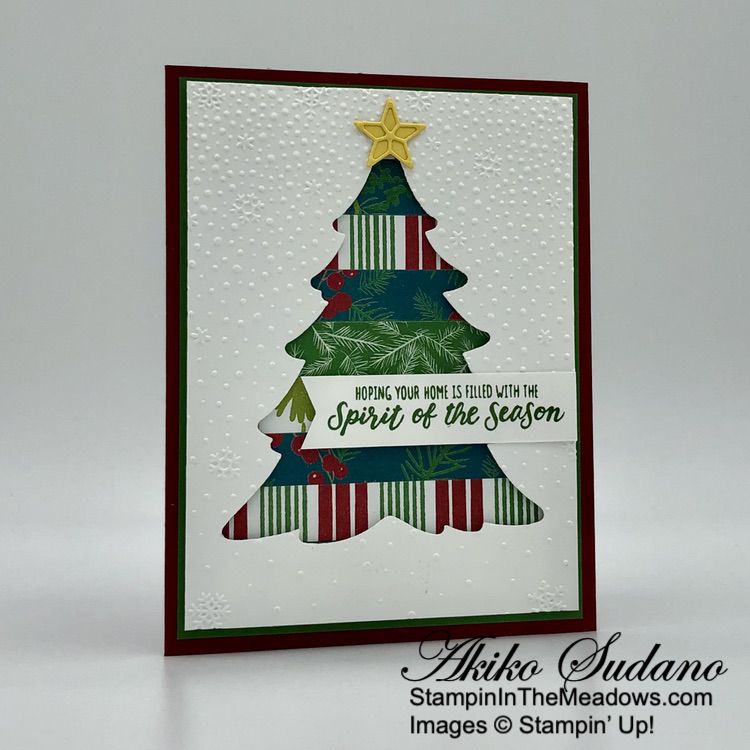
The first card is the one Mary designed – so fun to use the negative die cut space! I cut several strips of A Walk in the Forest DSP and adhered them to a Garden Green mat. I used the largest tree die from the Stampin’ Up! Merriest Trees dies to cut a Basic White panel and emboss the panel with the Snowflake Sky 3D embossing folder. Use lots of dimensionals to adhere the embossed layer to the mat and adhere it to the front of a Cherry Cobbler card base with dimensionals. Cut the star and adhere it to the tree top and stamp the sentiment in Garden Green, trim the end and adhere it to the front.

Update: Mary posted her card today and you can see it here.

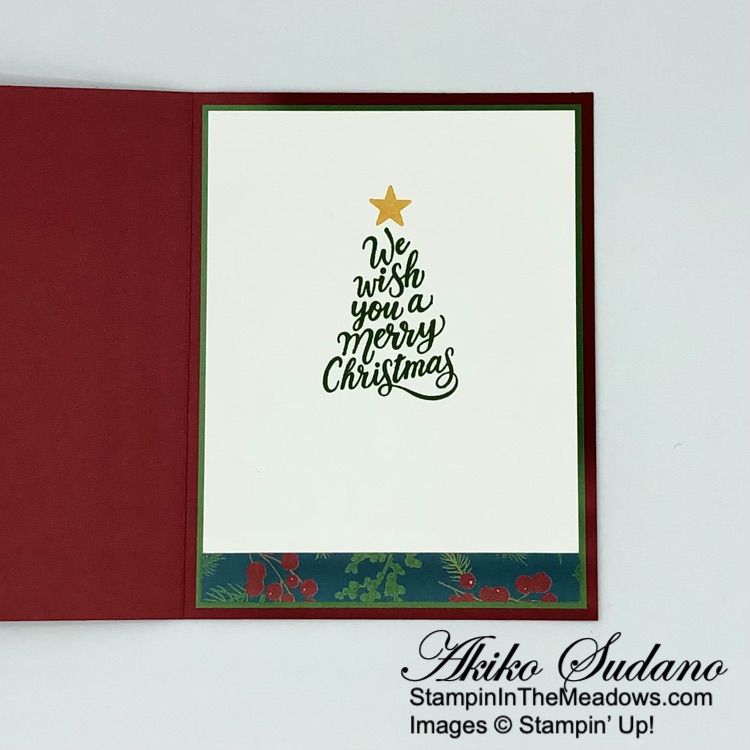
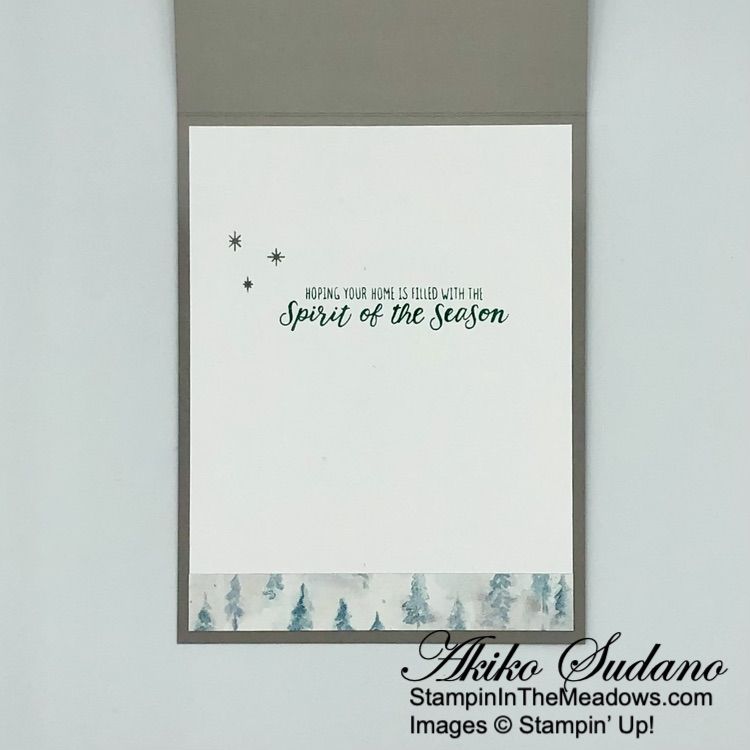
For the inside stamp the sentiment in Garden Green and the star in Daffodil Delight on a Basic White panel. Trim the bottom with a strip of DSP before adhering it to a Garden Green mat and to the inside of the card.

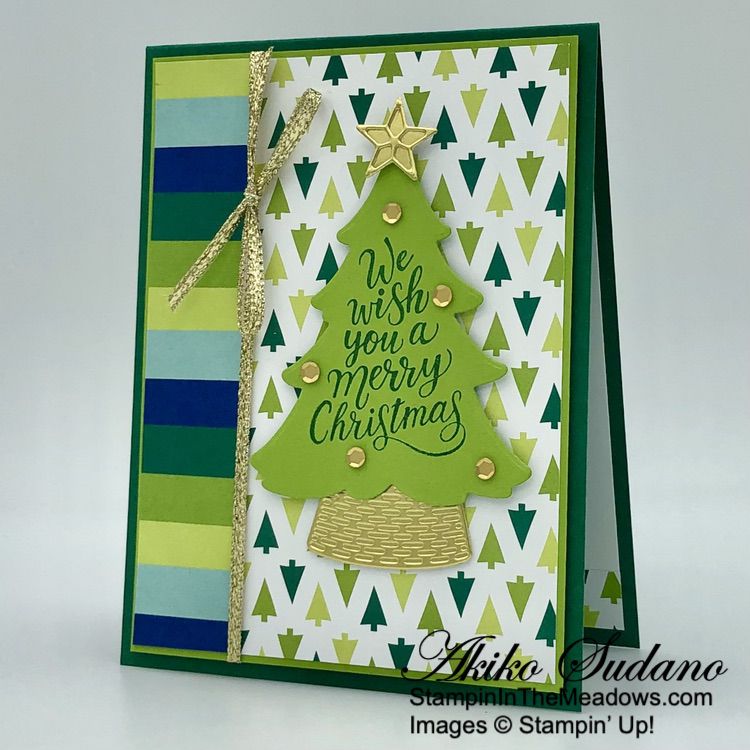
For my version of Karen’s design, I cut two large Pretty Peacock trees from the A Walk in the Forest DSP and cut them the way Karen did. Karen used the dies, and I had to fussy cut since the DSP tree boughs didn’t line up with the Stampin’ Up! Merriest Trees dies. But I built the tree like she instructed and adhered them to a panel of holiday greenery DSP matted on Cherry Cobbler. I adhered the panel to a Pretty Peacock card base and made a bow for the top using white iridescent ribbon. Check out Karen’s card HERE because her embossed tree is just gorgeous!

Here’s the inside. The sentiment is stamped in Cherry Cobbler on Basic White and matted on Cherry Cobbler. I love how Karen designed it with the DSP on both sides of the inside panel!

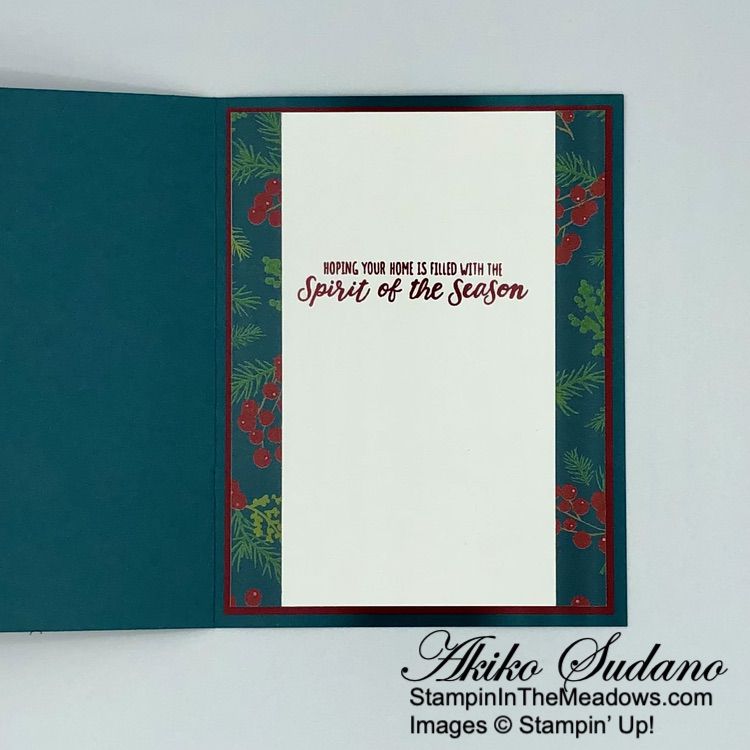
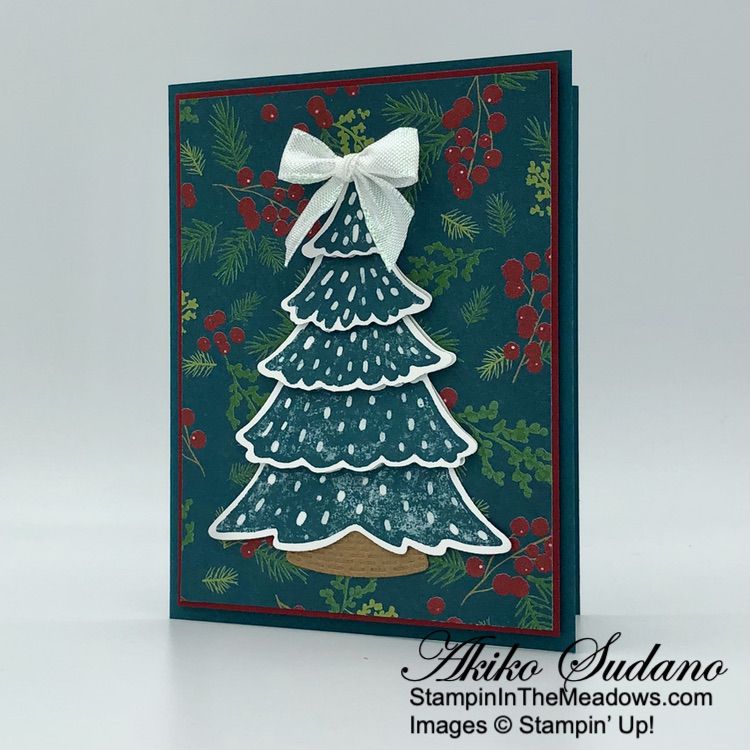
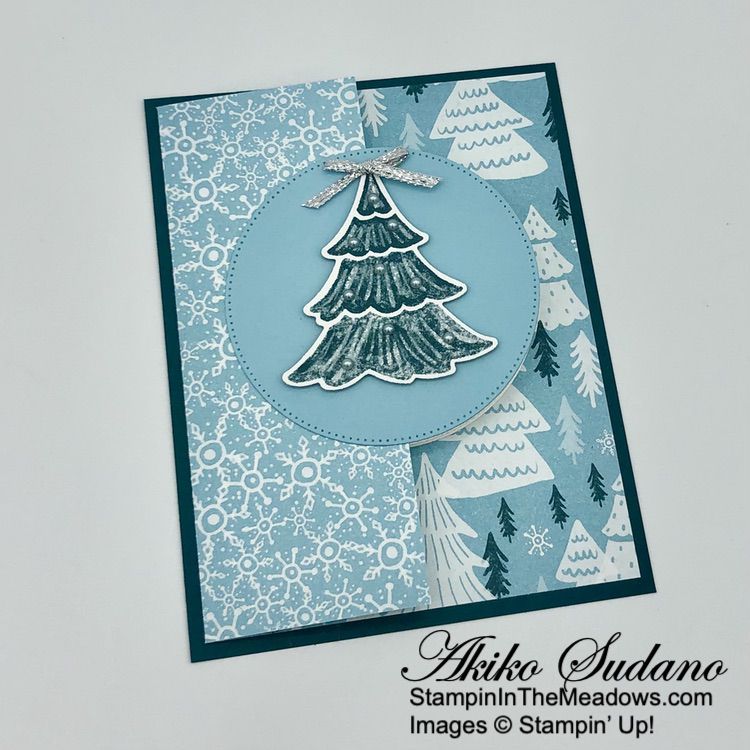
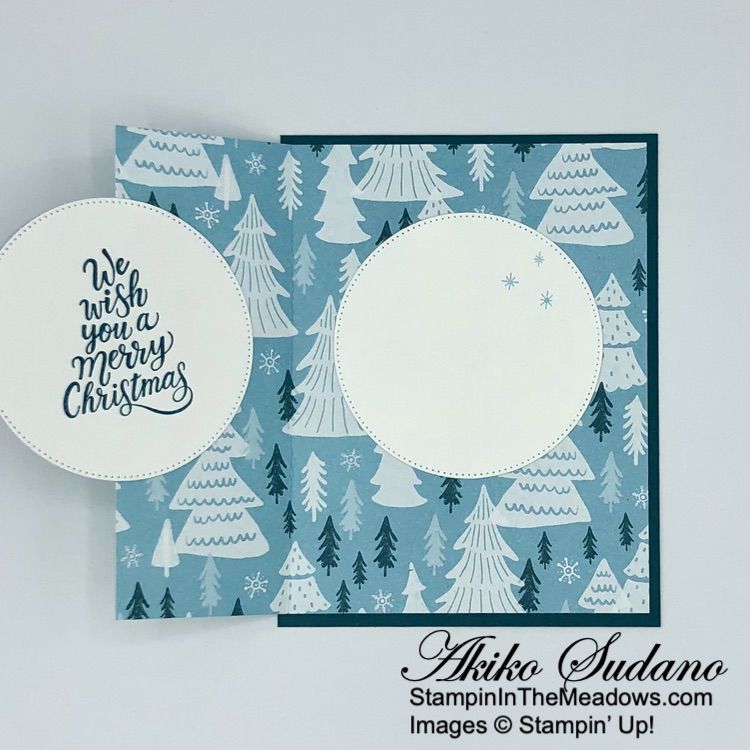
My last card is based on the card that Rosie Kean made during our meeting. Her design used the large tree, but I ran out of large trees that would go with the DSP and she showed an alternative using a die cut shape, so I decided to follow that example. I love the design using both sides of the pretty DSP! my card base is a single Pretty Peacock panel and I used the largest circle die from the Stylish Shapes dies to cut a Balmy Blue circle for the front and Basic White circles for the inside. I cut a Pretty Peacock tree with the middle tree die in the Stampin’ Up! Merriest Trees dies, adhered it with dimensionals and decorated it with a silver bow and Lost Lagoon Festive Pearls.

For the inside of the card, I stamped the sentiment in Pretty Peacock on one of the Basic White circles and stamped some Balmy Blue snowflakes on the second circle (this is where you can sign the card).

I’m so glad that the Stampin’ Up! Merriest Trees stamp set and dies are NOT retiring because they’re so versatile. And thank you Mary, Karen and Rosie for inspiring us with these pretty designs! I enjoyed playing with the A Walk in the Forest designer series paper so much that I was inspired to use it in making a rustic Christmas Tree ornament! I love that the bear can be cut with the Beary Cute punch!

Thanks to these pretty card designs, my Christmas cards are almost done! And thank goodness because the Demonstrator pre-order for the January-April 2024 Mini Catalog starts today and I’ll be getting my customer catalogs ready to mail out early next week along with my Christmas cards!


Last Chance Products Discounts Going on Now!

The September–December 2023 Mini Catalog is retiring soon! It’s bittersweet to say goodbye to a Stampin’ Up! catalog, but we’re looking forward to all the new products on their way—and we hope you are, too!

The lists of retiring and carryover products has been announcedFrom November 21, 2023 –January 3, 2024, you can stock up on your favorite seasonal products from the September – December 2023 Mini Catalog and save up to 60%! So, what are you waiting for? After all, Last Chance Products will only be available while supplies last.

Click HERE to download a PDF with the list of retiring items from the Sept-Dec 2023 Mini Catalog and the discounts that start Nov 21.

Click HERE to download a PDF with the list of items from the Sept-Dec 2023 Mini Catalog that will be carrying over.

Note that for some Last Chance bundles, the individual items may be carried over, but the items will no longer be bundled with the 10% savings. These items are marked with three asterisks in the Last Chance PDF.


Clearance Rack Has Been Refreshed!

Stampin’ Up! has added new items to the Clearance Rack in the Online store! Shop and save up to 60% off selected products. These items are only available while supplies last, so check it out HERE.


New January-April 2024 Mini and Sale-A-Bration

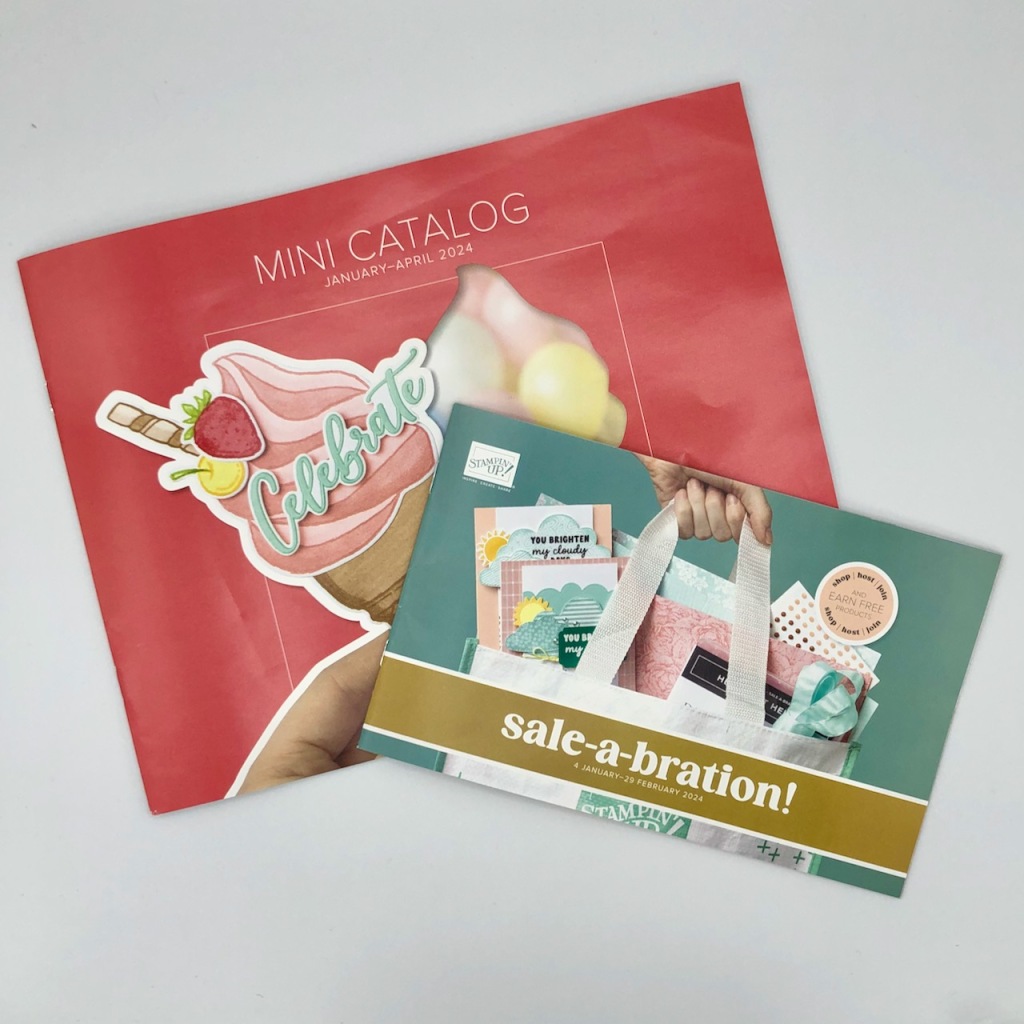
The Stampin’ Up! January – April 2024 Mini Catalog and Sale-A-Bration 2024 will begin on January 4, 2024! The Demonstrator pre-order period begins today and I will be ordering catalogs for customers who have ordered from me within the last year and sending them out. If you would like a copy, just place an order in my Online Store and I will be happy to send a new catalog to you too!


Current Host Code: 27CYQXTT

Use this host code when you order $50 or more and receive a Thank You gift from me!  The free gift is your choice of any item currently available valued up to $10.00.

If your order is over $150, please do not use the host code since you’ll receive your own Host Dollars plus I’ll still send you the Thank You gift!  This host code can be used by anyone, no club or commitment required. Let me know if you have any questions.


If you need any stamping supplies, I’d be very happy to be your Demonstrator.  Just click on the Shop Now Button on the right side of the screen to go directly to my Online store or contact me if you have any questions.  Happy Stamping!

Thanks for stopping by and have a great day!

Akiko

  • Visit my online store here
  • See the current Stampin’ Up! clearance rack specials here
  • Earn FREE Stampin’ Up! products through my Wildflower Frequent Shopper Program – my way of saying thank you to my online frequent shopper customers.
  • Have any questions? I’d be happy to help, click here to contact me.

Cardstock Cuts for this project:

  • DSP Strip Tree Card
    • Cherry Cobbler – 5-1/2″ x 8-1/2″ card base scored at 4-1/4″
    • Garden Green – two 4″ x 5-1/4″ panels (front and inside panel mats)
    • Daffodil Delight – 1″ x 2″ (die cut stars)
    • Basic White – two 3-7/8″ x 5-1/8″ panels (front background and inside panel), 5/8″ x 2-7/8″ (label)
    • A Walk in the Forest DSP – nine 1/2″ x 3-1/2″ strips (front tree), 1/2″ x 3-7/8″ (inside trim)
  • Layered Large Tree Card
    • Pretty Peacock – 5-1/2″ x 8-1/2″ card base scored at 4-1/4″
    • Cherry Cobbler – two 4″ x 5-1/4″ panels (front and inside panel mats)
    • Basic White – 3-7/8″ x 5-1/8″ (inside panel)
    • A Walk in the Forest DSP – 3-7/8″ x 5-1/8″ (front background), two 1/2″ x 5-1/8″ strips (inside trim), two large tree die cuts
  • Snowflake Fun Fold Tree Card
    • Pretty Peacock – 4-1/4″ x 5-1/2″ card base
    • Balmy Blue – 3-1/4″ x 3-1/4″ (die cut circle)
    • Basic White – two 3-1/4″ x 3-1/4″ panels (inside die cut circles)
    • A Walk in the Forest DSP – 6″ x 5-1/4″ mini card base scored at 2″, die cut medium tree

Stampin’ Up! products used in this project:


Stampin’ Up! Merriest Trees for the Happy Inkin’ Thursday Blog Hop

Good Morning and welcome to the Happy Inkin’ Thursday Blog Hop! One of my favorite Christmas bundles is the Stampin’ Up! Merriest Trees bundle and I used it today with the beautiful Winter Meadow designer series paper for a Christmas card. You can find the supplies I used along with card stock cuts at the bottom of my post.

We have a Theme challenge this week and and it’s perfect because I have so many more Christmas cards to make!

I adhered a panel of Winder Meadow designer series paper to the front of a Lost Lagoon mat and wrapped it with Silver and Sheer White ribbon and made a bow. I popped the panel on the front of a Smoky Slate card base with dimensionals.

I stamped a panel of mottled Lost Lagoon Winter Meadow DSP with the sentiment from the Stampin’ Up! Merriest Trees bundle in Versamark ink. I sprinkled it with white embossing powder and shook off the excess. I heated the powder with my heat tool until it was bright and shiny and cut it out with the second largest tree die. I cut a small panel of silver foil with he two stars and adhered them together and adhered thhem to the tree top.

I cut a vellum panel with the third largest Scalloped Contours die. I embossed it with the pretty Snowflake Sky 3D embossing folder and adhered it to the card front with Stampin’ Seal. I popped the die cut Christmas Tree on top with dimensionals and decorated it with light green pearls.

For the inside of the card, I stamped the sentiment from the Stampin’ Up! Merriest Trees stamp set in Lost Lagoon ink on a Basic White panel. I stamped the snowflakes in Smoky Slate and trimmed the bottom of the panel with a strip of DSP. I adhered the panel to a to the inside of the card with Stampin’ Seal.

The Stampin’ Up! Merriest Trees bundle is so versatile in the variety of Christmas Trees you can make for your cards. And I love the soft colors of the Winter Meadow designer series paper.

On with the Hop! Click on the Next Blog button to move forward to see the beautiful project Karen Ksenzakovic has created.

If you get lost along the way, here are the participants for the hop:


Current Host Code: CD4VVKRG

Use this host code when you order $50 or more and receive a free gift from me!  The free gift is your choice of any item currently available valued up to $10.00!

If your order is over $150, please do not use the host code since you’ll receive your own Host Dollars plus I’ll still send you the free gift!  This host code can be used by anyone, no club or commitment required. Let me know if you have any questions.


If you need any stamping supplies, I’d be very happy to be your Demonstrator.  Just click on the Shop Now button on the right side of the screen to go directly to my online store or contact me if you have any questions. 

Thanks for stopping by and Happy Stamping!

Akiko

  • Visit my online store here
  • See the current Stampin’ Up! clearance rack specials here
  • Earn FREE Stampin’ Up! products through my Wildflower Frequent Shopper Program – my way of saying thank you to my online frequent shopper customers.
  • Have any questions? I’d be happy to help, click here to contact me.

Cardstock Cuts for this project:

  • Smoky Slate – 4-1/4″ x 11″ card base scored at 5-1/2″
  • Lost Lagoon – 4″ x 5-1/4″ (front mat)
  • Silver foil – 1″ x 2″ (die cut layered star)
  • Vellum – 2-3/4″ x 4″ (embossed panel)
  • Basic White – 4″ x 5-1/4″ (inside panel)
  • Winter Meadow DSP – 3-7/8″ x 5-1/8″ (front background), 3″ x 3-1/4″ (Christmas Tree), 1/2″ x 4″ (inside trim)

Stampin’ Up! products used in this project:


Stampin’ Up! Merriest Trees Modern Christmas Card

Good Morning! The Stampin’ Up! Merriest Trees bundle is a wonderful Christmas Tree stamp set set that is so versatile and fun! I paired it with the Merry Bold and Bright designer series paper for a modern Christmas Card in different shades of green and gold. You can find the products I used at the bottom of my post along with the card stock sizes.

I adhered a strip of Merry Bold & Bright designer series paper to a larger panel with liquidd glue and adhered the layered panel to a Granny Apple Green mat. I wrapped a length of gold ribbon around the DSP seam and made a bow (In my short, I used gold trim which worked out great!). I popped the panel on the front of a Shaded Spruce card base with dimensionals.

I stamped the sentiment from the Stampin’ Up! Merriest Trees photopolymer stamp set in Shaded Spruce ink on Granny Apple Green and cut it out with the second largest tree die. I cut the tree stand and two stars from gold foil and adhered the detailed star to the solid star. I adhered the star to the tree top with a glue dot and adhered the tree stand to the card front with glue dots..

I adhered the tree to the card front with dimensionals and decorated the tree with gold sequins.

For the inside of the card, I stamped the sentiment from the Stampin’ Up! Merriest Trees stamp set in Real Red ink on a Basic White panel. I and trimmed the bottom with a strip of DSP and adhered the panel to the inside of the card with Stampin’ Seal.

Here’s a picture of both cards, so you can see the gold trim. This design comes together real quick and would be a good choice for making multiples. The Stampin’ Up! Merriest Trees sentiment on the solid tree is such a cheerful way to send Christmas greetings.


Designer Series Paper Special Release Going On Now!

A special selection of Designer Series Papers is available in the Online Exclusives section of the Online Store. These papers will be available only while supplies last, so shop early to bet yours before they’re gone. Click on the image below to download a PDF with all the details including item numbers and prices.

These papers are perfect for both holiday crafting and all occasion crafting.


World Card Making Day – October 7, 2023!

It’s time to celebrate one of our favorite days of the year—World Card Making Day! Invite your friends to craft along with Stampin’ Up! as we express our creativity and make fabulous cards! In just under three hours, we’ll create three unique cards together. Everyone is invited and welcome. And the event and registration are FREE!

Here are the Details:

  • Who: Anyone!
  • When: October 7, 2023 from 2:00 – 5:00 pm (MT)
  • Where: Online
  • Price of Event: FREE
  • Registration Dates: Sept 6 – Oct 7, 2023
    • You can participate in the event without registering. However, registration is encouraged because it’s the best way to stay up to date regarding event details. The email address provided will only be used for event communication.

Go to the World Card Making Day page in my Online Store to register and get more information. You will also find Supply Lists and Card Stock cuts that you can download to prepare.

Inkin’ Krew World Card Making Day Event

In addition to the World Card Making Day event that Stampin’ Up! is planning, The Inkin’ Krew is planning a Facebook event to celebrate World Card Making Day!! The event will be Saturday, Oct 7 and we’ll be scheduling our lives around the Stampin’ Up! event so that you’ll be able to attend both if you’d like!  We’ll be starting a new Facebook page for the event. We are planning to have as many team members as possible go live with card making presentations throughout the day. We will also have a few giveaways to keep it fun!

More details will follow.


Current Host Code: 4BTBNFDU

Use this host code when you order $50 or more and receive a Thank You gift from me!  The free gift is your choice of any item currently available valued up to $10.00 .

If your order is over $150, please do not use the host code since you’ll receive your own Host Dollars plus I’ll still send you the Thank You gift!  This host code can be used by anyone, no club or commitment required. Let me know if you have any questions.


If you need any stamping supplies, I’d be very happy to be your Demonstrator.  Just click on the Shop Now button on the right side of the screen to go directly to my online store or contact me if you have any questions.  Happy Stamping!

Thanks for stopping by and have a great weekend!

Akiko

  • Visit my online store here
  • See the current Stampin’ Up! clearance rack specials here
  • Earn FREE Stampin’ Up! products through my Wildflower Frequent Shopper Program – my way of saying thank you to my online frequent shopper customers.
  • Have any questions? I’d be happy to help, click here to contact me.

Cardstock Cuts for this project:

  • Shaded Spruce – 5-1/8″ x 8-1/2″ card base, scored at 4-1/4″
  • Granny Apple Green – 4″ x 5-1/4″ (front mat), 3″ x 4″ (die cut tree)
  • Gold Foil – 1-3/4″ x 2″ (tree stand and star)
  • Basic White – 4″ x 5-1/4″ (inside panel)
  • Merry Bold and Bright DSP – 3-7/8″ x 5-1/8″ (front tree background), 1″ x 5-1/8″ ((front striped background), 1/2″ x 4″ (inside trim)

Stampin’ Up! products used in this project:


Stampin’ Up! Merriest Trees Christmas Card

Good Morning! Today’s card uses the awesome Stampin’ Up! Merriest Trees bundle with a Christmas pattern from the Garden Walk 6″ x 6″ designer series paper to make a festive tag Christmas card. And the sentiment is from the cute Merry and Bright stamp set. You can find the products I used at the bottom of my post along with the card stock sizes.

I adhered a panel of Garden Walk 6″ x 6″ designer series paper to the front of a real Red card base with liquid glue. I cut a tag from Basic White using the die from the Stampin’ Up! Merriest Trees dies. I embossed the tag with the Christmas Tidings embossing folder and cut a hole reinforcer from Pretty Peacock. I adhered the reinforcer to the tag and looped Real Red and white iridescent ribbon through it and tied it with a Gold Twine bow.

I cut the 4 smallest tree sections using the Stampin’ Up! Merriest Trees dies from a Pretty Peacock panel of Hello, Irresistible 6″ x 6″ designer series paper. I used the detailed tree branch stamp from the Stampin’ Up! Merriest Trees photopolymer stamp set and stamped each section in pretty peacock. I used my bone folder to curl the bottoms of each section up and adhered them together using liquid glue. I cut a tree trunk from Wild Wheat and embossed with with the Timber 3D embossing folder and adhered it to the back.

I cut the two stars from Gold Foil and adhered them together before attaching them to the tree top with a glue dot and decorated the tree with Festive Pearls. I stamped the sentiments from the Merry and Bright stamp set in Poppy Parade and fussy cut it with my paper snips. I adhered the tree and sentiments to the tag with glue dots and popped the tag onto the card front with dimensionals.

For the inside of the card, I stamped the sentiment from the Stampin’ Up! Merriest Trees stamp set in Pretty Peacock ink on a Basic White panel. I adhered a strip of Garden Walk 6″ x 6″ DSP to the bottom of the panel and adhered the panel to the inside of the card with Stampin’ Seal.

I love tree Christmas cards and the Stampin’ Up! Merriest Trees bundle is pretty versatile for making different styles of trees and cards. The rich colors and designs of the Garden Walk 6″ x 6″ DSP make nice rustic cards and the gold trim & foil star with the shiny pearls give it just the right touch of shine!


The October Paper Pumpkin Kit is Home for the Holidays!

Create dazzling traditional Christmas cards with the Home for the Holidays Paper Pumpkin Kit! This kit includes eight beautiful cards—four each of two designs. Whether you want to send a few to your loved ones or fill your home with some extra special Christmas cheer, this kit has everything you need to make some sparkly, festive cards. 

The October Paper Pumpkin Kit Includes:

  • All the supplies you’ll need to create 8 sparkly and dazzling Christmas cards
    • 4 each of 2 designs—and eight coordinating envelopes.
    • Finished folded card size: 4-1/4″ x 5-1/2″
  • A coordinating photopolymer stamp set with endearing holiday sentiments and festive designs.
  • A Real Red Stampin’ Spot
  • A bottle of Glitter Glue
  • Beautiful Christmasy-themed precut pieces
  • Specially Designed matching Box
  • Coordinates with the November Paper Pumpkin Kit

Coordinating Colors: Balmy Blue, Blueberry Bushel, Cherry Cobbler, Crumb Cake, Crushed Curry, Daffodil Delight, Lemon Lolly, Mossy Meadow, Night of Navy, Old Olive, Pecan Pie, Real Red

If you’re interested in subscribing to Paper Pumpkin, you can either sign up for a subscription where you are billed monthly for your kit or you can purchase a prepaid subscription in my Online Store. To see more information and to sign up for the monthly subscription click here. To see the options for prepaid subscriptions in my Online Store, click here.

Sign up deadline for the October 2023 kit is October 10, 2023. Note: Supplies may be limited toward the end of the subscription period.


Introducing the newest addition to the Stampin’ Up! Kit’s Collection – Christmas Everywhere Kit!

Share the joy of Christmas with everyone, everywhere with the Christmas Everywhere Kit! Featuring trees from around the world, this kit comes with everything you need to quickly create 9 cards—3 each of 3 designs—so you can send the special people in your life warm Christmas wishes wherever they are! 

And here is a short instructional video showing how to put the cards together:

This Kit includes:

  • Item# 162422 – $21
  • Enough supplies to create 9 cards—3 each of 3 designs
  • 9 coordinating envelopes
  • Christmas Everywhere photopolymer stamp set
  • One Lost Lagoon Ink Spot
  • Printed card bases, printed die-cut labels and images with red glitter, adhesive, and a clear block
  • Finished card size: 5-1/2″ x 4-1/4″

Current Host Code: ATSGGVYD

Use this host code when you order $50 or more and receive a Thank You gift from me!  The free gift is your choice of any item currently available valued up to $10.00 .

If your order is over $150, please do not use the host code since you’ll receive your own Host Dollars plus I’ll still send you the Thank You gift!  This host code can be used by anyone, no club or commitment required. Let me know if you have any questions.


If you need any stamping supplies, I’d be very happy to be your Demonstrator.  Just click on the Shop Now button on the right side of the screen to go directly to my online store or contact me if you have any questions.  Happy Stamping!

Thanks for stopping by and have a great weekend!

Akiko

  • Visit my online store here
  • See the current Stampin’ Up! clearance rack specials here
  • Earn FREE Stampin’ Up! products through my Wildflower Frequent Shopper Program – my way of saying thank you to my online frequent shopper customers.
  • Have any questions? I’d be happy to help, click here to contact me.

Cardstock Cuts for this project:

  • Real Red – 4-1/4″ x 11″ card base, scored at 5-1/2″
  • Pretty Peacock – 3/4″ x 1-1/4″ (tag reinforcement)
  • Wild Wheat – 3/4″ x 1-1/4″ (tree trunk)
  • Basic White – 4″ x 5-1/4″ (inside panel),
  • Garden Walk 6″ x 6″ DSP – 4″ x 5-1/4″ (front background), 3/4″ x 4″ (inside trim)
  • Hello, Irresistible 6″ x 6″ DSP – 4-1/2″ x 6″ (tree sections)

Stampin’ Up! products used in this project: