Stampin’ Up! Joy Of Noel for the Happy Inkin’ Thursday Blog Hop

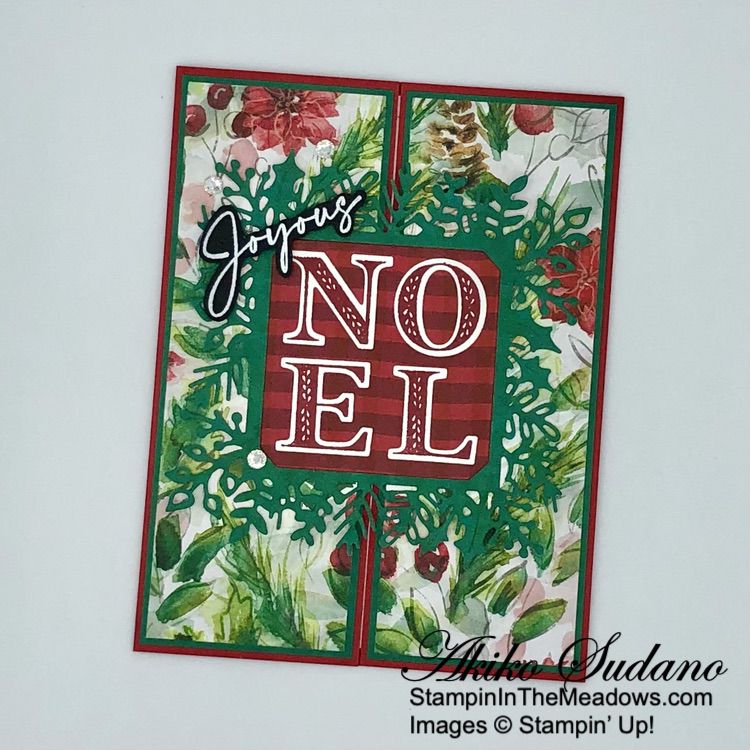
Good Morning and welcome to the Happy Inkin’ Thursday Blog Hop! I used the pretty Stampin’ Up! Joy Of Noel bundle with the beautiful Joy of Christmas designer series paper for a gate fold Christmas card. And I also used the pretty holiday greenery frame from the Christmas Classics dies to really make it fancy. You can find the supplies I used along with card stock cuts at the bottom of my post.
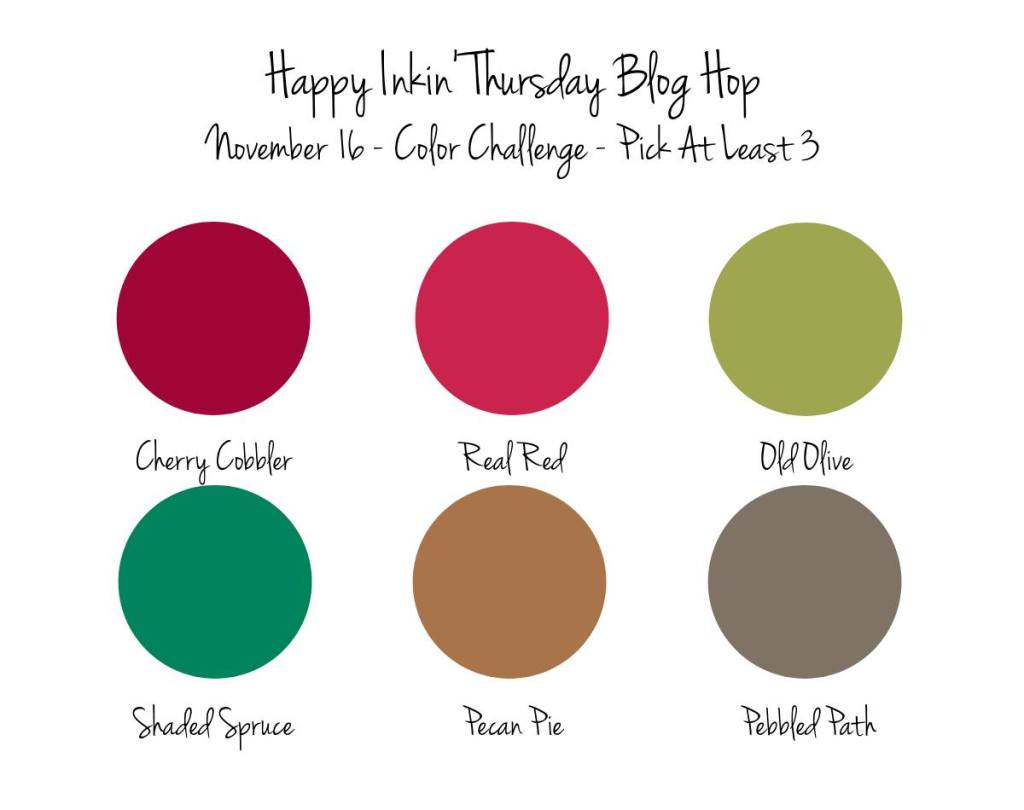
We have a color challenge this week and thanks to the pretty designer series paper, I managed to get all the colors in my card!
I adhered the floral panels of Joy of Christmas designer series paper to Shaded Spruce mats and adhered them to the two front flaps of a Real Red gatefold card base. I cut a mottled Shaded Spruce panel of the DSP with the pretty square greenery frame from the Christmas Classics dies. I cut a red plaid panel of the DSP with the small square die and adhered them together with liquid glue.

I stamped the NOEL letters from the Stampin’ Up! Joy of Noel stamp set in Cherry Cobbler ink on Basic White. I cut the letters out with the coordinating die and adhered them to the DSP frame with liquid glue. I applied liquid glue to the back left side of the frame and adhered it to the card front, so that it sticks only to the left flap of the card front.

I stamped the Joyous sentiment from the Stampin’ Up! Joy of Noel stamp set in Versamark ink and sprinkled it with white embossing powder. I shook off the excess powder and heated it with my heat tool until it was bright and shiny. I fussy cut around the letters with my paper snips and popped it on the card front with dimensionals. I finished the card front with rhinestone gems.
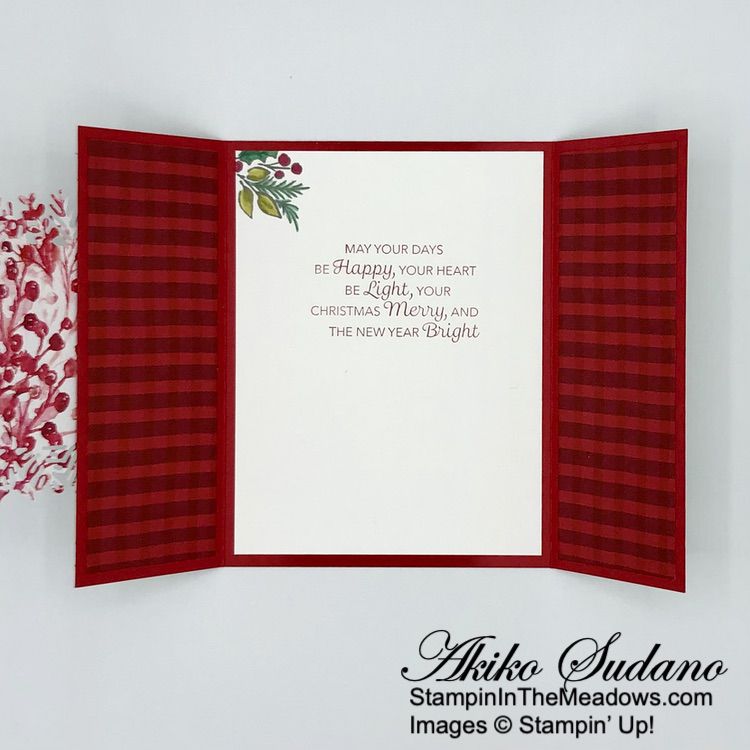
For the inside of the card, I stamped the sentiment from the Very Best Occasions stamp set in Real Red ink on a Basic White panel. I stamped part of the small spray from the Stampin’ Up! Joy Of Noel stamp set in the corner using Pebbled Path ink and colored it with Cherry Cobbler, Old Olive and Shaded Spruce Stampin’ Blends. I adhered the panel to the inside of the card. I also adhered red plaid panels of Joy of Christmas DSP to the inside of the front flaps.

The Stampin’ Up! Joy of Noel bundle has beautiful greenery stamps and dies and the NOEL stamp is just gorgeous! It goes so well with the Christmas Classics bundle and is perfect with the Joy of Christmas designer series paper for a beautiful traditional Christmas card.

On with the Hop! Click on the Next Blog button to move forward to see the beautiful project Karen Ksenzakovic has created.

If you get lost along the way, here are the participants for the hop:


Current Host Code: J39F9RSA

Use this host code when you order $50 or more and receive a free gift from me!  The free gift is your choice of any item currently available valued up to $10.00!

If your order is over $150, please do not use the host code since you’ll receive your own Host Dollars plus I’ll still send you the free gift!  This host code can be used by anyone, no club or commitment required. Let me know if you have any questions.


If you need any stamping supplies, I’d be very happy to be your Demonstrator.  Just click on the Shop Now button on the right side of the screen to go directly to my online store or contact me if you have any questions. 

Thanks for stopping by and Happy Stamping!

Akiko

  • Visit my online store here
  • See the current Stampin’ Up! clearance rack specials here
  • Earn FREE Stampin’ Up! products through my Wildflower Frequent Shopper Program – my way of saying thank you to my online frequent shopper customers.
  • Have any questions? I’d be happy to help, click here to contact me.

Cardstock Cuts for this project:

  • Real Red – 5-1/2″ x 8-1/2″ card base scored at 2-1/8″ and 6-3/8″
  • Shaded Spruce – two 2″ x 5-3/8″ panels (front mats)
  • Basic Black – 1-1/4″ x 2″ (fussy cut Joyous)
  • Basic White – 4″ x 5-1/4″ (inside panel), 2-1/2″ x 2-1/2″ (NOEL die cuts)
  • Joy Of Christmas DSP – four 1-7/8″ x 5-1/4″ panels (two floral for the front and two plaid for the inside), 4″ x 4″ (greenery frame), 2-1/2″ x 2-1/2″ (plaid label)

Stampin’ Up! products used in this project:


Stampin’ Up! Christmas Classics Christmas Card

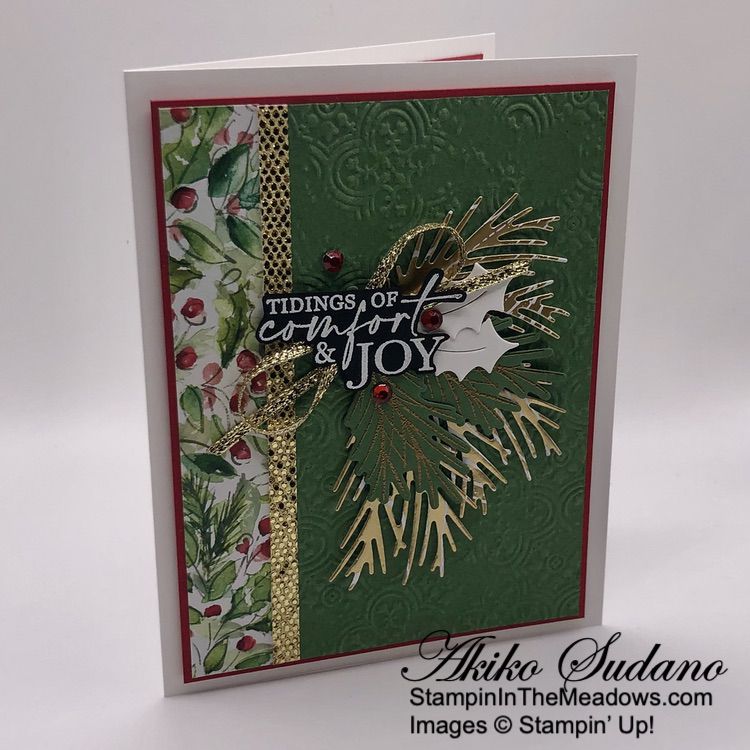
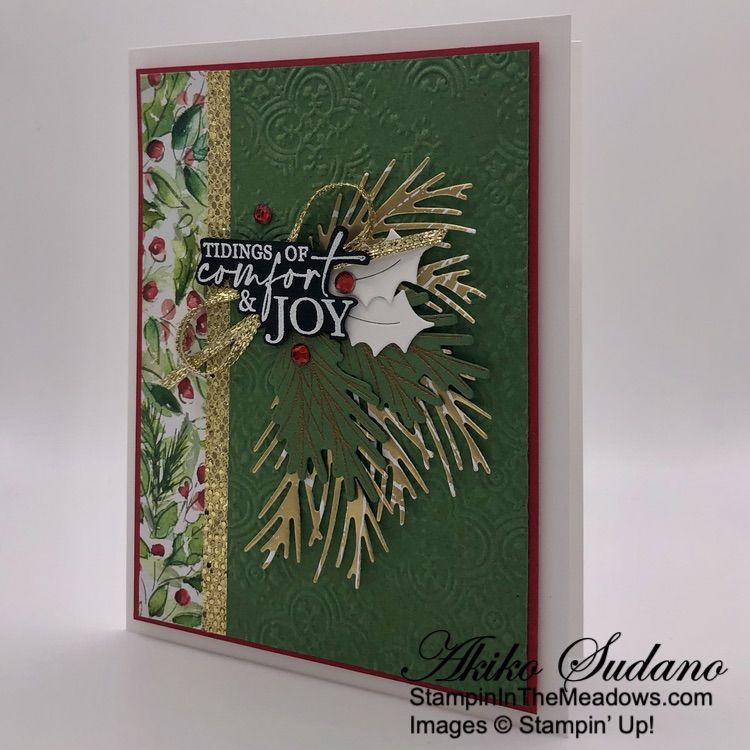
Good Morning! Here’s another Christmas card made with the beautiful Stampin’ Up! Christmas Classics bundle and the pretty Joy of Christmas designer series paper. This card adds lots of gold touches from the ribbon, More Dazzle & Joyful specialty papers. You can find the products I used at the bottom of my post along with the card stock sizes.

I embossed a panel of Garden Green with the Distressed Tile 3D embossing folder and adhered it to the right side of a Real Red mat. I adhered a strip of Joy of Christmas designer series paper to the left side and a thin strip of More Dazzle specialty paper in the middle. I popped the panel to the front of a Thick Basic White card base with dimensionals.

I used the pine bough die from the Joy of Noel dies to cut three boughs from the gold woodgrain paper from the Joyful specialty paper pack and adhered them to the card front with glue dots. I stamped two pine boughs from the Stampin’ Up! Christmas Classics stamp set in Versamark ink on Garden Green card stock. I sprinkled them with gold embossing powder and heated it with my heat tool until the powder was bright and shiny. I cut them out with the coordinating dies and adhered them to the card with glue dots.

Iused the smaller holly die from the Magical Meadow dies to cut two holly heaves from Basic White and adhered them to the card front with glue dots. I stamped the sentiment from the Stampin’ Up! Christmas Classics stamp set in Versamark ink on Basic Black and sprinkled it with white embossing powder. I shook off the excess and heated the powder with my heat tool until it was bright and shiny. I fussy cut the sentiment with my paper snips. I applied Stampin’ Seal to the back of the sentiment and wrapped it with gold trim, simulating a bow. I adhered the sentiment to the card with dimensionals and glue dots and finished with large red rhinestones.

For the inside of the card, I stamped the holly leaves from the Stampin’ Up! Christmas Classics stamp set in Garden Green ink on Basic White. I stamped the Merry in Memento Tuxedo Black and the Christmas in Real Red. I adhered the panel to a Real Red mat before adhering it to the inside of the card.

The sentiments from the Stampin’ Up! Christmas Classics are full of Christmas warmth and are perfect with the traditional colors of the Joy of Christmas designer series paper. The pine boughs in are pretty, both stamped and die cut and they work so well together!


Celebrate 35 Years Joining Special!

Stampin’ Up!’s is celebrating their 35th anniversary in style! From October 3 – October 31 2023, anyone who joins our fun crafting community as a new demonstrator can choose either 35% OFF the cost of their Starter Kit or get 35% MORE product with their Starter Kit!

Promotion Details:

  • Promotion Period: October 3 – October 31, 2023
  • Deadline to Join: October 31, 2023; 11:59 PM (MT)
  • New demonstrators can choose one of the following options for their Starter Kit:
    • Option 1: Get 35% OFF the normal cost of a Stampin’ Up! Starter Kit. Those who select this option will receive $125 worth of product for only $64.35!
    • Option 2: Get 35% MORE product with their Starter Kit. Those who select this option will receive $168.75 worth of product by spending $99!

No matter which option you choose for your Starter Kit, you will receive free business supplies and free shipping on your Starter Kit—not to mention all the fun that comes with being part of Stampin’ Up!

FREE OnStage@Home Registration

It gets better! Those who sign up for a Starter Kit during this offer will also be automatically registered for FREE to our virtual OnStage event on November 11 – a $77 value!

  • Those who sign up for this offer have the opportunity to watch the event independently, gathered together with other demonstrators, or with their Team Leader.
  • Demonstrators who join during this promotion will be automatically added to the OnStage attendees; they do not need to register separately.
  • Demonstrators who join during this promotion will also receive an email with all the information about this event.

Yay!  Stampin’ Up! events are always SO much fun!!  Bonus that you can join and attend your first even for free!!

Come Join Us!

If you’d like to join our team, we’d love to have you!  Once you join, you’ll get at least a 20% discount on all of your Stampin’ Up! purchases and you can preorder from the upcoming catalogs!

We welcome all types of Demonstrators from those only purchasing to get the discount for themselves to those who want to run a business and those anywhere in between!  We’re a relaxed group that loves to stamp with no pressure to sell!

Contact me at apsudano@stampininthemeadows.com if you have questions.


Current Host Code: CD4VVKRG

Use this host code when you order $50 or more and receive a Thank You gift from me!  The free gift is your choice of any item currently available valued up to $10.00 .

If your order is over $150, please do not use the host code since you’ll receive your own Host Dollars plus I’ll still send you the Thank You gift!  This host code can be used by anyone, no club or commitment required. Let me know if you have any questions.


If you need any stamping supplies, I’d be very happy to be your Demonstrator.  Just click on the Shop Now button on the right side of the screen to go directly to my online store or contact me if you have any questions.  Happy Stamping!

Thanks for stopping by and have a great weekend!

Akiko

  • Visit my online store here
  • See the current Stampin’ Up! clearance rack specials here
  • Earn FREE Stampin’ Up! products through my Wildflower Frequent Shopper Program – my way of saying thank you to my online frequent shopper customers.
  • Have any questions? I’d be happy to help, click here to contact me.

Cardstock Cuts for this project:

  • Thick Basic White – 5-1/2″ x 8-1/2″ card base scored at 4-1/4″
  • Garden Green – 2-3/4″ x 5″ (embossed front), 3″ x 3″ (die cut boughs)
  • Real Red – two 3-7/8″ x 5-1/8″ panels (front and inside mats)
  • More Dazzle specialty paper – 1/4″ x 5″ (front trim)
  • Joyful specialty paper – 2-1/4″ x 5″ (die cut pine boughs)
  • Basic Black – 1-1/4″ x 2-1/4″ (label)
  • Basic White – 4″ x 5-1/4″ (inside panel), 1-1/4″ x 2-1/2″ (die cut holly leaves)
  • Joy of Christmas DSP – 3/4″ x 5″ (front trim)

Stampin’ Up! products used in this project:


Stampin’ Up! Christmas Classics Seasons Greetings Card

Good Morning! The Stampin’ Up! Christmas Classics bundle has wonderful Christmas sentiments with gorgeous foliage die cut label frames. I used one of the frames and sentiments with the pretty Joy of Christmas designer series paper for a festive Seasons Greetings Christmas card. You can find the products I used at the bottom of my post along with the card stock sizes.

I cut a panel of More Dazzle specialty paper with the two open leaf dies from the Stampin’ Up! Christmas Classics dies. I cut the holly leaf twice from a Shaded Spruce panel of Joy of Christmas designer series paper. I cut the large foliage label from Garden Green and the berries from Real Red. I trimmed the berries and adhered them to the foliage on the label.

I stamped the Seasons Greetings sentiment from the Stampin’ Up! Christmas Classics stamp set in Real Red ink on Basic White and cut it out with the long label die. I adhered the label to the foliage label with liquid glue. I embossed a Garden Green panel with the pretty Distressed Tile embossing folder and adhered it to the front of a Garden Green card base. I adhered a panel of Joy of Christmas designer series paper to a Real Red mat and and adhered it to the card front.

I adhered die cut sprigs and holly leaves to the card with liquid glue and popped the layered label on top with dimensionals. I used glue dots to adhere a real Red bow and red rhinestones to finish the card.

For the inside of the card, I stamped the holly leaves from the Stampin’ Up! Christmas Classics stamp set in Garden Green ink on Basic White. I stamped the sentiment from the Brightest Glow stamp set in Real Red ink and trimmed the bottom with DSP. I adhered the panel to the inside of the card with Stampin’ Seal.

The gorgeous label dies from the Stampin’ Up! Christmas Classics bundle really make your handmade Christmas cards stunning! Christmas is coming up fast, so I need to get to work to finish in time.


Celebrate 35 Years Joining Special!

Stampin’ Up!’s is celebrating their 35th anniversary in style! From October 3 – October 31 2023, anyone who joins our fun crafting community as a new demonstrator can choose either 35% OFF the cost of their Starter Kit or get 35% MORE product with their Starter Kit!

Promotion Details:

  • Promotion Period: October 3 – October 31, 2023
  • Deadline to Join: October 31, 2023; 11:59 PM (MT)
  • New demonstrators can choose one of the following options for their Starter Kit:
    • Option 1: Get 35% OFF the normal cost of a Stampin’ Up! Starter Kit. Those who select this option will receive $125 worth of product for only $64.35!
    • Option 2: Get 35% MORE product with their Starter Kit. Those who select this option will receive $168.75 worth of product by spending $99!

No matter which option you choose for your Starter Kit, you will receive free business supplies and free shipping on your Starter Kit—not to mention all the fun that comes with being part of Stampin’ Up!

FREE OnStage@Home Registration

It gets better! Those who sign up for a Starter Kit during this offer will also be automatically registered for FREE to our virtual OnStage event on November 11 – a $77 value!

  • Those who sign up for this offer have the opportunity to watch the event independently, gathered together with other demonstrators, or with their Team Leader.
  • Demonstrators who join during this promotion will be automatically added to the OnStage attendees; they do not need to register separately.
  • Demonstrators who join during this promotion will also receive an email with all the information about this event.

Yay!  Stampin’ Up! events are always SO much fun!!  Bonus that you can join and attend your first even for free!!

Come Join Us!

If you’d like to join our team, we’d love to have you!  Once you join, you’ll get at least a 20% discount on all of your Stampin’ Up! purchases and you can preorder from the upcoming catalogs!

We welcome all types of Demonstrators from those only purchasing to get the discount for themselves to those who want to run a business and those anywhere in between!  We’re a relaxed group that loves to stamp with no pressure to sell!

Contact me at apsudano@stampininthemeadows.com if you have questions.


Current Host Code: CD4VVKRG

Use this host code when you order $50 or more and receive a Thank You gift from me!  The free gift is your choice of any item currently available valued up to $10.00 .

If your order is over $150, please do not use the host code since you’ll receive your own Host Dollars plus I’ll still send you the Thank You gift!  This host code can be used by anyone, no club or commitment required. Let me know if you have any questions.


If you need any stamping supplies, I’d be very happy to be your Demonstrator.  Just click on the Shop Now button on the right side of the screen to go directly to my online store or contact me if you have any questions.  Happy Stamping!

Thanks for stopping by and have a great weekend!

Akiko

  • Visit my online store here
  • See the current Stampin’ Up! clearance rack specials here
  • Earn FREE Stampin’ Up! products through my Wildflower Frequent Shopper Program – my way of saying thank you to my online frequent shopper customers.
  • Have any questions? I’d be happy to help, click here to contact me.

Cardstock Cuts for this project:

  • Garden Green – 4-1/4″ x 11″ card base, scored at 5-1/2″, 4-1/4″ x 5-1/2″ (embossed front), 4″ x 4-1/4″ (greenery die cut)
  • Real Red – 2-1/8″ x 5-1/8″ (DSP mat), 2-1/4″ x 2-1/2″ (berry die cuts)
  • More Dazzle paper – 2-1/2″ x 2-1/2″ (leaf die cuts)
  • Basic White – 4″ x 5-1/4″ (inside panel), 1-1/4″ x 4″ (label)
  • Joy of Christmas DSP – 2″ x 5″ (front background), 2-3/4″ x 3″ (die cut holly leaves), 1/2″ x 5-1/4″ (inside trim)

Stampin’ Up! products used in this project:


Stampin’ Up! Brightest Glow Christmas Card for the Happy Inkin’ Thursday Blog Hop

Good Morning and welcome to the Happy Inkin’ Thursday Blog Hop! The Stampin’ Up! Brightest Glow cling stamp set has some of the prettiest Christmas greetings and I used it with some of the pretty new Holiday papers for a simple Christmas card. You can find the supplies I used along with card stock cuts at the bottom of my post.

We have a sketch challenge this week:

I embossed a Basic White panel with the Merry Melody 3D embossing folder and adhered it to the front of a Real Red mat. I adhered the layered embossed panel to the front of a Thick Basic White card base with dimensionals.

I trimmed the bottom of a strip of Joyful Specialty DSP, Joy Of Christmas DSP and More Dazzle specialty paper with my paper snips to make fishtail banners. I adhered the banners to the card front with liquid glue.

I stamped the sentiment from the Stampin’ Up! Brightest Glow stamp set in Versamark ink on Basic White. I sprinkled it with gold embossing powder and shook off the excess. I heated the powder with my heat tool until it was bright and shiny. I cut it out with the pretty circle die from the Labels Aglow dies. I wrapped gold twine around the back and adhered the label to the card with dimensionals. I adhered holly leaf sequins and a gem to the label with glue dots.

For the inside of the card, I stamped the sentiment from the Stampin’ Up! Brightest Glow stamp set in Real Red ink on Basic White. I trimmed the bottom with a strip of Joy of Christmas DSP and adhered the panel to a Real Red mat before adhering it to the inside of the card.

The Merry Melody embossing folder is perfect for Christmas cards and pretty Christmas papers are perfecty for this week’s card sketch. All it needs is a pretty sentiment from the Stampin’ Up! Brightest Glow stamp set!

On with the Hop! Click on the Next Blog button to move forward to see the beautiful project Karen Ksenzakovic has created.

If you get lost along the way, here are the participants for the hop:


Current Host Code: CD4VVKRG

Use this host code when you order $50 or more and receive a free gift from me!  The free gift is your choice of any item currently available valued up to $10.00!

If your order is over $150, please do not use the host code since you’ll receive your own Host Dollars plus I’ll still send you the free gift!  This host code can be used by anyone, no club or commitment required. Let me know if you have any questions.


If you need any stamping supplies, I’d be very happy to be your Demonstrator.  Just click on the Shop Now button on the right side of the screen to go directly to my online store or contact me if you have any questions. 

Thanks for stopping by and Happy Stamping!

Akiko

  • Visit my online store here
  • See the current Stampin’ Up! clearance rack specials here
  • Earn FREE Stampin’ Up! products through my Wildflower Frequent Shopper Program – my way of saying thank you to my online frequent shopper customers.
  • Have any questions? I’d be happy to help, click here to contact me.

Cardstock Cuts for this project:

  • Thick Basic White – 5-1/2″ x 8-1/2″ card base scored at 4-1/4″
  • Real Red – two 4″ x 5-1/4″ panels (front and inside mats)
  • More Dazzle specialty paper – 1/2″ x 3-1/2″ (front banner)
  • Basic White – two 3-7/8″ x 5-1/8″ panels (front background and inside panel), 2-1/4″ x 2-1/4″ (label)
  • Joy of Christmas DSP – 1″ x 4-1/2″ (front banner), 1/2″ x 3-7/8″ (inside trim)
  • Joyful specialty DSP – 3/4″ x 4″ (front banner)

Stampin’ Up! products used in this project:


Stampin’ Up! Brightest Glow and Joy Of Noel Christmas Card

Good Morning! Today’s card is a simple Christmas card made with the pretty sentiments in the Stampin’ Up! Brightest Glow cling stamp set. I paired it with the beautiful Joy of Christmas designer series paper and and I used one of the pretty images from the Joy of Noel stamp set to decorate the inside. You can find the products I used at the bottom of my post along with the card stock sizes.

I adhered a panel of Joy of Christmas designer series paper to the front of a Real Red panel with liquid glue. I wrapped the layered panel with Real Red ribbon and made a bow and adhered the panel to the front of a Garden Green card base with dimensionals.

I stamped the beautiful sentiment from the Stampin’ Up! Brightest Glow stamp set in Real red ink on Basic White. I cut it out with the pretty Labels Aglow die and popped it on the card front with dimensionals.

I decorated the label with a rhinestone and holly leaves from the Loose Holly Gems and Sequins, adhered with glue dots.

For the inside of the card, I stamped the sentiment from the Stampin’ Up! Brightest Glow stamp set in Real Red ink on a Basic White panel. Rather than DSP, I stamped the image from the Joy Of Noel stamp set in stamped off Pebble Path ink in the bottom corner. I colored the image in Granny Apple Green, Garden Green and Real Red inks using a Blender Pen. I adhered the panel to a Real Red mat before adhering it to the inside of the card.

This was so simple, but the beautiful sentiments from the Stampin’ Up! Brightest Glow stamp set make it a card anyone would love to receive. And I love how well the Joy Of Noel stamped image on the inside coordinates with the pretty DSP!


Celebrate 35 Years Joining Special!

Stampin’ Up!’s is celebrating their 35th anniversary in style! From October 3 – October 31 2023, anyone who joins our fun crafting community as a new demonstrator can choose either 35% OFF the cost of their Starter Kit or get 35% MORE product with their Starter Kit!

Promotion Details:

  • Promotion Period: October 3 – October 31, 2023
  • Deadline to Join: October 31, 2023; 11:59 PM (MT)
  • New demonstrators can choose one of the following options for their Starter Kit:
    • Option 1: Get 35% OFF the normal cost of a Stampin’ Up! Starter Kit. Those who select this option will receive $125 worth of product for only $64.35!
    • Option 2: Get 35% MORE product with their Starter Kit. Those who select this option will receive $168.75 worth of product by spending $99!

No matter which option you choose for your Starter Kit, you will receive free business supplies and free shipping on your Starter Kit—not to mention all the fun that comes with being part of Stampin’ Up!

FREE OnStage@Home Registration

It gets better! Those who sign up for a Starter Kit during this offer will also be automatically registered for FREE to our virtual OnStage event on November 11 – a $77 value!

  • Those who sign up for this offer have the opportunity to watch the event independently, gathered together with other demonstrators, or with their Team Leader.
  • Demonstrators who join during this promotion will be automatically added to the OnStage attendees; they do not need to register separately.
  • Demonstrators who join during this promotion will also receive an email with all the information about this event.

Yay!  Stampin’ Up! events are always SO much fun!!  Bonus that you can join and attend your first even for free!!

Come Join Us!

If you’d like to join our team, we’d love to have you!  Once you join, you’ll get at least a 20% discount on all of your Stampin’ Up! purchases and you can preorder from the upcoming catalogs!

We welcome all types of Demonstrators from those only purchasing to get the discount for themselves to those who want to run a business and those anywhere in between!  We’re a relaxed group that loves to stamp with no pressure to sell!

Contact me at apsudano@stampininthemeadows.com if you have questions.


World Card Making Day – October 7, 2023!

It’s time to celebrate one of our favorite days of the year—World Card Making Day! Invite your friends to craft along with Stampin’ Up! as we express our creativity and make fabulous cards! In just under three hours, we’ll create three unique cards together. Everyone is invited and welcome. And the event and registration are FREE!

Here are the Details:

  • Who: Anyone!
  • When: October 7, 2023 from 2:00 – 5:00 pm (MT)
  • Where: Online
  • Price of Event: FREE
  • Registration Dates: Sept 6 – Oct 7, 2023
    • You can participate in the event without registering. However, registration is encouraged because it’s the best way to stay up to date regarding event details. The email address provided will only be used for event communication.

Go to the World Card Making Day page in my Online Store to register and get more information. You will also find Supply Lists and Card Stock cuts that you can download to prepare.

Inkin’ Krew World Card Making Day Event

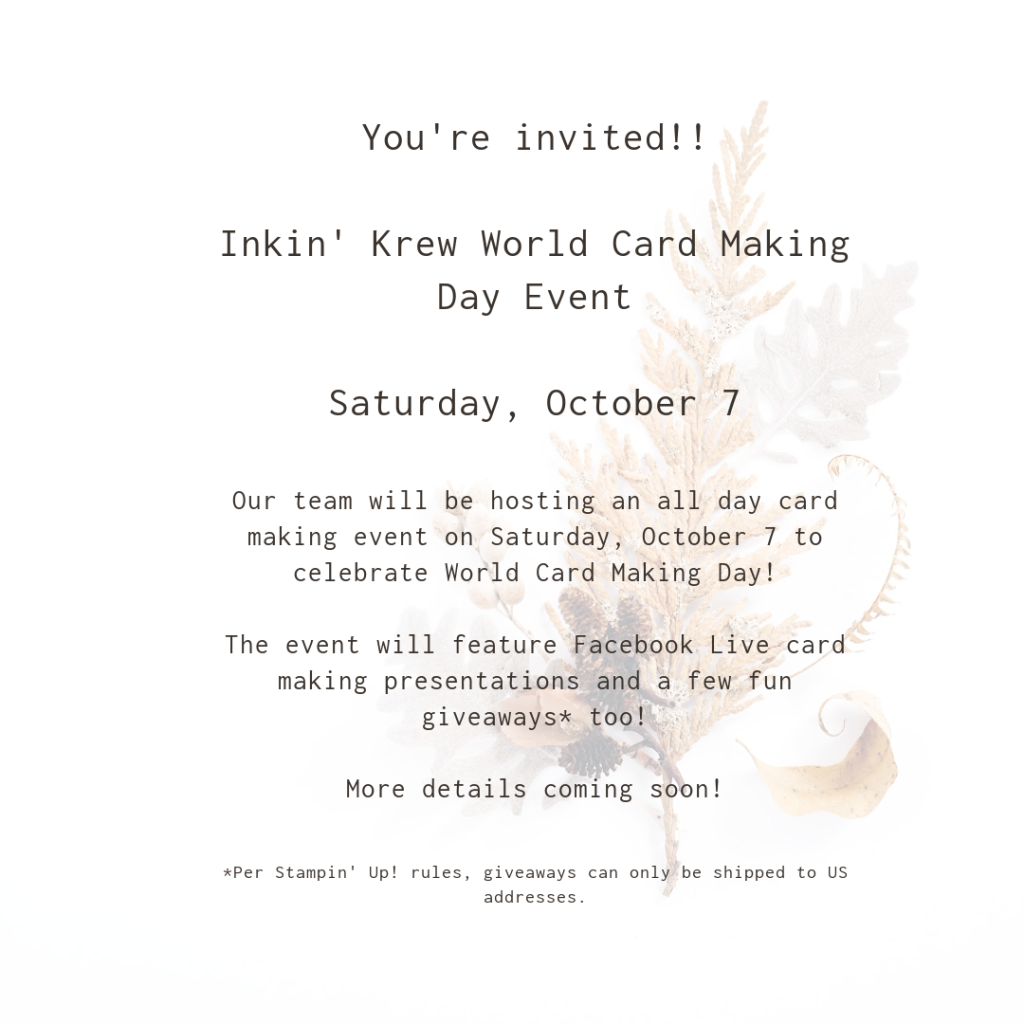
In addition to the World Card Making Day event that Stampin’ Up! is planning, The Inkin’ Krew is planning a Facebook event to celebrate World Card Making Day!! We’ll be sharing projects and doing live card making videos all day on Saturday, October 7!

Hop in now so that you’re all ready to go first thing on Saturday! It’s free and open to all who would like to join us! Here is the link to the event page: https://www.facebook.com/groups/worldcardmakingdayinkinkewevent2023/

Here’s the schedule for the videos:

Join our page any time between now and Saturday and you’ll be all set for a fun day of stamping!  I’ve pre-recorded a video that will go live at 3:00 PM ET – I hope you like it!


Current Host Code: 4BTBNFDU

Use this host code when you order $50 or more and receive a Thank You gift from me!  The free gift is your choice of any item currently available valued up to $10.00 .

If your order is over $150, please do not use the host code since you’ll receive your own Host Dollars plus I’ll still send you the Thank You gift!  This host code can be used by anyone, no club or commitment required. Let me know if you have any questions.


If you need any stamping supplies, I’d be very happy to be your Demonstrator.  Just click on the Shop Now button on the right side of the screen to go directly to my online store or contact me if you have any questions.  Happy Stamping!

Thanks for stopping by and have a great weekend!

Akiko

  • Visit my online store here
  • See the current Stampin’ Up! clearance rack specials here
  • Earn FREE Stampin’ Up! products through my Wildflower Frequent Shopper Program – my way of saying thank you to my online frequent shopper customers.
  • Have any questions? I’d be happy to help, click here to contact me.

Cardstock Cuts for this project:

  • Garden Green – 4-1/4″ x 11″ card base, scored at 5-1/2″
  • Real Red – two 3-7/8″ x 5-1/8″ panels (insite and front mats)
  • Basic White – 3-3/4″ x 5″ (inside panel), 2″ x 3-3/4″ (label)
  • Joy Of Christmas DSP – 3-3/4″ x 5″ (front background)

Stampin’ Up! products used in this project:


Stampin’ Up! Joy of Noel Sneak Peek

Good Morning! The Stampin’ Up! Joy of Noel bundle has beautiful holiday greenery and sentiments and I used it with the beautiful Joy of Christmas designer series paper for a Christmas card sneak peek. These products are from the new September – December Mini catalog which will open for orders on Wednesday! Yay!! You can find the currently available products I used at the bottom of my post along with the card stock sizes.

I embossed a Shaded Spruce panel with the star embossing folder from the Basics 3D embossing folders and adhered it to the front of a Shaded Spruce card base with liquid glue. I adhered a musical panel of Joy of Christmas DSP to a Real Red mat and adhered the panel to the card front with liquid glue.

I stamped the large greenery image from the Stampin’ Up! Joy of Noel photopolymer stamp set in Memento Tuxedo Black ink on a Basic White panel. I colored the Berries in Real Red Stampin’ Blends and the leaves in Granny Apple Green and Shaded Spruce Stampin’ Blends. I used the Lost Lagoon blend to trace over the pine needles to add some color there and cut the image out with the coordinating die. I popped the die cut onto the card front with dimensionals.

I stamped the sentiment from the Stampin’ Up! Joy of Noel stamp set in Versamark ink on Real Red and sprinkled it with white embossing powder. I shook off the excess and heated the powder with my heat tool until it was bright and shiny. I cut the label out with the long plain die from the Christmas Classics dies and looped some thin gold ribbon around the back, adhering it with glue dots. I adhered the label to the card front with dimensionals and glue dots and finished the card with gold pearls.

For the inside of the card, I stamped the sentiment from the Christmas Classics stamp set in Real Red ink on a Basic White panel. I stamped the greenery from the Stampin’ Up! Joy of Noel stamp set in Memento Tuxedo Black ink in the corner and colored them with Real Red and Shaded Spruce Stampin’ Blends. I adhered the panel to the inside of the card with Stampin’ Seal.

Isn’t the greenery from the Stampin’ Up! Joy of Noel stamp set pretty? It’s so easy to color with blends, but would look great in watercolor too. And I love the sentiments and can’t wait to use the large NOEL stamp! Here’s a picture of the bundle:

And here is the Christmas Classics bundle – they go so well together!

And here is the beautiful Joy of Christmas designer series paper with it’s classic Christmas Colors and patterns.

Remember that all of these new products will be available when the new Mini Catalog goes live for ordering on September 6, 2023.


Designer Series Paper Special Release Starts September 6, 2023!

A special selection of Designer Series Papers will be available in the Online Exclusives section of the Online Store beginning September 6, 2023. These papers will be available only while supplies last, so shop early to bet yours before they’re gone. Click on the image below to download a PDF with all the details including item numbers and prices.

These papers are perfect for both holiday crafting and all occasion crafting.


The September Paper Pumpkin Kit is With Love & Gratitude!

Express your love and gratitude in elegant style with the September Paper Pumpkin Kit inspired by Shelli! This kit includes eight treat packages (you can also use for small gifts) and eight miniature note cards with matching envelopes and specialty gold foil embellishments. Whether you’re needing a hostess gift, a sweet surprise for dinner guests, or have another reason to give love and thanks, this kit has you covered.

The September Kit Includes:

  • All the supplies you need to create 8 treat packages and note cards
    • 8 treat packages – Finished Size: 3-1/2″ x 5″ x 2″
    • 8 note cards – Card Size: 3-1/2″ x 3-1/2″
    • 8 coordinating envelopes
  • 1 photopolymer stamp set
  • 1 Lost Lagoon Ink Spot
  • Specialty gold foil, precut embellishments
  • Adhesives

Coordinating Colors: Copper Clay, Crumb Cake, gold foil, Lost Lagoon, Mossy Meadow, Pebbled Path

Plus, don’t miss the Thoughts of Thanks Journal! It matches both the design and intent of the kit, giving you an even more personal way to document and express your gratitude. It’s available as an add-on, but only while supplies last!

Thoughts of Thanks Journal

  • 8” x 10” journal
  • 2 specialty gold foil sticker sheets
  • Item number 163270
  • $15.00

If you’re interested in subscribing to Paper Pumpkin, you can either sign up for a subscription where you are billed monthly for your kit or you can purchase a prepaid subscription in my Online Store. To see more information and to sign up for the monthly subscription click here. To see the options for prepaid subscriptions in my Online Store, click here.

Sign up deadline for the September 2023 kit is September 10, 2023. Note: Supplies may be limited toward the end of the subscription period.


Current Host Code: ATSGGVYD

Use this host code when you order $50 or more and receive a Thank You gift from me!  The free gift is your choice of any item currently available valued up to $10.00 .

If your order is over $150, please do not use the host code since you’ll receive your own Host Dollars plus I’ll still send you the Thank You gift!  This host code can be used by anyone, no club or commitment required. Let me know if you have any questions.


If you need any stamping supplies, I’d be very happy to be your Demonstrator.  Just click on the Shop Now button on the right side of the screen to go directly to my online store or contact me if you have any questions.  Happy Stamping!

Thanks for stopping by and have a great weekend!

Akiko

  • Visit my online store here
  • See the current Stampin’ Up! clearance rack specials here
  • Earn FREE Stampin’ Up! products through my Wildflower Frequent Shopper Program – my way of saying thank you to my online frequent shopper customers.
  • Have any questions? I’d be happy to help, click here to contact me.

Cardstock Cuts for this project:

  • Shaded Spruce – 4-1/4″ x 11″ card base, scored at 5-1/2″, 4-1/4″ x 5-1/2″ (embossed background)
  • Real Red – 3-1/4″ x 3-3/4″ (DSP mat), 1-1/4″ x 4-1/2″ (label)
  • Basic White – 4″ x 5-1/4″ (inside panel), 3″ x 3-3/4″ (die cut greenery)
  • Joy of Christmas DSP – 3″ x 3-1/2″ (front background)

Stampin’ Up! products used in this project:


Stampin’ Up! Christmas Classics Sneak Peek

Good Morning! The Stampin’ Up! Christmas Classics bundle is one of the pretty new Christmas sets from the upcoming September-December 2023 Mini Catalog that goes live on September 6, 2023. The photopolymer stamp set is full of wonderful Christmas greetings and the dies are wonderful for creating fancy foliage filled labels. I paired it with the beautiful new Joy of Christmas designer series paper for a simple Christmas card. You can find the currently available products I used at the bottom of my post along with the card stock sizes.

I adhered a panel of Joy of Christmas designer series paper to a Real Red mat and adhered it to the front of a Garden Green card base. I cut a Shaded Spruce panel of Joy of Christmas DSP with the large square foliage die from the Stampin’ Up! Christmas Classics die.

I stamped the sentiment from the Stampin’ Up! Christmas Classics stamp set in Real Red ink on Basic White. I cut it out with the square label die and adhered it to the front of the large foliage die cut with liquid glue and popped it on the card front with dimensionals.

I decorated the front with three Poppy Parade iridescent discs (available Sept 6) and a Real Red bow. So simple and quick!! I love how the gorgeous DSP contrasts with the fancy die cuts!

For the inside of the card, I stamped the pine branch from the Stampin’ Up! Christmas Classics stamp set in Shaded Spruce ink twice (without reinking) on a Basic White panel. stamped the berries in Real Red ink along with the sentiment . I trimmed the bottom with a strip of the DSP and adhered the panel to the inside of the card with Stampin’ Seal.

Here is the pretty Stampin’ Up! Christmas Classics bundle – the sentiments are perfect to mix-n-match and I love the musical themes!

And here is the beautiful Joy of Christmas designer series paper. Oops – my music is upside down!

These beautiful products will be available in just a few weeks when the new Sept-Dec 2023 Mini Catalog goes live.


Bonus Days Redemption Period Going on Now!

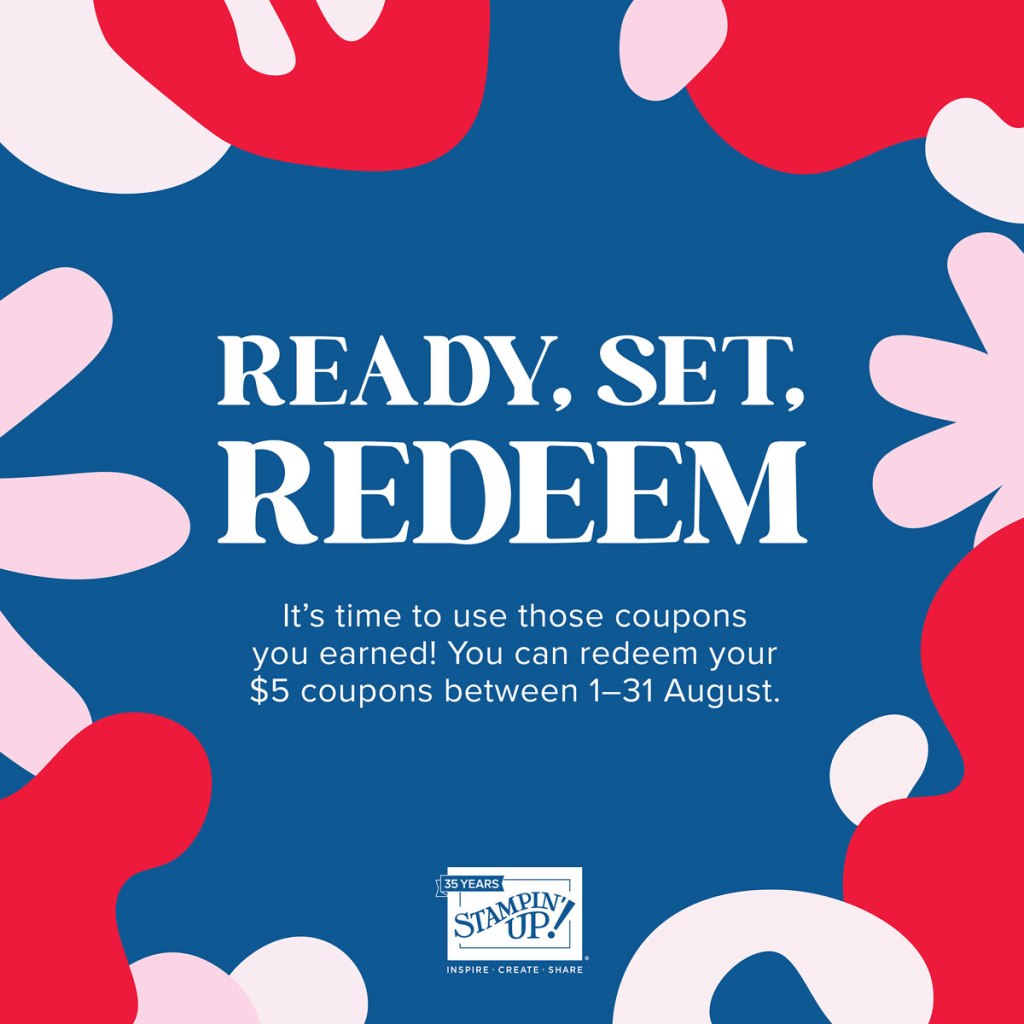
Time to redeem those Bonus Days coupons! Make sure you save all your coupons because you can redeem them (and we mean ALL of them) between August 1 – August 31, 2023. There’s no limit to how many coupons you can earn!

Promotion Details:

Redemption Period: August 1 – August 31, 2023

  • There is no limit to the number of coupon codes participants can redeem on an order during the redemption period. If using multiple codes, they must be separated by a space. 
  • Coupons may be redeemed one time only.
  • Coupon codes may be redeemed for any product (excluding Starter Kits, demonstrator supply items, and Paper Pumpkin month-to-month subscriptions).
  • New prepaid Paper Pumpkin codes may be discounted using Bonus Days coupon codes.

Let me know if you have any questions, and have fun shopping!


Kits Collection on Sale August 1 – August 31, 2023!

Save big on the Kits Collection for a limited time only! Each paper crafting kit comes with everything you need to create artistically designed handmade projects. From birthday cards to festive tags, cute treat packaging to floral wreaths, you can try something new at a great discount. Craft with friends, buy as gifts, or simply stock up on your favorites—just don’t miss out on this great deal!

Details:

  • Sales period: August 1, 2023 – August 31, 2023
  • The sale only applies to the Kits Collection by Stampin’ Up!
    • It does not include Paper Pumpkin kits
  • There is no limit to how many kits may be purchased.
  • The kits will be up to 30% off as indicated on the website.
  • No discount code necessary—the discount will be applied automatically.

Note: Discounted Kits are only available while supplies last!

Shop the Stampin’ Up! Kits Collection in my Online Store.


Current Host Code: MK3GJ47F

Use this host code when you order $50 or more and receive a Thank You gift from me!  The free gift is your choice of any item currently available valued up to $10.00 .

If your order is over $150, please do not use the host code since you’ll receive your own Host Dollars plus I’ll still send you the Thank You gift!  This host code can be used by anyone, no club or commitment required. Let me know if you have any questions.


If you need any stamping supplies, I’d be very happy to be your Demonstrator.  Just click on the Shop Now button on the right side of the screen to go directly to my online store or contact me if you have any questions.  Happy Stamping!

Thanks for stopping by and have a great weekend!

Akiko

  • Visit my online store here
  • See the current Stampin’ Up! clearance rack specials here
  • Earn FREE Stampin’ Up! products through my Wildflower Frequent Shopper Program – my way of saying thank you to my online frequent shopper customers.
  • Have any questions? I’d be happy to help, click here to contact me.

Cardstock Cuts for this project:

  • Garden Green – 4-1/4″ x 11″ card base, scored at 5-1/2″
  • Real Red – 4″ x 5-1/4″ (DSP mat)
  • Basic White – 4″ x 5-1/4″ (inside panel), 2-1/2″ x 2-1/2″ (label)
  • Joy of Christmas DSP – 3-7/8″ x 5-1/8″ (front background), 4″ x 4″ (label die cut), 3/4″ x 4″ (inside trim)

Stampin’ Up! products used in this project: