Good Morning! Are you ready for a Tropical Escape? I love tropical stamp sets like the Stampin’ Up! Happy Hibiscus bundle for this time of year, because it reminds me of warm sunshine and tropical beaches at this cold time of year – and I’m ready to escape there! So I put together a fun little thank you card using the Stampin’ Up! Happy Hibiscus bundle to warm me up. You can find the products I used at the bottom of my post along with the card stock sizes.

I embossed a panel of light Pool Party card stock with the Stampin’ Up! Happy Hibiscus embossing folder. The light Pool Party is from the two-tone scrapbooking collection card stock and makes a nice subtle contrast with regular Pool Party card stock. And I love that you can use the hybrid embossing folder without the dies! I adhered the embossed panel to the front of a Pool Party card base.

I stamped the three flowers from the Stampin’ Up! Happy Hibiscus stamp set using Memento Tuxedo Black ink on Basic White and cut it out with the coordinating die. I stamped the detailed stamp for each flower using Poppy Parade ink. I used the dark Daffodil Delight Stampin’ Blend to color the centers and stamen and the Flirty Flamingo Stampin’ Blends to fill in the white spaces. Finally, I used the dark Poppy Parade Stampin’ Blend to intensify the color in the centers of the flowers. After all the coloring, I carefully placed each flower back in the embossing folder and ran it through my Stampin’ Cut & Emboss machine to give the flowers dimension.
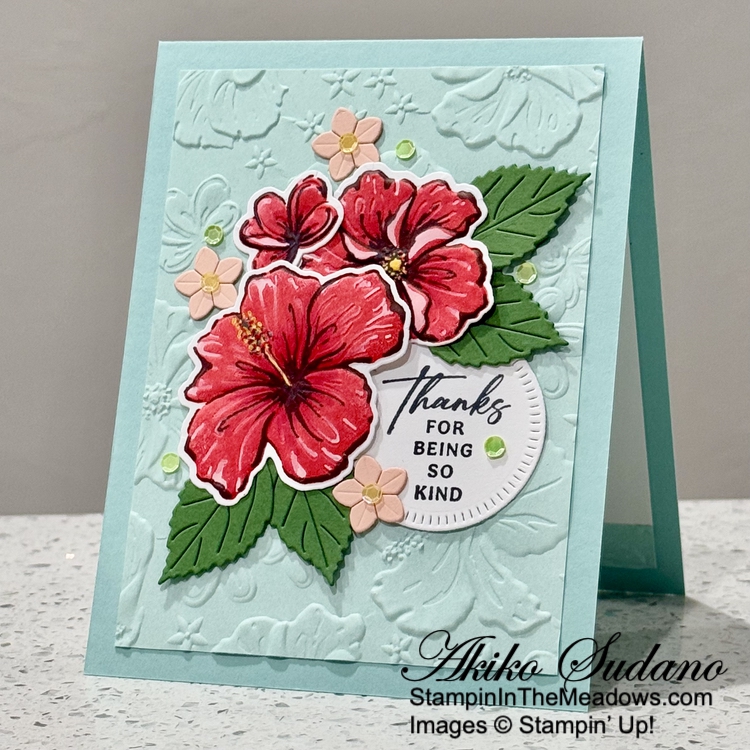
I stamped the sentiment from the Stampin’ Up! Happy Hibiscus stamp set using Memento Tuxedo Black ink on Basic White and cut it out with the circle die. I adhered the label to the card with glue dots. I adhered the middle sized flower with glue dots and the large flower with dimensionals. I cut four leaves from Garden Green and adhered them with glue dots, tucking the stems under the flowers. I cut three small flowers from Petal Pink and adhered them with glue dots and accented the centers with yellow sequins. I adhered additional green sequins around the flowers to add a touch more shine.

I left the inside of the card pretty simple, trimming a Basic White panel with an embossed strip of light Pool Party and adhering another die cut leaf and flower from the Stampin’ Up! Happy Hibiscus dies to the corner (I even added a little sequin to the flower center, I hope it doesn’t poke through the front. I adhered the panel to the inside of the card with Stampin’ Seal.

The Stampin’ Up! Happy Hibiscus bundle is a wonderful tropical floral bundle from the Online Exclusives collection. It has two-step stamping flowers and leaves in different sizes and pretty sentiments. And it has the hybrid embossing folder with the three flower die to cut and emboss at the same time, along with additional dies for labels and die cut accent flowers and leaves.

Last Chance Products Now Available!
Retiring products for the current September-December 2024 Mini Catalog are now available in the Last Chance Products category in the Online Store.
Stampin’ Up! is making some changes to their product retirement process. They are introducing a new Last Chance Products category in the Online Store today that will include retiring products from the current 2024 September-December Mini Catalog and Online Exclusives items that are being discontinued. The Last Chance Products category is replacing the current Clearance Rack and will be updated every two months.
Here are the details:
- Last Chance Products include retiring products from both catalogs and online releases, excluding Paper Pumpkin.
- Last Chance Products are available while supplies last and will be discontinued when they sell out. Items will be automatically removed from the category and the online store when they are discontinued.
- Discounts vary and are subject to change. Also, depending on inventory, these products may or may not have discounts.
- The Last Chance Products category will be updated every other month. Updates happen at the beginning of the month and may include additional products in the category and any adjustments to product discounts.
This change aligns with Stampin’ Up!’s product release strategy of new Online Exclusives every two months and unifies the retirement process for Online Exclusive and Catalog products. The goal is to keep product offerings fresh, trendy and exciting for Stampin’ Up! customers.
If you have any questions, let me know.
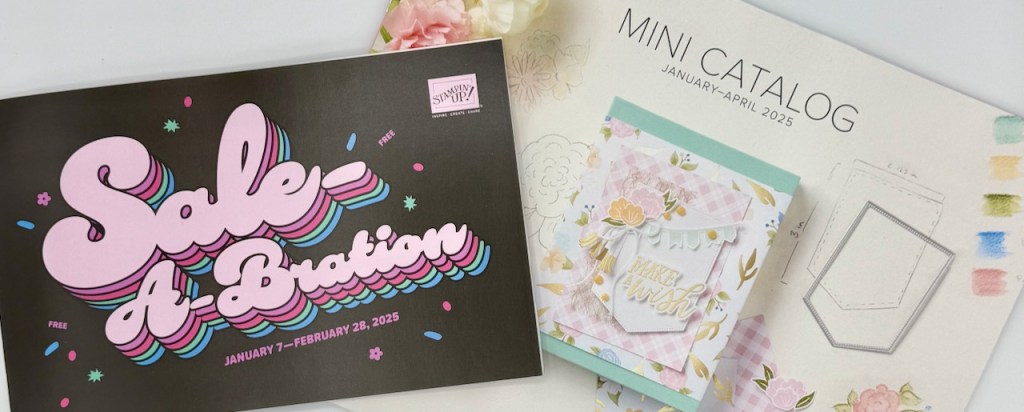
New January-April 2025 Mini Catalog and Sale-A-Bration Coming January 7, 2025!
January 7, 2025 is the big day!! The new Stampin’ Up! January-April 2025 Mini Catalog will be available and Sale-A-Bration 2025 will begin. The new Mini Catalog will feature lots of new products that will be great for the upcoming holidays and Spring months. Sale-A-Bration will be returning with lots of great items that you will be able to choose for FREE with each $60 order and a wonderful new Starter Kit bonus offer. Sale-A-Bration will run through February 28, 2025.
In addition to Sale-A-Bration and the new Mini Catalog, a new selection of Online Exclusives will be available for even more exciting new products. And scrapbooking crafters will be treated to a new Scrapbooking Brochure.
Current Host Code: S37YBRUS
Use this host code when you order $50 or more and receive a Thank You gift from me! The free gift is your choice of any item currently available valued up to $10.00.
If your order is over $150, please do not use the host code since you’ll receive your own Host Dollars plus I’ll still send you the Thank You gift! This host code can be used by anyone, no club or commitment required. Let me know if you have any questions.
If you need any stamping supplies, I’d be very happy to be your Demonstrator. Just click on the Shop Now Button on the right side of the screen to go directly to my Online store or contact me if you have any questions. Happy Stamping!
Thanks for stopping by and have a great day!
Akiko
- Visit my online store here
- See the current Stampin’ Up! Last Chance items here
- Earn FREE Stampin’ Up! products through my Wildflower Frequent Shopper Program – my way of saying thank you to my online frequent shopper customers.
- Have any questions? I’d be happy to help, click here to contact me.
Cardstock Cuts for this project:
- Pool Party – 4-1/4″ x 11″ card base, scored at 5-1/2″
- Two-Tone Pool Party – 3-3/4″ x 5″ (embossed background), 1/2″ x 3-3/4″ (embossed inside trim)
- Garden Green – 1-1/4″ x 5″ (die cut leaves)
- Petal Pink – 1″ x 4″ (die cut flowers)
- Basic White – 3-3/4″ x 5″ (inside panel), 3″ x 4-1/2″ (stamped flowers), 2″ x 2″ (label)
Stampin’ Up! products used in this project:
")

 Two Tone Cardstock")


 Designer Series Paper")
 Designer Series Paper")


