Stampin’ Up! Decorative Trees Christmas Card for the Happy Inkin’ Thursday Blog Hop

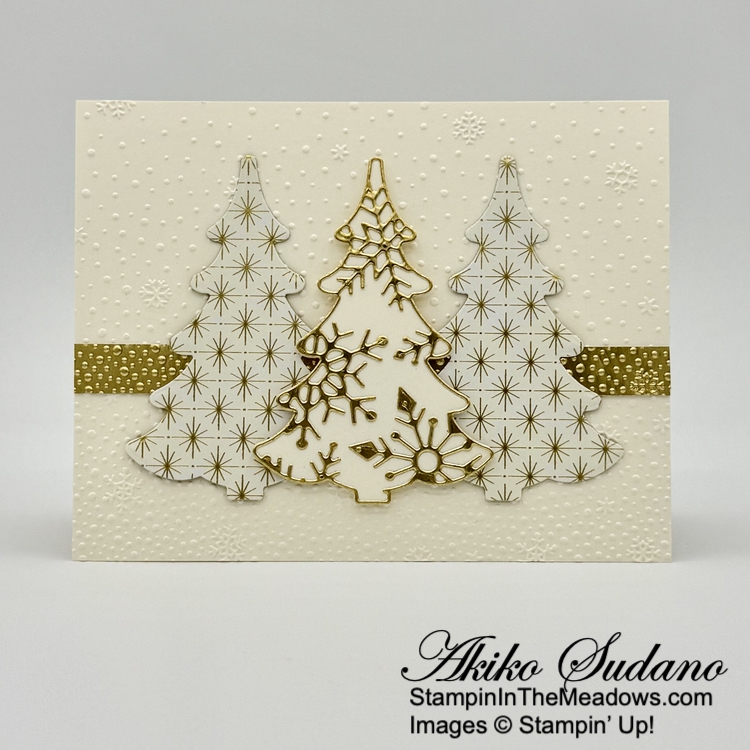
Good Morning and welcome to the Happy Inkin’ Thursday Blog Hop! One of favorites from the retiring September-December 2024 Mini Catalog is the Stampin’ Up! Decorative Trees bundle. The die cut overlays for the trees are just beautiful and I’ve made today’s card with Very Vanilla and gold for a simple and elegant Christmas card. You can find the supplies I used along with card stock cuts at the bottom of my post.

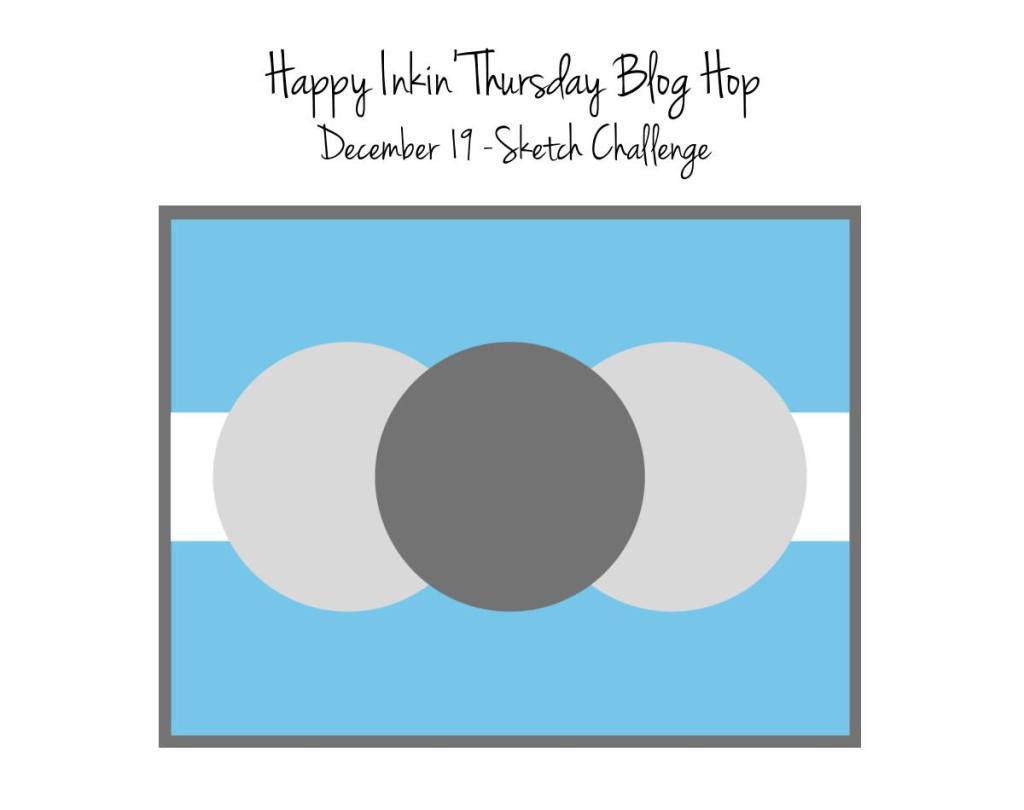
We have a pretty sketch challenge this week:

I embossed a Very Vanilla panel with the pretty Snowflake Sky 3D embossing folder and adhered it to the front of a Very Vanilla card base with liquid glue. I also embossed a strip of gold foil with the same folder, using the bottom where the snowflakes are dense. I adhered the embossed Gold Foil strip to the card with glue dots.

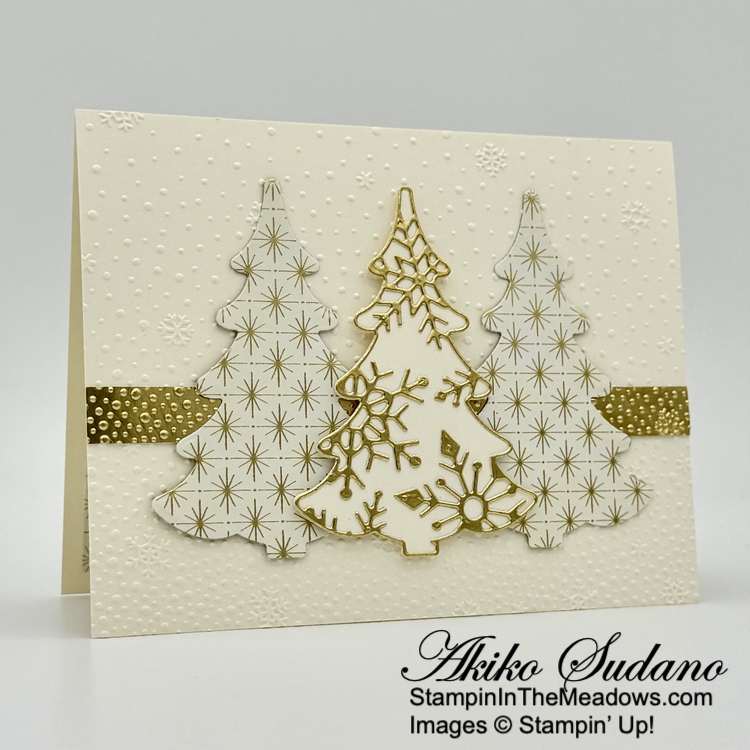
I I used the plain tree die from the Stampin’ Up! Decorative Trees dies to cut two panels from the Season of Green and Gold specialty designer series paper. I adhered the trees to the card with glue dots.

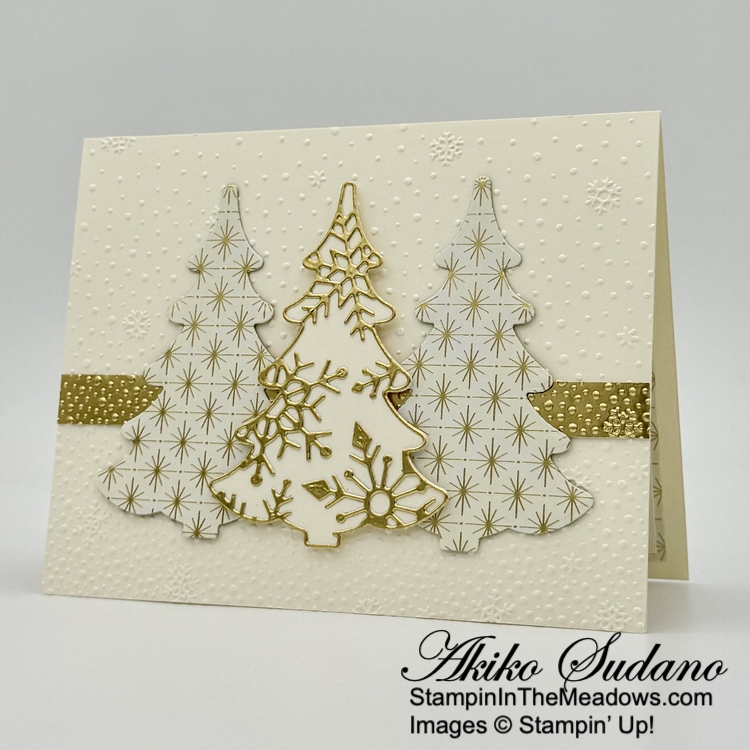
I cut another tree from Very Vanilla card stock. I cut the snowflake overlay from the Stampin’ Up! Decorative Trees dies from Gold Foil (after applying adhesive sheets to the back). I peeled off the adhesive sheet backing and adhered the snowflake overlay to the Very Vanilla tree and popped the tree on the card with dimensionals.

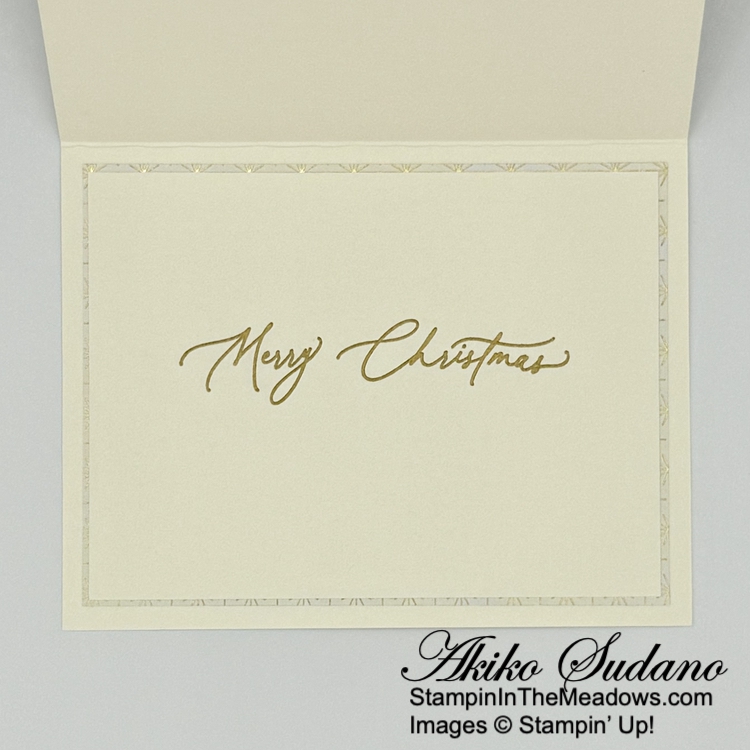
For the inside panel, I stamped sentiments from the Greetings of the Season stamp set using Versamark ink on a Very Vanilla panel. I sprinkled it with gold embossing powder and shook off the excess. I heated the powder with my heat tool until it was bright and shiny. I adhered the panel to a DSP mat and adhered the layered panel to the inside of the card with Stampin’ Seal.

The trees in the Stampin’ Up! Decorative Trees bundle are beautiful dressed up with gold foil or simply stamped on a rustic Christmas card. These are one of my all time Christmas favorites!

On with the Hop! Click on the Next Blog button to move forward to see the beautiful project Karen Ksenzakovic has created.

If you get lost along the way, here are the participants for the hop:


Current Host Code: VT29C2UC

Use this host code when you order $50 or more and receive a free gift from me!  The free gift is your choice of any item currently available valued up to $10.00!

If your order is over $150, please do not use the host code since you’ll receive your own Host Dollars plus I’ll still send you the free gift!  This host code can be used by anyone, no club or commitment required. Let me know if you have any questions.


If you need any stamping supplies, I’d be very happy to be your Demonstrator.  Just click on the Shop Now button on the right side of the screen to go directly to my online store or contact me if you have any questions. 

Thanks for stopping by and Happy Stamping!

Akiko

  • Visit my online store here
  • See the current Stampin’ Up! Last Chance items here
  • Earn FREE Stampin’ Up! products through my Wildflower Frequent Shopper Program – my way of saying thank you to my online frequent shopper customers.
  • Have any questions? I’d be happy to help, click here to contact me.

Cardstock Cuts for this project:

  • Very Vanilla – 5-1/2″ x 8-1/2″ card base, scored at 4-1/4″, 4-1/4″ x 5-1/2″ (embossed background), 2-1/2″ x 3-1/2″ (die cut tree), 3-3/4″ x 5″ (inside panel)
  • Gold Foil – 3/4″ x 5-1/2″ (embossed strip), 2-1/2″ x 3-1/2″ (die cut snowy insert)
  • Season of Green and Gold specialty DSP – two 2-1/2″ x 3-1/2″ panels (die cut trees), 3-7/8″ x 5-1/8″ (inside mat)

Stampin’ Up! products used in this project:


Stampin’ Up! Decorative Trees for the Inkin’ Krew Blog Hop

Good Morning! Welcome to the November Inkin’ Krew Team Blog Hop! The theme for this month’s hop is “Merry Christmas or Happy Holidays” and I used the pretty Stampin’ Up! Decorative Trees bundle with the Snowy Scenes designer series paper to make a Z Fold Christmas card. You can find the supplies I used along with card stock cuts at the bottom of my post.

I scored and burnished a 5-1/2″ x 8-1/4″ Poppy Parade card base at 4-1/4″ and 7″ to make a Z fold card with a skinny front section. This 1-1/4″ front section is in the middle of the card, so I had to trim 1/4″ off the normal card length, but it’s nice and symmetric! I adhered the panels of Snowy Scenes designer series paper to the different sections of the card base.

I used the third largest octagon die from the Countryside Corners die to cut a Pool Party panel and the next smallest size to cut a Basic White panel. I embossed the Basic White panel with the Snowflake Sky 3D embossing folder and adhered it to the mat. I adhered the layered octagons to the skinny front panel with liquid glue.

I used the solid tree die from the Stampin’ Up! Decorative Trees dies to cut a Garden Green panel. I applied an adhesive sheet to the back of a Basic White panel and cut it with the snowflake overlay tree die. I pulled off the adhesive backing and adhered the snowflake overlay to the Garden Green tree. I applied adhesive sheets to the back of a Poppy Parade panel and cut the garland dies. I removed the adhesive sheet backing and adhered the garlands to the tree. I cut a Daffodil Delight star and adhered it to the top of the tree and popped the tree onto the octagons with dimensionals. I finished the tree with iridescent faceted gems.

I stamped part of the sentiment from the Stampin’ Up! Decorative Trees stamp set using Poppy Parade ink on a Pool Party panel. I cut it out with the small octagon from the Countryside Corners dies and adhered it to the skinny front panel.

For the inside of the card, I stamped the sentiment from the Stampin’ Up! Decorative Trees stamp set in Poppy Parade ink on a Basic White panel. I stamped the holly leaves and berries from the Snowy Wonder stamp set in Garden Green and Poppy Parade ink in the corner and adhered the panel to the inside of the card with Stampin’ Seal, butting it up next to the DSP trim

The Stampin’ Up! Decorative Trees bundle is one of my favorite Christmas tree bundles of all time! There are so many different looks with the overlays, and even with plain cardstock, the trees are beautiful! They’re also fun to make!!

On With The Hop! Click on the Next Blog button to move forward to Ann Louise’s project or click the Previous Blog button to move back to see the project that Christie created.

If you get lost along the way, here are the participants for the hop:

  1. Tara Carpenter 
  2. Mary Deatherage 
  3. Christie King 
  4. Akiko Sudano  <– you are here
  5. Ann Louise Fodgaard 
  6. Shirley Gentry 
  7. Karen Ksenzakovic 
  8. Sue Prather 
  9. Karen Finkle 
  10. Carol Buckalew 
  11. Amy Koenders

Current Host Code: GBVHGQ4W

Use this host code when you order $50 or more and receive a Thank You gift from me!  The free gift is your choice of any currently available item valued up to $10.00.

If your order is over $150, please do not use the host code since you’ll receive your own Host Dollars plus I’ll still send you the Thank You gift!  This host code can be used by anyone, no club or commitment required. Let me know if you have any questions.


If you need any stamping supplies, I’d be very happy to be your Demonstrator.  Just click on the Shop Now button on the right side of the screen to go directly to my online store or contact me if you have any questions.  Happy Stamping!

Thanks for stopping by and have a great week!

Akiko

  • Visit my online store here
  • See the current Stampin’ Up! clearance rack specials here
  • Earn FREE Stampin’ Up! products through my Wildflower Frequent Shopper Program – my way of saying thank you to my online frequent shopper customers.
  • Have any questions? I’d be happy to help, click here to contact me.

Cardstock Cuts for this project:

  • Poppy Parade – 5-1/2-1/4″ x 8-1/4″ card base, scored at 4-1/4″ and 7″, 1″ x 2-1/2″ (garland die cuts)
  • Pool Party – 2-3/4″ x 4-1/4″ (octagon mat), 1″ x 3″ (label)
  • Garden Green – 2-1/2″ x 3-1/2″ (die cut tree)
  • Daffodil Delight – 1″ x 1″ (die cut star)
  • Basic White – 2-1/2″ x 5-1/4″ (inside panel), 2-1/4″ x 3-3/4″ (embossed octagon), 2-1/2″ x 3-1/2″ (die cut tree overlay)
  • Snowy Scenes DSP – two 2-1/2″ x 5-1/4″ panels (front and back of middle section), 1-1/2″ x 5-1/4″ (inside trim), 1″ x 5-1/4″ (front section background)

Stampin’ Up! products used in this project:

Stampin’ Up! Decorative Trees for the Happy Inkin’ Thursday Blog Hop

Good Morning and welcome to the Happy Inkin’ Thursday Blog Hop! I used the awesome Stampin’ Up! Decorative Trees bundle with the pretty Winter Meadow designer series paper to make a simple fun fold Christmas card in Pretty Peacock and gold. You can find the supplies I used along with card stock cuts at the bottom of my post.

We have a theme challenge this week:

I embossed a panel of Winter Meadow designer series paper with the Snowflake Sky 3D embossing folder and adhered it to a flat pretty Peacock card base. I scored and burnished the the mini pretty peacock card base and adhered it on top with liquid glue.

I cut the plain tree from the Stampin’ Up! Decorative Trees dies from Lost Lagoon and Brushed Metallic specialty paperand adhered them together. The Brushed Metallic paper is shiny and thin, so it needs extra support with dimensionals. I applied an adhesive sheet to the back of a Textured Gold Foil panel and used the curved tree branch die to cut it out. I removed the adhesive sheet backing and adhered it to the tree. I adhered a Pretty Peacock and gold bow to the card with a glue dot and adhered the layered tree on top with dimensionals.

I stamped the sentiment from the Stampin’ Up! Decorative Trees stamp set in Versamark ink on a Basic White panel. I sprinkled it with gold embossing powder and shook off the excess. I heated the sentiment with my heat tool until it was bright and shiny and cut it out with the long label die from the Autumn Trees dies. I adhered the label to the mini card with glue dots and finished the card with gold adhesive snowflakes, including adhering a snowflake to the tree top.

For the inside of the mini card, I stamped the sentiment from the Stampin’ Up! Decorative Trees stamp set using Pretty Peacock ink ink on a Basic White panel. I trimmed the bottom with DSP and adhered the panel to the inside of the mini card with Stampin’ Seal.

The beautiful overlay dies in the Stampin’ Up! Decorative Trees bundle are gorgeous with foil or glimmer paper and I love a Christmas card with lots of sparkle and shine. I think the Brushed Metallic paper is technically the retired Soft Succulent color, but it looks fantastic with Pretty Peacock and Lost Lagoon. Now which overlay should I use on my next card?

On with the Hop! Click on the Next Blog button to move forward to see the beautiful project Karen Ksenzakovic has created.

If you get lost along the way, here are the participants for the hop:


Current Host Code: GBVHGQ4W

Use this host code when you order $50 or more and receive a free gift from me!  The free gift is your choice of any item currently available valued up to $10.00!

If your order is over $150, please do not use the host code since you’ll receive your own Host Dollars plus I’ll still send you the free gift!  This host code can be used by anyone, no club or commitment required. Let me know if you have any questions.


If you need any stamping supplies, I’d be very happy to be your Demonstrator.  Just click on the Shop Now button on the right side of the screen to go directly to my online store or contact me if you have any questions. 

Thanks for stopping by and Happy Stamping!

Akiko

  • Visit my online store here
  • See the current Stampin’ Up! clearance rack specials here
  • Earn FREE Stampin’ Up! products through my Wildflower Frequent Shopper Program – my way of saying thank you to my online frequent shopper customers.
  • Have any questions? I’d be happy to help, click here to contact me.

Cardstock Cuts for this project:

  • Pretty Peacock – 4-1/4″ x 5-1/2″ card base, 3″ x 8-1/2″ mini card base, scored at 4-1/4″
  • Lost Lagoon – 2-1/2″ x 3-1/2″ (tree backing)
  • Textured Gold – 1-3/4″ x 3″ (detailed tree die cut)
  • Brushed Metallic specialty – 2-1/2″ x 3-1/2″ (tree)
  • Basic White – 2-3/4″ x 4″ (inside panel), 1-1/4″ x 3″ (label)
  • Winter Meadow DSP – 4″ x 5-1/4″ (embossed background), 2-3/4″ x 4″ (mini card background), 3/8″ x 2-3/4″ (inside trim)

Stampin’ Up! products used in this project:


Stampin’ Up! Decorative Trees Christmas Ornament

Good Morning! The Stampin’ Up! Decorative Trees bundle includes dies that make beautiful layered Christmas trees! I’ll make a card with the bundle tomorrow for our blog hop, but I wanted to use the tree die to make a simple Christmas Tree ornament.

I cut three panels of Dry Brushed Metallic specialty paper and three panels of Winter Meadow designer series paper with the solid tree die. The tree die is symmetrical, so it lines up when you adhere the die cuts back to back.

I carefully scored each of the die cuts down the center and gently folded them along the score lines. I applied liquid glue to one half and adhered another tree die cut to the back. I alternated between the metallic specialty paper and DSP until they were all glued together.

I used liquid glue to adhere a gold 1/8″ trim loop to the top and used retired Opal Rounds to add sparkle to the DSP sections. I wasn’t sure if I should use sequins or snowflakes and whether I should use gold or white, so I just settled on the opal rounds since I had so many in my stash!

This was so easy and so pretty with the specialty paper! One of my first Stampin’ Up! project was making Christmas Tree ornaments, so I was excited when this idea came to me. So tune back in tomorrow for the coordinating card.


Starter Kit Special During October!

Become a Stampin’ Up! demonstrator between October 1–31 and you’ll get $125 $155 worth of product in your Starter Kit for just $99! Your Starter Kit also includes FREE business supplies and FREE shipping. Not to mention all the FUN that comes with being part of our fantastic crafting community. There’s no better time to join than now!

Starter Kit Specia Details:

  • Promotion Period:  October 1–31, 2024
  • When you purchase your Starter Kit, you will be able to redeem $155 of Starter Kit eligible products for just $99!
  • New demonstrators who submit their Independent Demonstrator Agreement (IDA) before October 1 or after October 31 will not  be eligible for this offer.
  • Deadline to join:  October 31 2024, at 11:59 PM (MT)

We’d love to have you join our team!  Once you join, you’ll get at least a 20% discount on all of your Stampin’ Up! purchases and you can preorder from the upcoming catalogs! Plus, you’ll get invitations to Stampin’ Up! Demonstrator events. We welcome all types of Demonstrators from those only purchasing to get the discount for themselves to those who want to run a business and those anywhere in between!  We’re a relaxed group that loves to stamp with no pressure to sell!

There is no commitment and no penalty if you decide that being a Demonstrator isn’t right for you.  Why not give it a try?  We have a fun Facebook page where we chat a lot and we do virtual meetings monthly and in-person meetings quarterly.

As a demonstrator, I am happy to help you through the joining process and beyond. If you’re interested joining my team, please reach out! I am excited to answer your questions and help you get started on your creative journey. 

Contact me at apsudano@stampininthemeadows.com if you have any questions.


Stampin’ Up! Kits Collection on Sale During October

Save up to 30% off on all your favorite kits October 1–31! The Kits Collection by Stampin’ Up! come with everything you need to create a unique paper craft. There are crafting options for card kits, treat packaging, home decor, and so much more! Start shopping today, as kits are only available while supplies last.

Details:

  • Sales Period: October 1 – 31, 2024
  • ALL kits from our collection qualify for the discount. 
  • There is no limit on how many kits you can order, as long as product is available. 
  • Orders must be opened and placed during the promotion dates. Orders opened before October 1 will not qualify for the sale. 
  • Kits can be added to a Starter Kit at their discounted rate. 
  • Coupon codes can also be used with discounted kits.
  • Ordering Deadline: October 31 at 11:59 PM (MT)

New Kits In Kits Collection!

The new kits for October are the sweet A Look Back Kit and the wonderful Alpine Air Kit. The A Look Back kit includes a variety of precut paper pieces, stickers, paper pockets, and other ephemera and a spiral-bound notebook for memory keeping, journaling, and more. The Alpine Air Kit includes everything you need to make 9 all-occasion cards with an elegant mountain theme.

To check the availability of these kits or past kits, visit my Online Store. 


Current Host Code: GBVHGQ4W

Use this host code when you order $50 or more and receive a Thank You gift from me!  The free gift is your choice of any item currently available valued up to $10.00.

If your order is over $150, please do not use the host code since you’ll receive your own Host Dollars plus I’ll still send you the Thank You gift!  This host code can be used by anyone, no club or commitment required. Let me know if you have any questions.


If you need any stamping supplies, I’d be very happy to be your Demonstrator.  Just click on the Shop Now Button on the right side of the screen to go directly to my Online store or contact me if you have any questions.  Happy Stamping!

Thanks for stopping by and have a great day!

Akiko

  • Visit my online store here
  • See the current Stampin’ Up! clearance rack specials here
  • Earn FREE Stampin’ Up! products through my Wildflower Frequent Shopper Program – my way of saying thank you to my online frequent shopper customers.
  • Have any questions? I’d be happy to help, click here to contact me.