Stampin’ Up! Beautiful Motifs for the Happy Inkin’ Thursday Blog Hop

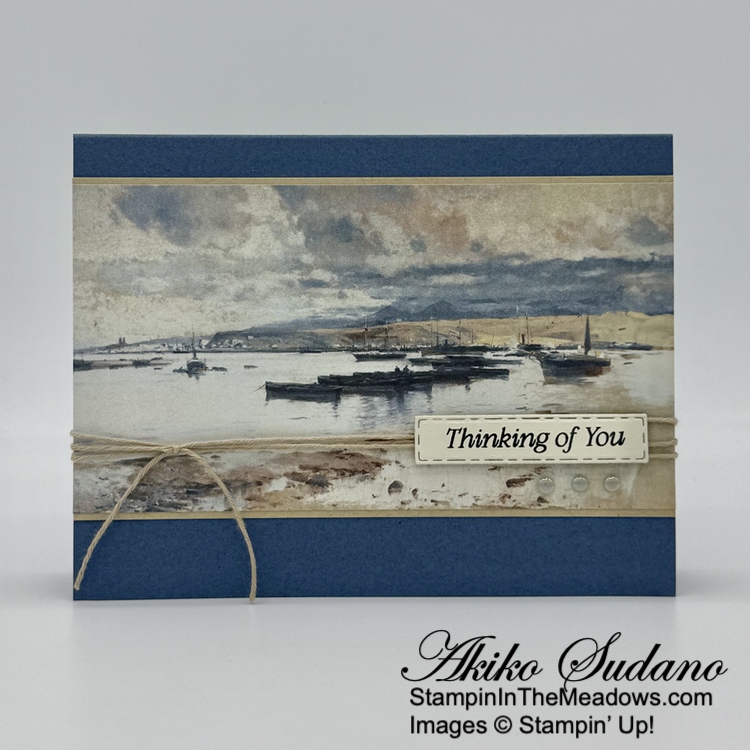
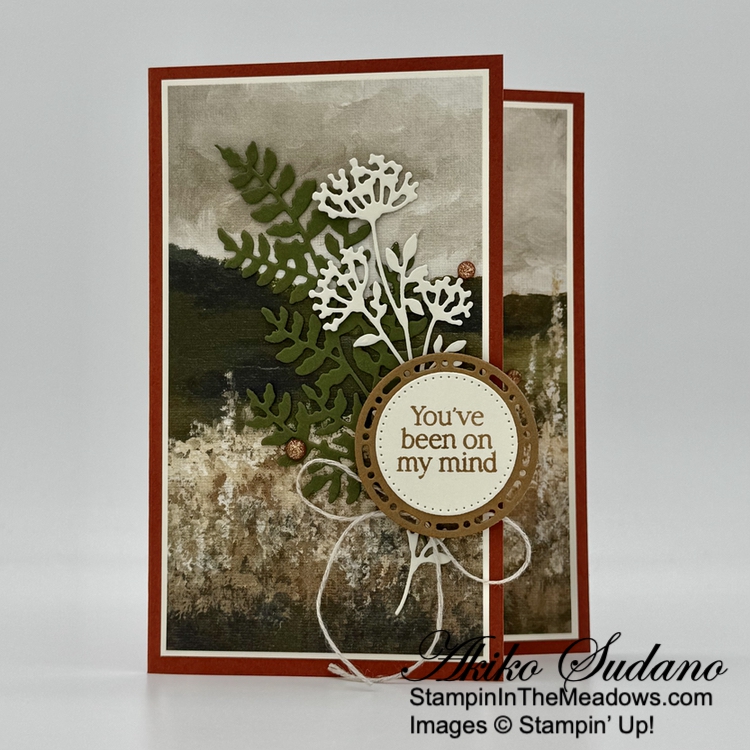
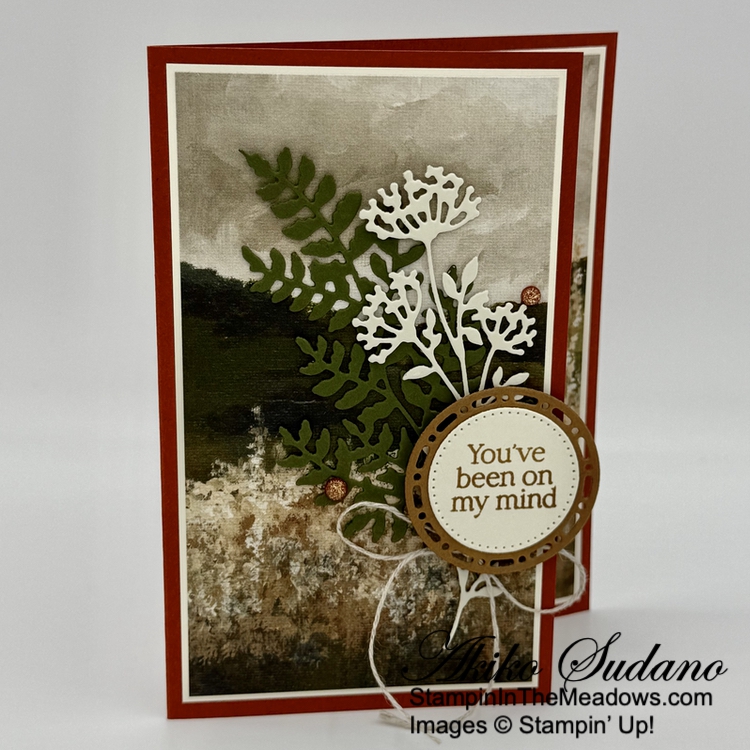
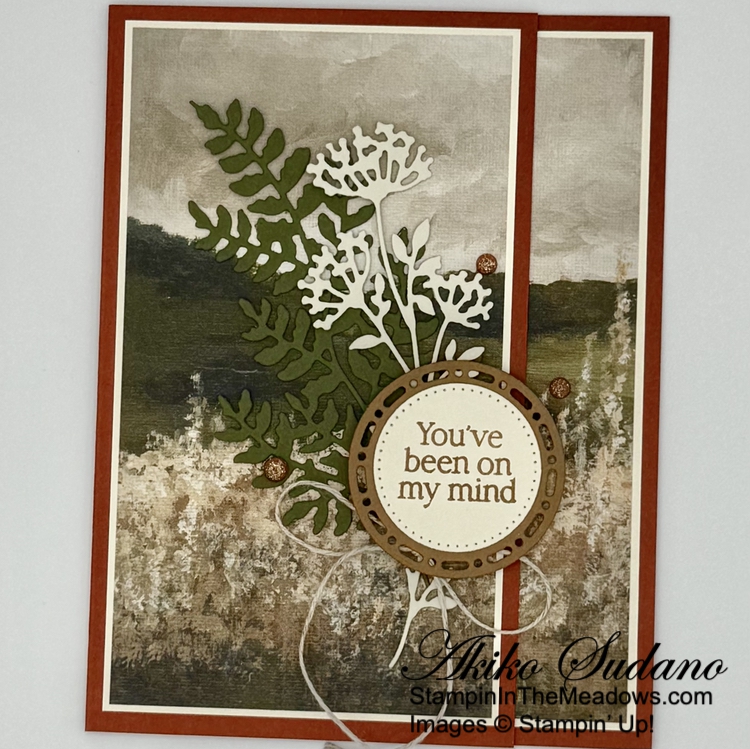
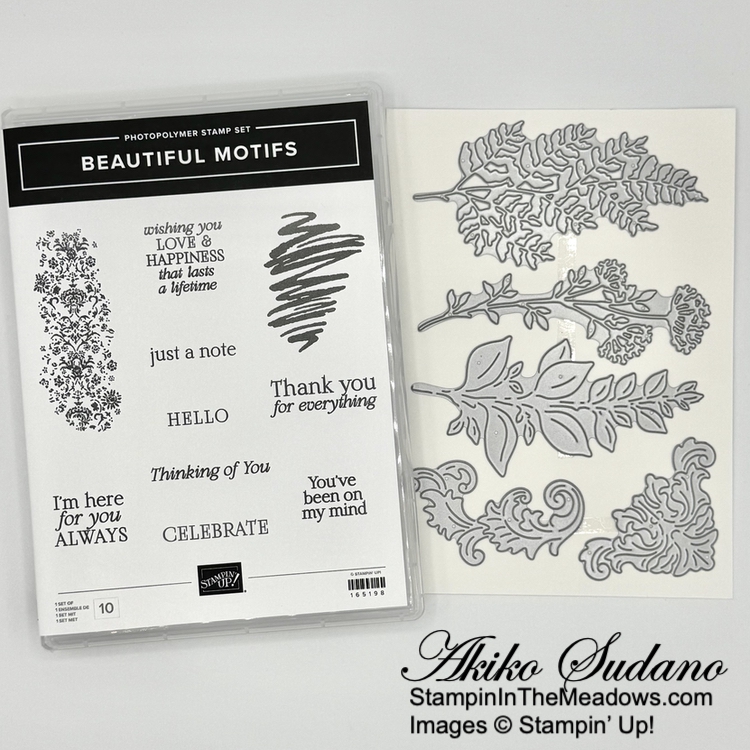
Good Morning and welcome to the Happy Inkin’ Thursday Blog Hop! Here’s another super simple card made with the Stampin’ Up! Beautiful Motifs stamp set and the Beautiful Gallery 6″ x 6″ designer series paper where the pretty DSP does all of the work. You can find the supplies I used along with card stock cuts at the bottom of my post.

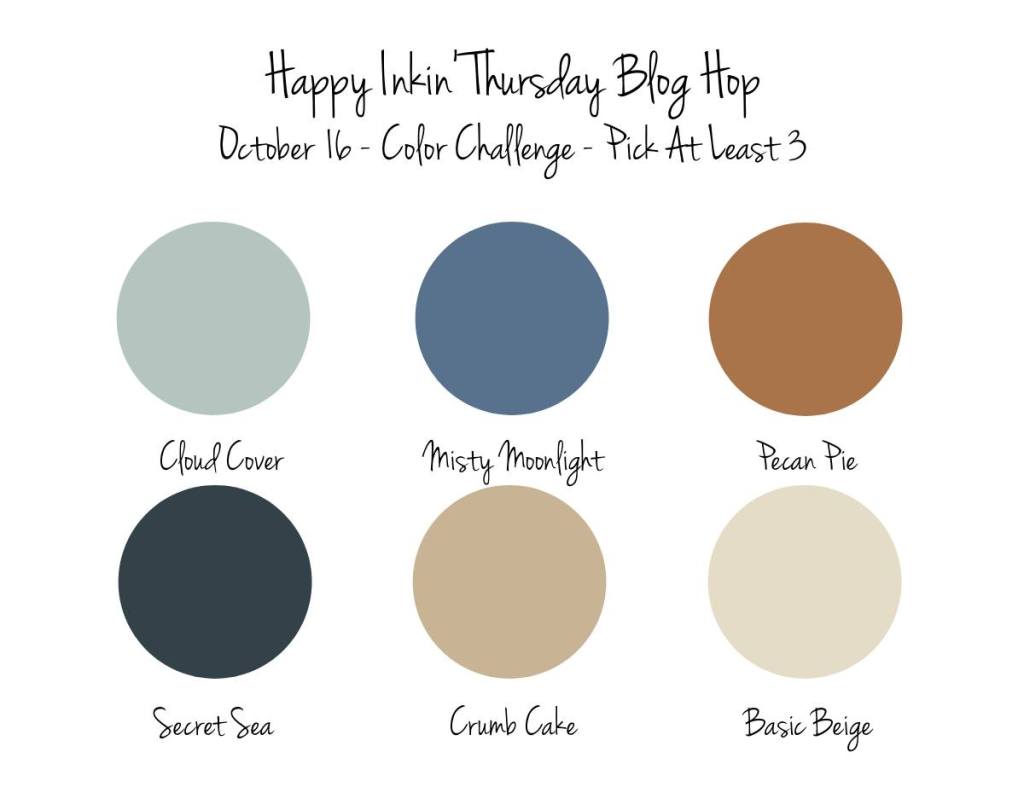
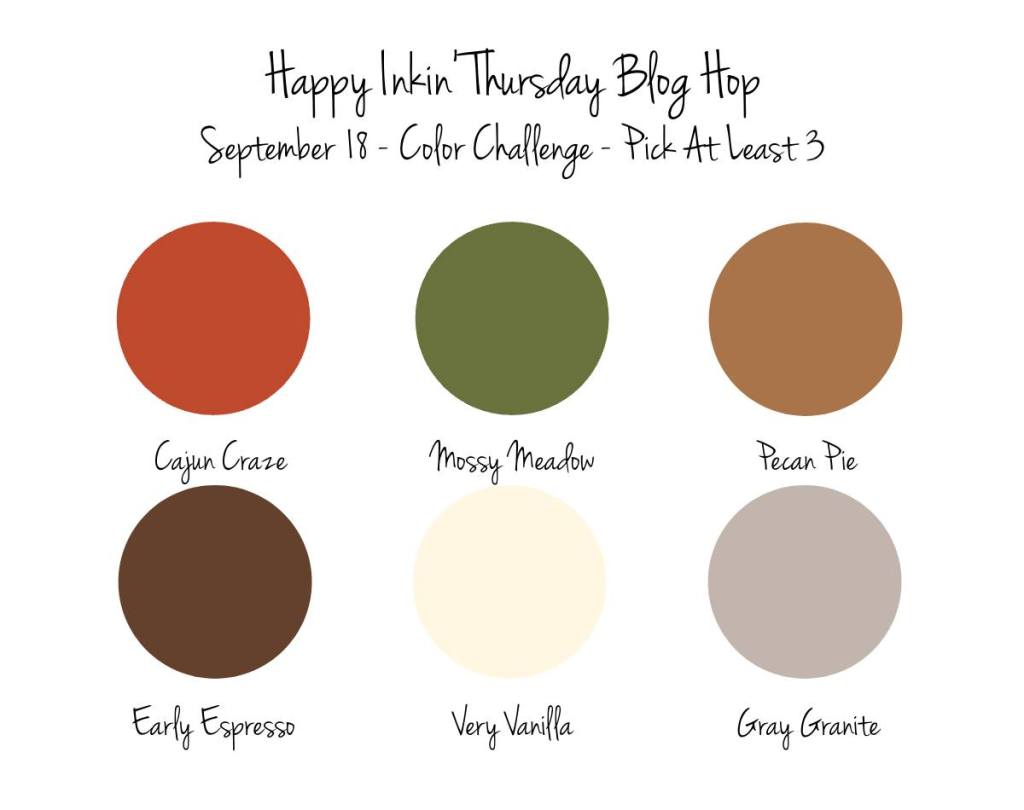
We have a color challenge this week and I let the Beautiful Gallery DSP panel meet the requirements:

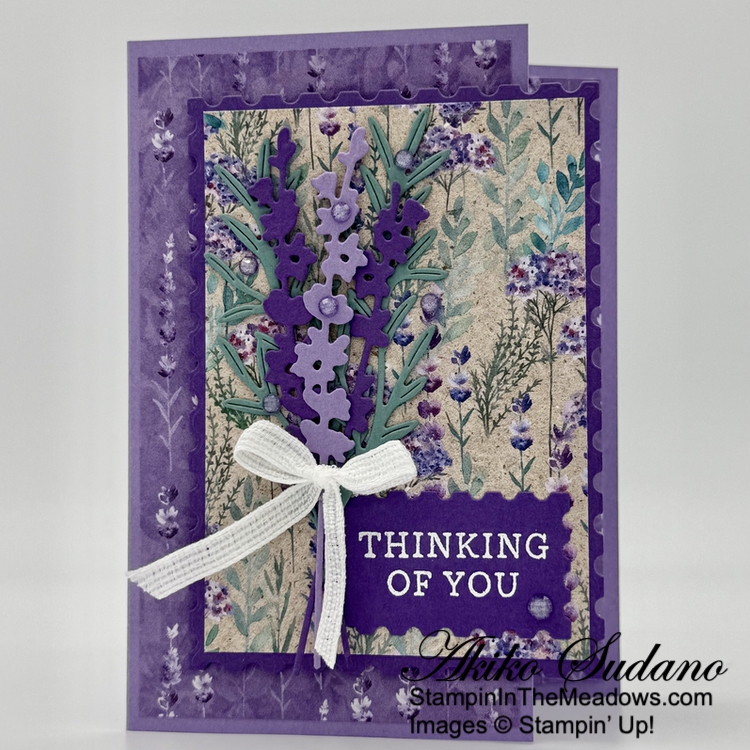
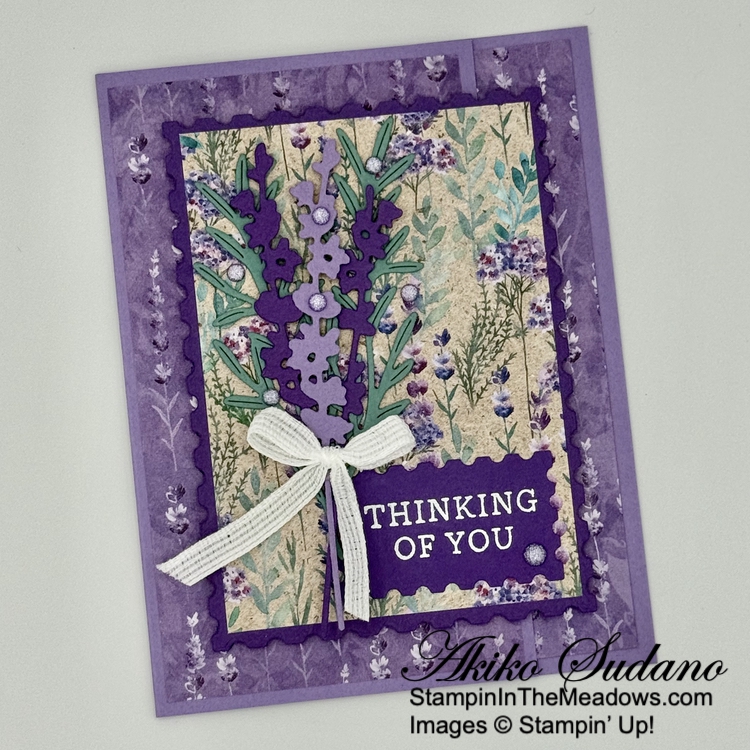
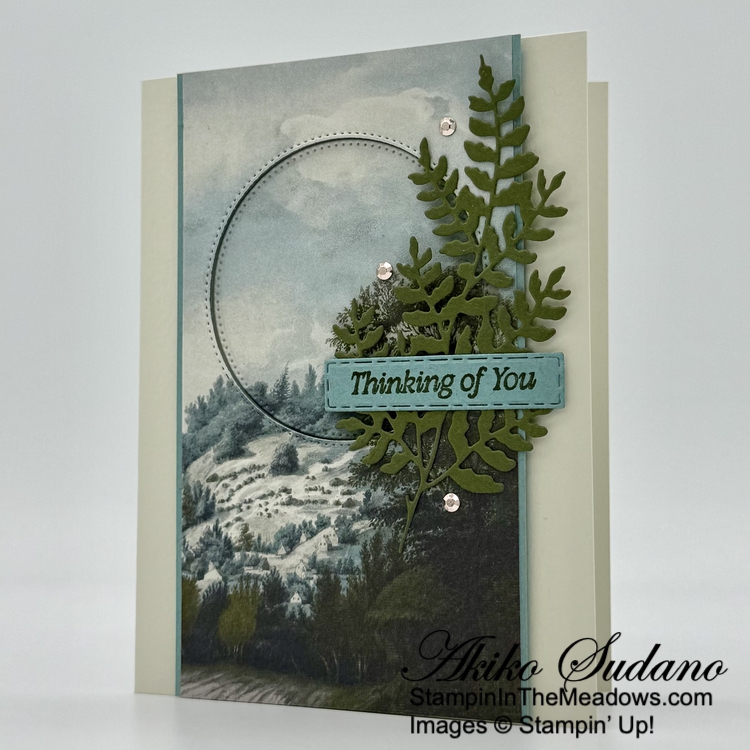
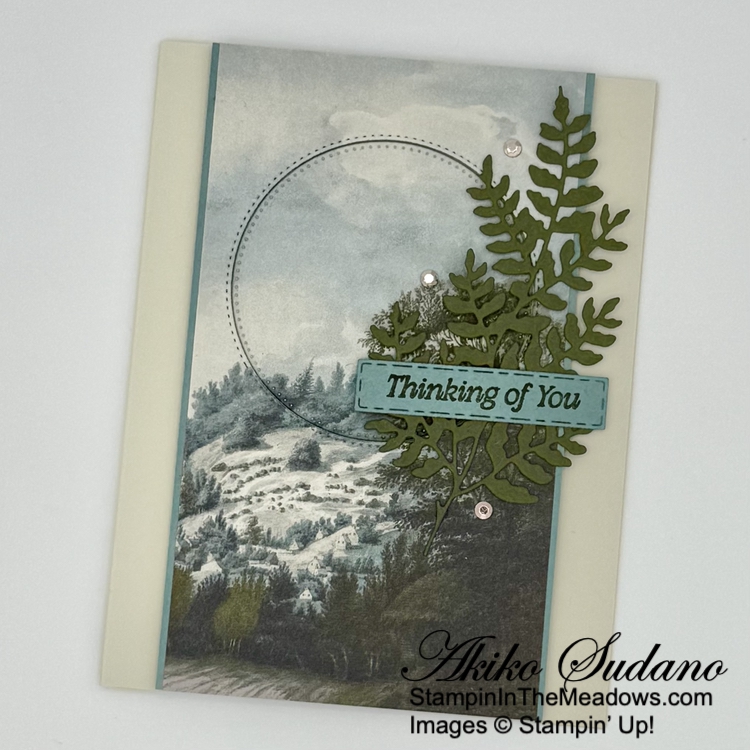
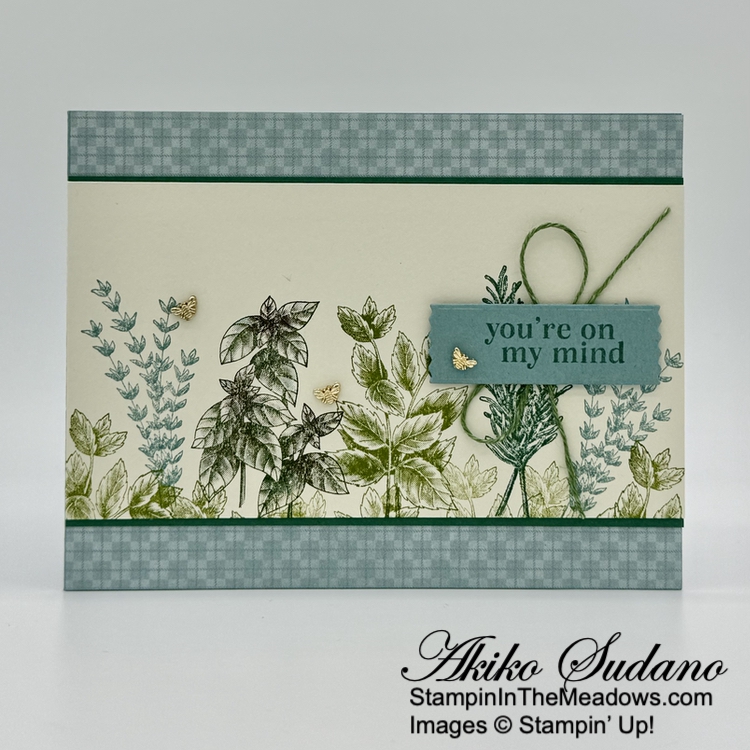
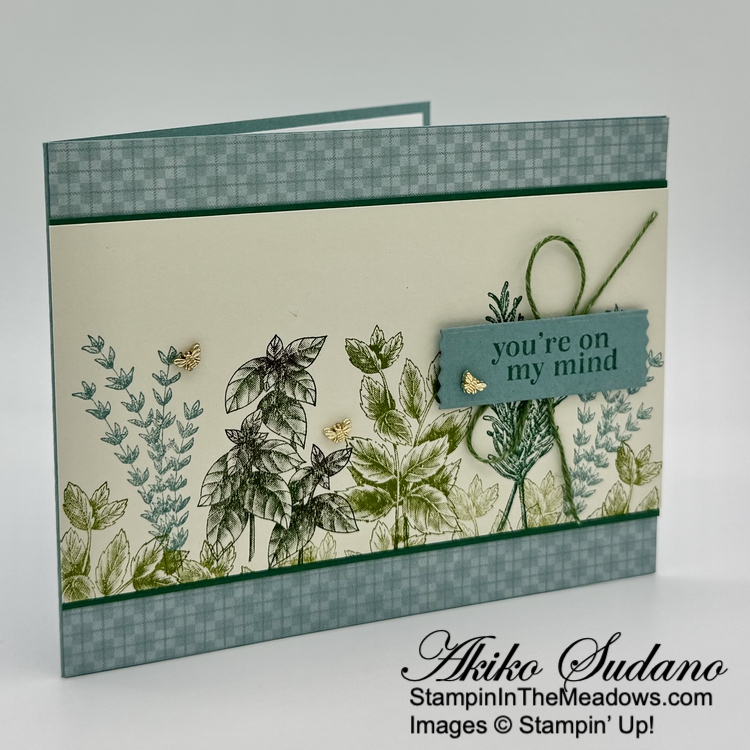
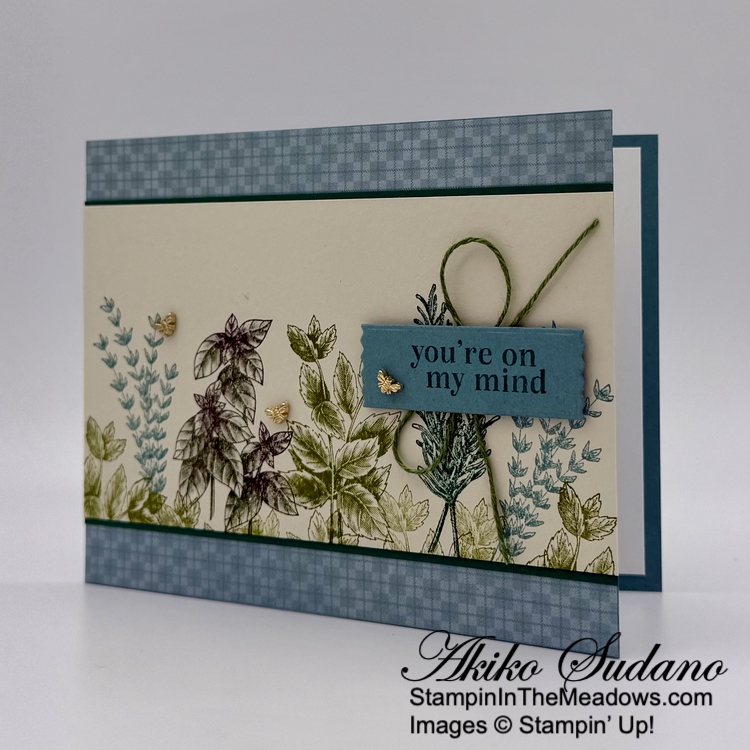
Adhere a panel of the Beautiful Gallery 6″ x 6″ designer series paper to a Crumb Cake mat and wrap it three times with Crumb Cake baker’s twine, tying a knot. Pop the panel on the front of a Misty Moonlight card base using dimensionals.

Stamp the sentiment from the Stampin’ Up! Beautiful Motifs stamp set using Secret Sea ink on a Basic Beige panel. Cut it out using the long skinny label die from the Textured Notes dies, using the two step method. Adhere the label to the card using dimensionals, carefully placing the dimensionals over the twine so that it sticks securely. Finish with three antique pearls.

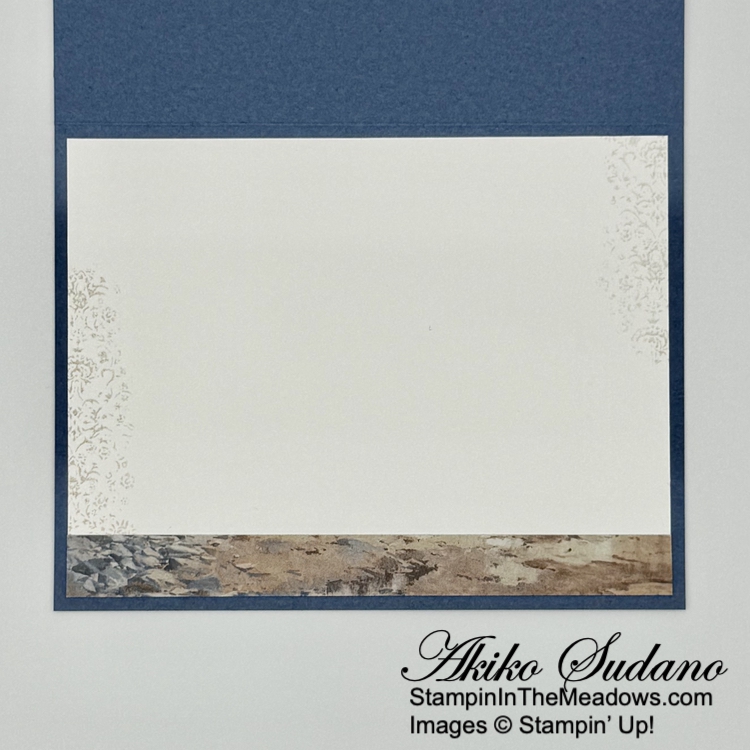
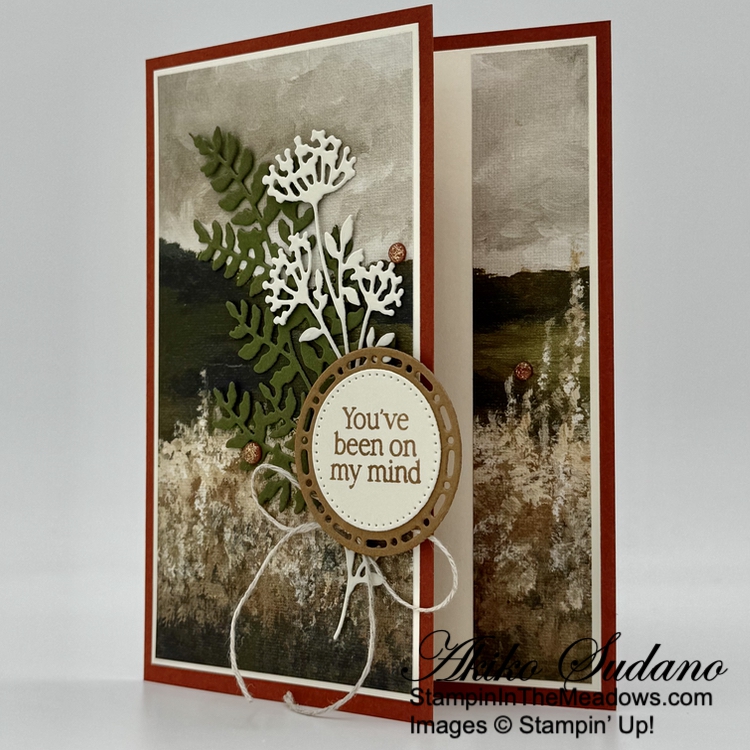
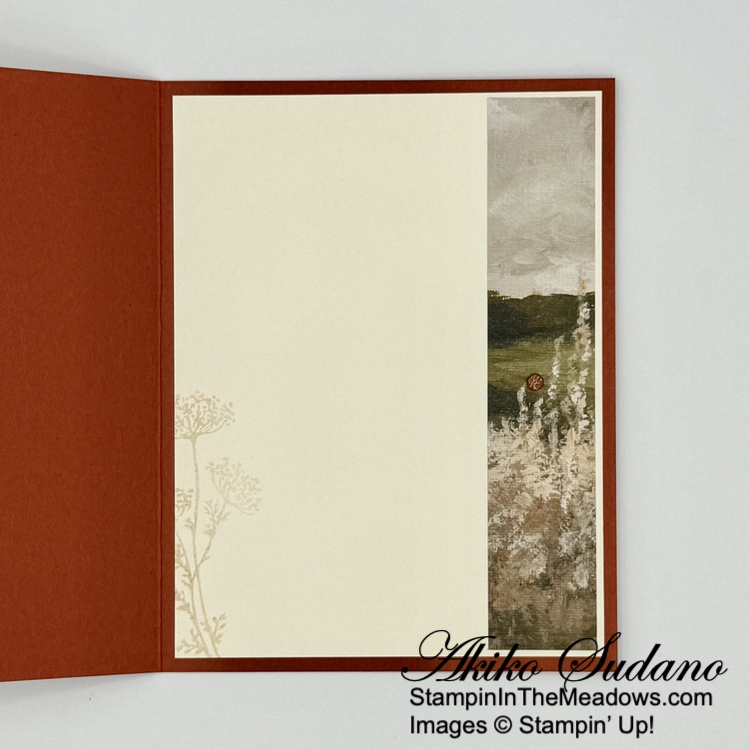
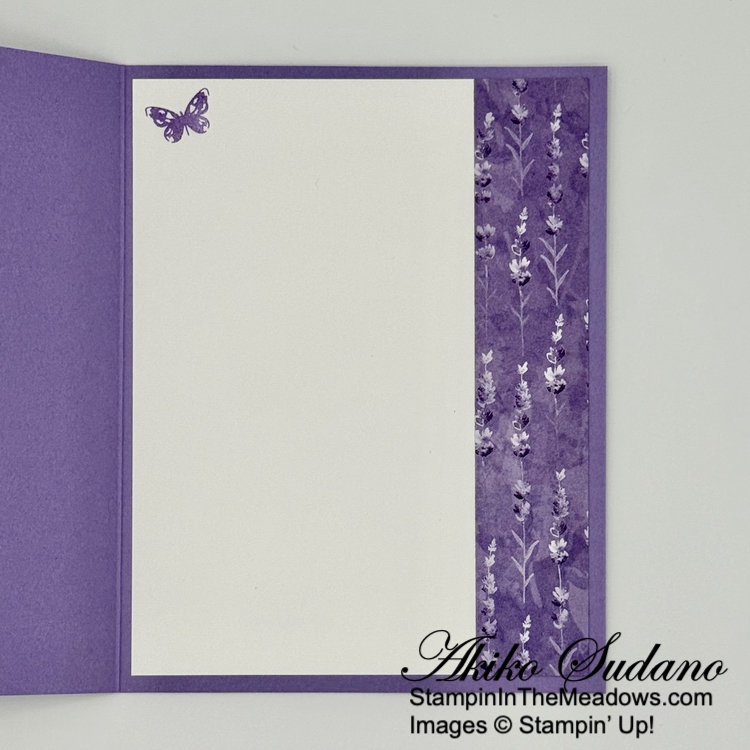
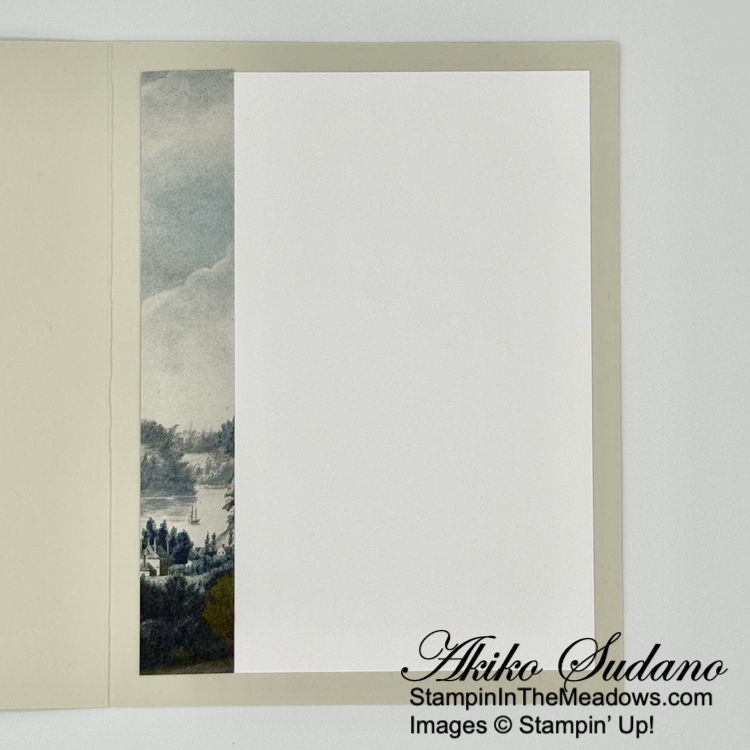
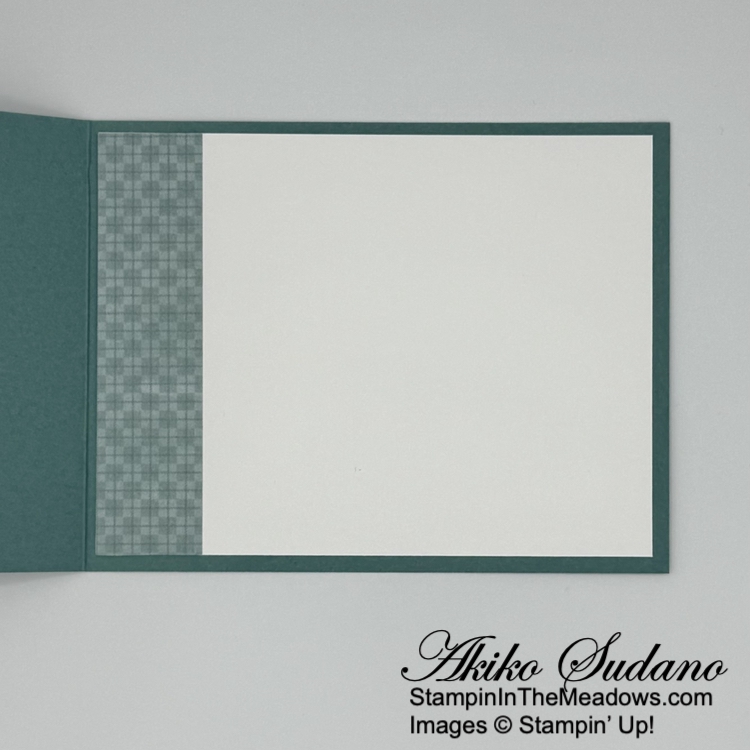
For the inside, stamp the flourish from the Stampin’ Up! Beautiful Motifs stamp set on a Basic White panel using stamped off Crumb Cake ink. Trim the bottom with DSP and adhere it to the inside of the card with Stampin’ Seal.

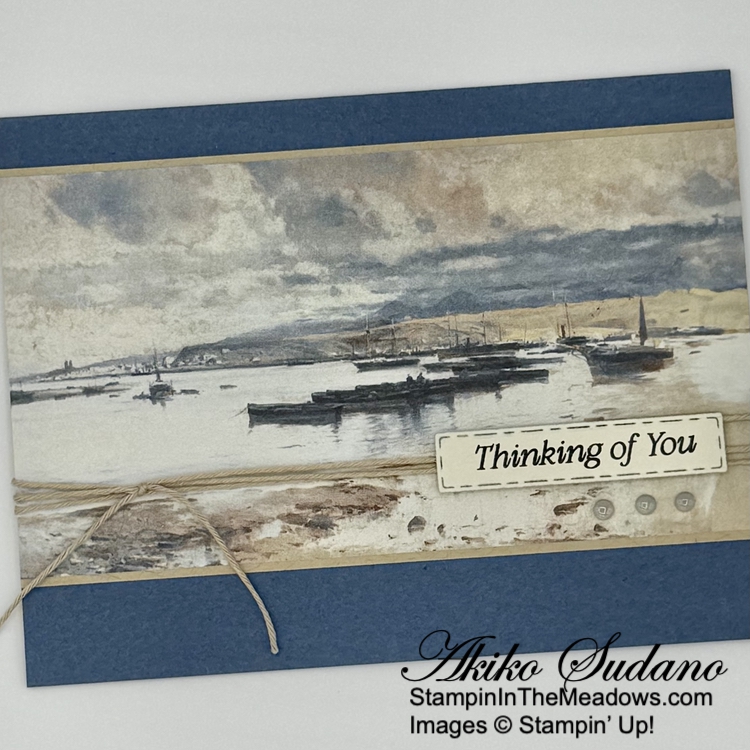
The landscape images in the Beautiful Gallery DSP are so serene and the sentiments in the Stampin’ Up! Beautiful Motifs stamp set work well with them and are great for many occasions.

On with the Hop! Click on the Next Blog button to move forward to see the beautiful project Tara Carpenter has created.

If you get lost along the way, here are the participants for the hop:

Thanks for stopping by and Happy Stamping!

Akiko


Cardstock Cuts for this project:

  • Misty Moonlight – 5-1/2″ x 8-1/2″ card base, scored at 4-1/4″
  • Crumb Cake – 3-1/8″ x 5-1/2″ (DSP mat)
  • Basic Beige – 1″ x 3″ (label)
  • Basic White – 4″ x 5-1/4″ (inside panel)
  • Beautiful Gallery 6″ x 6″ DSP – 3″ x 5-1/2″ (DSP panel), 1/2″ x 5-1/4″ (inside trim)

Stampin’ Up! products used in this project:

Stampin’ Up! Gallery Blooms and Beautiful Motifs for the Happy Inkin’ Thursday Blog Hop

Good Morning and welcome to the Happy Inkin’ Thursday Blog Hop! I used the Stampin’ Up! Gallery Blooms and Beautiful Motifs bundles to make a quick and easy Thinking of You card. This is also a very simple fun fold where the landscape in the Beautiful Gallery 6″ x 6″ designer series paper covers the front of the card and extends to the trim on the inside. You can find the supplies I used along with card stock cuts at the bottom of my post.

We have a color challenge this week:

Start with a 3-7/8″ x 5-1/8″ Beautiful Gallery 6″ x 6″ DSP panel and cut 1 inch off the right side so you have two panels with a continuous design. Adhere the large panel to a Very Vanilla mat and adhere the skinny panel to the right side of the Very Vanilla inside panel.

Adhere the large layered DSP panel to the front of the card with liquid glue. Use the Stampin’ Up! Beautiful Motifs dies to cut the leaf cluster and wildflowers from Mossy Meadow and Basic Beige card stocks. Adhere the die cuts to the card front with glue dots. Make a loopy bow with linen thread and adhere it with a glue dot.

Stamp the sentiment from the Stampin’ Up! Beautiful Motifs stamp set on Very Vanilla using Pecan Pie ink and cut it out with the second smallest circle from the Stylish Shapes dies. cut a Pecan Pie circle using the second smallest Spotlight on Nature dies and adhere it to the back of the label. Adhere the label to the card with dimensionals and finish with Cajun Craze gems.

Stamp the left side of the inside panel with the wildflower from the Stampin’ Up! Gallery Blooms stamp set using twice stamped off Pecan Pie ink. Adhere the panel to the inside of the card with Stampin’ Seal.

I love to use beautiful designer series paper on cards because it makes it so easy! Add a few complimentary die cuts with a pretty sentiment label and a few embellishments and you have an impressive handmade card that anyone would be happy to receive.

On with the Hop! Click on the Next Blog button to move forward to see the beautiful project Tara Carpenter has created.

If you get lost along the way, here are the participants for the hop:

Thanks for stopping by and Happy Stamping!

Akiko


Cardstock Cuts for this project:

  • Cajun Craze – 5-1/2″ x 7-1/2″ card base, scored at 3-1/4″
  • Mossy Meadow – 2-1/2″ x 4-1/2″ (leaf die cut)
  • Pecan Pie – 1-3/4″ x 1-3/4″ (label mat)
  • Basic Beige – 2″ x 4-1/2″ (flower die cut)
  • Very Vanilla – 4″ x 5-1/4″ (inside panel), 3″ x 5-1/4″ (front DSP mat), 1-1/2″ x 1-1/2″ (label)
  • Beautiful Gallery 6″ x 6″ DSP – 2-7/8″ x 5-1/8″ (front background), 1″ x 5-1/8″ (inside side trim)

Stampin’ Up! products used in this project:

Stampin’ Up! Painted Lavender Thinking of You Card

Good Morning! One of the prettiest bundles from the last few years is the Stampin’ Up! Painted Lavender stamp set and dies and they are currently on the Last Chance products list with wonderful discounts! I used it with the pretty Perennial Lavender designer series paper to make a simple fun fold Thinking of You card. You can find the products I used at the bottom of my post along with the card stock sizes.

Adhere a panel of Perennial Lavender designer series paper to the front panel of the Highland Heather card base. Cut a Gorgeous Grape panel with the second largest Perennial Postage dies and adhere another panel of the DSP to the die cut.

Stamp the sentiment from the Simply Said stamp set using Versamark ink on Gorgeous Grape. Sprinkle the sentiment with white embossing powder and shake off the excess. Heat the powder with a heat tool until it’s bright and shiny and cut it out with the rectangle die from the Perennial Postage dies. Adhere it to the layered die cut with glue dots.

Cut two leaf sprigs using the Stampin’ Up! Painted Lavender dies from Lost Lagoon and adhere them to the large die cut with glue dots. Cut two double floral sprigs from Gorgeous Grape and Highland Heather and adhere three of the sprigs to the die cut panel with bits of dimensionals at the top and glue dots at the bottom. Adhere the die cut panel to the card front with dimensionals and finish with a white bow and purple shimmer gems.

For the inside of the card, stamp the little butterfly from the Stampin’ Up! Painted Lavender stamp set using Highland Heather ink on a Basic White panel. Adhere a strip of DSP to the side and adhere the panel to the inside of the card with Stampin’ Seal so that the DSP shows when the card is closed.

The pretty Perennial Lavender designer series paper and purple shimmer gems are carried over in the new Annual Catalog and are perfect for making cards for those special ladies who love purple. Definitely check out the Stampin’ Up! Painted Lavender stamp set and dies on the Last Chance list for a great bargain while supplies last!


If you need any stamping supplies, I’d be very happy to be your Demonstrator.  Just click on the Shop Now Button on the right side of the screen to go directly to my Online store or contact me if you have any questions.  Happy Stamping!

Thanks for stopping by and have a great day!

Akiko

  • Visit my online store here
  • See the current Stampin’ Up! Last Chance items here
  • Have any questions? I’d be happy to help, click here to contact me.

Cardstock Cuts for this project:

  • Highland Heather – 5-1/2″ x 7-1/2″ card base scored at 3-1/4″, 1″ x 4-1/2″ (double lavender sprig die cut)
  • Gorgeous Grape – 3-1/2″ x 4-3/4″ (large postage stamp die cut), 1-1/2″ x 3″ (label), 1″ x 4-1/2 (double lavender sprig die cut)
  • Lost Lagoon – 2-1/2″ x 4″ (leaf sprig die cuts)
  • Basic White – 4″ x 5-1/4″ (inside panel)
  • Perennial Lavender DSP – 3″ x 5-1/4″ (front background), 1″ x 5-1/4″ (inside trim), 3″ x 4-1/4″ (die cut panel)

Stampin’ Up! products used in this project:


Stampin’ Up! Beautiful Motifs for the Happy Inkin’ Thursday Blog Hop

Good Morning and welcome to the Happy Inkin’ Thursday Blog Hop! The Stampin’ Up! Beautiful Motifs bundle is a new bundle from the upcoming Stampin’ Up! 2025-2026 Annual Catalog that will be available on May 6, 2025. I used it with a pretty landscape pattern of Beautiful Gallery 6″ x 6″ designer series paper to make a thinking of you card for today. You can find the currently available supplies I used along with card stock cuts at the bottom of my post.

We have a pretty sketch challenge this week:

I adhered a pretty landscape panel of Beautiful Gallery DSP to a Lost Lagoon mat by applying liquid glue around the outside edge. I used the second largest circle die from the Stylish Shapes dies to cut a circle from the layered DSP and adhered the outside to the front of a Basic Beige card base with dimensionals.

I adhered the die cut circle to the inside of the circle with liquid glue to get a two layer effect. I cut a Mossy Meadow panel with the pretty fern die from the Stampin’ Up! Beautiful Motifs dies and adhered it to the card with glue dots and bits of dimensionals.

I stamped the sentiment from the Stampin’ Up! Beautiful Motifs stamp set using Mossy Meadow ink on Lost Lagoon and cut it out with the long Textured notes label die using a two step methog. I adhered it to the card with glue dots and dimensionals and finished with a three small copper gems.

I left the inside of the card, blank, simply trimming the side of a Basic White panel with more of the landscape DSP and adhering it to the inside of the card with Stampin’ Seal.

The landscape panels of the Beautiful Gallery DSP are real pretty. I love the sentiments from the Stampin’ Up! Beautiful Motifs stamp set and the fern die is just gorgeous. The flourish dies are interesting in that they do a partial die cut – I need to play with them a bit to get comfortable. Here is the pretty Stampin’ Up! Beautiful Motifs bundle:

It will be available with the Beautiful Gallery 6″ x 6″ designer series paper are part of the new Beautiful Gallery Suite in the upcoming Stampin’ Up! 2025-2026 Annual Catalog on May 6.

On with the Hop! Click on the Next Blog button to move forward to see the beautiful project Karen Ksenzakovic has created.

If you get lost along the way, here are the participants for the hop:


If you need any stamping supplies, I’d be very happy to be your Demonstrator.  Just click on the Shop Now button on the right side of the screen to go directly to my online store or contact me if you have any questions. 

Thanks for stopping by and Happy Stamping!

Akiko

  • Visit my online store here
  • See the current Stampin’ Up! Last Chance items here
  • Have any questions? I’d be happy to help, click here to contact me.

Cardstock Cuts for this project:

  • Basic Beige – 5-1/2″ x 8-1/2″ card base, scored at 4-1/4″
  • Lost Lagoon – 3-1/4″ x 5-1/2″ (DSP mat), 1″ x 3″ (label)
  • Mossy Meadow – 2-1/4″ x 4-1/4″ (die cut fern)
  • Basic White – 3-3/4″ x 5″ (inside panel)
  • Beautiful Gallery 6″ x 6″ DSP – 3-1/8″ x 5-1/2″ (front background), 3/4″ x 5″ (inside trim)

Stampin’ Up! products used in this project:

Stampin’ Up! Grow With Love for the Happy Inkin’ Thursday Blog Hop

Good Morning and welcome to the Happy Inkin’ Thursday Blog Hop! The Stampin’ Up! Grow with Love bundle is a fun herb and seed themed set with beautiful stamped images and fun seed envelope dies. But I just used the beautiful herb stamps and pretty sentiment for today’s card. You can find the supplies I used along with card stock cuts at the bottom of my post.

We have a pretty sketch challenge this week and I took some liberties by resizing the sketch and mounting it on a DSP background:

I adhered a panel of Timeless Plaid 6″ x 6″ designer series paper to the front of a Lost Lagoon card base with liquid glue.

I stamped the herbs from the Stampin’ Up! Grow With Love stamp set on Basic Beige. Before the final stamping, I practiced several times on printer paper to arrange the herbs and select the right color combinations until I came up with the right mix of colors and herb placement. For my final run, I stamped the mint in Grammy Apple Green in the middle of the panel. Next, I inked up the basil using Garden Green ink and applied Blackberry Bliss to the buds with sponge daubers before stamping it next to the mint. Then I stamped the rosemary using Shaded Spruce ink and finished with thyme in Lost lagoon on either side. I filled in the bottom and sides with the top of the mint stamp in full strength and stamped off Granny Apple Green. I adhered the stamped panel to a Shaded Spruce mat and adhered it to the card with liquid glue.

I stamped the sentiment from the Stampin’ Up! Grow With Love stamp set using Shaded Spruce ink on Lost Lagoon and cut it out with the small label die. I used Garden Green linen thread to make a bow and adhered it to the back with a glue dot before adhering the label to the card with dimensionals. I finished with the cute mini bee trinkets adhered with glue dots.

For the inside of the card, I kept it simple, trimming the side of a Basic White panel with DSP and adhering the panel to the inside of the card with Stampin’ Seal.

The herb stamps in the Stampin’ Up! Grow with Love stamp set are so detailed and realistic, and they look beautiful no matter what color you use. I had fun playing with all the different shades of green as I was working on my arrangement.

On with the Hop! Click on the Next Blog button to move forward to see the beautiful project Karen Ksenzakovic has created.

If you get lost along the way, here are the participants for the hop:


If you need any stamping supplies, I’d be very happy to be your Demonstrator.  Just click on the Shop Now button on the right side of the screen to go directly to my online store or contact me if you have any questions. 

Thanks for stopping by and Happy Stamping!

Akiko

  • Visit my online store here
  • See the current Stampin’ Up! Last Chance items here
  • Have any questions? I’d be happy to help, click here to contact me.

Cardstock Cuts for this project:

  • Lost Lagoon – 4-1/4″ x 11″ card base, scored at 5-1/2″1-1/4″ x 3″ (label)
  • Shaded Spruce – 3-1/8″ x 5-1/2″ (herb mat)
  • Basic Beige – 3″ x 5-1/2″ (herb panel)
  • Basic White – 4″ x 5-1/4″ (inside panel)
  • Timeless Plaid 6″ x 6″ DSP – 4-1/4″ x 5-1/2 (front background), 1″ x 4″ (inside trim)

Stampin’ Up! products used in this project:

Stampin’ Up! Winterly Tree Tops for the Happy Inkin’ Thursday Blog Hop

Good Morning and welcome to the Happy Inkin’ Thursday Blog Hop! I used the pretty Stampin’ Up! Winterly Tree Tops stamp set with the sweet Nests of Winter designer series paper to make a simplenThinking of You card today. You can find the supplies I used along with card stock cuts at the bottom of my post.

We have a pretty sketch challenge this week:

I adhered a panel of Nests of Winter designer series paper to the front of a Thick Basic White card base with liquid glue.

I adhered a birdy panel of the DSP to a Shaded Spruce mat and popped it on the card front with dimensionals. I stamped part of the sentiment from the Stampin’ Up! Winterly Tree Tops stamp set using Memento Tuxedo Black ink on a Gray Granite strip and cut it out with the skinny banner die from the Stylish Shapes dies. I popped it on the card with dimensionals.

I made a bow with Gray Granite baker’s twine and adhered it to the label with a glue dot. I finished the card with Cherry Cobbler berries.

For the inside of the card, I stamped the bird from the Stampin’ Up! Winterly Tree Tops stamp set using twice stamped off Gray Granite ink on a Basic White panel. I adhered DSP to the side before adhering the panel to the inside of the card with Stampin’ Seal..

The sentiments in the Stampin’ Up! Winterly Tree Tops stamp set are simple and perfect for use year round. The pretty Nests of Winter DSP are nice for Christmas cards, making the suite perfect for any occasion during the Winter holidays!

On with the Hop! Click on the Next Blog button to move forward to see the beautiful project Karen Ksenzakovic has created.

If you get lost along the way, here are the participants for the hop:


Current Host Code: V3YZAAN7

Use this host code when you order $50 or more and receive a free gift from me!  The free gift is your choice of any item currently available valued up to $10.00!

If your order is over $150, please do not use the host code since you’ll receive your own Host Dollars plus I’ll still send you the free gift!  This host code can be used by anyone, no club or commitment required. Let me know if you have any questions.


If you need any stamping supplies, I’d be very happy to be your Demonstrator.  Just click on the Shop Now button on the right side of the screen to go directly to my online store or contact me if you have any questions. 

Thanks for stopping by and Happy Stamping!

Akiko

  • Visit my online store here
  • See the current Stampin’ Up! clearance rack specials here
  • Earn FREE Stampin’ Up! products through my Wildflower Frequent Shopper Program – my way of saying thank you to my online frequent shopper customers.
  • Have any questions? I’d be happy to help, click here to contact me.

Cardstock Cuts for this project:

  • Thick Basic White – 5-1/2″ x 8-1/2″ card base, scored at 4-1/4″
  • Shaded Spruce – 2-3/4″ x 4″ (DSP mat)
  • Gray Granite – 1″ x 3″ (label)
  • Basic White – 3-3/4″ x 5″ (inside panel)
  • Nests of Winter DSP – 4″ x 5-1/4″ (front background), 2-5/8″ x 4-7/8″ (DSP panel), 3/4″ x 3-3/4″ (inside trim)

Stampin’ Up! products used in this project:


Stampin’ Up! Thoughtful Wishes Note Card Trio

Good Morning! Earlier this month Stampin’ Up! held a special creative event and showed projects using the Stampin’ Up! Thoughtful Wishes bundle with a pink version of the Countryside Inn designer series papers. For today’s cards, I converted the designs to 3-1/2″ x 5″ note cards and used the regular Countryside Inn DSP. You can find the products I used at the bottom of my post along with the card stock sizes.

For my first card, I adhered strips of Countryside Inn designer series paper to the front of a Boho Blue card base. I cut the flourish from the Stampin’ Up! Thoughtful Wishes dies from a Countryside Inn panel and adhered it to the card. I stamped the sentiment in Misty Moonlight ink on Basic White and cut it out with the small rectangle from the Nested Essentials dies. I adhered a loopy bow to the back and popped it on the card with dimensionals and finished the card with iridescent gems.

On the second card, I adhered a panel of Countryside Inn DSP to the front of a Boho Blue card base. I cut a Balmy Blue banner using the Nested essential Dies and stamped it with the flowers from the Stampin’ Up! Thoughtful Wishes stamp set. I stamped the ‘Thanks’ sentiment using Misty Moonlight ink on Basic White and trimmed it with paper snips before adhering it to the banner. I popped the banner on the card with dimensionals and adhered a small bow on top. I finished the card with iridescent gems.

For the third card, I cut three panels of Countryside Inn DSP with the small diamond die and cut them in half. I adhered them to a Boho Blue card base. I cut two flower sprigs using the Stampin’ Up!Thoughtful Wishes dies, trimmed them with my paper snips and adhered them to the card. I stamped the sentiment in Misty Moonlight ink on Basic White and adhered it to a Boho Blue mat. I wrapped it with linen thread and popped it on the card with dimensionals. I finished the card with iridescent gems.

I kept the insides of the cards simple, lining them with Basic White panels.

These designs really show off the pretty patterns in the Countryside Inn designer series paper and give a really different feel to the Stampin’ Up! Thoughtful Wishes bundle. And the DSP will be part of the sale that starts next month( see details below)! The Linen Thread that I used is Night of Navy and part of the Nests of Winter suite that will be available in the new September – December Mini Catalog on September 4, 2024.


Today Is The Last Day For Bonus Days Earning Period!

It’s time for one of our favorite promotions—BONUS DAYS! Because do you know what’s a great deal? Getting rewarded for all the crafting supplies you’re already going to buy! When you shop between 3–31 July and spend $50 you will earn a $5 coupon! Make sure you save all your coupons because you can redeem them (and we mean ALL of them) between August 1 and August 31. There’s no limit to how many coupons you can earn! 

Promotion Details:

Earning Period: July 3 – July 31 2024

  • Earn a $5 coupon for every $50 spent (before shipping and tax). 
  • All coupon codes will be emailed right after a qualifying purchase has been made. Customers must have a customer account with a valid email address to earn coupons when they shop. If you don’t already have an account, you can easily create one in the Online store – contact me if you have any questions. 
  • If you earn multiple codes from a single order, you will receive one email with multiple codes. If you earn multiple codes from multiple orders, you will receive separate emails for each code earned.
  • All order types qualify for this promotion. Phone and email orders still require an email address.
  • Orders started before the promotion begins will not count toward earning coupon codes. For example, if you add items to your cart before July 3 and wait to purchase until that date or later, then those items will not qualify towards earning coupons. You must add items to your cart and complete your purchase during the earning period. 
  • There is no limit to the number of coupon codes participants can earn per order or throughout the duration of the earning period. 
  • Customers must use a valid email address during checkout in order to receive their coupon code. If a customer places an order over the phone, they must still provide a valid email address to receive their coupon code.
  • Starter Kit orders are excluded from this offer.

Redemption Period: August 1 – August 31, 2024

  • There is no limit to the number of coupon codes you can redeem on an order during the redemption period. If using multiple codes, they must be separated by a space. 
  • Coupon codes may be redeemed one time only. They cannot be redeemed after August 31, 2024.
  • Coupon codes may be redeemed for any product (excluding Starter Kits). They cannot be used on exchanges.
  • Bonus Days coupon codes can be applied to month-to-month Paper Pumpkin subscriptions and new prepaid subscriptions.

Designer Series Paper Sale Begins August 6, 2024!

We have some exciting news! Beginning August6, 2024, you can shop select Designers Series Paper from the 2024–2025 Annual Catalog at 15% off! It’s the perfect time to stock up and save on your favorite paper.

Stampin’ Up! Designer Series Paper is perfect for card making, gift packaging, scrapbooking, and more! The in-house artists create Designer Series Paper using different mediums. They work to create paper for every design you’d need for your paper crafts. Some of the designs coordinate with different products, such as die cuts and punches. It’s also made up of Stampin’ Up! colors, ensuring perfect color coordination with other products. The following paper is part of the sale:

  • Bright & Beautiful 
  • Countryside Inn 
  • Country Lace 
  • Country Woods
  • Full of Life
  • Lily Pond Lane
  • Mediterranean Blooms 
  • Perennial Lavender 
  • Take to the Sky 
  • Thoughtful Journey 
  • To Market 
  • Unbounded Beauty 
  • Wildly Flowering 
  • Winter Meadow 

While there are no limits to order quantity, product is only available while supplies last.


Current Host Code: DWUSFG7T

Use this host code when you order $50 or more and receive a Thank You gift from me!  The free gift is your choice of any item currently available valued up to $10.00.

If your order is over $150, please do not use the host code since you’ll receive your own Host Dollars plus I’ll still send you the Thank You gift!  This host code can be used by anyone, no club or commitment required. Let me know if you have any questions.


If you need any stamping supplies, I’d be very happy to be your Demonstrator.  Just click on the Shop Now Button on the right side of the screen to go directly to my Online store or contact me if you have any questions.  Happy Stamping!

Thanks for stopping by and have a great day!

Akiko

  • Visit my online store here
  • See the current Stampin’ Up! clearance rack specials here
  • Earn FREE Stampin’ Up! products through my Wildflower Frequent Shopper Program – my way of saying thank you to my online frequent shopper customers.
  • Have any questions? I’d be happy to help, click here to contact me.

Cardstock Cuts for this project:

  • You Make Life Better card
    • Boho Blue – 5″ x 7″ card base, scored at 3-1/2″
    • Basic White – 3″ x 4-1/2″ (inside panel), 1-1/2″ x 2-1/4″ (label)
    • Countryside Inn DSP – 1″ x 2-1/2″ (top strip), 1″ x 3″ (middle strip), 1″ x 2″ (bottom strip), 3″ x 5″ (die cut flourish)
  • Thanks card
    • Boho Blue – 5″ x 7″ card base, scored at 3-1/2″
    • Balmy Blue – 2″ x 2-3/4″ (die cut banner)
    • Basic White – 3″ x 4-1/2″ (inside panel), 1/2″ x 1-1/2″ (label)
    • Countryside Inn DSP – 3-1/4″ x 4-3/4″ (front background)
  • Thinking of you Fondly card
    • Boho Blue – 5″ x 7″ card base, scored at 3-1/2″, 7/8″ x 3-1/2″ (label mat)
    • Basic White – 3″ x 4-1/2″ (inside panel), 3-3/4″ x 3-3/4″ (two die cut flower sprigs), 3/4″ x 3-1/2″ (label)
    • Countryside Inn DSP – three 1-1/2″ x 3-3/4″ panels (die cut diamonds)

Stampin’ Up! products used in this project:


Stampin’ Up! Wildflower Designs Gate Fold Card

Good Morning! I I really love the Wildly Flowering designer series paper and I wanted to use the Wild Wheat pattern with the Stampin’ Up! Wildflower Designs stamp set. So I made this gatefold card to step it up a bit while still keeping it simple and showing off the pretty DSP. You can find the products I used at the bottom of my post along with the card stock sizes.

I embossed a Wild Wheat panel with the Dashing Designs 3D embossing folder and cut the panel in half. I adhered each embossed panel to the front flaps of my gatefold card base with liquid glue.

I cut my DSP panel into thirds and adhered them to an Early Espresso mat, starting at each end and adhering the middle panel last. I was careful to keep the panels in order, so that the design would flow continuously. I adhered the panel to the left side of the gatefold card with liquid glue.

I stamped the sentiment from the Stampin’ Up! Wildflower Designs stamp set in Early Espresso ink on Basic White and cut it out with the large rectangle label die from the Wild Ferns dies. I colored a length of white baker’s twine with my Mossy Meadow Stampin’ Blend and made a bow that I adhered to the back of the label with a glue dot. I adhered the label to the left flap of the card with dimensionals and finished with three textured dots.

For the inside of the card I stamped the the little flower from the Stampin’ Up! Wildflower Designs stamp set in Early Espresso ink on the top of a Basic White panel. I trimmed the bottom with a strip of DSP and adhered the panel to the inside of the card with Stampin’ Seal.

This is really a simple fun fold card that shows off the pretty DSP. The Wildly Flowering designer series paper has such a vintage feel – perhaps because of the color palette. But it is one of my favorites. And I need to use the pretty dies in the Stampin’ Up! Wildflower Designs bundle soon, because they’re just awesome!


Bonus Days Earning Period Ends Soon!

It’s time for one of our favorite promotions—BONUS DAYS! Because do you know what’s a great deal? Getting rewarded for all the crafting supplies you’re already going to buy! When you shop between 3–31 July and spend $50 you will earn a $5 coupon! Make sure you save all your coupons because you can redeem them (and we mean ALL of them) between August 1 and August 31. There’s no limit to how many coupons you can earn! 

Promotion Details:

Earning Period: July 3 – July 31 2024

  • Earn a $5 coupon for every $50 spent (before shipping and tax). 
  • All coupon codes will be emailed right after a qualifying purchase has been made. Customers must have a customer account with a valid email address to earn coupons when they shop. If you don’t already have an account, you can easily create one in the Online store – contact me if you have any questions. 
  • If you earn multiple codes from a single order, you will receive one email with multiple codes. If you earn multiple codes from multiple orders, you will receive separate emails for each code earned.
  • All order types qualify for this promotion. Phone and email orders still require an email address.
  • Orders started before the promotion begins will not count toward earning coupon codes. For example, if you add items to your cart before July 3 and wait to purchase until that date or later, then those items will not qualify towards earning coupons. You must add items to your cart and complete your purchase during the earning period. 
  • There is no limit to the number of coupon codes participants can earn per order or throughout the duration of the earning period. 
  • Customers must use a valid email address during checkout in order to receive their coupon code. If a customer places an order over the phone, they must still provide a valid email address to receive their coupon code.
  • Starter Kit orders are excluded from this offer.

Redemption Period: August 1 – August 31, 2024

  • There is no limit to the number of coupon codes you can redeem on an order during the redemption period. If using multiple codes, they must be separated by a space. 
  • Coupon codes may be redeemed one time only. They cannot be redeemed after August 31, 2024.
  • Coupon codes may be redeemed for any product (excluding Starter Kits). They cannot be used on exchanges.
  • Bonus Days coupon codes can be applied to month-to-month Paper Pumpkin subscriptions and new prepaid subscriptions.

Current Host Code: DWUSFG7T

Use this host code when you order $50 or more and receive a Thank You gift from me!  The free gift is your choice of any item currently available valued up to $10.00.

If your order is over $150, please do not use the host code since you’ll receive your own Host Dollars plus I’ll still send you the Thank You gift!  This host code can be used by anyone, no club or commitment required. Let me know if you have any questions.


If you need any stamping supplies, I’d be very happy to be your Demonstrator.  Just click on the Shop Now Button on the right side of the screen to go directly to my Online store or contact me if you have any questions.  Happy Stamping!

Thanks for stopping by and have a great day!

Akiko

  • Visit my online store here
  • See the current Stampin’ Up! clearance rack specials here
  • Earn FREE Stampin’ Up! products through my Wildflower Frequent Shopper Program – my way of saying thank you to my online frequent shopper customers.
  • Have any questions? I’d be happy to help, click here to contact me.

Cardstock Cuts for this project:

  • Wild Wheat – 5-1/2″ x 8-1/2″ card base scored at 2-1/8″ and 6-3/8″, 4″ x 5-3/8″ panel embossed and cut in half (two 2″ x 5-3/8″ embossed panels)
  • Early Espresso – 3-1/4″ x 4-1/8″ (DSP mat)
  • Basic White – 5″ x 5-1/4″ (inside panel), 1-1/2″ x 3″ (label)
  • Wildly Flowering DSP – 3″ x 4″ (DSP panel, cut in thirds for three 1″ x 4″ panels), 1/2″ x 4″ (inside trim)

Stampin’ Up! products used in this project:


Stampin’ Up! Poised Peony In My Thoughts Card

Good Morning! The Stampin’ Up! Poised Peony stamp set is sweet, simple cling stamp set with pretty line flowers and sentiments. I used it with the Country Lace designer series paper for a thinking of you card. You can find the products I used at the bottom of my post along with the card stock sizes.

I adhered a panel of Country Lace designer series paper to a Petal Pink mat with liquid glue. I adhered strip of the DSP to a Petal Pink mat and adhered it to the panel. I adhered the layered DSP panel to the front of a Petal Pink card base with dimensionals.

I stamped the large flower from the Stampin’ Up! Poised Peony stamp set using Smoky Slate ink on Basic White. I colored the flower with Petal Pink and Old Olive Stampin’ Blends and adhered the panel to a Petal Pink mat. I wrapped a length of white baker’s twine around the bottom and made a bow before popping it on the card with dimensionals.

I stamped the sentiment from the Stampin’ Up! Poised Peony stamp set using Smoky Slate ink on basic white and cut it out with a round die from the Stylish Shapes dies. I adhered it to the card with dimensionals and finished the card with Petal Pink foil gems.

For the inside of the card I stamped the small flower from the Stampin’ Up! Poised Peony stamp set using Petal Pink ink on a Basic White panel. I trimmed the bottom of the panel with DSP and adhered the it to the inside of the card with Stampin’ Seal.

The large, pretty flower in theStampin’ Up! Poised Peony stamp set is perfect for coloring with Stampin’ Blends or just leaving as an outline image. It’s very versatile and I love that the stamp set has other flowers that coordinate with it in different sizes, like the one I stamped on the inside of the card.


Bonus Days Earning Period Going On Now!

It’s time for one of our favorite promotions—BONUS DAYS! Because do you know what’s a great deal? Getting rewarded for all the crafting supplies you’re already going to buy! When you shop between 3–31 July and spend $50 you will earn a $5 coupon! Make sure you save all your coupons because you can redeem them (and we mean ALL of them) between August 1 and August 31. There’s no limit to how many coupons you can earn! 

Promotion Details:

Earning Period: July 3 – July 31 2024

  • Earn a $5 coupon for every $50 spent (before shipping and tax). 
  • All coupon codes will be emailed right after a qualifying purchase has been made. Customers must have a customer account with a valid email address to earn coupons when they shop. If you don’t already have an account, you can easily create one in the Online store – contact me if you have any questions. 
  • If you earn multiple codes from a single order, you will receive one email with multiple codes. If you earn multiple codes from multiple orders, you will receive separate emails for each code earned.
  • All order types qualify for this promotion. Phone and email orders still require an email address.
  • Orders started before the promotion begins will not count toward earning coupon codes. For example, if you add items to your cart before July 3 and wait to purchase until that date or later, then those items will not qualify towards earning coupons. You must add items to your cart and complete your purchase during the earning period. 
  • There is no limit to the number of coupon codes participants can earn per order or throughout the duration of the earning period. 
  • Customers must use a valid email address during checkout in order to receive their coupon code. If a customer places an order over the phone, they must still provide a valid email address to receive their coupon code.
  • Starter Kit orders are excluded from this offer.

Redemption Period: August 1 – August 31, 2024

  • There is no limit to the number of coupon codes you can redeem on an order during the redemption period. If using multiple codes, they must be separated by a space. 
  • Coupon codes may be redeemed one time only. They cannot be redeemed after August 31, 2024.
  • Coupon codes may be redeemed for any product (excluding Starter Kits). They cannot be used on exchanges.
  • Bonus Days coupon codes can be applied to month-to-month Paper Pumpkin subscriptions and new prepaid subscriptions.

The August Paper Pumpkin Kit – Time For Cake!

Bring on a birthday bash with elegant birthday cards made with rose gold details!

  • Makes 9 cards: 3 each of 3 designs with 9 coordinating envelopes
  • Project includes printed card bases, coordinating envelopes, and labels
  • Embellishments and rose gold cord
  • Night Of Navy Classic Stampin’ Spot
  • Free additional stamp set

Coordinating Colors: Moody Mauve, Night of Navy (Classic Stampin’ Spot), Petal Pink, Pecan Pie, Pretty in Pink, Wild Wheat

And the coordinating add-on is the Every Celebration dies – item #164991 for $12.

If you’re interested in subscribing to Paper Pumpkin, you can either sign up for a subscription where you are billed monthly for your kit or you can purchase a prepaid subscription in my Online Store. To see more information and to sign up for the monthly subscription click here. To see the options for prepaid subscriptions in my Online Store, click here.

Sign up deadline for the August 2024 kit is August 10, 2024. Note: Supplies may be limited toward the end of the subscription period.


Current Host Code: DWUSFG7T

Use this host code when you order $50 or more and receive a Thank You gift from me!  The free gift is your choice of any item currently available valued up to $10.00.

If your order is over $150, please do not use the host code since you’ll receive your own Host Dollars plus I’ll still send you the Thank You gift!  This host code can be used by anyone, no club or commitment required. Let me know if you have any questions.


If you need any stamping supplies, I’d be very happy to be your Demonstrator.  Just click on the Shop Now Button on the right side of the screen to go directly to my Online store or contact me if you have any questions.  Happy Stamping!

Thanks for stopping by and have a great day!

Akiko

  • Visit my online store here
  • See the current Stampin’ Up! clearance rack specials here
  • Earn FREE Stampin’ Up! products through my Wildflower Frequent Shopper Program – my way of saying thank you to my online frequent shopper customers.
  • Have any questions? I’d be happy to help, click here to contact me.

Cardstock Cuts for this project:

  • Petal Pink – 4-1/2″ x 11″ card base scored at 5-1/2″, 3-3/4″ x 5″ (front mat), 1-5/8″ x 4-7/8″ (DSP strip mat), 2-5/8″ x 3-5/8″ (art panel mat)
  • Basic White – 4″ x 5-1/4″ (inside panel), 2-1/2″ x 3-1/2″ (art panel), 2″ x 2″ (label)
  • Country Lace DSP – 3-3/4″ x 4-7/8″ (front background), 1-1/2″ x 4-7/8″ (DSP strip), 1/2″ x 3-3/4″ (inside trim)

Stampin’ Up! products used in this project:


Stampin’ Up! Thoughtful Wishes Thinking of You Card

Good Morning! The Stampin’ Up! Thoughtful Wishes bundle and Thoughtful Journey 6″ x6″ designer series paper are gorgeous products and I used them to make a simple Z-fold Thinking of you card. You can find the products I used at the bottom of my post along with the card stock sizes.

I adhered a panel of Thoughtful Journey 6″ x 6″ designer series paper to the left panel of a Lost Lagoon Z-fold card base with liquid glue. I used the thistle dies from the Stampin’ Up! Thoughtful Wishes dies to cut Fresh Freesia and Mossy Meadow panels and adhered them together with small dots of liquid glue. I adhered the die cut to the card front with glue dots.

I stamped the sentiment from the Stampin’ Up! Thoughtful Wishes stamp set using Mossy Meadow ink on Wild Wheat card stock. I cut it out with the small fat banner die from the Stylish Shapes dies. I cut a Fresh Freesia panel with the small thin banner die and cut it in half and adhered the pieces to the back of the sentiment label with liquid glue.

I made a loopy bow with Linen Thread and adhered it to the back of the label with a glue dot. I adhered the label to the card with dimensionals and finished the card front with fresh freesia dots.

For the inside of the card I stamped the sentiment from the Stampin’ Up! Thoughtful Wishes stamp set using Mossy Meadow ink on the side of a Basic White panel. I trimmed thr panel with the thin Thoughtful Journey DSP panel and adhered the panel to the inside of the card with Stampin’ Seal. I love how you can see the wide image when the card is open!

The Stampin’ Up! Thoughtful Wishes bundle coordinates so well with the beautiful Thoughtful Journey 6″ x 6″ DSP. This simple fun fold lets the pretty DSP be the star!


Bonus Days Coming July 3, 2024!

It’s time for one of our favorite promotions—BONUS DAYS! Because do you know what’s a great deal? Getting rewarded for all the crafting supplies you’re already going to buy! When you shop between 3–31 July and spend $50 you will earn a $5 coupon! Make sure you save all your coupons because you can redeem them (and we mean ALL of them) between August 1 and August 31. There’s no limit to how many coupons you can earn! 

Promotion Details:

Earning Period: July 3 – July 31 2024

  • Earn a $5 coupon for every $50 spent (before shipping and tax). 
  • All coupon codes will be emailed right after a qualifying purchase has been made. Customers must have a customer account with a valid email address to earn coupons when they shop. If you don’t already have an account, you can easily create one in the Online store – contact me if you have any questions. 
  • If you earn multiple codes from a single order, you will receive one email with multiple codes. If you earn multiple codes from multiple orders, you will receive separate emails for each code earned.
  • All order types qualify for this promotion. Phone and email orders still require an email address.
  • Orders started before the promotion begins will not count toward earning coupon codes. For example, if you add items to your cart before July 3 and wait to purchase until that date or later, then those items will not qualify towards earning coupons. You must add items to your cart and complete your purchase during the earning period. 
  • There is no limit to the number of coupon codes participants can earn per order or throughout the duration of the earning period. 
  • Customers must use a valid email address during checkout in order to receive their coupon code. If a customer places an order over the phone, they must still provide a valid email address to receive their coupon code.
  • Starter Kit orders are excluded from this offer.

Redemption Period: August 1 – August 31, 2024

  • There is no limit to the number of coupon codes you can redeem on an order during the redemption period. If using multiple codes, they must be separated by a space. 
  • Coupon codes may be redeemed one time only. They cannot be redeemed after August 31, 2024.
  • Coupon codes may be redeemed for any product (excluding Starter Kits). They cannot be used on exchanges.
  • Bonus Days coupon codes can be applied to month-to-month Paper Pumpkin subscriptions and new prepaid subscriptions.

New Online Exclusives Available Now!

A new selection of Online Exclusive products was just introduced. Online Exclusives won’t appear in any catalog and are only available in the Online Store. There is no fixed end date for Online Exclusives! Some products will be reordered when inventory is low, and others will only be available while supplies last. This way Stampin’ Up! can offer even more new products throughout the year.

This release includes several items to get an early start on Fall and Christmas crafting. So check them out!


Current Host Code: XQZKDQU9

Use this host code when you order $50 or more and receive a Thank You gift from me!  The free gift is your choice of any item currently available valued up to $10.00.

If your order is over $150, please do not use the host code since you’ll receive your own Host Dollars plus I’ll still send you the Thank You gift!  This host code can be used by anyone, no club or commitment required. Let me know if you have any questions.


If you need any stamping supplies, I’d be very happy to be your Demonstrator.  Just click on the Shop Now Button on the right side of the screen to go directly to my Online store or contact me if you have any questions.  Happy Stamping!

Thanks for stopping by and have a great day!

Akiko

  • Visit my online store here
  • See the current Stampin’ Up! clearance rack specials here
  • Earn FREE Stampin’ Up! products through my Wildflower Frequent Shopper Program – my way of saying thank you to my online frequent shopper customers.
  • Have any questions? I’d be happy to help, click here to contact me.

Cardstock Cuts for this project:

  • Lost Lagoon – 5-1/2″ x 8-1/2″ card base scored at 2-1/8″ and 4-1/4″
  • Mossy Meadow – 1-3/4″ x 3-1/2″ (die cut thistle)
  • Fresh Freesia – 1-3/4″ x 3-3/4″ (die cut thistle), 1″ x 2″ (label banner)
  • Wild Wheat – 1-1/4″ x 2-3/4″ (label)
  • Basic White – 4″ x 5-1/4″ (inside panel)
  • Thoughtful Journey 6″ x6″ DSP – 4″ x 5-1/4″ (front background), 1-3/4″ x 5-1/4″ (inside panel)

Stampin’ Up! products used in this project: