Stampin’ Up! Impressions Abloom Book Fold Card

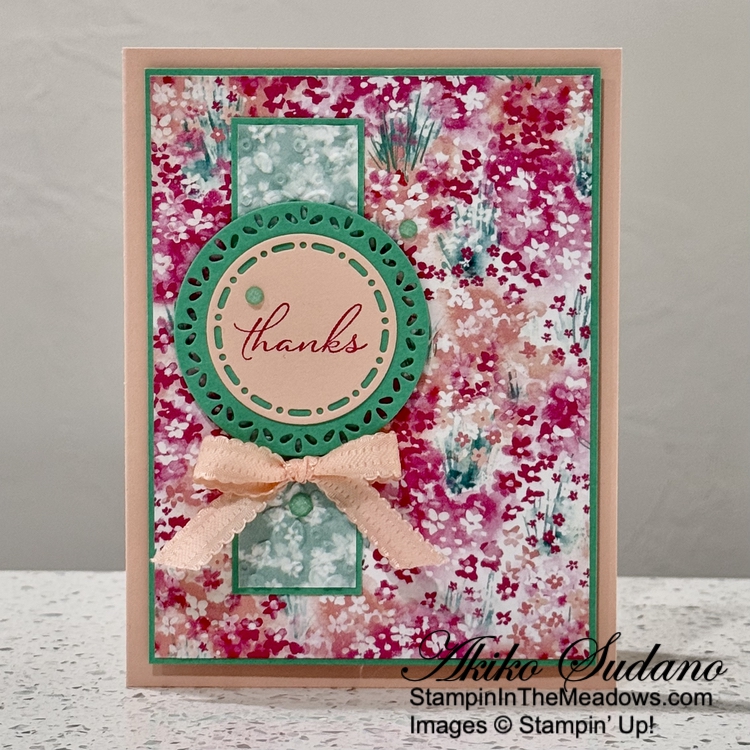
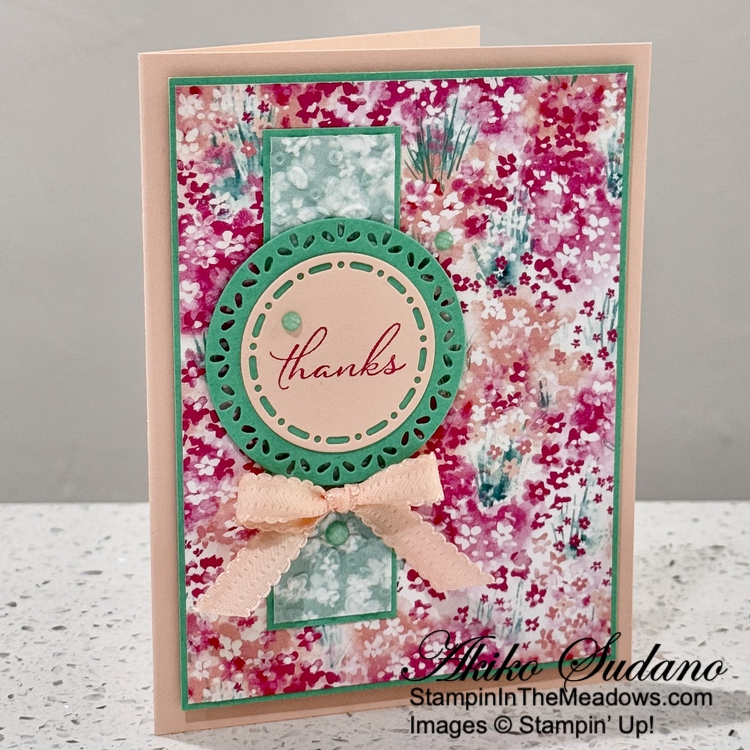
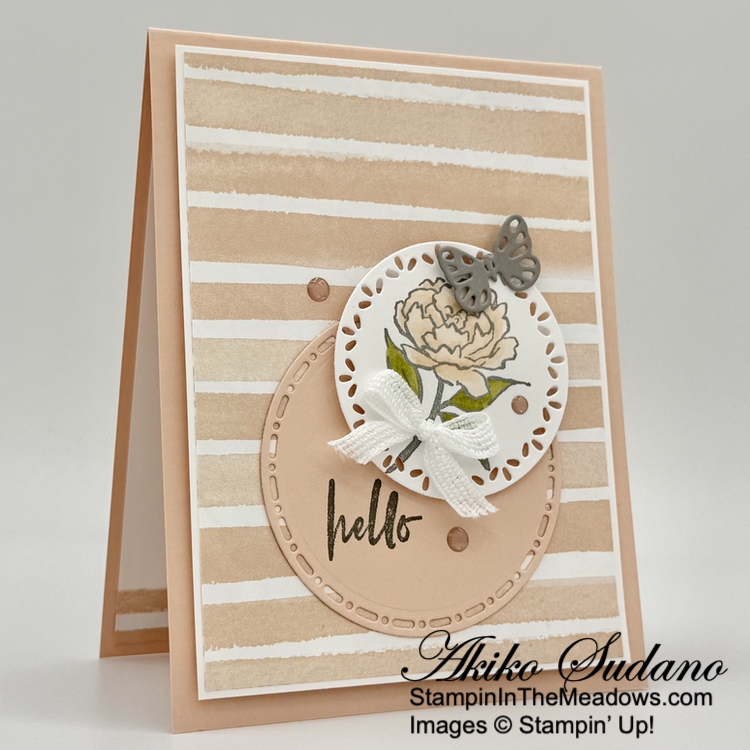
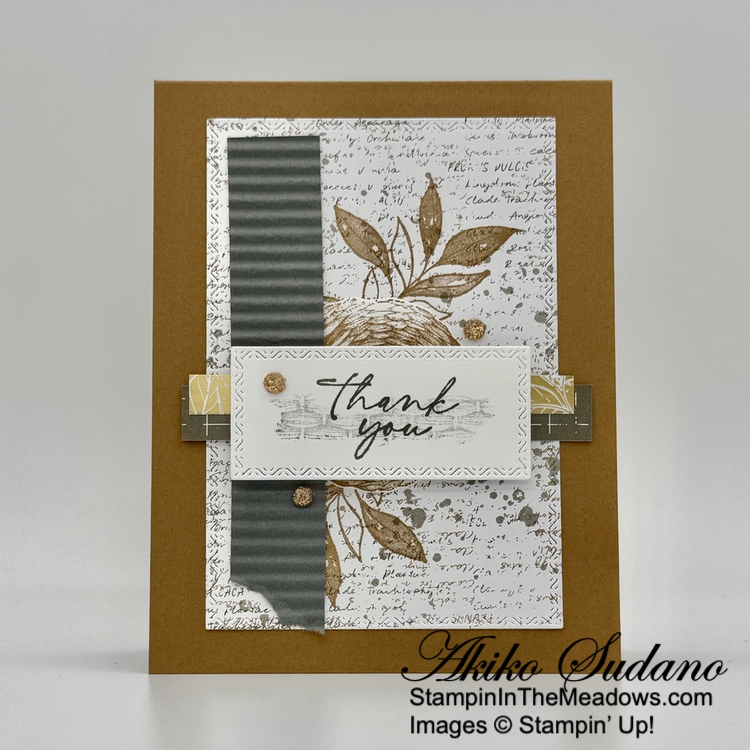
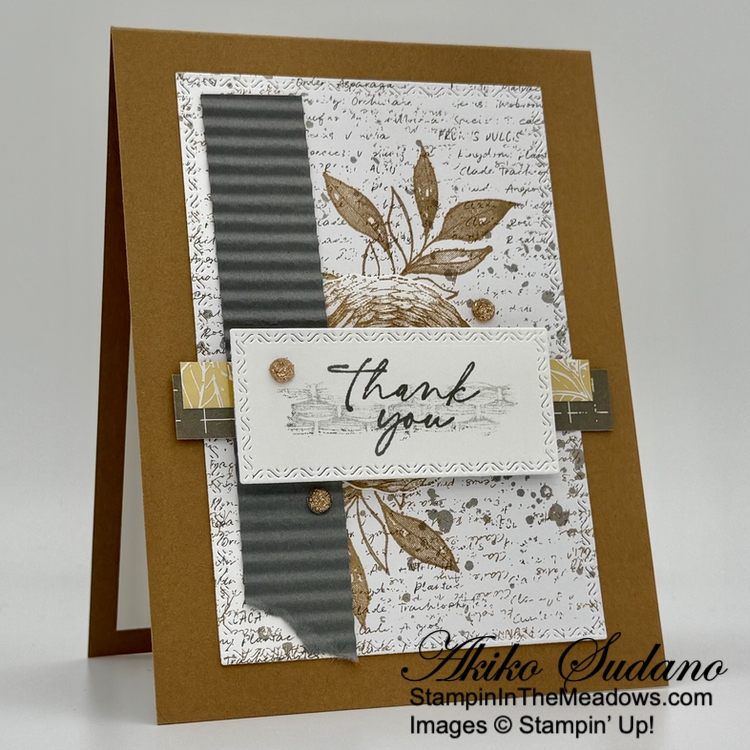
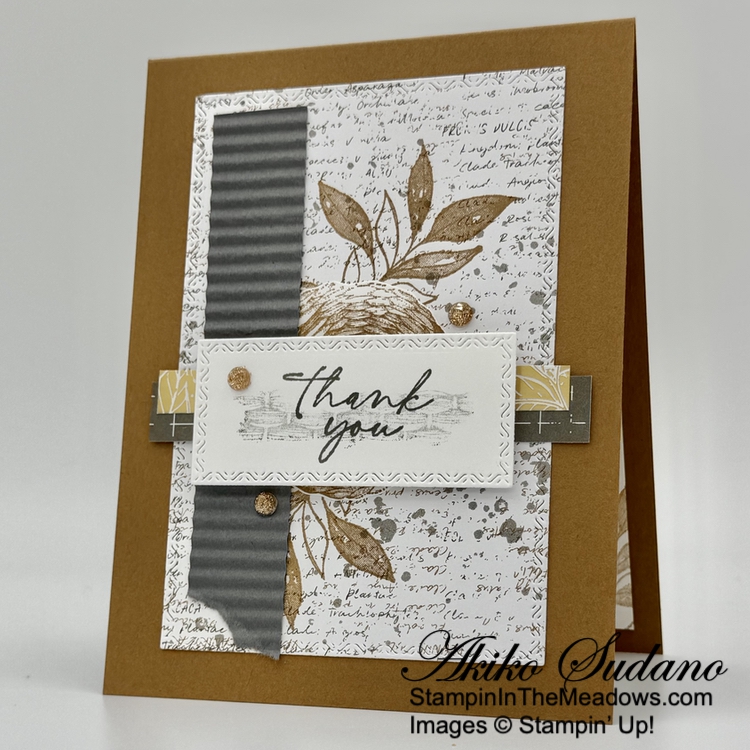
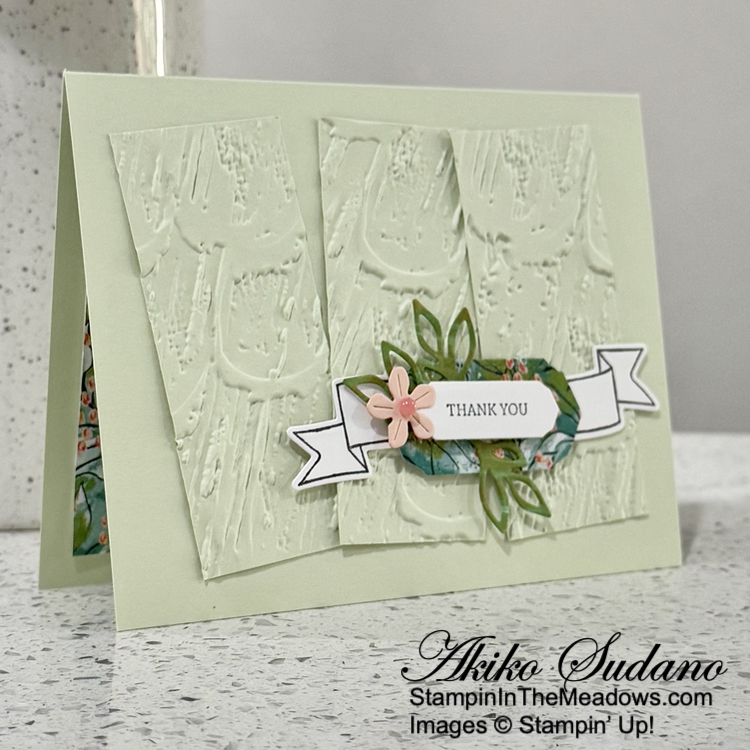
Good Morning! Here is a Book Fold card made with the new Stampin’ Up! Impressions Abloom bundle and the pretty Floral Impressions designer series paper. These are from the latest Online Exclusives release a few weeks ago. I also used new In Colors – Strawberry Slush and Darling Duckling. You can find the products I used at the bottom of my post along with the card stock sizes.

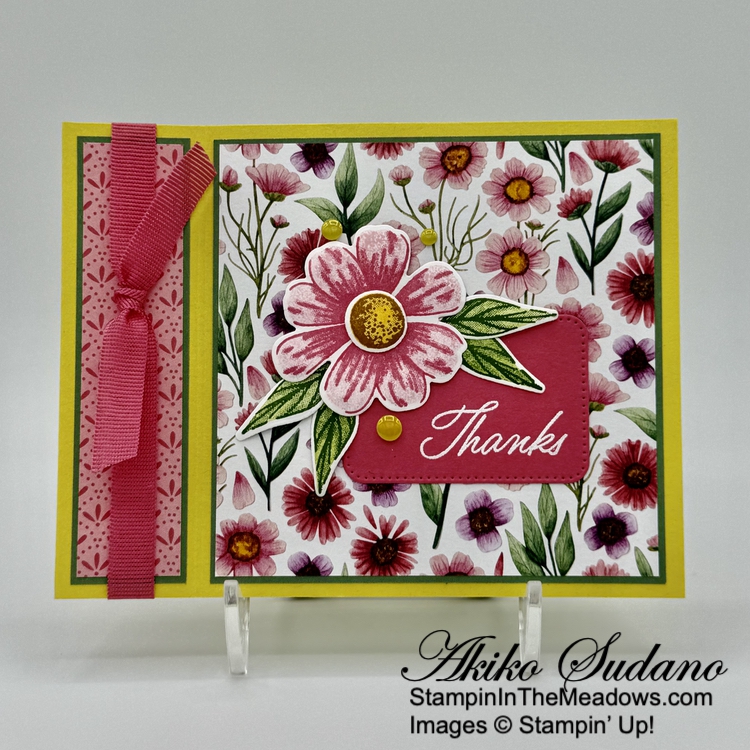
After scoring my Darling Duckling card base, I adhered the ‘book’ section on the left side together using liquid glue. I adhered the pretty Floral Impressions DSP to light Garden Green mats and adhered the panels to the card front with liquid glue.

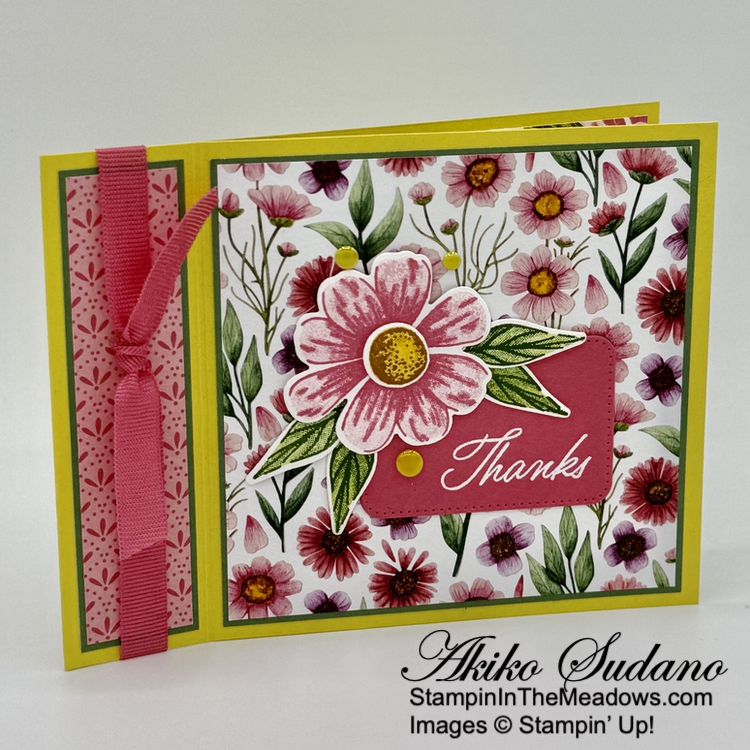
The Stampin’ Up! Impressions Abloom stamps are designed for two-step stamping with a detailed stamp and a background stamp for each image. I stamped the detailed stamps first and lined up the background stamps afterward. For the large flower, I used Strawberry Slush for the detailed stamp and stamped off Pretty In Pink for the background. I used Pecan Pie and Crushed Curry for the flower center and Garden Green and stamped off Granny Apple Green for the leaves. After stamping, I cut each image with the coordinating dies and used a ball stylus and a foam pad to make little circles on the back of the die cuts to make domes on the petals, leaves and flower center. This gives each piece dimension. I adhered the flower center using dimensionals.

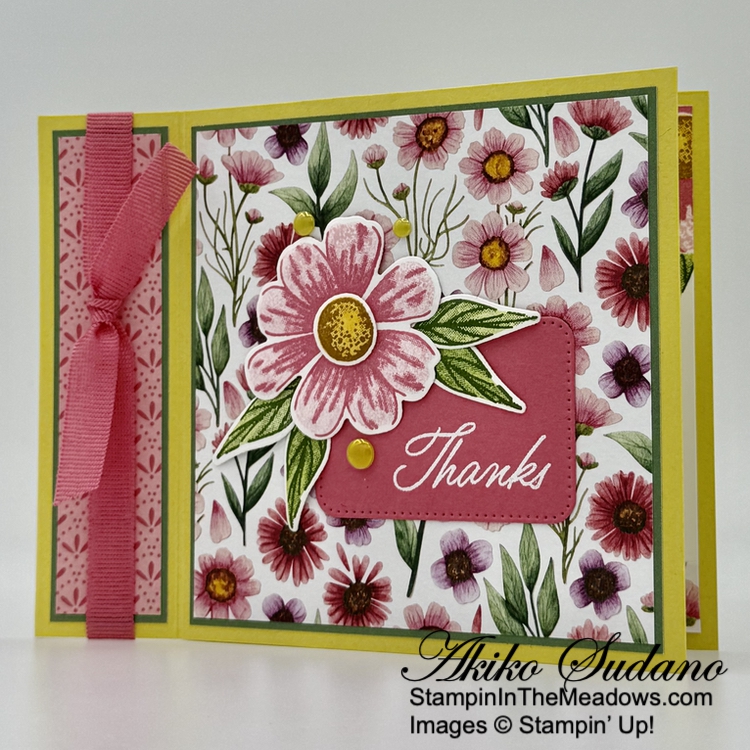
I stamped the sentiment from the Stampin’ Up! Impressions Abloom stamp set using Versamark ink on Strawberry Slush. I sprinkled it with white embossing powder, shook off the excess and heated it with my heat tool until it was bright and shiny. I cut it out with a rectangle from the Nesting Essentials dies and adhered it to the card with glue dots. I adhered the layered flower to the card with glue dots and tucked the leaves underneath, adhering them with more glue dots. I wrapped the side with Strawberry Slush ribbon, tying a know and securing it with another glue dot. I finished with beautiful Darling Duckling iridescent dots.

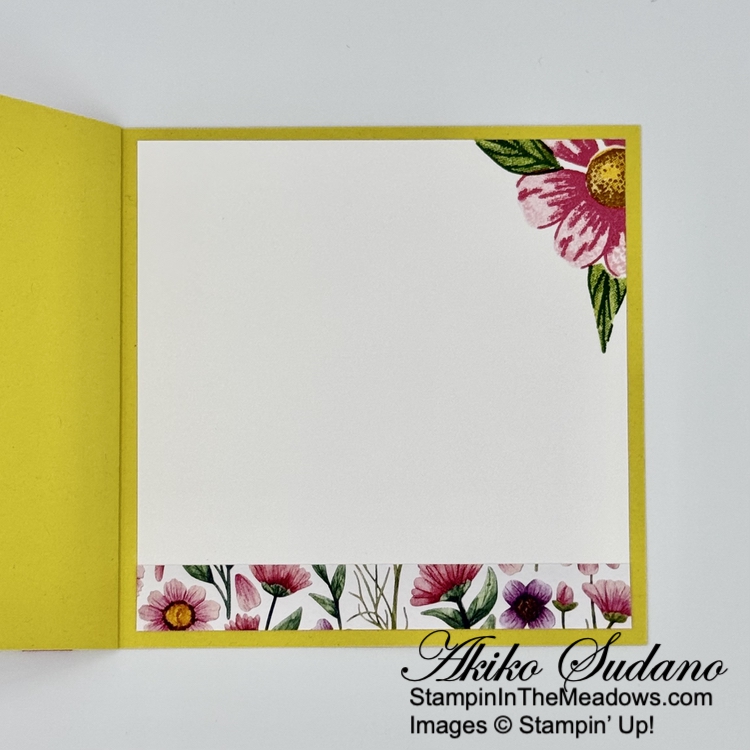
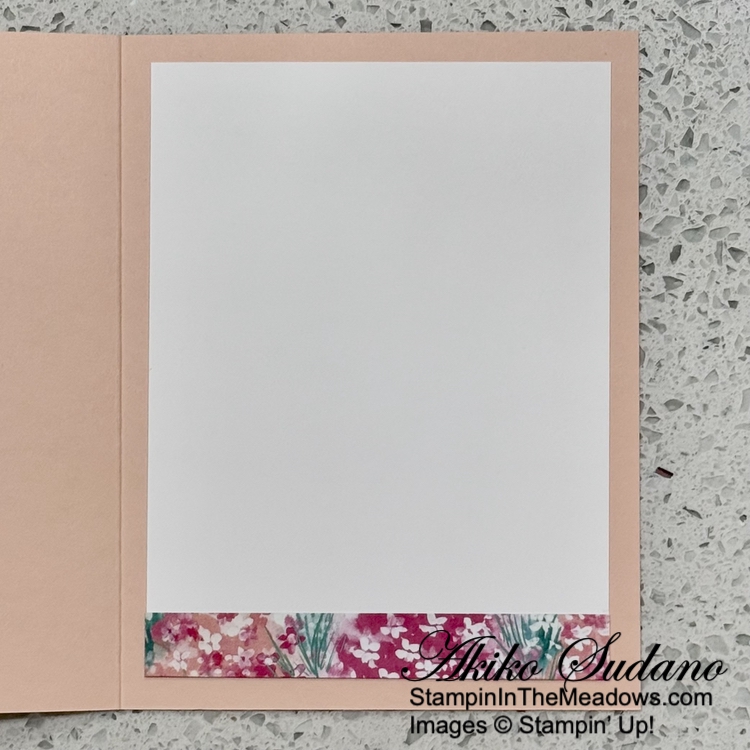
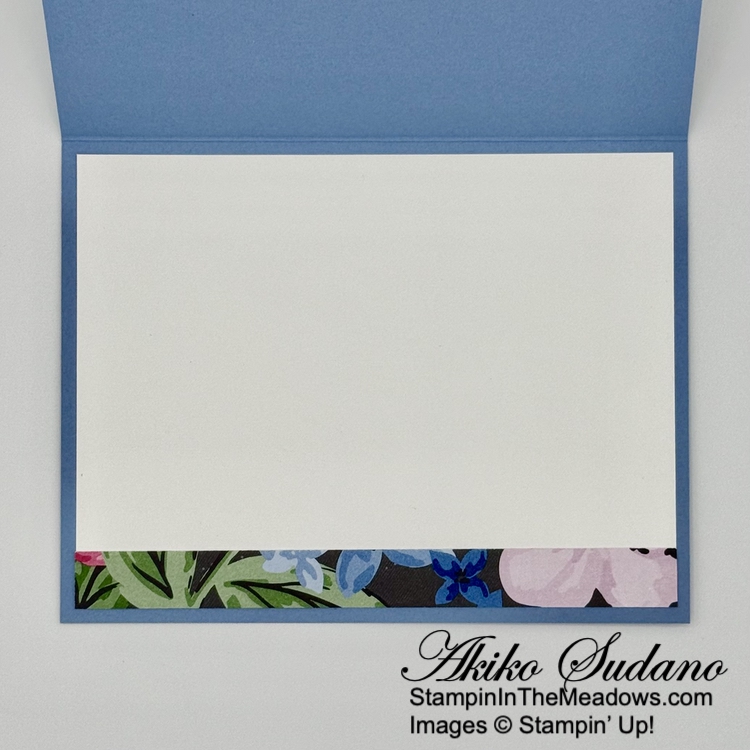
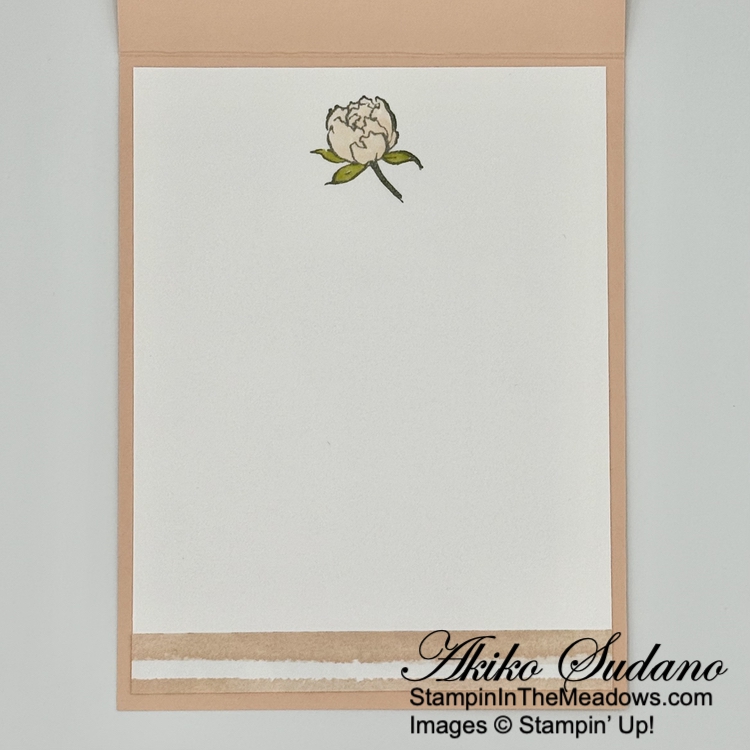
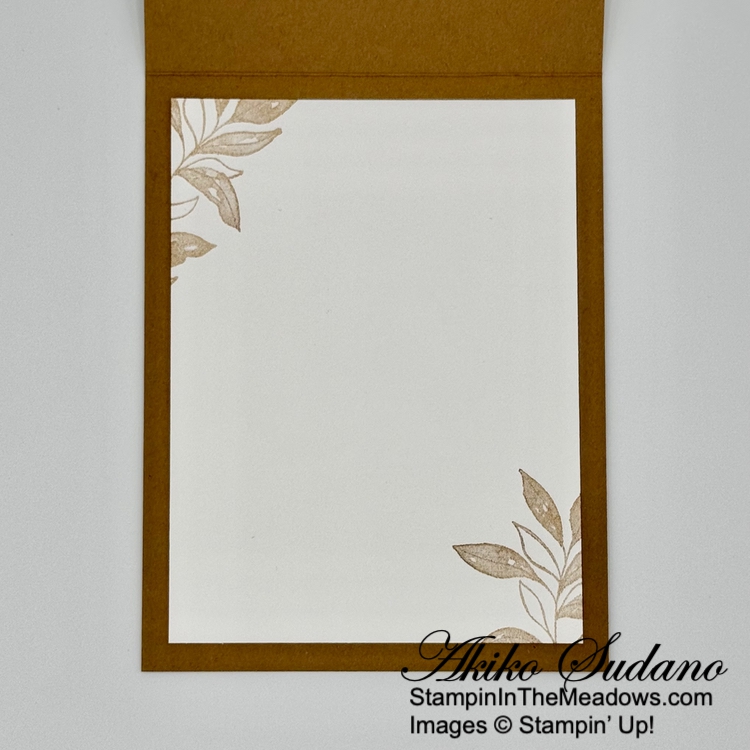
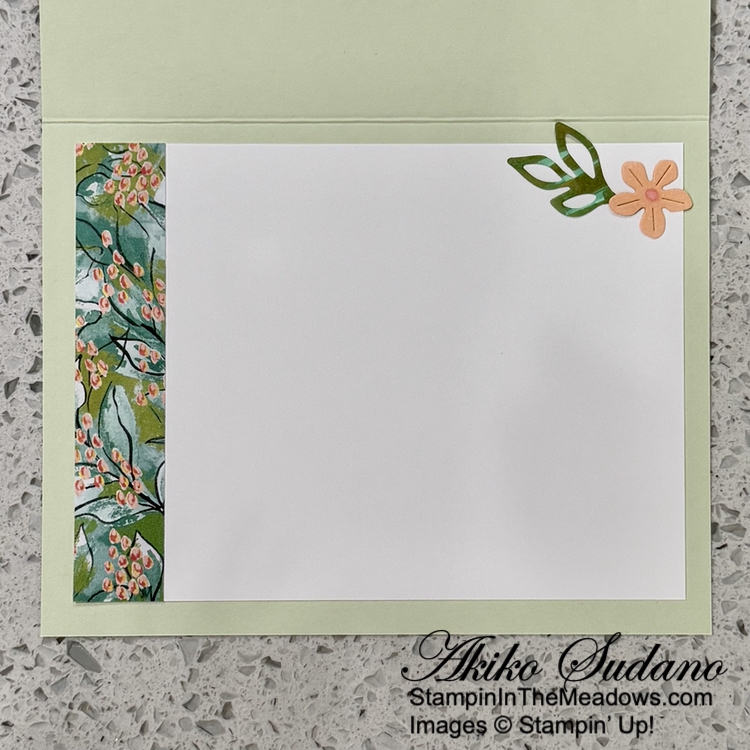
For the inside of the card, I stamped the flower, flower center and leaves from the Stampin’ Up! Impressions Abloom stamp set using the same colors as the front in the corner of a Basic White panel. I trimmed the bottom with DSP and adhered the panel to the inside of the card with Stampin’ Seal.

The Stampin’ Up! Impressions Abloom bundle is so versatile with stamped floral images, die cuts and pretty sentiments. All the pretty new designer series papers and stamps are so inspiring and really motivate me for Spring card making.


If you need any stamping supplies, I’d be very happy to be your Demonstrator.  Just click on the Shop Now Button on the right side of the screen to go directly to my Online store or contact me if you have any questions.  Happy Stamping!

Thanks for stopping by and have a great day!

Akiko

  • Visit my online store here
  • See the current Stampin’ Up! Last Chance items here
  • Have any questions? I’d be happy to help, click here to contact me.

Cardstock Cuts for this project:

  • Darling Duckling – 4-1/4″ x 11″ card base, scored at 4-1/4″ and 5-1/2″
  • Garden Green Two-Tone – 1″ x 4″ (‘book’ DSP mat), 4″ x 4″ (main background DSP mat)
  • Strawberry Slush – 2″ x 3″ (label)
  • Basic White – 4″ x 4″ (inside panel), 2″ x 5″ (stamped flowers and leaves)
  • Floral Impressions DSP – 7/8″ x 1″ (‘book’ section), 3-7/8″ x 3-7/8″ (main background)

Stampin’ Up! products used in this project:


Stampin’ Up! Textured Notes for the Happy Inkin’ Thursday Blog Hop

Good Morning and welcome to the Happy Inkin’ Thursday Blog Hop! I used the wonderful Stampin’ Up! Textured Notes bundle from the March Online Exclusives release with some new products from to make a thank you card for today. You can find the supplies I used along with card stock cuts at the bottom of my post.

We have a pretty sketch challenge this week, and I interpreted it on a portrait card:

I selected the landscape section from one of the panels of the Beautiful Gallery 6″ x 6″ designer series paper and cut it to 2-1/2″ x 4″. I stamped the sentiment from the Stampin’ Up! Textured Notes stamp set on the panel using Pecan Pie ink. I used the long side of one of the Stampin’ Up! Textured Notes rectangle dies to cut the top and bottom of the Pecan Pie panel and adhered the DSP to the die cut panel.

I stamped the large leaf cluster from the Stampin’ Up! Textured Notes stamp set using Mossy Meadow ink on a fairly plain panel of Beautiful Gallery DSP. I stamped it in the top right corner and then again in the lower left section. I stamped the woven circle basket using Crumb Cake ink and adhered the panel to the front of a Basic Beige card base. I cut a Basic White panel with the floral die from the Beautiful Motifs dies and snipped it in the middle. I adhered the two sections to the card with glue dots.

I wrapped the landscape panel twice with linen thread and tied a bow before adhering it to the card with dimensionals and finished with a textured metallic dot near the sentiment.

For the inside of the card I stamped the leaf cluster and woven circle basket from the Stampin’ Up! Textured Notes stamp set using Mossy Meadow and Crumb Cake inks on Basic White. I trimmed the top and bottom with dSP and adhered the panel to the inside of the card with Stampin’ Seal.

The gorgeous Beautiful Gallery 6″ x 6″ DSP is so versatile and the landscapes make nice focal points for cards. I was pleased that the images from the Stampin’ Up! Textured Notes stamp set would compliment the DSP so well and of course those rectangle dies make wonderful bordered mats!

On with the Hop! Click on the Next Blog button to move forward to see the beautiful project Karen Ksenzakovic has created.

If you get lost along the way, here are the participants for the hop:


If you need any stamping supplies, I’d be very happy to be your Demonstrator.  Just click on the Shop Now button on the right side of the screen to go directly to my online store or contact me if you have any questions. 

Thanks for stopping by and Happy Stamping!

Akiko

  • Visit my online store here
  • See the current Stampin’ Up! Last Chance items here
  • Have any questions? I’d be happy to help, click here to contact me.

Cardstock Cuts for this project:

  • Basic Beige – 5-1/2″ x 8-1/2″ card base, scored at 4-1/4″
  • Pecan Pie – 2-7/8″ x 4″ (DSP mat)
  • Basic White – 4″ x 5-1/4″ (inside panel), 1-3/4″ x 4-1/2″ (die cut flower)
  • Beautiful Gallery 6″ x 6″ DSP – 4″ x 5-1/4″ (front background), 2-1/2″ x 4″ (landscape panel), 3/4″ x 4″ (inside bottom trim), 1/4″ x 4″ (inside top trim)

Stampin’ Up! products used in this project:

Stampin’ Up! With You In Mind Thank You Card

Good Morning! Here’s a simple thank you card made with the pretty Stampin’ Up! With You In Mind stamp set and the beautiful Lovely Garden designer series paper. The big, bold sentiments in the stamp set go well with thebold and beautiful flowers in the DSP. You can find the products I used at the bottom of my post along with the card stock sizes.

Adhere a striped strip of Lovely Garden designer series paper to the bottom of a retiring Boho Blue card base with liquid glue.

Adhere another floral pattern of the Lovely Garden DSP to a Basic Black mat and wrap it with Strawberry Slush baker’s twine and make a bow on the right side. Adhere the layered panel to the card with dimensionals.

Stamp the sentiment from the Stampin’ Up! With You In Mind stamp set using Versamark Ink on Basic Black. Sprinkle it with white embossing powder, shake off the excess and heat the powder with a heat tool until it is bright and shiny. Fussy cut the sentiment with paper snips. Adhere the sentiment to the card over the bow with dimensionals. Finish with three Pretty In Pink dots.

For the inside of the card, adhere a strip of DSP to the bottom of a Basic White panel and adhere the panel to the inside of the card with Stampin’ Seal.

The pretty Lovely Garden designer series paper makes for quick & easy pretty layered cards. And I love the casual bold sentiments in the Stampin’ Up! With You In Mind stamp set. It is perfect for many occasions and has simple images that can be stamped for a DIY DSP in any color palette.


If you need any stamping supplies, I’d be very happy to be your Demonstrator.  Just click on the Shop Now Button on the right side of the screen to go directly to my Online store or contact me if you have any questions.  Happy Stamping!

Thanks for stopping by and have a great day!

Akiko

  • Visit my online store here
  • See the current Stampin’ Up! Last Chance items here
  • Have any questions? I’d be happy to help, click here to contact me.

Cardstock Cuts for this project:

  • Boho Blue – 5-1/2″ x 8-1/2″ card base scored at 4-1/4″
  • Basic Black – 3-1/8″ x 4-3/8″ (DSP mat), 2″ x 3″ (label)
  • Basic White – 4″ x 5-1/2″ (inside panel)
  • Lovely Garden DSP – 3″ x 4-1/4″ (floral panel), 1″ x 5″ (striped strip), 1/2″ x 5-1/4″ (inside trim)

Stampin’ Up! products used in this project:


Stampin’ Up! Sketched Butterflies Thank You Card for the Happy Inkin’ Thursday Blog Hop

Good Morning and welcome to the Happy Inkin’ Thursday Blog Hop! The Stampin’ Up! Sketched Butterflies bundle is full of pretty pen drawn butterflies and sweet sentiments and I paired it with the colorful Full Of Life 6″ x 6″ designer series paper for a Thank You card. You can find the supplies I used along with card stock cuts at the bottom of my post.

We have a color challenge this week and I used all of the colors – I love how the Full Of Life DSP blends the colors in those little circles!

I embossed a Summer Splash panel with the Forever Plaid 3D embossing folder and adhered it to the front of a Summer Splash card base. I adhered a panel of Full Of Life 6″ x 6″ designer series paper to a Melon Mambo mat and wrapped it with Summer Splash ribbon and tied a bow. I adhered the DSP panel to the card with liquid glue.

I stamped the sentiment from the Stampin’ Up! Sketched Butterflies stamp set Memento Tuxedo Black ink on Lemon Lime Twist card stock and cut it out with a Stylish Shapes circle die. I adhered it to the card with glue dots.

I used the die from the Stampin’ Up! Sketched Butterflies dies to cut a Basic Black panel. I brushed Wink of Stella on the butterflies to give them sparkle – I just wish it showed up better in the pictures. I adhered the butterflies to the card with bits of black dimensionals and finished the card with Lemon Lime Twist dots.

For the inside of the card, I stamped the small butterflies from the Stampin’ Up! Sketched Butterflies stamp set using Calypso Coral, Summer Splash, Lemon Lime Twist, Pumpkin Pie and Berry Burst inks. I inked up each butterfly separately and wiped the stamp before stamping the next one. I trimmed the bottom with DSP and adhered the panel to the inside of the card with Stampin’ Seal..

The Stampin’ Up! Sketched Butterflies bundle is on the Last Chance products list so it’s only available while supplies last. Be sure to check out the Last Chance list to see the retiring items from the current Annual and Mini Catalogs.

On with the Hop! Click on the Next Blog button to move forward to see the beautiful project Karen Ksenzakovic has created.

If you get lost along the way, here are the participants for the hop:


If you need any stamping supplies, I’d be very happy to be your Demonstrator.  Just click on the Shop Now button on the right side of the screen to go directly to my online store or contact me if you have any questions. 

Thanks for stopping by and Happy Stamping!

Akiko

  • Visit my online store here
  • See the current Stampin’ Up! Last Chance items here
  • Have any questions? I’d be happy to help, click here to contact me.

Cardstock Cuts for this project:

  • Summer Splash – 4-1/4″ x 11″ card base, scored at 5-1/2″, 5-3/8″ x 4-1/8″ (embossed background)
  • Melon Mambo – 3-1/8″ x 4-1/8″ (DSP mat)
  • Lemon Lime Twist – 2″ x 2″ (label)
  • Basic Black – 2″ x 4″ (die cut butterflies)
  • Basic White – 4″ x 5-1/4″ (inside panel)
  • Full Of Life 6″ x 6″ DSP – 3″ x 4″ (front background), 1/2″ x 4″ (inside trim)

Stampin’ Up! products used in this project:

Stampin’ Up! Poised Peony Hello Card for the Happy Inkin’ Thursday Blog Hop

Good Morning and welcome to the Happy Inkin’ Thursday Blog Hop! The Stampin’ Up! Poised Peony stamp set from the current Annual Catalog has pretty flowers and sentiments and I used it along with a striped pattern from the Mixed Media Florals designer series paper to make a simple Hello card for today. You can find the supplies I used along with card stock cuts at the bottom of my post.

We have a fun sketch challenge this week:

I adhered a panel of Mixed Media Florals designer series paper to a Basic White mat and popped it onto the front of a Petal Pink card base with dimensionals.

I stamped the sentiment from the Stampin’ Up! Poised Peony stamp set using Smoky Slate ink on Petal Pink and cut it out with one of the circle dies from the Spotlight On Nature dies. I adhered it to the card with liquid glue. I stamped the medium sized flower from the Stampin’ Up! Poised Peony stamp set using Smoky Slate ink and colored it with the Petal Pink and Old Olive Stampin’ Blends. I cut it out with another, smaller circle die and adhered it to the card with dimensionals.

I used the small butterfly die from the Sketched Butterflies dies to cut Gray Granite card stock, gently turned the wings up and adhered it to the card with a rolled up glue dotstuck to it’s body. I finished the card with a small white bow and Petal Pink dots.

For the inside of the card, I stamped the small flower from the Stampin’ Up! Poised Peony stamp set using Smoky Slate ink at the top of a Basic White panel. I colored it with Petal Pink and Old Olive Stampin’ Blends and trimmed the bottom with DSP. I adhered the panel to the inside of the card with Stampin’ Seal.

The Stampin’ Up! Poised Peony stamp set is simple with pretty flowers and sentiments.

On with the Hop! Click on the Next Blog button to move forward to see the beautiful project Karen Ksenzakovic has created.

If you get lost along the way, here are the participants for the hop:


If you need any stamping supplies, I’d be very happy to be your Demonstrator.  Just click on the Shop Now button on the right side of the screen to go directly to my online store or contact me if you have any questions. 

Thanks for stopping by and Happy Stamping!

Akiko

  • Visit my online store here
  • See the current Stampin’ Up! Last Chance items here
  • Have any questions? I’d be happy to help, click here to contact me.

Cardstock Cuts for this project:

  • Petal Pink – 4-1/4″ x 11″ card base, scored at 5-1/2″, 3″ x 3″ (die cut circle)
  • Gray Granite – 1″ x 4-1/2″ (die cut butterfly)
  • Basic White – 4″ x 5-1/4″ (inside panel), 3-7/8″ x 5-1/8″ (front mat), 2-1/2″ x 2-1/2″ (die cut circle)
  • Mixed Media Florals DSP – 3-3/4″ x 5″ (front background), 1/2″ x 4″ (inside trim)

Stampin’ Up! products used in this project:

Stampin’ Up! Memorable Blooms Thank You Card for the Happy Inkin’ Thursday Blog Hop

Good Morning and welcome to the Happy Inkin’ Thursday Blog Hop! The Stampin’ Up! Memorable Blooms bundle pretty floral stamp and die bundle with pretty sentiments and I used used it with the pretty Mixed Media floral designer series paper to make today’s thank you card. You can find the supplies I used along with card stock cuts at the bottom of my post.

We have a theme challenge this week and it was easy for me as I love floral cards.

I embossed a Shy Shamrock panel of Mixed Media Florals designer series paper with the Dashing Designs 3D embossing folder and adhered it to the side of a floral panel of the DSP, I adhered the layered panel to the front of a Calypso coral card base.

I stamped the sentiment from the Stampin’ Up! Memorable Blooms stamp set using Shy Shamrock ink on Basic White and cut it out with the octagon die. I adhered it to the card with liquid glue. I cut the leaf sprig from Old Olive and cut it in two. I adhered the two sprigs to the card with glue dots.

I stamped the large floral spray from the Stampin’ Up! Memorable Blooms stamp set using Memento Tuxedo Black ink on Basic White and colored it with light Calypso Coral, light Daffodil Delight, light Shy Shamrock, light Old Olive and light Shaded Spruce Stampin’ Blends. I cut it out with the coordinating die and popped it on the card with dimensionals. I finished the card with a Daffodil Delight bow and Shaded Spruce dots.

I left the inside of the card simple, trimming the bottom of a Basic White panel with DSP and adhering the panel to the inside of the card with Stampin’ Seal.

The the flowers in the Stampin’ Up! Memorable Blooms are so pretty and are easy to color in any color palette. And the beautiful Mixed Media Florals designer series paper goes with so many floral stamp sets!

On with the Hop! Click on the Next Blog button to move forward to see the beautiful project Karen Ksenzakovic has created.

If you get lost along the way, here are the participants for the hop:


If you need any stamping supplies, I’d be very happy to be your Demonstrator.  Just click on the Shop Now button on the right side of the screen to go directly to my online store or contact me if you have any questions. 

Thanks for stopping by and Happy Stamping!

Akiko

  • Visit my online store here
  • See the current Stampin’ Up! Last Chance items here
  • Have any questions? I’d be happy to help, click here to contact me.

Cardstock Cuts for this project:

  • Calypso Coral – 4-1/4″ x 11″ card base, scored at 5-1/2″
  • Old Olive – 1-3/4″ x 4-1/4″ (die cut leaves)
  • Basic White – 4″ x 5-1/4″ (inside panel), 3″ x 4-1/2″ (die cut flowers), 3-3/4″ x 3-3/4″ (die cut octagon)
  • Mixed Media Florals DSP – 4″ x 5-1/4″ (front background), 1/2″ x 4″ (inside trim), 1″ x 5-1/4″ (embossed strip)

Stampin’ Up! products used in this project:

Stampin’ Up! Textured Notes Sneak Peek

Good Morning! Next week a new set of Online Exclusives will be released on March 4 and one of the new bundles is the Stampin’ Up! Textured Notes bundle. This is stamp and die bundle featuring a stamp set with wonderful texture elements and sentiments along with a fabulous set of rectangle dies with fancy textured edges. I used the bundle with the Nature’s Sweetness specialty designer series paper for today’s card. You can find the currently available products I used at the bottom of my post along with the card stock sizes. And you can find a link further down to download a PDF with all the details of the Botanical Textures suite that includes this awesome new bundle.

I stamped a panel of Nature’s Sweetness specialty designer series paper with the large leaf sprig from the pretty Stampin’ Up! Textured Notes stamp set using Pecan Pie ink. I stamped the image twice so that the image flowed on a diagonal across the panel. I cut it out with one of the awesome rectangle dies and adhered it to the front of a Pecan Pie card base.

I stamped the basket from the Stampin’ Up! Textured Notes stamp set using Pecan Pie ink on Basic White. I fussy cut it out with my paper snips and adhered it to the card with liquid glue. I tore the end of a strip of Pebbled Path card stock and embossed it with the new Mini Corrugated 3D embossing folder. I adhered it to the card with liquid glue. I adhered two strips of Nature’s Sweetness specialty DSP to the card with glue dots.

I stamped the woven image from the Stampin’ Up! Textured Notes stamp set using stamped off Pebbled Path ink on Basic White. I stamped the sentiment in full strength Pebbled Path and cut it out with a rectangle die – isn’t the edge just gorgeous!

For the inside panel, I stamped the leaf from the Stampin’ Up! Textured Notes stamp set using stamped off Pecan Pie ink in the corners of a Basic White panel and adhered it to the inside of the card with Stampin’ Seal.

The pretty Stampin’ Up! Textured Notes bundle will be available on March 4 with the new release of Online Exclusives. Click on the picture below to download a flyer with details of this bundle and other items in the Botanical Textures Suite Collection.


Last Week For Sale-A-Bration!!

Sale-A-Bration is the biggest Stampin’ Up! promotion of the year. The best part of Sale-A-Bration is that you earn FREE items for every $60 worth of products you purchase. There are items that you get for $60 and there are items you can get for $120. All the details are in the Sale-A-Bration Brochure. Click on the picture of the brochure below to download a copy to view the items and details.

Another benefit of Sale-A-Bration is when you host a workshop with sales over $300 or have an individual order over $300, you get to choose an additional $30 worth of products from the Stampin’ Up! catalog or Online Store for FREE!

And Sale-A-Bration is the best time to join Stampin’ Up! as a new Demonstrator. During Sale-A-Bration, new Demonstrators who purchase a starter kit by choosing $125 worth of products for only $99 (includes shipping) have two FREE bonus options to add to your starter kit.

  • Option 1: Your choice of TWO marker sets from our Stampin’ Write Marker Assortments (Brights, Neutrals, Regals, Subtles), PLUS the Handmade Designs stamp set, a beautiful stamp set exclusively designed to work with them.
  • Option 2: Your Choice of an additional $30 in FREE products

Sale-A-Bration runs through February 28, 2025. Visit my Online Store to start shopping now.


Current Host Code: FYMGA4AN

Use this host code when you order $50 or more and receive a Thank You gift from me!  The free gift is your choice of any item currently available valued up to $10.00.

If your order is over $150, please do not use the host code since you’ll receive your own Host Dollars plus I’ll still send you the Thank You gift!  This host code can be used by anyone, no club or commitment required. Let me know if you have any questions.


If you need any stamping supplies, I’d be very happy to be your Demonstrator.  Just click on the Shop Now Button on the right side of the screen to go directly to my Online store or contact me if you have any questions.  Happy Stamping!

Thanks for stopping by and have a great day!

Akiko

  • Visit my online store here
  • See the current Stampin’ Up! Last Chance items here
  • Earn FREE Stampin’ Up! products through my Wildflower Frequent Shopper Program – my way of saying thank you to my online frequent shopper customers.
  • Have any questions? I’d be happy to help, click here to contact me.

Cardstock Cuts for this project:

  • Pecan Pie – 4-1/4″ x 11″ card base scored at 5-1/2″
  • Pebbled Path – 3/4″ x 5″ (embossed strip)
  • Basic White – 3-3/4″ x 5″ (inside panel), 1-1/2″ x 3 (label), 2″ x 2″ (fussy cut basket)
  • Nature’s Sweetness specialty DSP – 3-1/2″ x 5″ (die cut background), 1/2″ x 3-3/4″ (pebbled path strip), 3/8″ x 3″ (gold foil strip

Stampin’ Up! products used in this project:


Stampin’ Up! Mixed Labels Thank You Card

Good Morning! Today’s thank you card is CASE’d from a sample on the website for the Stampin’ Up! Mixed Labels bundle. It’s a fun card with layered labels that really show off the pretty label dies and the bold Plaster Painting 3D embossing folder. You can find the products I used at the bottom of my post along with the card stock sizes.

I embossed a panel of Soft Sea Foam with the Plaster Painting 3D embossing folder and cut it into thirds. I adhered the embossed panels to the front of a Soft Sea Foam card base with liquid glue.

I stamped the sentiment from the Stampin’ Up! Mixed Labels stamp set using Memento Tuxedo Black ink on Basic white and cut it out with the coordinating die. I stamped the banner using the same colors and cut it out as well. I cut a panel of Mixed Media Florals designer series paper with the next largest label die. I adhered the DSP label to the banner with liquid glue.

I used Shy Shamrock and Old Olive Stampin’ Blends to roughly color a Basic White strip with the brush ends and cut four leaf clusters using the Stampin’ Up! Mixed Labels die. I used the die from the Heart Shaped dies to cut two flowers from Petal Pink. I adhered three die cut leaves to the DSP label with liquid glue and popped the stamped label and die cut flower on top. I adhered the layered label to the card with glue dots and added a Flirty Flamingo dot to the flower center.

For the inside panel, I adhered the last die cut leaf and flower with liquid glue. I used the light Flirty Flamingo Stampin’ Blend to color the flower center and trimmed the side with DSP. I adhered the panel to the inside of the card with Stampin’ Seal.

The Stampin’ Up! Mixed Labels bundle is part of the latest release of Online Exclusives and has wonderful sentiments and labels.


Sale-A-Bration Is Going On Now!!

Sale-A-Bration is the biggest Stampin’ Up! promotion of the year. The best part of Sale-A-Bration is that you earn FREE items for every $60 worth of products you purchase. There are items that you get for $60 and there are items you can get for $120. All the details are in the Sale-A-Bration Brochure. Click on the picture of the brochure below to download a copy to view the items and details.

Another benefit of Sale-A-Bration is when you host a workshop with sales over $300 or have an individual order over $300, you get to choose an additional $30 worth of products from the Stampin’ Up! catalog or Online Store for FREE!

And Sale-A-Bration is the best time to join Stampin’ Up! as a new Demonstrator. During Sale-A-Bration, new Demonstrators who purchase a starter kit by choosing $125 worth of products for only $99 (includes shipping) have two FREE bonus options to add to your starter kit.

  • Option 1: Your choice of TWO marker sets from our Stampin’ Write Marker Assortments (Brights, Neutrals, Regals, Subtles), PLUS the Handmade Designs stamp set, a beautiful stamp set exclusively designed to work with them.
  • Option 2: Your Choice of an additional $30 in FREE products

Sale-A-Bration runs through February 28, 2025. Visit my Online Store to start shopping now.


Current Host Code: FYMGA4AN

Use this host code when you order $50 or more and receive a Thank You gift from me!  The free gift is your choice of any item currently available valued up to $10.00.

If your order is over $150, please do not use the host code since you’ll receive your own Host Dollars plus I’ll still send you the Thank You gift!  This host code can be used by anyone, no club or commitment required. Let me know if you have any questions.


If you need any stamping supplies, I’d be very happy to be your Demonstrator.  Just click on the Shop Now Button on the right side of the screen to go directly to my Online store or contact me if you have any questions.  Happy Stamping!

Thanks for stopping by and have a great day!

Akiko

  • Visit my online store here
  • See the current Stampin’ Up! Last Chance items here
  • Earn FREE Stampin’ Up! products through my Wildflower Frequent Shopper Program – my way of saying thank you to my online frequent shopper customers.
  • Have any questions? I’d be happy to help, click here to contact me.

Cardstock Cuts for this project:

  • Soft Sea Foam – 5-1/2″ x 8-1/2″ card base, scored at 4-1/4″, 3-1/2″ x 4-1/2″ (embossed panels, cut into three 1-1/2″ strips)
  • Petal Pink – 1″ x 2″ (die cut flowers)
  • Basic White – 3-3/4″ x 5″ (inside panel), 1″ x 1-3/4″ (label), 1″ x 4-1/2″ (banner), 1″ x 4″ (die cut leaves)
  • Mixed Media Florals DSP – 1-1/4″ x 2″ (label mat), 3/4″ x 3-3/4″ (inside trim)

Stampin’ Up! products used in this project:


Stampin’ Up! Spotlight On Nature Card for the Happy Inkin’ Thursday Blog Hop

Good Morning and welcome to the Happy Inkin’ Thursday Blog Hop! Here is a simple thank you card made with the Stampin’ Up! Spotlight On Nature bundle and the pretty Bloom Impressions Sale-A-Bration designer series paper. You can find the supplies I used along with card stock cuts at the bottom of my post.

We have a sketch challenge this week:

I adhered a panel of Bloom Impressions designer series paper to a Shy Shamrock mat and adhered it to the front of a Petal Pink card base with dimensionals. I embossed a strip of Bloom Impressions DSP with the Eyelet 3D embossing folder and adhered it to a Shy Shamrock mat before adhering it to the card front.

I stamped the sentiment from the Stampin’ Up! Spotlight on Nature stamp set using Melon Mambo ink on Petal Pink card stock. I cut it out with the dashed circle die. I cut the next largest circle from Shy Shamrock and adhered the sentiment with liquid glue. I popped the layered sentiment on the card with dimensionals.

I made a Petal Pink bow and adhered it to the card under the sentiment and finished with Shy Shamrock shimmer gems.

I left the inside panel plain, simply trimming the bottom of a Basic White panel with DSP and adhering it to the inside of the card with Stampin’ Seal.

I only used the sentiment from the pretty Stampin’ Up! Spotlight On Nature stamp set, but the gorgeous dies are one of my favorites. The Bloom Impressions DSP is an item that you can get for FREE with a $60 order during Sale-A-Bration which runs through February 28.

On with the Hop! Click on the Next Blog button to move forward to see the beautiful project Karen Ksenzakovic has created.

If you get lost along the way, here are the participants for the hop:


Current Host Code: FYMGA4AN

Use this host code when you order $50 or more and receive a free gift from me!  The free gift is your choice of any item currently available valued up to $10.00!

If your order is over $150, please do not use the host code since you’ll receive your own Host Dollars plus I’ll still send you the free gift!  This host code can be used by anyone, no club or commitment required. Let me know if you have any questions.


If you need any stamping supplies, I’d be very happy to be your Demonstrator.  Just click on the Shop Now button on the right side of the screen to go directly to my online store or contact me if you have any questions. 

Thanks for stopping by and Happy Stamping!

Akiko

  • Visit my online store here
  • See the current Stampin’ Up! Last Chance items here
  • Earn FREE Stampin’ Up! products through my Wildflower Frequent Shopper Program – my way of saying thank you to my online frequent shopper customers.
  • Have any questions? I’d be happy to help, click here to contact me.

Cardstock Cuts for this project:

  • Petal Pink – 5-1/2″ x 8-1/2″” card base, scored at 4-1/4″, 2″ x 2″ (label)
  • Shy Shamrock – 3-7/8″ x 5-1/8″ (front mat), 1-1/8″ x 4-1/8″ (accent DSP mat)
  • Basic White – 3-3/4″ x5″ (inside panel)
  • Bloom Impressions DSP – 3-3/4″ x 5″ (front background), 1″ x 4″ (accent DSP), 1/2″ x 3-3/4″ (inside trim)

Stampin’ Up! products used in this project:


Stampin’ Up! Grow With Love Thank You Card

Good Morning! The Stampin’ Up! Grow With Love bundle is a wonderful set with pretty herb stamps and dies and a fun mini envelope die. I used it to make a basil thank you card and a mini note card with a coordinating envelope. You can find the products I used at the bottom of my post along with the card stock sizes.

For my thank you card, I adhered a panel of Timeless Plaid 6″ x 6″ DSP to a Mossy Meadow mat and adhered it to the front of a Lost Lagoon card base. I stamped the frame and basil from the Stampin’ Up! Grow With Love stamp set using Pecan Pie ink on Basic White and cut it out with the rectangle die. I stamped the basil again using Mossy Meadow ink on Basic White and cut it out with the basil die and popped it over the Pecan Pie basil with dimensionals. I adhered the panel to the card with liquid glue.

I stamped part of the sentiment from the Stampin’ Up! Grow With Love stamp set using Mossy Meadow ink on Basic White. I cut it out with the small label die and adhered a Linen Thread bow to the back before adhering it to the card with dimensionals. I finished the card with textured metallic dots.

I used the envelope die from the Stampin’ Up! Grow With Love dies to cut a panel of Timeless Plaid DSP and burnished the score lines. I adhered the envelope together with liquid glue. I adhered a short length of linen thread to the envelope flap with a glue dot and cut the envelope clasps from Lost Lagoon. I adhered the large circles to the envelope with mini dimensionals, topped them with dots and looped the Linen Thread to secure it. I stamped the basil and frame again using Pecan Pie ink on Basic White and cut it out with the rectangle die. I adhered it to the front of a mini card made with the Timeless Plaid DSP.

For the inside panel of the main card, I trimmed the bottom of a Basic White panel with DSP. I stamped another basil from the Stampin’ Up! Grow With Love stamp set using Mossy Meadow ink on Basic White and cut it out with the coordinating die. I adhered it to the inside panel and trimmed the side before adhering the panel to the inside of the card with Stampin’ Seal.

For the inside of the mini card, I simply stamped the frame from the Stampin’ Up! Grow With Love stamp set using Pecan Pie ink and cut it out with the coordinating die. I adhered it to the inside of the mini card with Stampin’ Seal.

The Stampin’ Up! Grow With Love is one of the new Online Exclusives bundles that came out at the beginning of the month. The herb stamp images are just gorgeous with intricate details and shading and it was hard to choose which herb to use. The little envelope is pretty easy to put together and it’s so cute! It’s supposed to be for seeds, but it fits a gift card and is perfect for a little note card or tag to accompany a gift.


Sale-A-Bration Is Going On Now!!

Sale-A-Bration is the biggest Stampin’ Up! promotion of the year. The best part of Sale-A-Bration is that you earn FREE items for every $60 worth of products you purchase. There are items that you get for $60 and there are items you can get for $120. All the details are in the Sale-A-Bration Brochure. Click on the picture of the brochure below to download a copy to view the items and details.

Another benefit of Sale-A-Bration is when you host a workshop with sales over $300 or have an individual order over $300, you get to choose an additional $30 worth of products from the Stampin’ Up! catalog or Online Store for FREE!

And Sale-A-Bration is the best time to join Stampin’ Up! as a new Demonstrator. During Sale-A-Bration, new Demonstrators who purchase a starter kit by choosing $125 worth of products for only $99 (includes shipping) have two FREE bonus options to add to your starter kit.

  • Option 1: Your choice of TWO marker sets from our Stampin’ Write Marker Assortments (Brights, Neutrals, Regals, Subtles), PLUS the Handmade Designs stamp set, a beautiful stamp set exclusively designed to work with them.
  • Option 2: Your Choice of an additional $30 in FREE products

Sale-A-Bration runs through February 28, 2025. Visit my Online Store to start shopping now.


Current Host Code: S37YBRUS

Use this host code when you order $50 or more and receive a Thank You gift from me!  The free gift is your choice of any item currently available valued up to $10.00.

If your order is over $150, please do not use the host code since you’ll receive your own Host Dollars plus I’ll still send you the Thank You gift!  This host code can be used by anyone, no club or commitment required. Let me know if you have any questions.


If you need any stamping supplies, I’d be very happy to be your Demonstrator.  Just click on the Shop Now Button on the right side of the screen to go directly to my Online store or contact me if you have any questions.  Happy Stamping!

Thanks for stopping by and have a great day!

Akiko

  • Visit my online store here
  • See the current Stampin’ Up! Last Chance items here
  • Earn FREE Stampin’ Up! products through my Wildflower Frequent Shopper Program – my way of saying thank you to my online frequent shopper customers.
  • Have any questions? I’d be happy to help, click here to contact me.

Cardstock Cuts for this project:

  • Lost Lagoon – 5-1/2″ x 8-1/2″ card base, scored at 4-1/4″, 1″ x 1″ (envelope clasp)
  • Mossy Meadow – 2-1/2″ x 4-1/4″ (DSP mat)
  • Basic White – 3-3/4″ x 5″ (inside panel), three 2-1/2″ x 4″ panels (basil panels), two 2″ x 3″ panels (Mossy Meadow basil)
  • Timeless Plaid 6″ x 6″ DSP – 2-3/8″ x 4-1/4″ (front background), 5-1/2″ x 6″ (envelope), 1/2″ x 3-3/4″ (inside trim), 3-1/2″ x 4-1/2″, mini card base, scored at 2-1/4

Stampin’ Up! products used in this project: