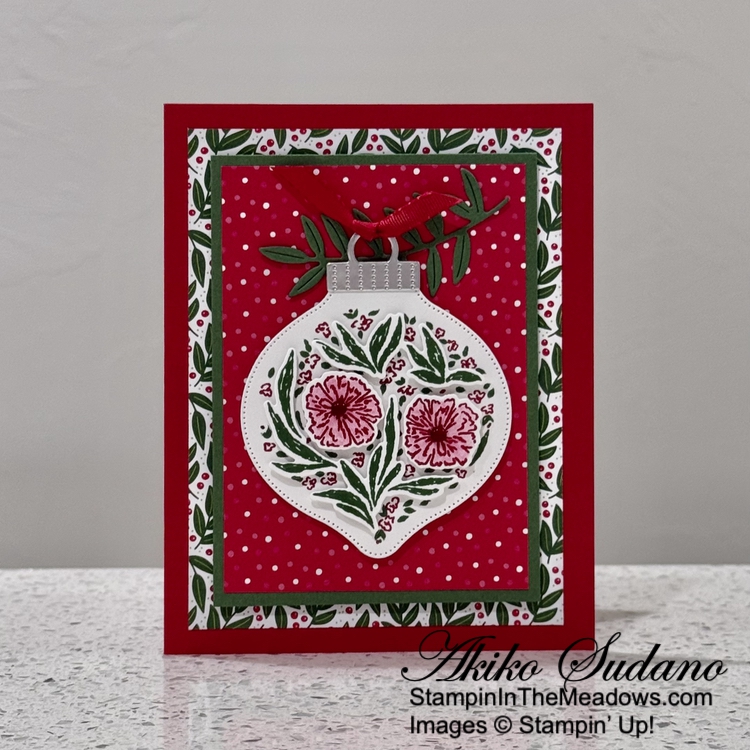
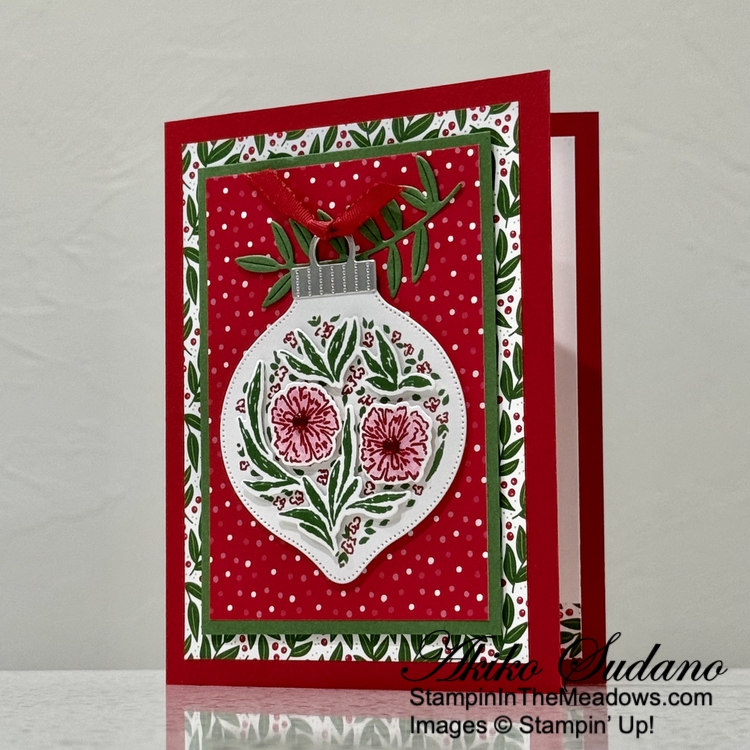
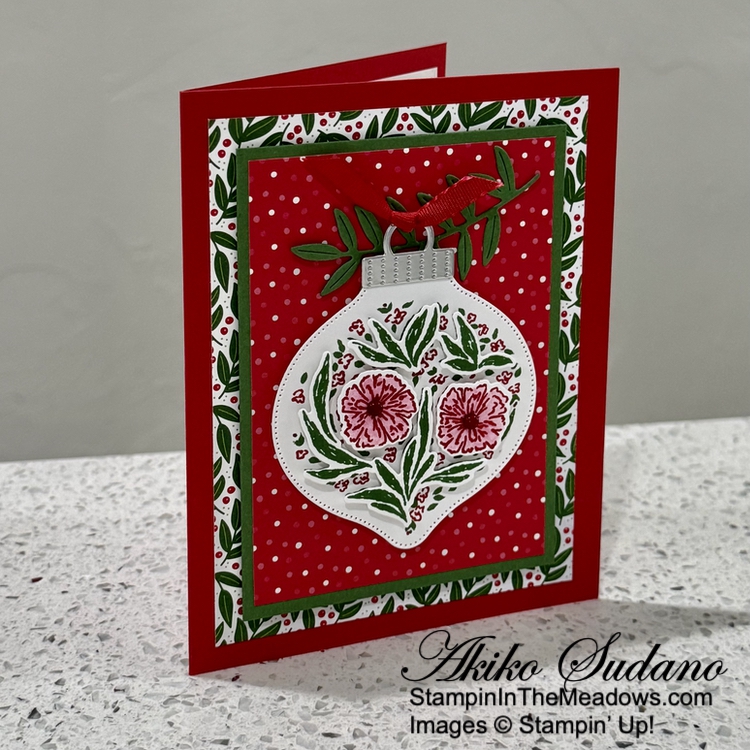
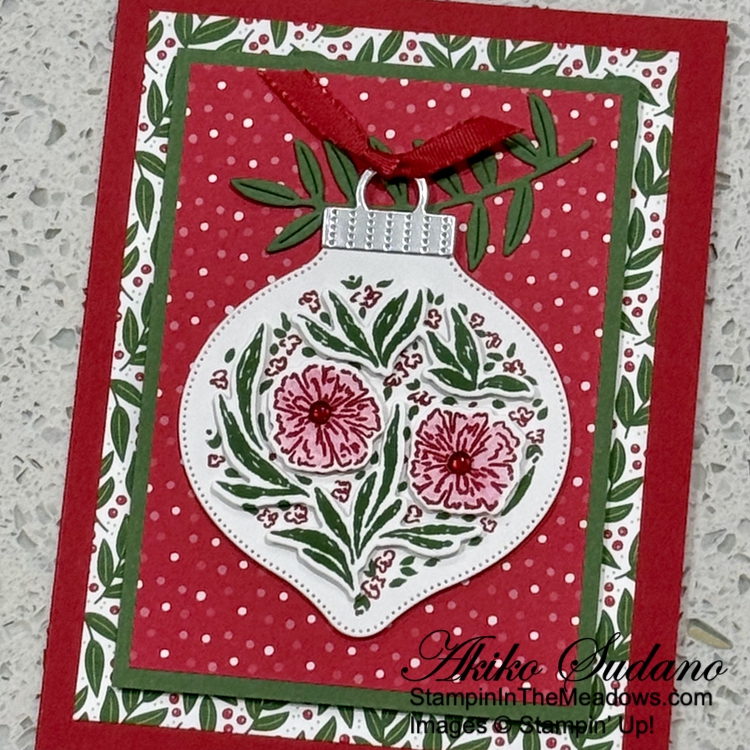
Good Morning! Here’s another Christmas card made with the Stampin’ Up! Bauble Blooms bundle with the beautiful Traditions of Christmas specialty designer series paper. You can find the card stock cuts along with supplies at the bottom of my post.

Emboss a Basic White panel with the new Traditional Wreath 3D embossing folder. Use a sponge dauber to apply Old Olive ink to the raised leaves and berries and adhere it to the front of an Old Olive card base with liquid glue.
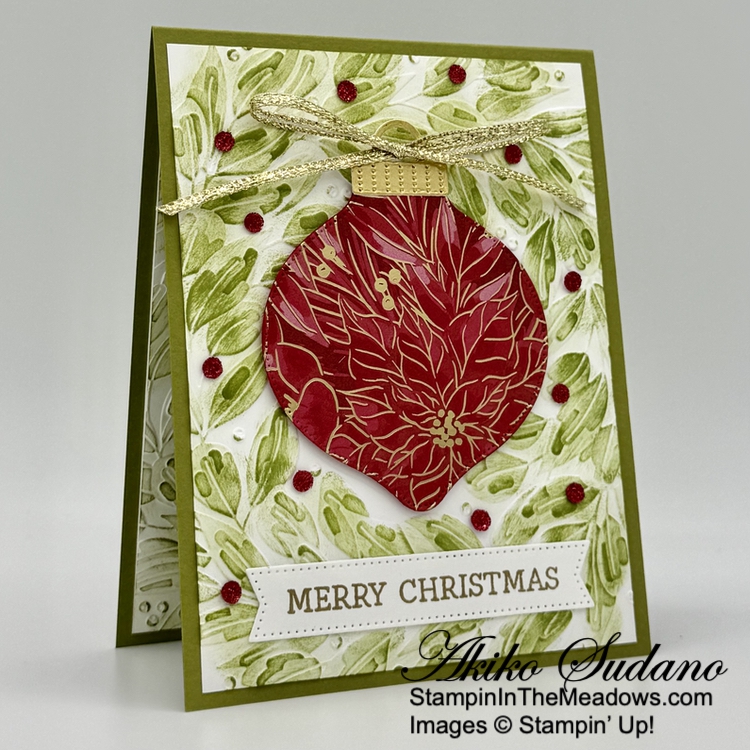
Use the ornament die from the Stampin’ Up! Bauble Blooms dies to cut a panel of the Traditions of Christmas specialty designer series paper and a Real Red backing. Adhere the DSP die cut to the backing with liquid glue. Cut the ornament topper from Gold foil and adhere it to the ornament. Adhere the ornament to the card with dimensionals.
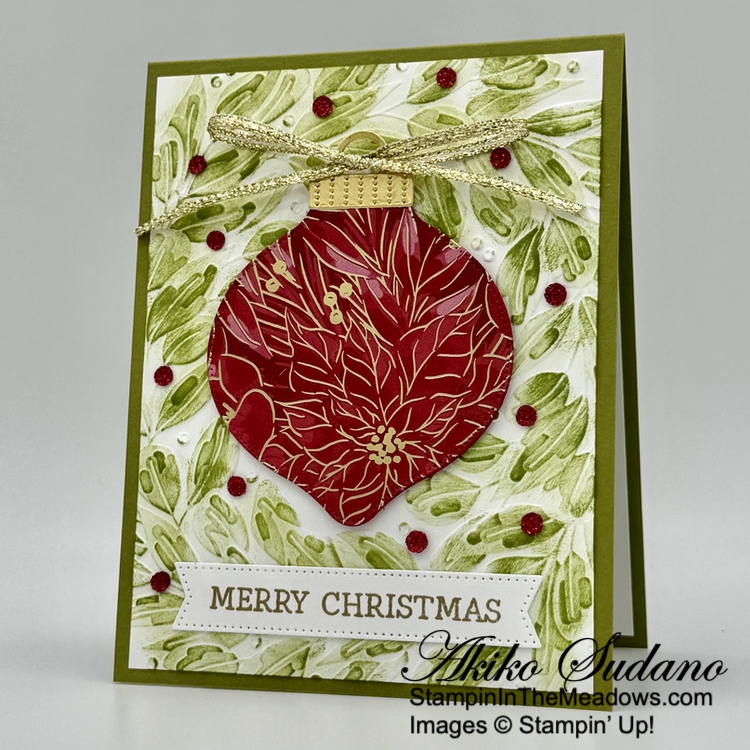
Stamp the sentiments from the Stampin’ Up! Bauble Blooms stamp set using Versamark ink on Basic White. Sprinkle with gold embossing powder and heat set. Cut it out with the long skinny Stylish Shapes banner die using a two step method and adhere it to the card with glue dots. Tie a loopy bow with gold trim and adhere it to the ornament top and decorate the rest of the wreath with lots of Real Red sparkly sequins.
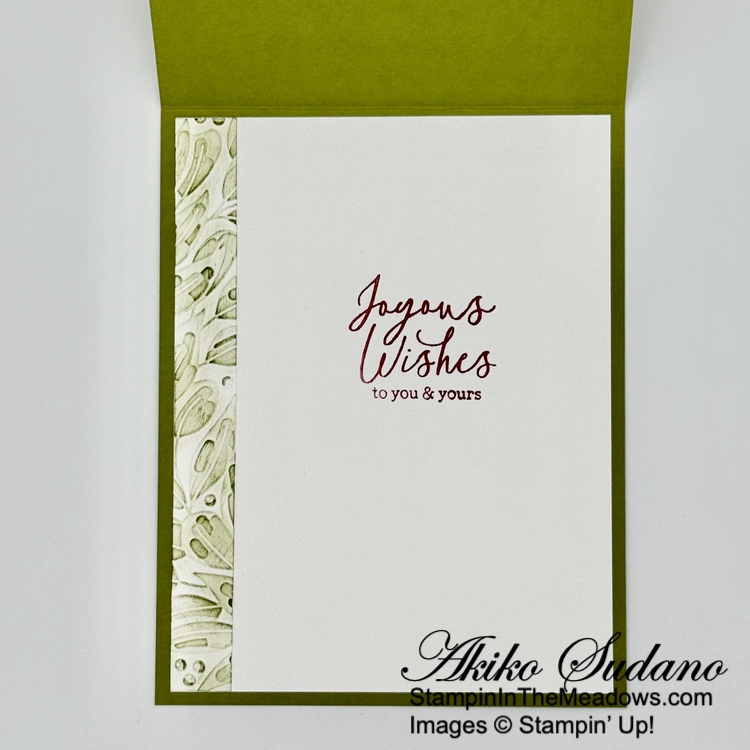
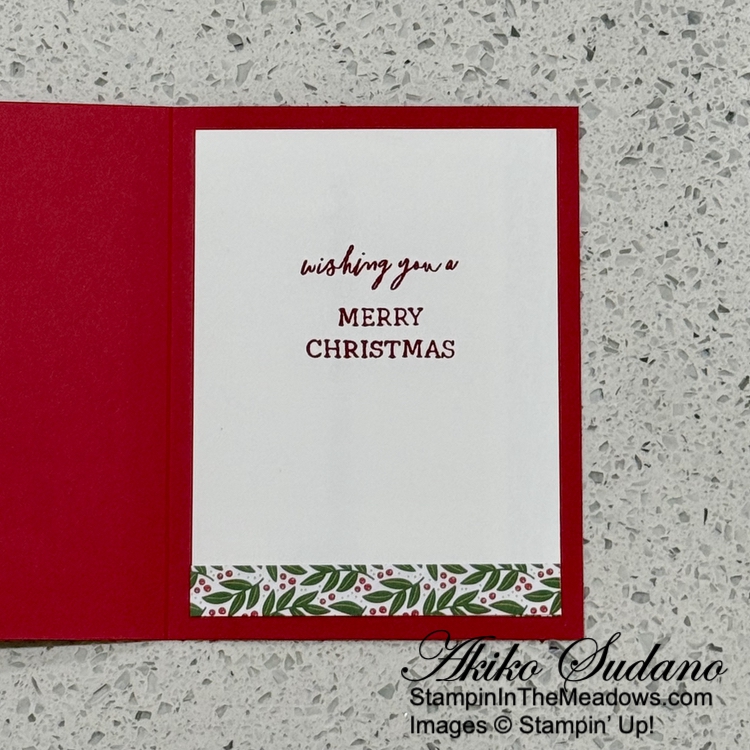
For the inside panel, emboss and sponge a Basic White strip like the front background and adhere it to the side of a Basic White panel. Stamp the sentiment from the Stampin’ Up! Bauble Blooms stamp set using Real Red ink and adhere the panel to the inside of the card.
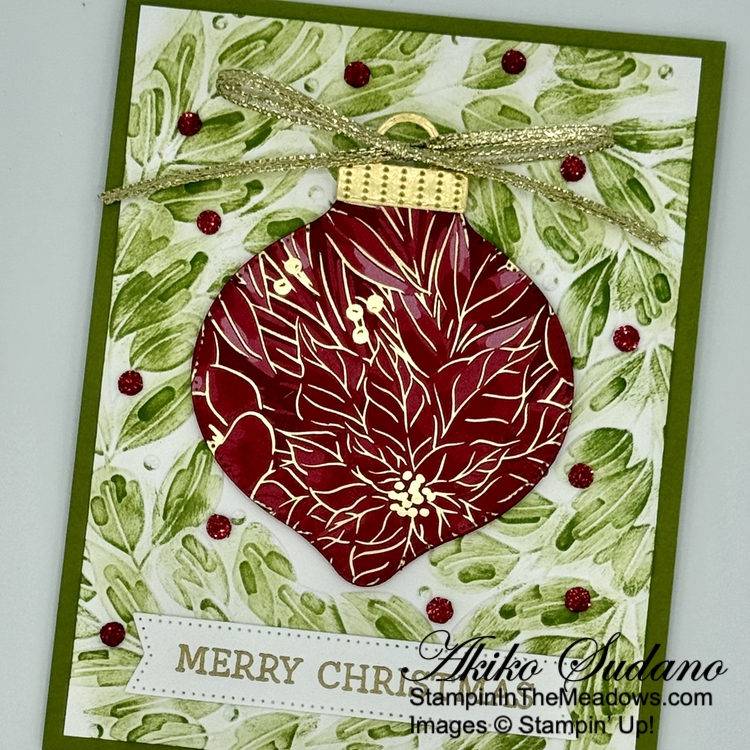
The Traditions of Christmas specialty designer series paper is so pretty that it makes a nice ornament on it’s own.
Thanks so much for stopping by and Happy Stamping!!
Akiko
Cardstock Cuts for this project:
- Old Olive – 4-1/4″ – 11″ card base, scored at 5-1/2″
- Real Red – 3″ x 3″ (ornament backing)
- Gold Foil – 1″ x 2″ (ornament top)
- Basic White – two 4″ x 5-1/4″ panels” (embossed front background and inside panel), 1″ x 4″ (label), 1/2″ x 5-1/4″ (embossed inside trim)
- Traditions of Christmas specialty DSP – 3″ x 3″ (die cut ornament)
Stampin’ Up! products used in this project:
![Bauble Blooms Bundle (English) [ 166096 ]](https://assets1.tamsnetwork.com/images/EC042017NF/166096s.jpg "Bauble Blooms Bundle (English) [ 166096 ]")
![Stylish Shapes Dies [ 159183 ]](https://assets1.tamsnetwork.com/images/EC042017NF/159183s.jpg "Stylish Shapes Dies [ 159183 ]")
![Traditional Wreath 3 D Embossing Folder [ 165874 ]](https://assets1.tamsnetwork.com/images/EC042017NF/165874s.jpg "Traditional Wreath 3 D Embossing Folder [ 165874 ]")
![Traditions Of Christmas 12" X 12" (30.5 X 30.5 Cm) Specialty Designer Series Paper [ 165853 ]](https://assets1.tamsnetwork.com/images/EC042017NF/165853s.jpg "Traditions Of Christmas 12\" X 12\" (30.5 X 30.5 Cm) Specialty Designer Series Paper [ 165853 ]")
![Old Olive 8-1/2" X 11" Cardstock [ 100702 ]](https://assets1.tamsnetwork.com/images/EC042017NF/100702s.jpg "Old Olive 8-1/2\" X 11\" Cardstock [ 100702 ]")
![Real Red 8-1/2" X 11" Cardstock [ 102482 ]](https://assets1.tamsnetwork.com/images/EC042017NF/102482s.jpg "Real Red 8-1/2\" X 11\" Cardstock [ 102482 ]")
![Gold Foil Sheets [ 132622 ]](https://assets1.tamsnetwork.com/images/EC042017NF/132622s.jpg "Gold Foil Sheets [ 132622 ]")
![Basic White 8 1/2" X 11" Cardstock [ 166780 ]](https://assets1.tamsnetwork.com/images/EC042017NF/166780s.jpg "Basic White 8 1/2\" X 11\" Cardstock [ 166780 ]")
![Old Olive Classic Stampin' Pad [ 147090 ]](https://assets1.tamsnetwork.com/images/EC042017NF/147090s.jpg "Old Olive Classic Stampin' Pad [ 147090 ]")
![Real Red Classic Stampin' Pad [ 147084 ]](https://assets1.tamsnetwork.com/images/EC042017NF/147084s.jpg "Real Red Classic Stampin' Pad [ 147084 ]")
![Versamark Pad [ 102283 ]](https://assets1.tamsnetwork.com/images/EC042017NF/102283s.jpg "Versamark Pad [ 102283 ]")
![Metallics Wow! Embossing Powder [ 165678 ]](https://assets1.tamsnetwork.com/images/EC042017NF/165678s.jpg "Metallics Wow! Embossing Powder [ 165678 ]")
![Traditional Sparkling Sequins [ 165875 ]](https://assets1.tamsnetwork.com/images/EC042017NF/165875s.jpg "Traditional Sparkling Sequins [ 165875 ]")
![Gold & Silver 1/8" (3.2 Mm) Trim Combo Pack [ 161633 ]](https://assets1.tamsnetwork.com/images/EC042017NF/161633s.jpg "Gold & Silver 1/8\" (3.2 Mm) Trim Combo Pack [ 161633 ]")
![Sponge Daubers [ 133773 ]](https://assets1.tamsnetwork.com/images/EC042017NF/133773s.jpg "Sponge Daubers [ 133773 ]")


![Stampin' Cut & Emboss Machine [ 149653 ]](https://assets1.tamsnetwork.com/images/EC042017NF/149653s.jpg "Stampin' Cut & Emboss Machine [ 149653 ]")

![Label Me Grateful Dies [ 166111 ]](https://assets1.tamsnetwork.com/images/EC042017NF/166111s.jpg "Label Me Grateful Dies [ 166111 ]")
![Garden Green 8-1/2" X 11" Cardstock [ 102584 ]](https://assets1.tamsnetwork.com/images/EC042017NF/102584s.jpg "Garden Green 8-1/2\" X 11\" Cardstock [ 102584 ]")
![Silver 12" X 12" (30.5 X 30.5 Cm) Foil Sheets [ 163387 ]](https://assets1.tamsnetwork.com/images/EC042017NF/163387s.jpg "Silver 12\" X 12\" (30.5 X 30.5 Cm) Foil Sheets [ 163387 ]")
![Garden Green Classic Stampin' Pad [ 147089 ]](https://assets1.tamsnetwork.com/images/EC042017NF/147089s.jpg "Garden Green Classic Stampin' Pad [ 147089 ]")
![Cherry Cobbler & Pearl Adhesive Backed Berries [ 164119 ]](https://assets1.tamsnetwork.com/images/EC042017NF/164119s.jpg "Cherry Cobbler & Pearl Adhesive Backed Berries [ 164119 ]")

